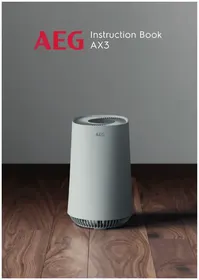
E6WHPED4 - Air purifier AEG - Free user manual and instructions
Find the device manual for free E6WHPED4 AEG in PDF.
| Product type | Air purifier |
| Brand | AEG |
| Model | E6WHPED4 |
| Dimensions (W x D x H) | 300 x 300 x 600 mm |
| Weight | 5 kg |
| Power supply | 220-240 V, 50 Hz |
| Power | 30 W |
| Coverage area | Up to 50 m² |
| Airflow (max) | 200 m³/h |
| Filtration system | Pre-filter + HEPA filter + Activated carbon filter |
| Noise level | 20 to 50 dB(A) |
| Operating modes | Auto, night, turbo, manual |
| Timer | 1 to 8 hours |
| Filter replacement indicator | Yes |
| Remote control | Yes |
| Maintenance | Clean the pre-filter every month; replace the HEPA and carbon filter every 6 to 12 months |
| Safety | Automatic shut-off if tipped over |
| Repairability | Filters and spare parts available |
| Warranty | 2 years |
Frequently Asked Questions - E6WHPED4 AEG
User questions about E6WHPED4 AEG
0 question about this device. Answer the ones you know or ask your own.
Ask a new question about this device
Download the instructions for your Air purifier in PDF format for free! Find your manual E6WHPED4 - AEG and take your electronic device back in hand. On this page are published all the documents necessary for the use of your device. E6WHPED4 by AEG.
USER MANUAL E6WHPED4 AEG
natural_image
Technical line drawing of a mechanical device with an open lid and internal compartments (no text or symbols)| EN | Accessories | Installation Instruction | 2 |
| BG | Аксесоари | Инструкция за монтаж | 8 |
| CZ | Příslušenství | Pokyny k instalaci | 14 |
| DA | Tilbehør | Installationsvejledning | 20 |
| DE | Zubehör | Montageanleitung | 26 |
| EL | Аξεσουάρ | Обнгієс егката́оста́снç | 32 |
| ES | Accesorios | Instrucciones de instalación | 38 |
| ET | Tarvikud | Paigaldusjuhend | 44 |
| FI | Tarvikkeet | Asennusohjeet | 50 |
| FR | Accessoires | Instructions d'installation | 56 |
| HR | Dodaci | Upute za montažu | 62 |
| HU | Tartozékok | Szerelési utasítások | 68 |
| IT | Accessori | Istruzioni di installazione | 74 |
| LT | Priedai | Montavimo instrukcija | 80 |
| LV | Piederumi | Uzstādīšanas norādījumi | 86 |
| NL | Accessoires | Montage-instructies | 92 |
| NO | Tilbehør | Monteringsanvisning | 98 |
| PL | Akcesoria | Instrukcja instalacji | 104 |
| PT | Acessórios | Instruções de instalação | 110 |
| RO | Accesorii | Instructiuni de instalare | 116 |
| RU | Аксессуары | Инструкции по установке | 122 |
| SK | Príslušenstvo | Návod na použitie | 128 |
| SL | Pripomočki | Navodila za namestitev | 134 |
| SR | Прибор | Упутство за постављање | 140 |
| SV | Tillbehör | Installationsinstruktion | 146 |
| TR | Aksesuarlar | Montaj Talimati | 152 |
| UA | Аксесуари | Інструкція з установки | 158 |
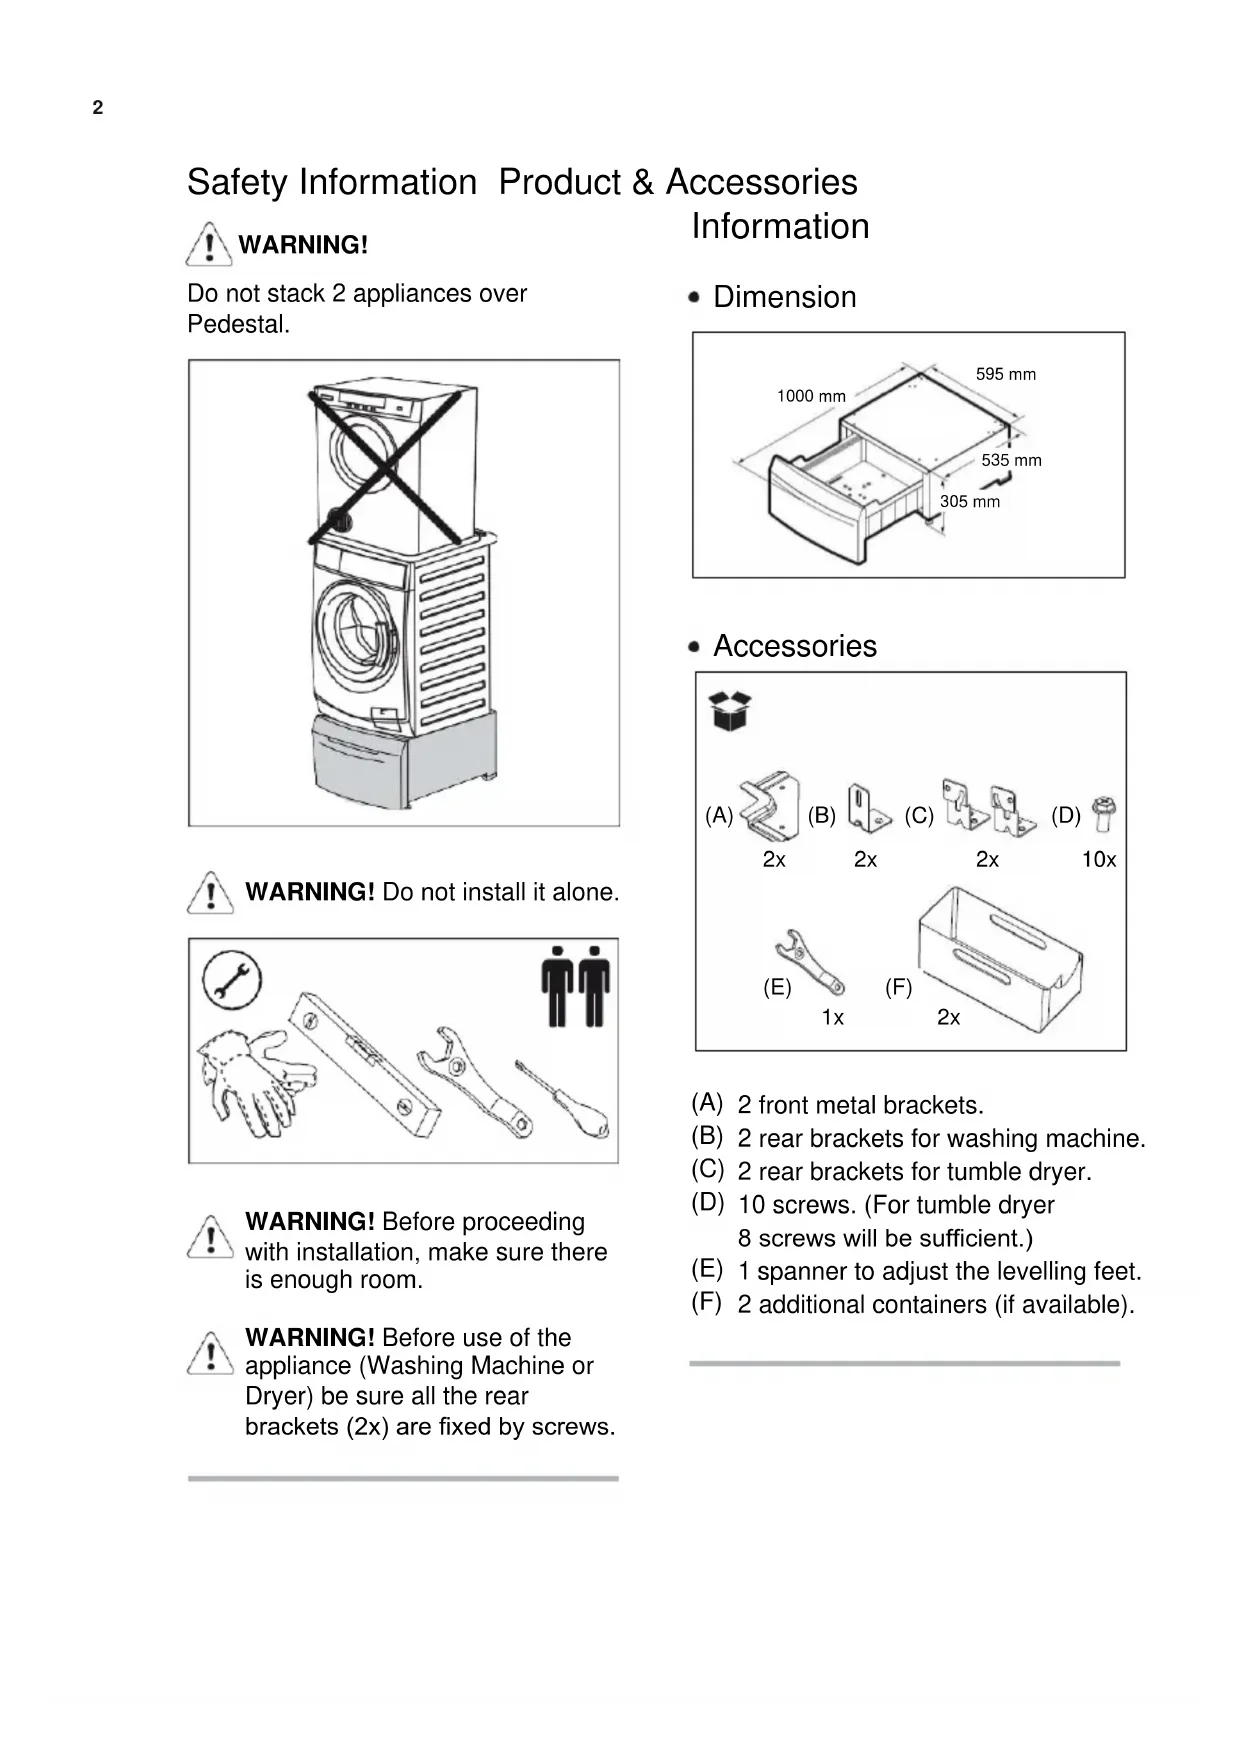
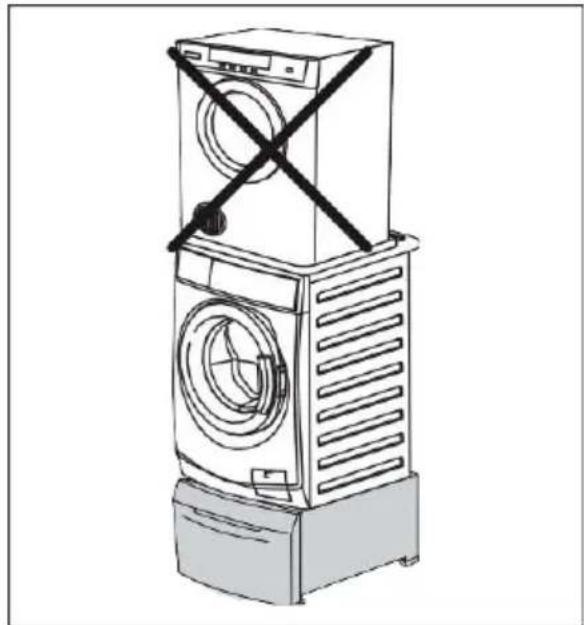
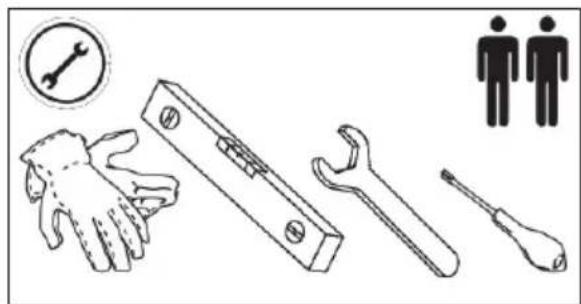
Safety Information Product & Accessories Information

WARNING!
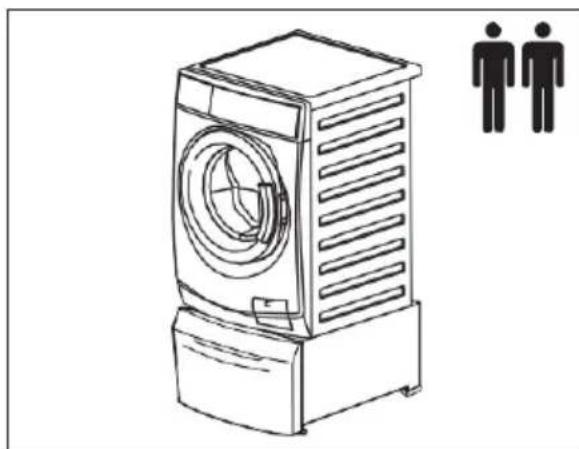
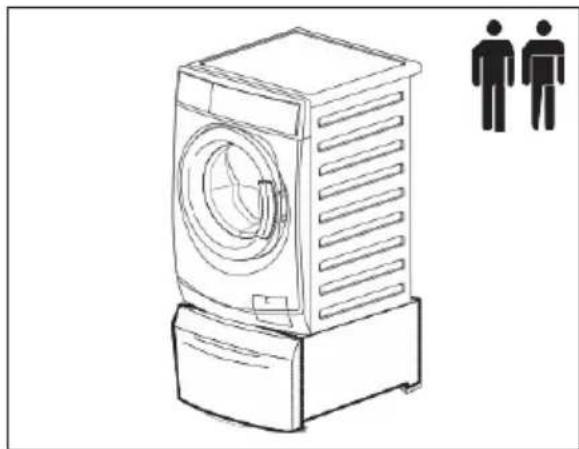
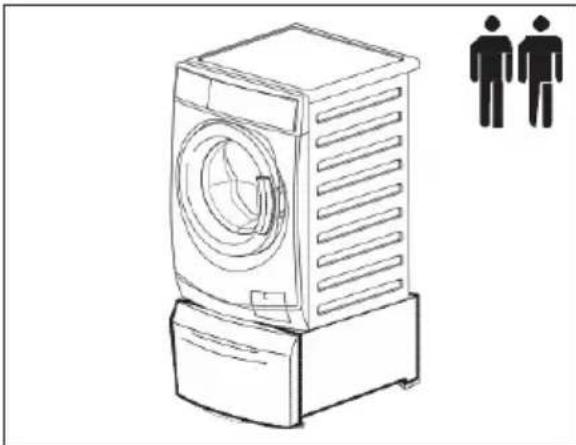
Do not stack 2 appliances over Pedestal.
natural_image
Line drawing of a multi-tiered washing machine with a double-headed X-bracing (no text or symbols)
WARNING! Do not install it alone.
natural_image
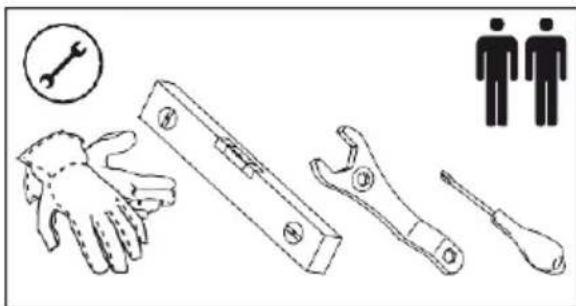
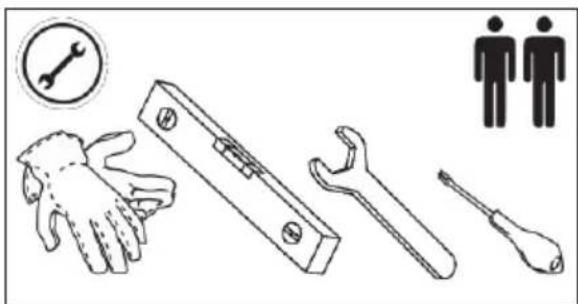
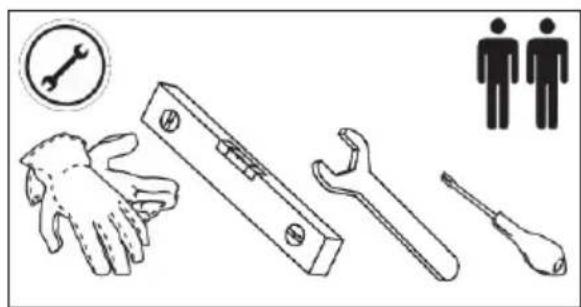
Illustration of various hand tools including wrench, wrench, screwdriver, and two male gender symbols (no text or labels present)
WARNING! Before proceeding with installation, make sure there is enough room.

WARNING! Before use of the appliance (Washing Machine or Dryer) be sure all the rear brackets (2x) are fixed by screws.
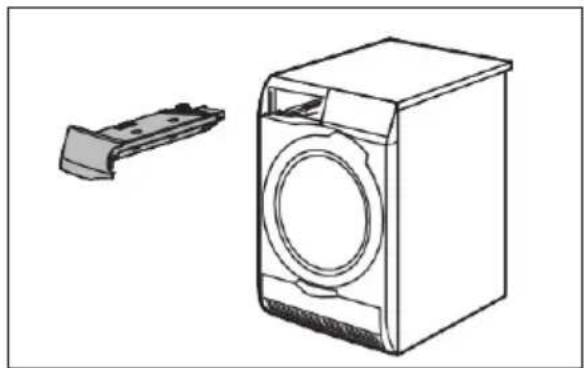
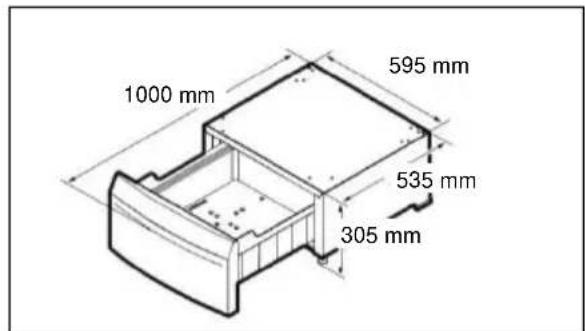
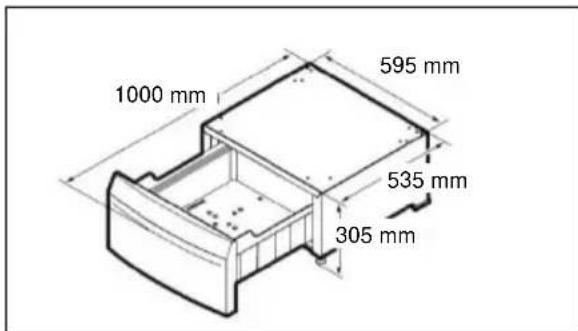
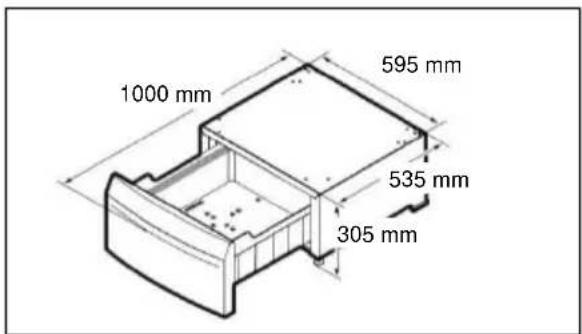
- Dimension

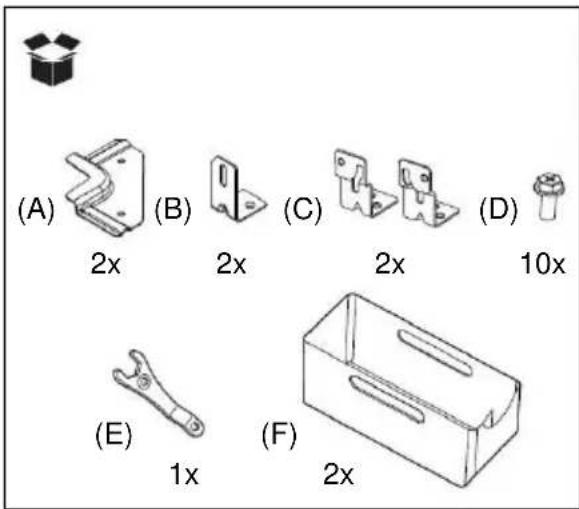
- Accessories
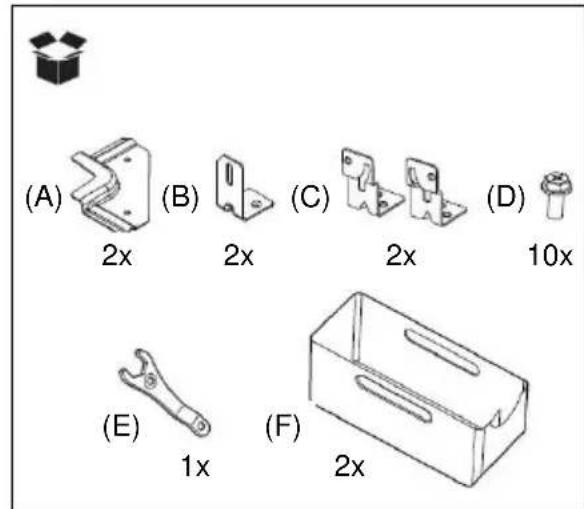
(A) 2 front metal brackets.
(B) 2 rear brackets for washing machine.
(C) 2 rear brackets for tumble dryer.
(D) 10 screws. (For tumble dryer 8 screws will be sufficient.)
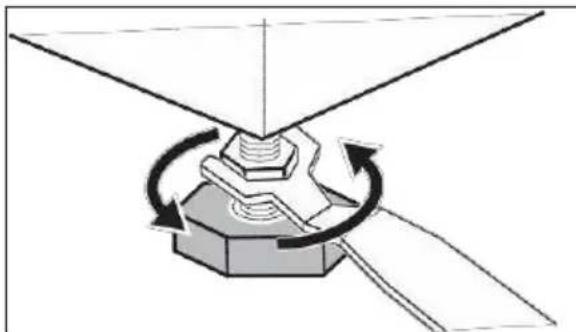
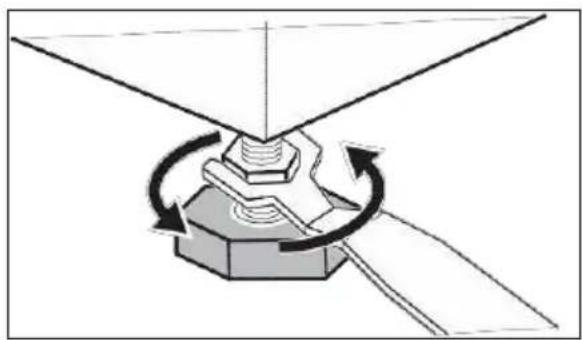
(E) 1 spanner to adjust the levelling feet.
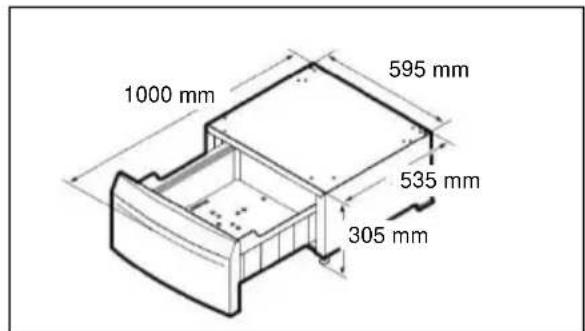
(F) 2 additional containers (if available).
Installation Procedure
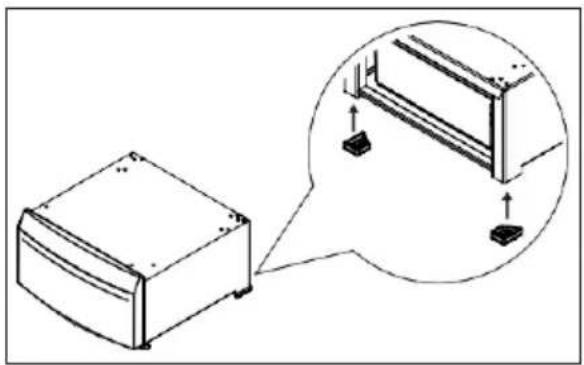
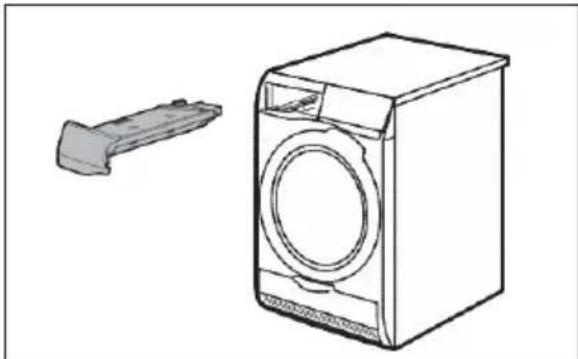
- Remove the pedestal and all accessories from the box.
- Make sure that the rear rubber feet are mounted.
natural_image
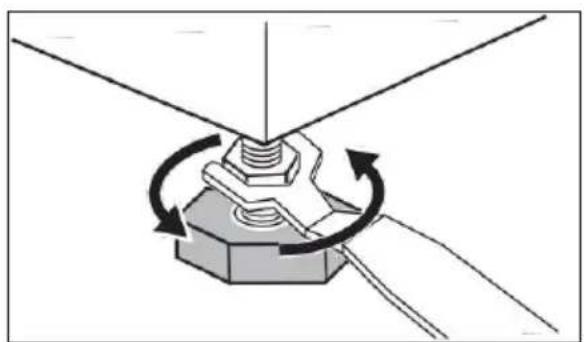
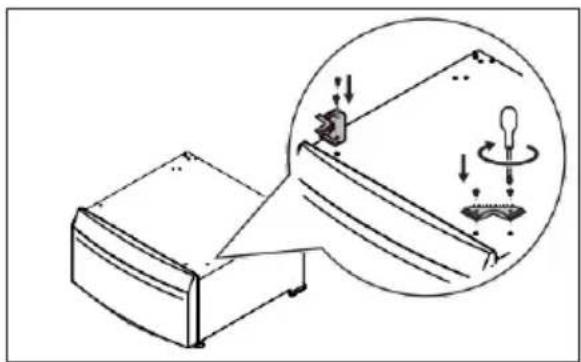
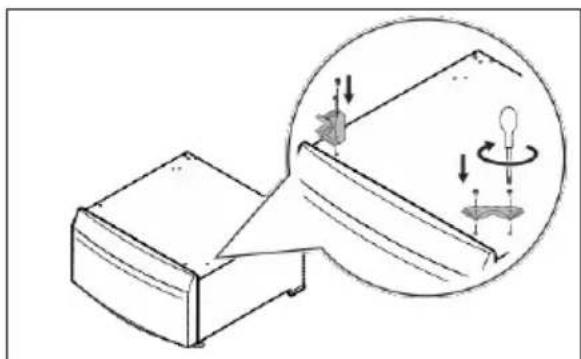
Diagram showing a device with a magnified inset of its structural components (no text or symbols present)- Adjust the front adjustable feet to make the pedestal stable.
natural_image
Mechanical diagram showing a bolt and nut assembly with rotational arrows indicating motion (no text or symbols)- If you install the pedestal under a brand new appliance, unpack the appliance as indicated in the instructions supplied with it and then proceed with step 6.
-
If the appliance is already connected:
-
Disconnect the mains plug from the mains socket.
- For washing machine. Close the water tap.
- For washing machine. Disconnect the inlet hose(s) form the water tap and let the water flow out from the inlet hose(s) and the drain hose and collect it in a shallow basin.
- For tumble dryer. Empty the water container in a wash basin or, if available, activate the direct drain system to let the water flow out.
natural_image
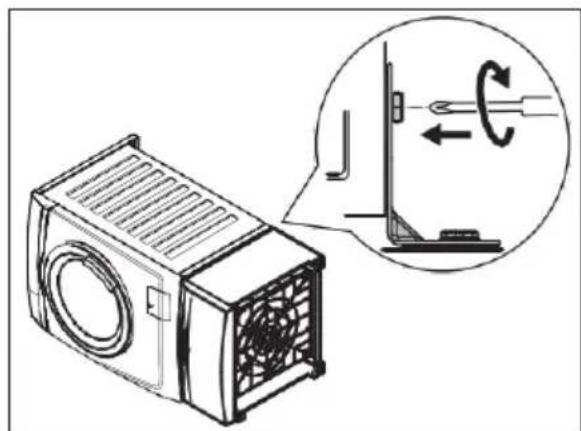
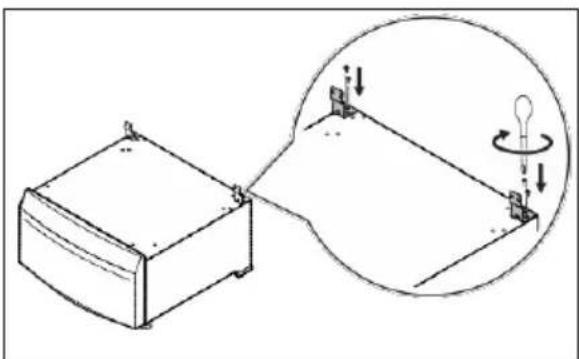
Line drawing of a washing machine and a small bracket (no text or symbols)- Screw the front brackets on the pedestal.
natural_image
Diagram showing a device with a magnified inset illustrating the internal components of a device (no text or symbols present)- For washing machine. Gently lay the washing machine on its detergent dispenser side.

Lay it on a cardboard or on a piece of polystyrene to avoid scratching the cabinet.
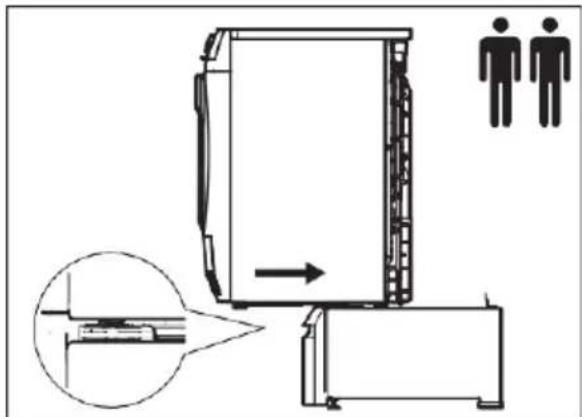
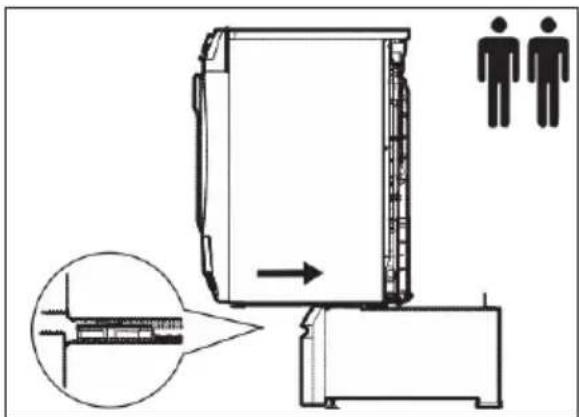
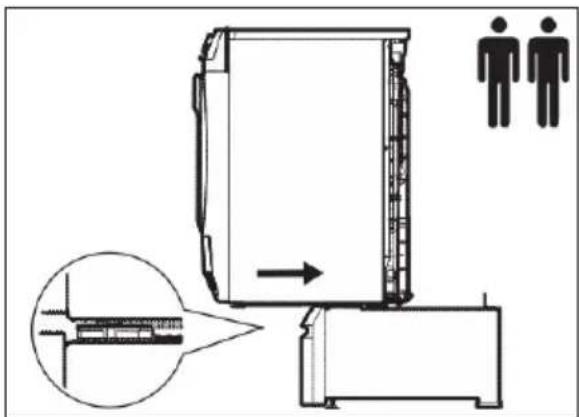
- For washing machine. Adjust the appliance adjustable feet at a suitable height to allow it to slide under the foot locking brackets.
- For washing machine. Lay the pedestal on the same side and slide it forward so that the appliance front feet slides under foot locking brackets.
natural_image
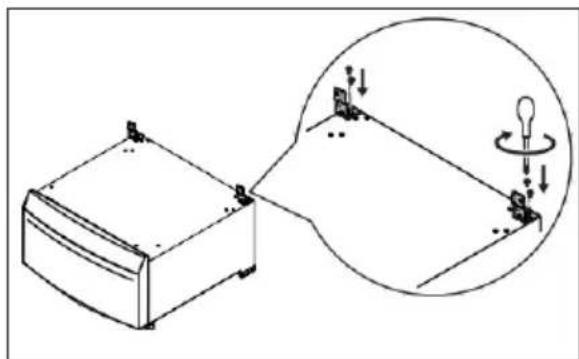
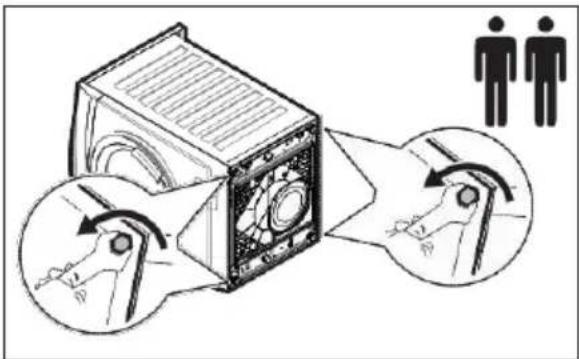
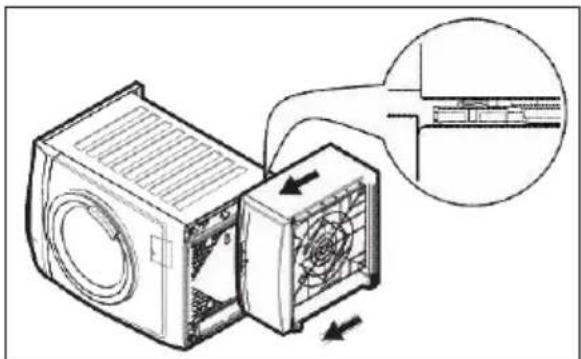
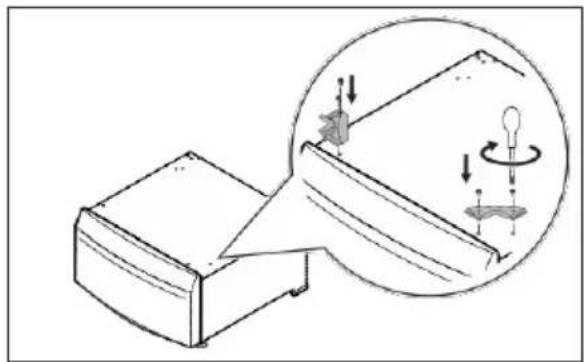
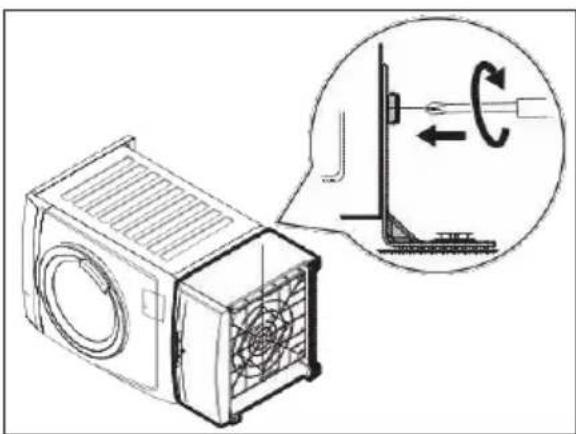
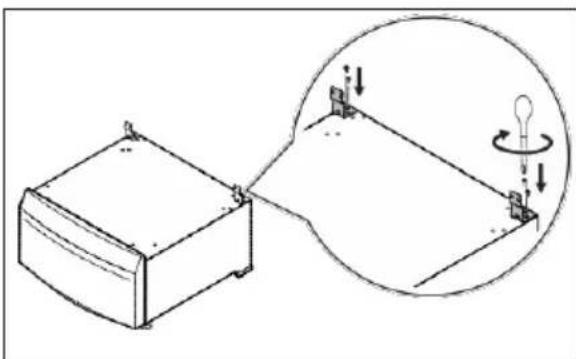
Technical line drawing of a mechanical device with internal fan structure and airflow indicators (no text or symbols)- For washing machine. Use the screws supplied to secure the rear brackets (B) on both the washers and the pedestal.
natural_image
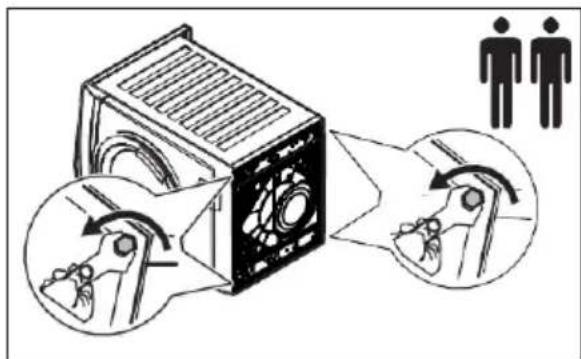
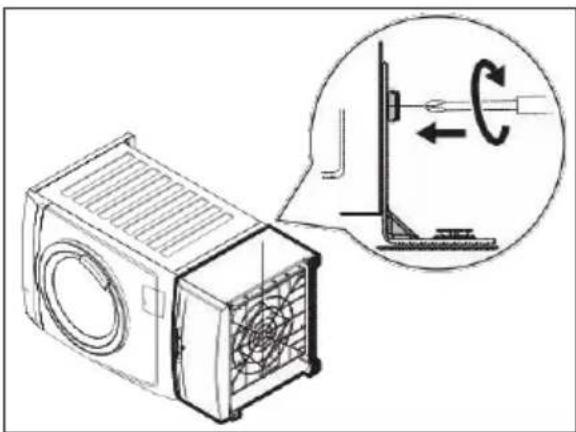
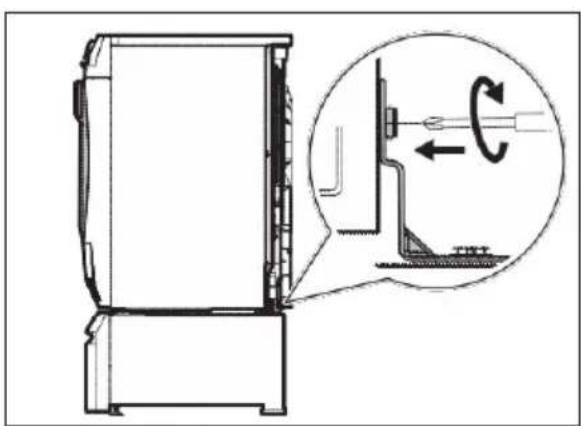
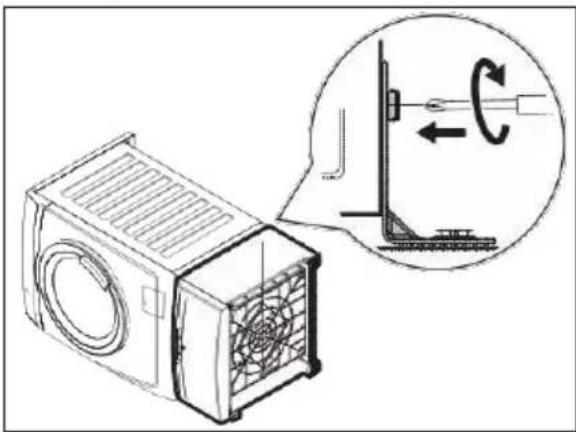
Technical line drawing of a mechanical device with a magnified inset showing rotational motion (no text or symbols)- For washing machine. Put the pedestal and appliance in vertical position. If necessary, adjust the appliance feet and go to step 16. Check that the screws are firmly crewed.
natural_image
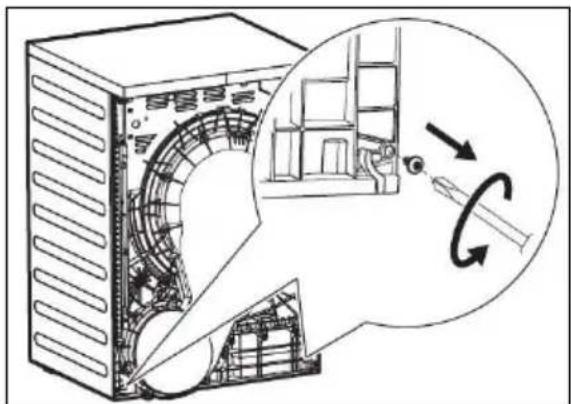
Line drawing of a washing machine with two male gender symbols beside it (no text or labels)- For tumble dryer. Unscrew the two bottom screws from the back of the appliance.

natural_image
Technical illustration of a computer tower with internal components and a magnified inset showing rotational motion (no text or symbols)- For tumble dryer. Screw the rear brackets (C) on the pedestal by using the screws supplied in the stand box.
natural_image
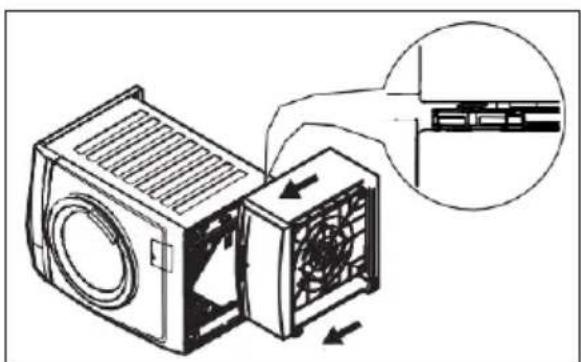
Diagram showing a device with a magnified view of its internal structure, including a light bulb and rotating component (no text or symbols present)- For tumble dryer. Lift the appliance and slide backwards so that the appliance front feet slides under foot locking brackets.
natural_image
Technical diagram of a mechanical device with two human figures and an inset showing internal components (no text or symbols)- For tumble dryer. Screw the rear brackets (C) to the back of the appliance by using the screws removed in step 12 and adjust the appliance feet if required.
natural_image
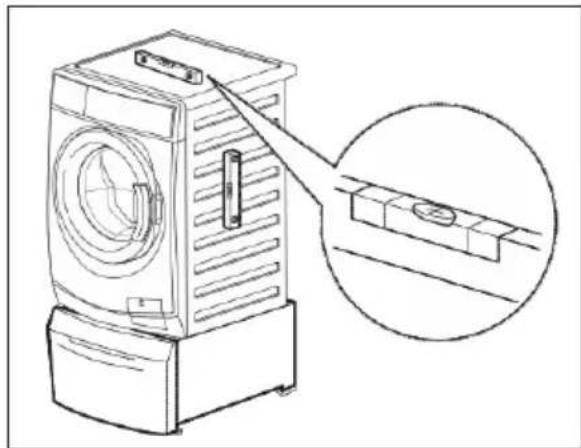
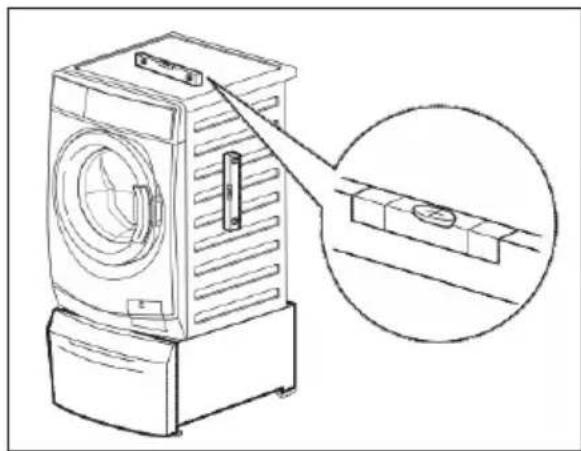
Technical line drawing of a mechanical component with an inset showing a rotating shaft and directional arrows (no text or symbols)- Move the Pedestal/Appliance assembly to its permanent location. Use a spirit level to check if the assembly is properly leveled. If not leveled, adjust feet to level properly.
natural_image
Line drawing of a washing machine with a magnified inset showing internal components (no text or symbols)- If available, you can insert the additional container (F).
natural_image
Isometric line drawing of a mechanical device with internal compartments (no text or symbols)- Connect the appliance as indicated in the instructions supplied with the appliance.
Environmental Concerns
Recycle the materials with the symbol 📊. Put the packaging in applicable containers to recycle it. Help protect the environment and human health and to recycle waste of electrical and electronic appliances.
Do not dispose appliances marked with the symbol with the household waste.
Return the product to your local recycling facility or contact your municipal office.
Note
natural_image
Line drawing of a washing machine with a double-headed X mark on top (no text or symbols)
natural_image
Illustration of various hand tools including wrench, screwdriver, and women's gender symbols (no text or labels)
natural_image
Diagram showing a box connected to a wall-mounted device, with an inset magnified view of the component (no text or symbols present)natural_image
Diagram of a mechanical assembly with rotating components and directional arrows (no text or symbols)natural_image
Line drawing of a washing machine and a plastic bag (no text or symbols)natural_image
Diagram showing a device with a magnified inset illustrating light interaction (no text or symbols present)natural_image
Diagram of a computer unit with fan blades and ventilation system, showing airflow direction (no text or labels)natural_image
Technical line drawing of a mechanical device with a magnified inset showing rotational motion (no text or symbols)natural_image
Line drawing of a washing machine with two gender symbols (no text or labels)natural_image
Technical illustration of a server rack with an inset showing internal components and motion arrows (no text or symbols)natural_image
Diagram showing a box connected to a light bulb with rotating coil, illustrating electrical or mechanical operation (no text or symbols)natural_image
Technical diagram of a mechanical device with two human figures and an inset showing internal structure (no text or symbols)natural_image
Technical line drawing of a mechanical device with an inset showing a rotating component (no text or symbols)natural_image
Line drawing of a washing machine with a magnified inset showing internal components (no text or symbols)natural_image
Isometric line drawing of a device casing with internal compartments (no text or symbols)natural_image
Line drawing of a washing machine with a black X mark on top (no text or symbols)
VÝSTRAHA! Neinstalujte bez pomoci.
natural_image
Illustration of various hand tools including wrench, screwdriver, handrail, and gender symbols (no text or labels)
natural_image
Diagram showing a 3D box connected to a wall-mounted device, with an inset magnified view of the component (no text or symbols present)natural_image
Diagram of a mechanical assembly with rotating components and directional arrows (no text or symbols)natural_image
Line drawing of a washing machine and a small mechanical component (no text or symbols)natural_image
Diagram showing a mechanical component with an inset circular view of motion or rotation, no text or symbols present.natural_image
Diagram of a computer fan with ventilation system, showing internal components and airflow direction (no text or labels)natural_image
Technical line drawing of a mechanical component with an inset showing rotational motion (no text or symbols)natural_image
Line drawing of a washing machine with two male gender symbols beside it (no text or labels)natural_image
Technical illustration of a server rack with internal components and a magnified inset showing airflow or mechanical motion (no text or symbols)natural_image
Diagram showing a box connected to a light bulb via a rotating switch, with an inset magnified view of the bulb's rotation (no text or symbols present)natural_image
Technical diagram of a mechanical device with two human figures and an inset showing internal structure (no text or symbols)natural_image
Technical line drawing of a mechanical component with an inset showing rotational motion (no text or symbols)natural_image
Line drawing of a washing machine with a magnified inset showing a small component (no text or symbols)natural_image
Isometric line drawing of a device casing with internal compartments (no text or symbols)natural_image
Line drawing of a washing machine with a double-headed X mark on top (no text or symbols)
natural_image
Illustration of various hand tools including wrench, screwdriver, hand tools, and a wrench icon (no text or labels)
natural_image
Diagram showing a box connected to a wall-mounted device, with an inset magnified view of the component (no text or symbols present)natural_image
Diagram of a mechanical assembly with rotating components and directional arrows (no text or symbols)natural_image
Line drawing of a washing machine with a handle and plastic clip (no text or symbols)natural_image
Diagram showing a device with a magnified view of its internal components, including a light bulb and rotating arrow (no text or symbols present)natural_image
Technical line drawing of a computer fan assembly with an inset showing internal components (no text or symbols)natural_image
Technical line drawing of a mechanical component with an inset showing rotational motion (no text or symbols)natural_image
Line drawing of a washing machine with two gender symbols (no text or labels)natural_image
Technical illustration of a computer tower with internal components and a magnified inset showing airflow or mechanical motion (no text or symbols)natural_image
Simple line drawing of a box connected to a light bulb, with an inset showing the bulb's rotation (no text or symbols)- For tørretumbler. Løft apparatet, og skub det bagud, så apparatets frontfødder glider ind under fodlåsebeslagene.
natural_image
Technical diagram of a mechanical device with internal components and two human figures, showing cross-section and assembly (no text or symbols)natural_image
Technical line drawing of a mechanical component with an inset showing rotational motion (no text or symbols)natural_image
Line drawing of a washing machine with a magnified inset showing internal components (no text or symbols)natural_image
Isometric line drawing of a device casing with internal compartments (no text or symbols)natural_image
Line drawing of a washing machine with a double-headed X mark on top (no text or symbols)
natural_image
Illustration of various hand tools including wrench, screwdriver, handrail, and women's gender symbols (no text or labels)
natural_image
Diagram showing a box connected to a wall-mounted device, with an inset magnified view of the component (no text or symbols present)natural_image
Diagram of a mechanical assembly with rotating components and directional arrows (no text or symbols)natural_image
Line drawing of a washing machine and a plastic clip (no text or symbols)natural_image
Diagram showing a device with a magnified view of its internal components, including a light bulb and rotating arrow (no text or symbols present)natural_image
Technical line drawing of a computer fan with an inset showing internal structure (no text or symbols)natural_image
Technical line drawing of a mechanical device with a magnified inset showing rotational motion (no text or symbols)natural_image
Line drawing of a washing machine with two gender symbols (no text or labels)natural_image
Technical illustration of a computer tower with internal components and a magnified inset showing mechanical assembly (no text or symbols)natural_image
Diagram showing a box connected to a light bulb with rotating coil, illustrating electrical or mechanical components (no text or symbols)natural_image
Technical diagram of a mechanical device with internal components and two human figures, showing cross-section and assembly (no text or symbols)natural_image
Technical line drawing of a mechanical component with an inset showing a rotating mechanism (no text or symbols present)natural_image
Line drawing of a washing machine with a magnified inset showing a small component (no text or symbols)natural_image
Isometric line drawing of a mechanical device with internal compartments (no text or symbols)natural_image
Line drawing of a multi-tiered washing machine with a double-headed X-bracing (no text or symbols)
natural_image
Illustration of various wrenches and tools including a wrench, wrench, screwdriver, and hand (no text or symbols)
natural_image
Diagram showing a device connected to a box, with an inset magnified view of its components (no text or symbols present)natural_image
Diagram of a mechanical assembly with rotating components and directional arrows (no text or symbols)natural_image
Line drawing of a washing machine and a small bracket (no text or symbols)natural_image
Diagram showing a device with a magnified inset illustrating the process of rotating components (no text or symbols present)natural_image
Diagram of a mechanical device with airflow arrows and a magnified inset showing internal components (no text or symbols)natural_image
Technical illustration of a mechanical device with a magnified inset showing rotational flow (no text or symbols)natural_image
Line drawing of a washing machine with two gender symbols (no text or labels)natural_image
Technical illustration of a server rack with internal components and a magnified inset showing mechanical assembly (no text or symbols)natural_image
Diagram showing a device connected to a light bulb, with an inset magnified view of its internal structure (no text or symbols present)natural_image
Technical diagram of a device with internal components and two human figures, showing directional flow and cross-section (no text or symbols)natural_image
Technical line drawing of a mechanical component with an inset showing a rotating component (no text or symbols present)natural_image
Line drawing of a washing machine with an inset close-up showing internal components (no text or symbols)natural_image
Isometric line drawing of a mechanical device with internal compartments (no text or symbols)natural_image
Line drawing of a washing machine with a black X mark on top (no text or symbols)
natural_image
Illustration of various hand tools including wrench, screwdriver, handrail, and gender symbols (no text or labels)
natural_image
Diagram showing a 3D box connected to a wall-mounted panel, with an inset magnified view of the panel (no text or symbols present)natural_image
Diagram of a mechanical assembly with rotating components and directional arrows (no text or symbols)natural_image
Line drawing of a washing machine and a small mechanical component (no text or symbols)natural_image
Diagram showing a device with a magnified inset illustrating light interaction (no text or symbols)natural_image
Diagram of a computer tower with fan blades and ventilation system, showing internal components and airflow direction (no text or labels)natural_image
Technical line drawing of a mechanical component with an inset showing rotational motion (no text or symbols)natural_image
Line drawing of a washing machine with two gender symbols (no text or labels)natural_image
Technical illustration of a computer tower with internal components and a magnified inset showing rotational motion (no text or symbols)natural_image
Diagram showing a box connected to a light bulb via a rotating switch, with an inset magnified view of the bulb's rotation (no text or symbols present)natural_image
Technical diagram of a mechanical device with internal components and two human figures, showing cross-section and assembly (no text or symbols)natural_image
Technical line drawing of a mechanical component with an inset showing rotational motion (no text or symbols)natural_image
Line drawing of a washing machine with a magnified inset showing its structural components (no text or symbols)natural_image
Isometric line drawing of a device casing with internal compartments (no text or symbols)natural_image
Line drawing of a washing machine with a double-headed X mark on top (no text or symbols)
natural_image
Illustration of various hand tools including wrench, screwdriver, and tool holder (no text or symbols)
HOIATUS! Enne paigaldama asumist veenduge, et teil on piisavalt ruumi.

natural_image
Technical line drawing of a box with an inset showing a close-up view of a wall-mounted panel (no text or symbols present)natural_image
Diagram of a mechanical assembly with rotating components and directional arrows (no text or symbols)natural_image
Line drawing of a washing machine and a small mechanical component (no text or symbols)natural_image
Diagram showing a device with a magnified inset illustrating light interaction (no text or symbols present)natural_image
Technical line drawing of a computer fan assembly with an inset showing internal components (no text or symbols)natural_image
Technical line drawing of a mechanical component with an inset showing rotational motion (no text or symbols)natural_image
Line drawing of a washing machine with two gender symbols (no text or labels)natural_image
Technical illustration of a server rack with internal components and a magnified inset showing mechanical assembly (no text or symbols)natural_image
Diagram showing a box connected to a light bulb with rotating coil, illustrating electrical or mechanical operation (no text or symbols)natural_image
Technical diagram of a mechanical device with internal components and two human figures, showing cross-section and assembly (no text or symbols)natural_image
Technical line drawing of a mechanical component with an inset showing rotational motion (no text or symbols)natural_image
Line drawing of a washing machine with a magnified inset showing a measurement scale (no text or symbols)natural_image
Isometric line drawing of a device casing with internal compartments (no text or symbols)natural_image
Line drawing of a washing machine with a black X mark on top (no text or symbols)- Mitat
- Tarvikkeet

natural_image
Illustration of various hand tools including wrench, screwdriver, and tool holder (no text or symbols)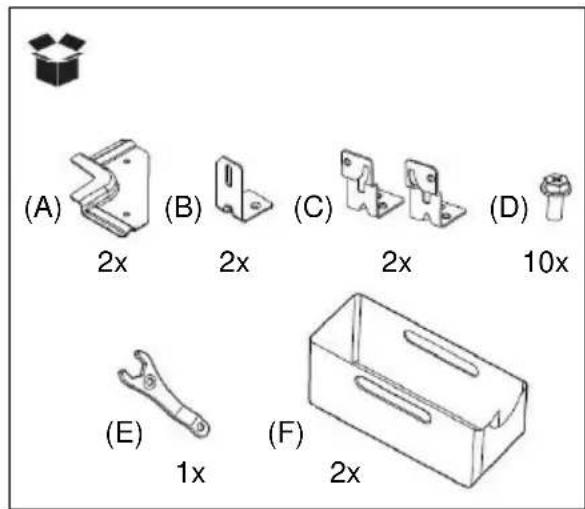

natural_image
Diagram showing a box connected to a wall-mounted device with an inset magnified view of the component (no text or symbols present)natural_image
Diagram of a mechanical assembly with rotating components and directional arrows (no text or symbols)natural_image
Line drawing of a washing machine and a small mechanical component (no text or symbols)natural_image
Diagram showing a device with a magnified inset illustrating light interaction (no text or symbols present)natural_image
Technical line drawing of a computer tower with fan blades and ventilation slots, showing internal structure and airflow direction (no text or symbols)natural_image
Technical line drawing of a mechanical component with an inset showing rotational motion (no text or symbols)natural_image
Line drawing of a washing machine with two human silhouettes on the side (no text or symbols)natural_image
Technical illustration of a server rack with internal components and a magnified inset showing a mechanical component (no text or symbols)natural_image
Diagram showing a device connected to a light bulb, with an inset magnified view of the bulb's rotation (no text or symbols present)natural_image
Technical diagram of a mechanical device with internal components and two human figures, showing cross-section and assembly (no text or symbols)natural_image
Technical line drawing of a mechanical component with an inset showing a rotating mechanism (no text or symbols)natural_image
Line drawing of a washing machine with a magnified inset showing its structural components (no text or symbols present)natural_image
Isometric line drawing of a mechanical device with internal compartments (no text or symbols)natural_image
Line drawing of a washing machine with a crossed-out black X mark, no text or symbols presentnatural_image
Illustration of various hand tools including wrench, screwdriver, and male gender symbol (no text or labels)natural_image
Diagram showing a box connected to a wall-mounted device, with an inset magnified view of the component (no text or symbols present)natural_image
Diagram of a mechanical assembly with rotating components and directional arrows (no text or symbols)natural_image
Line drawing of a washing machine and a small mechanical component (no text or symbols)natural_image
Diagram showing a device with a magnified inset illustrating light interaction (no text or symbols present)natural_image
Technical line drawing of a computer fan assembly with an inset showing internal components (no text or symbols)natural_image
Line drawing of a washing machine with two gender symbols (no text or labels)natural_image
Technical illustration of a computer tower with internal components and a magnified inset showing mechanical assembly (no text or symbols)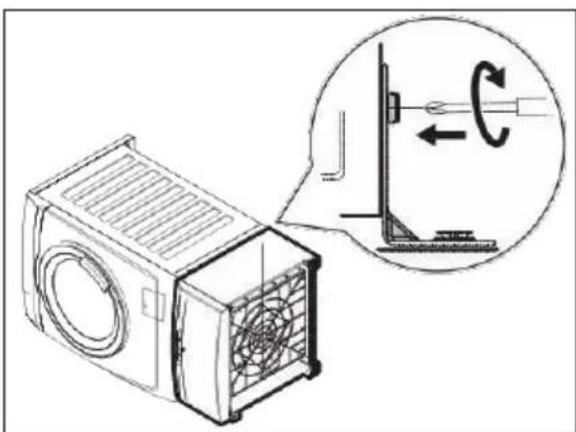
natural_image
Technical line drawing of a mechanical component with an inset showing rotational motion (no text or symbols)natural_image
Diagram showing a box connected to a light bulb with rotating coil, illustrating electrical or mechanical operation (no text or symbols)natural_image
Technical diagram of a mechanical device with internal components and two human figures, showing cross-section and assembly (no text or symbols)natural_image
Technical line drawing of a mechanical component with an inset showing rotational motion (no text or symbols)natural_image
Line drawing of a washing machine with a magnified inset showing its structural components (no text or symbols present)natural_image
Isometric line drawing of a device casing with internal compartments (no text or symbols)natural_image
Line drawing of a large washing machine with a double-headed X mark on top (no text or symbols)
UPOZORENJE! Ne postavljajte samostalno.
natural_image
Illustration of various hand tools including wrench, screwdriver, hand tool, and gender symbols (no text or labels)
UPOZORENJE! Prije postavljanja uvjerite se da ima dovoljno mjesta.

natural_image
Diagram showing a box connected to a wall-mounted device with an inset magnified view of the component (no text or symbols present)- Prilagodite prednje nožice kako bi podnožje bilo stabilno.
natural_image
Diagram of a mechanical assembly with rotating components and directional arrows (no text or symbols)-
Ako montirate podnožje ispod novog ureĐaja, raspakirajte ureĐaj kako je naznačeno u priloženim uputama i prijeĐite na korak 6.
-
Ako je ureĐaj već priključen:
- Izvucite električni utikač iz utičnice električne mreže.
- Za perilice rublja Zatvorite slavinu za vodu.
- Za perilice rublja Odvojite ulazno crijevo(crijeva) sa slavine za vodu i pustite da voda isteče iz ulaznog i odvodnog crijeva u plitko korito.
- Za sušilicu rublja. Ispraznite spremnik za vodu u umivaonik ili, ako je dostupan, aktivirajte sustav izravnog odvoda kako biste ispustili vodu.
natural_image
Line drawing of a washing machine and a small mechanical component (no text or symbols)natural_image
Diagram showing a device with a magnified inset illustrating light interaction (no text or symbols present)- Za perilice rublja Pažljivo položite perilicu rublja na stranu s ladicom za deterdžent.

Položite je na karton ili komad stiropora kako ne biste ogrebali okvir.
- Za perilice rublja Prilagodite nožice za prilagoĐavanje ureĐaja na prikladnu visinu kako bi mogle ući pod nosače za blokiranje nožica.
- Za perilice rublja Položite podnožje na istu stranu i gurnite ga prema naprijed kako bi prednje nožice ureĐaja ušle pod nosače za blokiranje nožica.
natural_image
Diagram of a computer tower with fan blades and ventilation system, showing internal components and airflow direction (no text or labels)- Za perilicu rublja. Upotrijebite vijke (G) isporučene za pričvršćivanje stražnjih nosača (B) na podlošku i Vijci (D) za postolje.
natural_image
Technical line drawing of a mechanical component with an inset showing rotational motion (no text or symbols)- Za perilice rublja Postavite podnožje i ureĐaj u uspravan položaj. Po potrebi prilagodite nožice ureĐaja i prijeĐite na korak 16. Provjerite je su li vijci pravilno zavijeni.
natural_image
Line drawing of a washing machine with two male gender symbols beside it (no text or labels)- Za sušilicu rublja. Odvijte i sačuvajte dva donja vijka ma stražnjem dijelu ureĐaja;
natural_image
Technical illustration of a server rack with internal components and a magnified inset showing mechanical assembly (no text or symbols)- Za sušilicu rublja. Zavijte stražnje nosače (C) na podnožje pomoću vijaka priloženih u kutiji podnožja.
natural_image
Diagram showing a box connected to a light bulb via a rotating switch, with an inset magnified view of the bulb's rotation (no text or symbols present)- Za sušilicu rublja. Podignite ureĐaj i gurnite ga unatrag kako bi prednje nožice ureĐaja ušle pod nosače za blokiranje nožica.
natural_image
Technical diagram of a mechanical device with internal components and two human figures, showing cross-section and assembly (no text or symbols)- Za sušilicu rublja. Zavijte stražnje nosače (C) na poleĐinu ureĐaja pomoću vijaka uklonjenih u koraku 12 i po potrebi prilagodite nožiceureĐaja.
natural_image
Technical line drawing of a mechanical component with an inset showing rotational motion (no text or symbols)natural_image
Line drawing of a washing machine with a magnified inset showing its structural components (no text or symbols)natural_image
Isometric line drawing of a mechanical device with internal components (no text or symbols)- Spojite ureĐaj kako je naznačeno u uputama priloženim s ureĐajem.
Ekološke informacije
Reciklirajte materijale sa simbolom 🚙. Ambalažu za recikliranje odložite u prikladne spremnike. Pomozite u zaštiti okoliša i ljudskog zdravlja te u recikliranju otpada od električnih i elektroničkih uređaja.
UreĐaje označene simbolom ne odlažite zajedno 🚙️ s kućnimotpadom.
Proizvod odnesite na lokalno reciklažno mjesto ili kontaktirajte nadležnu službu.
Napomena
natural_image
Line drawing of a large washing machine with a double-headed X mark on top (no text or symbols)- Méret
- Tartozékok

natural_image
Illustration of various hand tools including wrench, screwdriver, and women's gender symbols (no text or labels)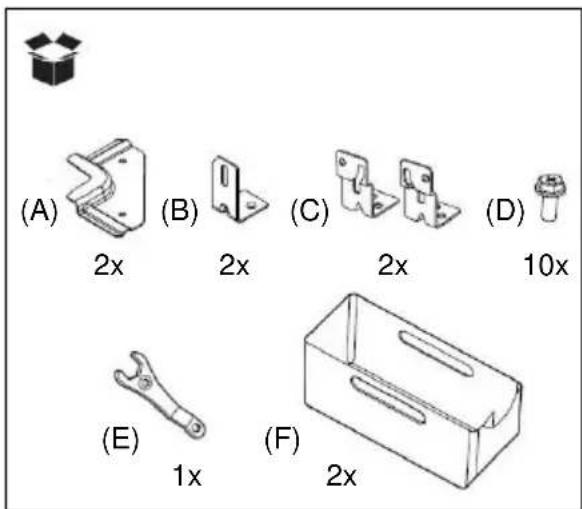

natural_image
Diagram showing a 3D box connected to a wall-mounted device, with an inset magnified view of the component (no text or symbols present)natural_image
Diagram of a mechanical assembly with rotating components and directional arrows (no text or symbols)natural_image
Line drawing of a washing machine and a small mechanical component (no text or symbols)natural_image
Diagram showing a device with a magnified inset illustrating light interaction (no text or symbols present)natural_image
Technical line drawing of a computer fan with ventilation slots and a magnified inset showing internal structure (no text or symbols)natural_image
Line drawing of a washing machine with two gender symbols (no text or labels)natural_image
Technical illustration of a server rack with internal components and a magnified inset showing mechanical assembly (no text or symbols)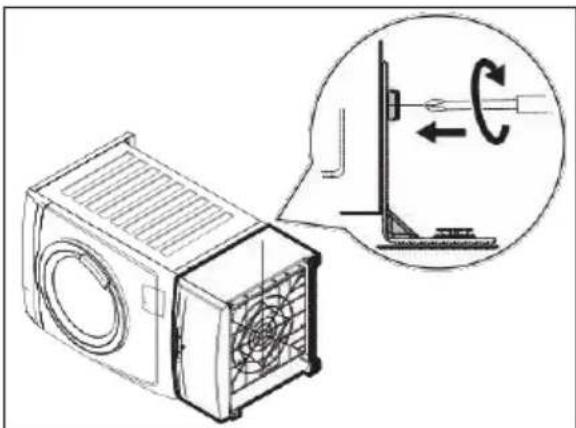
natural_image
Technical line drawing of a mechanical component with an inset showing rotational motion (no text or symbols)natural_image
Simple line drawing of a box connected to a light bulb via a rotating switch (no text or symbols)natural_image
Technical line drawing of a mechanical component with an inset showing a rotating mechanism (no text or symbols present)natural_image
Line drawing of a washing machine with a magnified inset showing its structural components (no text or symbols)natural_image
Isometric line drawing of a mechanical device with internal compartments (no text or symbols)natural_image
Line drawing of a washing machine with a large front-mounted fan and a crossed-out black X mark (no text or symbols)
natural_image
Illustration of various hand tools including wrench, screwdriver, handrail, and tool holder (no text or symbols)
natural_image
Diagram showing a box connected to a wall-mounted device with an inset magnified view of the component (no text or symbols present)natural_image
Diagram of a mechanical assembly with rotating components and directional arrows (no text or symbols)natural_image
Line drawing of a washing machine and a small mechanical component (no text or symbols)natural_image
Diagram showing a device with a magnified inset illustrating light interaction (no text or symbols present)natural_image
Technical line drawing of a computer unit with fan and ventilation system, showing internal components and airflow direction (no text or symbols)natural_image
Line drawing of a washing machine with two male gender symbols beside it (no text or labels)natural_image
Technical illustration of a server rack with an inset showing internal components and a magnified view of the rack (no text or symbols present)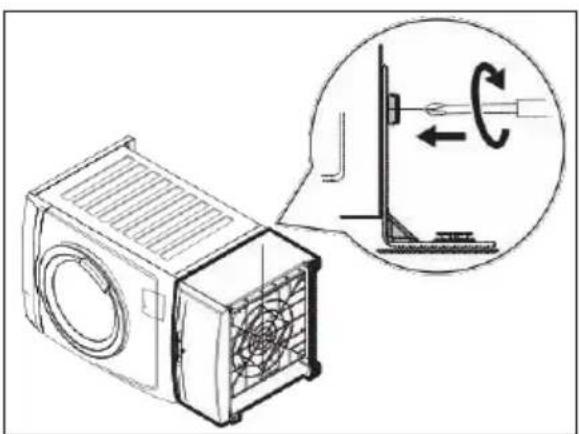
natural_image
Technical line drawing of a mechanical component with an inset showing rotational motion (no text or symbols)natural_image
Technical diagram of a mechanical device with two human figures and an inset showing internal structure (no text or symbols)natural_image
Technical line drawing of a mechanical component with an inset showing a rotating mechanism (no text or symbols)natural_image
Line drawing of a washing machine with a magnified inset showing the mounting detail (no text or symbols)natural_image
Isometric line drawing of a mechanical device with internal compartments (no text or symbols)natural_image
Line drawing of a washing machine with a black X mark on top (no text or symbols)- Matmenys
- Priedai

ISPĖJIMAS! Nemontuokite jo vieni.

natural_image
Illustration of various hand tools including wrench, screwdriver, and women's gender symbols (no text or labels)

natural_image
Diagram showing a 3D box connected to a wall-mounted panel, with an inset magnified view of the panel (no text or symbols present)natural_image
Diagram of a mechanical assembly with rotating components and directional arrows (no text or symbols)natural_image
Line drawing of a washing machine and a small mechanical component (no text or symbols)- Prisukite priekinius laikiklius prie pagrindo.
natural_image
Diagram showing a mechanical assembly with a magnified inset illustrating rotational motion (no text or symbols)natural_image
Diagram of a computer fan with an inset showing internal structure (no text or symbols)natural_image
Line drawing of a washing machine with two male gender symbols beside it (no text or labels)natural_image
Technical illustration of a server rack with internal components and a magnified inset showing airflow direction (no text or symbols)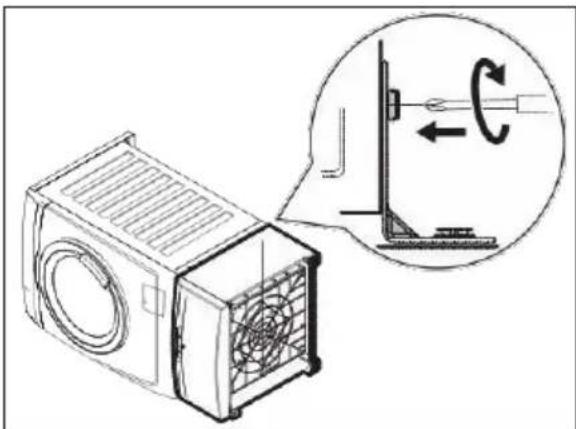
natural_image
Technical illustration of a mechanical device with a magnified inset showing rotational motion (no text or symbols)natural_image
Diagram showing a box connected to a light bulb with rotating coil, illustrating electrical or mechanical operation (no text or symbols)natural_image
Technical diagram of a mechanical device with internal components and two human figures, showing cross-section and assembly (no text or symbols)natural_image
Technical line drawing of a mechanical component with an inset showing a rotating mechanism (no text or symbols)natural_image
Line drawing of a washing machine with a magnified inset showing its structural components (no text or symbols)natural_image
Isometric line drawing of a device casing with internal compartments (no text or symbols)natural_image
Line drawing of a washing machine with a double-headed X mark on top (no text or symbols)
natural_image
Illustration of various hand tools including wrench, screwdriver, handrail, and gender symbols (no text or labels)
natural_image
Diagram showing a 3D box connected to a wall-mounted panel, with an inset magnified view of the panel (no text or symbols present)natural_image
Diagram of a mechanical assembly with rotating components and directional arrows (no text or symbols)natural_image
Line drawing of a washing machine and a small mechanical component (no text or symbols)natural_image
Diagram showing a mechanical component with an inset illustrating rotational motion (no text or symbols)natural_image
Diagram of a computer fan with ventilation system, showing internal components and airflow direction (no text or labels)natural_image
Technical illustration of a mechanical component with a magnified inset showing rotational motion (no text or symbols)natural_image
Line drawing of a washing machine with two male gender symbols beside it (no text or labels)natural_image
Technical illustration of a server rack with internal components and a magnified inset showing mechanical assembly (no text or symbols)natural_image
Diagram showing a box connected to a light bulb via a rotating switch, with an inset magnified view of the bulb's rotation (no text or symbols present)natural_image
Technical diagram of a mechanical device with internal components and two human figures, showing cross-section and assembly (no text or symbols)natural_image
Technical line drawing of a mechanical device with an inset showing a rotating component (no text or symbols)natural_image
Line drawing of a washing machine with a magnified inset showing its structural components (no text or symbols)natural_image
Isometric line drawing of a device casing with internal compartments (no text or symbols)natural_image
Line drawing of a washing machine with a double-headed X mark on top (no text or symbols)
natural_image
Illustration of various hand tools including wrench, screwdriver, and hand tools with gender symbols (no text or labels)
natural_image
Diagram showing a 3D box connected to a wall-mounted panel, with an inset magnified view of the panel (no text or symbols present)natural_image
Diagram of a mechanical assembly with rotating components and directional arrows (no text or symbols)natural_image
Line drawing of a washing machine and a small mechanical component (no text or symbols)natural_image
Diagram showing a mechanical component with an inset illustrating rotational motion around a light bulb (no text or symbols present)natural_image
Technical line drawing of a computer fan assembly with an inset showing internal components (no text or symbols)natural_image
Line drawing of a washing machine with two male gender symbols beside it (no text or labels)natural_image
Technical illustration of a computer tower with internal components and a magnified inset showing rotational motion (no text or symbols)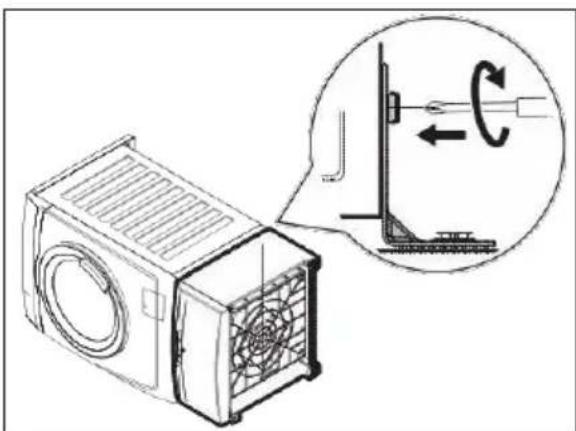
natural_image
Technical line drawing of a mechanical component with an inset showing rotational motion (no text or symbols)natural_image
Diagram showing a box connected to a light bulb via a rotating switch, with an inset magnified view of the bulb's rotation (no text or symbols present)natural_image
Technical diagram of a mechanical device with internal components and two human figures, showing cross-section and assembly (no text or symbols)natural_image
Technical line drawing of a mechanical device with an inset showing a rotating component (no text or symbols)natural_image
Line drawing of a washing machine with a magnified inset showing a small component (no text or symbols)natural_image
Isometric line drawing of a mechanical device with internal components (no text or symbols)natural_image
Line drawing of a washing machine with a large double-headed X mark on top (no text or symbols)
natural_image
Illustration of various hand tools including wrench, screwdriver, handrail, and gender symbols (no text or labels)
natural_image
Diagram showing a 3D box connected to a wall-mounted device, with an inset magnified view of the wall-mounted components (no text or symbols present)natural_image
Diagram of a mechanical assembly with rotating components and directional arrows (no text or symbols)natural_image
Line drawing of a washing machine and a small mechanical component (no text or symbols)- Skru fast de fremre brakettene på sokkelen.
natural_image
Diagram showing a device with a magnified inset illustrating light interaction (no text or symbols present)natural_image
Diagram of a computer fan assembly with an inset showing internal structure (no text or symbols)- For vaskemaskin. Bruk (G) de medfølgende skruene til å feste bakbrakettene (B) på skiven og (D) skruer for pidestallen.
natural_image
Technical illustration of a mechanical component with a magnified inset showing rotational motion (no text or symbols)- For vaskemaskin. Reis sokkelen og apparatet opp i vertikal posisjon. Om nødvendig justerer du føttene og går til Trinn 16. Sjekk at skruene er forsvarlig trukket til.

natural_image
Line drawing of a washing machine with two gender symbols (no text or labels)natural_image
Technical illustration of a computer tower with internal components and a magnified inset showing the interior mechanism (no text or symbols)natural_image
Technical diagram of a mechanical device with two human figures and an inset showing internal structure (no text or symbols)natural_image
Technical line drawing of a mechanical device with an inset showing a rotating component (no text or symbols)natural_image
Line drawing of a washing machine with a magnified inset showing its structural components (no text or symbols)natural_image
Isometric line drawing of a device casing with internal compartments (no text or symbols)natural_image
Line drawing of a washing machine with a double-headed X mark on top (no text or symbols)
natural_image
Illustration of various hand tools including wrench, screwdriver, and tool holder (no text or symbols)
natural_image
Diagram showing a 3D box connected to a wall-mounted panel, with an inset magnified view of the panel (no text or symbols present)natural_image
Diagram of a mechanical assembly with rotating components and directional arrows (no text or symbols)natural_image
Line drawing of a washing machine and a small mechanical component (no text or symbols)natural_image
Diagram showing a device with a magnified inset illustrating light interaction (no text or symbols present)natural_image
Diagram of a computer tower with fan blades and ventilation system, showing internal components and airflow direction (no text or labels)natural_image
Technical line drawing of a mechanical component with an inset showing rotational motion (no text or symbols)natural_image
Line drawing of a washing machine with two gender symbols (no text or labels)natural_image
Technical illustration of a server rack with an inset showing internal components and a magnified view of the rack (no text or symbols present)natural_image
Simple line drawing of a box connected to a light bulb, with an inset showing the bulb's rotation (no text or symbols)natural_image
Technical diagram of a mechanical device with internal components and two human figures, showing cross-section and assembly (no text or symbols)natural_image
Technical line drawing of a mechanical assembly with an inset showing a rotating component (no text or symbols)natural_image
Line drawing of a washing machine with a magnified inset showing a small component (no text or symbols)natural_image
Isometric line drawing of a device casing with internal compartments (no text or symbols)natural_image
Line drawing of a washing machine with a black X mark on top (no text or symbols)
natural_image
Illustration of various hand tools including wrench, screwdriver, and women's gender symbols (no text or labels)
natural_image
Diagram showing a 3D box connected to a wall-mounted device, with an inset magnified view of the component (no text or symbols present)natural_image
Diagram of a mechanical assembly with rotating components and directional arrows (no text or symbols)natural_image
Line drawing of a washing machine and a small mechanical component (no text or symbols)natural_image
Diagram showing a mechanical component with an inset circular view of motion or force vectors (no text or symbols)- Para a máquina de lavar roupa: Pouse a máquina de lavar roupa suavemente no chão sobre o lado do distribuidor de detergente.

natural_image
Diagram of a computer fan with ventilation system, showing internal components and airflow direction (no text or labels)- Para máquina de lavar. Use os (G) parafusos fornecidos para fixar os suportes traseiras (B) na arruela e (D) nos parafusos do pedestal.
natural_image
Technical line drawing of a mechanical device with a magnified inset showing rotational motion (no text or symbols)natural_image
Line drawing of a washing machine with two male gender symbols on the side (no text or labels)natural_image
Technical illustration of a computer tower with internal components and a magnified inset showing the interior view (no text or symbols)natural_image
Diagram showing a box connected to a light bulb via a rotating mechanism, with no text or symbols present.natural_image
Technical diagram of a mechanical device with internal components and two human figures, showing cross-section and assembly (no text or symbols)natural_image
Technical line drawing of a mechanical device with an inset showing a rotating component (no text or symbols)natural_image
Line drawing of a washing machine with a magnified inset showing a small component (no text or symbols)natural_image
Isometric line drawing of a device drawer with internal compartments (no text or symbols)natural_image
Line drawing of a washing machine with a double-headed X mark on top (no text or symbols)
natural_image
Illustration of various hand tools including wrench, screwdriver, handrail, and gender symbols (no text or labels)
natural_image
Diagram showing a 3D box connected to a wall-mounted device, with an inset magnified view of the wall-mounted components (no text or symbols present)natural_image
Diagram of a mechanical assembly with rotating components and directional arrows (no text or symbols)natural_image
Line drawing of a washing machine and a small mechanical component (no text or symbols)natural_image
Diagram showing a mechanical component with an inset illustrating rotational motion (no text or symbols)natural_image
Diagram of a computer tower with fan blades and ventilation system, showing internal components and airflow direction (no text or labels)natural_image
Technical line drawing of a mechanical component with an inset showing rotational motion (no text or symbols)natural_image
Line drawing of a washing machine with two gender symbols (no text or labels)natural_image
Technical illustration of a computer tower with internal components and an inset showing a magnified view of the interior space (no text or symbols present)natural_image
Diagram showing a box connected to a light bulb via a switch, with an inset magnified view of the bulb's rotation (no text or symbols present)natural_image
Technical diagram of a mechanical device with two human figures and an inset showing internal components (no text or symbols)natural_image
Technical line drawing of a mechanical component with an inset showing rotational motion (no text or symbols)natural_image
Line drawing of a washing machine with a magnified inset showing a small component (no text or symbols)natural_image
Isometric line drawing of a mechanical device with internal compartments (no text or symbols)natural_image
Line drawing of a washing machine with a double-headed X mark on top (no text or symbols)
natural_image
Illustration of various hand tools including wrench, screwdriver, handrail, and gender symbols (no text or labels)
natural_image
Diagram showing a box connected to a wall-mounted device, with an inset magnified view of the component (no text or symbols present)natural_image
Diagram of a mechanical assembly with rotating components and directional arrows (no text or symbols)natural_image
Line drawing of a washing machine and a small mechanical component (no text or symbols)natural_image
Diagram showing a 3D object with an inset illustrating light interaction (no text or symbols)natural_image
Technical line drawing of a computer fan assembly with a magnified inset showing internal structure (no text or symbols)natural_image
Technical line drawing of a mechanical component with an inset showing rotational motion (no text or symbols)natural_image
Line drawing of a washing machine with two gender symbols (no text or labels)natural_image
Cross-sectional diagram of a server room with internal components and a magnified inset showing mechanical assembly (no text or symbols)natural_image
Diagram showing a box connected to a light bulb via a rotating switch, with an inset magnified view of the bulb's rotation (no text or symbols present)natural_image
Technical line drawing of a mechanical device with an inset showing a rotating component (no text or symbols present)natural_image
Line drawing of a washing machine with a magnified inset showing internal components (no text or symbols)natural_image
Isometric line drawing of a device casing with internal compartments (no text or symbols)natural_image
Line drawing of a washing machine with a double-headed X mark on top (no text or symbols)
UPOZORNENIE! Nemontujte ho samostatne.
natural_image
Illustration of various hand tools including wrench, screwdriver, and women's gender symbols (no text or labels)
natural_image
Diagram showing a box connected to a wall-mounted device, with an inset magnified view of the component (no text or symbols present)natural_image
Diagram of a mechanical assembly with rotating components and directional arrows (no text or symbols)natural_image
Line drawing of a washing machine and a small mechanical component (no text or symbols)- Naskrutkujte predné svorky na podstavec.
natural_image
Diagram showing a mechanical component with an inset circular view of motion or force vectors (no text or symbols)- Pre práčku. Opatrne položte práčku na stranu dávkovača pracieho prostriedku.

natural_image
Technical line drawing of a computer fan assembly with an inset showing internal components (no text or symbols)natural_image
Line drawing of a washing machine with two male gender symbols on the side (no text or labels)natural_image
Technical illustration of a computer tower with internal components and a magnified inset showing mechanical assembly (no text or symbols)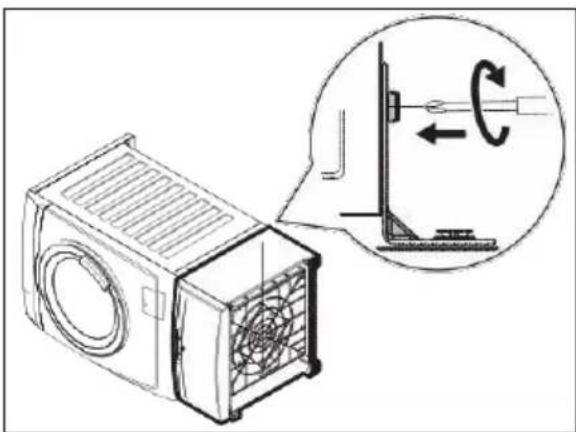
natural_image
Technical line drawing of a mechanical component with an inset showing rotational motion (no text or symbols)natural_image
Diagram showing a box connected to a light bulb via a rotating switch, with an inset magnified view of the bulb's rotation (no text or symbols present)- Pre sušičku. Zodvihnite spotrebič a zasuňte ho tak, aby sa predné nôžky spotrebiča zasunuli pod uzamykacie svorky nôžok.

natural_image
Technical line drawing of a mechanical device with an inset showing rotational motion (no text or symbols)- Presuňte podstavec/spotrebič na svoje trvalé miesto. Použite vodováhu a skontrolujte, či je montážna súprava v rovnováhe. Ak nie, nastavte nôžky a vyrovnajte.
natural_image
Line drawing of a washing machine with a magnified inset showing its structural components (no text or symbols)natural_image
Isometric line drawing of a device casing with internal compartments (no text or symbols)natural_image
Line drawing of a washing machine with a double-headed X mark on top (no text or symbols)- Mera
- Pripomočki

OPOZORILO! Ne nameščajte sami.
natural_image
Illustration of various hand tools including wrench, screwdriver, and hand tools with gender symbols (no text or labels)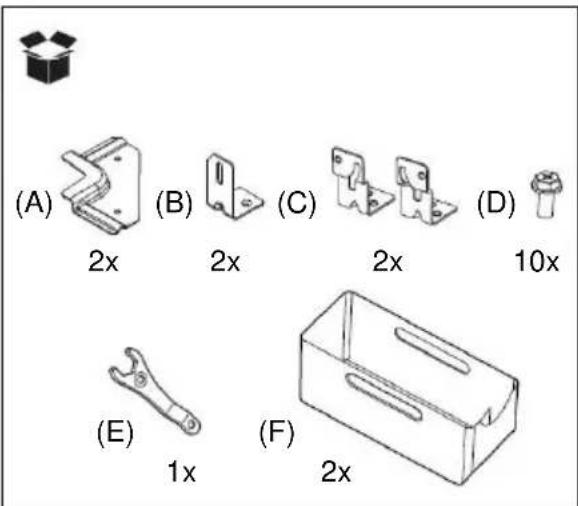

OPOZORILO! Preden nadaljujete z nameščanjem, se prepričajte, da imate dovolj prostora.

OPOZORILO! Pred uporabo naprave (pralnega stroja ali sušilnika) se prepričajte, da sta hrbtna nosilca pritrjena z vijaki.
natural_image
Diagram showing a box connected to a wall-mounted shelf, with an inset magnified view of the shelf structure (no text or symbols present)- Nastavite sprednji nastavljivi nogi, da bo podstavek stabilen.
natural_image
Diagram of a mechanical assembly with rotating components and directional arrows (no text or symbols)natural_image
Line drawing of a washing machine and a small mechanical component (no text or symbols)- Na podstavek privijte sprednja nosilca.

natural_image
Diagram showing a device with a magnified view of its internal components, including a light bulb and rotating arrow (no text or symbols present)natural_image
Technical line drawing of a computer fan assembly with an inset showing internal components (no text or symbols)natural_image
Technical line drawing of a mechanical component with an inset showing rotational motion (no text or symbols)- Za pralni stroj. Podstavek in napravo postavite pokonci. Po potrebi nastavite noge naprave in pojdite na 16. korak. Preverite, ali so vijaki dobro priviti.
natural_image
Line drawing of a washing machine with two gender symbols (no text or labels)natural_image
Technical illustration of a server rack with internal components and a magnified inset showing airflow direction (no text or symbols)- Za sušilni stroj. Na podstavek privijte zadnja nosilca (C) s priloženimi vijaki.
natural_image
Diagram showing a box connected to a light bulb via a rotating switch, with an inset magnified view of the bulb's rotation (no text or symbols present)natural_image
Technical line drawing of a mechanical device with an inset showing rotational motion (no text or symbols)- Podstavek/napravo premaknite na stalno mesto. Z vodno tehtnico preverite, ali je naprava poravnana. Če ni, ustrezno poravnajte noge.
natural_image
Line drawing of a washing machine with a magnified inset showing its structural components (no text or symbols)natural_image
Isometric line drawing of a device casing with internal compartments (no text or symbols)natural_image
Line drawing of a washing machine with a double-headed X mark on top (no text or symbols)
natural_image
Illustration of various hand tools including wrench, screwdriver, and human figure (no text or symbols)
natural_image
Diagram showing a box connected to a wall-mounted device, with an inset magnified view of the components (no text or symbols present)natural_image
Diagram of a mechanical assembly with rotating components and directional arrows (no text or symbols)natural_image
Line drawing of a washing machine and a small mechanical component (no text or symbols)natural_image
Diagram showing a device with a magnified inset illustrating light interaction (no text or symbols present)natural_image
Technical line drawing of a computer fan assembly with internal components and airflow direction (no text or symbols)natural_image
Technical line drawing of a mechanical device with a magnified inset showing rotational motion (no text or symbols)natural_image
Line drawing of a washing machine with two gender symbols (no text or labels)natural_image
Technical illustration of a server rack with an inset showing internal components and a magnified view of the rack (no text or symbols present)natural_image
Diagram showing a box connected to a light bulb via a rotating switch, with an inset magnified view of the bulb's rotation (no text or symbols present)natural_image
Technical diagram of a mechanical device with internal components and two human figures, showing cross-section and assembly (no text or symbols)natural_image
Technical line drawing of a mechanical device with an inset showing rotational motion (no text or symbols)natural_image
Line drawing of a washing machine with a magnified inset showing a small component (no text or symbols)natural_image
Isometric line drawing of a device casing with internal compartments (no text or symbols)natural_image
Line drawing of a washing machine with a crossed-out black X mark, no text or symbols present- Dimensioner

- Tillbehör

natural_image
Illustration of various hand tools including wrench, screwdriver, handrail, and gender symbols (no text or labels)natural_image
Diagram showing a box connected to a wall-mounted device, with an inset magnified view of the component (no text or symbols present)natural_image
Diagram of a mechanical assembly with rotating components and directional arrows (no text or symbols)natural_image
Line drawing of a washing machine and a small mechanical component (no text or symbols)natural_image
Diagram showing a mechanical component with an inset magnified view of its internal structure (no text or symbols)natural_image
Diagram of a computer fan with ventilation system, showing internal components and airflow direction (no text or labels)natural_image
Technical line drawing of a mechanical component with an inset showing rotational motion (no text or symbols)natural_image
Line drawing of a washing machine with two gender symbols (no text or labels)natural_image
Diagram of a server rack with internal components and a magnified inset showing a mechanical assembly (no text or symbols)natural_image
Diagram showing a box connected to a light bulb with rotating coil, illustrating electrical or mechanical setup (no text or symbols)natural_image
Technical line drawing of a mechanical device with an inset showing a rotating component (no text or symbols present)natural_image
Line drawing of a washing machine with a magnified inset showing a small component (no text or symbols)natural_image
Isometric line drawing of a mechanical device with internal components (no text or symbols)natural_image
Line drawing of a washing machine with a double-headed X mark on top (no text or symbols)
natural_image
Illustration of various hand tools including wrench, screwdriver, and women's gender symbols (no text or labels)
natural_image
Diagram showing a box connected to a wall-mounted device with an inset view of the component (no text or symbols present)natural_image
Diagram of a mechanical assembly with rotating components and directional arrows (no text or symbols)natural_image
Line drawing of a washing machine and a small mechanical component (no text or symbols)natural_image
Diagram showing a device with a magnified inset illustrating light interaction (no text or symbols present)natural_image
Diagram of a computer fan with ventilation system, showing internal components and airflow direction (no text or labels)natural_image
Technical line drawing of a mechanical component with an inset showing rotational motion (no text or symbols)natural_image
Line drawing of a washing machine with two gender symbols (no text or labels)natural_image
Technical illustration of a computer tower with internal components and a magnified inset showing mechanical assembly (no text or symbols)natural_image
Technical line drawing of a mechanical component with an inset showing rotational motion (no text or symbols)natural_image
Line drawing of a washing machine with a magnified inset showing its structural components (no text or symbols)natural_image
Isometric line drawing of a device drawer with internal compartments (no text or symbols)natural_image
Line drawing of a washing machine with a double-headed X mark on top (no text or symbols)
ПОПЕРЕДЖЕННЯ! Не
natural_image
Illustration of various hand tools including wrench, screwdriver, and women's gender symbols (no text or labels)