
VFE900G - Monitor JVC - Free user manual and instructions
Find the device manual for free VFE900G JVC in PDF.
| Product type | Monitor (electronic viewfinder) for camera |
| Brand | JVC |
| Model | VFE900G |
| Weight | Approximately 750 g |
| Power supply | DC 12 V, 0.5 A (provided by the camera) |
| Screen | OLED WVGA 3.26 inches (854 × 480 pixels) |
| Drip-proof protection | Equivalent to IPX2 |
| Operating temperature | 0 °C to 40 °C |
| Operating humidity | 30% to 80% RH |
| Image adjustments | Brightness, contrast, color (CHROMA), peaking (PEAKING), RGB gain |
| Display functions | Zebra pattern (ZEBRA), image mirroring (MIRROR), black and white display |
| Front tally light | High/OFF/Low |
| Cleaning | Dry cloth only |
| Maintenance | Refer all repairs to qualified personnel |
| Safety | Do not expose to rain or moisture; disconnect during storms |
| Included accessories | Warranty card (United States), instruction manual |
| Compatibility | GY-HC900 series and other compatible models |
| Repairability | No user-serviceable internal parts |
Frequently Asked Questions - VFE900G JVC
User questions about VFE900G JVC
0 question about this device. Answer the ones you know or ask your own.
Ask a new question about this device
Download the instructions for your Monitor in PDF format for free! Find your manual VFE900G - JVC and take your electronic device back in hand. On this page are published all the documents necessary for the use of your device. VFE900G by JVC.
USER MANUAL VFE900G JVC
Please read the following before getting started:
Thank you for purchasing this product. Before operating this unit, please read the instructions carefully to ensure the best possible performance.
Enter below the Serial No. which is located on the body.
Retain this information for future reference.
Model No. VF-E900G
Serial No.
Safety Precautions
FOR USA
These are general Important Safety Instructions and certain items may not apply to all appliances.
Important Safety Instructions
-
Read these instructions.
-
Keep these instructions.
-
Heed all warnings.
-
Follow all instructions.
-
Do not use this apparatus near water.
-
Clean only with dry cloth.
-
Do not block any ventilation openings. Install in accordance with the manufacturer's instructions.
-
Do not install near any heat sources such as radiators, heat registers, stoves, or other apparatus (including amplifiers) that produce heat.
-
Protect the power cord from being walked on or pinched particularly at plugs, convenience receptacles, and the point where they exit from the apparatus.
-
Only use attachments/accessories specified by the manufacturer.
-
Use only with the cart, stand, tripod, bracket, or table specified by the manufacturer, or sold with the apparatus. When a cart is used, use caution when moving the cart/apparatus combination to avoid injury from tip-over.
-
Unplug this apparatus during lightning storms or when unused for long periods of time.
-
Refer all servicing to qualified service personnel. Servicing is required when the apparatus has been damaged in any way, such as power-supply cord or plug is damaged, liquid has been spilled or objects have fallen into the apparatus, the apparatus has been exposed to rain or moisture, does not operate normally, or has been dropped.

FOR USA AND CANADA
CAUTION
RISK OF ELECTRIC
SHOCK
DO NOT OPEN

CAUTION:
TO REDUCE THE RISK OF ELECTRIC SHOCK.
DO NOT REMOVE COVER (OR BACK).
NO USER-SERVICEABLE PARTS
INSIDE. REFER SERVICING TO
QUALIFIED SERVICE
PERSONNEL.
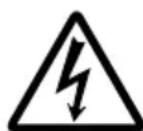
The lightning flash with arrowhead symbol, within an equilateral triangle is intended to alert the user to the presence of uninsulated "dangerous voltage" within the product's enclosure that may be of sufficient magnitude to constitute a risk of electric shock to persons.

The exclamation point within an equilateral triangle is intended to alert the user to the presence of important operating and maintenance (servicing) instructions in the literature accompanying the appliance.
Supplier's Declaration of Conformity
Model Number: VF-E900G
Trade Name: JVC
Responsible JVCKENWOOD USA
party: Corporation
Address: 500 Valley Road,
Suite 203 Wayne,
NJ07470
Telephone 973-317-5000
Number:
This device complies with Part 15 of FCC Rules. Operation is subject to the following two conditions: (1) This device may not cause harmful interference, and (2) this device must accept any interference received, including interference that may cause undesired operation.
Changes or modifications not approved by JVC could void the user's authority to operate the equipment. This equipment has been tested and found to comply with the limits for a Class A digital device, pursuant to Part 15 of the FCC Rules. These limits are designed to provide reasonable protection against harmful interference when the equipment is operated in a commercial environment.
This equipment generates, uses, and can radiate radio frequency energy and, if not installed and used in accordance with the instructions, may cause harmful interference to radio communications. Operation of this equipment in a residential area is likely to cause harmful interference in which case the user will be required to correct the interference at his own expense.
CAUTION:
The mains plug shall remain readily operable.
- Remove the mains plug immediately if the camera functions abnormally.
WARNING: TO PREVENT FIRE OR SHOCK HAZARD, DO NOT EXPOSE THIS UNIT TO RAIN OR MOISTURE.
NOTES:
- The rating plate and safety caution are on the bottom and/or the back of the main unit.
- The serial number plate is on the bottom of the unit.
The apparatus shall not be exposed to dripping or splashing and that no objects filled with liquids, such as vases, shall be placed on the apparatus.
CAUTION:
To prevent shock, do not open the cabinet. No user serviceable parts inside. Refer servicing to qualified personnel.
WARNING
Operation of this equipment in a residential environment could cause radio interference.
CAUTION:
Where there are strong electromagnetic waves or magnetism, for example near a radio or TV transmitter, transformer, motor, etc., the picture and the sound may be disturbed. In such case, please keep the apparatus away from the sources of the disturbance.
The plastics packaging bags may cause suffocation when they are covered over the head. Tear them open, and keep them away from the reach of infants and children by ensuring that they are disposed of properly.
Dear Customer
This apparatus is in conformance with the valid European directives and standards regarding electromagnetic compatibility and electrical safety. European representative of JVC KENWOOD Corporation is: JVCKENWOOD Deutschland GmbH Konrad-Adenauer-Allee 1-11 61118 Bad Vilbel GERMANY
Safety Precautions 3
Contents 6
Precautions for Proper Use 6
Names of Parts 7
Settings and Adjustments Before Use 8
Attaching the Viewfinder 8
Adjusting the Viewfinder 8
Troubleshooting 10
Specifications 10
Symbols used
Caution: Describes precautions concerning the operation of this product.
Memo : Describes reference information, such as functions and usage restrictions of this product.
Indicates the reference page numbers and reference items.
Content of this manual
- All rights reserved by JVC KENWOOD Corporation. Unauthorized duplication or reprinting of this manual, in whole or in part, is strictly prohibited.
- Illustrated designs, specifications and other contents of this manual are subject to change for improvement without prior notice.
- Other product and company names included in this instruction manual are trademarks and/or registered trademarks of their respective companies. Marks such as ^TM and ^ have been omitted in this manual.
Precautions for Proper Use
This unit is compatible with the GY-HC900 series. For information on other compatible models, please consult your dealer.
Please also read the instruction manual of the camera to be connected before using.
When making use of the IPX2 equivalent drip-proof structure of this unit, please note that the IP rating of the camera must be at least IPX2.
Viewfinder
The viewfinder screen are manufactured using high-precision technology. Black spots and/or bright spots may appear on the viewfinder screen. However, this is not a malfunction and these spots are not recorded on the SD card.
If you use this unit continuously for a long period of time, the characters displayed in the viewfinder may temporarily remain on the screen. This is not recorded on the SD card.
- Do not press against the surface with force or subject it to strong impact. Doing so may damage or break the screens.
Drip-proof
This camera recorder has a drip-proof structure equivalent to IPX2 according to our testing method. It is not completely waterproof. And the drip-proof performance under all conditions is not guaranteed.
- IPX2 (protection rating against dripping water) ensures that when a device is tilted at an angle of 15 degrees to the front, back, right and left with water dripping vertically on it at a rate of 3mm / min for a total of 10 minutes at 2 minutes 30 seconds for each position, the device will function properly when operated.
To ensure the drip-proof performance, close the caps and covers fully.
Avoid heavy rain and heavy water splashes.
If this camera recorder gets wet and there are water droplets, wipe off with a dry cloth immediately. If the camera recorder is turned upside down or tilted at 15^ or more while it is wet, water may enter the camera recorder and cause malfunction.
If this camera recorder gets wet, water may come out from the gaps. Do not carry it while it is wet. Place it on a dry cloth for a while and let it dry.
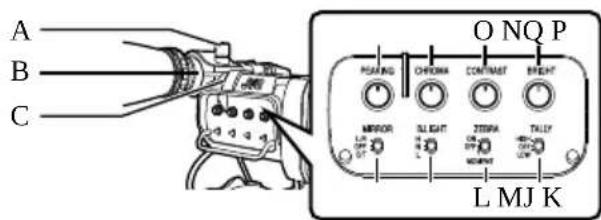
Names of Parts
Microphone Holder Lock Knob
Microphone Holder
3 Front Tally Lamp
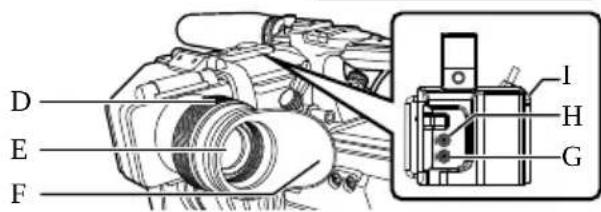
Eyepiece Focus Ring For adjusting the visibility.
Electronic Viewfinder
Eyepiece Prevents external light from entering the viewfinder screen and cameraman's vision.
[USER1] Button (VF) It can beassigned with a specific menu function.
[USER2] Button (VF) It can be assigned with a specific menu function.
Slide Stopper Use it when mounting or unmounting the viewfinder.
[MIIRROR] Switch
Flips the image.
L/R: Flips horizontally; OFF: Normal display; B/ T: Flips vertically
[1] [B.LIGHT] Switch
For configuring the brightness of the viewfinder. H: Bright; N: Normal; L: Dark
12 [ZEBRA] Switch
Displays the zebra pattern. ON: Turns on zebra pattern; OFF: Turns off zebra pattern; MOMENT: "Turns on zebra pattern" for a specific time interval while the switch is being pressed.
16 [TALLY] Front Tally Switch
For configuring the front tally lamp. HIGH: Bright; OFF: Light off; LOW: Dark
16 [BRIGHT] Knob
For adjusting the brightness of the viewfinder.
[CONTRAST] Knob
For adjusting the contrast of the viewfinder.
[CHROMA] Knob
For adjusting the color of the viewfinder.
[PEAKING] Knob
For adjusting the outline of the viewfinder.
Settings and Adjustments Before Use
Attaching the Viewfinder
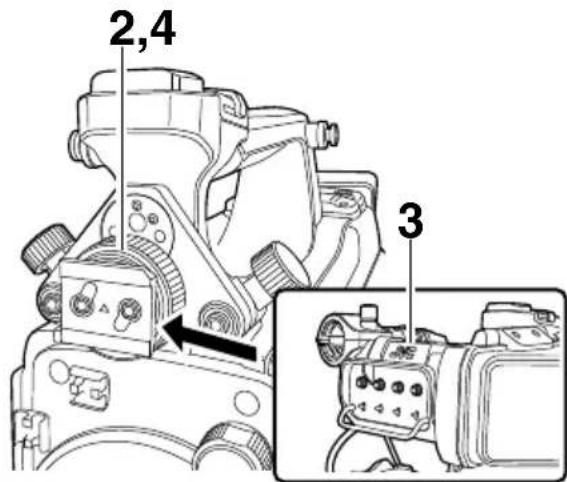
1 Set the [POWER ON/OFF] switch of the camera recorder to "OFF".
2 Loosen the viewfinder left-right position lock ring.
3 Slide the viewfinder in the direction of the arrow to attach it.
Memo :
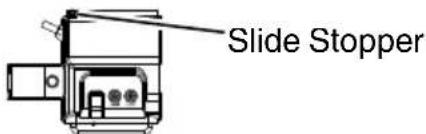
- To detach the viewfinder, pull the slide stopper up and slide it in opposite direction of the arrow.
4 Turn the viewfinder left-right position lock ring to secure the position of the viewfinder.
5 Attach the viewfinder cable to the [VF] terminal.
6 Pin the viewfinder cable to the clamp.
Adjusting the Viewfinder
You can change the brightness and peaking of the viewfinder screen according to your usage conditions.
Changing the brightness of the screen will not affect the recorded images.
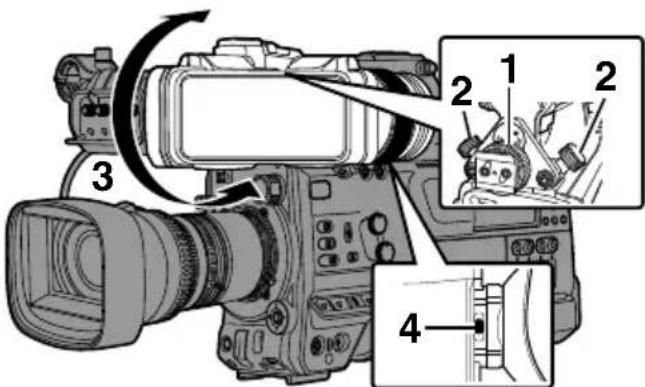
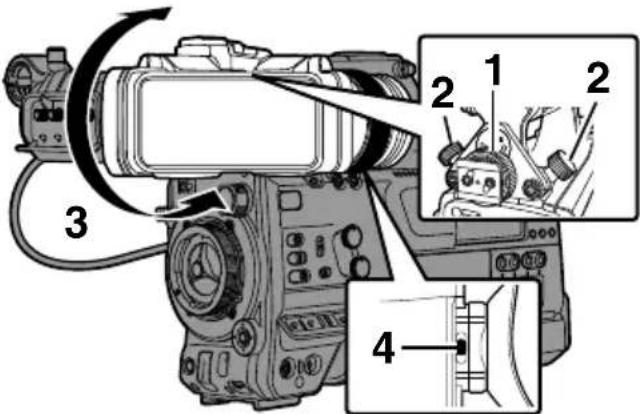
1 Loosen the fastening rings on the left and right sides of the viewfinder to adjust the horizontal position, followed by tightening the rings.
2 Loosen the viewfinder front-back position lock ring. Adjust the front and back positions then tighten the ring.
3 Adjust the angle of the viewfinder to a position that enables easy viewing.
4 Adjust the visibility using the eyepiece focus ring.
Adjust until the viewfinder image appears sharp.
5 Adjust the brightness, outline and contrast of the viewfinder screen.
Adjusting the Brightness
Use the [BRIGHT] knob to adjust the brightness of the viewfinder.
Adjusting the Outline
Use the [PEAKING] knob toadjust the outline of the viewfinder.
Adjusting the Contrast
Use the [CONTRAST] knob to adjust the contrast of the viewfinder.
Adjusting the Color
Use the [CHROMA] knob to adjust the color of the viewfinder.
Configuring the Luminance
Use the [B.LIGHT] switch to configure the luminance level.
H: Bright; N: Normal; L: Dark
Adjusting the VF RGB gain
Use [LCD/VF] [VF RGB Gain] to adjust the R/ G/B gain level of the viewfinder.
- This is the menu example of GY-HC900. For details on the menu, refer to the instruction manual of the camera.
Displaying in Black and White
The display can be switched to black-and-white by configuring [LCD/VF] [VF Color] to "Off".
- This is the menu example of GY-HC900. For details on the menu, refer to the instruction manual of the camera.
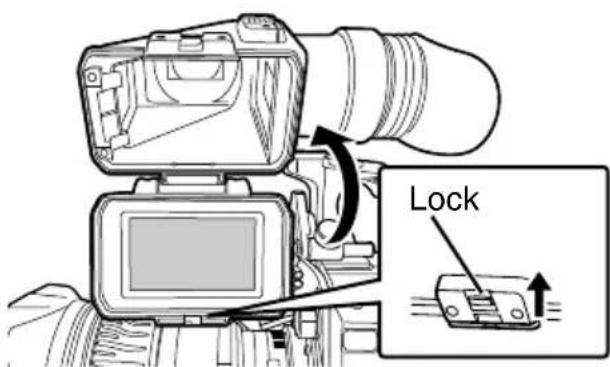
Flipping up the Eyepiece
Flipping up the eyepiece provides a better view of the entire image.
Push the lock upward to flip up the eyepiece.

Flipping up the VF Barrel
Flipping up the viewfinder barrel enables viewing of the image directly. The image will be inverted in this case. Press the [MIRROR] switch to display the image correctly. Push the lock upward to flip up the viewfinder barrel.
Troubleshooting
Symptom Action
Camera image is not output on the viewfinder screen.
- Is the CONTRAST knob on the viewfinder set to the minimum?
Adjust the [CONTRAST] knob on the viewfinder.
Specifications
General
Item Description
Power DC 12 V 0.5 A
- Power supplied from the camera
Mass Approx. 750g
Allowable operating 0^ to 40^ (32^ to 104^)
temperature
Allowable operating 30% RH to 80% RH
humidity
Allowable storage -20°C to 50°C (-4°F to 122°F) temperature
Drip-proof
Equivalent to IPX2
performance
Display panel 3.26-inch OLED WVGA (854 x 480)
Accessories
Accessories
Warranty Card (for USA) 1
INSTRUCTIONS 1
- The warranty card is included in the instruction manual.
Dimensional Outline Drawing (Unit: mm)
εε
265
6
- The specifications and appearance of this product are subject to changes for further improvement without prior notice.
RISQUE D' ELECTROCUTION NE PAS OUVRIR

ATTENTION:
POUR EVITER TOUT RISQUE D' ELECTROCUTION NE PAS OUVRIR LE BOITER. AUCUNE PIECE INTERIEURE N'EST A REGLER PAR L'UTILISATEUR. SE REFERER A UN AGENT QUALIFIE EN CAS DE PROBLEME.
responsible : Corporation
Adresse :
500 Valley Road,
Suite 203 Wayne,
NJ 07470
He donyckaetc nonadaHne Ha yctpoicTBO Kaenb nn 6pbI3r, TaKKe 3anpeaaetc yCTaHaBnBaTb Ha KaMepy EMKOCTN, 3aONHeHHbIe KNDKOCTaMn, HApPIMep, Ba3bl.
ПЕДОCTЕРЖЕнЯ :
HactpoHa BnOncHaTeJIa
JrKocTb N BbICOTy BnDOnCKaTeJI MOnH0
N3MeHHTb B COOTBeTCTBnC yCNoBnMn
NCNoJIb3OBAHn.
N3MeHeHne JrKocTH 3KpaHa He NOBIneT Ha
3aIncbIbAembie n3O6paKeHn.
1 Ocna6bTe KpeHnHbIe HOBaHaJeBOH nPaBOI CTOPOHAX BIDONCKaTeJI, YTO6bl OTpeYlnPoBaTb NOLOKeHne N0 Tropn3OHTaJI, a 3aTeM 3aTaNHTe KOJIba.
2 Ocna6bTe HoIbUO 6JIOHnPOBHN nepeHrero-3aAdHrero NpOJOHeHH BnDOnsChATEJI. OTperyLHyPuyTe NOLOKeHne CpeepuN c3aDi, a 3aTeM 3aTAHHTe KOJIbUo.
3 Otperynpyte yroI BINOCHaTeIa IIOLOKeHna, oecneuBaIOUeIo IerHn npocMOTp.
4 Otperynpyte BnIMoctb c NOMOsbIO KOIbua oKycnpOBH OkyIpa. Perynyte, noka n306paKeHne B BVIONCaTeHe He cTaHET pe3kM.
5 OtperyuHpyTe aRHOCTb, KOHTyp IN KOHTpactHOCTb 3HpaHa BnOINCKaTeIa.
PerynpoBHa npKocTn
IcnoJIb3yIte pyKy [BRIGHT] IaI HaCTpoIKN IapKoCTN BIOONCKaTeJI.
PerylnpoBka KOHTypa
HcnoJIb3yIte pyKy [PEAKING] nla NaCTpoN KONTypa BnDOnCKaTeJ.
PerylnoBbKa KOHTpactHOCTN
Hcnoj3yIe pyHy [CONTRAST] nla HacTpoiKoHTpactHOCTN BuOnCKaTeJI.
PerynpoBHa CBeTa
HcnoB3yIte pyHy [CHROMA] nHaCTpoHN CBETA BnDOncKaTeJI.
HactpoHaApHOCTN
IcnoB3yIte nepeKIOuateIb [B.LIGHT] dIaHacTpoN yPOBn IpKoCTn. H: npKn; N: 06bIHy; L: Temhbl
PerylnpoBb ya ycnJeHnRgB BNDONcHaTeJIa
IcnoJIb3yIe [LCD/VF] [VF RGB Gain] npeRyIInpOBn yPoBn yCIneHn R/G/B BIDOnCKaTeJI.
*3To npimep MeHIO GY-HC900.ДЯ NOLyueHnI DOnOJIHnTeJbHOI HHΦOpMauIN O MeHIO CM. INHCTpyKcIIO NO 3KcPnyaTaUIN KaMepbl.
OTo6paKeHHeYepeHoro n 6eIoro
Information on Disposal of Old Electrical and Electronic Equipment and Batteries (applicable for countries that have adopted separate waste collection systems)
Products and batteries with the symbol (crossed-out wheeled bin) cannot be disposed as household waste. Old electrical and electronic equipment and batteries should be recycled at a facility capable of handling these items and their waste by products.
Contact your local authority for details in locating a recycle facility nearest to you.
Proper recycling and waste disposal will help conserve resources whilst preventing detrimental effects on our health and the environment.
Notice: The sign "Pb" below the symbol for batteries indicates that this battery contains lead.
HanomeHa: HAKOT "Pb" noD cHMM6oNt 3a 6aTepeHny KaKyBa Ha Toa DeKa OBaa 6aTepeJa coOpHn ONoBO.
nno nnnn nn nnnnnn nnnn
X ou neo n 9) iion ou nioi oio n 7
.
10000000000000000000000000000000000000000000000000000000000000000
100
Importer (EU only)
JVCKENWOOD U.K. Limited
12 Priestley Way, London NW2 7BA, UNITED KINGDOM
Manufacturer JVCKENWOOD Corporation
3-12, Moriya-cho, Kanagawa-ku, Yokohama-shi, Kanagawa, 221-0022, JAPAN
WHAT IS NOT COVERED:
This limited warranty provided by JVC does not cover:
-
Products which have been subject to abuse, accident, alteration, modification, tampering, negligence, misuse, faulty installation, lack of reasonable care, or if repaired or serviced by anyone other than a service facility authorized by JVC to render such service, or if affixed to any attachment not provided with the products, or if the model or serial number has been altered, tampered with, defaced or removed;
-
Initial installation, installation and removal from cabinets or mounting systems.
-
Operational adjustments covered in the Owner's Manual, normal and recommended maintenance, and replacement of consumable parts, video and audio head cleaning;
-
Damage that occurs in shipment, due to act of God, and cosmetic damage;
-
Signal reception problems and failures due to line power surge;
-
Video head, CCD Image Sensors, DILA devices are covered for 90 days from the date of purchase:
-
Accessories
-
Batteries (except that Rechargeable Batteries are covered for 90 days from the date of purchase).
There are no express warranties except as listed above.
THE DURATION OF ANY IMPLIED WARRANTY, INCLUDING THE IMPLIED WARRANTY OF MERCHANTABILITY, IS LIMITED TO THE DURATION OF THE EXPRESS WARRANTY HEREIN.
JVC SHALL NOT BE LIABLE FOR ANY LOSS OF USE OF THE PRODUCT, INCONVENIENCE OR ANY OTHER DAMAGES, WHETHER DIRECT, INCIDENTAL OR CONSEQUENTIAL (INCLUDING, WITHOUT LIMITATION, DAMAGE TO TAPES, RECORDS OR DISCS) RESULTING FROM THE USE OF THIS PRODUCT, OR ARISING OUT OF ANY BREACH OF THIS WARRANTY. ALL EXPRESS AND IMPLIED WARRANTYES, INCLUDING THE WARRANTYES OF MERCHANTABILITY AND FITNESS FOR PARTICULAR PURPOSE, ARE LIMITED TO THE WARRANTY PERIOD SET FORTH ABOVE.
Some states do not allow the exclusion of incidental or consequential damages or limitations on how long an implied warranty lasts, so these limitations or exclusions may not apply to you. This warranty gives you specific legal rights and you may also have other rights which vary from state to state.
REFURBISHED PRODUCTS CARRY A SEPARATE WARRANTY, THIS WARRANTY DOES NOT APPLY. FOR DETAIL OF REFURBISHED PRODUCT WARRANTY, PLEASE REFER TO THE REFURBISHED PRODUCT WARRANTY INFORMATION PACKAGED WITH EACH REFURBISHED PRODUCT.
RETAIN THIS PART OF YOUR WARRANTY

FIRST-CLASS POSTAGE REQUIRED POST OFFICE WILL NOT DELIVER WITHOUT PROPER POSTRAGE
JVC
JVCKENWOOD USA Corporation
PO Box 22745
2201 E. Dominguez St, Long Beach, CA 90810-5745

LIMITED WARRANTY
PRO.PRODUCTS 2-1 CI
JVCKENWOOD USA Corporation (JVC) warrants this product and all parts thereof, except as set forth below ONLY TO THE ORIGINAL END-USER PURCHASER to be FREE FROM DEFECTIVE MATERIALS AND WORKMANSHIP from the date of the original purchase for the period shown below. ("The Warranty Period")
| Model | Serial No. | Parts | Labor |
| VF-E900G | 2YR | 1YR |
THIS LIMITED WARRANTY IS VALID ONLY IN THE FIFTY (50) UNITED STATES, THE DISTRICT OF COLUMBIA AND IN THE COMMONWEALTH OF PUERTO RICO.
WHAT WE WILL DO:
If this product is found to be defective within the warranty period, JVC will repair or replace defective parts with new or rebuilt equivalents at no charge to the original owner. Such repair and replacement services shall be rendered by JVC during normal business hours at JVC authorized service centers. Parts used for replacement are warranted only for the remainder of the Warranty Period.
WHAT YOU MUST DO FOR WARRANTY SERVICE:
Box the product carefully, preferably in the original carton and ship to the nearest JVC authorized service center. It is recommended that you insure the product against loss or damage. To obtain the address of the nearest authorized service center, please call (800) 582-5825. Service locations can also be obtained from our website at http://www.us.jvckenwood.com.
Please be sure to include a copy of your bill of sale to substantiate warranty (if applicable) and a note detailing the problem. If you have any questions concerning your JVC Product, please contact our Customer Relations Department at 800-582-5825.
SEE OTHER SIDE
JVCKENWOOD USA Corporation
PO Box 22745, 2201 E. Dominguez St,
Long Beach, CA 90810-5745
PRODUCT SAFETY REGISTRATION CARD
To help us better serve you, we request you to return this "PRODUCT SAFETY REGISTRATION CARD". The information will enable us to contact you quickly if it is ever necessary to correct a safety related condition in this product.
Thank you for helping us to service you better.
Please fill in the requested information and mail or you can register your product online at: http://www.jvc.com/pro
THIS IS NOT A WARRANTY REGISTRATION CARD. PLEASE RETAIN YOUR BILL OF SALE FOR PROOF OF WARRANTY.
First Name Initial Last Name
Organization Title
Address (Number and Street) Apt #
City State/Province Zip
Phone Number Email Addres Please add me to your mailing list.
Date of Purchase Model Number Serial Number Month Day Year VF-E900G
Name of Dealer where purchased/Address/Phone Number
This form is for Product Registration purpose only. Failure to return this form does not diminish your rights during the warranty period.