
5VF4X00EME - Dishwasher BLAUPUNKT - Free user manual and instructions
Find the device manual for free 5VF4X00EME BLAUPUNKT in PDF.
| Product type | Built-in dishwasher |
| Brand | Blaupunkt |
| Model | 5VF4X00EME |
| Capacity | 13 place settings |
| Dimensions (H x W x D) | 815 x 598 x 550 mm (door closed) |
| Adjustable height | 815 - 875 mm |
| Depth with door open at 90° | 1150 mm |
| Power supply | 220-240 V, 50 Hz, 1760-2100 W |
| Water pressure | 0.04 - 1.0 MPa (0.4 - 10 bar) |
| Annual energy consumption | 234 kWh |
| Annual water consumption | 3080 liters |
| Energy efficiency class | A+++ (until 02/2021) / D (from 03/2021) |
| Noise level | 47 dB(A) |
| Wash programs | Intensive, Universal, ECO, Glass, 90 min, Quick |
| Special functions | Half load, Timer (delayed start up to 24h), Automatic door opening |
| Water softener | Adjustable according to hardness (H1 to H6) |
| Upper basket | Height adjustable |
| Safety | Grounding, door lock, child protection (via instructions) |
| Maintenance | Washable filters, cleanable spray arms |
Frequently Asked Questions - 5VF4X00EME BLAUPUNKT
User questions about 5VF4X00EME BLAUPUNKT
0 question about this device. Answer the ones you know or ask your own.
Ask a new question about this device
Download the instructions for your Dishwasher in PDF format for free! Find your manual 5VF4X00EME - BLAUPUNKT and take your electronic device back in hand. On this page are published all the documents necessary for the use of your device. 5VF4X00EME by BLAUPUNKT.
USER MANUAL 5VF4X00EME BLAUPUNKT
3 SAFETY INFORMATION
6 PRODUCT OVERVIEW
7 USING YOUR DISHWASHER
7 Filling salt into the water softener
9 Water softener
10 Preparing and loading dishes
13 Loading the basket
17 Tips for using the basket
19 Function of rinse aid and detergent
20 Filling the rinse aid container
21 Filling the dosing unit
22 USING YOUR DISHWASHER
22 Operating panel
24 PROGRAMMING THE DISHWASHER
25 Overview of wash cycles
26 Starting a wash cycle
26 Changing the programme during the wash cycle
27 Forgotten item
28 MAINTENANCE AND CLEANING
28 External care
28 Internal care
31 Dishwasher care
32 INSTALLATION INSTRUCTIONS
32 Information on the power connection
33 Water supply and drainage
35 Connecting the drain hoses
36 Setting up the appliance
37 Installation
41 TROUBLESHOOTING TIPS
44 ERROR CODES
45 TECHNICAL INFORMATION
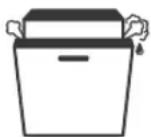
WARNING
When you use your dishwasher, follow the precautions listed below:
- Installation and repair work may only be carried out by a qualified technician.
-
This appliance is designed for household use and similar applications, such as:
-
staff kitchens in shops, offices and other working environments
farmhouses
from customers in hotels, motels and other home-like environments -
bed & breakfasts
-
This appliance can be used by children 8 years of age or older and persons with restricted physical, sensory or intellectual capabilities or a lack of experience and knowledge, if they are observed by a responsible person or if they have received instructions on how to use the appliance safely, and understand the associated hazards.
Children may not play with the appliance. Children may only clean and maintain this appliance under supervision. (for EN60335-1) - This appliance must not be used by persons (including children) with reduced physical, sensory or intellectual capabilities or a lack of experience and knowledge, unless they are supervised or have received instruction in the safe use of the appliance and understand the associated hazards. (for IEC60335-1)
- The packaging material may be dangerous for children!
- This appliance is solely intended for indoor use.
To protect yourself from the risk of electric shock, do not immerse the appliance, cord or plug in water or other liquids. Unplug the appliance before cleaning and carrying out maintenance work on the appliance.
- Use a soft moistened cloth with mild soap and then wipe off the appliance with a dry cloth.
Earthing instructions
- This appliance must be earthed. In the event of a malfunction or fault, earthing reduces the risk of electric shock by providing the path of least resistance to the electric current. This appliance is equipped with an earthing plug.
- The plug must be plugged into an appropriate outlet that is installed and earthed in accordance with all local regulations and ordinances.
- There is a risk of electric shock if the earthing conductor is not connected properly.
- Consult a qualified electrician or service representative if you are in doubt as to whether the appliance is properly earthed.
If the plug supplied with the appliance does not fit into the outlet, it must not be modified. - In this case, have a qualified electrician install a suitable power outlet.
- Do not sit on the appliance or stand on the door or the dish basket.
- Only operate the dishwasher if all the panels of the housing are properly attached.
- Open the door very carefully when the dishwasher is in operation. Water could splash out.
- Do not place heavy items on the open door or stand on it. The appliance could tip forward.
-
When loading items to be washed:
-
Position sharp items so that they cannot damage the door seal.
WARNING: Knives and other utensils with sharp points must be placed in the basket with their points pointing downwards or in a horizontal position. -
Some dishwashing detergents are strongly alkaline. They may be extremely harmful if swallowed. Avoid skin and eye contact and keep children away from the dishwasher when the door is open.
- Make sure that the detergent dispenser is empty when the wash cycle is complete.
- Only wash plastic items if they are marked as "dishwasher safe" or equivalent.
If plastic items are not marked accordingly, check the manufacturer's recommendations.
Use only detergent and rinse aid recommended for use in an automatic dishwasher. - Never use soap, laundry detergent or hand laundry detergent in your dishwasher.
- The door should not be left open, as this could increase the risk of tripping. If the power cord is damaged, it must be replaced by the manufacturer or its customer service or a similarly qualified technician to avoid hazards.
- Do not excessively or dangerously twist or flatten the power cord during installation.
- Do not manipulate the operating elements.
- The appliance must be connected to the main water valve with new hose kits. Old kits should not be reused.
To save energy, the appliance switches off automatically when in standby mode if it is not in operation for 15 minutes.
- A maximum of 13 place settings fit in the dishwasher.
- The maximum permissible water supply pressure is 1MPa .
The minimum permissible water supply pressure is 0.04MPa
Disposal
- To dispose of the packaging and the appliance, please contact a recycling centre. To do this, disconnect the power cord and render the door closing device unusable.
- Cardboard packaging is made from recycled paper and should be disposed of in the waste paper collection for recycling.
- When you ensure this appliance is disposed of properly, you help avoid potential damage to the environment and to human health that could occur if this product was disposed of improperly.
- For more detailed information about recycling this product, please contact your local city council or household garbage disposal company.
- DISPOSAL: Do not dispose of this product as unsorted municipal waste. Such waste must be collected separately, as it requires special treatment.
IMPORTANT NOTE
To get the best possible performance from your dishwasher, read the operating manual before using it for the first time.
NOTE:
The images are for reference only. The actual situation may vary depending on the model. Please note this.
USING YOUR DISHWASHER
Before first use:
- Adjust water softener
- Add salt to water softener
- Load basket
- Fill dosing unit
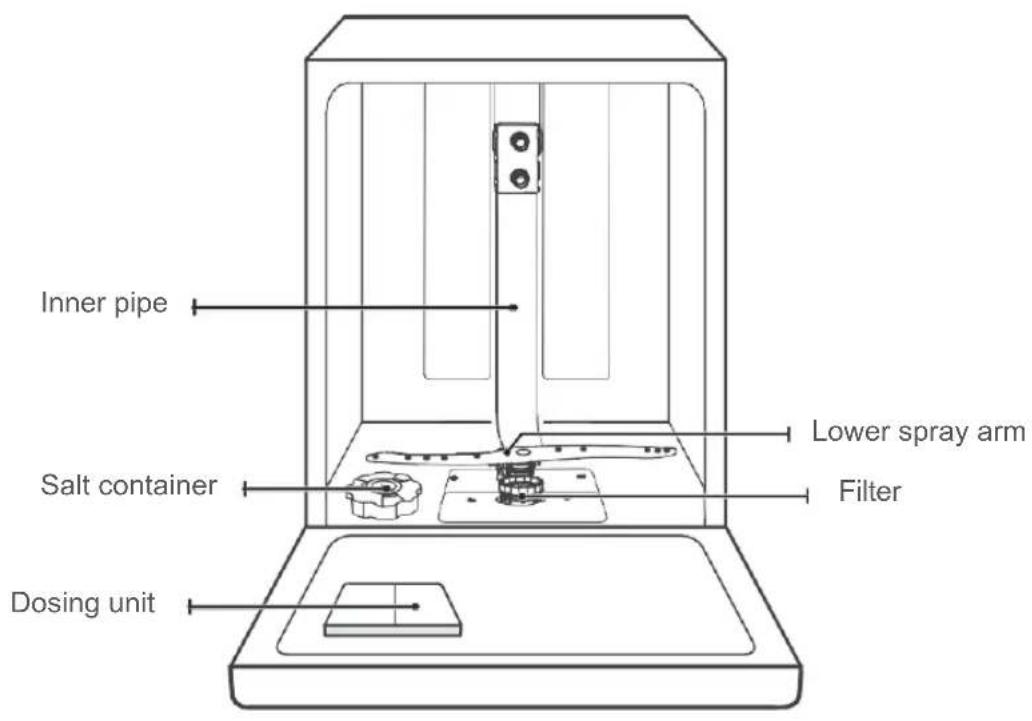
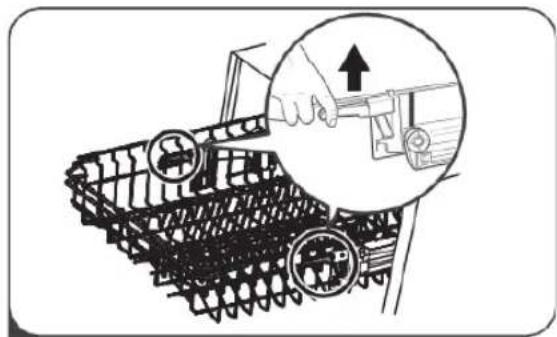
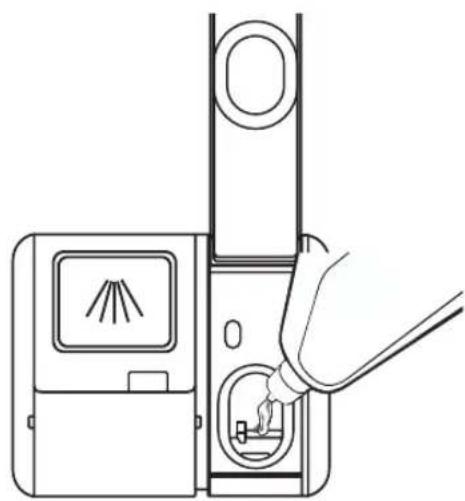
FILLING SALT INTO THE WATER SOFTENER
NOTE:
Only use salt that is suitable for use in this dishwasher.
The salt container is located under the lower basket and should be filled as follows:

WARNING
Only use salt that is suitable for use in dishwashers!
- Any other type of salt not specifically developed for use in dishwashers, especially table salt, will damage the water softener. The manufacturer does not provide any warranty for and assumes no liability for any damage resulting from the use of unsuitable salt.
Only fill the water softener with salt before you perform a wash cycle.
- This prevents any spilled salt or salt water from remaining on the bottom of the machine for a long time, which can lead to corrosion.
Follow the steps below to add dishwasher salt:
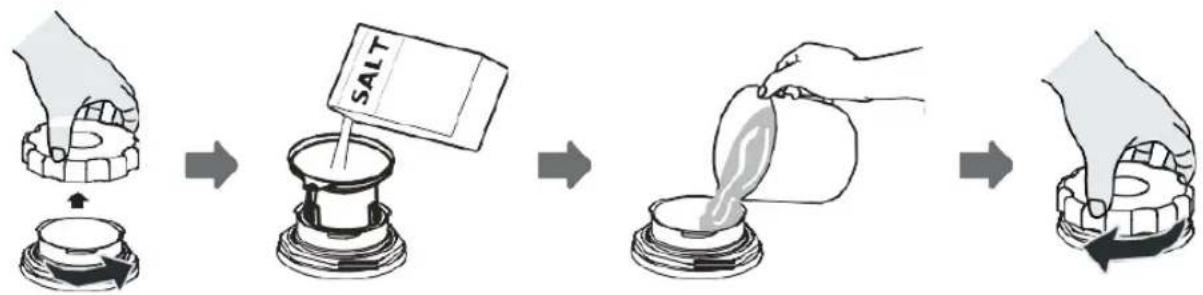
- Remove the lower basket and unscrew the container cap.
- Insert the end of the funnel (supplied) into the hole and add about 1.5kg of dishwasher salt.
- Fill the salt container with water to the maximum. It is normal for a small amount of water to escape from the salt container.
- Screw the cap back on after filling the container.
- The salt warning light goes out once the salt container has been filled with salt.
- Immediately after filling the salt into the salt container, a wash programme should be started (we recommend a short programme). Otherwise, the filter system, pump or other important parts of the appliance may be damaged by the salt water. This is not covered by the warranty.
NOTE:
- The salt container may only be refilled if the salt warning light () in the operating panel is illuminated. Depending on how well the salt dissolves, the salt warning light may remain on even if the salt container is full.
If there is no salt warning light on the operating panel (on some models), you can estimate when to refill the salt in the softener based on the number of wash cycles the dishwasher has run.
- If salt is spilled, run a soak or quick programme to remove it.
The water softener must be adjusted manually using the water hardness control.
The water softener removes minerals and salts from the water that would affect the operation of the appliance.
The more minerals there are in your water, the harder it is.
The water softener should be adjusted according to the hardness of the water in your region. Your local water authority will inform you about the water hardness in your region.
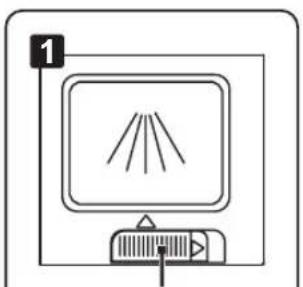
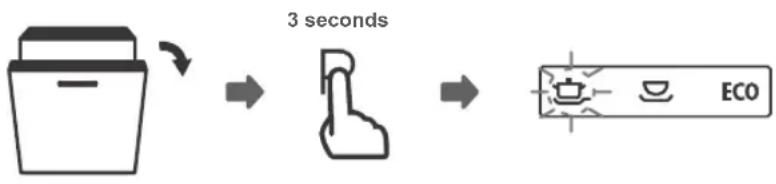
Adjusting the salt consumption
The dishwasher is designed so that the amount of salt used can be adjusted according to the hardness of the water used. This is intended to allow the optimisation and individual adjustment of the salt consumption.
Follow the following steps to adjust the salt consumption.
- Open the door and switch on the appliance.
- Press the programme button for more than 5 seconds to start the water softener within 60 seconds of pressing the power button.
- Press the programme button to select the correct water softener for your region. The water softeners change in the following order: H3->H4->H5->H6->H1->H2->H3;
- Wait 5 seconds or press the power button to complete the setting and exit the setting mode.
Water hardness
| Germany °dH | France °fH | England °Clarke | mmol/l | Water softener level | Salt consumption (grams/wash cycle) |
| 0-5 | 0-9 | 0-6 | 0-0.94 | H1 | 0 |
| 6-11 | 10-20 | 7-14 | 1.0-2.0 | H2 | 9 |
| 12-17 | 21-30 | 15-21 | 2.1-3.0 | H3 | 12 |
| 18-22 | 31-40 | 22-28 | 3.1-4.0 | H4 | 20 |
| 23-34 | 41-60 | 29-42 | 4.1-6.0 | H5 | 30 |
| 35-55 | 61-98 | 43-69 | 6.1-9.8 | H6 | 60 |
1^ = 1.25^ Clarke = 1.78^ = 0.178mmol / l
Factory setting: H3
Contact your local water authority for information about the hardness of your water.
Water softener
Water hardness varies from place to place. If hard water is used in the dishwasher, deposits will form on the dishes and utensils.
The appliance is equipped with a special water softener with a salt container to remove lime and minerals from the water.
PREPARING AND LOADING DISHES
- Consider buying utensils that are marked as dishwasher safe.
- For certain items, select a programme with the lowest possible temperature.
- To prevent damage, do not unload glasses and cutlery from the dishwasher immediately after the end of the programme.
Washing of certain cutlery/dishes
Unsuitable
Cutlery with handles made of wood, horn or mother of pearl
- Plastic items that are not heat-resistant
- Older cutlery with glued parts that are not temperature resistant
- Glued cutlery or dishes
- Items made of tin or copper
Crystal glass
- Stainless-steel items
Wooden plates
- Items made of synthetic fibres
Suitable to limited extent
- Some types of glass may become dull after many washes
Silver and aluminium parts tend to discolour during washing - Glazed patterns may fade if they are frequently washed in the dishwasher
Recommendations for loading the dishwasher
Scrape off large quantities of leftover food. Soak pans with burnt food in water. It is not necessary to rinse the dishes under running water.
Follow the loading guidelines below to achieve the best dishwasher performance.
(The features and appearance of baskets and cutlery baskets may differ from your model).
Position items in the dishwasher as follows:
- Items such as cups, glasses, pots/pans etc. point downwards.
- Curved items or those with depressions should be placed at an angle so that the water can run off.
- All utensils are safely stacked and cannot tip over.
- All utensils are placed so that the spray arms can rotate freely.
- Hollow items such as cups, glasses, pans, etc. have their openings pointing downwards so that no water can collect in the container or a deep bottom.
- Dishes and cutlery may not lie inside each other or cover each other. To prevent damage, glasses must not touch each other.
- The upper basket is intended for more delicate and lighter dishes, such as glasses, coffee cups and teacups.
- Knives with long blades that are stored upright are a potential danger!
- Long and/or sharp cutlery such as carving knives must be stored horizontally in the upper basket.
- Do not overload your dishwasher. This is important for good results and for reasonable energy consumption.
NOTE:
Very small items should not be washed in the dishwasher, as they could easily fall out of the basket.
Removing the dishes
To prevent water from dripping from the upper basket into the lower basket, you should empty the lower basket first and then the upper basket.
WARNING

The items will be hot!
To prevent damage, do not unload glasses and cutlery from the dishwasher until about 15 minutes after the end of the programme.
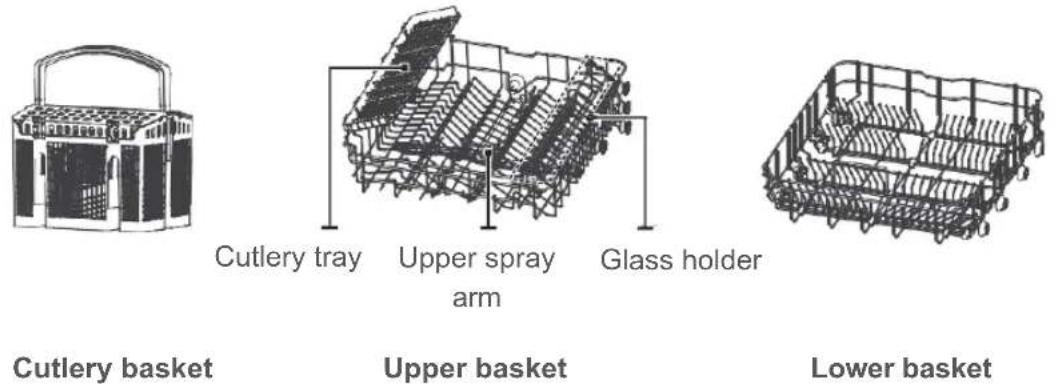
Loading the upper basket
The upper basket is designed to hold more delicate and lighter dishes, such as glasses, coffee cups, and teacups and saucers, as well as plates, bowls and shallow pans (if they are not too dirty). Position the dishes and cookware so that they are not moved by the water jet.
Loading the lower basket
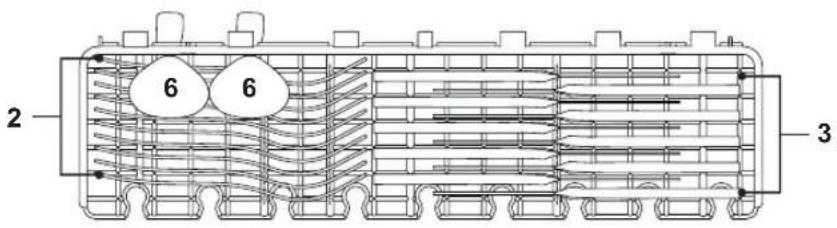
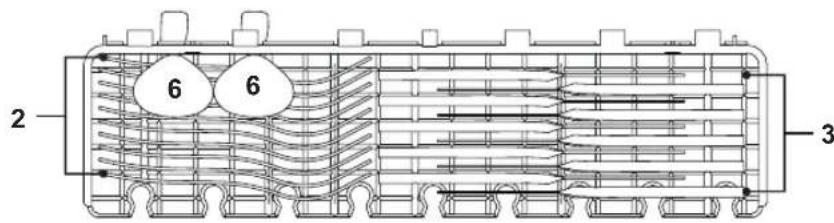
We recommend placing large items and the items that are most difficult to clean, such as pots, pans, lids, serving dishes and bowls, in the lower basket, as shown in the figure below. Serving dishes and lids should be placed on their sides in the slots so that they do not block the rotation of the upper spray arm. The recommended maximum diameter for plates in front of the dosing unit is 19cm so as not to obstruct the opening of the dosing unit.
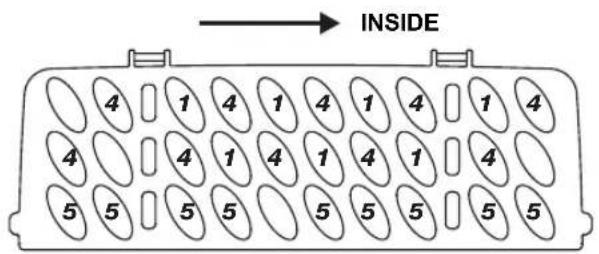
Loading the cutlery basket
Cutlery should be placed individually at the appropriate places in the cutlery tray, and care should be taken not to nest the utensils together, as this may result in poor cleaning performance.
WARNING

Do not let any items protrude through the bottom. Always position sharp items with the sharp tip pointing downwards!
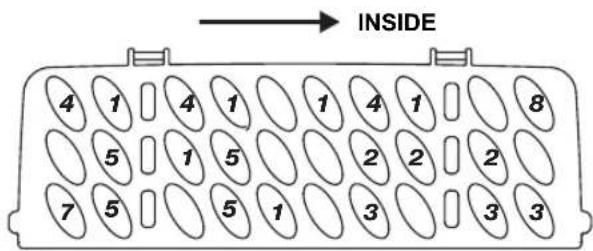
LOADING THE BASKETS
(ACC. TO EN50242)
1. Upper basket
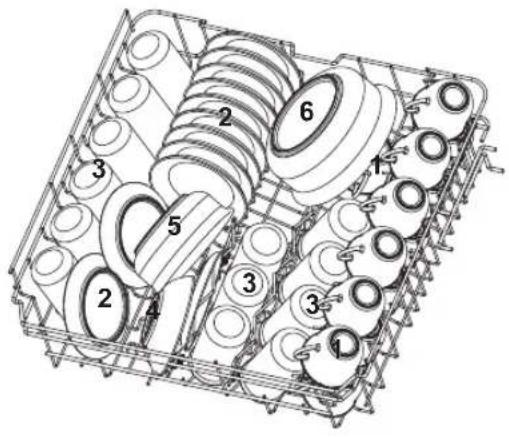
| Number | Item |
| 1 | Cups |
| 2 | Saucers |
| 3 | Glasses |
| 4 | Small serving bowl |
| 5 | Medium serving bowl |
| 6 | Large serving bowl |
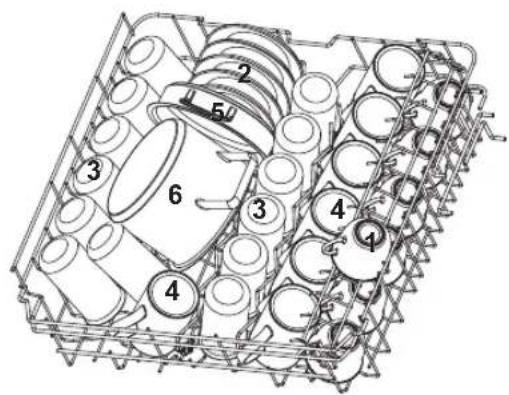
2. Lower basket
| Number | Item |
| 7 | Dessert plate |
| 8 | Large plate |
| 9 | Soup plate |
| 10 | Oval plates |
| 11 | Cutlery basket |
3. Cutlery tray
NOTE:
Place light, flat items in the compartment. The total weight must not exceed 1.5kg
4. Cutlery basket
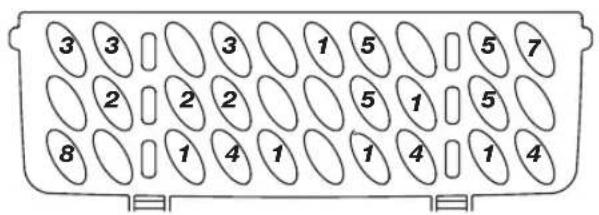
Information on comparability tests according to
EN50242
Capacity: 13 place settings
Position of upper basket: lower position
Programme: ECO
Setting of rinse aid: 5
Setting of softener: H3
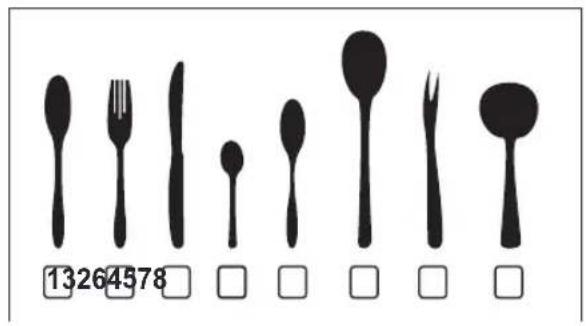
| Number | Item |
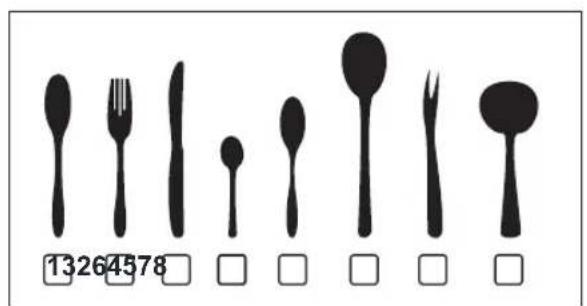
| 1 | Soup spoons |
| 2 | Forks |
| 3 | Knives |
| 4 | Teaspoons |
| 5 | Dessert spoons |
| 6 | Serving spoons |
| 7 | Serving fork |
| 8 | Ladle |
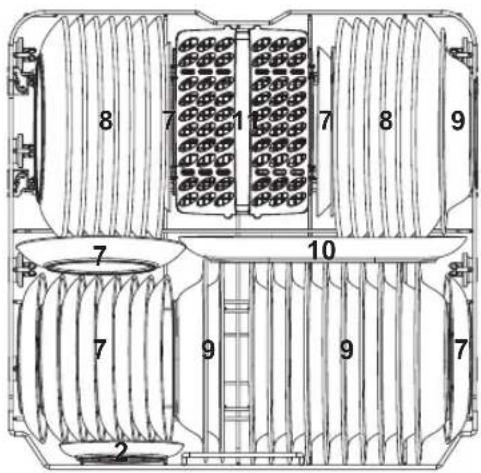
LOADING THE BASKETS
(ACC. TO EN60436)
1. Upper basket
| Number | Item |
| 1 | Cups |
| 2 | Saucers |
| 3 | Glasses |
| 4 | Mugs |
| 5 | Small casserole dish |
| 6 | Small pot |
2. Lower basket
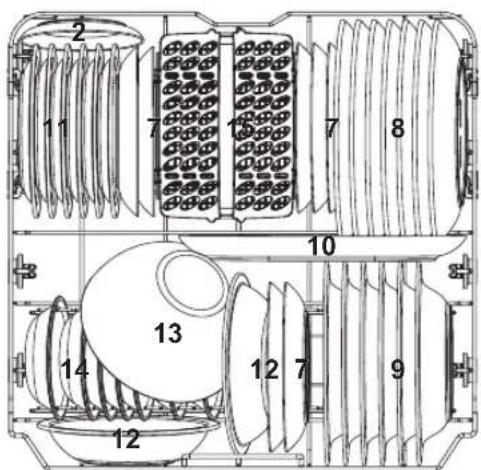
| Number | Item |
| 7 | Dessert plate |
| 8 | Large plate |
| 9 | Soup plate |
| 10 | Oval plates |
| 11 | Melamine dessert plates |
| 12 | Melamine bowls |
| 13 | Glass bowls |
| 14 | Dessert bowls |
| 15 | Cutlery basket |
3. Cutlery tray
NOTE:
Place light, flat items in the compartment. The total weight must not exceed 1.5kg
4. Cutlery basket
Information on comparability tests according to EN60436
Capacity: 13 place settings
Position of upper basket: lower position
Programme: ECO
Setting of rinse aid: 5
Setting of softener: H3
| Number | Item |
| 1 | Soup spoons |
| 2 | Forks |
| 3 | Knives |
| 4 | Teaspoons |
| 5 | Dessert spoons |
| 6 | Serving spoons |
| 7 | Serving fork |
| 8 | Ladle |
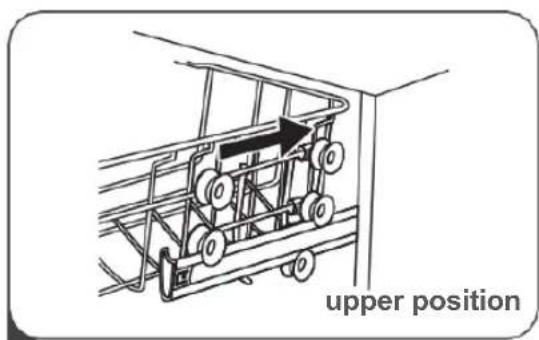
ADJUSTING THE UPPER BASKET
Type 1:
The height of the upper basket can be easily adjusted to accommodate taller containers in the upper or lower basket.
Proceed as follows to adjust the height of the upper basket:
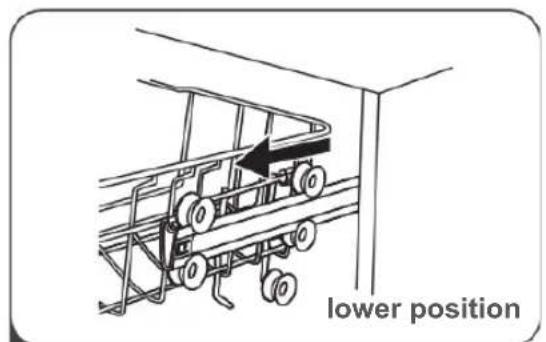
1 Pull out the upper basket.

2 Remove the upper basket.
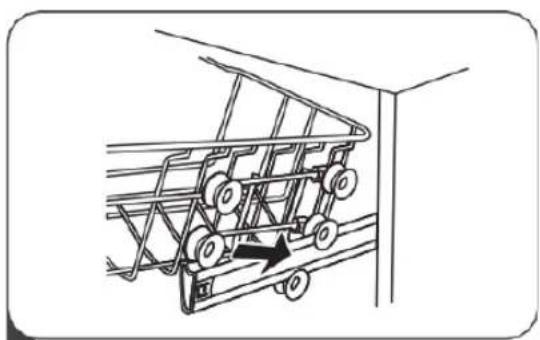
3 Place the upper basket back on the upper or lower rollers.
4 Slide in the upper basket.
Type 2:
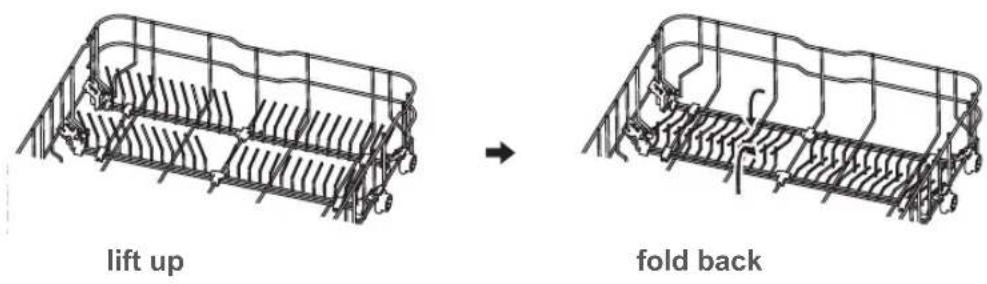
To lift the upper basket, simply lift the upper basket at the side until the basket locks into the upper position. It is not necessary to lift the adjustment lever.
2 To lower the upper basket, pull the adjustment levers on each side to release the basket and lower it to the lower position.
Folding back the glass holder
Fold the glass holder upwards to make room for higher items in the upper basket. You can then lean tall glasses against it. You can also remove the glass holder entirely when it is not required.
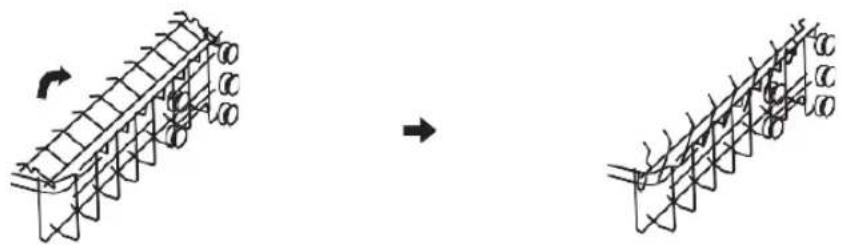
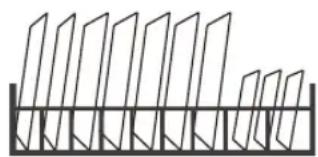
Folding back the rows of spikes
The spikes of the lower basket serve to hold plates and dishes. They can be lowered to create more space for large items.
The rinse aid is released during the final rinse to prevent the water from forming droplets on your dishes, which could lead to stains and streaks. It also improves drying by allowing the water to roll off the dishes. Your dishwasher is designed for the use of liquid rinse aids.
WARNING
Only use brand name rinse aid for your dishwasher. Never fill the rinse aid container with other substances (e.g. dishwashing detergent, liquid detergent). This would damage the appliance.
When should the rinse aid be refilled?
How regularly the dispenser needs to be refilled depends on how often the dishes are washed and which rinse aid setting is used.
The indicator for too little rinse aid ( lights up when rinse aid is needed.
- Do not fill the rinse aid container too full.
Function of the rinse aid
The chemical components that make up the detergent are necessary to remove, break down and distribute the soiling from the dishwasher. Most commercially available quality detergents are suitable for this purpose.
WARNING
- Proper use of detergents
Only use detergents that have been specially made for use in dishwashers. Keep your detergent fresh and dry.
Only add powdered detergent to the dispenser once you are ready to wash your dishes.
- Dishwashing detergent is corrosive!
Keep dishwashing detergent out of the reach of children.
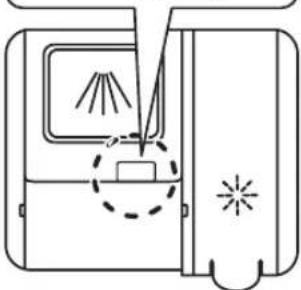
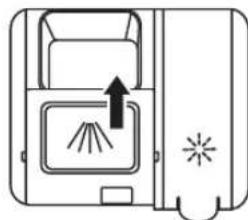
1 Lift the handle to remove the lid of the rinse aid container.

3 Afterwards, close the cap.
Pour the rinse aid into the dispenser, taking care not to overfill it.
Adjusting the rinse aid container
To achieve a better drying result with limited rinse aid, the dishwasher is designed to allow the user to adjust the consumption of rinse aid. Follow these steps:
- Open the door and switch on the appliance.
- Within 60 seconds of pressing the power button, press the programme button for more than 5 seconds and then press the timer button to enter the set model. The rinse aid indicator will flash at a frequency of 1Hz .
- Press the programme button to select the correct water softener according to your usage habits. The settings change in the following order: D1->D2->D3->D4->D5->D1. The higher the number, the more rinse aid your dishwasher will use.
- Wait 5 seconds or press the power button to complete the setting and exit the setting mode.
Slide to the right

Press down
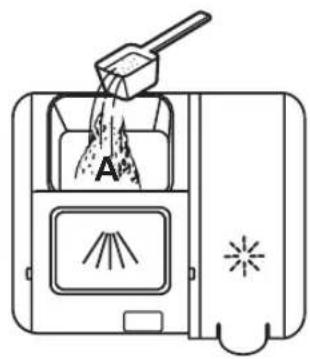
2 Add detergent to the larger chamber (A) for the main wash cycle. For a better cleaning result, especially with very dirty items, apply a small amount of detergent to the door. The additional detergent is activated during the pre-wash phase.
1 Select an opening method according to the current situation.
- Open the cover by sliding the unlocking catch.
- Open the cover by pushing down the unlocking catch.
3 Close the cover by sliding it forward and then pushing it down.
NOTE:
Please note that the setting may vary depending on water pollution.
Follow the manufacturer's recommendations on the detergent packaging.
OPERATING PANEL
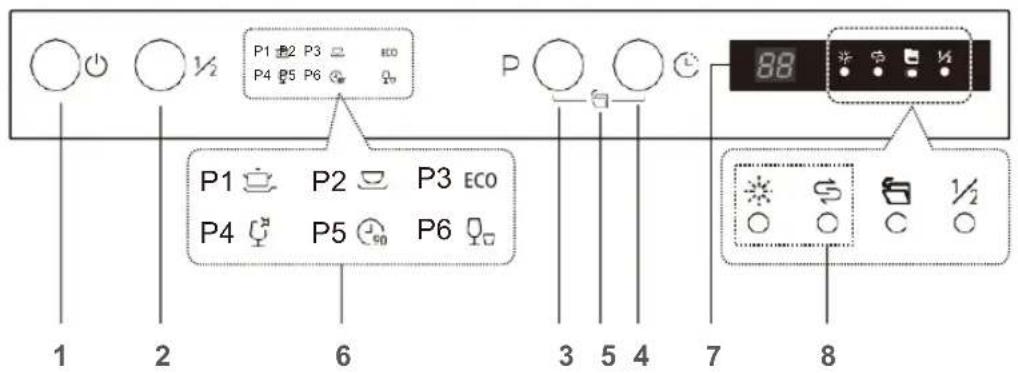
Operation (button)
| 1 | Power button | Press this button to switch on your dishwasher. The display will light up. |
| 2 | Half load | For selecting the "half load" function. (You can only use this function if you only have about 6 place settings or less. This function consumes less water and energy. Can only be used with Intensive, Universal, ECO, Glass and 90 min program). If you press this button, the corresponding indicator will light up. |
| 3 | Programme | Select the appropriate wash programme. The indicator for the selected programme will light up. |
| 4 | Timer | Press this button to set the time until the next wash cycle. You can delay the start of the next wash cycle by up to 24 hours. A single press of this button delays the start of the wash cycle by one hour. |
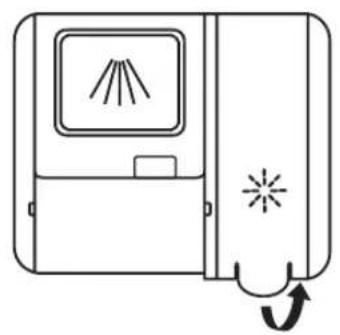
| 5 | Open automatically | The dishwasher door opens automatically at the end of the programme, which improves the drying result. Press the program button and timer button to activate or cancel this function. When you activate tis function, corresponding indicator will be lit. |
Display
| 6Programmeindicator | IntensiveFor heavily soiled items, such as pots and pans. With dried-onfood residues. | |
| UniversalFor normally soiled items, such as pots, plates, glasses and lightlysoiled pans. | ||
| ECO | ECOThis is the standard programme, which is suitable for normallysoiled items, such as pots, plates, glasses and lightly soiled pans. | |
| GlassFor lightly soiled dishes and glass. | ||
| 90' | 90 minFor normally soiled items that have to be cleaned quickly. | |
| QuickA shorter washing time for lightly soiled items that do not need tobe dried. | ||
| 7 Display | Displays the programme, timer, error codes, etc. | |
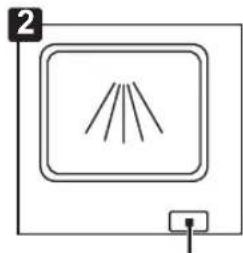
| 8 Warningindicator | Rinse aidIf the indicator lights up, this means that the dishwasher hastoo little rinse aid and it must be refilled. | |
| SaltIf the indicator lights up, this means that the dishwasher has toot little salt and it must be refilled. |
PROGRAMMING THE DISHWASHER
OVERVIEW OF WASH CYCLES
The table below shows which programmes are best suited for which amount of food residues and how much detergent is required. In also includes various information about the programmes.
Means: Refill rinse aid.
| Programme | Description of the wash cycle | Detergent Pre-/main wash cycle | Cycle time (min) | Energy (kWh) | Water (l) | Rinse aid |
| Intensive | Pre-wash cycle (50 °C) | 5/27.5 | 205 | 1.651 | 18.7 | ● |
| Main wash cycle (65 °C) | ||||||
| Rinse | ||||||
| Rinse (60 °C) | ||||||
| Dry | ||||||
| Universal | Pre-wash cycle (45 °C) | 5/27.5 | 175 | 1.451 | 18.7 | ● |
| Main wash cycle (55 °C) | ||||||
| Rinse | ||||||
| Rinse (60 °C) | ||||||
| Dry | ||||||
| ECO (*EN50242) | Main wash cycle (50 °C) | 5/27.5 | 198 | 0.823 | 11 | ● |
| Rinse (50 °C) | ||||||
| Dry | ||||||
| Glass | Pre-wash cycle (40 °C) | 5/27.5 | 120 | 0.902 | 15.2 | ● |
| Main wash cycle (50 °C) | ||||||
| Rinse | ||||||
| Rinse (50 °C) | ||||||
| Dry | ||||||
| 90 min | Main wash cycle (55 °C) | 32.5 | 90 | 0.891 | 11.5 | ● |
| Rinse (50 °C) | ||||||
| Dry | ||||||
| Quick | Main wash cycle (40 °C) | 15 | 30 | 0.781 | 11 | ○ |
| Rinse (40 °C) | ||||||
| Rinse (55 °C) |
NOTE:
ECO (*EN50242): This programme is the test wash cycle. Information on comparability tests according to EN50242.
OVERVIEW OF WASH CYCLES
The table below shows which programmes are best suited for which amount of food residues and how much detergent is required. In also includes various information about the programmes.
Means: Refill rinse aid.
| Programme | Description of the wash cycle | Detergent Pre-/ main wash cycle | Cycle time (min) | Energy (kWh) | Water (I) | Rinse aid |
| Intensive | Pre-wash cycle (50 °C) Main wash cycle (65 °C) Rinse Rinse Rinse (60 °C) Dry | 4/17 1 or 2 parts | 205 | 1.651 | 18.7 | ● |
| Universal | Pre-wash cycle (45 °C) Main wash cycle (55 °C) Rinse Rinse Rinse (60 °C) Dry | 4/17 1 or 2 parts | 175 | 1.451 | 18.7 | ● |
| ECO (*EN60436) | Main wash cycle (50 °C) Rinse Rinse (50 °C) Dry | 4/17 1 or 2 parts | 198 | 0.836 | 11 | ● |
| Glass | Pre-wash cycle (40 °C) Main wash cycle (50 °C) Rinse Rinse (50 °C) Dry | 4/17 1 or 2 parts | 120 | 0.902 | 15.2 | ● |
| 90 min | Main wash cycle (55 °C) Rinse Rinse (50 °C) Dry | 21 1 part | 90 | 0.891 | 11.5 | ● |
| Quick | Main wash cycle (40 °C) Rinse (40 °C) Rinse (55 °C) | 12 1 part | 30 | 0.781 | 11 | ○ |
NOTE:
ECO (*EN60436): This programme is the test wash cycle. Information on comparability tests according to EN60436.
- Pull out the lower and upper basket, load the dishes and push back the baskets. We recommend loading the lower basket first, then the upper basket.
- Add detergent.
- Plug the power plug into the socket. Power supply: see last page of the product data sheet. Make sure that the water supply is switched on completely.
- Open the door and press the power button.
- Select a programme, the answer lamp will light up. Then close the door. The dishwasher will now start the wash cycle.
CHANGING THE PROGRAMME DURING THE WASH CYCLE
You can only change a wash cycle can if it has only been running for a short time. Otherwise, the detergent may have already been released and the dishwasher may have already drained the rinse water. If this is the case, the dishwasher must be reset and the detergent dispenser refilled. Follow these instructions to reset the dishwasher:
- Open the door slightly to stop the dishwasher. When the movement of the spray arm has stopped, you can open the door fully.
- Press the programme button for more than three seconds to put the appliance in standby mode.
- You can now change the programme.
A forgotten item can be added at any time before the detergent dispenser is opened. Follow the instructions below to add a forgotten item:
- Open the door slightly to stop the wash cycle.
- When the movement of the spray arm has stopped, you can open the door fully.
- Add the forgotten item.
- Close the door.
- The dishwasher will continue to run.

WARNING
It is dangerous to open the door in the middle of a wash cycle, since the hot steam could scald you.
MAINTENANCE AND CLEANING
EXTERNAL CARE
Door and door seal
Clean the door seals regularly with a soft, damp cloth to remove any food residues.
When the dishwasher is loaded, food and drink residues may drip onto the sides of the door. These areas are located outside the wash cabinet and are not reached by water from the spray arms. Any residues should be wiped off before closing the door.
Operating panel
If cleaning is required, the operating panel should only be wiped with a soft, damp cloth.
WARNING
- To prevent the ingress of water into the door lock and electrical components, do not use spray cleaner.
- Never use abrasive cleaning agents or scouring sponges on the outer surfaces, as these may scratch the surface. Some paper towels may also leave scratches or marks on the surface.
INTERNAL CARE
Filter system
The filter system in the bottom of the wash cabinet catches coarse soiling from the wash cycle. The accumulated coarse dirt may result in the clogging of the filters. Check the condition of the filters regularly and clean them under running water if necessary. Carry out the following steps to clean the filters in the wash cabinet.
NOTE:
The images are for reference only. The filter systems and spray arms may vary depending on the model.
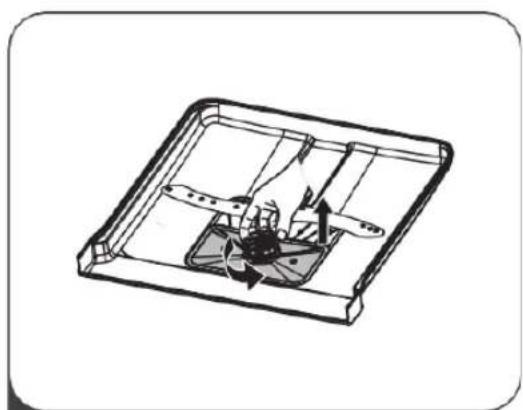
Hold the coarse filter firmly and turn it counter-clockwise to unlock it. Lift the filter up and out of the dishwasher.
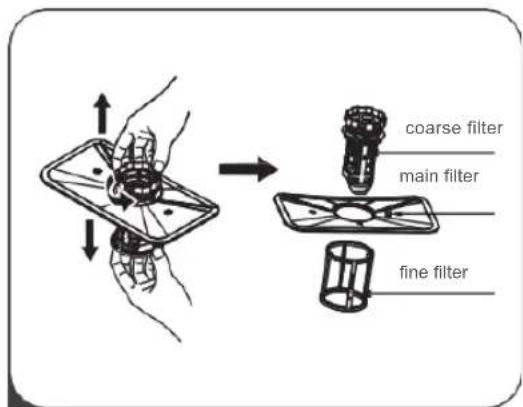
The fine filter can be removed from the bottom of the filter assembly. You can remove the coarse filter from the main filter by slightly squeezing and pulling away the tabs at the top.
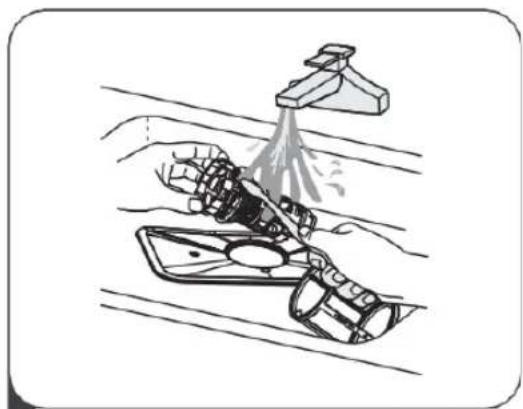
3 Larger food residues can be rinsed off under running water.
4 Reassemble the filters in reverse order, replace the filter insert and turn the close arrow clockwise.
For a more thorough cleaning, use a soft cleaning brush.
WARNING
- Do not over-tighten the filters. Replace the filters in the correct order, otherwise coarse soiling could enter the system and cause clogging.
- Never use the dishwasher without filters. Improper filter replacement may reduce the performance of the appliance and damage dishes and utensils.
Spray arms
The spray arms must be cleaned regularly, as hard water and chemicals clog the nozzles and bearings of the spray arms.
Follow the following instructions to clean the spray arms:
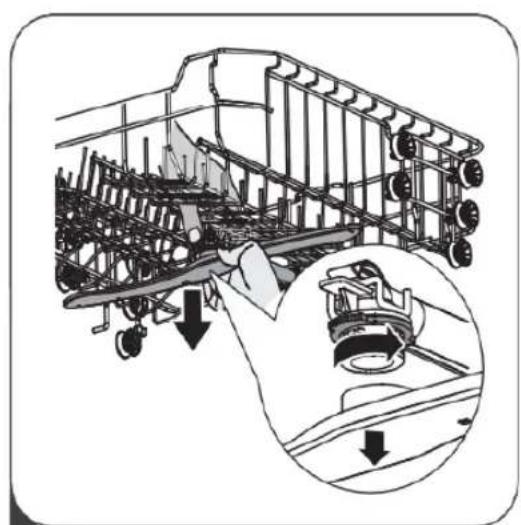
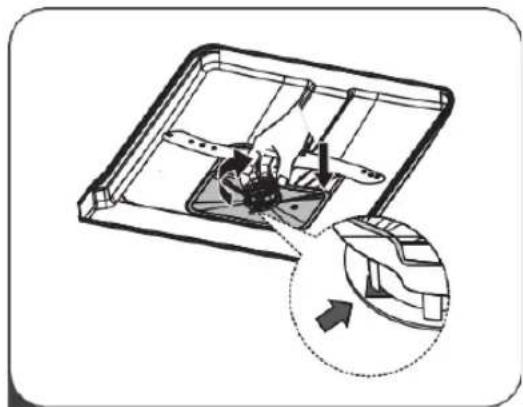
1 To remove the upper spray arm, hold the nut in the middle and turn the spray arm counter-clockwise.
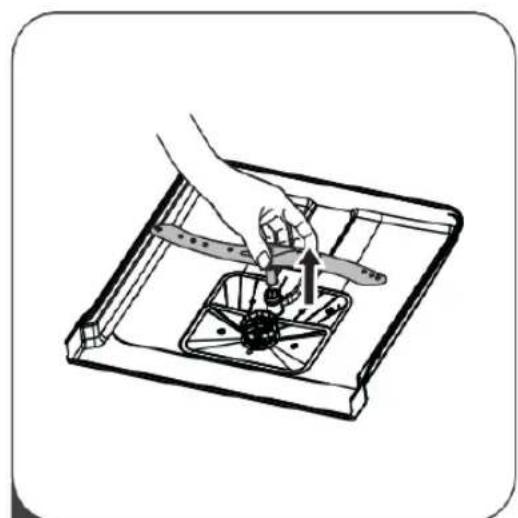
2 Pull out the lower spray arm upwards.
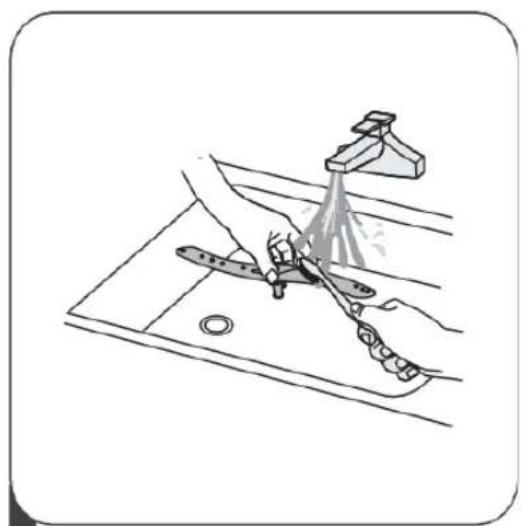
3 Clean the spray arms in soapy, warm water and use a soft brush to clean the nozzles. Rinse them thoroughly and then reinsert them correctly.
Frost protection measures
In winter, frost protection measures should be taken for the dishwasher. After each wash cycle, proceed as follows:
- Disconnect the power supply to the dishwasher at the power source.
- Switch off the water supply and disconnect the water supply line from the water valve.
- Drain the water from the inlet line and water valve. (Use a bowl to trap the water)
- Reconnect the water supply to the water valve.
- Remove the filter at the bottom of the tub and suck up the water at the bottom.
After each wash cycle
Switch off the water supply to the appliance after each wash cycle and leave the door open slightly so that no moisture or odours are trapped inside the appliance.
Pull out the plug
Always pull out the plug from the socket before cleaning or carrying out maintenance work.
No solvents or abrasive cleaning agents
Do not use solvents or abrasive cleaning agents to clean the outside and rubber parts of the dishwasher.
Use only a cloth with warm soapy water.
To remove stains from the inside surface, use a cloth moistened with water and a little vinegar or a detergent specially made for dishwashers.
For longer periods of non-use
It is recommended to perform a wash cycle with an empty dishwasher, then unplug the appliance, turn off the water supply and leave the door open slightly.
This will help to extend the life of the door seals and prevent the formation of odours in the appliance.
Moving the appliance
If you must move the appliance, try to keep it in a vertical position. If absolutely necessary, it can be placed on its back.
Seals
One of the factors leading to the formation of odours in the dishwasher is food trapped in the seals. Regular cleaning with a damp sponge will prevent this.
INSTALLATION INSTRUCTIONS
WARNING

Risk of electrical shock
Before installing the dishwasher, disconnect it from the power supply. Failure to follow this instruction may result in death or electric shock.
CAUTION:
The installation of the hoses and electrical components should be carried out by specialists.
INFORMATION ON THE POWER CONNECTION
WARNING
For your personal safety:
- Do not use an extension cord.
- Never cut or remove the earthing connection from the power cord.
Electrical requirements
Look at the type plate to check the rated voltage and connect the dishwasher to a suitable power supply. Use the required 10A/13A/16A fuse, a time-delay fuse or a recommended circuit breaker and provide a separate circuit that supplies power to this appliance only.
Electrical connection
Ensure that the voltage and frequency of the power supply correspond to the specifications on the rating plate. Only insert the plug into a power outlet that has been properly earthed. If the power outlet to which the appliance must be connected is unsuitable for the plug, replace the power outlet instead of using an adapter or equivalent, as this may result in overheating and fire.

Ensure that the appliance is proper earthed prior to use.
WATER SUPPLY AND DRAINAGE
Cold water connection
Connect the cold water supply hose to a threaded 3/4 (inch) connector and make sure it is securely attached. If the water pipes are new or have not been used for a long period of time, let the water run to ensure that the water is clear. This precaution is necessary to avoid the risk of blocking the water supply and damaging the appliance.
standard supply hose

safety supply hose
Information on the safety supply hose
The safety supply hose consists of double walls. The hose system blocks the flow of water if the supply hose ruptures and the air space between the supply hose and the outer corrugated hose is filled with water.
WARNING
A hose attached to a sink sprayer may burst if it is installed on the same water pipe as the dishwasher. If your sink has such a sprayer, it is advisable to disconnect the hose and close the hole.
Connecting the safety supply hose
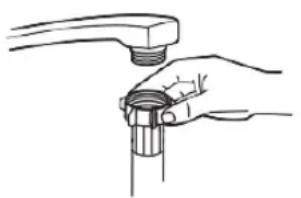
- Pull the safety supply tubes completely out of the compartment at the back of the dishwasher.
- Tighten the screws of the safety supply hose on the water tap with a 3/4 inch thread.
- Switch the water on completely before starting the dishwasher.
Detaching the safety supply hose
- Shut off the water.
- Unscrew the safety supply hose from the water tap.
Insert the drain hose into a drain pipe with a minimum diameter of 4cm or let it run into the sink, taking care not to kink or crush it. The height of the drain hose must be less than 1,000~mm . To avoid backflow in the hose, the free end of the hose must not be immersed in water.

Fix the drain hose securely in position A or B.
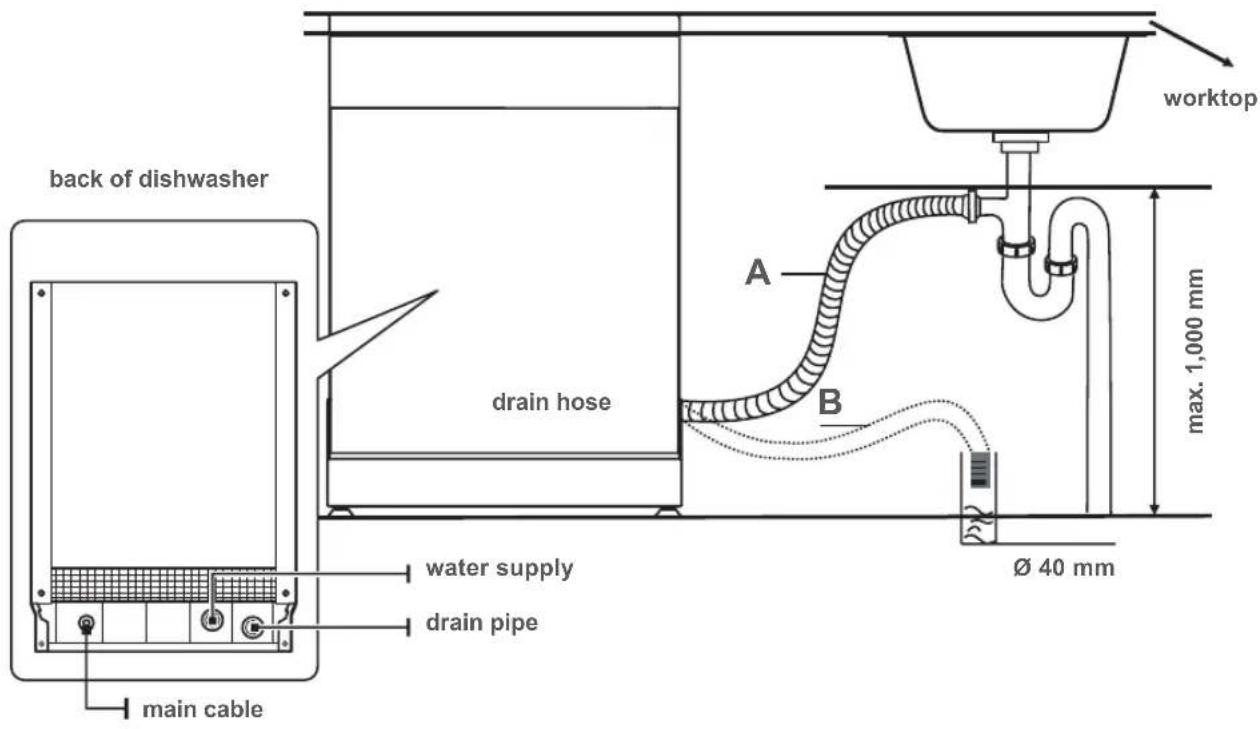
Draining excess water from hoses
If the sink is 1,000mm higher than the floor, the excess water in the hoses cannot be drained directly into the sink. In this case, excess water from the hoses must be drained into a bowl or suitable vessel located outside and lower than the sink.
Water supply
Connect the water drain hose. The drain hose must be correctly installed to prevent water leaks. Ensure that the water hose is not kinked or crushed.
Extension hose
If you need a drain hose extension, make sure you use a similar drain hose.
It must not be longer than 4 metres, otherwise the cleaning effect of the dishwasher could be compromised.
Siphon connection
The drain connection must be at a height of less than 100cm (maximum) from the bottom of the dishwasher. The water drain hose should be fixed in place.
SETTING UP THE APPLIANCE
Position the appliance at the desired location. The back of the appliance should be positioned along wall behind it and the sides along the adjacent cabinets or walls. The dishwasher is equipped with water supply and drain hoses that can be installed either on the right or left to facilitate proper installation.
Aligning the appliance
Once the appliance is positioned for alignment, the height of the dishwasher can be altered by adjusting the screw height of the feet. The appliance must not be tilted by more than 2^ .
INSTALLATION
Step 1: Select the best location for the dishwasher
The dishwasher should be installed close to the existing supply and drain hoses and the power cord. Illustrations of the cabinet dimensions and the installation situation of the dishwasher.
- Less than 5mm between the top of the dishwasher and the cabinet and the outer door adapted to the cabinet.
90 90
820-870mm
580mm power, drain and supply line entrances
80
100
distance between the cabinet bottom and the floor
100-150mm
600mm
- If the dishwasher is placed in the corner of the cabinet, some space should be left when opening the door.
Dishwasher
Cabinet
Dishwasher door
Minimum required space of 50 mm
NOTE:
Depending on where your power outlet is located, you may need to cut a hole in the opposite side of the cabinet.
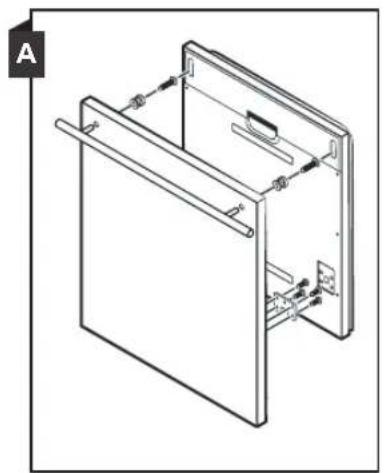
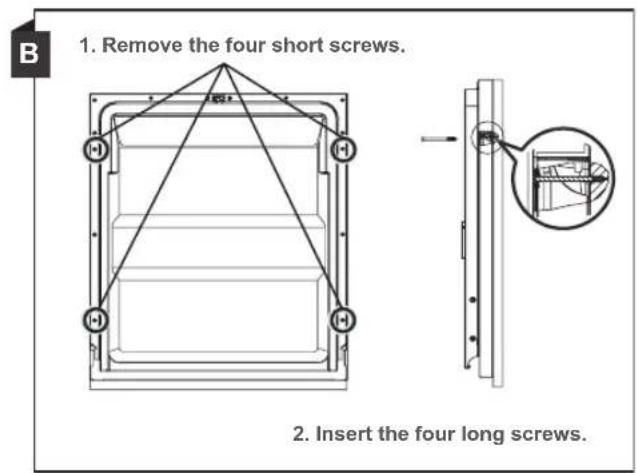
Step 2: installation of the panel
The wooden panel can be worked according to the installation drawings.
Fully integrated model
Attach the hook to the wooden panel and insert the hook into the slot of the outer door of the dishwasher (see figure A). After positioning the panel, it is fixed to the outer door with screws and bolts (see figure B).
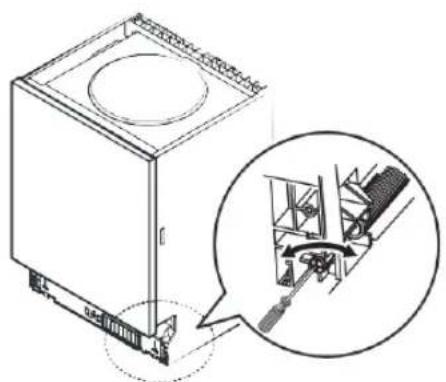
Step 3: Adjusting the door spring tension
- The door springs are adjusted at the factory to the correct tension for the outer door. If wooden panels are installed, you must adjust the door spring tension. Turn the adjusting screw to use the adjuster to tension or loosen the steel cable.
- The door spring tension is correct if the door remains horizontal in the fully open position, but folds up to close with a light touch of the finger.
Step 4: Installation steps for the dishwasher
Please follow the installation steps specified in the installation drawings.
-
Apply the condensation strip under the worktop of the cabinet. Ensure that the condensation strip is flush with the edge of the worktop. (Step 2)
-
Connect the inlet hose to the cold water supply.
-
Connect the drain hose.
-
Bring the dishwasher into position. (Step 4)
-
The dishwasher must be secured in place. There are two ways to do this:
a) Normal worktop: Insert the installation hook into the slot on the side and fasten it to the worktop with the wood screws.
b) Marble or granite worktop; Secure the side with the screw.
-
Connect the power cord.
-
Align the dishwasher. The rear foot can be adjusted from the front of the dishwasher by turning the Phillips screw in the middle of the dishwasher base using a Phillips screwdriver. To adjust the front feet, use a slotted screwdriver and turn the front feet until the dishwasher is level. (Step 5 to Step 6)
-
Install the cabinet door on the outer door of the dishwasher. (Step 7 to Step 10)
-
Adjust the door spring tension by turning an Allen key clockwise to tension the left and right door spring. Failure to do so could damage your dishwasher. (Step 11)
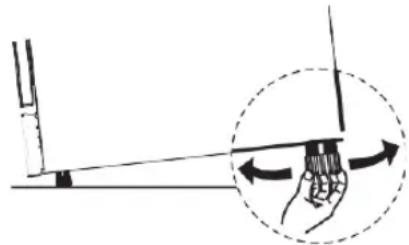
Step 5: Aligning the dishwasher
The dishwasher must be horizontal to ensure that the dishwasher basket works properly and to guarantee a good washing result.
- Place a spirit level on the door and the rail inside the wash cabinet as shown to check that the dishwasher is level.
- Align the dishwasher by adjusting the three levelling feet individually.
- When aligning the dishwasher, make sure that the dishwasher does not tip over.
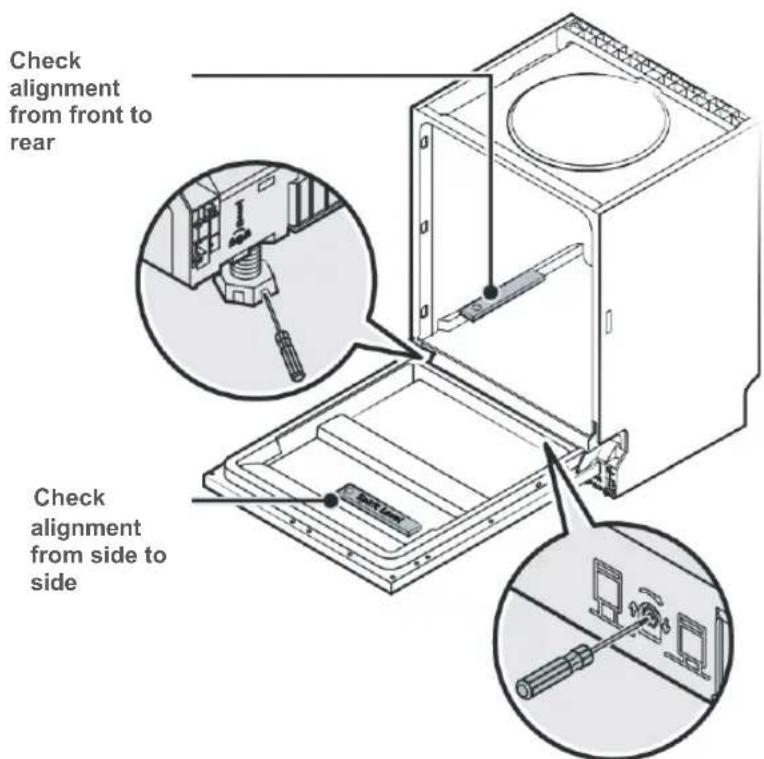
NOTE:
The maximum adjustment height of the feet is 50~mm
TROUBLESHOOTING TIPS
Before you call customer service
If you look at the diagrams on the following pages, you may save yourself a call to customer service.
| Problem | Possible causes | What to do |
| Dishwasher does not start | The fuse has blown or the circuit breaker has tripped. | Replace the fuse or reset the circuit breaker. Remove all other appliances that share the same circuit with the dishwasher. |
| The power supply is not switched on. | Make sure that the dishwasher is switched on and the door is securely closed. Ensure that the power cord is properly plugged into the wall outlet. | |
| The water pressure is low. | Check that the water supply is connected properly and the water is switched on. | |
| The door of the dishwasher is not properly closed. | Ensure that the door is properly closed and locked. | |
| Water not pumped out of the dishwasher | Twisted or pinched drain hose. | Check the drain hose. |
| Filter clogged. | Check the coarse filter. | |
| Kitchen sink clogged. | Check the kitchen sink to ensure that the water drain is working properly. If the problem is a non-draining sink, you may need a plumber rather than customer service for your dishwasher. | |
| Suds in the wash cabinet | Incorrect detergent. | Only use special dishwashing detergent to avoid the formation of suds. If this occurs, open the dishwasher and allow the suds to evaporate. Pour 4 litres of cold water on the bottom of the dishwasher. Close the door of the dishwasher and then select any wash cycle. First the dishwasher drains the water. Open the door when the emptying phase is complete and check that the suds have disappeared. Repeat the process if necessary. |
| Spilled detergent | Always wipe up any spilled rinse aid immediately. | |
| Dirty wash cabinet | A detergent with dye may have been used. | Make sure that the detergent contains no dyes. |
| White film on the inner surface | Minerals in hard water. | To clean the interior, use a damp sponge with dishwashing detergent and wear rubber gloves. Never use any detergent other than dishwashing detergent, as it can cause foam or suds to form. |
| Rust stains on cutlery | The items concerned are not corrosion-resistant. | Avoid washing items that are not corrosion-resistant in a dishwasher. |
| A programme was not executed after salt was added to the dishwasher. Traces of salt have entered the wash cycle. | Run a wash programme without dishes each time you add salt. After adding salt, do not select the Turbo function (if available). | |
| The softener cap is loose. | Check that the cap of the softener is securely fastened. | |
| Knocking noise in the dishwasher | A spray arm is knocking against an item in one of the baskets. | Stop the programme and rearrange the items obstructing the spray arm. |
| Rattling noise in the dishwasher | Dishes loaded loosely in the dishwasher. | Stop the programme and rearrange the dishes. |
| Knocking noises in the water pipes | May be caused by the on-site installation or the cross-section of the pipeline. | Does not affect the functioning of the dishwasher. In case of doubt, contact a qualified installer. |
| The dishes are not clean | The dishes were loaded improperly. | See "Preparing and loading dishes". |
| The programme was not strong enough. | Select a more intensive programme. | |
| The dishes are not clean | Not enough detergent added | Use more detergent or change your detergent. |
| Items are blocking the movement of the spray arms. | Arrange the items so that the spray arms can rotate freely. | |
| The filter combination is not clean or not correctly inserted into the bottom of the wash cabinet. This can lead to the blocking of the spray arm nozzles. | Clean the filter and/or insert it correctly. Clean the spray arm nozzles. | |
| Clouding on glassware | Combination of soft water and too much detergent. | Use less detergent if you have soft water and select a shorter wash cycle to clean glassware. |
| White spots on dishes and glasses | Hard water can cause lime deposits. | Add more detergent. |
| Black or grey stains on the dishes | Aluminium utensils rubbed against the dishes. | Use a mild abrasive cleaning agent to remove these spots. |
| Detergent left in the dosing unit | Dishes are blocking the dosing unit. | Rearrange the dishes. |
| The dishes will not dry. | The dishes were loaded improperly. | Load the dishwasher as recommended in the instructions for use. |
| The dishes were removed prematurely. | Do not empty the dishwasher immediately after the wash cycle. Only unload the dishes when the inside temperature is safe to touch. Empty the lower basket first so that no water drips from the upper basket. | |
| The wrong programme was selected. | With a short programme, the washing temperature is lower, which reduces the cleaning performance. Select a programme with a long washing time. | |
| Use of cutlery with an inferior coating. | Water drainage is more difficult with these items. Cutlery or dishes of this type are not suitable for cleaning in a dishwasher. |
ERROR CODES
OVERVIEW OF WASH CYCLES
If a malfunction occurs, the dishwasher displays error codes to identify the malfunction:
| Code | Meaning | Possible causes |
| E1 | Long starting time | The water tap is not opened, the water supply is limited or the water pressure is too low. |
| E3 | Required temperature not reached | Malfunction of the heating element. |
| E4 | Water leaking | A dishwasher element is leaking. |
WARNING
If water is leaking, turn off the main water supply before calling customer service.
If there is water in the tub, you should remove the water before putting the dishwasher back into operation.
TECHNICAL INFORMATION
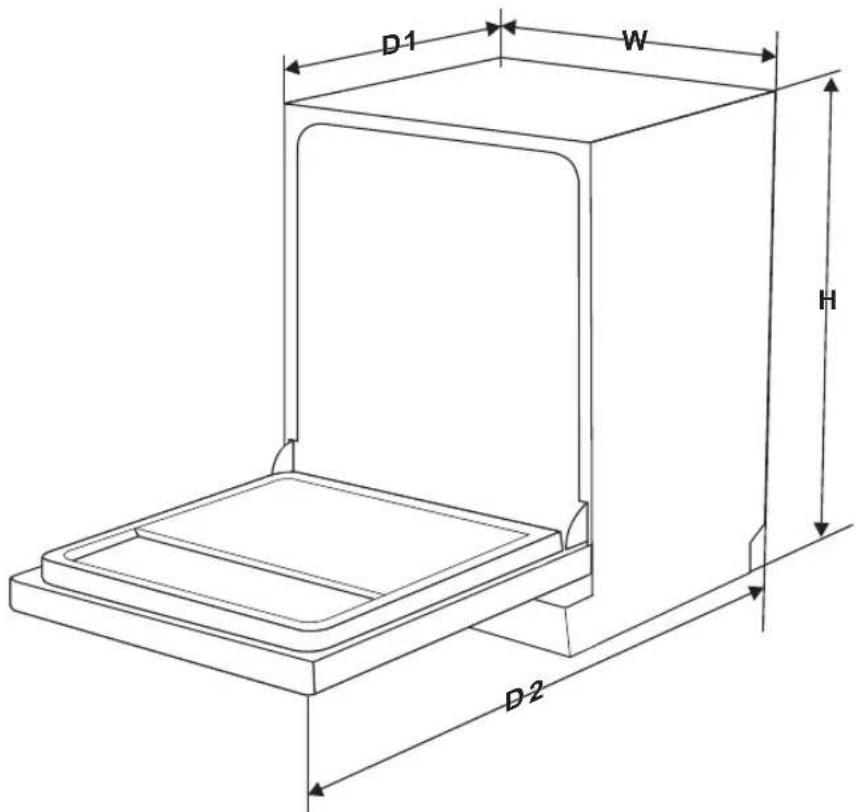
| Height (H) | 815 mm/815 – 875 mm |
| Width (W) | 598 mm |
| Depth (D1) | 550 mm (with door closed) |
| Depth (D2) | 1150 mm (with door open 90°) |
Product data sheet (EN50242)
Product data sheet of a household dishwasher according to EU regulations 1016/2010 & 1059/2010:
| Manufacturer | Blaupunkt |
| Type/description | 5VF4X00EME |
| Standard place settings | 13 |
| Energy efficiency class | A +++ 1.)/D2.) |
| Annual energy consumption 3.) | 234 kWh |
| Energy consumption of standard cleaning cycle | 0.823 kWh |
| Power consumption when switched off | 0.45 W |
| Power consumption when switched on | 0.49 W |
| Annual water consumption 4.) | 3080 litres |
| Drying efficiency class 5.) | A |
| Standard cleaning cycle 6.) | ECO 50 °C |
| Programme duration of standard cleaning cycle | 198 min |
| Noise level | 47 dB(A) re 1 pW |
| Installation | Fitted |
| Can be fitted | YES |
| Power consumption | 1760 – 2100 W |
| Rated voltage / frequency | 220 – 240 V / 50 Hz |
| Water pressure (flow pressure) | 0.04 - 1.0 MPa = 0.4 - 10 bar |
NOTE:
1.) Values according to Regulation (EU) 1059 / 2010 to 02/2021
2.) Values according to Regulation (EU) 2017 / 1369 from 03/2021
3.) Energy consumption based on 280 standard cleaning cycles with cold water filling and consumption in low-energy modes. The actual energy consumption depends on how the appliance is used.
4.) Water consumption based on 280 standard cleaning cycles. The actual water consumption depends on how the appliance is used.
5.) A (highest efficiency) to G (lowest efficiency)
6.) This programme is suitable for cleaning normally soiled dishes and is the most efficient programme for this type of dishes with respect to the combined energy and water consumption.
Product information sheet (EN60436)
| Name or trademark of the supplier: | HK Appliances GmbH | |||
| Address of supplier (b): | Werkstraße 3, 32289 Rödinghausen | |||
| Model: | 5VF4X00EME | |||
| General product parameters: | ||||
| Parameter | Value | Parameter | Value | |
| Rated capacity (a) (ps) | 13 | Dimensions in cm | Height | 81.5 |
| Width | 59.8 | |||
| Depth | 55.0 | |||
| EEI (a) | 49.9 | Energy efficiency class (a) | D (c) | |
| Cleaning performance index (a) | 1.13 | Drying performance index (a) | 1.07 | |
| Energy consumption in kWh [per cycle], based on the Eco programme with cold water. The actual energy consumption depends on how the appliance is used. | 0.836 | Water consumption in litres (per cycle), based on the Eco programme. The actual water consumption depends on the water hardness and how the appliance is used. | 11 | |
| Programme duration (a) (h:min) | 03:18 | Type | Fitted | |
| Airborne acoustical noise (a) (dB(A) re 1 pW) | 47 | Airborne acoustical noise class (a) | C (c) | |
| Switched-off state (W)Switched-off state (W) | 0.49 | Switched-off state (W) | n/a | |
| Start delay (W) (if applicable) | 1.00 | Network standby (if applicable) | n/a | |
| Minimum duration of the warranty offered by supplier (b): | ||||
| Additional information: | ||||
| Web link to the supplier's website where the information in point 6 of Annex II to Commission Regulation (EU) 2019/2022 (1) (b) can be found: | ||||
(a) for the Eco programme
(b) Amendments to these points shall not be considered relevant for the purposes of Article 4(4) of Regulation (EU) 2017/1369.
(c) If the product database automatically generates the final content of this cell, the supplier must not enter this data.
(1) Commission Regulation (EU) 2019/2022 of 1 October 2019 laying down eco-design requirements for household dishwashers pursuant to Directive 2009/125/EC of the European Parliament and of the Council amending Commission Regulation (EC) No 1275/2008 and repealing Commission Regulation (EU) No 1016/2010 (see page 267 of this Official Journal).
TABLE DES MATIÈRES
3 CONSIGNES DE SECURITE
6 PRÉSENTATION DU PRODUIT
7 UTILISATION DE VOTRE LAVE-VAISSELL
WATERTOEVOER EN -AFVOER
INNEHÄLLSFÖRTECKNING
3 SAKERHETSHÄNVISNINGAR
6 PRODUKTÖVERSIKT
7 ANVÄNDNING AV DISKMASKINEN
7 Fylla pa salt i vattenavhardsaren
9 Vattenavhardsare