
GDMC520K - Other computer accessories SONY - Free user manual and instructions
Find the device manual for free GDMC520K SONY in PDF.
| Product Type | Color Reference Monitor (Artisan™ Color Reference System) |
| Brand | Sony |
| Model | GDM-C520K |
| Dimensions (W x H x D) | Approx. 497 x 499 x 487 mm |
| Weight (monitor only) | Approx. 30.5 kg |
| Power Supply | 100-240 V ~ 50-60 Hz, 2.0-1.0 A |
| Operating Temperature | 10°C to 35°C |
| Connectivity | HD15 port, USB port |
| Main Functions | Automatic calibration with Artisan sensor, colorimetric modes (Print RGB D50, Print RGB D65, Web RGB sRGB), Professional mode |
| Included Accessories | Power cord, Artisan™ signal cable, Artisan™ sensor with protective case, screen protector, Artisan™ System CD, quick setup guide, warranty card |
| Maintenance and Cleaning | Disconnect before cleaning; use a damp cloth for the exterior |
| Safety | Do not block ventilation openings, avoid water, do not insert metal objects, refer opening to qualified technician |
| Spare Parts and Repairability | Contact an authorized dealer or Sony (http://www.sony.com/displays/support, phone 1-866-256-9392) |
| General Information | Manual available in French, English, Spanish, and other languages upon request |
Frequently Asked Questions - GDMC520K SONY
User questions about GDMC520K SONY
0 question about this device. Answer the ones you know or ask your own.
Ask a new question about this device
Download the instructions for your Other computer accessories in PDF format for free! Find your manual GDMC520K - SONY and take your electronic device back in hand. On this page are published all the documents necessary for the use of your device. GDMC520K by SONY.
USER MANUAL GDMC520K SONY
Artisan™ Color Reference System
Quick Setup Guide US
Observe the following safety instructions when connecting and using your display:
☐ Be sure that your display is electrically rated to operate with the AC power available in your location.
☐Locate your display near an easily accessible electrical outlet.
Place your display on a solid surface and treat it carefully. The screen can be damaged if dropped, sharply hit, or touched with a sharp or abrasive implement.
Place your display in a cool location with low humidity and a minimum of dust.
☐ Do not use your display if the power cable has been damaged. Do not allow anything to rest on the power cable, and keep the cable away from where people can trip over it.
☐ Do not insert anything metallic into the display openings. Doing so may cause electric shock.
To avoid electric shock, do not touch the inside of the display. Only a qualified technician should open the display's case.
Hold the plug, not the cable, when disconnecting the display from an electrical outlet.
Openings in the display cabinet are provided for ventilation. To prevent overheating, these openings should not be blocked or covered. Also, avoid using the display on a bed, sofa, rug, or other soft surface. Doing so may block the ventilation openings on the bottom of the cabinet. If you put the display in a bookcase or other enclosed space, be sure to provide adequate ventilation.
☐ Do not expose the display to rain or use it near water. If the display accidentally gets wet, unplug it and contact an authorized dealer immediately. You can clean the exterior of the display with a damp cloth when necessary, but be sure to unplug the display first.
☐ If your display does not operate normally in particular, if there are any unusual sounds or smells coming from it unplug the display immediately and contact an authorized dealer or service center.
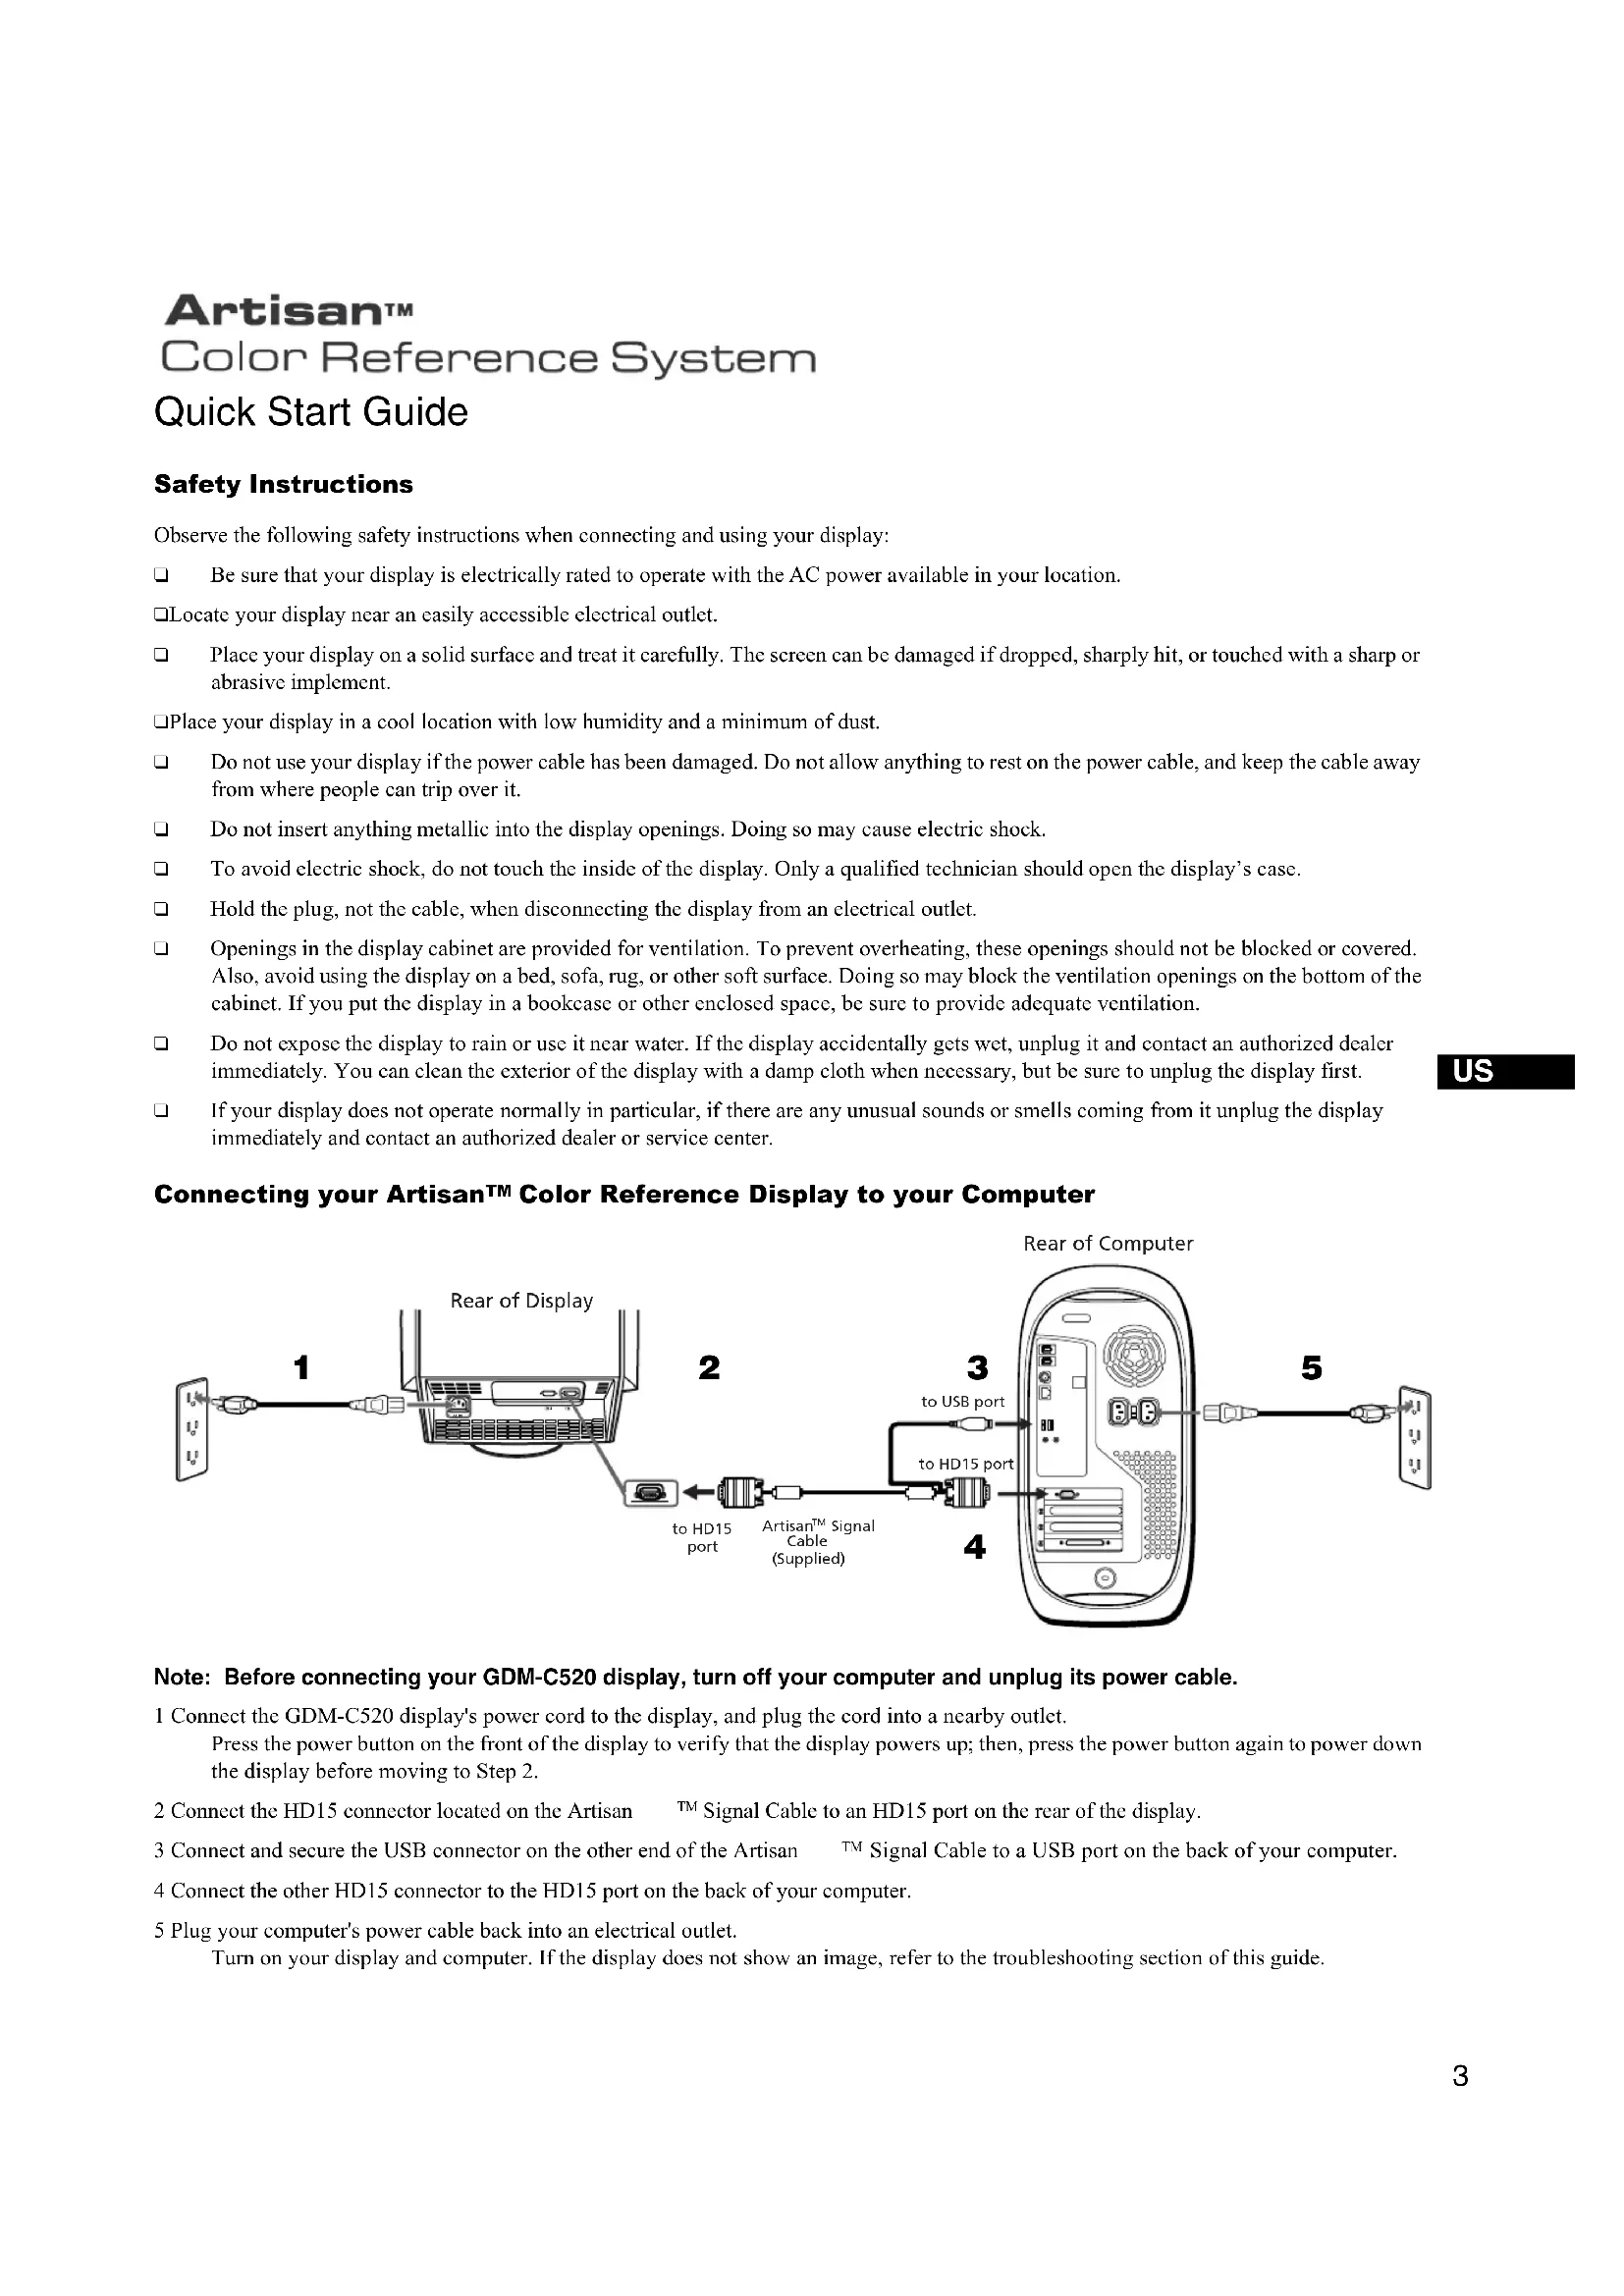
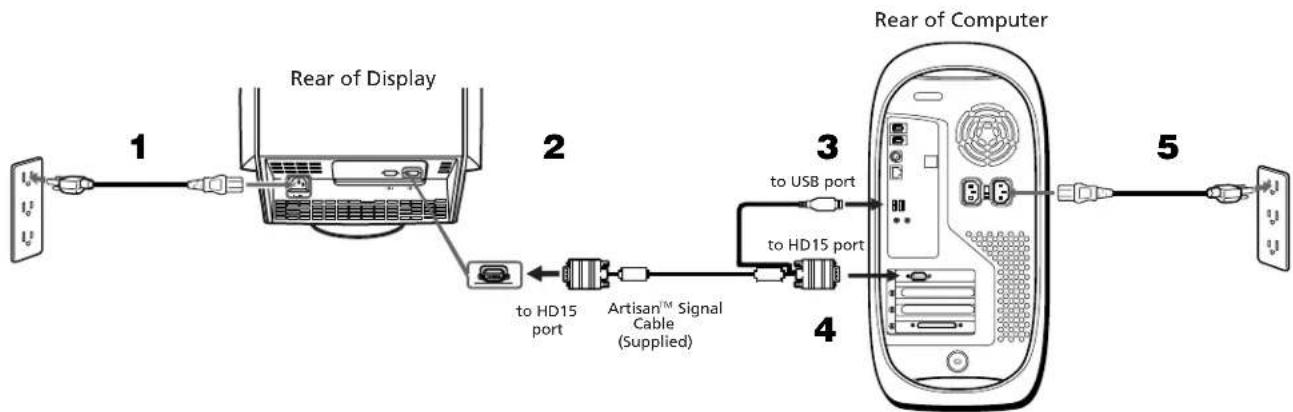
Connecting your Artisan™ Color Reference Display to your Computer
flowchart
graph LR
    A["Monitor"] -->|1| B["Rear of Display"]
    B --> C["to HD15 port"]
    C --> D["Artisan™ Signal Cable (Supplied)"]
    D --> E["to HD15 port"]
    E --> F["Rear of Computer"]
    F --> G["USB port"]
    F --> H["Computer"]
Note: Before connecting your GDM-C520 display, turn off your computer and unplug its power cable.
1 Connect the GDM-C520 display's power cord to the display, and plug the cord into a nearby outlet. Press the power button on the front of the display to verify that the display powers up; then, press the power button again to power down the display before moving to Step 2.
2 Connect the HD15 connector located on the Artisan ^TM Signal Cable to an HD15 port on the rear of the display.
3 Connect and secure the USB connector on the other end of the Artisan TM Signal Cable to a USB port on the back of your computer.
4 Connect the other HD15 connector to the HD15 port on the back of your computer.
5 Plug your computer's power cable back into an electrical outlet. Turn on your display and computer. If the display does not show an image, refer to the troubleshooting section of this guide.
Connecting the Artisan™ Sensor to your Computer

1 Connect the USB end of the Artisan ^TM Sensor to an open USB port on your computer, or connect it through a peripheral device such as a keyboard or USB hub. Note: Make sure that the sensor can be placed easily over the center of your display screen, without stretching the sensor's cord.
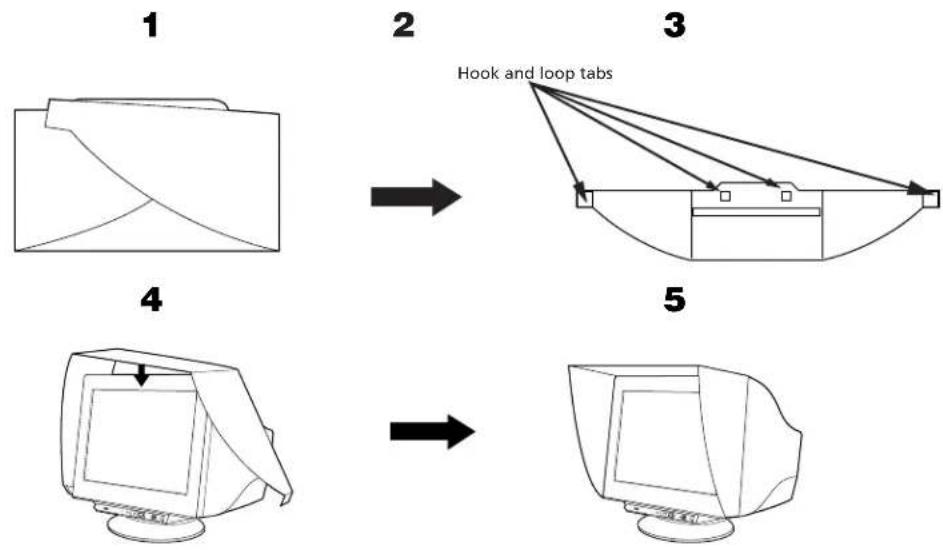
Attaching the Display Hood to your GDM-C520 Display
flowchart
graph TD
    A["1: File with Folder"] --> B["2: Hook and loop tabs"]
    B --> C["3: Display with Tab"]
    C --> D["4: Display with Tablet"]
    D --> E["5: Computer monitor with Panel"]
1 Unfold the hood.
2 Attach the hook and loop tabs to the underside of the display hood, as shown above.
3 Remove the liners protecting the adhesive on each hook and loop tab.
4 Wrap the hood around the display. Make sure that the hood is evenly aligned.
5 Fold the adhesive tabs inward the display, pressing firmly to ensure proper adhesion of the tabs to the underside of the display.
Troubleshooting Tips
Display Has No Power
If the display power indicator is off and no image appears on the display, check the following:
☐ Ensure that the power cable is fully inserted into both the display's power port and a working electrical outlet.
☐ Test the electrical outlet by plugging in a working electrical device, such as a lamp.
☐Press the power button, hold down, and wait for the power indicator to light.
☐ Try another power cable on the display. Use the computer's power cable and turn on the display with the signal cable disconnected. If the display is working correctly, a self-test pattern appears.
No Image Is Shown on the Display
If the display power indicator is on but no image appears on the display, check the following:
☐ Ensure that the video connector is seated properly. Tighten the connector screws securely with your fingers.
☐Ensure that the computer is on.
□Increase contrast and brightness controls.
☐Turn off the display and unplug the Artisan ™ Signal Cable. Check the cable connector for bent or broken pins.
☐ With the signal cable still disconnected, turn on the display. If the display is working correctly, a self-test pattern appears.
☐Perform a display reset or recall.
Installing the Artisan™ Software
Macintosh
1 Locate and insert the Artisan ^TM CD into your computer's CD-ROM drive.
2 Double-click on the Artisan ™ icon that appears on your computer's desktop.
3 Double-click on the "Artisan TM Installer" icon.
4 Follow the screen prompts for software installation.
5 Restart your computer.
Windows
1 Before installing the software, disconnect the USB connection between the Artisan ^TM Signal Cable and the display. Also, disconnect the Artisan ^TM Sensor's USB connection. If this is not done, the software will not install correctly.
2 Locate and insert the Artisan ^TM CD into your computer's CD-ROM drive.
3 Click on the "My Computer" icon located on your desktop.
4 Locate and double-click on the CD-ROM icon. Then, locate and double-click on the "Setup" icon for the language of your choice.
5 Follow the screen prompts for software installation.
6 Reconnect the Artisan ^TM Signal Cable's USB connector and the Artisan ^TM Sensor's USB connector to your computer.
7 Follow the on-screen prompts to install the drivers for the signal cable and sensor.
Note: If prompted for the location of the Artisan drivers, use Windows' "Browse" function to open the CD-ROM drive in which the Artisan CD is located.
8 Restart your computer.
Calibrating Your Artisan™ System
Preparing Your System for Calibration
1 Make sure that your color settings are set to "millions" or at least 16-bit color.
2 Make sure your display is set to "Professional" mode. To do this, press the "Picture Effect" button on the front of your GDM-C520 display until the on-screen display shows the text "Professional".
3 Warm your display up by leaving the display on and displaying a relatively bright screen (over 50% white) for at least an hour before calibration.
4 Make sure that the Artisan ^TM Sensor is connected to one of your computer's USB ports.
5 Lower the light in the room to under 64 lux. Ideally, the ambient light level should be approximately 16 lux.
Calibrating Your System
1 Double-click on the Artisan ™ icon to start the application. The main screen will appear.
2 Choose a target colorspace from the "Target Colorspace" dropdown menu. Choose from the following three options:
Print RGB D50: Standard colorspace for U.S. prepress and printing professionals.
Print RGB D65: Standard colorspace for European prepress and printing professionals.
Web RGB (sRGB): Standard colorspace for output limited to computer displays, TV, and video.
3 Click the "Calibrate" button.
4 Center the Artisan ^TM Sensor over the target in the middle of the screen, using the hash marks on the screen and sensor to guide this process.
5 Click the "Start" button. Your system will take approximately 10 minutes to fully calibrate.
6 When the calibration is done, a "Calibration Complete" message will appear. Remove the sensor.
7 The new calibration is now active, and is displayed under the "Calibration Data" dropdown menu on the main screen.
Quick Specifications
| AC input voltage/current 100 – 240 V ~ 50 – 60Hz, 2.0 – 1.0 A | |
| Operating Temperature 10°C – 35°C | |
| Dimensions Approx. 19 5/8” x 19 3/4” x 19 1/4” | (497 x 499 x 487 mm) |
| Weight (display only) Approx. 67.1lbs (30.5kg) | |
| Other accessory items in the package GDM-C520 Display | |
| Powercord | |
| ArtisanTM Signal Cable | |
| ArtisanTM Sensor and protective case | |
| Display Hood | |
| ArtisanTM System CD | |
| Quick Setup Guide | |
| Warranty card | |
If you need additional assistance in setting up your display or calibrating your system, please refer to the user's manual, located on your Artisan™ Color Reference System CD. If you still require aid, you can reach Sony at http://www.sony.com/displays/support, or by phone at 1-866-256-9392.
Artisan™
Color Reference System
flowchart
graph TD
    A["1: File Orientation"] --> B["2: Pestañas de enganche"]
    B --> C["3: Computer Screen with Connection"]
    C --> D["4: Computer Display"]
    D --> E["5: Computer Screen with Connection"]
1 Despliegue la visera.

- Artisan™ Color Reference System
- Connecting your Artisan™ Color Reference Display to your Computer
- Note: Before connecting your GDM-C520 display, turn off your computer and unplug its power cable.
- Connecting the Artisan™ Sensor to your Computer
- Attaching the Display Hood to your GDM-C520 Display
- Troubleshooting Tips
- Display Has No Power
- No Image Is Shown on the Display
- Installing the Artisan™ Software
- Macintosh
- Windows
- Note: If prompted for the location of the Artisan drivers, use Windows' "Browse" function to open the CD-ROM drive in which the Artisan CD is located.
- Calibrating Your Artisan™ System
- Preparing Your System for Calibration
- Calibrating Your System
- Artisan™
- Color Reference System
Brand : SONY
Model : GDMC520K
Category : Other computer accessories