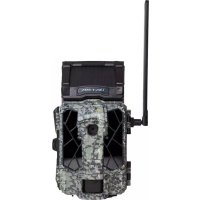
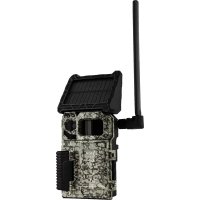
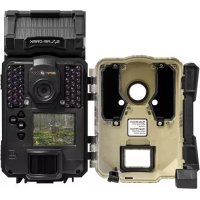
LinkMicroLTE - Camera Spypoint - Free user manual and instructions
Find the device manual for free LinkMicroLTE Spypoint in PDF.

| Product type | Cellular trail camera |
| Brand | Spypoint |
| Model | LinkMicroLTE |
| Power supply | 8 AA alkaline or lithium batteries (recommended: LIT-10 rechargeable battery pack, sold separately) |
| Battery type | AA alkaline or lithium batteries (do not use rechargeable AA batteries) |
| Memory card capacity | Class 10 microSD card, 2 to 32 GB (sold separately) |
| Cellular network | LTE bands 800/850/900/1900/2100 MHz with pre-activated SIM card included |
| Antenna | Adjustable antenna with removable mount |
| Operating period | Programmable by day of the week (continuous if start and end set to 12 h) |
| Trigger delay | Adjustable |
| Multi-shot mode | Up to 2 photos per detection with 5-second interval |
| Detection sensitivity | Adjustable |
| Transfer frequency | Adjustable (default: every 4 hours) |
| First transfer time | Adjustable |
| Activation | Via the Spypoint app (iOS/Android) or the Spypoint website |
| Transmission plan | Subscription required (see www.spypoint.com/en/experience-spypoint/plans) |
| Mounting | By installation strap or standard 1/4\"-20 tripod |
| Charging port | 12V jack for external power supply |
| Anti-theft cable port | Opening for padlock cable |
| Dimensions | Not specified in the manual (estimate: about 15 x 10 x 8 cm) |
| Weight | Not specified (estimate: about 400 g without batteries) |
| Warranty | 2 years (\"You Are Covered\" warranty) |
| Compliance | FCC Part 15 |
| Disposal | Mandatory recycling at a WEEE center |
Frequently Asked Questions - LinkMicroLTE Spypoint
User questions about LinkMicroLTE Spypoint
0 question about this device. Answer the ones you know or ask your own.
Ask a new question about this device
Download the instructions for your Camera in PDF format for free! Find your manual LinkMicroLTE - Spypoint and take your electronic device back in hand. On this page are published all the documents necessary for the use of your device. LinkMicroLTE by Spypoint.
USER MANUAL LinkMicroLTE Spypoint
1x LINK-MICRO-LTE camera
1x SIM card (preactivated and inserted in the camera)
1x Antenna holder
1x Installation strap
1x Quick Start Guide
NOTE
Memory card and batteries are sold separately.
User Manual, latest firmware, and FAQ available at: www.spypoint.com/support.
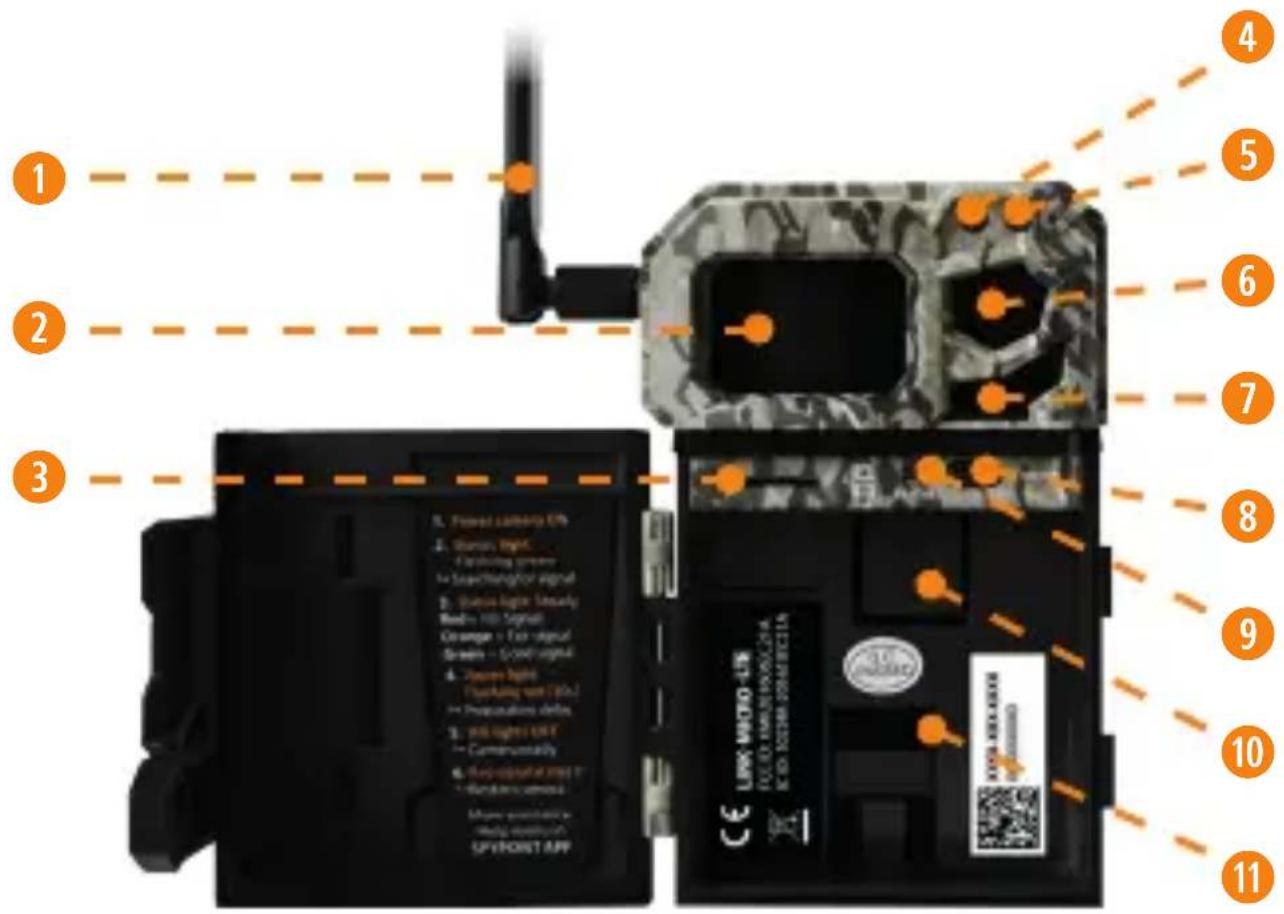
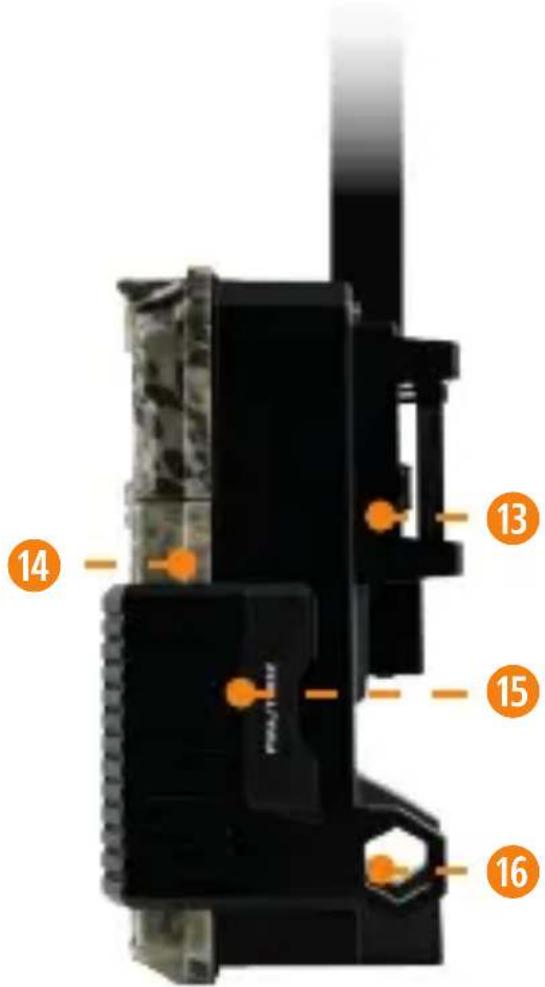
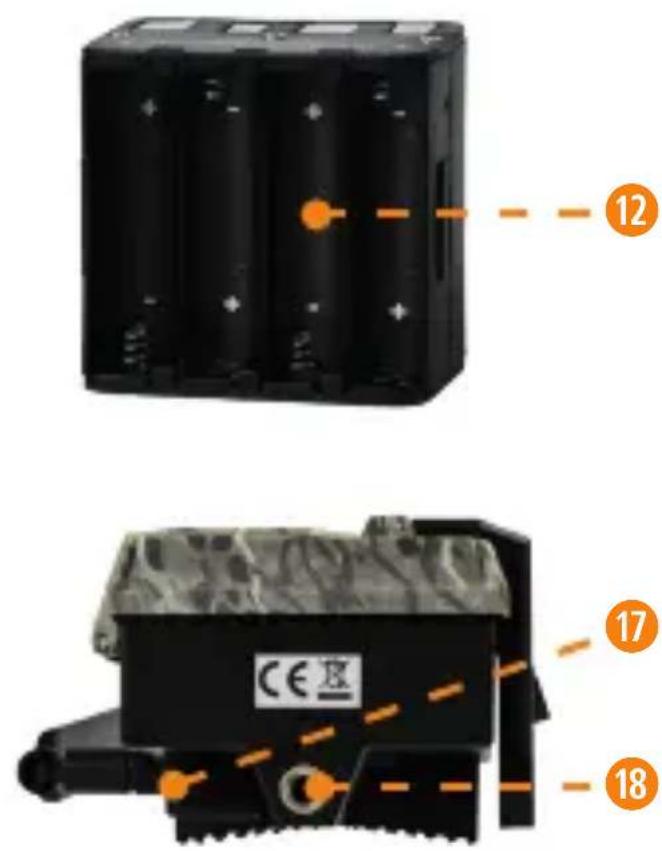
COMPONENTS
1 Antenna
2 Detection lens
3 MicroSD card slot
4 Light sensor
5 Delay light
6 Photo lens
7 LED
OFF/ON switch
9 STATUS light
10 SIM card slot
11 Battery compartment
12 Battery holder
13 Slot for installation strap
14 Door
15 Locking latch
16 Cable lock hole
17 12Vjack
18 Screw-thread for standard 14 -20 tripod mount
ENGLISH
GETTING STARTED
CHOOSING A POWER SOURCE (3 OPTIONS)
- Alkaline or lithium AA batteries
- Rechargeable battery 12 V (#KIT-12V sold separately)
- Rechargeable battery pack 3,7 V (#LIT-10 sold separately)
NOTE
We recommend using the SPYPOINT #LIT-10 rechargeable lithium battery pack, sold separately.
FOR BEST RESULTS AND NO LEAKAGE
- Use only new alkaline or lithium batteries.
- Do not mix new and old batteries.
- Do not use rechargeable AA batteries (their lower voltage can generate operational issues).
HOW TO INSTALL AA BATTERIES PROPERLY
- Unlock the latch and open the LINK-MICRO-LTE door.
- Remove the battery compartment by grasping it by the 2 small notches on the side and pulling it out (see photo).
- Insert the AA batteries into the battery holder following polarity (+) and (-) indications.
- Place the battery holder back into the battery compartment.

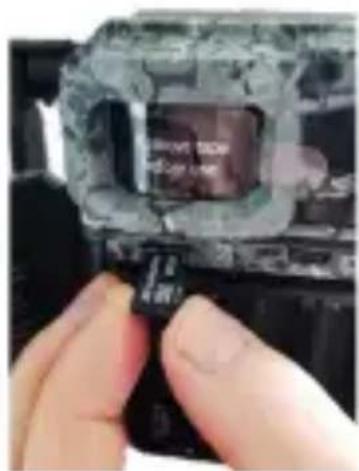
INSTALLING A MICROSD CARD
The memory card is sold separately. You must first purchase a class 10 microSD card between 2 GB and 32 GB of memory.
Before inserting the microSD card into your camera, it must be formatted to ensure proper operations. Visit www.spypoint.com/support if you need help to format your microSD card.
INSERTING YOUR MICROSD CARD
- Make sure the camera is turned OFF.
- Find the microSD card slot. It is located on the left, above the battery compartment (see photo).
- Insert a microSD card (up to 32 GB) in the microSD card slot with the metal contacts facing down.
- The card is inserted correctly when a click is heard.
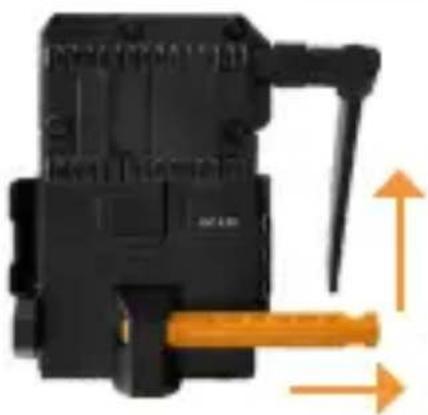
CLEAR THE ANTENNA
The camera comes with an antenna mount that holds and protects the antenna during shipping. You have to remove it. This will allow you to move and point your antenna in the desired direction. Save and reuse the mount to protect your antenna during future trips.
ACTIVATE YOUR CAMERA

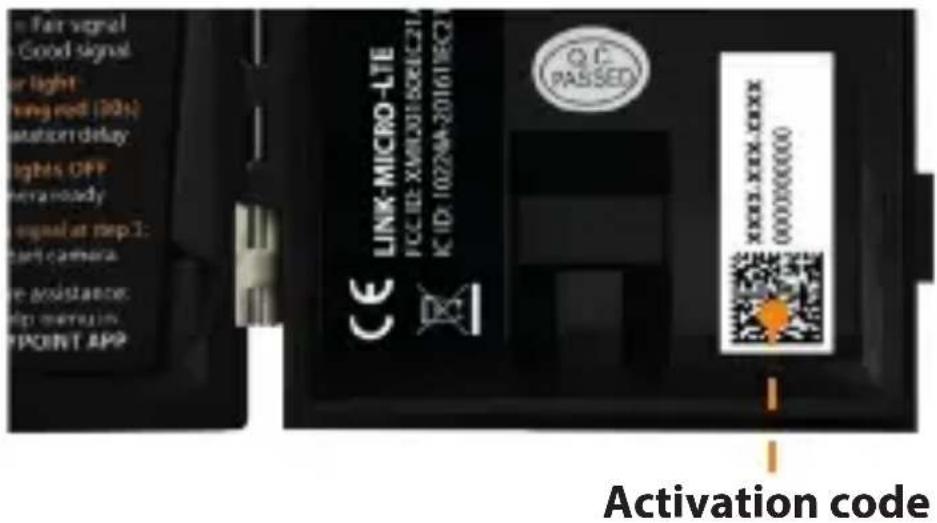
Before you can use your camera, you have to activate it. To do so, you will need your activation code.
FINDING THE ACTIVATION CODE
The activation code is located inside the LINK-MICRO-LTE's battery compartment.
To activate your camera, you have two choices: you can either do it via the SPYPOINT app or via our website www.spypoint.com.
SPYPOINT APP
If you choose to use the SPYPOINT app to activate your device, follow these steps:
- On Google Play™ or the App Store™, search for "SPYPOINT".
- Download and install the app on your smartphone or tablet.
- Start the app. Select "ACTIVATE A DEVICE". In the list, select "LINK-MICRO-LTE" then follow the steps to create an account.
- When complete, a confirmation email with instructions on how to finalize the creation of your account will be sent to you.
- Log in to the SPYPOINT app using your email address and password.

SPYPOINT.COM WEBSITE
If you choose to use our SPYPOINT website to activate your device, follow these steps:
- On the www.spypoint.com website, select "LOGIN" in the top navigation menu. On the displayed "SPYPPOINT" page, select "REGISTER", fill out the required fields, then log in.
- Select the + sign on the far right of the page; in the list, select "LINK-MICRO-LTE" then follow the steps.
- When complete, a confirmation email with instructions on how to finalize the creation of your account will be sent to you.
- On the SPYPOINT website, log in to your account using your email address and password.
CHOOSING A PHOTO TRANSMISSION PLAN FOR YOUR CAMERA
Go to www.spypoint.com/en/spypoint-experience/plans to read the latest offers and choose the plan that suits you.
CONFIGURING YOUR CAMERA
Both the SPYPOINT app and website let you configure all the camera settings remotely. They also provide basic information on your camera - such as: cellular signal strength, battery level, and microSD card space used. This information is based upon the latest connection with your camera.
New settings take effect every time the camera connects with app or website.
Note that for 15 minutes after the camera is turned ON, it will communicate with the server every time it takes a photo and will also apply the settings you have chosen. Afterwards, it will communicate according to the default settings (transfer frequency/ first transfer time) or those you chose to apply. Below are the most basic settings you will configure.
CONFIGURATION: MAIN SETTINGS
Delay: Allows you to set the time interval between each detection before the camera records the next photo or video.
Multi-shot: Allows you to set the number of photos per detection (up to 2) with a 5-second delay between each photo.
Sensitivity: Allows you to set the detection sensitivity of the camera.
Camera name: Allows you to name each owned camera.
CELLULAR SETUP
First transfer time: Allows you to choose the time when the camera makes its first transfer of the day.
Transfer frequency: Allows you to choose the number of daily transfers.
ADVANCED OPTIONS/CONFIGURATION
Schedule: Allows you to set the period of operation for each day of the week. For a 24-hour operation mode, both the start and stop times must be 12 AM.
NOTE
Camera transfers are set by default to 4-hour intervals determined from the time you activated your camera. For example, if your camera was activated at 1:42 p.m., the next transfer will take place at 5:42 p.m.
STARTING YOUR CAMERA
- Turn ON the camera.
- The green STATUS light will flash while searching for a signal (can take a few minutes).
- The STATUS light will light up in one of the following 3 colors:
Red: Insufficient signal
Orange:Acceptable signal
Green: Optimal signal
-
When the top right light flashes red, 30 seconds remain before the photo mode is turned ON. This allows you to leave the area without being photographed.
-
The camera is ready for use when all the lights turn OFF.
-
If the light is red during step 3, you should:
-
Turn your camera OFF and then back ON.
- Retry while pointing the antenna at different angles.
- Try moving it to a spot with better signal.
- Try our #CA-01 long range cellular antenna (sold separately), which could help improve signal strength.
INSTALLING YOUR CAMERA
- Mount the camera using the installation strap.
- The camera should be at the same height as the animal's mid-body.
- The targeted animal should be at 25 feet (7.5 meters) away from the camera.
- To produce brighter photos at night, there could be items reflecting the camera's flash in the background.
DISPOSAL
ONLY USE ORIGINAL SPARE PARTS AND ACCESSORIES.
If, one day, your camera has been used so intensively that it has to be replaced, or if you no longer have any use for it, you are obliged to dispose of it at a recycling center.
Information on return points for your electrical appliance can be obtained from your local waste disposal company or from your local administrative offices.
Electrical appliances not only contain valuable recyclable raw materials, but also substances which, if disposed of improperly, can affect public health and the environment. Help ensure that valuable raw materials are recycled by returning your old appliance to a central collection point.
The WEEE (Waste Electrical and Electronic Equipment Directive) symbol represents the obligation for the labeled camera to be sent to a separate center for the proper recycling of electrical and electronic equipment.

FREQUENCY
FREQUENCY RANGE:
800/850/900/1900/2100 MHz
MAXIMUM TRANSMISSION POWER:
FREQUENCY MAX.
GSM850 33 DBM ± 2 DB
EGSM900 33 DBM ± 2 DB
DCS1800 30 DBM ± 2 DB
PCS1900 30 DBM ±2 DB
GSM850 (8-PSK) 27 DBM ± 3 DB
EGSM900 (8-PSK) 27 DBM ± 3 DB
DCS1800 (8-PSK) 26 DBM ± 3 DB
PCS1900 (8-PSK) 26 DBM ± 3 DB
UMTS 2100 24 DBM + 1.7/-3.7 DB
UMTS 1900 24 DBM + 1.7/-3.7 DB
UMTS 900 24 DBM + 1.7/-3.7 DB
UMTS 850 24 DBM + 1.7/-3.7 DB
UMTS 800 24 DBM + 1.7/-3.7 DB

THIS DEVICE COMPLIES WITH PART 15 OF THE FCC RULES.
Operation is subject to the following two conditions:
- This device must not cause harmful interference.
- This device must accept any interference received, including interference that may cause undesired operation.
THANK YOU FOR CHOOSING
SPYPOINT
WARRANTY
Sit back and relax as this device is covered by the "Know you're covered" 2-year warranty. We strive to provide our customers with a positive experience and an outstanding service.
For a complete list of specifications, features, and settings, visit our LINK-MICRO-LTE page at www.spypoint.com
FAQ, User Manual & latest firmware available at www.spypoint.com/support
Live chat support at www.spypoint.com
Join the community


GUIDE DE DEMARRAGE RAPIDE LINK-MICRO-LTE ET COMPARABLES*
DANS LA BOITE
CHOISIR UNE SOURCE D'ALIMENTATION [3 OPTIONS]
- Piles AA alcalines ou au lithium
- Pile rechargeable 12 V (#KIT-12V vendue séparément)
- Pile rechargeable 3,7 V (#LIT-10 vendue séparément)
NOTE
COMMENT INSTALLER DES PILES AA CORRECTEMENT
DZIEKUJE CI DLA WYBORU
SPYPOINT
GWARANCJA
NAJLEPSIE VYSLEDKY A ZIADNE UNIKY
- Používajte iba nové litiove alebo alkalické batérié.
Nemiesajte nové a staré batérié. - Nepoužívajte nabíjatelné batérié (ich nízke napàtie moze spósobit prévádkové problémy).
AKO SPRÁVNE VLOZIT AA BATÉRIE
NAJDETE AKTIVACNY KOD
CONFIGURAR SU CÁMARA
INSTALANDO SU CÁMARA
EU DECLARATION OF CONFORMITY (NO.SPO160)
Product Description: LINK-MICRO-LTE Camera
Manufacturer: SPYPOINT
Address: 330 de la Jacques-Cartier
Victoriaville, Qc Canada
G6T 1Y3
This declaration of conformity is issued under the sole responsibility of the manufacturer.
The object of the declaration described above is in conformity with the relevant Community harmonisation legislation:
2014/53/EU The Radio Equipment Directive (RED)
2011/65/EU The restriction of the use of certain hazardous substances
Directive (ROHS)
(EU)2015/863
References to the relevant harmonised standards used or references to the specifications in relation to which conformity is declared:
EMC:
EN 301 489-52 V1.1.0 (2016-11)
EN 301 489-3 V2.1.1 (2017-03)
EN 301 489-1 V2.2.0 (2017-03)
ROHS:
IEC 62321-2:2013
IEC 62321-3-1:2013
IEC 62321-5:2013
IEC 62321-4:2013+AMD1:2017
IEC 62321-7-1:2015
IEC 62321-7-2:2017
IEC 62321-6:2015
IEC 62321-8:2017
SAFETY:
EN 60950-1:2006+A11:2009+A1:2010+A12:2011+A2:2013 EN 62311:2008
RADIO:
EN 300 440 V2.1.1 (2017-03)
EN 301 511 V12.5.1 (2017-03)
EN 301 908-1 V11.1.1 (2016-07)
EN 301 908-2 V11.1.1 (2016-07)

Additional information:
The product carries the
CE Mark.
Signed for and on behalf of:
SPYPOINT
Place of issue: Victoriaville
Date of issue: April 1 st,2020
Name and position: Yan Gagnon, CEO
Signature: