LinkMicroSLTE - Camera Spypoint - Free user manual and instructions
Find the device manual for free LinkMicroSLTE Spypoint in PDF.

| Brand | Spypoint |
| Model | LinkMicroSLTE |
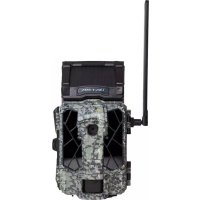
| Product type | Cellular trail camera |
| Main power supply | LIT-10 lithium battery pack (3.7V, 10200 mAh), rechargeable via USB |
| Secondary power supply | Integrated solar panel (trickle charge) and external 12V battery (BATT-12V, sold separately) |
| Battery pack charging time | Approximately 12 hours with USB cable |
| Operating temperature | -30°C to +50°C |
| Storage temperature | -40°C to +60°C |
| Memory card | MicroSD up to 32 GB (sold separately) |
| Cellular network | Quad-band 800/850/900/1900/2100 MHz, pre-activated SIM card included |
| Connectivity | Photo transfer via cellular network, remote setup via Spypoint app or website |
| Main features | Motion detection, day and night photos (infrared), multi-shot (up to 2 per detection), adjustable delay, adjustable sensitivity |
| Installation | Installation strap included, recommended height: center of animal's body, ideal distance: 7.5 meters |
| STATUS indicator light | Green (optimal signal), orange (acceptable), red (insufficient) |
| Activation | Via Spypoint app (Google Play or App Store) or Spypoint.com, activation code in battery compartment |
| Transmission plan | To be selected on Spypoint.com or via the app |
| Warranty | 2 years "You are covered" |
| Spare parts and accessories | LIT-10 battery pack, CA-01 long-range antenna, BATT-12V external 12V battery (sold separately) |
| Maintenance | Format MicroSD card on computer before use (quick format enabled) |
| Recycling | Do not dispose of with household waste, take to a WEEE collection center |
Frequently Asked Questions - LinkMicroSLTE Spypoint
User questions about LinkMicroSLTE Spypoint
0 question about this device. Answer the ones you know or ask your own.
Ask a new question about this device
Download the instructions for your Camera in PDF format for free! Find your manual LinkMicroSLTE - Spypoint and take your electronic device back in hand. On this page are published all the documents necessary for the use of your device. LinkMicroSLTE by Spypoint.
USER MANUAL LinkMicroSLTE Spypoint
1x LINK-MICRO-S-LTE camera
1x Antenna holder
1x Installation strap
1x Quick start guide
1x SIM card that is preactivated and inserted in the camera
1x USB Micro USB cable
1x LIT-10 lithium battery pack
NOTE: MicroSD memory card is sold separately.
User manual, latest firmware, and FAQ available at: SPYPOINT.COM/SUPPORT
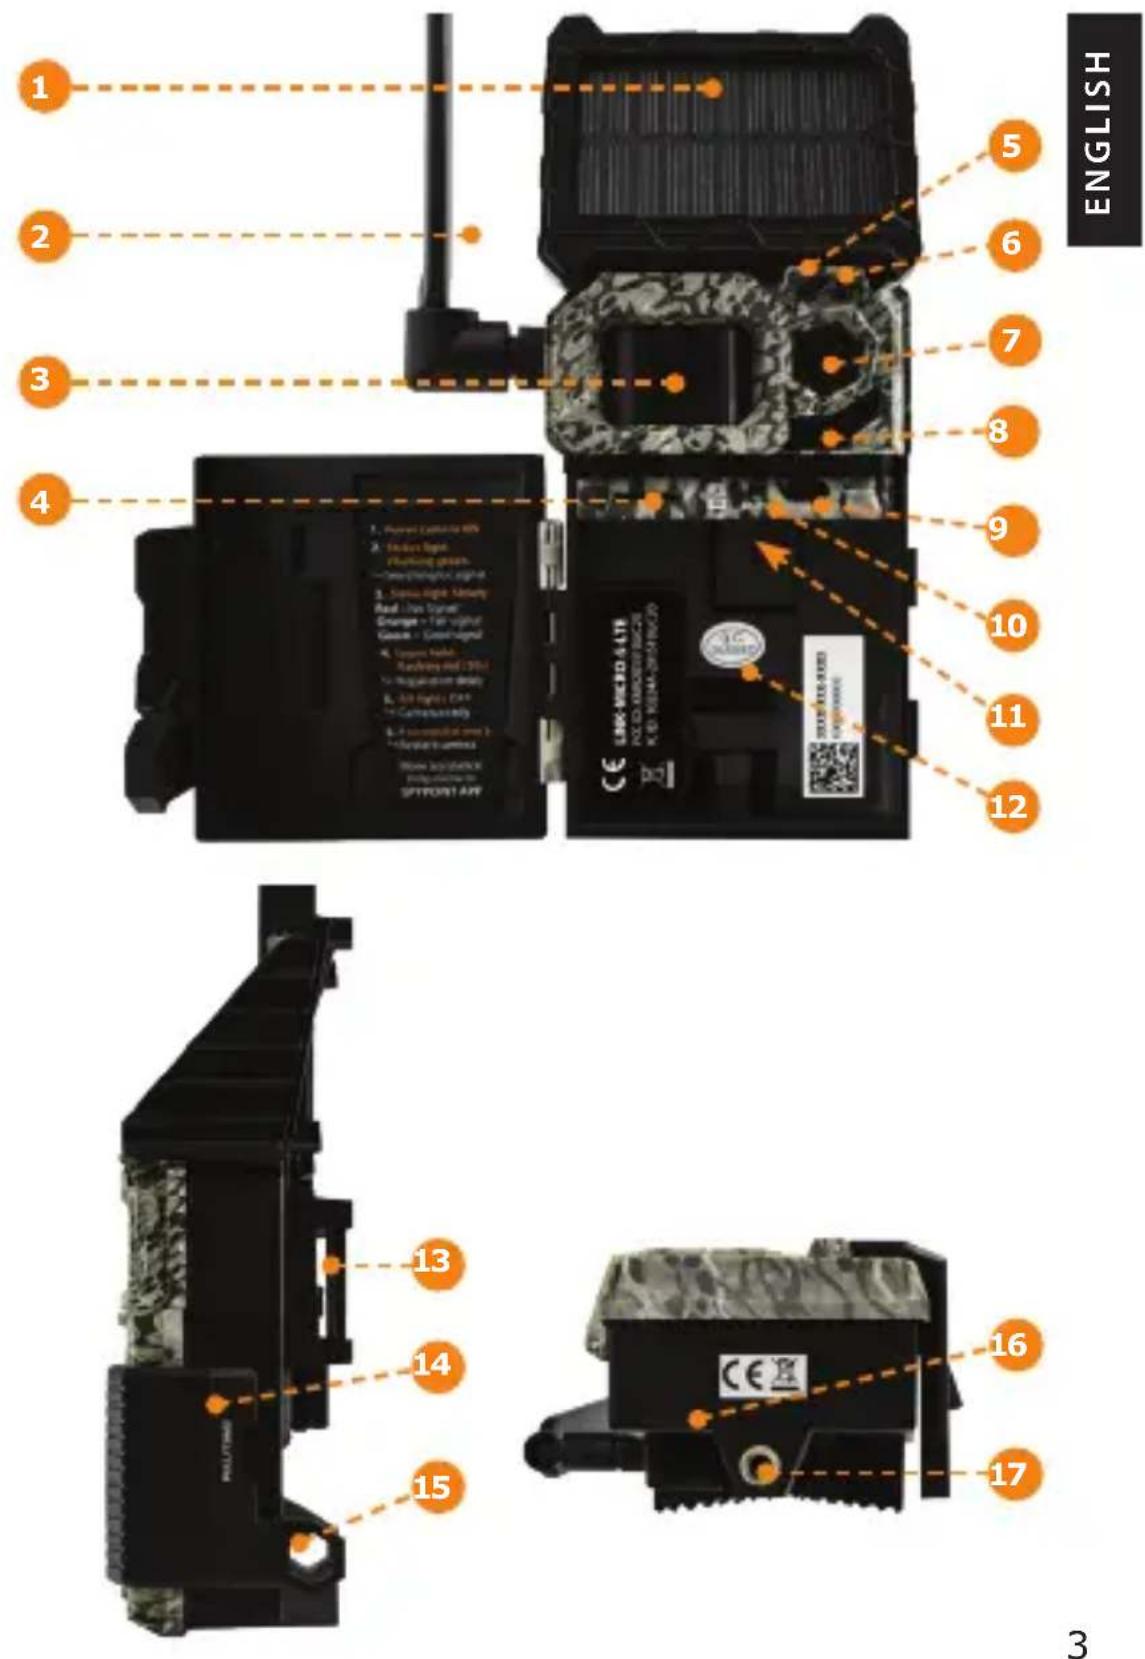
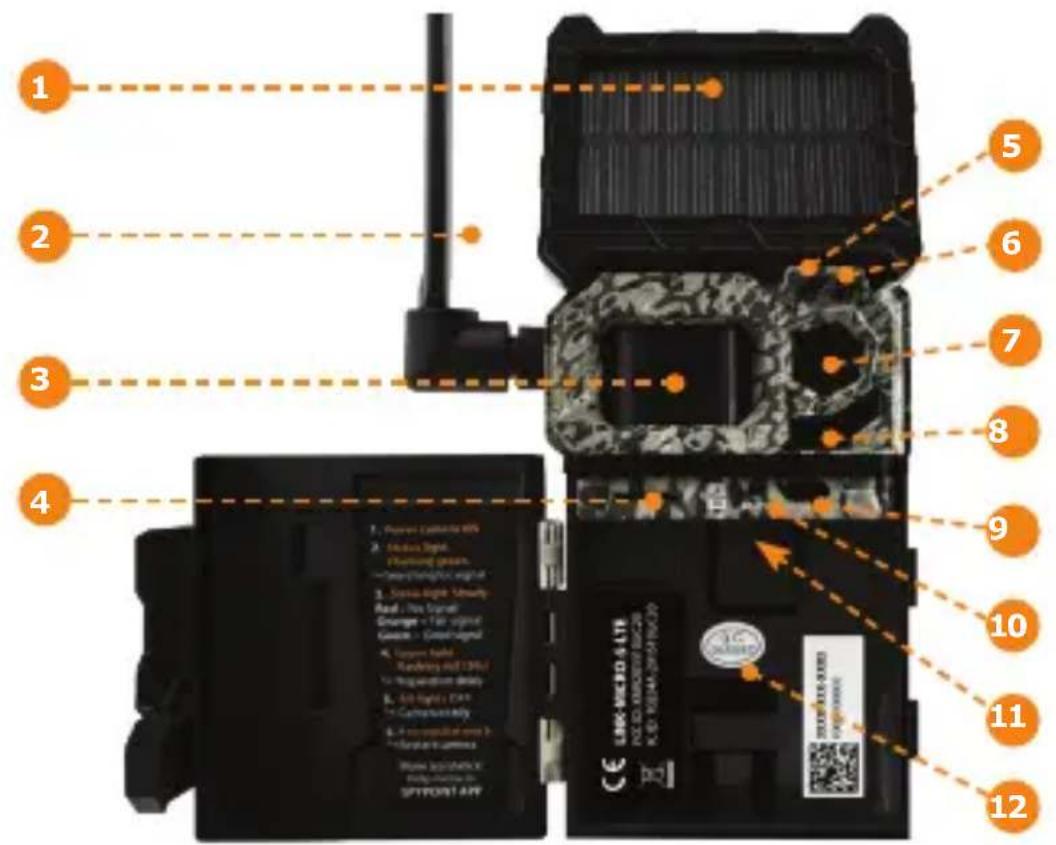
COMPONENTS
Solar panel
2 Antenna
3 Detection lens
4 MicroSD card slot
Light sensor
6 Delay light
7 Photo lens
8 LED
9 ON/OFF switch
10 "STATUS" light
SIM card slot
12 Battery compartment
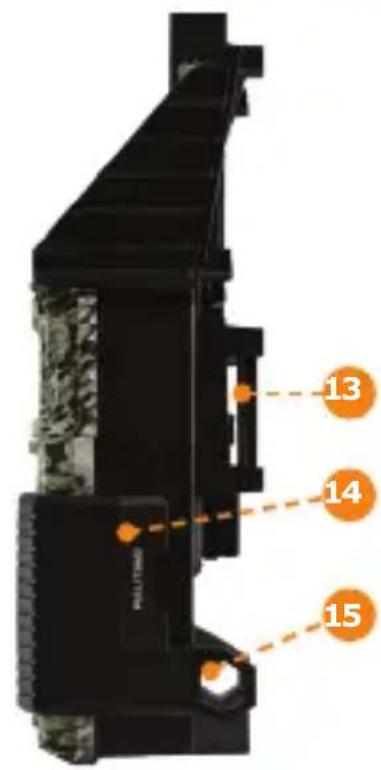
13 Slot for installation strap
14 Locking latch
15 Cable lock hole
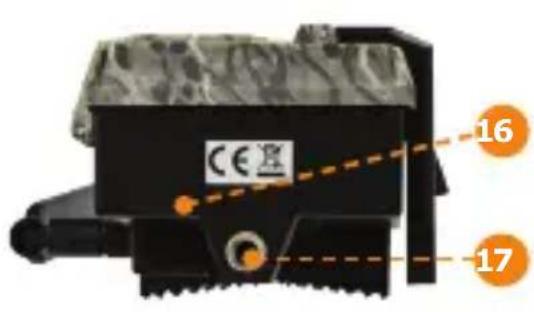
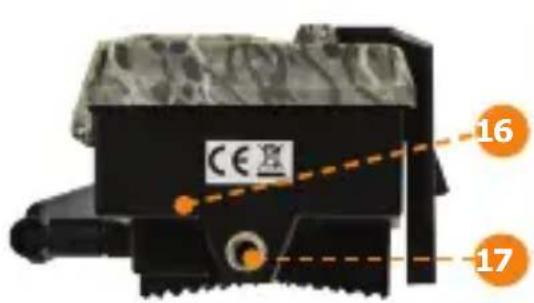
16 12V jack
17 Standard 1 / 4 -20 tripod mount
HSITDNNE
GETTING STARTED
CHARGING THE LITHIUM BATTERY
- Remove the lithium battery pack from the camera.
- Using the Micro USB cable, recharge the battery pack for about 12 hours.
- Once the lithium pack is fully charged, the red light will turn green.

Do not insert AA batteries into the lithium battery compartment, as this could damage the camera.
HOW YOUR CAMERA USES SEVERAL POWER SOURCES
-
The main power source of your camera is the lithium battery pack (#LIT-10 included), which provides a long charge time, more than double that of AA batteries.
-
The solar panel is designed to maintain the battery pack's charge. The camera will be energy self-sufficient under ideal conditions (an adequate configuration, i.e. low power consumption and a sunny environment).
- When the battery pack charge level becomes insufficient, the camera will turn off.
- The solar panel will continue to power the battery pack. However, for quick and complete recharging, connect the battery pack to a wall outlet using the supplied USB cable and a USB power adapter.
-
When you restart your camera, after recharging the battery pack, it will return to the settings you previously selected.
-
Moreover, the camera was designed to recognize and use a primary power source other than the lithium battery pack:
-
As soon as you plug an external 12V battery (#BATT-12V, sold separately) into your camera, it becomes your camera's new primary power source. The lithium battery pack will only be used once the 12V battery is depleted.
- Simply plug the 12V cable into the 12V jack of the camera and connect the other end to the 12V battery.
GETTING STARTED
USING AN EXTERNAL 12V BATTERY
- Using an external 12V battery source does not recharge the lithium battery pack.
- The solar panel will not recharge an external 12V battery.
FORMATTING YOUR MICROSD CARD
Before inserting the MicroSD card into your camera, it must be reformatted via a computer to ensure proper functionality.
Memory card is sold separately. Whether you choose to use a MicroSD card you previously used in another device or a brand new one you've just bought, its capacity must not exceed 32 GB and it must be reformatted. Do not use the "Quick format" option.
INSERTING A MICROSD CARD
- Ensure the camera is turned off.
- Insert a MicroSD memory card (up to 32 GB capacity) into the MicroSD card slot with the label facing up.
The card is inserted correctly when a click is heard.
LIT-10 BATTERY SPECIFICATIONS
This lithium battery is compatible with all SPYPOINT LINK-MICRO cameras and the CELL-LINK.
Charging time ≈ 12 hours (with USB cable)
Operating temperature (-30°C to +50°C) (-22°F to +122°F)
Storage temperature (-40^ to +60^) (-40^ to +140^)
Voltage 3.7 Volts
Capacity 10200mAh
HSITDN3
ACTIVATING YOUR CAMERA

You must activate your camera through the free SPYPOINT app or the SPYPOINT.COM website.
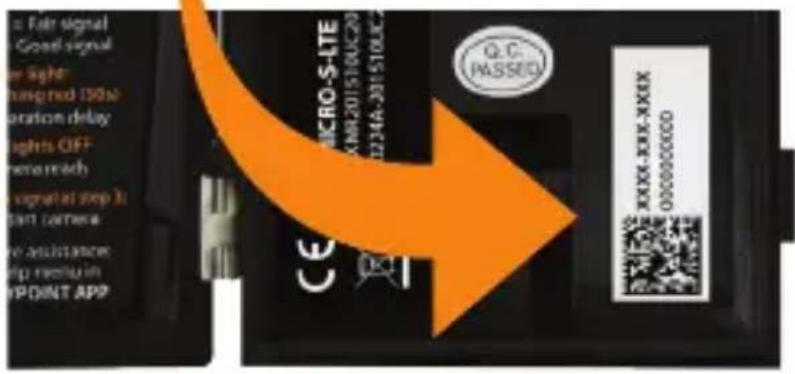
FINDING THE ACTIVATION CODE
The activation code is located inside the battery compartment. You will need this unique code to activate the LINK-MICRO-S-LTE.
SPYPOINT APP
Follow these steps:
- On Google Play™ or the App Store™, search for "SPYPOINT app".
- Download and install the app on your smartphone or tablet.
- Start the app. Select "ACTIVATE A DEVICE". In the list, select "LINK-MICRO-S-LTE" then follow the steps.
- When complete, a confirmation email with instructions on how to finalize the creation of your account will be sent to you.
- Log in to the SPYPOINT app using your email and password.
ACTIVATING YOUR CAMERA

SPYPOINT.COM website
Follow these steps:
- On the SPYPOINT.COM website, select "LOGIN" in the top navigation menu. On the displayed page, select "Register," fill out the required fields, then log in.
- Select the + sign on the far right of the page; in the list, select "LINK-MICRO-S-LTE" then follow the steps.
- When complete, a confirmation email with instructions on how to finalize the creation of your account will be sent to you.
- On the website, log in to your account using your email and password.
You can activate additional cameras
NOTE:
SPYPOINT app or website.
CHOOSING A PHOTO TRANSMISSION PLAN FOR YOUR CAMERA
Go to
https://www.spypoint.com/en/spypoint-experience/plans to read the latest offers and choose the plan that suits you.
HSITDNNE
CONFIGURING YOUR CAMERA
Both the SPYPOINT app and website let you configure all the camera settings remotely. They also provide basic information on your camera - such as: cellular signal strength, battery level, and MicroSD card space used. This information is based upon the latest connection with your camera.
New settings take elect every time the camera connects with app or website.
BASIC PHOTO SETTINGS
Delay: Allows you to set the time interval between each detection before the camera records the next photo or video.
Multishot: Allows you to set the number of photos per detection (up to 3) with a 5-second delay between each photo.
Sensitivity: Allows you to set the detection sensitivity of the camera.
Camera name: Allows you to name each owned camera.
CELLULAR SETUP
First transfer time: Allows you to choose the time when the camera makes its first transfer of the day.
Transfer frequency: Allows you to choose the number of daily transfers.
ADVANCED OPTIONS/CONFIGURATION
Schedule: Allows you to set the period of operation for each day of the week. For a 24-hour operation mode, both the start and stop times must be 12 AM
NOTE: Camera transfers are set by default to every 4 hours from midnight.
STARTING YOUR CAMERA
FIRST TIME SETUP
- Turn on the camera.
- The green "STATUS" light will flash while searching for a signal (can take a few minutes).
- The "STATUS" light will light up in one of the following 3 colors:
Red: Insufficient signal.
Orange: Acceptable signal.
Green: Optimal signal.
- When the top right light flashes red, 30 seconds remain before the photo mode is turned on. This allows you to leave the area without being photographed.
- The camera is ready for use when all the lights turn off.
-
If the light is red during step 3, you should:
-
Turn your camera off and then back on.
- Retry while pointing the antenna at different angles.
Try moving it to a spot with better signal.
Try our #CA-01 long-range cellular antenna (sold separately), which could help improve signal strength.
INSTALLING YOUR CAMERA

- Mount the camera using the installation strap.
- The camera should be at the same height as the animal's mid-body.
- The targeted animal should be at 25 feet/7.5 meters away from the camera.
- For brighter pictures at night, ensure you have elements in the background to reflect the IR flash.
HSITDNNE
DISPOSAL
ONLY USE ORIGINAL SPARE PARTS AND ACCESSORIES.
If one day your camera has been used so intensively that it has to be replaced, or if you no longer have any use for it, you are obliged to dispose of it at a recycling center.
Information on return points for your electrical appliance can be obtained from your local waste disposal company or from your local administrative offices.
Electrical appliances not only contain valuable recyclable raw materials, but also substances which, if disposed of improperly, can affect public health and the environment. Help ensure that valuable raw materials are recycled when you return your old appliance to a central collection point.
The WEEE (Waste Electrical and Electronic Equipment Directive) symbol represents the obligation that the labeled camera to be sent to a separate center for the proper recycling of electrical and electronic equipment.

FREQUENCY
FREQUENCY RANGE:
800/850/900/1900/2100MHz
MAXIMUM TRANSMISSION POWER:
FREQUENCY
GSM850
EGSM900
DCS1800
PCS1900
GSM850 (8-PSK)
EGSM900 (8-PSK)
DCS1800 (8-PSK)
PCS1900 (8-PSK)
UMTS 2100
UMTS 1900
UMTS 900
UMTS 850
UMTS800
MAX.
33DBM±2DB
33DBM±2DB
30DBM±2DB
30DBM±2DB
27DBM±3DB
27DBM±3DB
26DBM±3DB
26DBM±3DB
24DBM+1.7/-3.7DB
24DBM+1.7/-3.7DB
24DBM+1.7/-3.7DB
24DBM+1.7/-3.7DB
24DBM+1.7/-3.7DB
FCC
THIS DEVICE COMPLIES WITH PART 15 OF THE FCC RULES.

Operation is subject to the following two conditions:
- This device must not cause harmful interference.
- This device must accept any interference received, including interference that may cause undesired operation.
For a complete list of specifications, features, and settings, visit our LINK-MICRO-S-LTE page at
WWW.SPYPOINT.COM
THANK YOU FOR CHOOSING
firmwareavailableat:

FAQ, user manual & latest
SPYPOINT.COM/SUPPORT

Live chat support at www.spypoint.com

service@spypoint.com
JOIN THE COMMUNITY


Sit back and relax as this device is covered by the "Know you're covered" 2-year warranty. We strive to provide our customers with a positive experience and an outstanding service.

DANS LA BOITE
FRANÇAIS
service@spypoint.com
REJOIGNEZ LA COMMUNAUTÉ


https://www.spypoint.com/en/spypoint-experience/plans
service@spypoint.com
TRETE DER COMMUNITY BEI


support.spypoint.com
SKLADNIKI
service@spypoint.com
DOLACZ DO SPOLECZNOSCI


support.spypoint.com
KOMPONENTY
HDEZD
Jolárni panel
Antena
Detekni cocka
Sapot pro kartu microSD
Svetelny senzor
6pozdenesvetlo
Hoto cocka
8 LED
9acitko ON/OFF
ontrolkaSTATUS
Slot pro SIM kartu
Prihradka na baterie
13lot pro instalacni popruh
12lokovací zapadka
Gtvor pro kabelovy zamek
162V jack
Standardni drzak stativu 1 / 4 "20

PRIPRAVA
NABIJENI LITHIOVÉ BATERIE
Vvjmete lithiovou baterii z fotoaparatu.
- Pomoci kabelu Micro USB dobijte baterii asi 12 hodin.
- Jakmile je lithiove baleni plne nabite, Červene světlo se zmení na zelené.

service@spypoint.com
HDEZD
PRIPOJTE SE KE KOMUNITE


support.spypoint.com
SUCASTI
Solárny panel
2 Antena
Detekcnasosovka
lot pre kartu microSD
Svetelný senzor
6neskorené svetlo
7oto objektiv
8 LED
9lačidlo ON / OFF
ontrolkaSTATUS
Slot na SIM kartu
12riehradka na baterie
13lot pre instalačné páš
14lokovacia zepadka
1Stvor na zaistenie kábla
162 V jack
17 Štandardná montáž na
stativ 20 "20

eannnnnne
PRIPRAVA
NABIJANIE LITHIUM BATÉRIE
- Vyberte z Fotoaparatu litiovú bateriu.
- Pomocou kábla Micro USB nabite bateriu priblizne 12 hodín.
- Po uplnom nabiti litioveho balenia sa cervene svetlo zmeni na zelené.

Nevkladajte batérié AA do priestoru pre litiové batérié, mohlo by to poskodit'photoaparát.
AKO VÁŠ FOTOAPARÁT POUŽÍVA NIEKOLKO ZDROJOV NAPAJANIA
Operation is subject to the following two conditions:
- Toto zariadenie nesmie sposobovat skodlive ru Senie.
- Toto zariadenie musi akceptovat akekol'vek prijate ru Senie, vratane ru Senia, ktoré moze sposobit nezelanu prevadzku.

service@spypoint.com
PRIPOJTE SA KU KOMUNITE


support.spypoint.com
KOMPONENTIT
LIT-10 TEKNISET TIEDOT
service@spypoint.com
LIITY YHTEISÖN


CONFIGURAR SU CÁMARA
TONyds
INSTALANDO SU CÁMARA

service@spypoint.com
UNETE A LA COMMUNITAD


INCLUSONELLACONSEGNA
support.spypoint.com
COMPONENTI
First transfer time: Allows you to choose the time when the camera makes its first transfer of the day.
Transfer frequency: Allows you to choose the number of daily transfers.
service@spypoint.com
UNISCITI ALLA COMMUNITY