BP2203 - Drill BLAUPUNKT - Free user manual and instructions
Find the device manual for free BP2203 BLAUPUNKT in PDF.
| Product Type | Impact Drill |
| Brand | Blaupunkt |
| Model | BP2203 |
| Rated Power | 750 W |
| Power Supply Voltage | 230-240 V~ AC |
| No-load Speed | 0-2800 rpm |
| Impacts per Minute | 44,800 impacts/min |
| Chuck | 13 mm Keyed Chuck |
| Weight | 2.2 kg |
| Auxiliary Handle | Yes, removable and adjustable |
| Depth Stop | Yes, adjustable |
| Forward/Reverse | Yes, selector |
| Variable Speed | Yes, variable speed trigger |
| Lock-on | Yes, lock button |
| Mode Selector | Drilling / Impact |
| Required Personal Protective Equipment | Safety glasses, gloves, hearing protection, dust mask |
| Double Insulation | Yes |
| Warranty | 3 years against manufacturing defects |
| Intended Use | Domestic, drilling in wood, metal, concrete |
Frequently Asked Questions - BP2203 BLAUPUNKT
User questions about BP2203 BLAUPUNKT
0 question about this device. Answer the ones you know or ask your own.
Ask a new question about this device
Download the instructions for your Drill in PDF format for free! Find your manual BP2203 - BLAUPUNKT and take your electronic device back in hand. On this page are published all the documents necessary for the use of your device. BP2203 by BLAUPUNKT.
USER MANUAL BP2203 BLAUPUNKT
natural_image
Black and white photo of a Blaupunkt Power tool, no visible text or symbols on the device bodyEnjoy it.
Schlagbohrmaschine
Hammer drill
Taladro percutor de 750 W
natural_image
Illustration of a hand using a drill press to lift a workpiece in a vise (no text or symbols)Power Tools – General Safety Guidelines
This guidance is general guidance for all electrical power tools and accessories such as chargers, other advice specific to the supplied power tool is contained in the relevant section of this manual. Failure to adhere to the following may result in electric shock or serious injury.
- Wear Protective Equipment: Ensure you wear all personal protective equipment as directed in this manual.
- Eye Protection: Always wear eye protection. Any power tool can throw foreign objects into your eyes and cause permanent eye damage. ALWAYS wear safety goggles (not glasses) that comply with EU safety standard EN166. Everyday glasses have only impact resistant lenses. They ARE NOT safety glasses.
• Hand Protection: Always wear suitable gloves compliant with EU safety standard EN388
• Hearing Protection: Always wear suitable hearing protection compliant with EU safety standard EN352
- Dust Masks: Always wear a dust mask compliant with EN149/EN405 suitable for the material you are working with.
- Before each use: You must inspect the condition of the tool. If any damage is found you must not use the tool and have it repaired by a suitably qualified person.
- Check Working Area: Check your work area to ensure it is clear of hazards and people, always maintain a tidy area while working to reduce risk of injury.
- Wet and Damp: Electrical tools must not be used in wet, damp conditions or during rain, neither should they be left or stored outside. Never touch the plug or operate the machine with wet hands.
- Dress properly: Do not wear loose clothing or jewellery. Keep your hair, clothing and gloves away from moving parts. Loose clothes, jewellery or long hair can be caught in moving parts.
• Take Regular Breaks: Tiredness can result in loss of concentration and makes working with tools dangerous.
- Adults Only: Power tools are designed for use by able bodied ADULTS only. If you are in any way unsure of your ability to use the tool – do not use it.
- Training: Never use a power tool unless you have undertaken formal training in its use, there are often unforeseen factors that may put you or others in danger.
- Loaning Tools: Only loan tools to people you are sure are trained to use them. Always provide the instruction manual along with the tool.
• Medicines and Drugs: Never operate tools or machinery if you are taking medication that may leave you drowsy, or if you are under influence of alcohol or illegal drugs.
- Store in a Safe Place: When not in use or once you have finished using, Power tools must always be stored in a safe place away from damp/water and not accessible to children or others. In between breaks or tasks it is important to ensure that tools are placed in a safe location.
- For Intended Use Only: Power tools should be used for their intended use only – always check the manual if unsure.
- Dust: If devices are provided for the connection of dust extraction and collection facilities, ensure these are connected and properly used. Use of dust collection can reduce dust related hazards.
- Water: Do not expose power tools to rain or wet conditions. Water entering a power tool will increase the risk of electric shock.
- Explosion Hazard: Do not operate power tools in explosive atmospheres, such as in the presence of flammable liquids, gases or dust. Power tools create sparks which may ignite the dust or fumes.
• Service: Have your power tool serviced by a qualified repair person using only identical replacement parts. This will ensure that the safety of the power tool is maintained.
Electrical Tools – General Safety Guidelines
These are still relevant if you have purchased a battery tool and it is supplied with a battery charger.
- Use an RCD: For safe operation it is always necessary to use and RCD device which will protect you in the case of an electrical emergency.
- Operating voltage: Before putting the tool into operation, make sure that the voltage stated on the rating plate is the same as that of your electricity supply.
- Extension cables: Always ensure a cable is does not become a trip hazard by routing it safely to your work location. Do not walk, ride or place objects on the cable as it will result in damage. It is important that you are aware of the location of an extension cable whenever you are working to prevent accidents. Always protect power cables from sharp edges, heat and oil. Do not allow the cable to become knotted or kinked.
- If the extension cord becomes damaged: Pull the plug immediately from the socket outlet, do not touch the cable until you have done so.
Machine Specific Safety Instructions
Know your hammer drill. Do not plug in the hammer drill until you have read and understand this Instruction Manual. Learn the tool's applications and limitations, as well as the specific potential hazards related to this tool.
- Use only hammer drill bits and accessories that are designed for use with a hammer drill when using this hammer drill in the hammer mode. Standard drill bits are NOT designed for use in a hammer drill and MUST NOT be used with a hammer drill. They may shatter and possibly cause serious injury.
- Always keep hands out of the path of the drill bit. Avoid awkward hand positions where a sudden slip could cause your hand to move into the path of the drill bit.
- When drilling walls ensure that there are no concealed electrical cables.
- To avoid injury from accidental starting, always remove the plug from the power source before installing or removing a drill bit.
- Before starting the operation, press the drill switch to make sure the drill bit does not wobble or vibrate.
• Make sure the spindle has come to a complete stop before touching the chuck or attempting to change the drill bit.
• Always make sure the chuck is tight and the drill bit firmly tightened in the chuck before starting drill.
Operating Instructions

-
Chuck
-
Variable speed trigger switch
-
Forward/reverse switch
-
Auxiliary handle
-
Air vents
-
Lock-on button
-
Chuck key
-
Drill/hammer mode switch
-
Depth stop rod
Forward/Reverse Switch (1) (Fig. 1)
To make the drill rotate clockwise for drilling, push the forward/reverse switch to the left. To make the drill rotate counter-clockwise, push the forward/reverse switch to the right. Never change the position of the forward/reverse switch while the chuck is turning.
Variable-Speed Trigger Switch (2) (Fig. 1)
This drill is equipped with a variable-speed ON/OFF trigger switch.
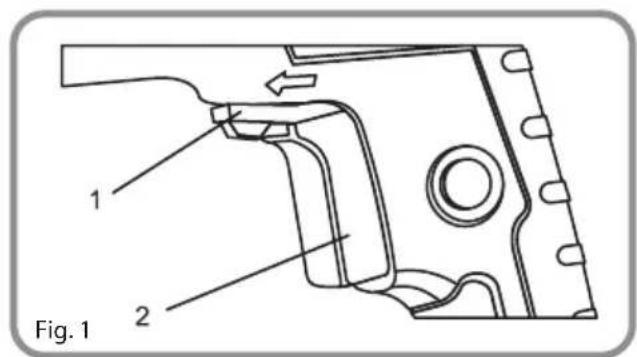
• To start drill, gently squeeze the trigger switch.
- The drill will turn at its slowest speed when the trigger switch is depressed slightly. The drill will turn at its fastest speed when the trigger switch is fully depressed.
• To stop the drill, release the trigger switch.
- Drilling at a slow speed for an extended period of time may cause the drill motor to overheat. If drill gets hot, stop drilling and allow it to cool for at least 15 minutes.
Drill / Impact Switch (Fig 2)
The drill / impact switch (1) changes the drilling mode between conventional drilling and impact for drilling concrete. To operate the drill in drill mode, push the drill / impact switch to the right (Fig 2A). To operate the drill in impact mode, push the drill / impact switch to the left (Fig. 2B).
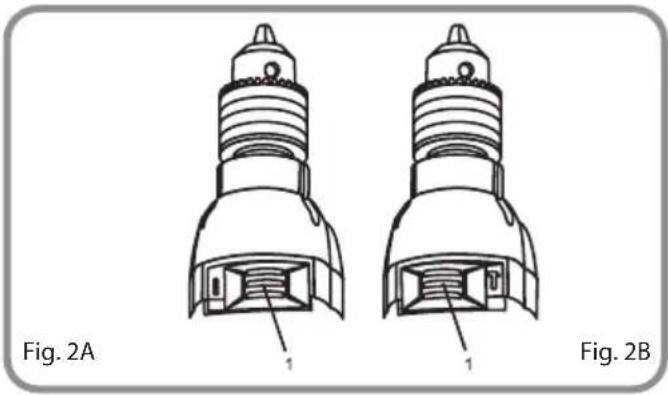
natural_image
Technical line drawing of two mechanical components labeled Fig. 2A and Fig. 2B, showing internal structure with no text or symbols beyond labels.Installing Drill Bits (Fig. 3)
WARNING: Never hold the chuck body with one hand and use the drill power to rotate the drill body to loosen or tighten bits. Serious injury may result.
- Remove drill plug from the power source.
- Rotate chuck collar (1) in a counter clockwise direction until the chuck jaws (2) open wide enough to accept the bit (3).
- Insert the bit into the chuck the full length of the jaws or until the spiral portion of the bit is near the chuck jaws. Raise the front of your drill slightly to prevent the bit from falling out of the chuck jaws.
• Tighten the chuck jaws onto the bit by turning the chuck body in a clockwise direction.
- NOTE: Make sure the bit is properly aligned in the jaws and NOT at an angle. An improperly aligned bit could be thrown from the chuck when the drill is started.
- Finish tightening the chuck jaws by inserting the chuck key (4) into one of three holes (5) in the chuck body. Rotate chuck key clockwise until drill bit is held firmly in place by the chuck jaws.
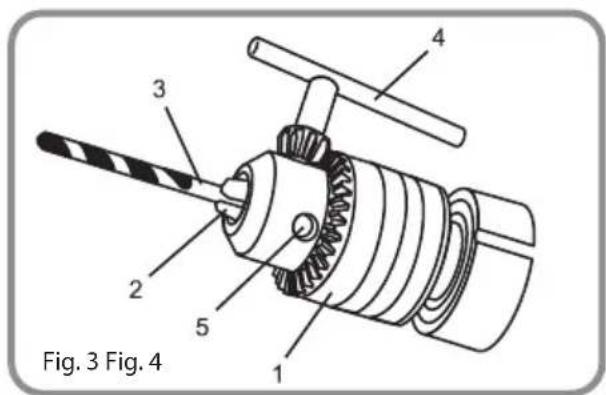
Removing Drill Bits (Fig. 3)
- Remove the drill plug from the power source.
- Insert the chuck key (4) into one of the three holes (5) in the chuck body. Rotate the chuck key counter clockwise until the chuck jaws release the drill bit
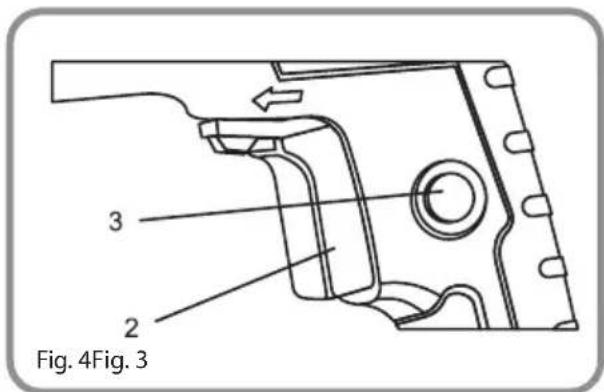
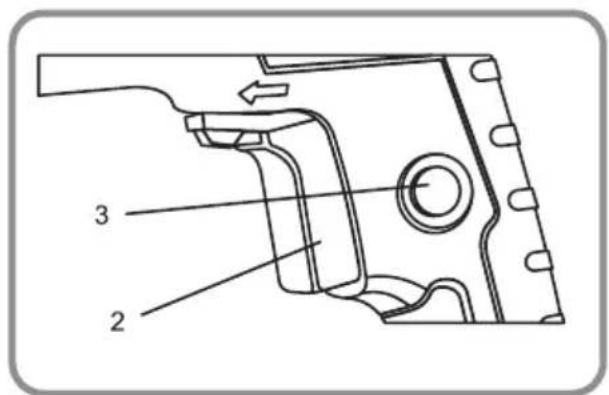
Trigger Switch Lock (Fig. 4)
The trigger switch lock-on feature allows the trigger switch to be locked in the ON position at full speed when continuous operation for extended periods of time is required.
- To lock the trigger switch in the ON position, pull back on the trigger switch (2) to start the drill. Continue to squeeze the trigger until the drill reaches its maximum speed. Push the trigger switch lock button (3) into the drill handle. Release the trigger switch while holding the trigger switch lock button into the drill handle. The drill will continue to run at full speed.
• To release the trigger switch lock button, pull the trigger switch back and then release the trigger.
Installing the Auxiliary Handle (Fig. 5)
Install the auxiliary handle (1) for two handed operation of the drill. This is particularly important for drilling in concrete.
- Rotate the auxiliary handle counter clockwise to open mounting collar (2).
- Slide the auxiliary handle collar over the chuck and fully onto the drill housing (3).
- Rotate the auxiliary handle to a comfortable position.
- Rotate the auxiliary handle clockwise to tighten the mounting collar onto the drill housing.
NOTE: Do not over tighten the auxiliary handle. You will break the mounting collar.
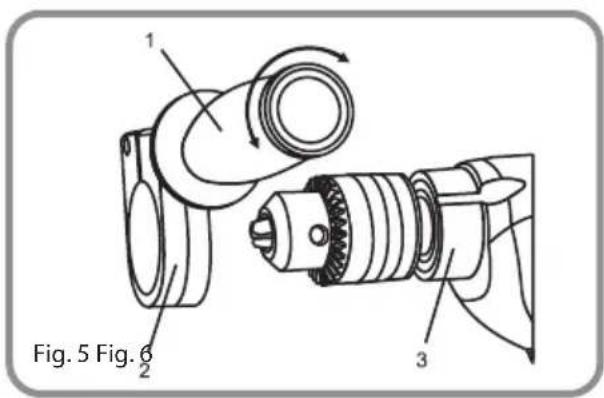
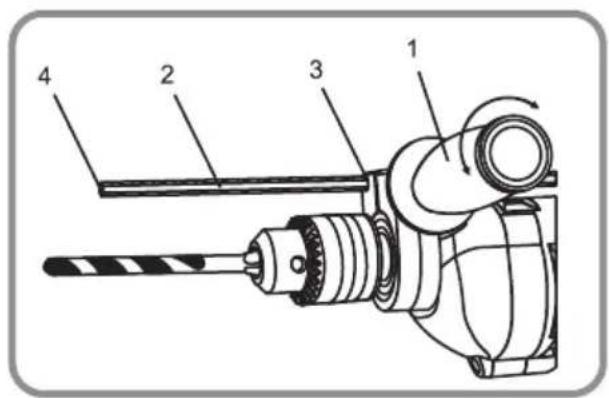
Installing the Depth Rod (Fig. 6)
• The depth rod is used as a gauge to control the depth of the drilled hole.
- Rotate the auxiliary handle (1) counter clockwise to open the mounting collar.
- Insert the hexagonal depth rod (2) into the matching hole in the auxiliary handle mounting collar (3).
- Position the depth rod so the tip (4) will contact the workpiece when the drill reaches the appropriate depth.
- NOTE: The auxiliary handle must be placed in the horizontal position to allow depth rod to be inserted into the mounting collar. Tighten the auxiliary handle by rotating it clockwise.
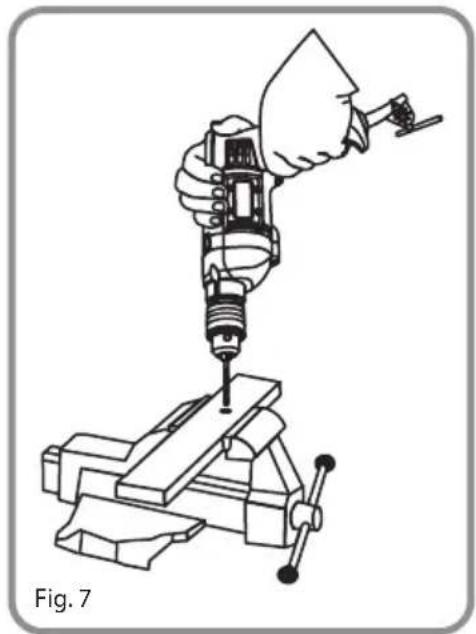
Drilling (Fig 7.)
- When drilling into smooth, hard surfaces such as metal, use a centre punch to mark the desired hole location. This will prevent the drill bit from slipping off centre as the hole is started.
- The workpiece to be drilled should be secured in a vice or with clamps to keep it from turning as the drill bit rotates
- Check the drill bit to make sure it is firmly locked into the drill chuck, and verify that the forward/reverse switch is in the forward position.
- Hold the drill firmly with both hands whenever possible. Use one hand to grasp the handle and switch.
- NOTE: Make sure the hand placed on the body of the drill does not cover the air vents. Covering these air vents will reduce motor cooling, and possibly lead to overheating the motor.
- While holding the drill firmly, place the point of the drill bit at the point to be drilled. Squeeze the switch trigger to start the drill.
- Move the drill bit into the workpiece applying only enough pressure to keep the bit cutting. Do not force the drill bit or apply sideways pressure to elongate the hole.
natural_image
Illustration of a hand using a drill press to lift a vise (no text or symbols)WARNING: Be prepared for binding. When this situation occurs, the drill bit has a tendency to jam in the workpiece. This will cause the body of the drill to rotate in the opposite direction to the drill bit rotation, and could cause loss of control. This is most likely to happen when breaking through material as you complete drilling the hole. If you are not prepared, this loss of control can result in serious injury.
In the event of this occurring, whilst gripping the drill firmly by the handle, release your finger from the trigger. Take extreme caution if you are operating the drill with the trigger switch lock active, this will require releasing before you can relax your grip on the drill.
| Product Specifications | |
| Power Rating 230-240v AC | |
| Power | 750W |
| Motor Speed 0-2700 RPM | |
| Beats Per Minute 43,200 | |
| Chuck 13mm Key | |
| Weight | 2.2Kg |
Symbols
The manual or rating plate on your tool may show symbols. These represent important information about the product or instructions on its use.
 | You must read the instruction manua Wear |  /e /e | footwear |
 | Product is compliant with CE safety standards |  | Wear ear protection |
 | Product is compliant with RoHS safety standards |  | Wear safety gloves |
 | General warning |  | Wear protective clothing |
 | Dispose of in compliance with WEEE standards |  | Wear safety mask |
 LHON LHON | Contains Lithium-Ion battery |  | Wear eye protection |
 | Product is double insulated |  | Wear head protection |
 | Fire hazard |  | Wear respiratory protection |
| Electrocution hazard |
DISPOSAL
Do not dispose of in general waste.
As stated in European Directive 2012/19/EU for Waste Electrical and Electronic Equipment, this product must be disposed of in an environmentally safe manner. We recommend taking it to a recycling facility.
Warranty
This product has 3 Years Warranty (except batteries) for manufacturing defects. The warranty period will be counted from the date of purchase of the product, according to purchase invoice. Product warranty only covers manufacturing defects, defects resulting from improper use, such as dropping, improper transportation, connection to the mains power supply not in compliance with the voltage specified in this manual, insertion of foreign objects and natural wear of parts and parts Such as plastic parts (caps, buttons, handles, latch locks, power cables, etc.) and metal parts (wires, motors, etc.).
Also not covered are damages due to agents of nature, lightning, food, sea, oxidation, humidity etc.). The product will lose its warranty if it presents defects, which after analysis by our technicians, are characterised as being improperly used, used for professional use or for the purpose for which it is not intended (according to the Owner's Manual). This warranty will be void if it is found that the device has been tampered with, has been repaired by a person or service not authorised by Blaupunkt. The guarantee is only valid with the receipt/invoice provided at purchase.
We undertake to provide the above-mentioned services within the warranty period only in places where it maintains an authorised service. Consumers not located near an authorised service centre are responsible for the costs and risks of transport to an authorised service.
Territorial Limitations: Any repair, replacement, or support of the Products provided under the Warranty (or any other support service offered in our sole discretion), shall be restricted to, and provided solely within, the Distribution Territory as then in effect on the date the Product is delivered to you. If you purchase a Product within a defined Distribution Territory and later transport the Product outside of the Distribution Territory, we cannot provide returns, warranty, out-of-warranty, or aftermarket support of any kind outside the Distribution Territory.
Natural 'wear and tear' is not covered under warranty.
This product is for domestic use only.
SAVE THESE INSTRUCTIONS
Imported and distributed by:
UNOLD AG
Mannheimer Straße 4
68766 Hockenheim
Tel.: 06205 9418 0
E-Mail: info@unold.de
natural_image
Illustration of a hand using a drill press to lift a workpiece in a vise (no text or symbols)Removendo as brocas (Fig. 3)
• Retire o pluque da fonte de energia.
Instalar o limitador de profundidade (Fig. 6)
natural_image
Illustration of a hand using a drill press to lift a vise (no text or symbols)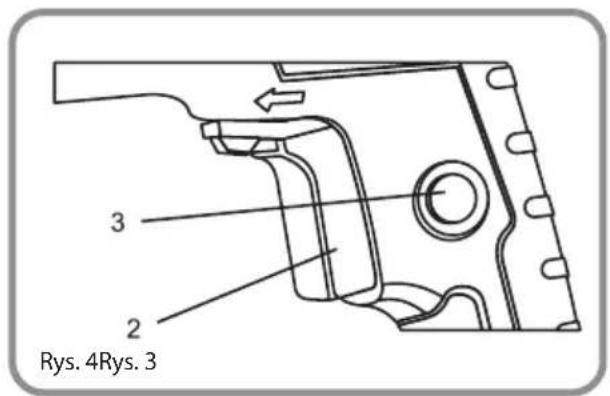
natural_image
Illustration of a hand using a drill press to lift a workpiece in a vise (no text or symbols)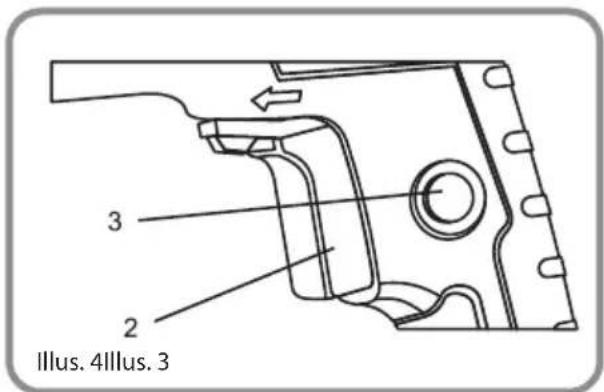
natural_image
Illustration of a hand using a drill press to lift a workpiece in a vise (no text or symbols)