Cubase AI 7 - Software license & extension STEINBERG - Free user manual and instructions
Find the device manual for free Cubase AI 7 STEINBERG in PDF.




| Product Type | Software license & extension |
| Version | Cubase AI 7 |
| Brand | Steinberg |
| Compatible operating system | Windows 7/8 (32/64-bit), Mac OS X 10.7/10.8 (32/64-bit) |
| Required processor | Intel dual-core or AMD dual-core |
| Recommended RAM | 2 GB |
| Required hard disk space | 8 GB |
| Recommended display resolution | 1280 x 800 pixels |
| Internet connection | Required for installation, activation and registration |
| Main functions | Composition, recording, editing and mixing of audio and MIDI |
| Included tools | MixConsole, Channel Strip, chord track, VST instruments (HALion Sonic SE), audio effects |
| License type | Perpetual with Soft-eLicenser protection |
| Activation | 30-day trial period (DVD) or immediate activation (download) |
| Registration | Required for technical support via MySteinberg |
| Provided documentation | Quick guide, user manual, plug-in reference, HALion Sonic SE manual |
| Available languages | French, German, English, Spanish, Italian and others |
| Updates | Downloadable via MySteinberg |
| Installation method | Via Start Center or manual installation |
| Maintenance | Regularly update the software and drivers |
| Security | Software copy protection (Soft-eLicenser) |
| Spare parts and repairability | Software only, no spare parts. Technical support via MySteinberg |
Frequently Asked Questions - Cubase AI 7 STEINBERG
User questions about Cubase AI 7 STEINBERG
0 question about this device. Answer the ones you know or ask your own.
Ask a new question about this device
Download the instructions for your Software license & extension in PDF format for free! Find your manual Cubase AI 7 - STEINBERG and take your electronic device back in hand. On this page are published all the documents necessary for the use of your device. Cubase AI 7 by STEINBERG.
USER MANUAL Cubase AI 7 STEINBERG
Integrated Music Production Software
CUBASE LE7
Music Production Software
English
Cristina Bachmann, Heiko Bischoff, Marion Bröer, Christina Kaboth, Insa Mingers, Sabine Pfeifer, Benjamin Schütte
The PDF document provides improved access for vision-impaired users. Please note that due to the complexity and number of images in this document, it is not possible to include text descriptions of images.
The information in this document is subject to change without notice and does not represent a commitment on the part of Steinberg Media Technologies GmbH. The software described by this document is subject to a License Agreement and may not be copied to other media except as specifically allowed in the License Agreement. No part of this publication may be copied, reproduced, or otherwise transmitted or recorded, for any purpose, without prior written permission by Steinberg Media Technologies GmbH. Registered licensees of the product described herein may print one copy of this document for their personal use.
All product and company names are ™ or ® trademarks of their respective holders. For more information, please visit www.steinberg.net/trademarks.
Release Date: May 08, 2013
© Steinberg Media Technologies GmbH, 2013.
All rights reserved.
Table of Contents
6 Introduction
7 Welcome!
8 About the Documentation and the Help
9 Key Command Conventions
10 How You Can Reach Us
12 System Requirements and Installation
13 System Requirements
13 Installing the Program
14 License Activation and Registration
16 Hardware Installation
18 Setting Up Your System
1
Introduction
Welcome!
Congratulations and thank you for purchasing a high-quality Steinberg product!
Building on the core technologies used in the Cubase 7 advanced music production system, Cubase Elements 7 and the hardware-bundled versions, Cubase AI 7 and Cubase LE 7, offer all the basic tools for composing, recording, editing, and mixing your latest idea into a true masterpiece. Combining the very best sound quality, intuitive handling, and a vast range of highly advanced audio and MIDI tools, the seventh version of the Cubase family condenses almost 30 years of Steinberg development into the most cutting-edge line-up of digital audio workstations anywhere.
Cubase provides the latest tools inviting you to venture into new artistic territory and give your creativity free reign. Whether you are a professional, a hobby musician, a student, or a teacher, Cubase has it all covered and supports you through every stage of music production, from the inception of the first fleeting idea right down to the final mix. The brand-new MixConsole with built-in channel strip processing modules, a selected collection of fresh quality instrument sounds and effect processors, professional-grade editing capabilities and many helpers and tools such as the global Chord Track for easy chord management will catapult your artistic output to the next level.
Cubase owners are among the most successful artists in just about any musical genre - from engineers recording and mixing rock albums to dance DJs, hip-hop producers, songwriters and composers scoring for Hollywood blockbusters. If you are entirely new to Cubase, you have just become a member of this large community of professionals and music enthusiasts! Check out the official Cubase community for tips and tons of other useful information at www.steinberg.net/forum.
In case you are using Cubase LE 7 or AI 7 make sure to trial the great additions to Cubase Elements 7 by simply entering a trial activation code and without any new installation required!
Please don't forget to register your Cubase version on MySteinberg in order to gain access to online support offers and additional exclusive services.
We wish you musical inspiration when working with your brand-new Cubase DAW.
See you around!
Your Steinberg Cubase Team
About the Documentation and the Help
The Cubase documentation is divided into several sections, as listed below. The documents are available in Adobe Acrobat format (extension .pdf) and can be accessed as follows:
- In the program, you can open the PDF documents from the Documentation submenu on the Help menu.
- On Windows systems, you open the PDF documents via the Start menu, from the Steinberg Cubase folder.
- On Mac OS X systems, the PDF documents are located in the "/Library/Documentation/Steinberg/Cubase 7" folder.
⇒ To read the PDF documents, a suitable PDF reader application must be installed on your computer.
Quick Start Guide
This is the document you are reading. It covers the following areas without going into details:
- Computer requirements, installation procedure, and license activation.
- Setting up your system for audio and MIDI work.
Operation Manual
The Operation Manual is the main Cubase reference documentation, with detailed descriptions of operations, parameters, functions, and techniques.
Plug-in Reference
This document describes the features and parameters of the included VST plug-ins and VST instruments.
HALion Sonic SE
This document describes the features and parameters of the included VST instrument HALion Sonic SE.
Remote Control Devices
This document lists the supported MIDI remote control devices.
Dialog Help
To get information about the active dialog, click its Help button.
Key Command Conventions
Many of the default key commands in Cubase use modifier keys, some of which are different depending on the operating system. For example, the default key command for Undo is [Ctrl]-[Z] on Windows and [Command]-[Z] on Mac OS X systems.
When key commands with modifier keys are described in this manual, they are shown with the Windows modifier key first, in the following way:
[Win modifier key]/[Mac modifier key]-[key]
For example, [Ctrl]/[Command]-[Z] means "press [Ctrl] on Windows or [Command] on Mac OS X systems, then press [Z]".
Similarly, [Alt]/[Option]-[X] means "press [Alt] on Windows or [Option] on Mac OS X systems, then press [X]".
⇒ This manual often refers to right-clicking, for example, to open context menus. If you are using a Mac with a single-button mouse, hold down [Ctrl] and click.
How You Can Reach Us
On the Steinberg Hub menu in Cubase you find items linking to additional information.
The menu contains links to various Steinberg web pages. Selecting a menu item automatically launches your browser and opens the page. On these pages you can find support and compatibility information, answers to frequently asked questions, information about updates and other Steinberg products, etc. This requires that you have a web browser installed on your computer, and a working internet connection.
2
System Requirements and Installation
System Requirements
Your computer must meet the following minimum requirements for the Windows and Mac versions of Cubase:
| Mac OS X Windows | |
| Mac OS X Version 10.7/10.8*Intel dual-core processorCoreAudio-compatible audio hardware | Windows 7/Windows 8*Intel or AMD dual-core processorWindows-compatible audio hardware** |
| 2 GB RAM8 GB of free hard-disk spaceDisplay resolution of 1280 x 800 pixels recommendedDVD ROM dual-layer drive required for installationInternet connection required for installation, activation, account setup, and personal/product registration. | |
| *Native 32-bit and 64-bit program version.**ASIO compatible audio hardware recommended for low-latency performance. | |
Installing the Program
You have two possibilities to install your program, via the Start Center application or manually.
Launching Installation via the Start Center
From the Start Center application you can easily install your program and inform yourself about the package contents.
- For Steinberg software delivered with an installation medium, the Start Center launches automatically as soon as you insert the disc in your computer's CD/DVD drive, provided that autorun is activated.
- For Steinberg software downloaded from the internet, the Start Center launches when you double-click the downloaded file.
Proceed as follows:
- In the Start Center, click Installation.
- Follow the instructions on screen.
Launching Installation Manually
If you do not want to install the program via the Start Center, you can install it manually.
- On Windows systems, double-click the file "Setup.exe" and follow the instructions on screen.
- On Mac OS X systems, double-click the file "Cubase LE AI Elements 7.pkg" and follow the instructions on screen.
License Activation and Registration

The process for license activation is described in detail on the Steinberg web site. To open the corresponding page, follow the “Activation & Registration” link in the Start Center.
Cubase Elements, Cubase AI, and Cubase LE use a software-based copy protection scheme. The so-called Soft-eLicenser is installed automatically with your version of Cubase. It can be accessed via the eLicenser Control Center application that is installed automatically with the product.
Cubase Elements
After installation, you must activate your product. If you purchased Cubase Elements in a shop, the product package contains the “Essential Product License Information” sheet which contains an activation code and describes the process in detail.
If you purchased the download version of Cubase Elements, you receive an e-mail with the activation code.
For information on how to activate your product visit www.steinberg.net/activate.
Register Cubase Elements
Register your product at the MySteinberg online customer portal. As a registered user, you are entitled to technical support, you gain access to exclusive offers such as software updates and upgrades, and more.

Make sure that you have a working internet connection.
Proceed as follows:
- Start your software.
- On the Steinberg Hub menu, select the Registration option. An online registration form opens in your web browser.
Follow the instructions on screen to register at MySteinberg.
Cubase AI and Cubase LE
To be entitled to technical support, you must register Cubase AI and LE. Once you have subscribed to the Steinberg newsletter, you are kept aware of updates and other news regarding Cubase.
Registering and Activating the DVD-Version
If you have received Cubase AI or LE on a DVD, you can use the program out of the box for 30 days. After this period, you must register your program and activate your license permanently.
When you start Cubase AI or Cubase LE, a dialog opens that informs you for how much longer you can use the program without registration and activation.
- In this dialog, click "Register Now" to open the MySteinberg section on the Steinberg web site in your standard web browser.
- Follow the instructions on screen.
Once you have registered, you receive all the information required to activate your product.
For information on how to activate your product visit www.steinberg.net/activate.
Registering and Activating the Download-Version
If you have downloaded Cubase AI or LE from MySteinberg using a download access code, you must activate Cubase AI or LE permanently using the activation code that you have received at MySteinberg. Cubase AI or LE are automatically registered when they are activated.
For information on how to activate your product visit www.steinberg.net/activate.
Hardware Installation
Installing the Audio Hardware and Its Driver
- Install the audio hardware and related equipment on the computer, as described in the hardware documentation.
- Install the driver for the audio hardware.
A driver is a piece of software that allows a program to communicate with a certain piece of hardware. In this case, the driver allows Cubase to use the audio hardware. Depending on the operating system of your computer, there are different types of drivers that can be used.
Dedicated ASIO Drivers
Professional audio hardware often comes with an ASIO driver written especially for the device. This allows for direct communication between Cubase and the audio hardware. As a result, the devices with specific ASIO drivers can provide lower latency (input-output delay), which is crucial when monitoring audio via Cubase or using VST instruments. The ASIO driver may also provide special support for routing, synchronization, etc.
ASIO drivers are provided by the audio hardware manufacturers. Make sure to check the manufacturer's web site for the latest driver versions.

If your audio hardware comes with a specific ASIO driver, we strongly recommend that you use this.
Generic Low Latency ASIO Driver (Windows Only)
On Windows systems, you can use the Generic Low Latency ASIO driver. This driver provides ASIO support for any audio hardware supported by Windows, thus allowing for low latency. The Generic Low Latency ASIO driver provides the Windows Core Audio technology in Cubase. No additional driver is needed. This driver is included with Cubase and does not require any special installation.
→ This driver should be used if no specific ASIO driver is available. Although the Generic Low Latency ASIO driver supports all audio devices, you might get better results with on-board audio cards than with external USB audio interfaces.
Mac OS X Drivers (Mac Only)
If you are using a Macintosh computer, make sure that you are using the latest Mac OS X drivers for your audio hardware. Follow the manufacturer's instructions to install the driver.
Testing the Audio Hardware
To make sure that the audio device works as expected, perform the following tests:
- Use any software included with the hardware to make sure that you can record and play back audio without problems.
- If the hardware is accessed via a standard operating system driver, try playing back audio using the computer's standard audio application, for example, Windows Media Player or Apple iTunes.
Installing a MIDI Interface or USB MIDI Keyboard
Although many USB MIDI keyboards and MIDI interfaces are plug&play devices, you may have to install a dedicated device driver. Follow the installation procedure described in the documentation that came with the device.
You should also check the manufacturer's web site for the latest driver updates.
Setting Up Your System
Selecting the Driver for Your Audio Device
Before you can set up the routing for your audio signals and start recording, you need to make sure that the correct ASIO driver is selected:
- Open the Devices menu and select the "Device Setup..." option.
- In the Device Setup dialog, click the "VST Audio System" entry in the list on the left.
The VST Audio System page is shown on the right. - On the ASIO Driver pop-up menu, select the driver that you want to use.
The different types of drivers are described in the section "Hardware Installation" on page 16.
Setting Up the VST Connections
The VST Connections window allows you to set up the routing of input and output signals between Cubase and your audio hardware. These connections are called busses. In this section you will learn how to set up the busses for playback and recording.
Adding Outputs
In this section you will learn how to set up the outputs for playing back audio in Cubase. Let's start from scratch and remove any outputs that were automatically added by Cubase:
-
Open the Devices menu, and select "VST Connections".
The VST Connections window opens. The default key command for this is [F4]. -
Select the Outputs tab.
-
In the "Bus Name" column, right-click the top entry and select "Remove Bus" from the context menu.
If necessary, repeat this step for any further busses.
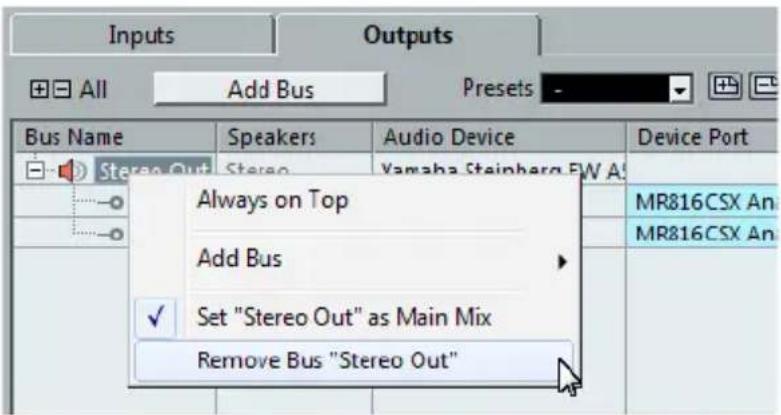
Now that the "Bus Name" column is empty, you are ready to set up the output that you need:
- Click the "Add Bus" button.
The Add Output Bus dialog opens.
-
Choose "Stereo" for Configuration and "1" for Count.
-
Click "Add Bus".
A new stereo bus (Left and Right) is added, allowing you to have audio in Cubase routed to your audio hardware.
- If you want to change the output ports that were selected automatically, open the "Device Port" pop-up menu and select different ports.
Depending on your audio hardware, more than two output ports might be available. For most cases we recommend to use the main stereo outputs.
| Inputs | Outputs | ||||
| All Add Bus Presets | |||||
| Bus Name | Speakers | Audio Device | Device Port | Click | |
| Stereo Out | Stereo | Yamaha Steinberg FW AS | Click | ||
| Left | MR816CSX Analog 1 | ||||
| Right | Not Connected | ||||
| ✓ Not Connected | |||||
| MR816CSX Analog 1 [ Stereo Out - Left ] | |||||
| MR816CSX Analog 2 | |||||
| MR816CSX Analog 3 | |||||
Adding Inputs
In this section you will learn how to set up the inputs for recording into Cubase from scratch:
- In the VST Connections window, select the Inputs tab.
-
In the "Bus Name" column, right-click the top entry and select "Remove Bus" from the context menu.
If necessary, repeat this step for any further busses. -
Click the "Add Bus" button.
The Add Input Bus dialog opens.
-
Choose "Stereo" for Configuration and "1" for Count.
-
Click "Add Bus".
A new stereo bus (Left and Right) is added, allowing you to have audio from your audio device's input routed to Cubase for recording.
A stereo input is useful for recording audio with two channels, for example, to record a keyboard with a left and a right audio channel. If you want to record with two mono channels instead, you can set up separate mono busses:
- Click the "Add Bus" button.
The Add Input Bus dialog opens.
- Choose "Mono" for Configuration and "2" for Count.
- Click "Add Bus".
Two new mono busses are added.
- Click in the "Device Port" column to select the audio inputs of your audio device for the stereo and mono inputs.
That's it! You are now ready to record audio in Cubase and play it back.
Deutsch
Cristina Bachmann, Heiko Bischoff, Marion Bröer, Christina Kaboth, Insa Mingers, Sabine Pfeifer, Benjamin Schütte
Programminstallation
Driver Mac OS X (solo Mac)

- Table of Contents
- Introduction
- System Requirements and Installation
- Welcome!
- About the Documentation and the Help
- Quick Start Guide
- Operation Manual
- Plug-in Reference
- HALion Sonic SE
- Remote Control Devices
- Dialog Help
- Key Command Conventions
- How You Can Reach Us
- 2
- System Requirements and Installation
- System Requirements
- Installing the Program
- Launching Installation via the Start Center
- Launching Installation Manually
- License Activation and Registration
- Cubase Elements
- Register Cubase Elements
- Cubase AI and Cubase LE
- Registering and Activating the DVD-Version
- Registering and Activating the Download-Version
- Hardware Installation
- Installing the Audio Hardware and Its Driver
- Dedicated ASIO Drivers
- Generic Low Latency ASIO Driver (Windows Only)
- Mac OS X Drivers (Mac Only)
- Testing the Audio Hardware
- Installing a MIDI Interface or USB MIDI Keyboard
- Setting Up Your System
- Selecting the Driver for Your Audio Device
- Setting Up the VST Connections
- Adding Outputs
- Adding Inputs
- Deutsch
- Programminstallation
- Driver Mac OS X (solo Mac)
Brand : STEINBERG
Model : Cubase AI 7
Category : Software license & extension