T480 - Smartphone AIRIS - Free user manual and instructions
Find the device manual for free T480 AIRIS in PDF.
User questions about T480 AIRIS
0 question about this device. Answer the ones you know or ask your own.
Ask a new question about this device
Download the instructions for your Smartphone in PDF format for free! Find your manual T480 - AIRIS and take your electronic device back in hand. On this page are published all the documents necessary for the use of your device. T480 by AIRIS.
USER MANUAL T480 AIRIS
text_image
1 2 3 4 5 6 7 8 9 10 11 12 HIRTS HAPPLENT HAPPLENT HAPPLENT HAPPLENT HAPPLENT HAPPLENT HAPPLENT HAPPLENT HAPPLENT HAPPLENT HAPPLENT HAPPLENT HAPPLENT HAPPLENT HAPPLENT HAPPLENT HAPPLENT HAPPLENT HAPPLENT HAPPLENT HAPPLENET HAPPLENET HAPPLENET HAPPLENET HAPPLENET HAPPLENET HAPPLENET HAPPLENET HAPPLENET HAPPLENET HAPPLENET HAPPLENET HAPPLENET HAPPLENET HAPPLENET HAPPLENET HAPPLENET HAPPLENET HAPPLENET HAPPLENET HAPPLENT HAPPLENT HAPPLENT HAPPLENT HAPPLENT HAPPLENT HAPPLENT HAPPLENT HAPPLENT HAPPLENT HAPPLENT HAPPLENT HAPPLENT HAPPLENT HAPPLENT HAPPLENT HAPPLENT HAPPLENT HAPPLENT HAPPLENEUTS HAPPLENEUTS HAPPLENEUTS HAPPLENEUTS HAPPLENEUTS HAPPLENEUTS HAPPLENEUTS HAPPLENEUTS HAPPLENEUTS HAPPLENEUTS HAPPLENEUTS■ CÓMO INSTALAR LA TARJETA SIM
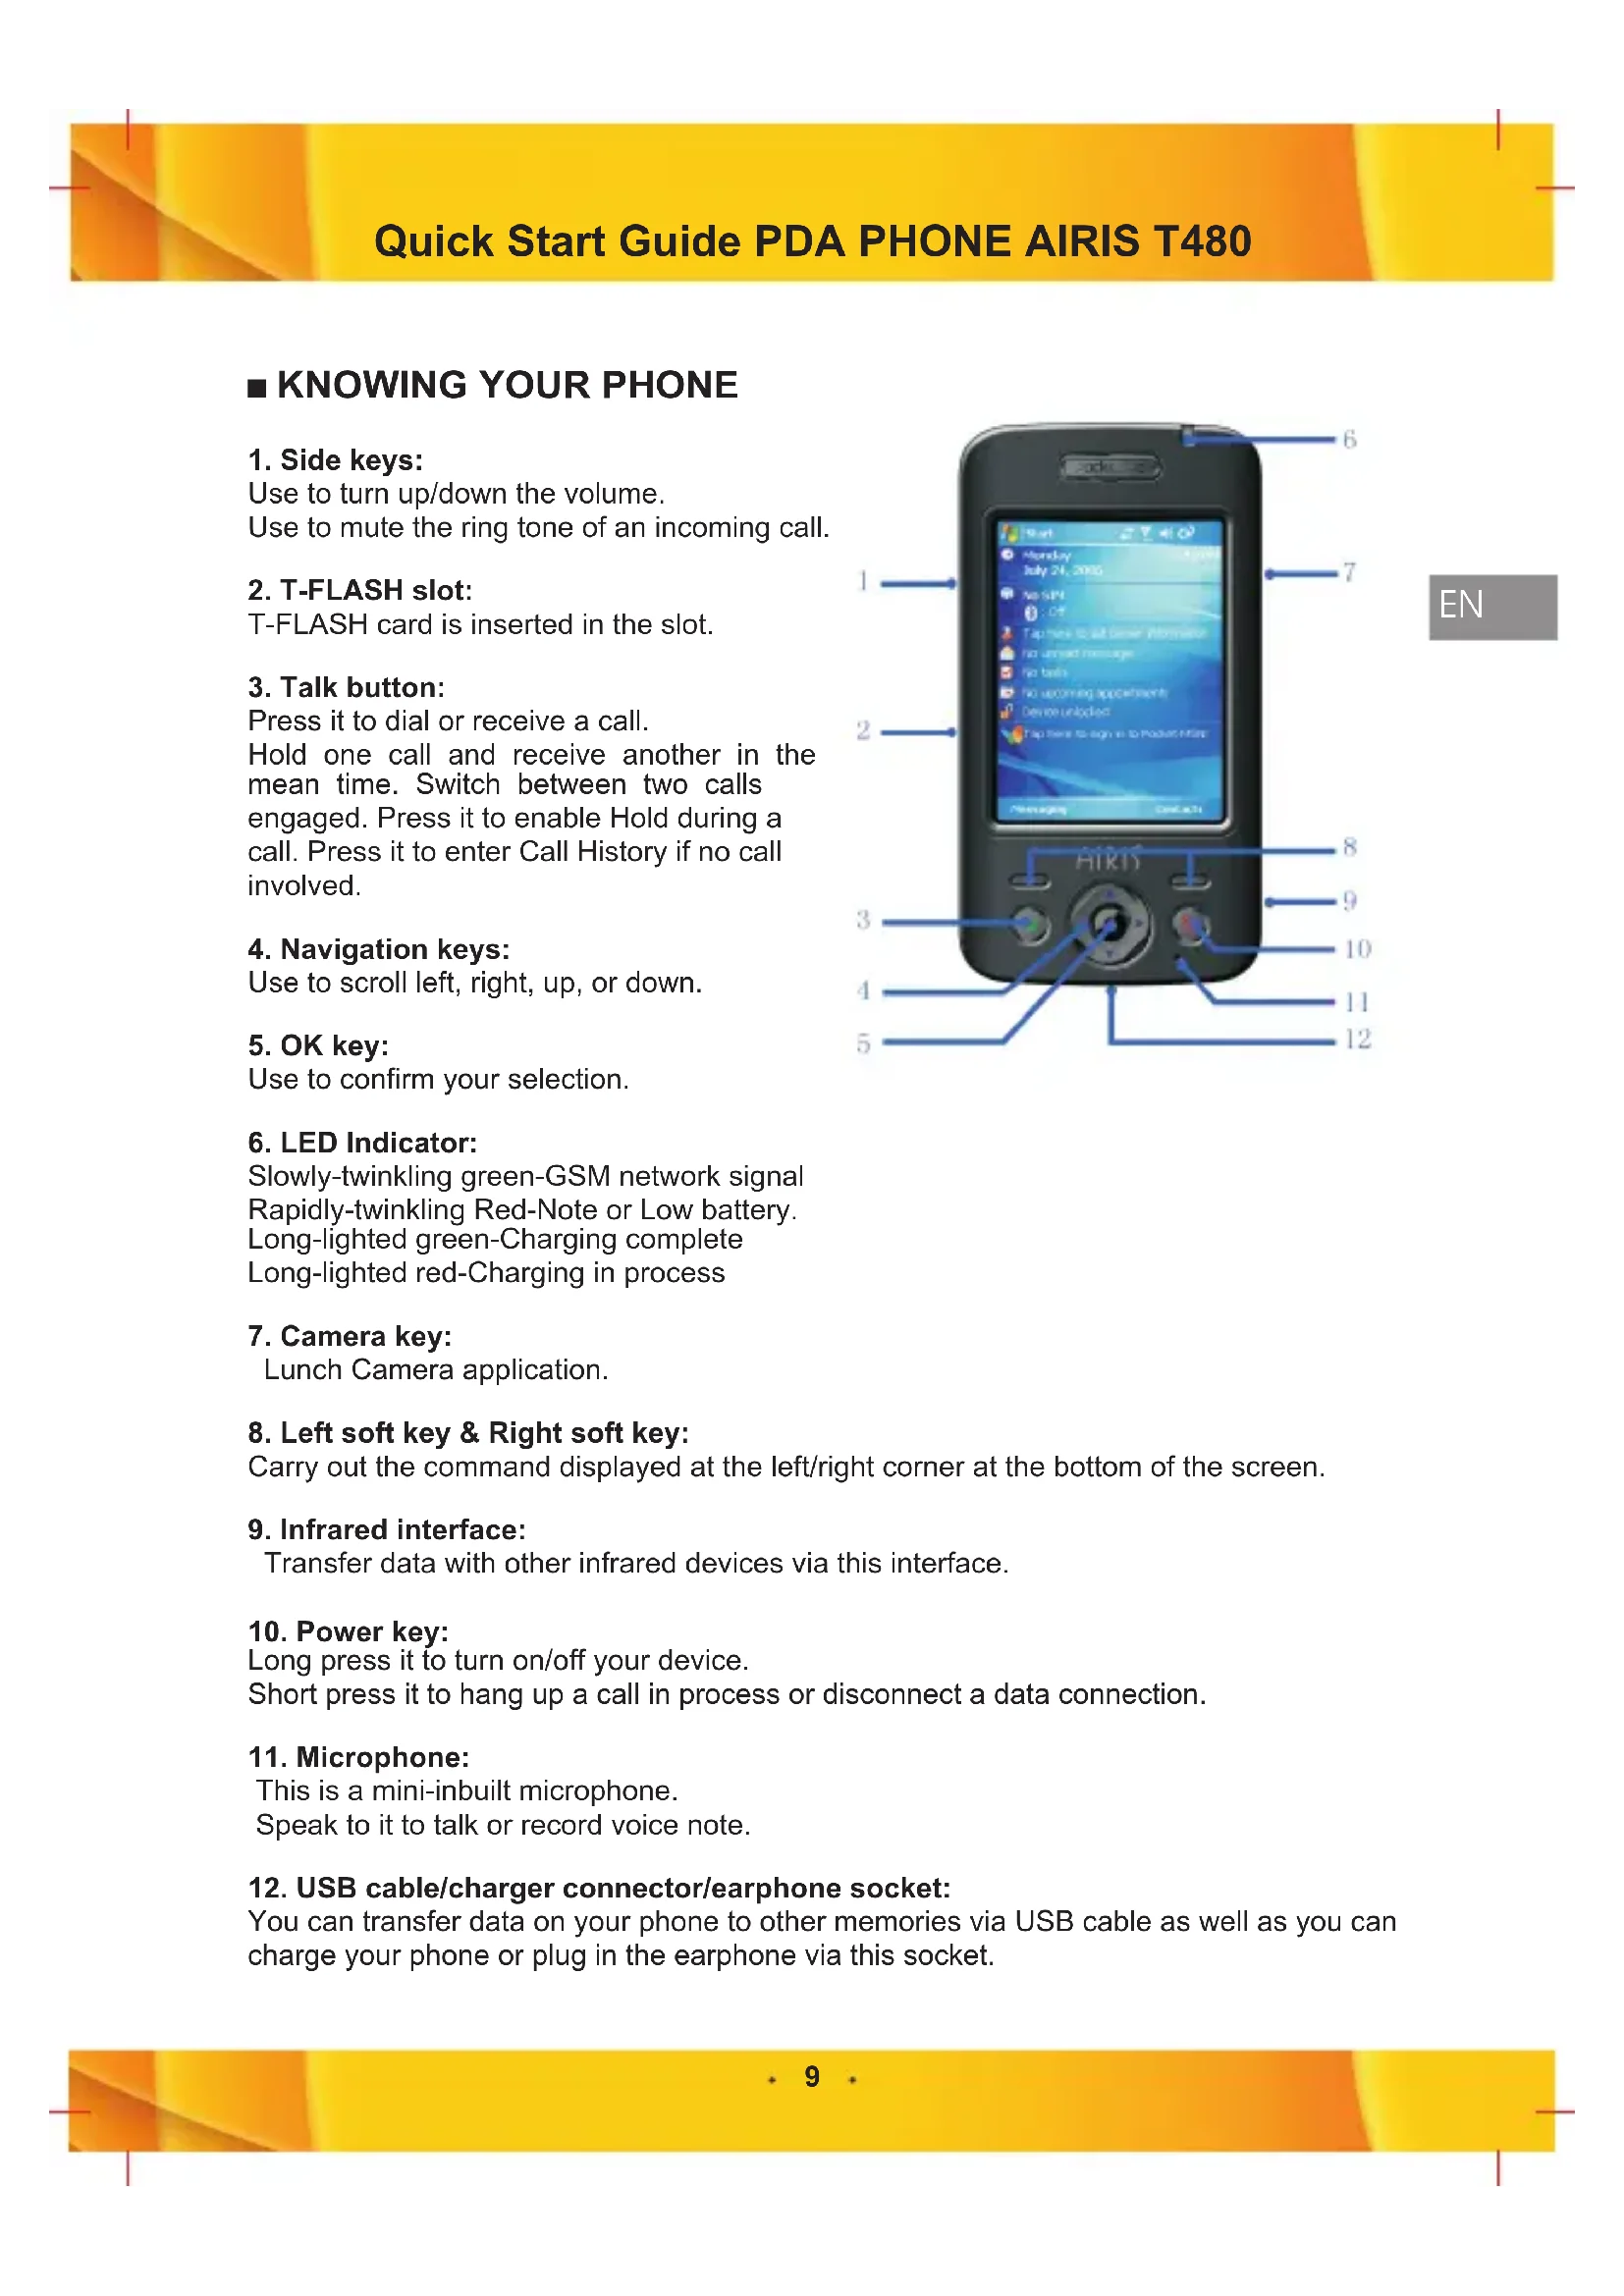
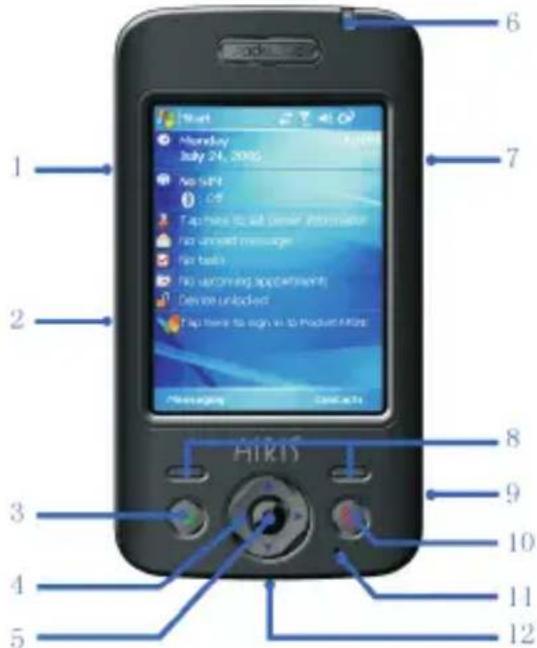
■ KNOWING YOUR PHONE
1. Side keys:
Use to turn up/down the volume.
Use to mute the ring tone of an incoming call.
2. T-FLASH slot:
T-FLASH card is inserted in the slot.
3. Talk button:
Press it to dial or receive a call.
Hold one call and receive another in the mean time. Switch between two calls engaged. Press it to enable Hold during a call. Press it to enter Call History if no call involved.
4. Navigation keys:
Use to scroll left, right, up, or down.
5. OK key:
Use to confirm your selection.
6. LED Indicator:
Slowly-twinkling green-GSM network signal Rapidly-twinkling Red-Note or Low battery. Long-lighted green-Charging complete Long-lighted red-Charging in process
7. Camera key:
Lunch Camera application.
8. Left soft key & Right soft key:
Carry out the command displayed at the left/right corner at the bottom of the screen.
9. Infrared interface:
Transfer data with other infrared devices via this interface.
10. Power key:
Long press it to turn on/off your device.
Short press it to hang up a call in process or disconnect a data connection.
11. Microphone:
This is a mini-inbuilt microphone.
Speak to it to talk or record voice note.
12. USB cable/charger connector/earphone socket:
You can transfer data on your phone to other memories via USB cable as well as you can charge your phone or plug in the earphone via this socket.
text_image
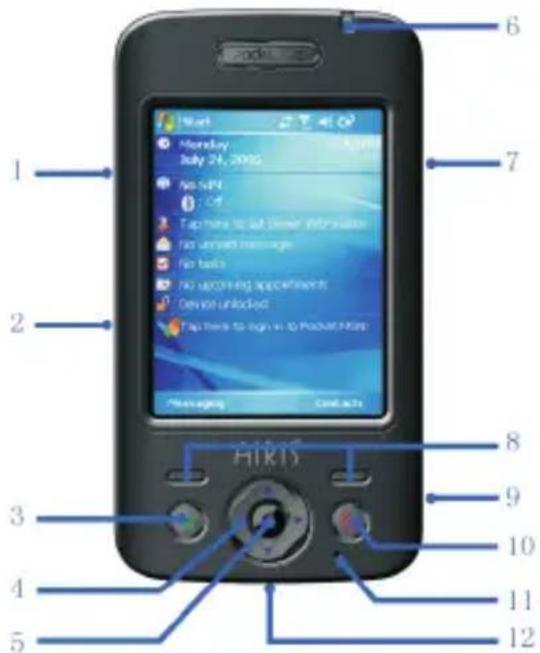
1 2 3 4 5 6 7 8 9 10 11 12 HIRIS■ INSERTING THE SIM CARD
SIM card (Subscriber Identity Module) contains your phone number, service details and Phonebook/message memory.
Before you begin, ensure that the phone is turned off.
- Open the cover and remove the battery
- Hold the phone in one hand with the keypad facing down in the palm of your hand. Press gently on the stamped latch at the seam, then slide down to open the rear jacket;
- Remove the battery by lifting it up from the bottom end.
- Install SIM card
- Insert the SIM card into the SIM card slot with its gold contacts facing down (the cut-off corner of the SIM card should match the cut-off corner in the slot).
- Replace the battery and gently push down to snap it into place.
Precautions
- If the SIM card is malfunctioned, please contact the network services operator.
- Please put the SIM card where children cannot reach it.
- SIM card and its golden contacts can be easily scuffed or even damaged by a warp.
Please be careful when you are using, inserting, or removing it. - Do not place the SIM card in electrostatic, dusty, or wet environment.
- Ensure that the battery is installed properly
■ CHARGING THE BATTERY
When the power of the battery is below the normal value of working electronic pressure, the screen will display a charging Note and an empty battery icon. At the same time, the battery will make a Note sound. Please charge the battery immediately; otherwise, the saved information might be lost. If you do not charge the battery or replace the battery immediately, the phone will be closed automatically after a while.
The phone contains a rechargeable lithium battery. The phone is designed to use only manufacturer-specified original chargers and batteries, to secure the longevity of service of the phone.
Plugging the charger connector in the USB charger port carefully. Make sure the connector is plugging in properly. If charging in the switch-off status of the phone, connect the USB charger to the external power source, and the battery icon in the phone screen will begin flickering and the phone still can be used. If charging in the switch-on status of the phone, the LED indicator will turn red. Before the first use, please charge the battery by using the accessory charger. The charging time needs 8 to 10 hours. The new battery will reach its best performance after two or three times full charge/discharge cycles.
When the battery finishes charging, the indicator LED will turn green. Disconnect the connections between the charger and the phone.
Press and hold POWER to turn on the phone.
■ MAKING A PHONE CALL
- Ensuring SIM card is installed and the battery is fully charged.
- Enter the phone number by dialing number on the keypad and press the TALK button.
- Ending a call Press the END button to finish the call.
■ CAMERA
- Capturing a photo
Enter the image capture mode by pressing "shooting" button or selecting camera function from the main menu. The screen will show the scenery shot by the camera lens. Now, press "OK" key or "Shooting" button to capture images.
After shooting the images, the system will save the images automatically. At the same time, the screen will display the images shot.
· If you need to shoot more images, please tap OK to back to the shooting screen.
- Capturing a video
The phone provides with video capture function. Before starting the video capture, you need to change the shooting mode first.
-
On the screen of shooting preview, select Video from Mode function of Menu. The system will be switched to video capture mode.
-
The length of video shooting time depends on the storage capability of the storage devices.
- Previewing Pictures and videos
You can view pictures stored in your phone or storage card using the Pictures and Videos application.
To start the program, go to Start > Pictures and Videos.
After you enter Pictures and videos, it will show on screen the preview of all pictures stored on both your phone and memory card.
- Click on any picture to zoom in on one picture.
- On the preview screen, press navigation keys to preview previous/next picture in turn.
■ INSTALLING ACTIVESYNC
ActiveSync synchronizes information between your phone and your PC, keeping information up to date in both devices.
Before you connect your phone to your PC, you must install ActiveSync on the PC. ActiveSync is already installed on your phone.
- Insert the Getting Started CD into the CD drive of your PC.
- Follow the instructions on the installation wizard screen to install ActiveSync.
- Connect the sync cable to the phone and plug it into the USB port of your PC.
- Turn on your phone .When the PC detects a USB connection, it starts the ActiveSync Synchronization Setup Wizard. Follow the instructions on the screen and select the items you want to synchronize.
■ BROWSING THE WEB
Your phone comes with internet Explorer Mobile installed. Internet Explorer Mobile is a full-featured internet browser, optimized for use on your phone.
To open Internet Explorer:
On the home screen, select Start > Internet Explorer.
You can use ActiveSync to synchronize the Internet Explorer favorites on your PC with your phone so you can use them with Internet Explorer Mobile as well. For more information, see ActiveSync Help on your PC.
Schnellreferenz PDA PHONE AIRIS T480
■ IHR TELEPHON KENNENLERNEN
1. Side keys
Use to turn up/down the volume.
Use to mute the ring tone of an incoming call.
2. T-FLASH slot
T-FLASH card is inserted in the slot.
3. Talk button
Press it to dial or receive a call. Hold one call and receive another in the mean time. Switch between two calls engaged. Press it to enable Hold during a call. Press it to enter Call History if no call involved.
4. Navigation keys
Use to scroll left, right, up, or down.
5. OK key
Use to confirm your selection.
6. LED Indicator
Slowly-twinkling green-GSM network signal Rapidly-twinkling Red-Note or Low battery. Long-lighted green-Charging complete Long-lighted red-Charging in process
7. Camera key
Lunch Camera application.
8. Left soft key & Right soft key
Carry out the command displayed at the left/right corner at the bottom of the screen.
9. Infrared interface
Transfer data with other infrared devices via this interface.
10. Power key
Long press it to turn on/off your device. Short press it to hang up a call in process or disconnect a data connection.
11. Microphone
This is a mini-inbuilt microphone. Speak to it to talk or record voice note.
12. USB cable/charger connector/earphone socket
You can transfer data on your phone to other memories via USB cable as well as you can charge your phone or plug in the earphone via this socket.
text_image
Hikfs 1 2 3 4 5 6 7 8 9 10 11 12You can transfer data on your phone to other memories via USB cable as well as you can charge your phone or plug in the earphone via this socket.
text_image
Hikis 1 2 3 4 5 6 7 8 9 10 11 12 Start Monday July 24, 2005 No NPN No Off No traffic information No unswitch message No banks No upcoming appointments Device unlocked Stop here to sign in to Product Files Messages Contacts■ INSERIMENTO DELLA SCHEDA SIM
text_image
Hikis 1 2 3 4 5 6 7 8 9 10 11 12 Start Monday July 24, 2005 No NPN No Off No home to set personal information No unwell message No banks No upcoming appointments Device unlocked Stop home to sign in to Pocket Files Messages Contact info■ COMMENT INSTALLER LA CARTE SIM
You can transfer data on your phone to other memories via USB cable as well as you can charge your phone or plug in the earphone via this socket.

text_image
Hikis 1 2 3 4 5 6 7 8 9 10 11 12 Start Monday July 24, 2005 No NPN No Off No home to set personal information No unwell message No banks No upcoming appointments Device unlocked Stop home to sign in to Pocket Files Messages Contact infoYou can transfer data on your phone to other memories via USB cable as well as you can charge your phone or plug in the earphone via this socket.

text_image
Hikis 1 2 3 4 5 6 7 8 9 10 11 12 Start Monday July 24, 2005 No NPN No Off No home to set personal information No unwell message No banks No upcoming appointments Device unlocked Stop home to sign in to Pocket Files Messages Contact infotext_image
Hikis 1 2 3 4 5 6 7 8 9 10 11 12 Start Monday July 24, 2005 No NPN No NPN No NPN to set personal information. No unwell message. No banks. No upcoming appointments. Device unlocked. Stop here to sign up to Product Name. Messages Contacts"This electronic device must not be dropped with litter. Ask to your council how about to eliminate correctly in order to save the environment. Follow related legislation. Lawbreakers depend on law penalties"
WEEE-Hinweis

WEEE: Note explicative