
Digital Compass Pro 700102 - GPS device BUSHNELL - Free user manual and instructions
Find the device manual for free Digital Compass Pro 700102 BUSHNELL in PDF.
| Product Type | Digital compass watch (compass, altimeter, barometer) |
| Brand | Bushnell |
| Model | Digital Compass Pro 700102 |
| Power Source | CR2430 lithium battery |
| Estimated Battery Life | More than one year under normal use |
| Display | Liquid crystal display (LCD) with backlight |
| Main Functions | Digital compass, altimeter, barometer, weather forecast, stopwatch, 5 alarms, countdown timer, altitude memory (10 records) |
| Altimeter Range | -700 to 8940 m (-2300 to 29320 ft) |
| Temperature Accuracy | Step of 0.1 °C (0.2 °F) |
| Barometric Pressure Range | 260 to 1100 hPa (7.65 to 32.45 inHg) |
| Graphs | Barometric (last 13 hours) and altimetric (14 columns) |
| Compass Calibration | Manual rotation on a horizontal surface (2 slow turns) |
| Declination Adjustment | Yes, from -180° to +180° (east/west) |
| Auto-Guidance Mode | Yes, with reference bearing |
| Alarms | 5 alarms (3 time, 1 altitude, 1 temperature) with snooze |
| Stopwatch | Accuracy to 1/100th second, with split time |
| Countdown Timer | Automatic repeat possible |
| Warranty | 2-year limited |
| Maintenance | Avoid magnetic fields, replace CR2430 battery, clean with a soft cloth |
| Spare Parts | CR2430 battery (standard) |
Frequently Asked Questions - Digital Compass Pro 700102 BUSHNELL
User questions about Digital Compass Pro 700102 BUSHNELL
0 question about this device. Answer the ones you know or ask your own.
Ask a new question about this device
Download the instructions for your GPS device in PDF format for free! Find your manual Digital Compass Pro 700102 - BUSHNELL and take your electronic device back in hand. On this page are published all the documents necessary for the use of your device. Digital Compass Pro 700102 by BUSHNELL.
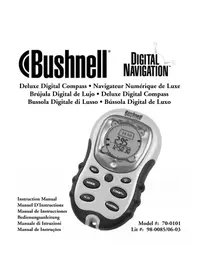
USER MANUAL Digital Compass Pro 700102 BUSHNELL
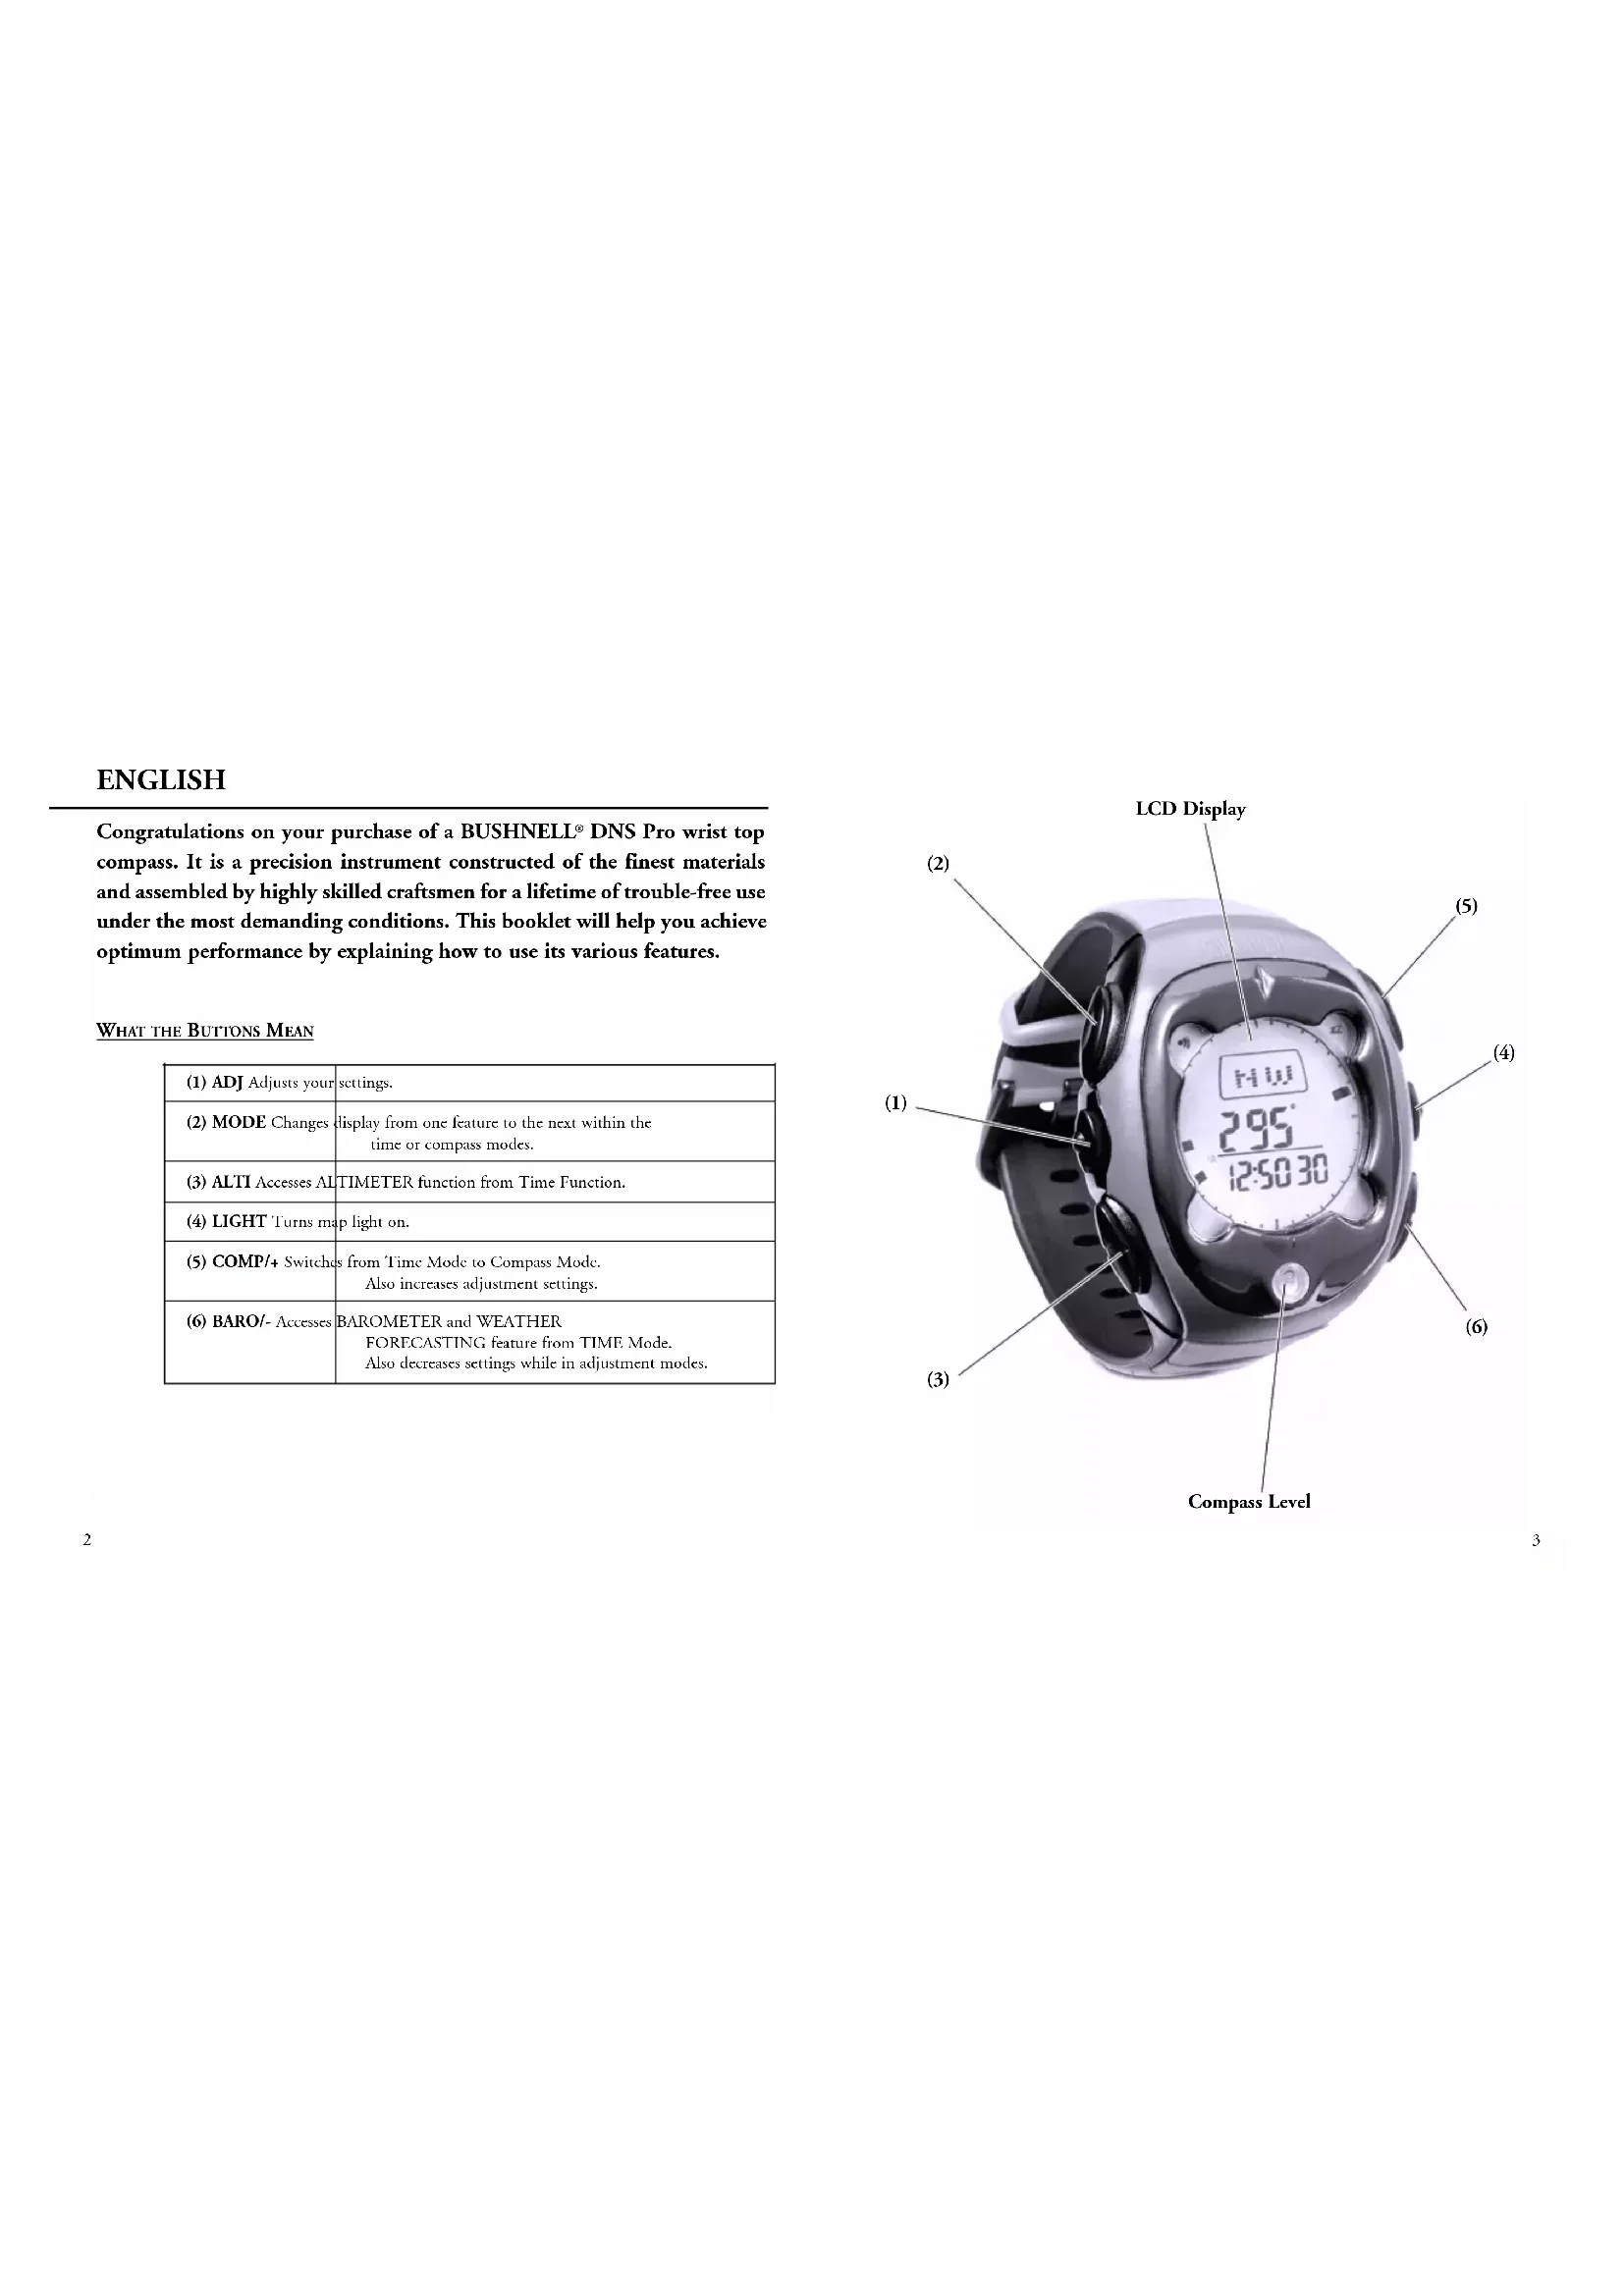
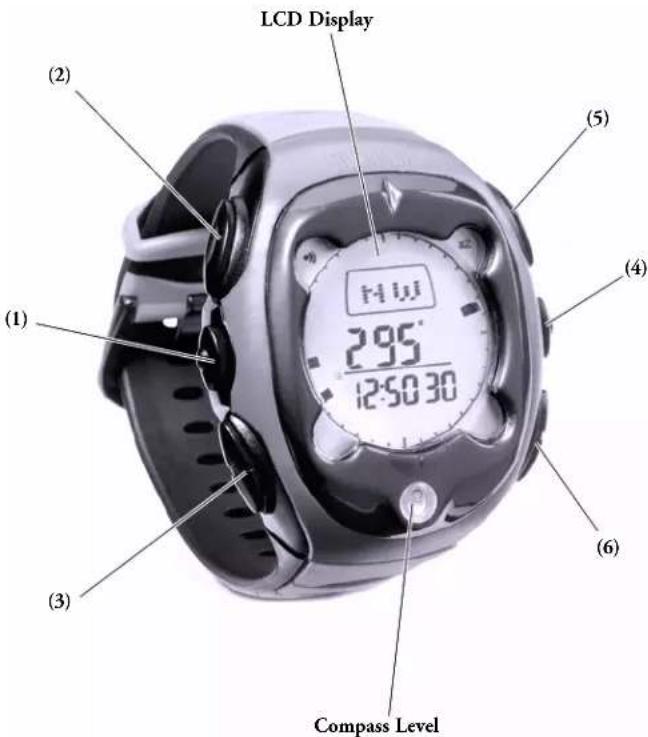
Congratulations on your purchase of a BUSHNELL® DNS Pro wrist top compass. It is a precision instrument constructed of the finest materials and assembled by highly skilled craftsmen for a lifetime of trouble-free use under the most demanding conditions. This booklet will help you achieve optimum performance by explaining how to use its various features.
WHAT THE BUTTONS MEAN
| (1) ADJ Adjusts your settings. | |
| (2) MODE Changes display from one feature to the next within the time or compass modes. | |
| (3) ALTI Accesses AL TIMETER function from Time Function. | |
| (4) LIGHT Turns map light on. | |
| (5) COMP/+ Switches from Time Mode to Compass Mode.Also increases adjustment settings. | |
| (6) BARO/- Accesses BAROMETER and WEATHERFORECASTING feature from TIME Mode.Also decreases settings while in adjustment modes. |
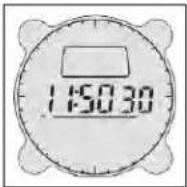
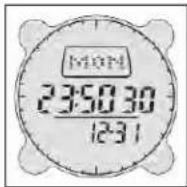
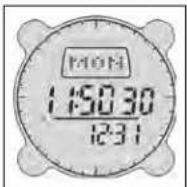
SETTING THE TIME
Default Time Mode / Time Settings
Press MODE button until Tune Mode is displayed. Press and hold down ADJ for 3 seconds. Press COMP/+ or BARO/- button until desired value appears, and then press MODE button for next setting. Press ADJ button at any time to save changes and exit. When this is done, seconds will be reset to 00. A small "A" or "P" will be to the lower left of the hours to denote AM or PM.

Date Settings
When setting the date, the year is also displayed. Press MODE button until Time Mode is displayed. Press and hold down ADJ for 3 seconds. Press MODE button and scroll to desired setting to change. Press COMP/+ or BARO/- button until desired value appears, and then press MODE button for next setting. Press ADJ button at any time to save changes and exit.

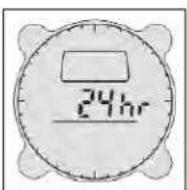
For 24/12 hour setting press MODE button until Time Mode is displayed. Press and hold down ADJ for 3 seconds. Press MODE button and scroll through settings until 24/12 hour setting appears, then press COMP/+ or BARO/- button to enter desired setting. Press ADJ button at any time to save changes and exit.
New Settings
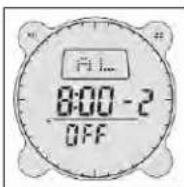
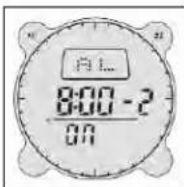
ALARM
Alarm Setting Mode
Press MODE button until Alarm Mode is displayed. The alarm consists of 5 alarms, 3 for Time 1 for Altitude, and 1 for Temperature. Press COMP/+ or BARO/- button to scroll through the different alarms. Press and hold down ADJ for 3 seconds until the minute blinks, press COMP/+ or BARO/- button to adjust to desired values. Press MODE button for next setting. Press ADJ button at any time to save changes and exit. The alarm is activated automatically after adjustments have been made. To stop the alarm from beeping, press any button.
The alarm can also be turned on or off by going to the relevant alarm and pressing the ALTI button to activate alarm function, press again to activate Snooze function, and press again to de-activate alarm.
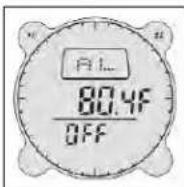
Temperature Alarm
Sets the alarm to sound when the temperature measurement reaches the programmed level. In the Alarm Mode, the Temperature alarm uses the same measurement units (°C or F) that were last set in the Temperature Mode. To change this you must first change the temperature units in the Barometer Mode. Pressing the COMP/+ or BARO/- once changes the temperature in tenths of a degree. Holding the button down changes the temperature in increments of 1 degree.
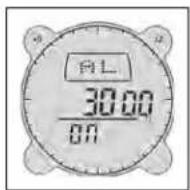
Altitude Alarm
Sets the alarm to sound when the altitude reaches the programmed level. In the Alarm Mode, the Altitude alarm uses the same measurement units that were last set in the Altimeter Mode. To change this you must first change it in the Altimeter Mode. To adjust the altitude at which the alarm will go off, press ADJ to enter the setting mode. Press COMP/+ or BARO/- to change the altitude alarm setting. Press ADJ to save and exit.
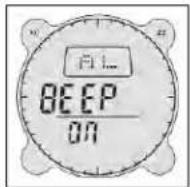
Beep Function
In the Alarm Mode a Beep function is also available. When activated, the Beep function causes a beep sound to be made whenever a button is depressed, even when the Alarm function is turned off. To activate the function go to the Beep function in the Alarm Mode, press the ALTI button and 'ON' is displayed. Press again and 'OFF' is displayed.
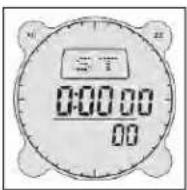
Stopwatch Mode
Press MODE button until Stop Watch Mode is displayed. To operate, press COMP/+ button to start and press again to stop. Pressing BARO/- button will reset the Stop Watch.
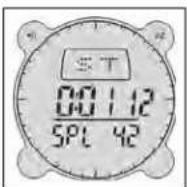
Stop Watch Mode / Split Timing Function
For split timing function, press the BARO/- button while the Stop Watch is operating in order to stop the display and press again to continue. The display will show your time down to 1/100th of a second. You can also press the BARO/- button while the Stop Watch is operating to stop the display and then press the COMP/+ button to stop the Stop Watch and display the final reading. Press the BARO/- button again to reset the Stop Watch. Split timing function is displayed as 'SPL' when activated and the display returns to normal when BARO/- button is pressed.
COUNTDOWN TIMER ALARM
Countdown / Reverse-Timer Mode
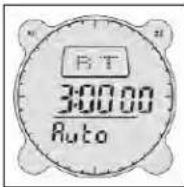
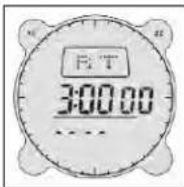
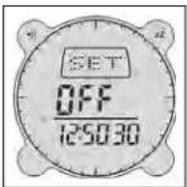
Press MODE button until Countdown Timer Mode is displayed, represented by 'RT' (reverse timer). To operate press COMP/+ button to start and press again to stop, then press BARO/- button to reset the Countdown Timer.
To set the Countdown Timer press and hold down ADJ button for 3 seconds, which will cause the seconds setting to blink. Adjust with the COMP/+ or BARO/- button, and then press MODE button to adjust next setting. Press ADJ button to save settings and exit. Press ALTI for 'AUTO' to allow Countdown Timer to repeat function automatically, and press ALTI again to turn off 'AUTO' function.
Press any button when alarm sounds to stop the Countdown Timer. If nothing is pressed the Countdown Timer will stop beeping after 10 seconds, but the countdown timer will continue if the 'AUTO' function is on. To stop the Countdown Timer if the 'AUTO' function is on, you must go to the Countdown Timer Mode and press COMP/+ to turn off the 'AUTO' function and then press ALTI button to stop it.
DIGITAL COMPASS
Compass Mode
Press MODE button until Time Mode is displayed, and then press COMP/+ button. If already in Time Mode, simply press COMP/+ button and Compass Mode is displayed. Hold the compass level using the bubble level to get a reading. If the Cardinal Points blink then the compass may need to be calibrated. (See trouble shooting tips.)
Compass Calibration
In Compass Mode, hold down ADJ button for 3 seconds. Calibration Mode is displayed. Put the compass on a level, non-magnetic surface and press the COMP/+ button. The word CAL will start blinking. Then, rotate the compass 2 full circles slowly WHILE HOLDING THE COMPASS LEVEL. Each revolution should take about 10 seconds. When done, press COMP/+ again. When completed, the display shows 'DONE' and it will then go

automatically into Declination Setting Mode. If Calibration is unsuccessful, the Cardinal Points will blink and you will have to repeat the previous 4 steps again. To skip setting the declination, press the ADJ button to return to the Compass Mode.
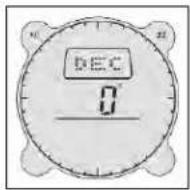
Declination Setting
Declination adjusts the compass for the local magnetic fields. In some areas, magnetic declination can be considerable, so it is a good idea to check for declination on your map or on the Internet. To adjust the compass declination angle, go to Compass Mode and hold down ADJ button for 3 seconds, and the Compass Homing Calibration Mode is displayed. Press MODE button until you get into Declination Setting Mode displayed as 'DEC'. Press COMP/+ or BARO/- button for desired value then press ADJ button to save settings and exit the mode. Declination is sometimes measured as degrees positive and negative. Degrees East are considered positive and Degrees West are considered negative. For example, to change from 3 degrees East (positive) declination to 3 degrees West (negative) until 3W appears.
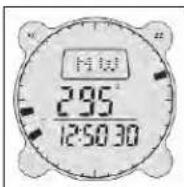
Self Homing Mode
Allows you to preset a reference bearing which tells the Compass to alert you to the direction you should be heading. Go into Compass Mode and press COMP/+ button to display compass homing. To adjust homing bearing, press and hold ADJ button for three seconds. Press COMP/+ button or BARO/- button to adjust to desired bearing setting. Pressing COMP/+ or BARO/- will increase or decrease bearing by increments of ten. A single push of COMP/+ or BARO/- moves bearing by 1 degree. When done, press ADJ to return to Homing Mode. To return to Compass Mode press COMP/+ button.
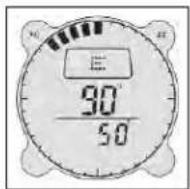
To operate the compass in Homing Mode go into the Compass Mode first, then press the COMP/+ button again to get into Homing Mode.
The main reading displays the actual bearing and the lower reading shows the 'home' bearing. The segments on the circumference show the difference between the two bearings, which can be used to redirect you to stay on course.
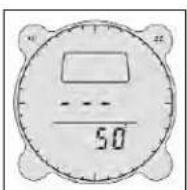
To conserve energy, the display in the Homing Mode will show 3 'bars' instead of the current bearing, and the segments will not be displayed after 1 minute. To activate the display again you must press COMP/+ . To exit the Homing Mode press MODE again to return to default Compass Mode or MODE to return to Time Mode.
AUTO BACK LIGHT
Press the LIGHT button to turn on LCD backlight for 5 seconds.
Night Mode
Night Mode allows the backlight to come on automatically when any of the function keys are pressed except when the compass is in Compass Mode. Press and hold down LIGHT button for 3 seconds, and the Night Mode icon (represented by the light symbol) appears. To turn off, press and hold down LIGHT button until the light symbol disappears.
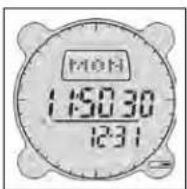
BATTERY INDICATOR
Low Battery Indicator
A blinking battery icon will appear when the battery is low. The battery compartment is on the back of the compass. Replace used battery with a CR2430 lithium battery.
BAROMETER AND TEMPERATURE
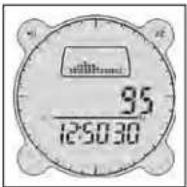
Barometer Mode
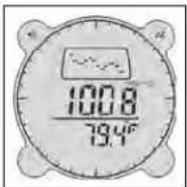
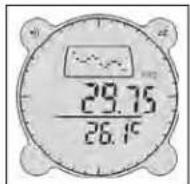
Barometric pressure in hPa(mb) and temperature in degrees °F with weather forecast graphic. To enter the Barometer Mode press MODE button until Time Mode is displayed, then press BARO/- button. If in Time Modc, Compass Mode or Altimeter Mode then just press BARO/- button and Barometer Mode is displayed. On entering the Barometer Mode, a barometric graph is displayed graphically on the dot matrix display.
Weather Forecast Mode
To change to the Weather Forecast Mode, press the BARO/- button and the weather forecast is displayed. Press BARO/- button again to change it back to a barometric graph display. For a full explanation of how the weather forecasting mode works, please see the appendix.
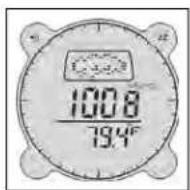
Weather Forecasting Icons
Sunny Partly Cloudy Cloudy Rain/Snow
Barometer and Temperature Units
Barometric pressure in Hg and temperature in °C. 'To change the type of units of measurement used, press and hold down the ALTI button for 3 seconds until the temperature unit blinks and press COMP/+ or BARO/- button to change it. Then press MODE to go to pressure unit and press COMP/+ or BARO/- button to change it. Press ADJ button at any time to exit. 'To get an accurate reading of temperature, please keep in mind that the unit needs to be kept away from source of heat for about 15 minutes (i.e. the temperature will reflect the temperature in your pocket instead of outside if the unit is kept in your pocket.)
Sampling
Barometric pressure and temperature measurements are taken every time you enter the Barometer Mode or when you press the BARO/- button when you are in this mode. After that, temperature measurements are taken every 5 seconds for the first 3 minutes, and then it is taken every 5 minutes thereafter.
The barometer automatically takes measurements on the start of every hour even when you are not in the Barometer Mode, except when in the Altimeter Mode where no barometric measurements are taken. The temperature is displayed in resolution of 0.1°C (or 0.2°F). 4 'bars' are displayed when the temperature falls outside the range of -10°C to 60°C (14.0°F to 140°F). Normal reading returns when the temperature value returns to within the set range.
Barometric Graph
The barometric pressure graph shows the barometric readings for the past 13 hours. The newest reading is shown as a flashing point on the right side of the graph. The pressure graph readings are relative to the newest measurement point, one dot above the newest point is plus 1 hPa(mb)/0.05 inHg, or if below then it is minus 1 hPa(mb)/0.05 inHg.
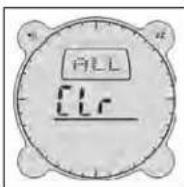
Clearing Previous Barometric Readings
Sometimes you need to clear all the previous barometric readings, e.g. when you are in a different country. To clear previous information press MODE button until Time Mode is displayed, then press BARO/- button. If already in Time Mode then just press BARO/- button and Barometer Mode is displayed. Press and hold down ADJ button for 3 seconds, the display blinks and 'CLR ALL' is displayed, then press COMP/+ button to confirm that you want to clear all the previous barometric readings, and the display will then return to Barometer Mode automatically. Press ADJ button to exit and return to Barometer Mode if you do not want to clear the previous readings.
Barometric pressure is displayed in units of 1 hPa(mb) (or 0.05 inHg). 4 'bars' are displayed when the barometric pressure falls outside the range of 260 hPa(mb) to 1100 hPa(mb) (or 7.65 inHg to 32.45 inHg). Normal reading returns when the barometric value returns to within the set range.
Altimeter Mode
Press MODE button until Time Mode is displayed, then press ALTI button. If already in Time Mode, Compass Mode or Barometer Mode, then just press ALTI button and the Altimeter Mode is displayed. Press ALTI button and hold down for 3 seconds to change Altimeter setting from Feet to Meters or vice versa.
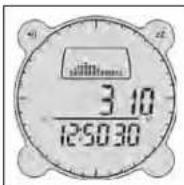
Altitude is displayed in resolution of 5 meters (10 feet). The measuring range is -700 to 8940 meters (-2,300 to 29320 feet) 4 'bars' are displayed when the value exceeds this range. The measured altitude may be a negative value in cases where there is a reference altitude value set or because of certain conditions.
The Altitude graph consists of 14 columns and 9 rows of dots with each column of dots representing a period when the altitude measurements were taken, with each dot representing a unit of 10 meters (30 feet).
The graph takes an altitude reading every 5 seconds for the first 3 minutes and then every 5 minutes thereafter.
Setting a Reference Altitude
The altimeter uses the built in ISA (International Standard Atmosphere) values to convert the air pressure measured at the current location to the equivalent altitude. But you can set a reference altitude and the compass automatically adjusts its air pressure to altitude conversion calculation accordingly.
To set a reference altitude, press and hold down ADJ button for 3 seconds while in the Altimeter Mode. The reading displays 'OFF' or the current reference value (if set) will blink, which indicates the setting screen, if setting is 'OFF' press ALTI button. Press COMP/+ button to increase the value in increments of 5 meters (10 feet) or press BARO/- button to decrease it. When in feet, holding down CO altitude by 100 ft increments. When in meters, it shifts the altitude. Pressing ALTI button turns the value to 'OFF', repeating the procedure set reference value. Setting the reference altitude to 'OFF' means the conversion based on factory preset data is used only. Pressing ADJ but setting mode.
Memory Function
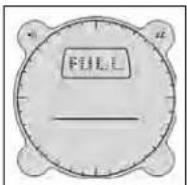
There are 10 memories where you can store altitude, time and date information. To store current altitude measurement, time and date, press MODE button and hold down for 3 seconds. While in the Altimeter Mode, a memory number is displayed with 3 'bars' meaning it is empty or the last viewed memory is shown. Press COMP/+ button until an empty memory is located. If the memory is full, 'FULL' is displayed (then nothing can be stored until memory is made available). Press and hold down COMP/+ button for 3 and the displayed values are stored into the memory (the date
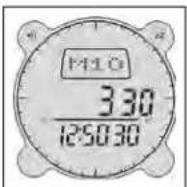
is also stored), and the display is returned to Altimeter Mode. If you decide you do not want to store anything when you have entered the memories, you will have to press MODE button or ADJ button which will return you to the Altimeter Mode.
'Full' is displayed when all 10 memories are used up. The memory will need to be reset before you can store new entries.
Reading Stored Memories
To read stored memories press and hold down MODE button for 3 seconds once while in the Altimeter Mode, a memory number is displayed with 3 'bars' meaning it is empty, or the last viewed memory is shown. If memory is full, 'FULL' is displayed. Press COMP/+ button and the last viewed memory is displayed. To view other stored memories press COMP/+ button again to scroll through all stored memories.
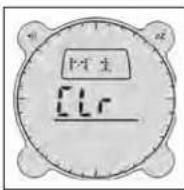
Clearing Memory
To clear a memory press and hold down MODE button for 3 seconds while in the Altimeter Mode. The last viewed memory is displayed, or if memories is full 'FULL' is displayed. Press COMP/+ button until the memory you want to clear is displayed, then press BARO/- button, a blinking 'CLR' is displayed, press BARO/- button again to confirm. To exit press MODE or ADJ button.
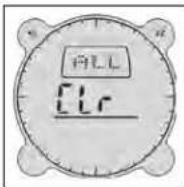
To clear all memory press and hold down MODE button for 3 seconds while in the Altimeter Mode, the last viewed memory is displayed, or if memories are full 'FULL' is displayed. Press COMP/+ button to view memories. Then press BARO/- button and hold down until 'CLR ALL' is displayed. Press BARO/- button again to confirm or press MODE button or ADJ button to exit, or press COMP/+ button to continue viewing the memory.
INSTALLING A BATTERY
To open the battery compartment cover, insert a coin in the coin slot and rotate cover in a clockwise direction until it lifts open. Insert the lithium cell (battery type: CR2430) into the compartment, making sure that the negative polarity faces downwards. Close battery compartment cover until it clicks shut.
APPENDIX: HOW THE WEATHER FORECASTER WORKS
Your barometer is a tool to that measures how heavy the air is. The trend is more important for forecasting than the absolute amount of pressure. Generally speaking, a rising barometer means that the air is becoming more stable (and nicer) and a falling barometer means the air is becoming less stable (stormier). Your unit is designed to forecast the weather 12 to 24 hours from now,
Weather Forecast
The weather forecast for the next 12-24 hours is calculated from absolute pressure once the unit is powered up.
| Absolute Pressure / mbar Weather Condition | |
| P<970 Rainy | |
| 970<P<1000 Cloudy | |
| 1000<P<1030 Partly Cloudy | |
| P>1030 Sunny | |
Your DNS Pro takes barometric pressure every hour and compares current pressure with the previous one to trace the change. If pressure keeps rising or falling for more than 3 hours, weather condition will be changed relative to the change in pressure.
The weather forecast is calculated from the change in pressure per time period. The change in weather condition is directly proportional to the speed of change in barometric pressure. A rising slope indicates High Pressure System and a good (stable) weather trend. A falling slope means a Low Pressure System and worsening weather trend (unstable).
Fluctuations in pressure typically due to a sudden change of conditions (ex. rapid change in elevation due to flying from one elevation to another) are filtered out and no weather forecast is made. If this happens, the unit will restart monitoring the pressure for required time period. Barometric pressure that keeps constantly rising or falling during the past 3 hours will effectively change the forecast weather condition.
BATTERY LIFE
Your DNS is designed for continuous use and batteries will last over one year with regular usage. Heavy use of the alarms, light, or compass will shorten battery life.
TROUBLE SHOOTING
- If the Cardinal points (N, NE, E, SE etc.) on your compass blink - Try holding the compass LEVEL using the bubble level as a guide. The Cardinal points may also blink when the Compass encounters magnetic interference from the surrounding areas. The Cardinal points blink because the Compass is unable to measure Bearings accurately. If this does not fix the blinking, please recalibrate your compass. Remember to keep the Compass away from metal objects which may cause magnetic interference. Also double check that your declination is properly set (In general, zero degrees should be the default setting).
- Three dashes are displayed – Your compass has gone into a "sleep" mode to save batteries. Press COMP/+ to reactivate the compass.
- Can't turn unit off – This unit is designed to be constantly on and the batteries will last about a year assuming normal usage.
- The Temperature does not seem accurate – remember that it takes 15 minutes for the unit to adjust to the ambient temperature. Keeping the unit in a pocket or in direct sunlight will impact the temperature.
- My weather forecaster shows rain but it is sunny right now – Your weather forecaster is designed to forecast the weather 12-24 hours from the current time.
- Reset compass – If, during operation, an external electrodischarge occurs near the compass, the unit may exhibit erroneous readings. To solve this problem, the watch must be reset and recalibrated. The watch is automatically reset when the battery is removed.
- If your wristtop goes into a test mode after inserting the battery – you will need to re-install your battery. Remove battery. Wait 10 seconds then carefully re-insert the battery making sure that it is well placed in the battery compartment. Close battery door.
- You will know that your wristtop has gone into test mode – if you see the LCD segments around the display turning on one-by-one and moving in an counter-clockwise direction. After the test mode is completed, your wristtop will return to normal. The test mode will not harm your wristtop's normal operation.
WARRANTY / REPAIR
TWO-YEAR LIMITED WARRANTY
Your Bushnell® product is warranted to be free of defects in materials and workmanship for two years after the date of purchase. In the event of a defect under this warranty, we will, at our option, repair or replace the product, provided that you return the product postage prepaid. This warranty does not cover damages caused by misuse, improper handling, installation, or maintenance provided by someone other than a Bushnell Authorized Service Department.
Any return made under this warranty must be accompanied by the items listed below:
1) A check/money order in the amount of \$10.00 to cover the cost of postage and handling
2) Name and address for product return
3) An explanation of the defect
4) Proof of Date Purchased
5) Product should be well packed in a sturdy outside shipping carton, to prevent damage in transit, with return postage prepaid to the address listed below:
IN U.S.A. SEND TO: IN CANADA SEND TO:
Bushnell Performance Optics Bushnell Performance Optics
Attn.: Repairs Attn.: Repairs
8500 Marshall Drive 25A East Pearce Street, Unit 1
Lenexa, Kansas 66214 Richmond Hill, Ontario L4B 2M9
For products purchased outside the United States or Canada please contact your local dealer for applicable warranty information. In Europe you may also contact Bushnell at:
BUSHNELL Performance Optics GmbH
European Service Centre
MORSESTRASSE 4
D- 50769 KÖLN
GERMANY
Tél: +49 (0) 221 709 939 3
Fax: +49 (0) 221 709 939 8
This warranty gives you specific legal rights.
You may have other rights which vary from country to country.
©2003 Bushnell Performance Optics
FRENCH
Fonction Bip (Beep Function)
Mode Autoguidage (Self Homing Mode)
(Barometer and Temperature Units)
(Clearing Previous Barometric Readings)
8500 Marshall Drive 25A East Pearce Street, Unit 1
Lenexa, Kansas 66214
Richmond Hill, Ontario L4B 2M9
©2003 Bushnell Performance Optics
SPANISH
(Clearing Previous Barometric Readings)
25A East Pearce Street, Unit 1
Richmond Hill, Ontario L4B 2M9
European Service Centre
MORSESTRASSE 4
D- 50769 KÖLN
ALEMANIA
Tél: +49 (0) 221 709 939 3
Fax: +49 (0) 221 709 939 8
©2003 Bushnell Performance Optics
GERMAN
(Stopwatch Mode / Split Timing Function)
GARANTIE / REPARATUR
ZWEIJÄHRIGE BESCHRÄNKTE GARANTIE
25A East Pearce Street, Unit 1
Lenexa, Kansas 66214
Richmond Hill, Ontario L4B 2M9
European Service Centre
MORSESTRASSE 4
D- 50769 KÖLN
Deutschland
Tél: +49 (0) 221 709 939 3
Fax: +49 (0) 221 709 939 8
©2003 Bushnell Performance Optics
ITALIAN
8500 Marshall Drive 25A East Pearce Street, Unit 1
Lenexa, Kansas 66214 Richmond Hill, Ontario L4B 2M9
European Service Centre
MORSESTRASSE 4
D- 50769 - Cologne
Germania
Tél: +49 (0) 221 709 939 3
Fax: +49 (0) 221 709 939 8
©2003 Bushnell Performance Optics
PORTUGUÊS
8500 Marshall Drive 25A East Pearce Street, Unit 1
Lenexa, Kansas 66214 Richmond Hill, Ontario L4B 2M9
European Service Centre
MORSESTRASSE 4
D- 50769 KÖLN
Alemanha
Tel: +49 (0) 221 709 939 3
Fax: +49 (0) 221 709 939 8
©2003 Bushnell Performance Optics
Bushnell®
www.bushnell.com


- SETTING THE TIME
- Default Time Mode / Time Settings
- Date Settings
- New Settings
- ALARM
- Alarm Setting Mode
- Temperature Alarm
- Altitude Alarm
- Beep Function
- Stopwatch Mode
- Stop Watch Mode / Split Timing Function
- COUNTDOWN TIMER ALARM
- DIGITAL COMPASS
- Compass Calibration
- Declination Setting
- Self Homing Mode
- AUTO BACK LIGHT
- Night Mode
- BATTERY INDICATOR
- Low Battery Indicator
- BAROMETER AND TEMPERATURE
- Barometer Mode
- Weather Forecast Mode
- Weather Forecasting Icons
- Barometer and Temperature Units
- Sampling
- Barometric Graph
- Clearing Previous Barometric Readings
- Altimeter Mode
- Setting a Reference Altitude
- Memory Function
- Reading Stored Memories
- Clearing Memory
- INSTALLING A BATTERY
- APPENDIX: HOW THE WEATHER FORECASTER WORKS
- Weather Forecast
- BATTERY LIFE
- TROUBLE SHOOTING
- WARRANTY / REPAIR
- TWO-YEAR LIMITED WARRANTY
- IN U.S.A. SEND TO: IN CANADA SEND TO:
- FRENCH
- Fonction Bip (Beep Function)
- Mode Autoguidage (Self Homing Mode)
- SPANISH
- GERMAN
- GARANTIE / REPARATUR
- ZWEIJÄHRIGE BESCHRÄNKTE GARANTIE
- ITALIAN
- PORTUGUÊS
Brand : BUSHNELL
Model : Digital Compass Pro 700102
Category : GPS device