UBC41 - Battery charger Tripp Lite - Free user manual and instructions
Find the device manual for free UBC41 Tripp Lite in PDF.
| Product Type | 4-in-1 Battery Charger |
| Brand | Tripp Lite |
| Model | UBC41 |
| Output Voltages | 12 V, 24 V, 36 V, 48 V selectable |
| Output Current (High Mode) | 30 A (12/24 V), 25 A (36 V), 15 A (48 V) |
| Output Current (Low Mode) | 10 A (12/24/36 V), 7 A (48 V) |
| Input Power | AC 100-240 V, 50/60 Hz |
| Max Output Power | 450 W (12 V), 900 W (24 V), 1000 W (36 V), 900 W (48 V) |
| Dimensions (L × W × H) | 300 × 223 × 101 mm |
| Weight | 4.5 kg |
| Compatible Battery Types | Lead-acid, NiMH, protected cells |
| LED Indicators | Error (red), Pulse/Accept (yellow), Charge/Maintain (green), % charge |
| Built-in Protections | Short-circuit, reverse polarity, overheat |
| Cooling System | Auto-adjusting fan |
| Operating Temperature | -20 to 60 °C |
| Operating Humidity | 95% RH max, non-condensing |
| Warranty | 1 year (limited) |
| Maintenance | No regular maintenance required; keep dry |
| Mounting | Horizontal on rigid surface (fixings not included) |
Frequently Asked Questions - UBC41 Tripp Lite
User questions about UBC41 Tripp Lite
0 question about this device. Answer the ones you know or ask your own.
Ask a new question about this device
Download the instructions for your Battery charger in PDF format for free! Find your manual UBC41 - Tripp Lite and take your electronic device back in hand. On this page are published all the documents necessary for the use of your device. UBC41 by Tripp Lite.
USER MANUAL UBC41 Tripp Lite
4-in-1 Battery Charger
AC: 100-240V, 50-60 Hz DC: 12/24/36/48V Selectable
Important Safety Instructions 2
Controls 3
Installation 3
Operation 4
Mounting (Optional) 4
Specifications 5
Maintenance and Service 5
Warranty and Product Registration 6
Espanol 7
Francais 13
Pycckn 19
PROTECT YOUR INVESTMENT!
Register your product for quicker service and ultimate peace of mind.
You could also win an ISOBAR6ULTRA surge protector—a $100 value!
www.triplite.com/warranty


Manufacturing
ExceIence.
1111 W. 35th Street, Chicago, IL 60609 USA · www.triplite.com/support
Copyright © 2015 Tripp Lite. All rights reserved.
Important Safety Instructions
SAVE THESE INSTRUCTIONS!
This manual contains important instructions and warnings that should be followed during the installation, operation and storage of all Tripp Lite Chargers.
LocationWarnings
- Do not mount unit with its front or rear panel facing down (at any angle). Mounting in this manner will seriously inhibit the unit's internal cooling, eventually causing product damage not covered under warranty.
- Use your charger in a location or compartment that minimizes exposure to heat, dust, direct sunlight and moisture. Flooding the unit with water will cause it to short-circuit and could cause personal injury due to electric shock.
- For proper ventilation, allow a minimum 2 inches of clearance at front and back of the charger. To avoid overheating, the compartment that houses the charger must be properly ventilated with adequate outside air flow. The heavier the load of connected equipment, the more heat will be generated by the unit.
- Do not install or use the charger near flammable materials, fuel or chemicals.
Battery ConnectionWarnings
- Because explosive hydrogen gas can accumulate near batteries if they are not well ventilated, do not connect to batteries in a "dead air" compartment. The battery compartment should have some ventilation to outside air.
- Sparks may result during final battery connection. Always observe proper polarity as batteries are connected.
- Do not allow objects to contact the DC input terminals or battery terminals. Do not short or bridge these terminals together. Serious personal injury or property damage could result.
ServiceWarnings
- During service work, both the AC source and battery should be disconnected.
- Potentially lethal voltages exist when the AC source is connected.
- An energy hazard exists when the battery is connected to the charger and AC source.
Equipment ConnectionWarnings
- Use of this equipment in life support applications where failure of this equipment can reasonably be expected to cause the failure of the life support equipment or to significantly affect its safety or effectiveness is not recommended. Do not use this equipment in the presence of a flammable anesthetic mixture with air, oxygen or nitrous oxide.
OperationWarnings
- Your charger is designed only for battery charging. It cannot be used as a power supply.
- Only charge lead-acid, NiMH and enclosed cell batteries.
- Do not attempt to charge a battery whose voltage differs from the charger's selected voltage setting.
- Your charger does not require routine maintenance.
- Your charger is designed with an aluminum heat-sink housing that safely dissipates excess heat. Avoid touching the unit during charging, as external temperatures can reach up to 122^ (50^) .
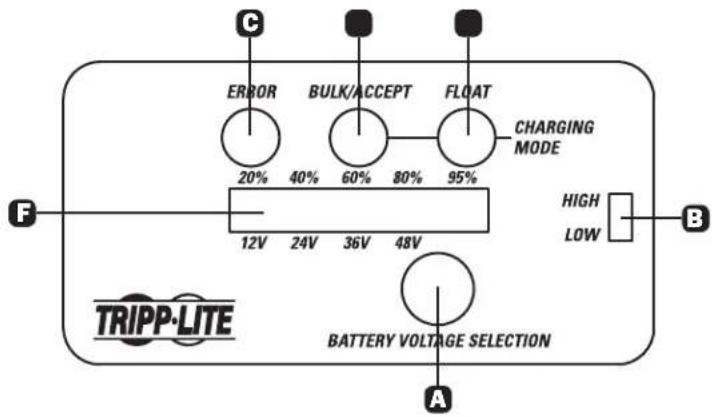
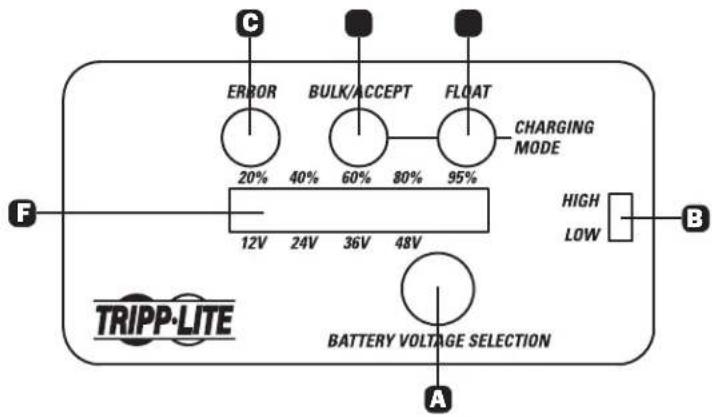
Controls
A Battery Voltage Selection Button
High/Low Charge Rate Switch
Error (Red) LED
Bulk/Accept (Yellow) LED
Charging/Float (Green) LED
F Battery Charge % / Battery Voltage Selector LEDs
Installation
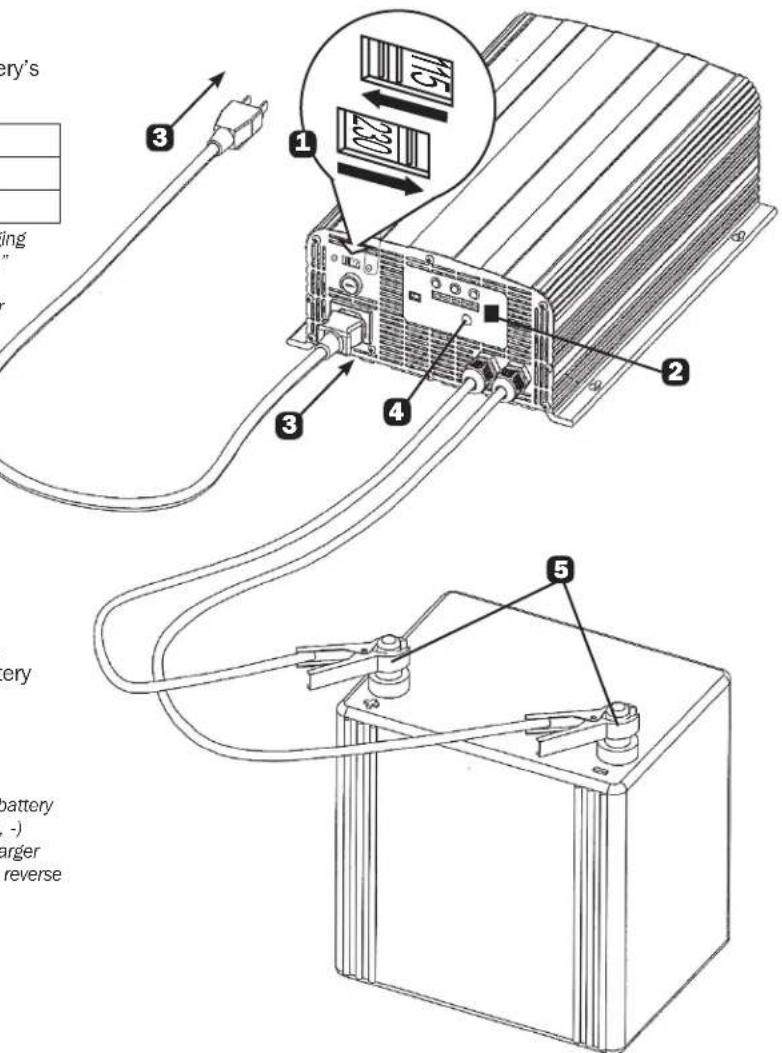
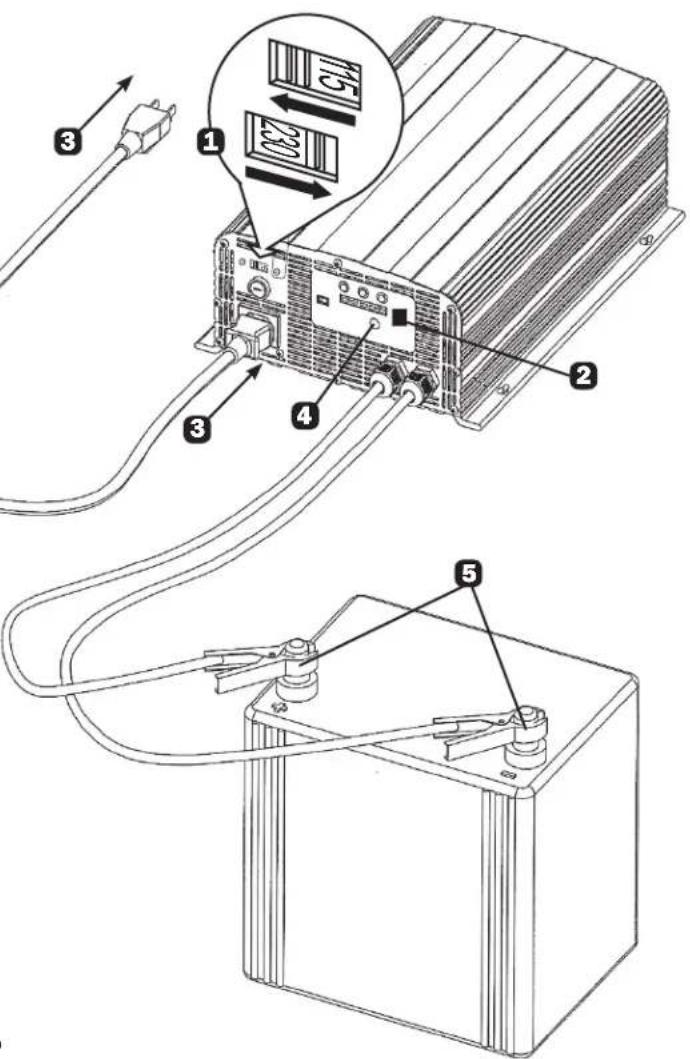
1 Select the appropriate mains voltage for your region.
Set the High/Low Charge Rate Switch according to battery's capacity:
| DC Output Voltage to Battery | 12V 24V 36V | 48V | |
| Set to “High” | 30A 30A 25A | 15A | |
| Set to “Low” | 10A 10A 10A | 7A |
Note: The "Low" setting is recommended for general battery charging and batteries whose charge has been severely depleted. The "high" setting will charge a battery faster, but repeated fast charges may overcharge a battery and reduce useful battery life. Reference your battery manufacturer's charging instructions to determine the proper setting.
3 Insert the power cord's C19 connector into the charger's C20 power inlet. Then plug the other end of the power cord into an available AC power outlet. CAUTION: Do not establish power connections with an ungrounded AC outlet.
Note: Complete Step 3 before connecting the charger to a battery.
Once an AC power connection is established, press the Battery Voltage Selection button to match the battery's voltage (12/24/36/48V). LEDs will illuminate in the Battery Charge % / Battery Voltage Selector bar to correspond with the desired charging voltage.
5 Connect the charger's clamps to the battery terminals.
Note: Always attach the red clamp to the positive (POS, P, +) battery terminal before attaching the black clamp to the negative (NEG, N, -) terminal. For unmarked terminals, the positive post usually has a larger diameter than the negative post. When disconnecting the charger, reverse the order of the connecting steps.
Operation
LED Indicators
| LED (Color) LED Status Operation Status Description | |||
| Normal Operation | |||
| Bulk/Accept (Yellow) Solid Soft | start Current is charging slowly | ||
| Slow flash Bulk constant current charging Battery drawing maximum charge current | |||
| Fast flash Absorption constant voltage charging Battery reaches set voltage limit; adjusts to draw less charge current | |||
| Very fast flash finsh constant voltage charging Battery near 100% capacity; approaching floating status | |||
| Charging/Float (Green) LED Slow flash Floating Battery charge full | |||
| Fast flash Floating Battery | charge full and floating current < 0.5 A | ||
| Abnormal Operation | |||
| Error (Red) | Flash 2x | Charger cannot connect to battery or broken DC fuse | Check fuse and replace if broken |
| Flash 3x | Battery voltage is too high or too low | Check that battery voltage selected on charger matches battery's voltage | |
| Flash 4x | Shorted internal thermal sensor or open circuit | Defective thermal sensor; follow the Service instructions on the next page | |
| Flash 5x | Internal overheat protection | Unit cooling down; will automatically restart upon reaching average internal operating temperature | |
Notes:
- Battery voltage selection cannot be changed during charging; the battery must be disconnected before selecting the charger voltage.
The battery is fully charged when the green LED is illuminated. You can stop charging the battery at this point or keep it connected in floating status.
To end a charging session, disconnect the AC power cord from the source, then disconnect the charger's clamps from the battery terminals.
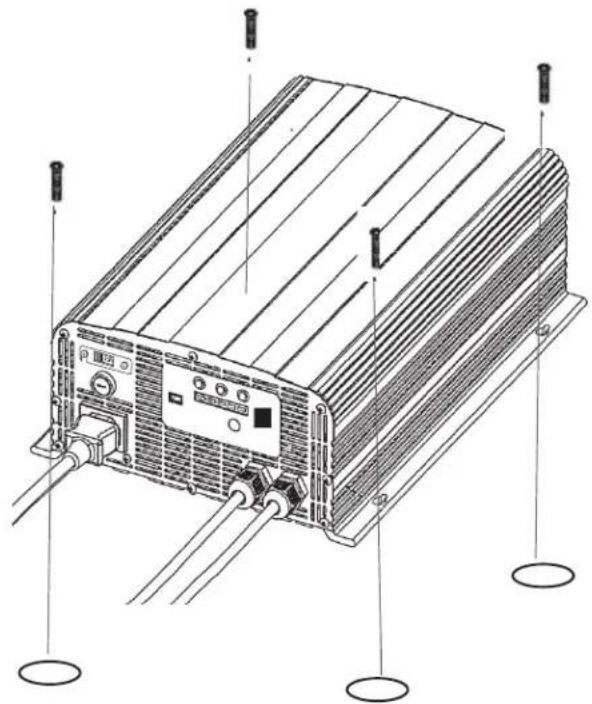
Mounting (Optional)
The 4-in-1 Charger can be mounted to a horizontal surface. To mount, install four fasteners (not included) through the charger's mounting slots into a rigid surface. Secure the fasteners as far back in the mounting slots as possible, otherwise the fasteners may loosen and cause the charger to slide back and forth.
Note: The user is responsible for determining if the hardware and mounting surface are suitable to support the charger.
Specifications
| Input Voltage | 100V ~ 240V Manual Switch | ||
| Input Frequency | 50 / 60 Hz | ||
| Current (Without Load) | < 0.1A | ||
| Maximum Output Current | < 15A | ||
| Maximum Efficiency in Max Power | >80% | ||
| Output Voltage | 12V 24V 36V 48V | ||
| Maximum Ampere Imax(Input Voltage Switch Set to "High") | 30A 30A 25A 15A | ||
| Minimum Ampere Imax(Input Voltage Switch Set to "Low") | 10A 10A 10A 7A | ||
| Maximum Output Charging Power | 450W 900W 1000W 900W | ||
| Voltage Sensor Startup Position | 5V | ||
| Charging Range | 8 ~ 14.8V 16 ~ 29.6V 30 ~ 39.9V 40 ~ 60V | ||
| Average Charging Voltage (Vblk) | 14.5V 29V 42.6V 56.5V | ||
| Floating Charging Voltage (Vflt) | 13.3V 26.6V 39.9V 53.2V | ||
| Protection Functions | Short Circuit Protection | ||
| Reverse Connection Protection | |||
| Internal Overheat Protection | |||
| Voltage / Current Precision | < 5% | ||
| Longest Floating Charging Time | No Limitation | ||
| Operating Ambient Temperature | Full Load: -4° ~ 140°F (-20° ~ 60°C) | ||
| Operating Ambient Humidity | Maximum 95% RV, Not Condensing | ||
| Cooling System | Automatic adjust fan according to internal temperature | ||
| Average Internal Temperature | <150°F (< 70°C) | ||
| Dimensions [L x W x H] | 11.8 x 8.8 x 4 in. (300 x 223 x 101 mm) | ||
| Weight | 9.9 lb. (4.5 kg) | ||
Note: If the battery voltage is below the charge range, the charger may not run (turn on). For example, this can occur when the terminal voltage for a 12V battery is less than 8V.
Maintenance and Service
Maintenance
Your Tripp Lite Charger requires no maintenance and contains no user-serviceable or replaceable parts, but should be kept dry at all times. Periodically check, clean and tighten all cable connections as necessary, both at the unit and at the battery.
Service
Your Tripp Lite product is covered by the warranty described in this manual. A variety of Extended Warranty and On-Site Service Programs are also available from Tripp Lite. For more information on service, visit www.triplite.com/support. Before returning your product for service, follow these steps:
- Review the installation and operation procedures in this manual to insure that the service problem does not originate from a misreading of the instructions.
- If the problem continues, do not contact or return the product to the dealer. Instead, visit www.triplite.com/support.
- If the problem requires service, visit www.triplite.com/support. Click "Product Returns" from the left-side drop down or menu bar, then select the "Request Return (RMA)" link. From here you can request a Returned Material Authorization (RMA) number, which is required for service. This simple on-line form will ask for your unit's model and serial numbers, along with other general purchaser information. The RMA number, along with shipping instructions will be emailed to you. Any damages (direct, indirect, special or consequential) to the product incurred during shipment to Tripp Lite or an authorized Tripp Lite service center are not covered under warranty. Products shipped to Tripp Lite or an authorized Tripp Lite service center must have transportation charges prepaid. Mark the RMA number on the outside of the package. If the product is within its warranty period, enclose a copy of your sales receipt. Return the product for service using an insured carrier to the address given to you when you request the RMA.
Warranty and Product Registration
1-Year Limited Warranty
w
THIS WARRANTY DOES NOT APPLY TO NORMAL WEAR OR TO DAMAGE RESULTING FROM ACCIDENT, MISUSE, ABUSE OR NEGLECT. SELLER MAKES NO EXPRESS WARRANTYES OTHER THAN THE WARRANTY EXPRESSLY SET FORTH HEREIN. EXCEPT TO THE EXTENT PROHIBITED BY APPLICABLE LAW, ALL IMPLIED WARRANTYES, INCLUDING ALL WARRANTYES OF MERCHANTABILITY OR FITNESS, ARE LIMITED IN DURATION TO THE WARRANTY PERIOD SET FORTH ABOVE; AND THIS WARRANTY EXPRESSLY EXCUSES ALL INCIDENTAL AND CONSEQUENTIAL DAMAGES. (Some states do not allow limitations on how long an implied warranty lasts, and some states do not allow the exclusion or limitation of incidental or consequential damages, so the above limitations or exclusions may not apply to you. This Warranty gives you specific legal rights, and you may have other rights which vary from jurisdiction to jurisdiction).
WARNING: The individual user should take care to determine prior to use whether this device is suitable, adequate or safe for the use intended. Since individual applications are subject to great variation, the manufacturer makes no representation or warranty as to the suitability or fitness of these devices for any specific application.
Product Registration
Visit www.triplite.com/warranty today to register your new Tripp Lite product. You'll be automatically entered into a drawing for a chance to win a FREE Tripp Lite product!
- No purchase necessary. Void where prohibited. Some restrictions apply. See website for details.
Regulatory Compliance Identification Numbers
For the purpose of regulatory compliance certifications and identification, your Tripp Lite product has been assigned a unique series number. The series number can be found on the product nameplate label, along with all required approval markings and information. When requesting compliance information for this product, always refer to the series number. The series number should not be confused with the marketing name or model number of the product.
WEEE Compliance Information for Tripp Lite Customers and Recyclers (European Union)

Under the Waste Electrical and Electronic Equipment (WEEE) Directive and implementing regulations, when customers buy new electrical and electronic equipment from Tripp Lite they are entitled to:
- Send old equipment for recycling on a one-for-one, like-for-like basis (this varies depending on the country)
- Send the new equipment back for recycling when this ultimately becomes waste
Tripp Lite has a policy of continuous improvement. Specifications are subject to change without notice.


Manufacturing Excellence
1111 W. 35th Street, Chicago, IL 60609 USA · www.triplite.com/support

Manufacturing Excellence
1111 W. 35th Street, Chicago, IL 60609 USA · www.triplite.com/support
PykoBoDCTBO noIb3OBaTeJIa
UBC41
3apянhoe yctpoiCtBO "4-B-1"
IpeMeHHbI ToK: 100-240 B, 50/60 rU NocToHbI ToK: 12/24/36/48 B (Ha BB6Op)
BaxHbIe yka3aHnno TeXnKe 6e3oNaChocTu 20
3nemeHTbI ynpaBneHn 21
YcTaHOBka 21
Iopraok 3kcnnyatauun 22
MONTAX (no keJahnIO noJIb3OBaTeJIa) 22
Texnueckne xapaKtepncTkn 23
YxOu TeXnueckoe 06nyKuBaHne 23
TapaHTnHbIe 06a3aTeJIbCTBa 24
English 1
Espanol 7
Francais 13
Baxhhie yka3aHnno texhne 6e30naChoctn
COXPAHNTE HACTOJIUE YKA3AHNAI!
B hactoem pykoobctBe coepkataBaxhhe yka3aHn H npdynpexHn, KOTpbie Heo6xOIMo co6IaTb B npoucece ycTaHOBKn, 3Kcnnyataunn XpaHeHH Bcx 3apndhix ycTpoCTB Tripp Lite.
PpeynpekdeHn OTHoCHTeNbHO MeCTa yCTaHOBKn
3aPpeaaetc yctahabnBaTb ycTpoCTBO c paonnoKeHem ero Inebo nn 3aHe nnaHn no HapbaeHHBn (noIIObIMyTOM). YcTaHObKa IVBn IO6bHbIM o6pa30m npueet K co3aHnO cepbe3bIX npenrTCTBn dnn CnCTeMb BHyTpEHHBeHTUNAun yCtpoCTBaN, B KOHeHOM NTore, K nobpeJeHNIO IVBn, Ha KOTope He pacnpocTpaHIO Tc rapaTHnHbIe ycNoBn.
- UcTaHOBInTe CBoe 3apAINHO yCTpoiCTBO B KAKOM-NIb6o MeCte Nn WkaFy, Ige OH NIOBepraJIc8b MHNIMaJIbHOMy BO3JeCTBnIO TEnIIa, Nblnn, PpIamOrO coJIHeHOrO CBeta n BlaIg. NpIaHaHne BOdb BVHTpb yCTpoiCTBa npIBeET K KOPOTKOMy 3aMbKaHIO N MoKeT pNCHNTB BpeD 3dOpOBbIO JIODeB CJIeDCTBnE nopaxHenr 3NEKTprueckm TOKOM.
IgnoobcepeHnHaNekxueroBo3dyXoo6MeHa Cbo6oDHe npocpaHCTBO CnepeHEn 3aHNe CTPOH 3apHOrO yctpoCTBa DOnKHO coCTABTb He Mehee 50 MM. Bo n36eKaHne nepepeBa npocpHaCtBO, B KOTOpom pacnonaraetc 3apHoe yctpoCTBO, DOnKHO HaNekzauM oBpa3OM pOBeTpBaTbc DOCTaTOHbIM NOTOKOM HApYHKOrO BO3dyxa. Yem Bblwe Harpy3ka, Co3daBaMa IOnkIOUeHHbIM ObOpyDOBaHnEM, TEM 60nlbe Tennba 6ydt BldenrTaBC daHHbIM yctpoCTBOM.
- He yctaHabnBaIte 3apJHOe ycTpoCTBO B6JIImN BOCpIaMeHReMbIX, TOPIINBbIX INI XIMMuecknx MaTePnaIOB.
PpeynpeKdHnO tHocntelbNo nokkIOueHn 6aTapeM
- Nockony npn HeoctaOnHb BENTINIaBbIa36 bataep Bo3MOxHO cKONHe B3pbBOonacHO rA30Opa3HO BOIOpa, He nokuayTe 6batae K 3apAnHomy yctpoNCTBy B MeCTax C 3atpydHeHNo LnpKyluae BO3dyxa. BaTapeHb otceK dOnKeH IMetb HeKOtopoe coo6JeHne C BHeUHe cpeoi.
- Pn OkHATeNBOM NOKIOUeHNN 6aTapeN K Harpy3Ke BO3MOxHO NCKPOO6pa3OBaHne. O6raTeNbHO co6IIOaJIte npabINbHyIO IOnpHocTB npn NOKIOUeHN 6aTapeN.
- He Doynckai Te KOhtakTa KaKnx-JI6o IpeDMTe CO BXOHNMI KJEMMaMNI NOCTOHNTOKA. He 3aKopaunBaHrTe H He UHTnpyuTe 3TN KJIeMMBmMeKdy co6oN. 3To MoKeT npuHHnTB cyueCTBeHHb BpeD 3doOpBBIO JIODe IN MATEpnaIbHb yueep6.
PpeynpeKdHnOTHoCTeIbHO TexHueckoro 6cnyxBaHHa
- PnBbIopJIHeHm pa60T no TeXHHueCKOMy o6cnyKmbAHIO nCTOuyHK npeMeHHoro TOKa N 6aTaPeJdoJxHbI 6bItb OTKJIUChEbl OT yCtpoCTBa.
- Pn IIOKJIIOHHeHOM ICTOCHNIke nepemehHO TOKa BHTPN KOpNyca 3apdHoro yctpoiCTBa IMeHOTcra OAnChbIe IJRA JIN3HN HApRJaKeHn.
- Pn npKJIIOHmN 6bAtepe N 3apdHOMy yctpoiCTby n HcToHHky nepMeHHoro ToKa IMeet MeCTo 3HepreTueckn OnaChb foakTop.
PpeynpeKdHn OTHocHTeJbHo nOpkNIOUeHHn o6OpydoBaHHa
He peKomeHnyetc HcNOnb3OBAb Ta daHHoe obOpdyOBaHne B CnCTeMax Kx3Heo6ecneueHnB Tex cnyaX, Korda erO c60oi c 60Ibwoi BepoTHocTbIO npBeTeK C60IO o6OpdyOBaHn Jx3Heo6ecneueHn IIN 3HaHTeNBOMy CHKeHIO erO 6e3oNaCHOCn IIN 3ΦΦeKTUBHOCTN. 3aPeUaTcraHNOb3OBAb Ta daHHoe obOpdyOBaHne np HaNNu BOCnPaMeHIOxxCr Cmec e aHeCTeNUeCKnx Ra3OB C Bo3DyXOM, KICNpOPOOM IIN 3akncbO a30Ta.
PpeynpeXeHn OTHoCtJeBHO nopAka 3KcnIyataun
- Pnpo6peTeHoe BAMN 3apraHoe yctpoictBO npedHa3nueHo TOnbKO dIg 3aprKn 6atapeB. B KaueCTBe nctOHNka NITAHNOHO NCIOJIb30BaTBCa He MOKeT.
3apkaTe cero nMOUbTOIbKO CBHIOBO-KMCIOThbI, HIKeJIb-MeTaN-ITbPnIDhBie N3aKpbTIbe aKKyMnyTopHbI 6aTapei. - He 3apjaKeTe 6aTapeN c HnnpjKeHHeM, OTNIuHaOUsIMcR OYCTaHOBJIeHHOro Ha 3apJdHOM yCTpoIcTBe.
BaWe 3apdHoe yctpoiCtBO He Tpe6yeT peyIpaHoro Texnueckoro obcnyuBaan.
KohctpykneB Bawero 3apndHoro yctpoCTBa npedyCMATPBaeTcA ANHomHHeBb KOpNc C paadnTopom, 6e0nacHO paccenBaOUM 36bItoHoe TENIO. He npikacaiTeCb K yctpoCTBy BO Bpemr 3apdKn, Nocoklbky ero BheHHe NOBepxHOCm MOrTy HarpBaTcRdo 50^
3JemeHbI ynpabJeHnA
A Khonka BbIbopa HanpJxKeHn 6aTapeu
IpeeknouateIb pexmOB noctoHHoro TOKa "CnIbHb/ Cna6b"
CND Error("OuMbKa")(KpaChbI)
D CnBulk/Accept ("ObemHbI/npHnTb") (KeHTbI)
CNDCharging/Float("3apka/xoiocto{xo")(seIeHbI)
CINB Battery Charge % / Battery Voltage Selector ("3apd 6atapen % /ipeeknouateh nnapjhenbatape")
YCTaHOBKa
BbIbepTe HOMHnHaJIbHoe 3HaueHHe CeTeBOrO HAnpJKeHn, nIOJIb3yEmoR B BaUem perNoHE.
YcTaHOBHTe nepeKJIouaTeIb peXIMOB NOCToHHoro TOKa High/ Low("CnJIbHbI/Cna6bI") B COOTBeTCTBm C TeKyuue EmKocTbO 6atapen:
| Быхонhoe habряжени постонною Тoka, подаимою на затуpeю | 12 B 24 B 36 B 48 B | |
| Установънь На "High" ("Сильный") 30 | A 30 A 25 A 15 A | |
| Установънь На "Low" ("Слобий") 10 A | 10 A 10 A 7A |
Pumeyue. IonoJeue Cna6bui pekomehyemc uonb3oamb
dnoobinyou3apoku damapeu,amakeo 6aapeucyuecmehno
HOMOGENUM 1000000000000000000000000000000000000000000000000000000000
aennnnnne nnnnne ennnnne nnnnne nnnnne nnnnne nnnnne nnnnne nnnnne nnnnne nnnnne nnnnne nnnnne nnnnne nnnnne nnnnne nnnnne nnnnne nnnnne nnnnne nnnnne nnnnne nnnnne nnnnne nnnnne nnnnne nnnnne nnnnne
CunBn) 3apnoka damape npoa3eocmch Obicnpee, Ho
yacmoe uonb30aHue pexuma bbcmpou 3apdku moxem
noedeepzambambeamapeu u3bimoHMy 3apoy, cokpauaa meM
cambm ee npehny neycn. nno npedene hndpexaaezo
T
nonoxen Hm. ykasaun No sapnke, nanyehnne om
BCTaBbTe pa3bEm C19 shHpya nTaNnB BO BXoHNOpa3bEm nTaNnA C20 3apdHoro yCtpoNCTBa.3aTEM
BCTaBbTe pa3bEm, HaxoJMyNCsHa Dpyrom KOHcpe UHypa NITAHNBA CBO6OHyKo p03eTky NITAHNIEpeMeHHORo TOka. BHIMAHNE! He yCTaHABnBaIte CNIOBbIE CoeINHeHcN C He3a3eMNeHHOHpo3eTKo NITAHNIEpeMeHHORo TOka.
Pumeyane. Ipeo nooknouenem 3apno ycmpoucmra K bamaee 6bnnonHume Wae 3.
4 Nocne NOKJIUcHEna K CETn NITAHn NEpeMeHHoro TOKa HaxMNTe Ha KNOKy BbIbopa HAnpJKeHn6 BaTapeu INy yCTaHOBKn 3aprHoro YcTPOIcTBa HA HOMHaNbHoe HAnpJKeHn6 BaTapeu. Ha Ikaane Battery Charge % / Battery Voltage Selector ("3aprD 6atapeu % / IpeeknOHTeNB HAnpJKeHn6 BaTapeu") 3aropaoTcCBToIONoHbIe INdikaTopbl, COOTBeTCTByIOue JeLaemOMy 3haeHnIO 3aprHoro HAnpJKeHn.
5 POncoeHNHtE 3aXmbl 3apnHO rYcTPOCTBa K KJIeMMam 6aTapeN.
Pumeyue. O63amelbHO coeHnme chayana 3akm kpacHo zema c noKumbeH (POS, P, +) KEMMou bamaepu, a 3ame 3akm YepHo2o ueMa K ompuamelbH (NEG, N, -) KEMMe. Ppu omycmeuu kaux-nbo o03aueHH noKoXumbeH KEMMa Umeem 6onbui duammp no cpaehuco ompuamelbH. Ppu omknOHeHH zapHoo ycmpoucme npou3odume omcoedunheue e 6opamHom npraKe.
Popraok 3Kcnpnyatau
CBeToOnoHbIe HnDnKaTopbl
TapaHTnHbIe 06aTeJIbCTBa
YcnoBna 1-JeTHeN orpaHnueZHHoR rapaHTnn
PpOaBecrnapHTpyet OTCYCTBNE I3HAYaIbIbX dEeKTOB MaTePnA IIN I3ROTOBHeNBA T EteHne 1 NET C MOnEtA neBIO NKyKn DAnHO rnpia cnoBn erpoCNO B0aHnR aCOBTCTBn CO BcEMn pIMeHNbMlbN K HeMy yKa3aHnMI. B CyTae npoeBHeNBA KcHx-NbO deEeKTOB MaTePnA INI I3ROTOBHeNBA T EteHne yKa3aHnORo nepHOJa PpOaBeC oUcTeBnRE pEmOH NT m3AmOHy DAHOHO nIKNoHTenHBO NO CBOMeY yCMOTpeHNO
JECTBIE HACTORIUEI IAPAHNTI HE PACNPOCTPAHRETCA HA CNYAEN ECTECTBEHHO N3HOCA NIN NOBPEKDEHNA B PE3yNBATE ABAPIM,HEHAIIEKAUEROICNOIL3OBAHNIA, HAPUYEHN IIPABNIKCNPTAYATAUNI INXALATHOCTN. IPODABELI HE PNEOCTABETH NIKAKHX YBHO BIBPAXEHBX TAPAHNTI 3A NCKNIIOHEHEMIPOMOI3NOKEHHO HBACTORAUMIDOKHEMIEA 3A NCKIOHEHNEI CNDYAEAEI 3AIPENEHHBIX DEETBYOUIM 3AKOHODATELBCTCBM, BCE NODPA3YMEBAEMBLEI IAPAHNTI, BKNIOUARCEBA TAPAHNTI PNPINOHOCTN DII NPODAKNNI INN CNOJIb3OBAHNIA IO HA3HAHEHIO, OPGANHEHBI NO PNODOJNKITEJBHOCTNB IBLWUEVKA3AHBBIM IAPAHNTIINHBIM CPOKOM; KPOME TOTO, IN3 HACTORIUEI IAPAHNTI RBNbIM O5P3OM NCKNIIOHYOTCR BCE NIOBOHBE, CIVYAIHBE IN KOCBEHHBIEYbITKI.(B NEKOTOpBx IIATAXE H DoNYCAtBcTB BEEHNHE Na POLOKHTeBtcb DeTcBTRnTex INN INhIXo NDpa3MeBaEMbIX rapaTHn, a B HkOTOpSIX -NCKNUOHeHINOPaHCTBnepaHCTBnepaHCTBnepaHCTBnepaHCTBnepaHCTBnepaHCTBnepaHCTBnepaHCTBnepaHCTBnepaHCTBnepaHCTBnepaHCTBnepaHCTBnepaHCTBnepaHCTBnepaHCTBnepaHCT
BHMAHME! Do hauhna hcnno3oBAHN daHNO OYcTPOACTb NOIIO3oBATEb DOJIENKey bEDpITCB a TOM, YOHO IRIETCR pRTODnHM, COOTBTCTByOUIIM HIN SE30NaCHBM JIN PEPINONARaEMo PRIMENHEM B CBAHc 6 BoHMM PA3HOOBpa3N KOKEThbIX pRIMENHEM INH IOBDOHTB He DaET KAKHX-NIO 3ABepeHm INI rapaHTM OTHCOTEnBO nPINOHOCTN DAHHN MNEINI DAKKO-NIO KOHKTeHFO PRIMENHEM INH INX COOTBTCTBIA KAKM-NIO KOHKTeHBM TPEBOEHO
HdeTHnKauHbIe Homepa, CbntTeNbCTByIOUne O COOTBeTcBn HOpMaTHNbHbIM Tpe6oBaHnA
C 1950 HOPMATBHBIM Tpe6oHnMn I pno6pTeHHOMy BAMn H3dEHNIO KOMNAHNI Tripp Lite npncBOEH YNKHANbHb CEINHbHb HOpem. CepnHbHb HOpem, BmCTe Co BcEHI HeOxIDMOHN IHOpMaHne H mKApKOBaHMe O oOb6PnHn, ykazanHa n ApNkIke I aTOTOBTeN, pnpKHeNtHOMK INdEHNIO. PmIaONPOCE HnDopMaHmO O COOTBCTBN HOPMATBHBIM Tpe6oHnBMr BCERda COoBuAte TceBHpNbHmOp EINENIAH He cIpyET NpTaB CEiHbHb MOp CM KMapKO INN HOpem MO ENIN3ENIA.
Hnopmaa nIg KJIeHTOB KOMNaHH Tripp Lite o co6liOeHNu Tpe6oBaHn dIpeKTHBb EC 06 OTXoAxA 3neKtpueckoro n 3NeKtpoHHoro o6OpyDobAHN (WEEE)

Cnnae HnepeKTHBE EC 06 OTOxOaX eKTPuueckoro HneKtPOHoro oOpdyoBaHn (WEE) n pnmehmblm HopMaB CnyaX, KOrda nokynten npnopeTahot HOBOe aektpueckoe n eKtPOHOe oOpdyoBaHne kOMmaHn Tripp Lite, OHnmeot npaba H cnekyoee:
- Otnpabky CTaporo 6obpydoabaHn, KOtOpoe RABIeTc3KBMBAIEHTbIM NO KOLINyCECTBy IN DEHTMHIM NIOYeyHHOMy HOBOMy 6obpydoabaHn, Ha yTINN3aHIO (3TO YCNOBE MOKET OTINHcBcR 3aBNCMOCtN oT cPaHb).
Otnpabky HOBOro 0bOpDyobHnna 6bpaTno Ha yTmN3aIIO, KOrA OHO B KOHeHOM ITORE CTAHOBTC N3HOWeHHBM POnNTKAKOMNaHIM Tripp Lite HapBaJIeHa Ha NoctoHHoe yuueHne KaueCTBa npdyukun uycnyr. Cneuikuaum Moryt bItb N3MeHEnb 6e3 yBcDopmeHnra.
KOMNAHTRIe nocToaHHo COBepHeCTByeT cBOO npOdyuNIO. B CBAHc 3TtHM Bo3MOXHO m3MeHHe HTe XapakTePncTHK 6e3 ppeBaHpTeBHorO yBeDMnEHNr.


Manufacturing Excellence
1111 W. 35th Street, Chicago, IL 60609 USA · www.triplite.com/support