FREEVINYL - Turntable IBIZA SOUND - Free user manual and instructions
Find the device manual for free FREEVINYL IBIZA SOUND in PDF.
User questions about FREEVINYL IBIZA SOUND
0 question about this device. Answer the ones you know or ask your own.
Ask a new question about this device
Download the instructions for your Turntable in PDF format for free! Find your manual FREEVINYL - IBIZA SOUND and take your electronic device back in hand. On this page are published all the documents necessary for the use of your device. FREEVINYL by IBIZA SOUND.
USER MANUAL FREEVINYL IBIZA SOUND
Belt-Drive Turntable with Direct RECORD
Ref.: FREE-VINYL (15-2330)
USER'S MANUAL
MANUEL DE L'UTILISATEUR
BEDIENUNGSANLEITUNG
MANUAL DE INSTRUÇÕES
CE
Safety instruction
◆ Read these Instructions
- Read these Instructions.
- Keep these Instructions.
- Heed all Warnings.
- Follow all Instructions.
- Do not use this apparatus near water.
- Clean only with a damp cloth.
- Do not block any of the ventilation openings. Install in accordance with the manufacture's instructions.
- Do not install near nay heat sources such as radiators, heat registers, stoves, or other apparatus (including amplifiers) that produce heat.
- Do not defeat the safety purpose of the polarized plug. The wide blade is provided for your safety. If the provided plug does no fit into your outlet, consult an electrician for replacement of the obsolete outlet.
- Protect the power cord from being walked on or pinched particularly at plug, convenience receptacles, and point where they exit from the apparatus.
- Only use attachments/accessories specified by the manufacturer.
- Use only with a cart, stand, tripod, bracket, or table specified by the manufacturer, or sold with the apparatus. When art is used, use caution when moving the cart/apparatus combination to avoid injury from tip-over
● Unplug this apparatus during lighting storms or when unused for long periods of time.
- Refer all servicing to qualified service personnel. Serving is required when the apparatus has been damaged in any way, such as power-supply cord or plug is damaged, liquid has been spilled or objects have fallen into the apparatus, the apparatus has been exposed to rain or moisture, does not operate normally, or has been dropped.
● This mains plug is used as the disconnect device, the disconnect device shall be readily operable.

CAUTION
RISK OF ELECTRIC SHOCK DO NOT OPEN

CAUTION: To reduce the risk of electric shock, do not remove any cover. No user-serviceable parts inside. Refer servicing to qualified service personnel only.

The lightning flash with arrowhead symbol within the equilateral triangle is intended to alert the use to the presence of un-insulated "dangerous voltage" within the product's enclosure that may be of sufficient magnitude to constitute a risk of electric shock.

The exclamation point within the equilateral triangle is intended to alert the user to the presence of important operation and maintenance (servicing) instructions in the literature accompanying this appliance.
CAUTION
To prevent electric shock, do not use this polarized plug with an extension cord, receptacle or other outlet unless the blades can be fully inserted to prevent blade exposure.

Description
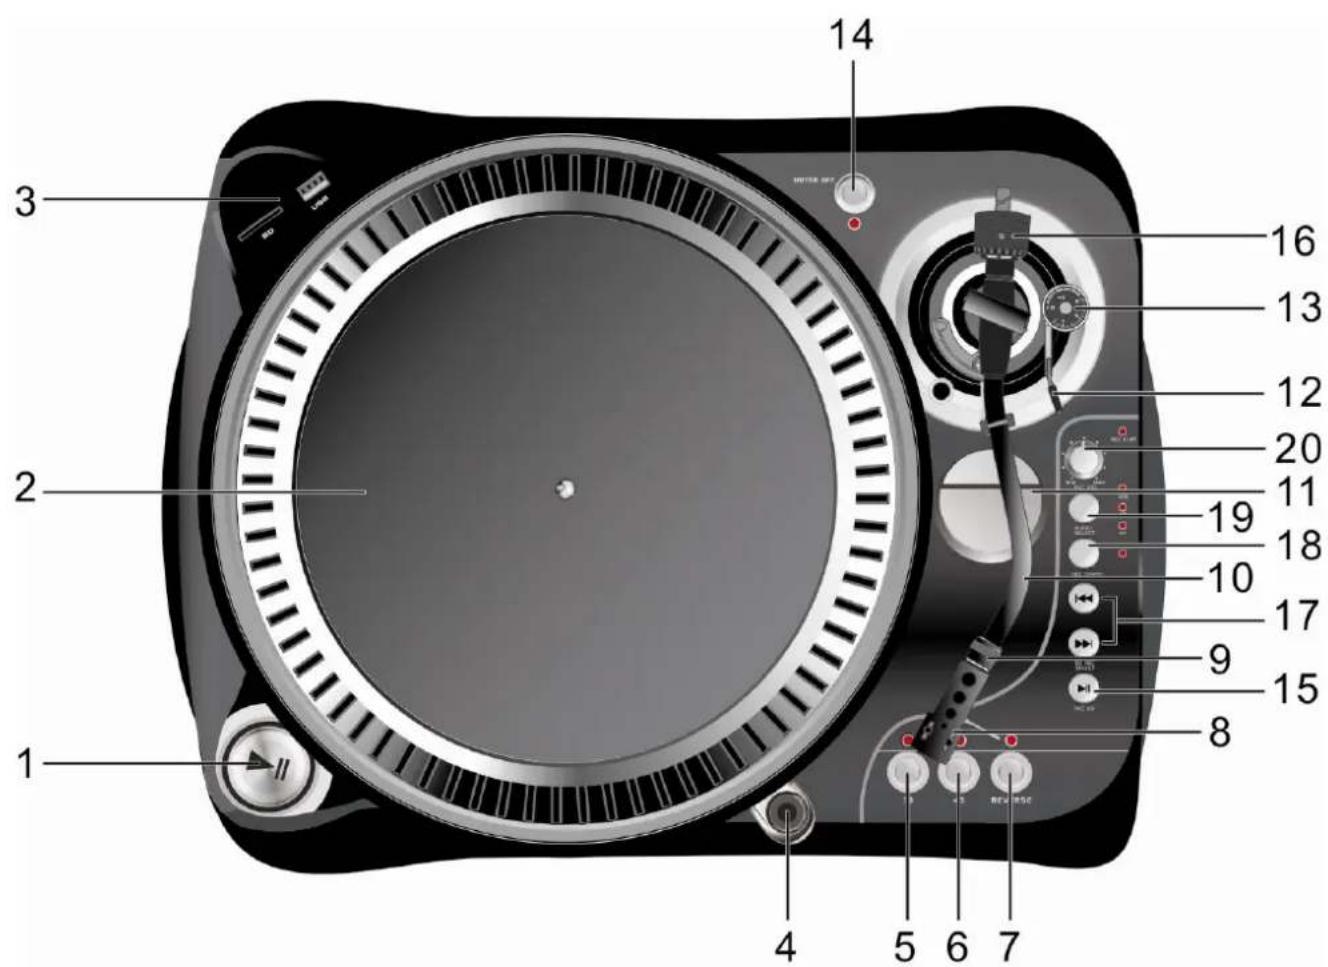
Description
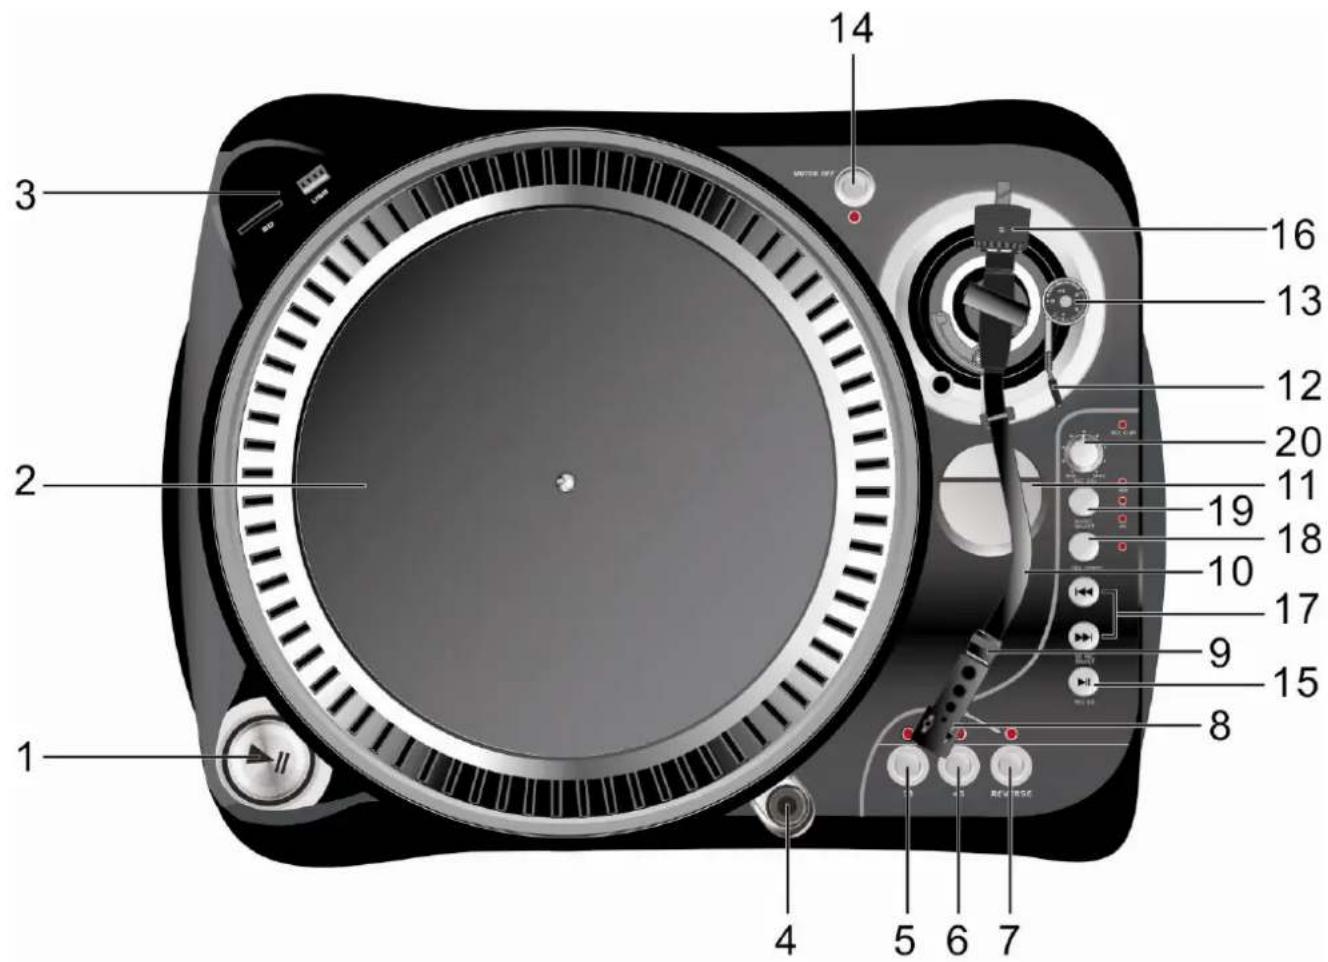
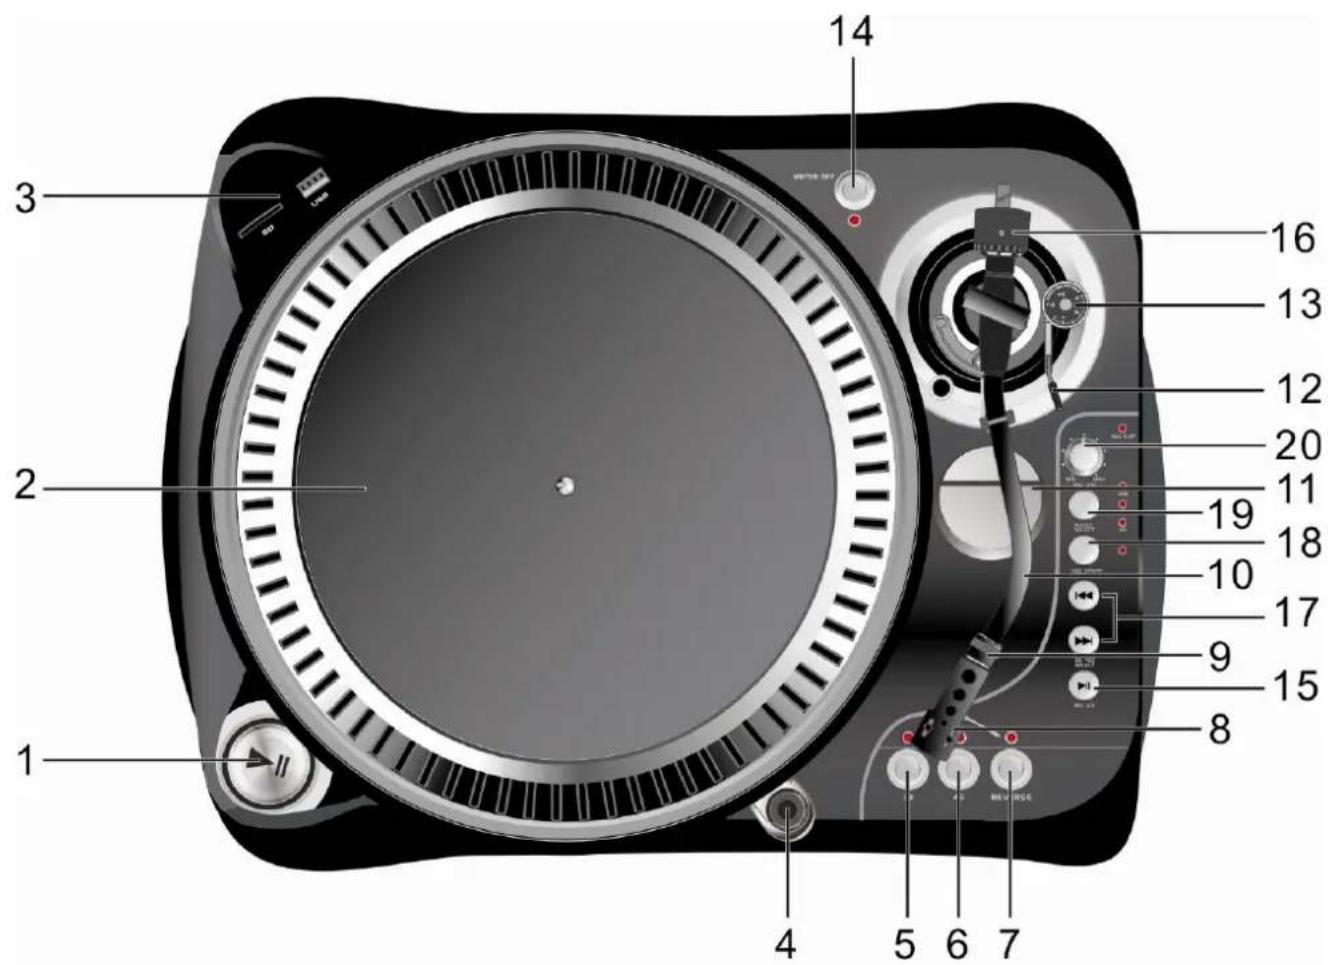
1- Start/stop buttons Tonearm lift
Press this button to start or stop the platter.
2- Platter
The platter is equipped with a slip mat. This makes it easier to manipulate the record for scratch performances.
3- USB&SD SOCKET
Plug USB stick and SD card into, the LED will indicate while worked.
4- Target light
Insert target light to the deck and it will light up.
5- 33 rpm Speed select buttons
Press the "33" button to select the 33rpm speed.
6- 45,78 rpm Speed select buttons
Press the "45" button to select the 45rpm speed.
Press the "33" and "45" at the same time to select the 78rpm speed.
7- Reverse button
This button is used to reverse rotate the platter.
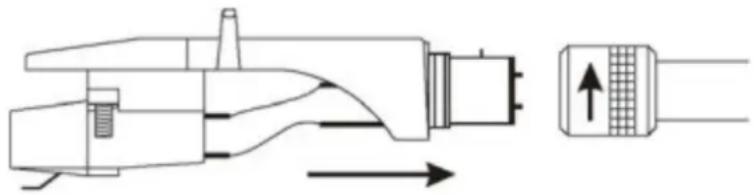
8- Headshell
Install cartridge here. When installing a cartridge, refer to the installation instructions supplied by the manufacture of that cartridge. During installation, attach the stylus protector to guard the stylus tip from damage. Attach wires as follows:
White (L+) Left channel +
Blue (L-) Left channel -
Red (R+)
Green (R-) Right channel –
Right channel+
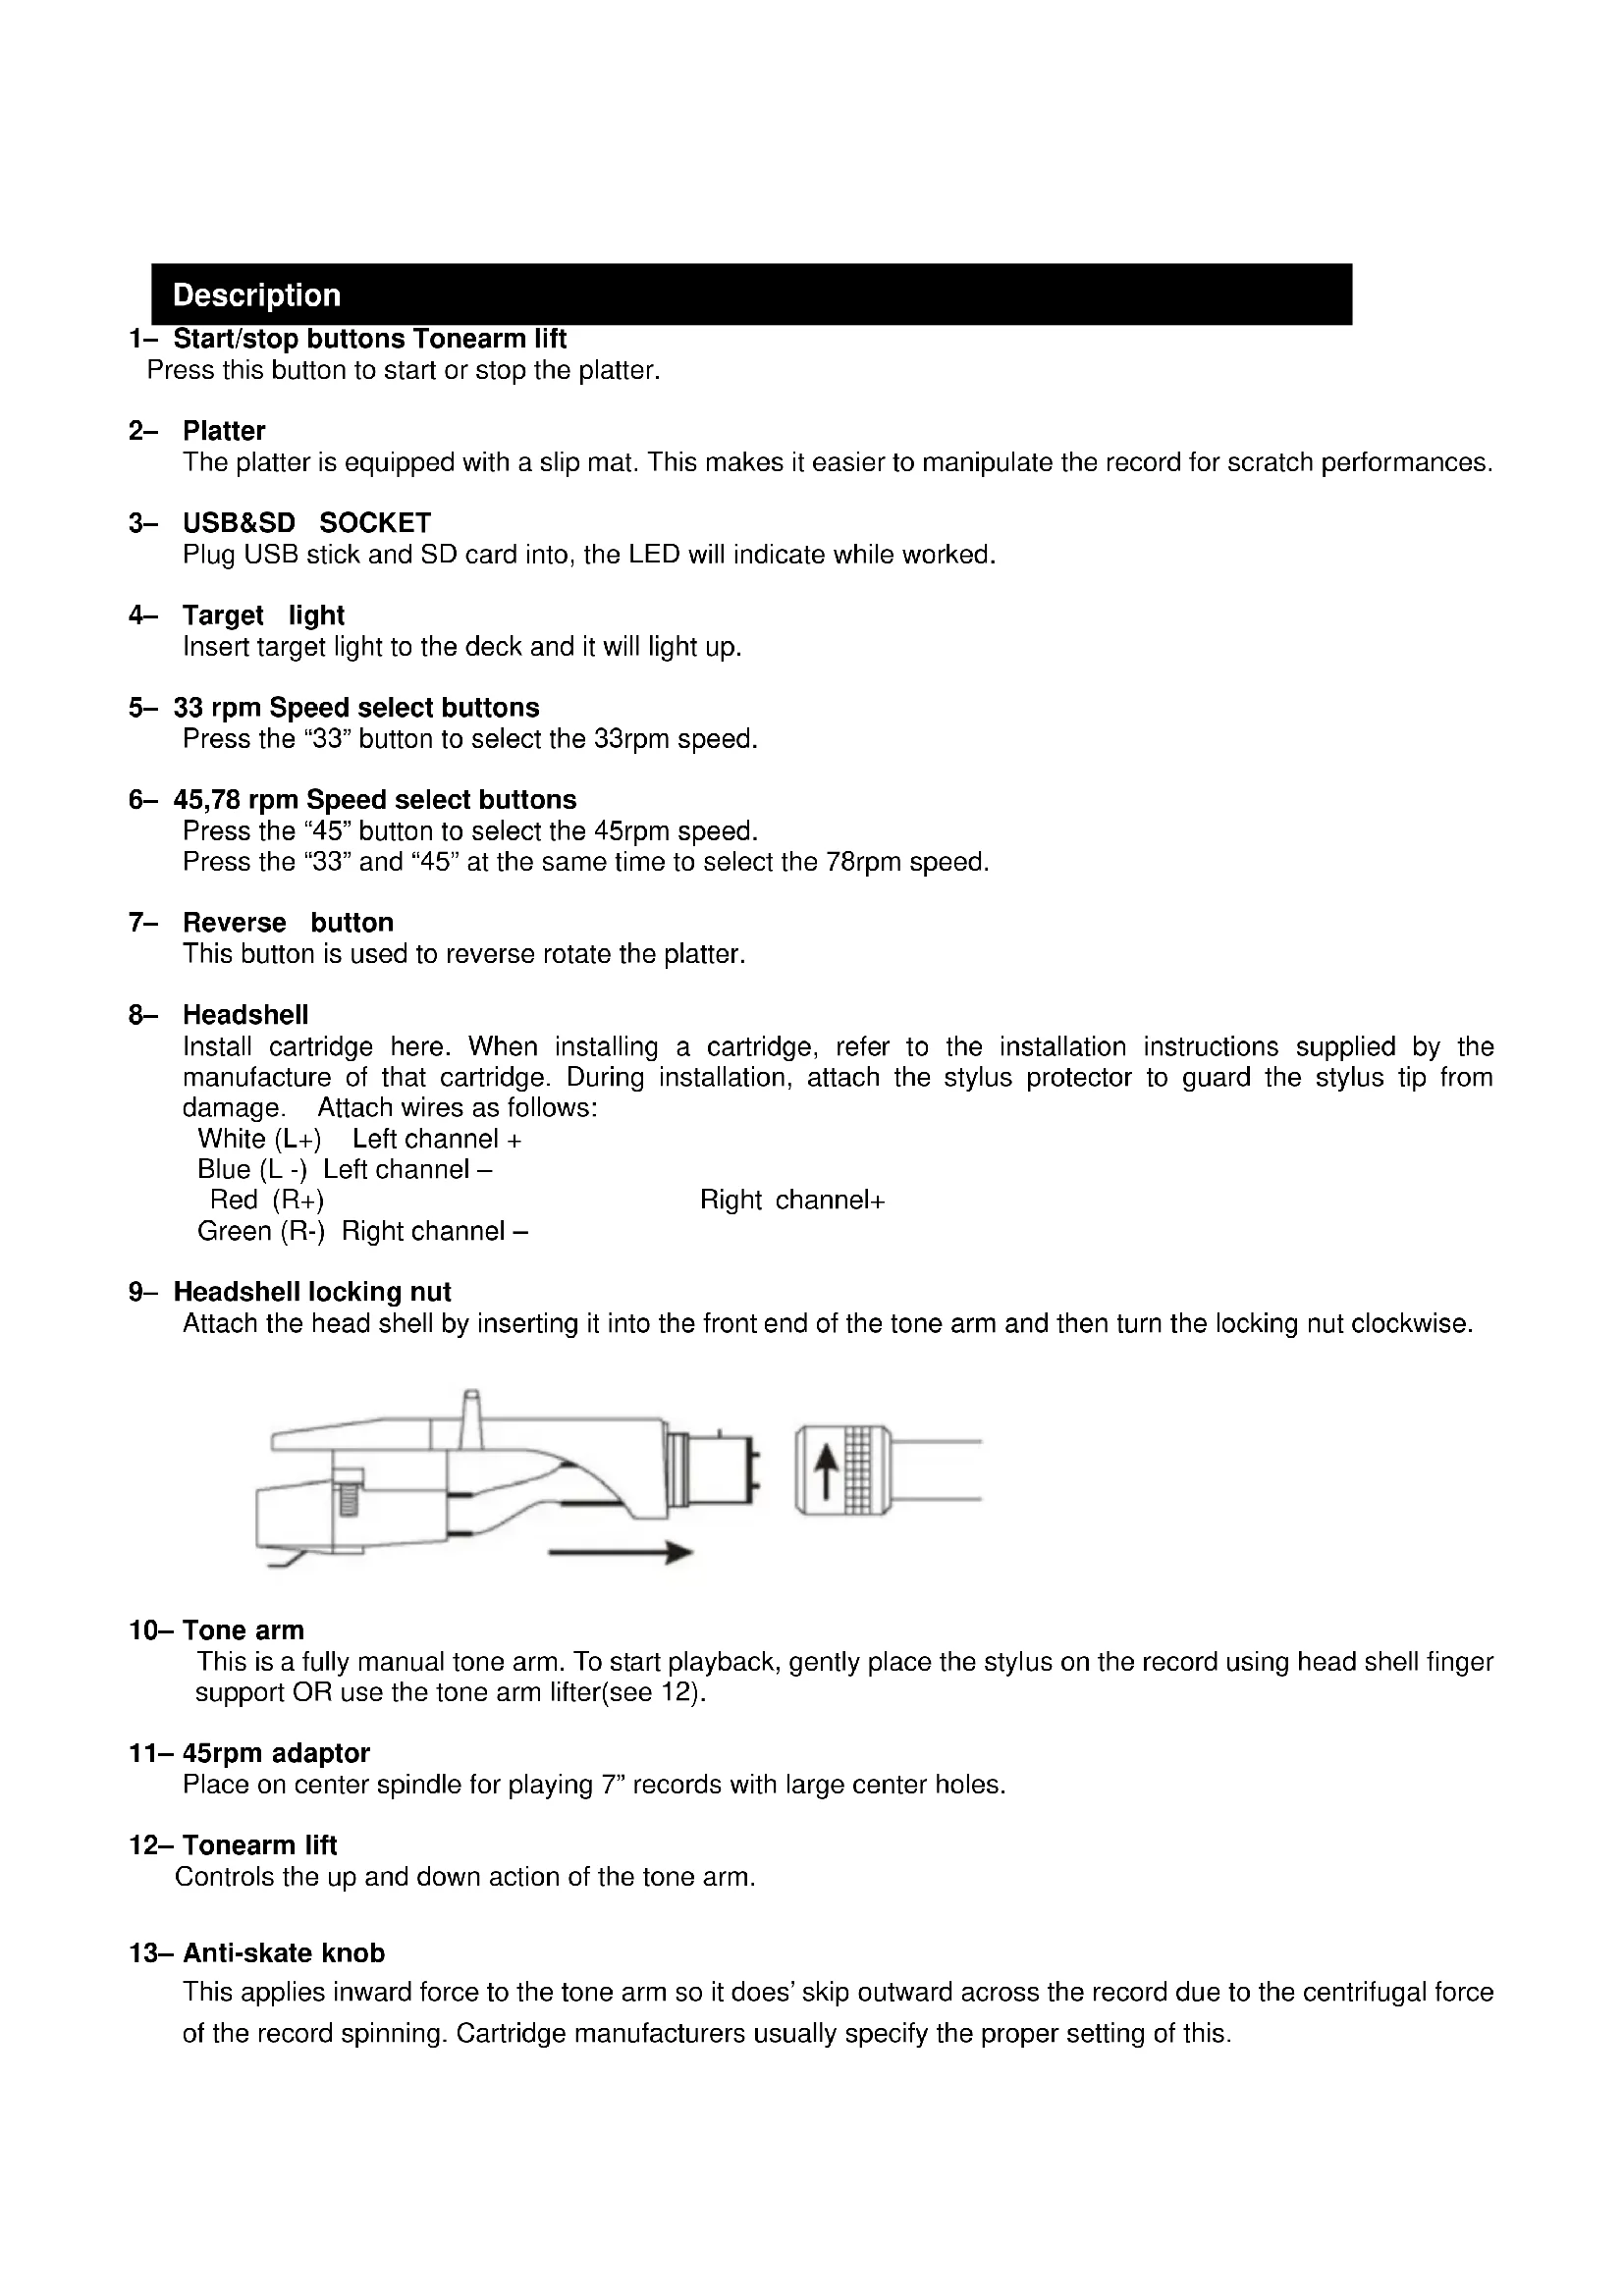
9- Headshell locking nut
Attach the head shell by inserting it into the front end of the tone arm and then turn the locking nut clockwise.
natural_image
Technical line drawing of a mechanical component with directional arrows indicating flow or movement (no text or symbols)10- Tone arm
This is a fully manual tone arm. To start playback, gently place the stylus on the record using head shell finger support OR use the tone arm lifter(see 12).
11-45rpm adaptor
Place on center spindle for playing 7" records with large center holes.
12- Tonearm lift
Controls the up and down action of the tone arm.
13- Anti-skate knob
This applies inward force to the tone arm so it does' skip outward across the record due to the centrifugal force of the record spinning. Cartridge manufacturers usually specify the proper setting of this.
Description
14- Motor off button
Press the button to enable motor off, and the led will be flash. Press the button again to disable function.
15- Play & pause the song of the USB & SD and start recording
Each press of this button toggles PLAY/PAUSE during playback from USB or SD. In addition, this button starts and pauses recording of the vinyl to SD/USB when record is armed before (see 18)
16- Counterweight
Adjustment creates the proper downward pressure of the stylus to the record. Attach now by sliding the counterweight onto the rear of the tone arm. Twist it lightly and it will screw onto the rear shaft of the tone arm. counterweight adjustment: bring tone arm in 0-level with counterweight. When leveled set scale on counterweight to 0 (watch the stripe). Now turn we counterweight until it shows the specified downward pressure in gram. The right downward pressure is given in stylus specifications.
17- Skip button (+/-)
Press it to select the any one track of the USB stick and SD card.
18- Start & pause recording action
This button(de) activates record function. In order to record a vinyl the LED besides this button has to be lit
19- Audio select
This button selects the source to listen to. In order to record/listen to a vinyl the LED "PH" must be lit.
20- Record volume
Used to adjust the level of volume which be recording.
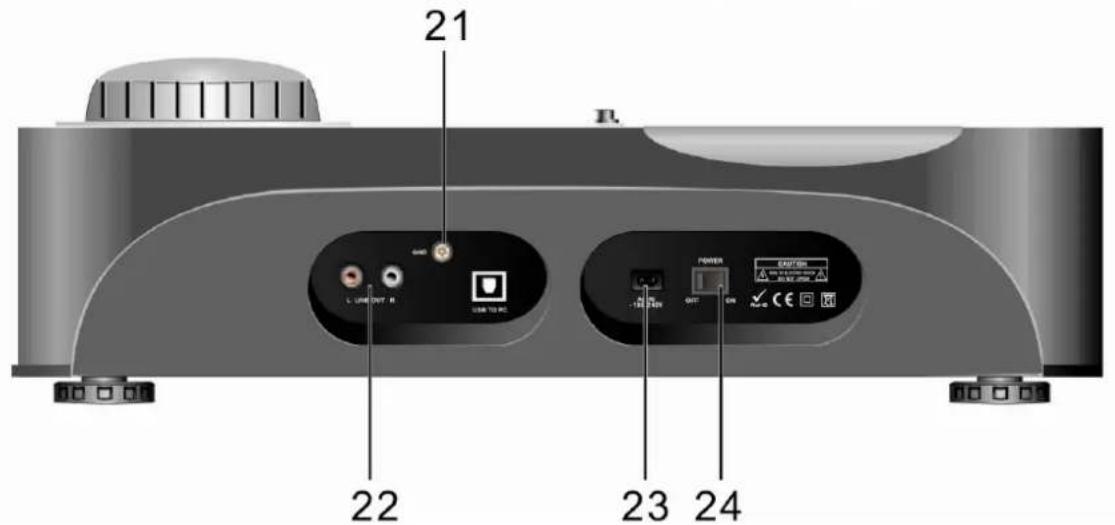
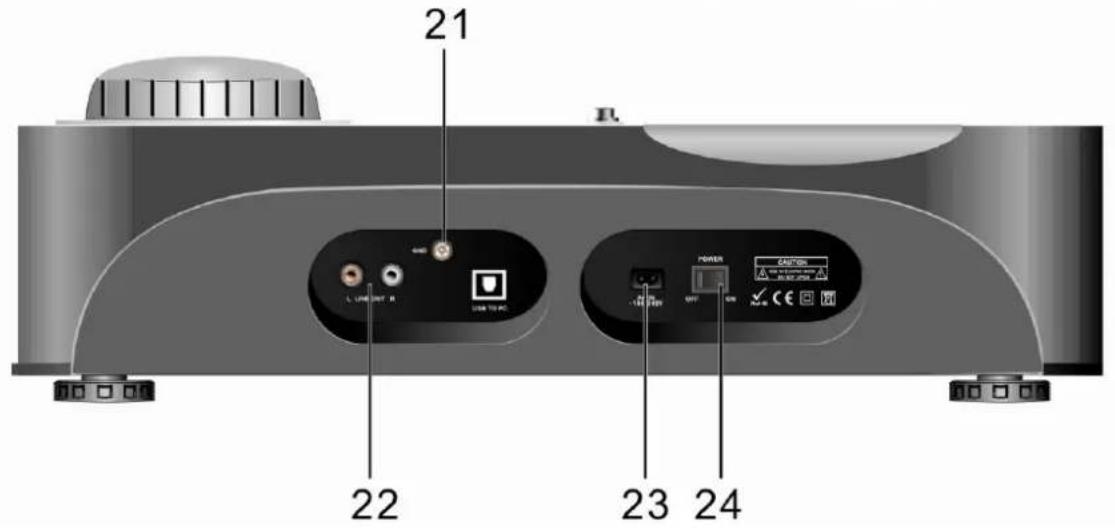
21- Ground
22- Output L & R
This is the standard analog output (RCA jacks) which can be connected either to phone or line input on any DJ mixer, depending on the setting of the phone/line selector.
23- Power cord connector
Used to connect to the mains, using the supplied power cord.
24- Power ON/OFF switch
Used to turn the turntable on and off.
Specifications
Motor:
DC
motor
Driving Method: Belt Drive
Starting & braking time: Less than 1sec
Speed adjustment: 33
^1/3 , 45, 78 rpm
Wow & Flutter: +/-10%
Tone arm type: Static balanced S-shaped tone arm
Computer interface; USB 1.1 compliant, Windows XP or MACOS X
Power supply: AC 115/230V, 60/50Hz, User Selectable
Single Voltage: AC 100V, 50/60Hz (Japan)
AC 120V, 60Hz (U.S.A and Canada)
AC 127V, 60Hz (Mexico)
AC 220V, 50Hz (Chile and Argentina)
AC 240V, 60Hz (Australia)
AC 220V, 60Hz (Philippines and Korea)
AC 230V, 50Hz (Europe, U.K., New Zealand, South Africa, and Singapore)
Dimensions:
449 x 370 x 145 mm
Power Consumption:
5.5 Watts
Weight:
4 Kgs
Audacity software overview
Audacity is free software, licensed under the GNU General Public License (GPL). More information as well as open source code can be found on the wed at http://www.
Note: Please ensure you have installed the software before starting.
Setting up your PC to work with Audacity
- Connect an input source to the unit
- Connect the USB lead to your computer
- Install the Audacity recording software
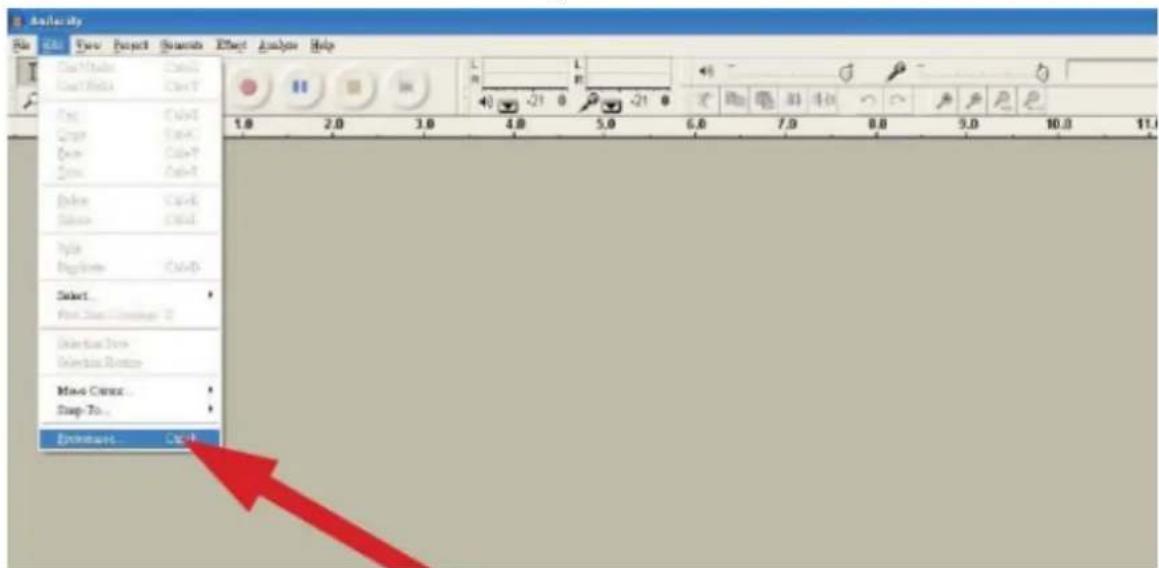
- Open the Audacity program
- Select Preference from the Edit tab in the Audacity menu
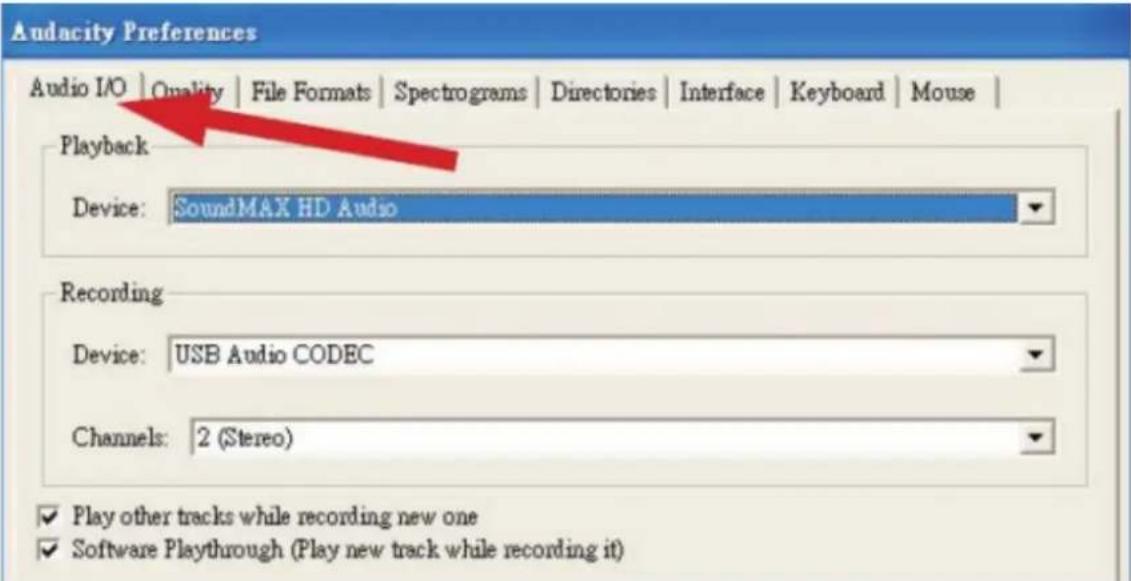
- Select Audio I/O tab at the top left
• Under Playback, Device, select you internal sound card
• Under Recording, Device, select USB AUDIO CODEC
• Under Recording, Channels, select 2 (stereo)
- Check the box marked Play other tracks while recording new one
- Check the box marked software Play through
Audacity software overview
Recording Albums with Audacity
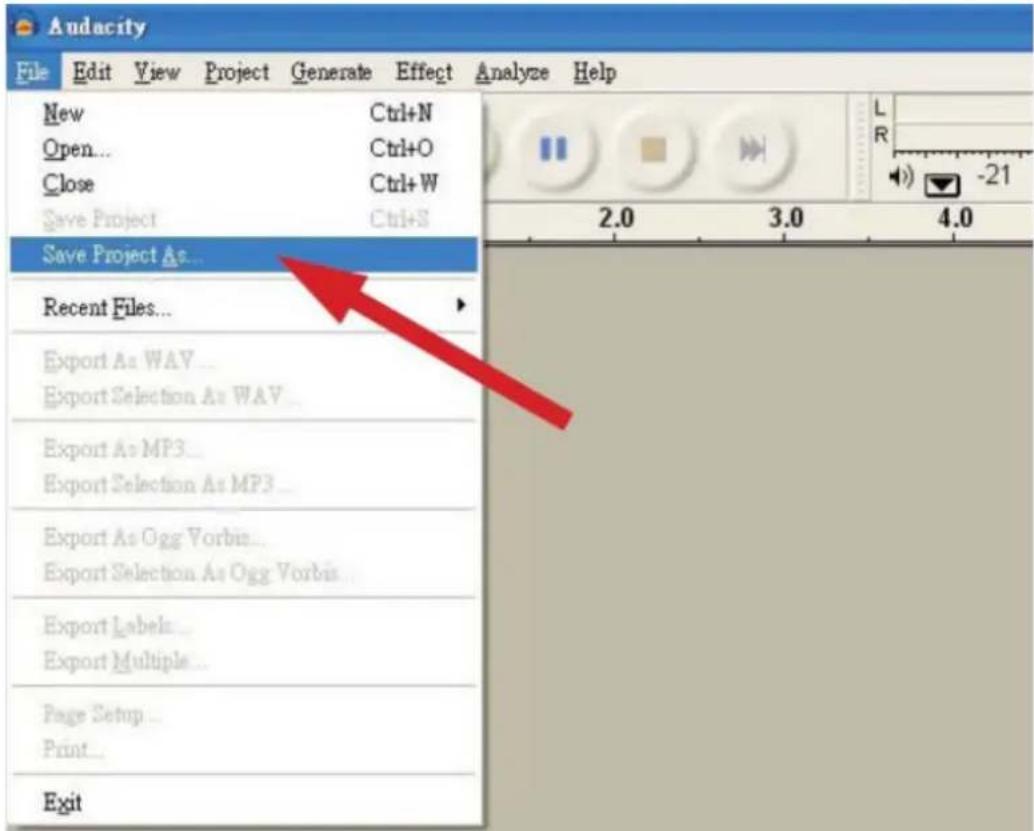
1. Saving a project
- Audacity write all the changed and recorded audio to directory called projefcftname_data, which is located right where you saved the project file itself
- Thus, select Save project as from your Audacity File tab and choose a location and filename for your project
- Please note that when you startup Audacity fresh, only the "Save As..." menu option is available.
2. How to record
- Set your USB turntable up to play the song or album you want to record

- Click on the red Play button to start the recording.
- Lower tone arm on USB Turntable onto album and track you want to record.

- Click on the blue Pause button to pause the recording. Press it again to continue.

That's it. You can now play around with your recording and explore the editing capabilities of Audacity.
Remember that you can use the Undo function almost without limits while the project is open.
Note: CD'S cannot be burned directly from the Audacity application. Other CD burning applications should be used.
FAQ:
Software:
F: can not listen to record while recording
A: please activate "software playthrough" in audacity like shown in IM. check the record source (USB Audio Codec) like shown in IM check volume settings of your computer
F: can not store songs as MP3
A: please download LAME MP3-Codec from the internet
F: can not record
A: first the player has to be connected with the computer, then AUDACITY may be started.
F: can only record MONO
A: mostly this occurs with VISTA. please select in Windows config recording source as "stereo" not "mono" or "microphone"
Player:
F: sound is crackling
A: please make sure that this player is connected to a high-level-input of your amplifier. High-level inputs are: CD, AUX, TAPE. The input PHONE is not suitable. The player has a built-in pre-amplifier. clean the stylus and the vinyl check for correct counterweight setting check for correct anti-skating-level
F: direct recoding is not possible
A: USB-Stick/Card is write-protected check correct file system (FAT16)
F: direct recoded songs are recorded oversteered
A: check for correct recording level, see point 20 of IM

If at any time in the future you should need to dispose of this product please Note that: Waste electrical products should not be disposed of with household waste. Please recycle where facilities exist. Check with your Local Authority or retailer for recycling advice. (Waste Electrical and Electronic Equipment Directive)
CAUTION: To reduce the risk of electric shock, do not remove any cover. No user-serviceable parts inside. Refer servicing to qualified service personnel only.

The lightning flash with arrowhead symbol within the equilateral triangle is intended to alert the use to the presence of un-insulated "dangerous voltage" within the product's enclosure that may be of sufficient magnitude to constitute a risk of electric shock.

The exclamation point within the equilateral triangle is intended to alert the user to the presence of important operation and maintenance (servicing) instructions in the literature accompanying this appliance.
CAUTION
To prevent electric shock, do not use this polarized plug with an extension cord, receptacle or other outlet unless the blades can be fully inserted to prevent blade exposure.
Description
Description
natural_image
Technical line drawing of a mechanical component with directional arrows indicating flow or movement (no text or symbols)10- Bras de lecture
Logiciel Audacity
4. Enregistrement
CAUTION: To reduce the risk of electric shock, do not remove any cover. No user-serviceable parts inside. Refer servicing to qualified service personnel only.

The lightning flash with arrowhead symbol within the equilateral triangle is intended to alert the use to the presence of un-insulated "dangerous voltage" within the product's enclosure that may be of sufficient magnitude to constitute a risk of electric shock.

The exclamation point within the equilateral triangle is intended to alert the user to the presence of important operation and maintenance (servicing) instructions in the literature accompanying this appliance.
CAUTION
To prevent electric shock, do not use this polarized plug with an extension cord, receptacle or other outlet unless the blades can be fully inserted to prevent blade exposure.

Beschreibung


Beschreibung
1- Start/Stopp Tasten Tonarmhebel
natural_image
Technical line drawing of a mechanical component with directional arrows indicating flow or movement (no text or symbols)10- Tonarm
13- Anti-skate Knopf
Audacity Software Überblick
6. Aufnahme
CAUTION: To reduce the risk of electric shock, do not remove any cover. No user-serviceable parts inside. Refer servicing to qualified service personnel only.

The lightning flash with arrowhead symbol within the equilateral triangle is intended to alert the use to the presence of un-insulated “dangerous voltage” within the product’s enclosure that may be of sufficient magnitude to constitute a risk of electric shock.

The exclamation point within the equilateral triangle is intended to alert the user to the presence of important operation and maintenance (servicing) instructions in the literature accompanying this appliance.
CAUTION
To prevent electric shock, do not use this polarized plug with an extension cord, receptacle or other outlet unless the blades can be fully inserted to prevent blade exposure.

Descrição

Descrição
1- Botões Start/stop Tonearm lift