S760D - Speaker EDIFIER - Free user manual and instructions
Find the device manual for free S760D EDIFIER in PDF.
| Product Type | 5.1 Speaker System with Subwoofer |
| Brand | Edifier |
| Model | S760D |
| Total Power | 540 W (5 x 60 W satellites + 240 W subwoofer) |
| Frequency Response (satellites) | 145 Hz - 20 kHz (FL/FR/SL/SR) |
| Frequency Response (center) | 128 Hz - 20 kHz |
| Frequency Response (subwoofer) | 45 Hz - 130 Hz |
| Tweeter | 2.5 cm Silk Dome |
| Mid-range driver | 9.2 cm (3.5 inches) |
| Bass driver (subwoofer) | 26 cm (10 inches) |
| Input Sensitivity (5.1 IN) | Satellites: 800 mV ± 50 mV, Subwoofer: 1280 mV ± 20 mV |
| Input Sensitivity (AUX/CD) | Satellites: 800 mV ± 50 mV, Subwoofer: 1020 mV ± 20 mV |
| Input Sensitivity (optical/coaxial) | Satellites: 400 mV ± 50 mV, Subwoofer: 460 mV ± 20 mV |
| Audio inputs | 5.1 analog, optical, coaxial, AUX, CD |
| Outputs | Headphone jack |
| Audio functions | Dolby Pro Logic II (Music, Movie, Emul, Matrix, Virtual, Game), dynamic compression, treble and bass settings |
| Control | Wired controller with LCD screen, infrared remote control |
| Power supply | Mains (power adapter included) |
| Power consumption | Not specified |
| Maintenance | Clean with a dry cloth. Do not use chemical solvents. |
| Safety | Do not open the device. Keep away from water and heat sources. Unplug during thunderstorms. |
Frequently Asked Questions - S760D EDIFIER
User questions about S760D EDIFIER
0 question about this device. Answer the ones you know or ask your own.
Ask a new question about this device
Download the instructions for your Speaker in PDF format for free! Find your manual S760D - EDIFIER and take your electronic device back in hand. On this page are published all the documents necessary for the use of your device. S760D by EDIFIER.
USER MANUAL S760D EDIFIER
Important safety instruction
- Please read the instructions carefully. Keep it in safe place for future reference.
- Use only accessories approved by the manufacturer.
- Install the instrument properly by following the instructions in the device connection section.
- Using the product in a 0-35°C environment is recommended.
- To reduce the risk of fire and electric shock, do not expose the product to rain or moisture.
- Do not use this product near water. Do not immerge the product into any liquid or have it exposed to dripping or splashing.
- Do not install or use this product near any heat source (e.g. radiator, heater, stove, or other devices that generate heat).
- Do not place any object filled with liquids, such as vases on the product; neither should any open fire, such as lighted candles be placed on the product.
- Do not block any ventilation openings. Do not insert any object into ventilation openings or slots. It may cause fire or electric shock.
- Keep sufficient clearance around the product to maintain good ventilation (minimum 5cm is recommended).
- Do not force a plug into the jack. Before connection, check for blockage in the jack and whether the plug matches the jack and is oriented to the right direction.
- Keep the provided accessories and parts (such as screws) away from children to prevent from being swallowed by mistake.
- Do not open or remove the housing yourself. It may expose you to dangerous voltage or other hazardous risks. Regardless the cause of damage (such as damaged wire or plug, exposure to liquid splash or foreign object falling in, exposure to rain or moisture, product not working or being dropped, etc.), the repair has to be performed by an authorized service professional immediately.
- Before cleaning the product with dry cloth, always turn off the product and disconnect the power plug first.
- Never use strong acid, alkali, gasoline, alcohol, or other chemical solvents to clean the product surface. Use only neutral solvent or clear water for cleaning.

Excessively loud music may lead to hearing loss. Please keep the volume in a safe range.

Correct Disposal of this product. This marking indicates that this product should not be disposed with other household wastes throughout the EU. To prevent possible harm to the environment or human health from uncontrolled waste disposal, recycle it responsibly to promote the sustainable reuse of material resources. To return your used device, please use the return and collection systems or contact the retailer where the product was purchased. They can take this product for environmental safe recycling.

Use only with the cart, stand, tripod, bracket, or table specified by the manufacturer, or sold with the apparatus. When a cart is used, use caution when moving the cart/apparatus combination to avoid injury from tip-over.
Important safety instructions
Power warning:
- Place the product near the power outlet.
- Before use, make sure that the operating voltage is the same as your local power supply. Correct operating voltage can be found on the product plate.
- For safety purpose, unplug the product during lightning storms or when unused for extended periods of time.
- Under normal conditions, the power supply may get hot. Please keep good ventilation in the area and exercise caution.
- Safety warning labels on the housing or bottom of the product or power adaptor.

This symbol is to alert the user to the presence of un-insulated dangerous voltage within the product's enclosure that may be of sufficient magnitude to constitute a risk of electric shock to persons.

This symbol is to warn the user not to disassemble the enclosure of the product and there is no user-replaceable part inside. Take the product to an authorized service center for repair.

This symbol indicates that the product is for indoor use only.
The MAINS plug is used as the disconnect device, the disconnect device shall remain readily operable.
WARNING! The unit is of Class I construction and must be connected to a mains socket outlet with a protective earthing connection. Where the mains plug is used as the disconnect device, the disconnect device shall remain readily operable.
Unpack the box
Box contents
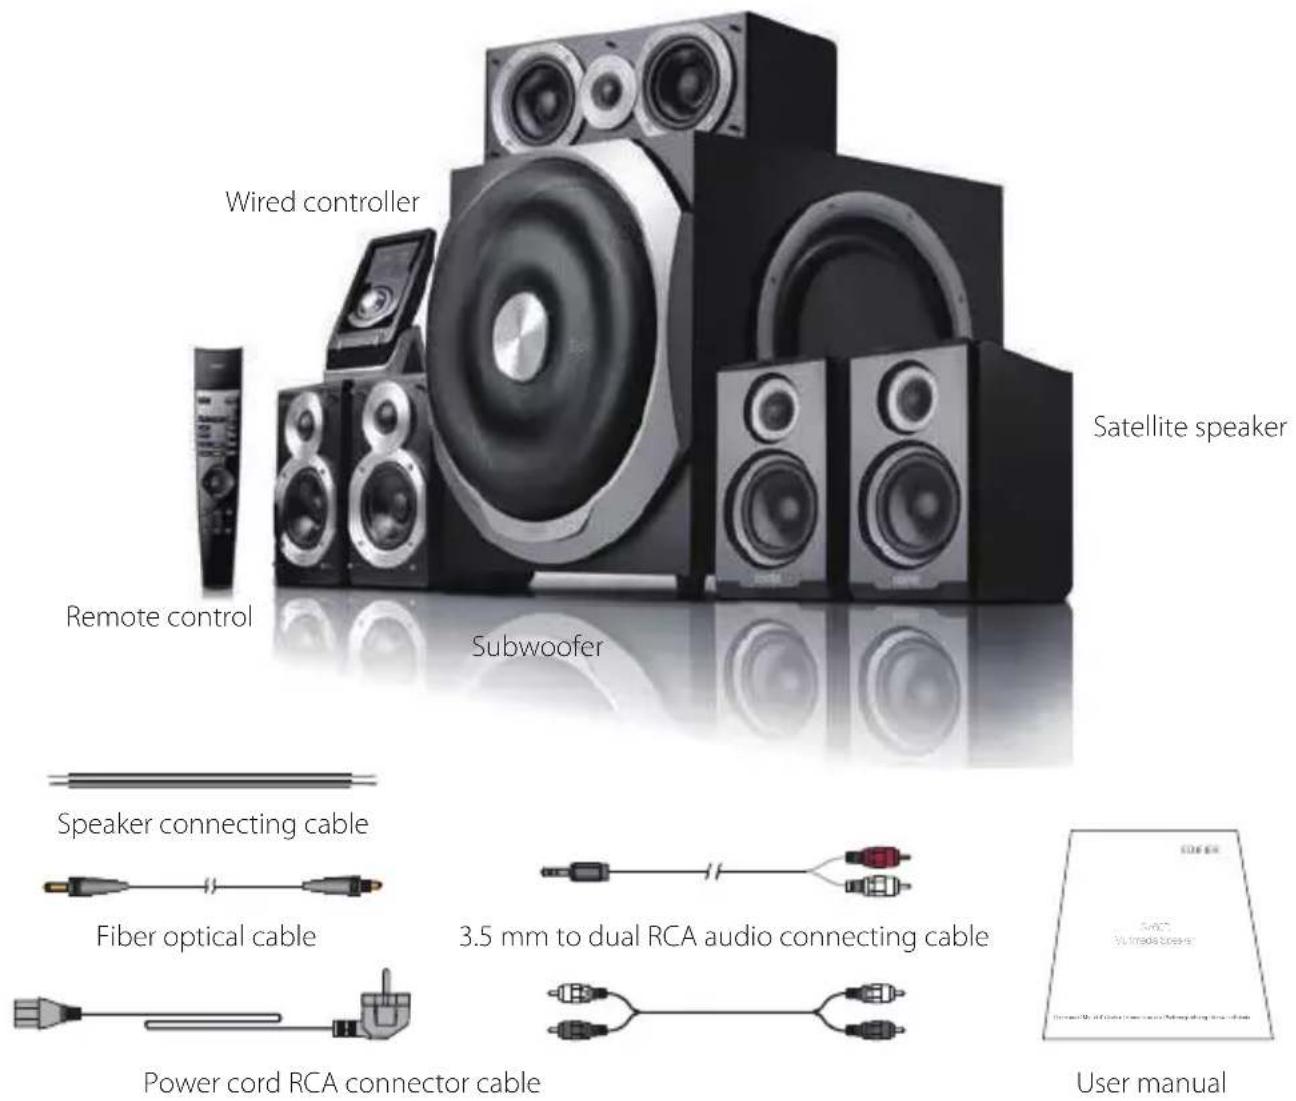
Illustrations
text_image
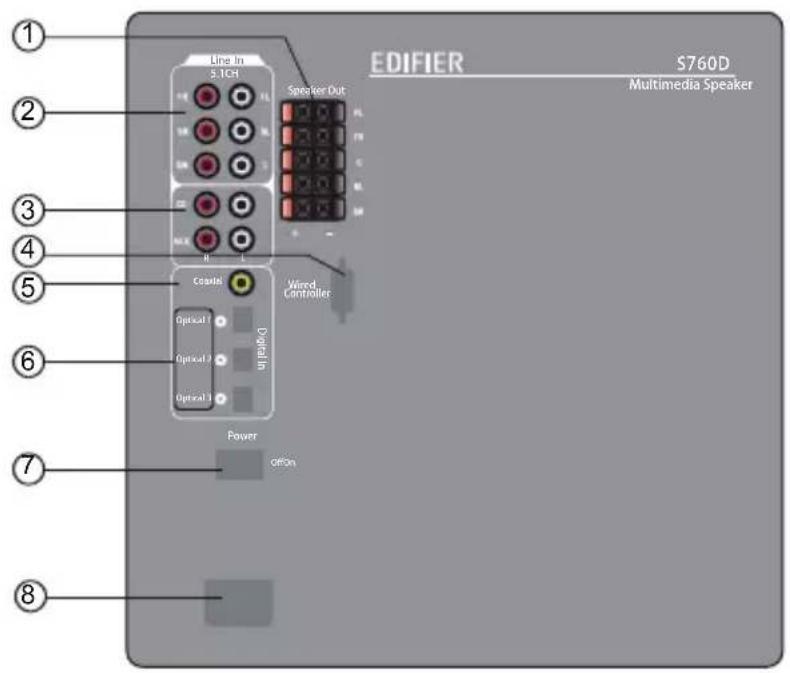
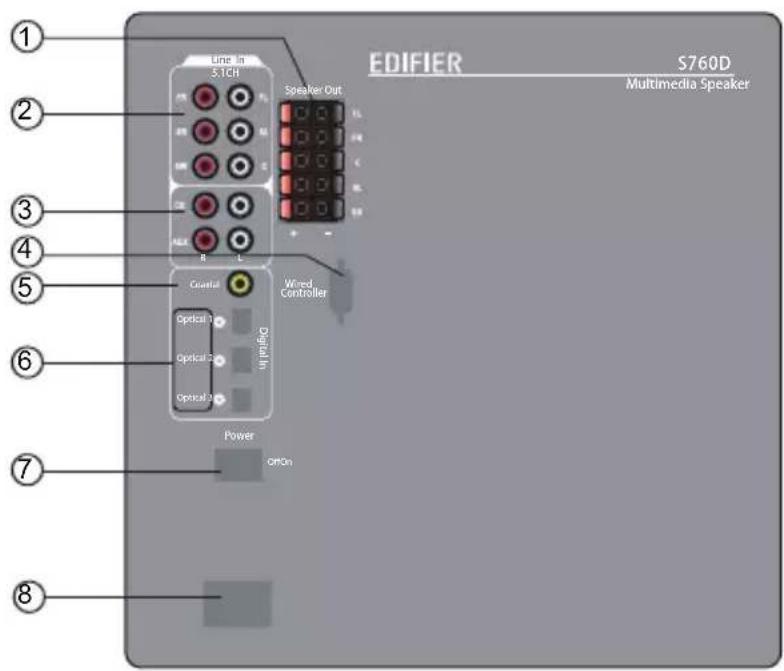
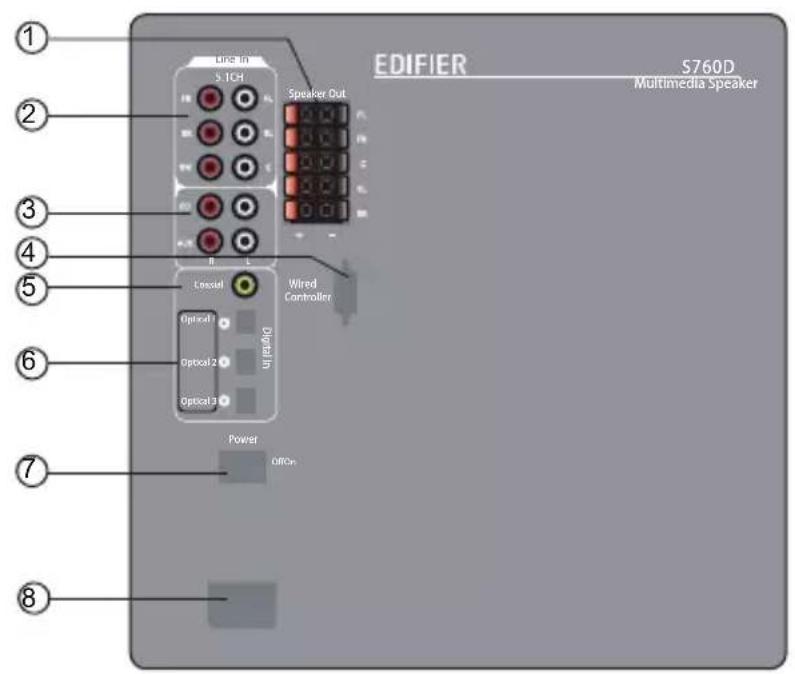
EDIFIER S760D Multimedia Speaker Line In S-1CH Speaker Out Coastal Fixed Optical 1 Optical 2 Optical 3 Mixed Controller Power OffOnRear panel of subwoofer
text_image
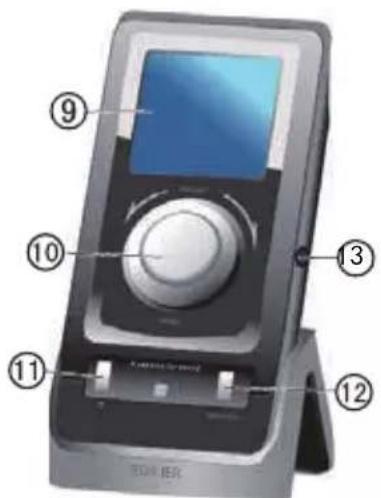
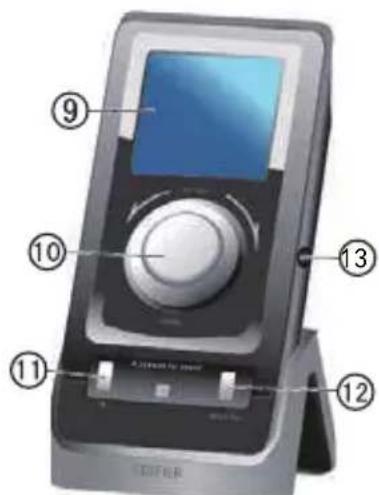
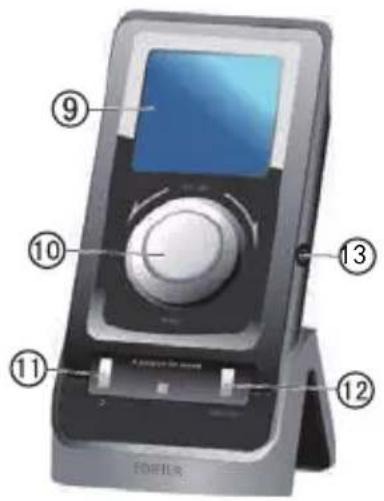
Diagram of a CD-ROM device with numbered parts labeled for identificationWired controller
- Speaker output ports
2.5.1CH input connector ports - Stereo input connector ports (AUX/CD)
- Wired controller connector port
- Coaxial input connector
- Optical connector ports
- Master power switch
-
Power cord connector port
-
LCD display window
- Function dial/master volume dial
- Standby/ON
- Audio source selector
- Headphone port
Operational guide for remote control
text_image
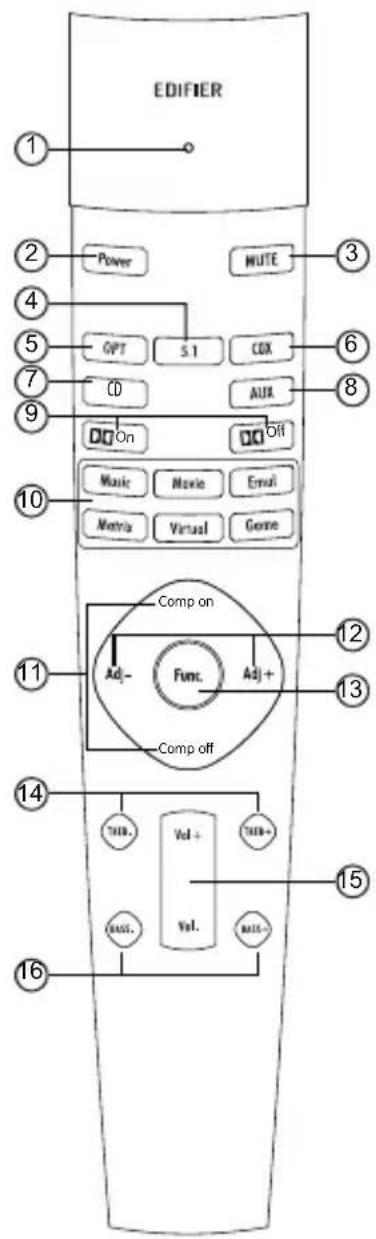
EDIFIER ① ② -Power NOTE ③ ④ ⑤ -OPT S1 COX ⑥ ⑦ -0 AUX ⑧ ⑨ -On Off Music Movie Email Matra Virtual Game ⑩ Comp on ⑪ Adj- Func. Adj+ ⑫ Comp off ⑬ Vol+ Vol- ⑭ ⑮ ⑯ ⑰ ⑱ ⑲ ⑳ ⑮+. ⑯+. ⑰+. ⑱+. ⑲+. ⑳+. ⑮+. ⑯+. ⑱+.-
Indicator 2. Standby/On
-
Mute key
-
5.1CH input
-
Optical input 6. Coaxial input
-
CD input 8. AUX input
-
☐☐ On/Off: Dolby Pro Logic II On/Off
-
Music---- Dolby Pro Logic II Music mode
Movie---- Dolby Pro Logic II Moive mode
Emul---- Dolby Pro Logic II Emulation mode
Matrix---- Dolby Pro Logic II Matrix mode
Virtual---- Dolby Pro Logic II Virtual mode
Game---- Dolby Pro Logic II Game mode
-
Compression On/Off (Effective only for Dolby Digital decoder)
-
Adjustment keys
Step 1: press "Func" repeatedly;
Step 2: press ADJ+/ADJ-.
-
Function navigator
-
Treble adjustment
-
Master volume up/down
-
Bass adjustment
Operational guide
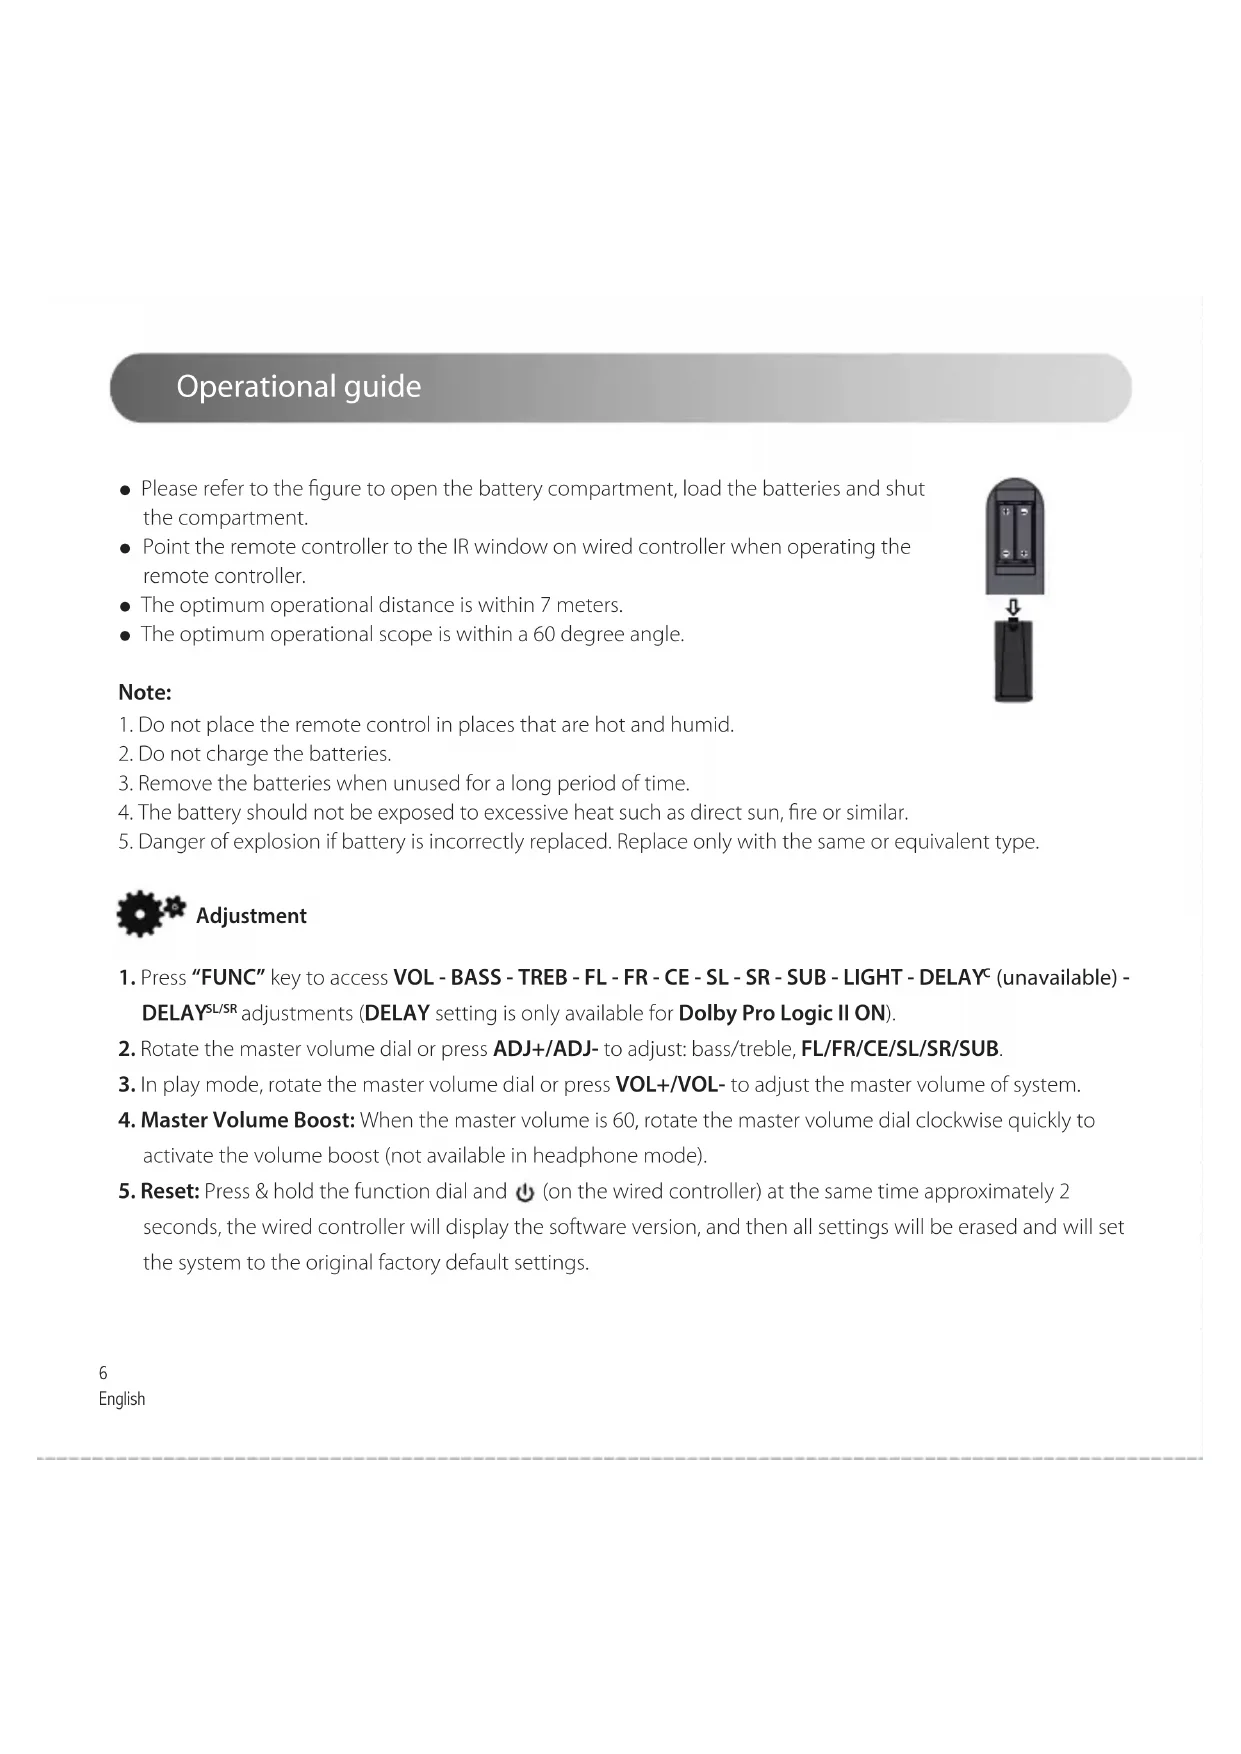
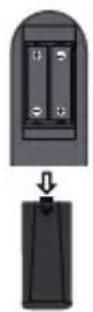
- Please refer to the figure to open the battery compartment, load the batteries and shut the compartment.
- Point the remote controller to the IR window on wired controller when operating the remote controller.
- The optimum operational distance is within 7 meters.
- The optimum operational scope is within a 60 degree angle.
Note:
- Do not place the remote control in places that are hot and humid.
- Do not charge the batteries.
- Remove the batteries when unused for a long period of time.
- The battery should not be exposed to excessive heat such as direct sun, fire or similar.
- Danger of explosion if battery is incorrectly replaced. Replace only with the same or equivalent type.

Adjustment
- Press "FUNC" key to access VOL - BASS - TREB - FL - FR - CE - SL - SR - SUB - LIGHT - DELAY ^c (unavailable) - DELAY ^SL/SR adjustments (DELAY setting is only available for Dolby Pro Logic II ON).
- Rotate the master volume dial or press ADJ+/ADJ- to adjust: bass/treble, FL/FR/CE/SL/SR/SUB.
- In play mode, rotate the master volume dial or press VOL+/VOL- to adjust the master volume of system.
- Master Volume Boost: When the master volume is 60, rotate the master volume dial clockwise quickly to activate the volume boost (not available in headphone mode).
- Reset: Press & hold the function dial and ⏻ (on the wired controller) at the same time approximately 2 seconds, the wired controller will display the software version, and then all settings will be erased and will set the system to the original factory default settings.
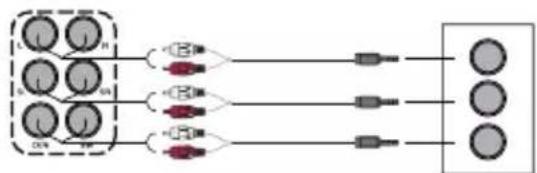
Connectivity
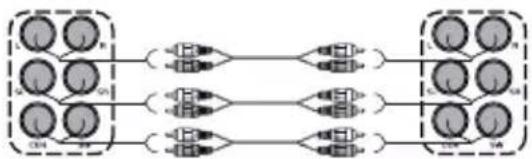
Connect to the speakers and audio source
text_image
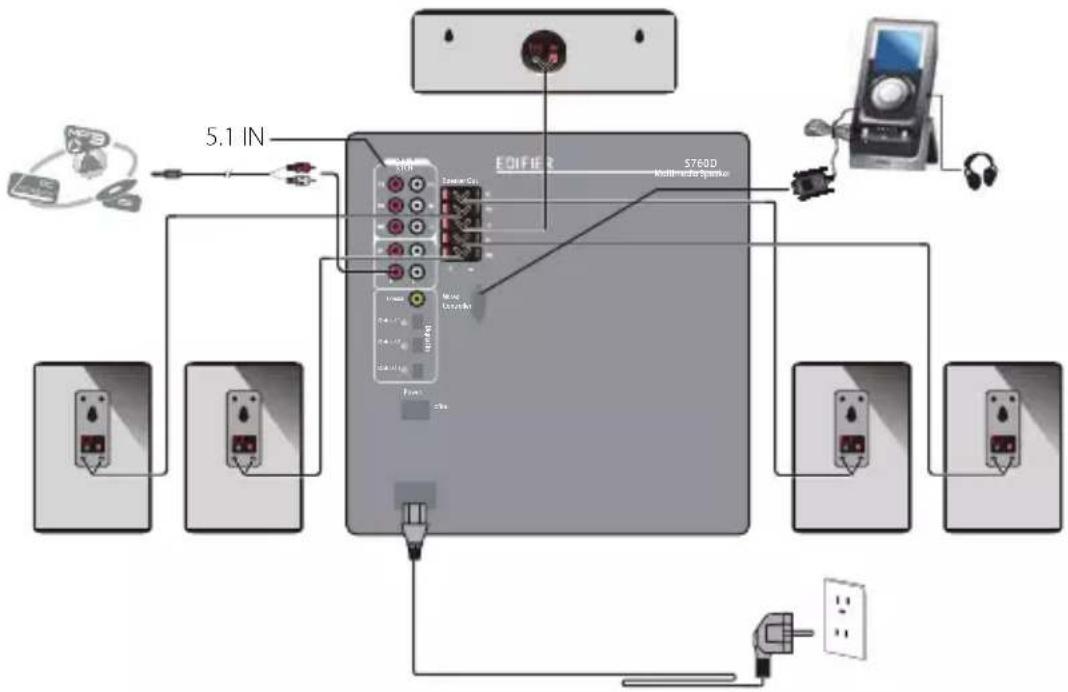
5.1 IN EDIFIER 5760D Multimeter Spanke Audio C# Audio Cable Audio Audio Cable Audio Cable Audio Cable Audio Cable Audio Cable Audio Cable Audio Cable Audio Cable Audio Cable Audio Cable Audio Cable Audio Cable Audio Cable Audio Cable Audio Cable Audio Cable Audio Cable Audio Cable Audio Cable Audio Cable Audio Cable Audio Cable Audio Cable Audio Cable Audio Cable Audio Cable Audio Cable Audio Cable Audio Cable Audio Cable Audio Cable Audio Cable Audio Cable Audio Cable→ Connect the satellite speaker to the "Speaker Out" port on the rear panel of the subwoofer (golden cable to red wire clamp, and silver cable to the black wire clamp).
→ Connect the audio cable to the 5.1/PC/AUX connector ports on the rear panel to your audio source (PC sound card, DVD/MP3/MP4 player etc.)
→ Connect the power cable to the wall socket and turn on the power switch, system is in on.
Note: 1. Make sure the system is powered off when connecting speakers.
- Before powering off the speaker, please press ⏻ to set speaker to standby mode, and then turn off the the system at the master power switch.
Operational guide
Place the satellite speakers
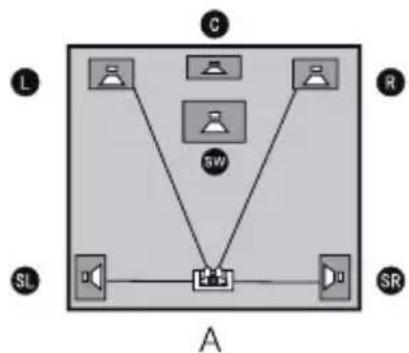
To achieve the best surround effect, all speakers should be of the similar distance from the listening spot. If your room is shaped like a horizontal-rectangle, we suggest you arrange the speakers in the way shown in figure A. If your room is a vertical-rectangle, we suggest you arrange the speakers in the way shown in figure B.

Power on/Standby
text_image
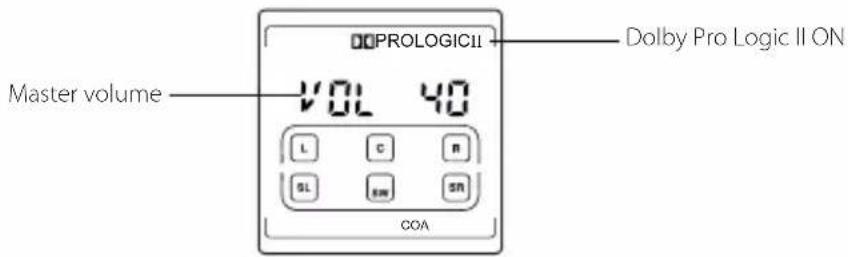
DOLBY Pro Logic II ON Master volume VOL 40 L C R SL SM SR COA- Connect the power cord to the wall socket, and turn on the power switch, the system is on;
- Rotate the function dial (or use the remote control) to adjust the master volume and other settings;
- In playing mode, press & hold ⏻ for approximately 2 seconds to set system into standby mode, LCD display of the wired controller will turn off;
- Press ⏻ to set system back to playing mode.
Operational guide

Optical input

flowchart
graph LR
    A["Optical input"] --> B["OPTI--IN"]
    B --> C["→"]
    C --> D["↓"]
    D --> E["→"]
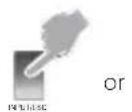
- Press the "INPUT" button on wired controller until the LCD displays "OPT", or press "OPT" key on the remote control.
- Connect the "OPT" connector port to your audio source (DVD, etc) using the fiber optical cable.
- Play the music on the connected device and adjust the settings to a desired level.
Note: Only the standard PCM audio signals (44.1/48/96KHz) of sampling clock are adaptable in optical mode.

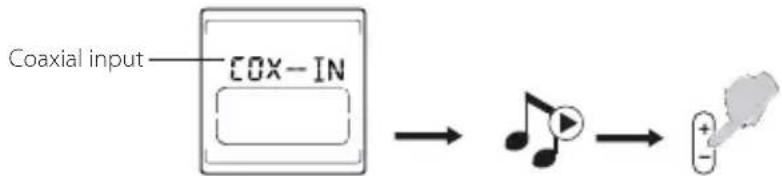
Coaxial input


flowchart
graph LR
    A["Coaxial input"] --> B["COX-IN"]
    B --> C["Audio/MI"]
    C --> D["+/-"]
- Press the "INPUT" button on wired controller until the LCD displays "COX", or press "COX" key on the remote control.
- Connect the "COX" connector port to your audio source with the coaxial cable.
- Play the music on the connected device and adjust the settings to a desired level.

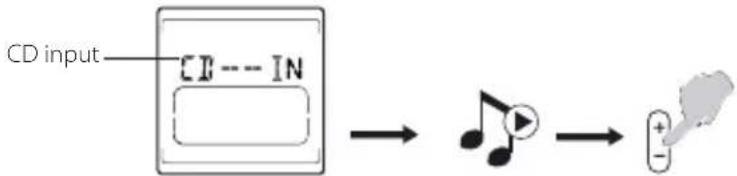
CD INPUT

flowchart
graph LR
    A["CD input"] --> B["IN"]
    B --> C["播放器"]
    C --> D["+"]
- Press the "INPUT" button on wired controller until the LCD displays "CD", or press "CD" key on the remote control to select CD input.
- Connect the "CD" connector ports to your CD player with the audio connecting cable.
- Play the music on the connected device and adjust the settings to a desired level.
English
Operational guide

5.1 INPUT

flowchart
graph LR
    A["or"] --> B["5.1"]
    B --> C{5.1 input}
    C --> D["IN - 5.1"]
    D --> E["播放器"]
    E --> F["+"]
- Press the "INPUT" button on wired controller or "5.1CH" key on remote control until the LCD displays "5.1CH".
- Connect the "5.1CH" connector ports to your device with the 3.5mm-dual RCA audio cable.
- Play the music on the connected device and adjust the settings to a desired level.
Connect to PC
5.1 input connector ports PC sound card ports
flowchart
graph LR
    A["Input Node 1"] --> C1["Router"]
    B["Input Node 2"] --> C2["Router"]
    D["Input Node 3"] --> C3["Router"]
    E["Input Node 4"] --> C4["Router"]
    C1 --> F["Output Node 1"]
    C2 --> G["Output Node 2"]
    C3 --> H["Output Node 3"]
    C4 --> I["Output Node 4"]
Connect to DVD
5.1 input connector ports DVD output connector ports
flowchart
graph LR
    A["Node 1"] --> B["Device 1"]
    C["Node 2"] --> D["Device 2"]
    E["Node 3"] --> F["Device 3"]
    G["Node 4"] --> H["Device 4"]
    B --> I["Output"]
    D --> J["Output"]
    F --> K["Output"]
    H --> L["Output"]
- Dual RCA-Dual RCA audio cables are needed if you want to play music through certain devices.

AUX INPUT

flowchart
graph LR
    A["Input"] --> B["AUX"]
    B --> C["AUX input"]
    C --> D["RUX -- IN"]
    D --> E["Output"]
- Press the "INPUT" button on wired controller until the LCD displays "AUX", or press "AUX" key on the remote control to select AUX input.
- Connect the "AUX" connector ports to your audio source (MP3/MP4 player, etc.) with the audio connecting cable.
- Play the music on the connected device and adjust the settings to a desired level.
Specifications
| Power output: | FL/FR/C/SL/SR: 60W+60W+60W+60W+60WSW: 240W |
| Noise level: | ≤30dB(A) |
| System response: | FL\FR\SL\SR: 145Hz ~ 20KHzC: 128Hz ~ 20KHzSW: 45Hz ~ 130Hz |
| Input sensitivity: | 5.1IN: Satellite: 800mV ± 50mVSubwoofer: 1280mV ± 20mVAUX/CD: Satellite: 800mV ± 50mVSubwoofer: 1020mV ± 20mVOptical/Coaxial: Satellite: 400mFFS ± 50mFFSSubwoofer: 460mFFS ± 20mFFS |
| Treble unit: | Φ25mm silk dome tweeter |
| Mid-range unit: | 31⁄2 inch (92mm) |
| Bass unit: | 10 inch (260mm) |
There are no restrictions of use.
Troubleshooting
| Problem Solution | |
| No sound | Check if the power indicator light is ON |
| Try to turn up the volume using either the master volume control or remote control. | |
| Ensure the audio cables are firmly connected and the input is set correctly on the speakers. | |
| Check if there is a signal output from the audio source. | |
| The S760D does not turn on | Check if main power is connected, or if the wall outlet is switched on. |
To learn more about EDIFIER, please visit www.edifier.com
For Edifier warranty queries, please visit the relevant country page on www.edifier.com and review the section titled Warranty Terms.
USA and Canada: service@edifier.ca
South America: Please visit www.edifier.com (English) or www.edifierla.com (Spanish/Portuguese) for local contact information.
Consignes de securite importantes
text_image
EDIFIER S760D Multimedia Speaker Line In S.1CH Speaker Out Circuit Wired Controller Optical 1 Optical 2 Optical 3 Power oncetext_image
Crisson Muthesa spenterManual de usuario
Ilustraciones
text_image
EDIFIER S760D Multimedia Speaker Line In STCH Speaker Out Wired Controller Created Optical Optical Optical Power OptionPanel trasero del subwoofer
text_image
CDIFFER 10 11 12 13 9text_image
5.1 IN CD/LED S760D Power DC/LED DC/LED DC/LED DC/LED DC/LED DC/LED DC/LED DC/LED DC/LED DC/LED DC/LED DC/LED DC/LED DC/LED DC/LED DC/LED DC/LED DC/LED DC/LED DC/LED DC/LED DC/LED DC/LED DC/LED DC/LED DC/EDflowchart
graph TD
    SW["SW"] --> L["L"]
    SW --> R["R"]
    SW --> SL["SL"]
    SW --> SR["SR"]
    style SW fill:#f9f,stroke:#333,stroke-width:2px
    style L fill:#ccf,stroke:#333,stroke-width:2px
    style R fill:#ccf,stroke:#333,stroke-width:2px
    style SL fill:#cfc,stroke:#333,stroke-width:2px
    style SR fill:#cfc,stroke:#333,stroke-width:2px
    note right of SW
        B
    end
text_image
EDIFIER S760D Multimedia Speaker Line in 5.1CH Speaker Out R L Wired Controller Circuit Optical Optical 2 Optical 3 Power OFFn ① ② ③ ④ ⑤ ⑥ ⑦ ⑧text_image
Diagram of an LCD TV player with numbered parts labeled for identificationKabelgebundener Controller
text_image
5.1 IN S760D multimodal speaker CD/CD 52.8 100 Signal/Color Wired Control Switch Control Select Select Select Select Select Select Select Select Select Select Select Select Select Select Select Select Select Select Select Select Select Select Select Select Select Select Select Select Select Select Select Select Select Select Select Select Select Select Select Select Select Select Select Select Select Select Select Select Select Select 5.1 INflowchart
graph LR
    subgraph Left_System
        A1[" "] --> B1[" "]
        A2[" "] --> B2[" "]
        A3[" "] --> B3[" "]
        A4[" "] --> B4[" "]
    end
    subgraph Right_System
        C1[" "] --> D1[" "]
        C2[" "] --> D2[" "]
        C3[" "] --> D3[" "]
        C4[" "] --> D4[" "]
    end
    A1 --> B1
    A2 --> B2
    A3 --> B3
    A4 --> B4
    B1 --> C1
    B2 --> C2
    B3 --> C3
    B4 --> C4
    style Left_System fill:#f9f,stroke:#333
    style Right_System fill:#bbf,stroke:#333
text_image
EPCO Pamela B. B. and the following: Theorem 4.1 of theorem 5.2. (Theorem 4.1 of theorem 5.2.)Manuale dell'utente
Immagini
text_image
EDIFIER S760D Multimedia Speaker Line in 5.1CH Speaker Out Loxial Optical Optical2 Optical3 Wired Controller Power OffOn ① ② ③ ④ ⑤ ⑥ ⑦ ⑧Pannello posteriore del subwoofer
text_image
⑨ ⑩ ⑪ 10 13 12 12 CD-ROMControllore cablato
text_image
PROLOGICII Dolby Pro Logic II attivo Volume master VOL 40 L C R SL SW SR COAflowchart
graph LR
    A["Ingresso 5.1"] --> B["IN -5.1"]
    B --> C["5.1"]
Manufactured under license from Dolby Laboratories. Dolby and the double-D symbol are trademarks of Dolby Laboratories.

Manufactured under license from Dolby Laboratories. Dolby, Pro Logic, and the double-D symbol are trademarks of Dolby Laboratories.

Manufactured under license under U.S. Patent Nos: 5,956,674; 5,974,380; 6,487,535 & other U.S. and worldwide patents issued & pending. DTS, the Symbol, & DTS and the Symbol together are registered trademarks & DTS Digital Surround and the DTS logos are trademarks of DTS, Inc. Product includes software. © DTS, Inc. All Rights Reserved.
Manual Edition 1.3, Oct. 2017
IB-200-S0760D-03
Version 2017
Suit 2207, 22nd floor,
Tower II, Lippo centre,
89 Queensway
Hong Kong
Tel: +852 2522 6989
Fax: +852 2522 1989
www.edifier.com
© 2017 Edifier International Limited. All rights reserved.
Printed in China
NOTICE:
For the need of technical improvement and system upgrade, information contained herein may be subject to change from time to time without prior notice.
Products of EDIFIER will be customized for different applications. Pictures and illustrations shown on this manual may be slightly different from actual product. If any difference is found, the actual product prevails.