
ELPLX02S - Video projector EPSON - Free user manual and instructions
Find the device manual for free ELPLX02S EPSON in PDF.
| Product type | Interchangeable lens for video projector |
| Brand | Epson |
| Model | ELPLX02S |
| Focal length | 8.0 mm |
| Aperture value (F) | 1.9 |
| Operating temperature | 0 to +50 °C (without condensation) |
| Storage temperature | -10 to +60 °C (without condensation) |
| Weight | Approximately 5000 g |
| Package contents | Lens unit with caps (large and small), decorative cover, cover attachment (separate sheet), user's guide |
| Main functions | Lens replacement, focus adjustment, keystone correction, lens shift |
| Maintenance and cleaning | Clean with a dry, soft cloth. Do not use alcohol, benzene, or thinner. Do not use flammable gas spray. |
| Safety | Unplug the projector before installation/removal. Do not disassemble or modify. Avoid shocks. Wait 30 minutes after turning off before removing the lens (risk of burns). |
| Spare parts and repairability | Contact the dealer or Epson after-sales service. The unit is not designed to be disassembled or repaired by the user. |
| Compatibility | Compatible Epson projectors (check projector model before installation) |
| Zoom | Not supported (fixed focal length lens) |
| Lens shift adjustment | Possible, return to original position before removal |
Frequently Asked Questions - ELPLX02S EPSON
User questions about ELPLX02S EPSON
0 question about this device. Answer the ones you know or ask your own.
Ask a new question about this device
Download the instructions for your Video projector in PDF format for free! Find your manual ELPLX02S - EPSON and take your electronic device back in hand. On this page are published all the documents necessary for the use of your device. ELPLX02S by EPSON.
USER MANUAL ELPLX02S EPSON
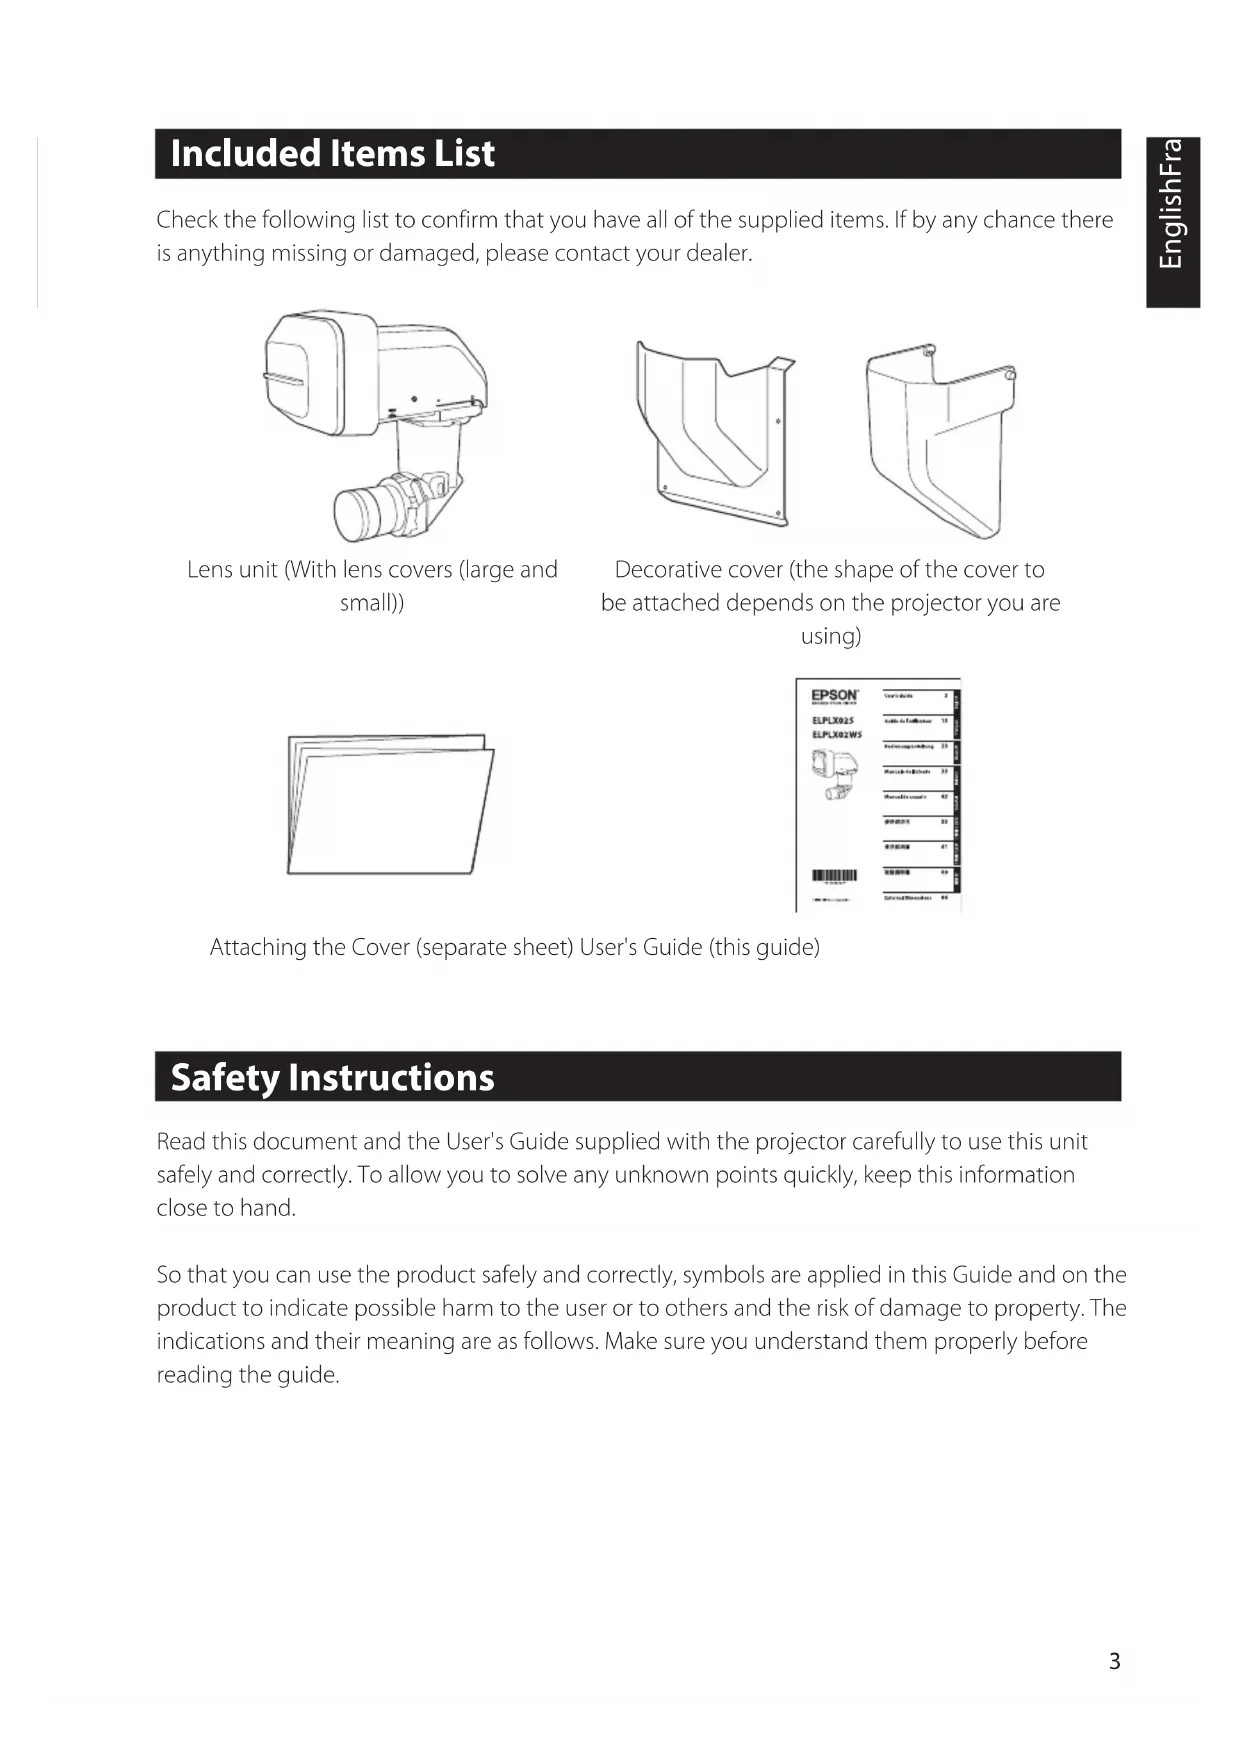
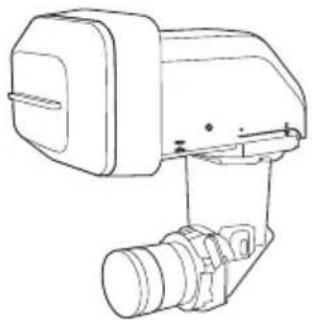
Check the following list to confirm that you have all of the supplied items. If by any chance there is anything missing or damaged, please contact your dealer.
Lens unit (With lens covers (large and small))
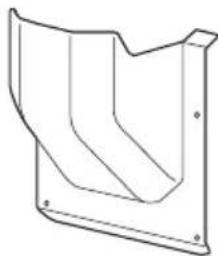
Decorative cover (the shape of the cover to be attached depends on the projector you are using)
Attaching the Cover (separate sheet) User's Guide (this guide)
Safety Instructions
Read this document and the User's Guide supplied with the projector carefully to use this unit safely and correctly. To allow you to solve any unknown points quickly, keep this information close to hand.
So that you can use the product safely and correctly, symbols are applied in this Guide and on the product to indicate possible harm to the user or to others and the risk of damage to property. The indications and their meaning are as follows. Make sure you understand them properly before reading the guide.
| Warning | This symbol indicates information that, if ignored, could possibly result in death or personal injury due to incorrect handling. |
| Caution | This symbol indicates information that, if ignored, could possibly result in personal injury or physical damage due to incorrect handling. |
| Warning |
| ·Disconnect the power cord from the projector before attaching or removing this product. Attaching or removing while the power cord is connected could cause an electric shock. ·When attaching the product to the projector, make sure that it is securely installed and that it is locked in place. If this product is not attached correctly it may fall, resulting in personal injury or an accident. ·When removing dirt and dust from the product, do not use a spray that contains flammable gas. The high heat generated inside the projector may cause a fire. |
| Caution |
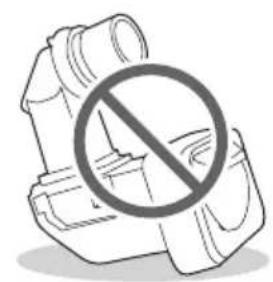
| ·When projecting,remove the lens cover from the front of the lens unit. ·Before attaching the lens unit,check the projector's model number.If this lens unit is attached to a projector other than the specified projector,the lens unit or the projector could be damaged. ·Be careful not to trap your finger when attaching this product to the projector.This may cause an injury. ·Do not disassemble or remodel. ·Do not use or store the projector in places where it might be subjected to high and low extremes of temperature.Also,avoid any sudden changes in temperature. ·Do not use or store the projector in places where smoke from oil or cigarettes may be present,as it can adversely affect the quality of the projected images. ·Do not get it wet. ·Do not drop it or subject it to impacts.When putting this product down,make sure you place it on a flat,stable surface. ·When moving the projector,do not hold the lens unit and decorative cover.They may come off and the projector may fall causing an injury. ·Remove the lens unit when transporting the projector.If the projector is transported with the lens unit attached,the lens unit or the projector could be damaged. |
Caution
- Do not attach the lens unit when the projector's lens insertion section is facing up. Dust or dirt could enter the projector.
- Try not to touch the lens section with your hand or fingers. If fingerprints or oils are left on the surface of the lens, projection quality deteriorates.
- Do not touch or pull the connector part or the cable as this could cause a malfunction.
- When cleaning this product, do not use a wet cloth or solvents such as alcohol, benzene, or thinner as this could cause an electric shock or a malfunction.
- Attach the cover to the lens unit, and place it on its side on a stable surface. Failure to do so may cause the lens unit to fall causing a malfunction or damage.
Removing and Attaching the Lens Unit
Depending on the projector being used, procedures and illustrations may differ from the explanations. Make sure you read the User's Guide supplied with the projector.
Attaching
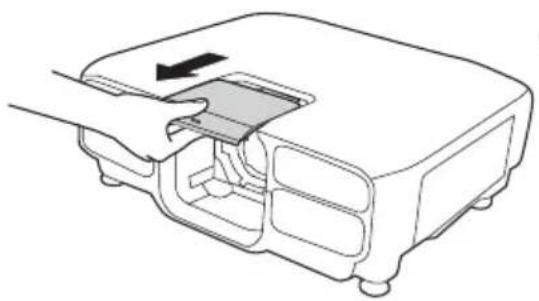
1 Remove the lens replacement cover.
Keep the lens replacement cover in a safe place.
*The shape of the lens replacement cover and how to remove it differs depending on the projector you are using. See the "User's Guide" supplied with the projector.
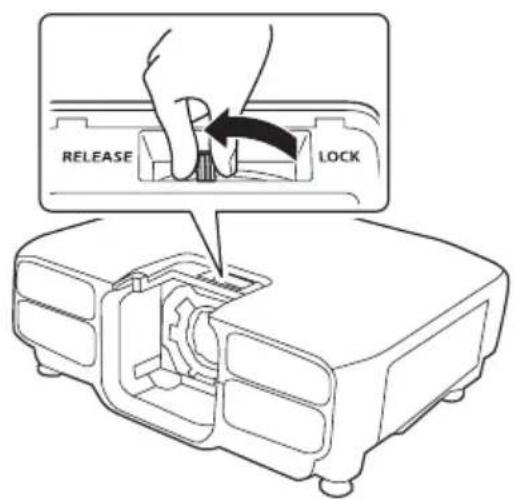
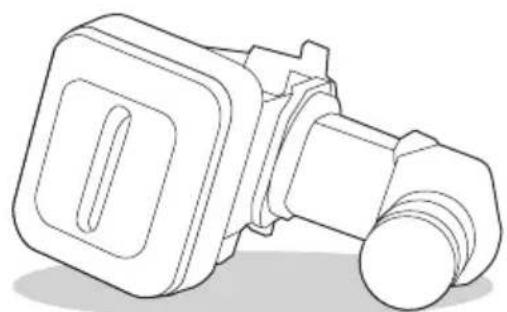
Hold the lock lever and turn it counterclockwise.
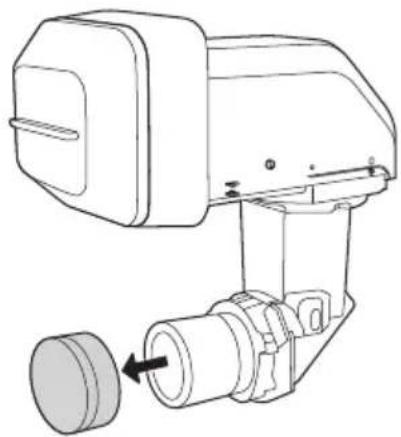
3 Remove the lens cover (small) from the lens unit.
Use the cover when storing or transporting the lens unit on its own. Keep the lens cover in a safe place.
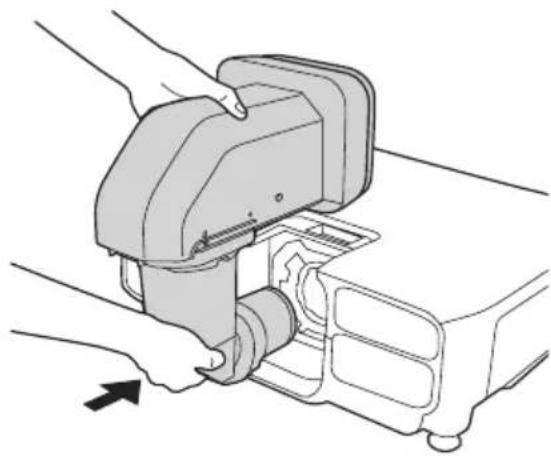
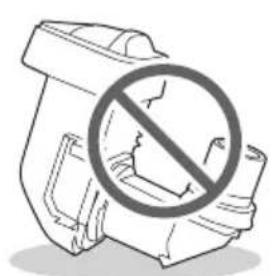
Make sure the lens unit is not at an angle, and insert it straight into the lens insertion section.
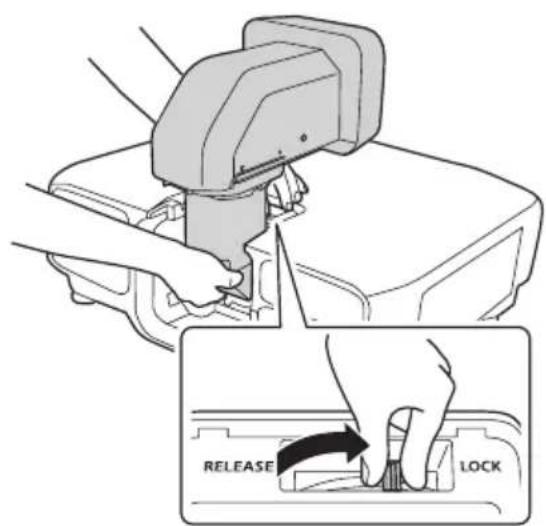
While holding the lens unit firmly, hold the lock lever and turn it clockwise to lock the lens unit.
Check that the lens cannot be detached.
If it cannot be locked, the lens unit is at an angle.
Remove and then reinstall the lens unit.

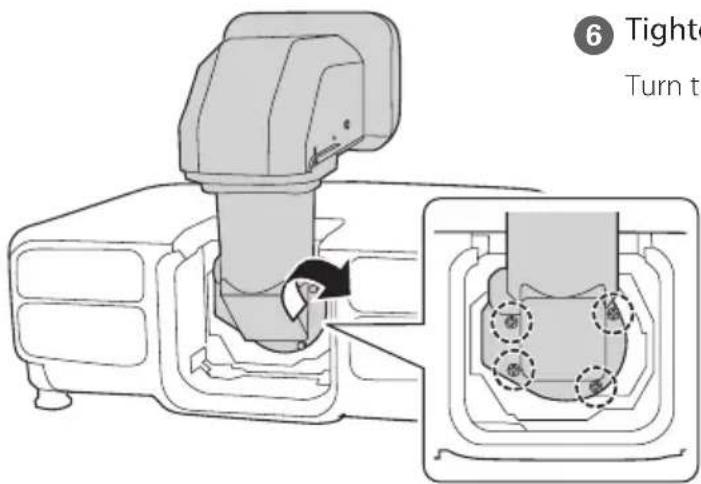
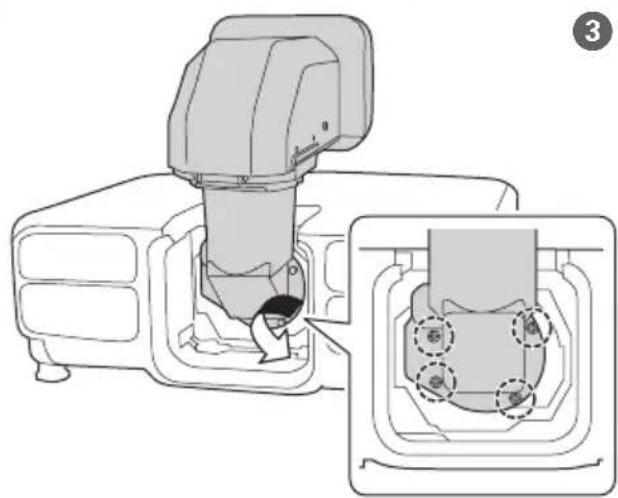
6 Tighten the screws (4 points) to fix the lens unit.
Turn the screws by hand.
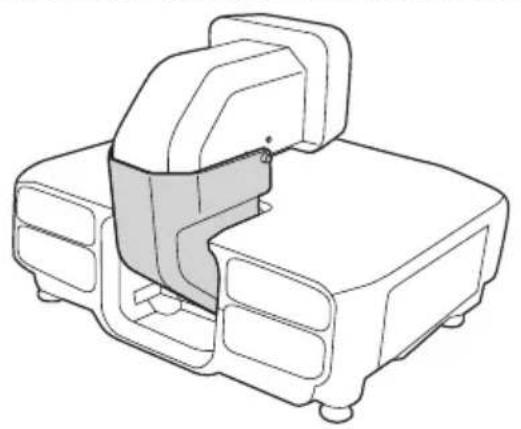
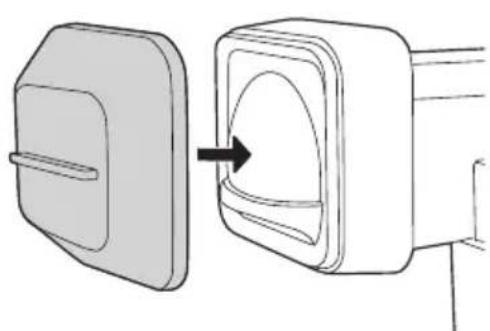
7 Attach the decorative cover. See the "Attaching the Cover" supplied.
8 Remove the lens cover (large). Keep the lens cover in a safe place.
After Replacing the Lens Unit
After replacing the lens unit, calibrate the lens so that the projector can correctly acquire the lens position and adjustment range. After attaching a lens unit, a message is displayed when the projector is turned on. Select [Yes] to calibrate the lens.
Adjusting the Image
For more information on the following, see the User's Guide supplied with the projector.
- Focus adjustment
Distortion adjustment
When you perform distortion adjustment, the size of the screen changes.
- Lens shift
- Keystone correction
*This product is a fixed focus lens. The zoom function is not supported.
The User's Guide is available from the following Web site.
epson-sn
Visit the following Web site to find the projection distance calculator. http://www.epson.com/
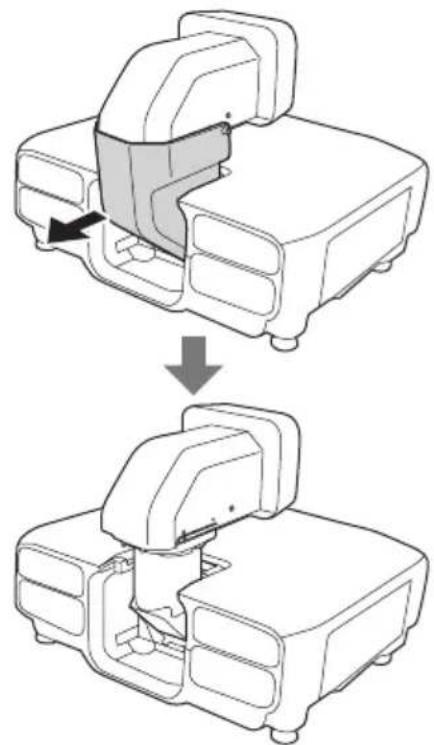
Removing
Caution
- If lens shift has been performed, move the lens position to the home position before replacing the lens unit.
- Turn off the projector and then wait for a while (approximately 30 minutes) before removing the lens unit. If you touch the lens unit during projection or immediately after turning off the projector, it could cause a burn.
1 Attach the lens cover (large).
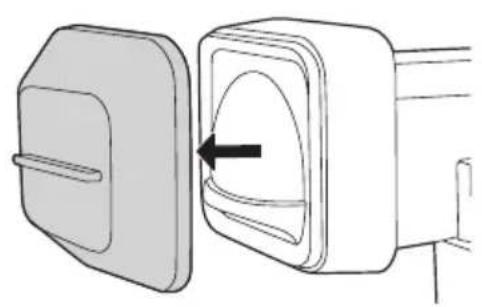
2 Remove the decorative cover.
See the "Attaching the Cover" supplied.
3 Loosen the screws (4 points).
Turn the screws by hand.
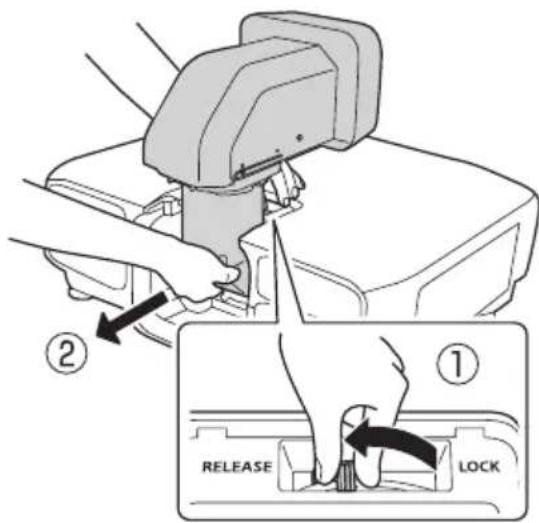
While holding the lens unit firmly, hold the lock lever and turn it counterclockwise to unlock the lens unit.
Pull the lens unit straight out as it is released.
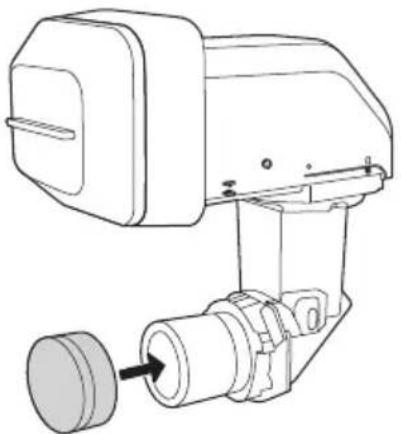
5 Attach the lens cover (small).
Specifications
| Product name ELPLX02S/ELPLX02WS | |
| Focal length 8.0 mm | |
| F number 1.9 | |
| Operating temperature 0 to +50°C (No condensation) | |
| Storage temperature -10 to +60 °C (No condensation) | |
| Mass Approx. 5,000 g | |
Contact your local dealer or the nearest address provided in the documentation supplied with the projector.
Listedes elementfournis
http://www.epson.jp/products/bizprojector/simulator/
取外力
注意
The crossed out wheeled bin label that can be found on your product indicates that this product and incorporated batteries should not be disposed of via the normal household waste stream. To prevent possible harm to the environment or human health please separate this product and its batteries from other waste streams to ensure that it can be recycled in an environmentally sound manner. For more details on available collection facilities please contact your local government office or the retailer where you purchased this product. Use of the chemical symbols Pb, Cd or Hg indicates if these metals are used in the battery.
Deutsch
This information only applies to customers in the European Union, according to Directive 2002/96/EC OF THE EUROPEAN PARLIAMENT AND OF THE COUNCIL OF 27 January 2003 on waste electrical and electronic equipment (WEEE) and DIRECTIVE 2006/66/EC OF THE EUROPEAN PARLIAMENT AND OF THE COUNCIL OF 6 September 2006 on batteries and accumulators and waste batteries and accumulators and repealing Directive 91/157/EEC and legislation transposing and implementing it into the various national legal systems.
For other countries, please contact your local government to investigate the possibility of recycling your product.
For users outside the Province of Buenos Aires, Argentina:
This information only applies to customers in the Province of Buenos Aires, Argentina, according to Law No. 14321 in the Province of Buenos Aires (excluding the City of Buenos Aires) on waste electrical and electronic equipment (WEEE).
For other countries and other locations, please contact your local government to investigate the possibility of recycling your product.
Indication of the manufacturer and the importer in accordance with requirements of directive 2011/65/EU (RoHS)
Manufacturer: SEIKO EPSON CORPORATION
Address : 3-5, Owa 3-chome, Suwa-shi, Nagano-ken 392-8502 Japan
Telephone :81-266-52-3131
http://www.epson.com/
Importer : EPSON EUROPE B.V.
Address: Atlas Arena, Asia Building, Hoogoorddreef 5, 1101 BA Amsterdam Zuidoost The Netherlands
Telephone:31-20-314-5000
http://www.epson.eu/