
AVerVision M70W - Document camera AVer - Free user manual and instructions
Find the device manual for free AVerVision M70W AVer in PDF.
| Product Type | Document Camera |
| Brand | AVer |
| Model | AVerVision M70W |
| Sensor | CMOS 1/3.2", 13 megapixels |
| Frame Rate | 60 fps (max) |
| HDMI Output Resolution | 4K, 1080p, 720p (60 Hz) |
| Optical Zoom | AVerZOOM™ x10 |
| Digital Zoom | Up to 23x |
| Total Zoom | Up to 33x |
| Focus | Automatic / Manual / Zone (software) |
| Field of Vision | 480 x 345 mm at 470 mm distance (A3) |
| Image Modes | Normal, High Frame Rate, High Quality, Microscope, Infinity, Macro |
| Effects | Rotation, Freeze |
| Connectivity | Dual-band Wi-Fi 2.4/5 GHz, Miracast, USB 2.0, HDMI input/output |
| Storage | USB port for USB flash drive (capture/recording) |
| Lamp | Built-in LED |
| Microphone | Built-in |
| Power Supply | DC 5 V / 3 A, AC 100-240 V power adapter |
| Battery | Built-in rechargeable (battery life not specified) |
| Dimensions (in use) | 587 x 159 x 546 mm |
| Dimensions (folded) | 363.5 x 159 x 76.3 mm |
| Weight | 2.6 kg (approx. 5.7 lb) |
| Compatible Software | AVerTouch (Windows and macOS) |
| Wireless Security | WEP, WPA/WPA2-PSK, WPA/WPA2-Enterprise |
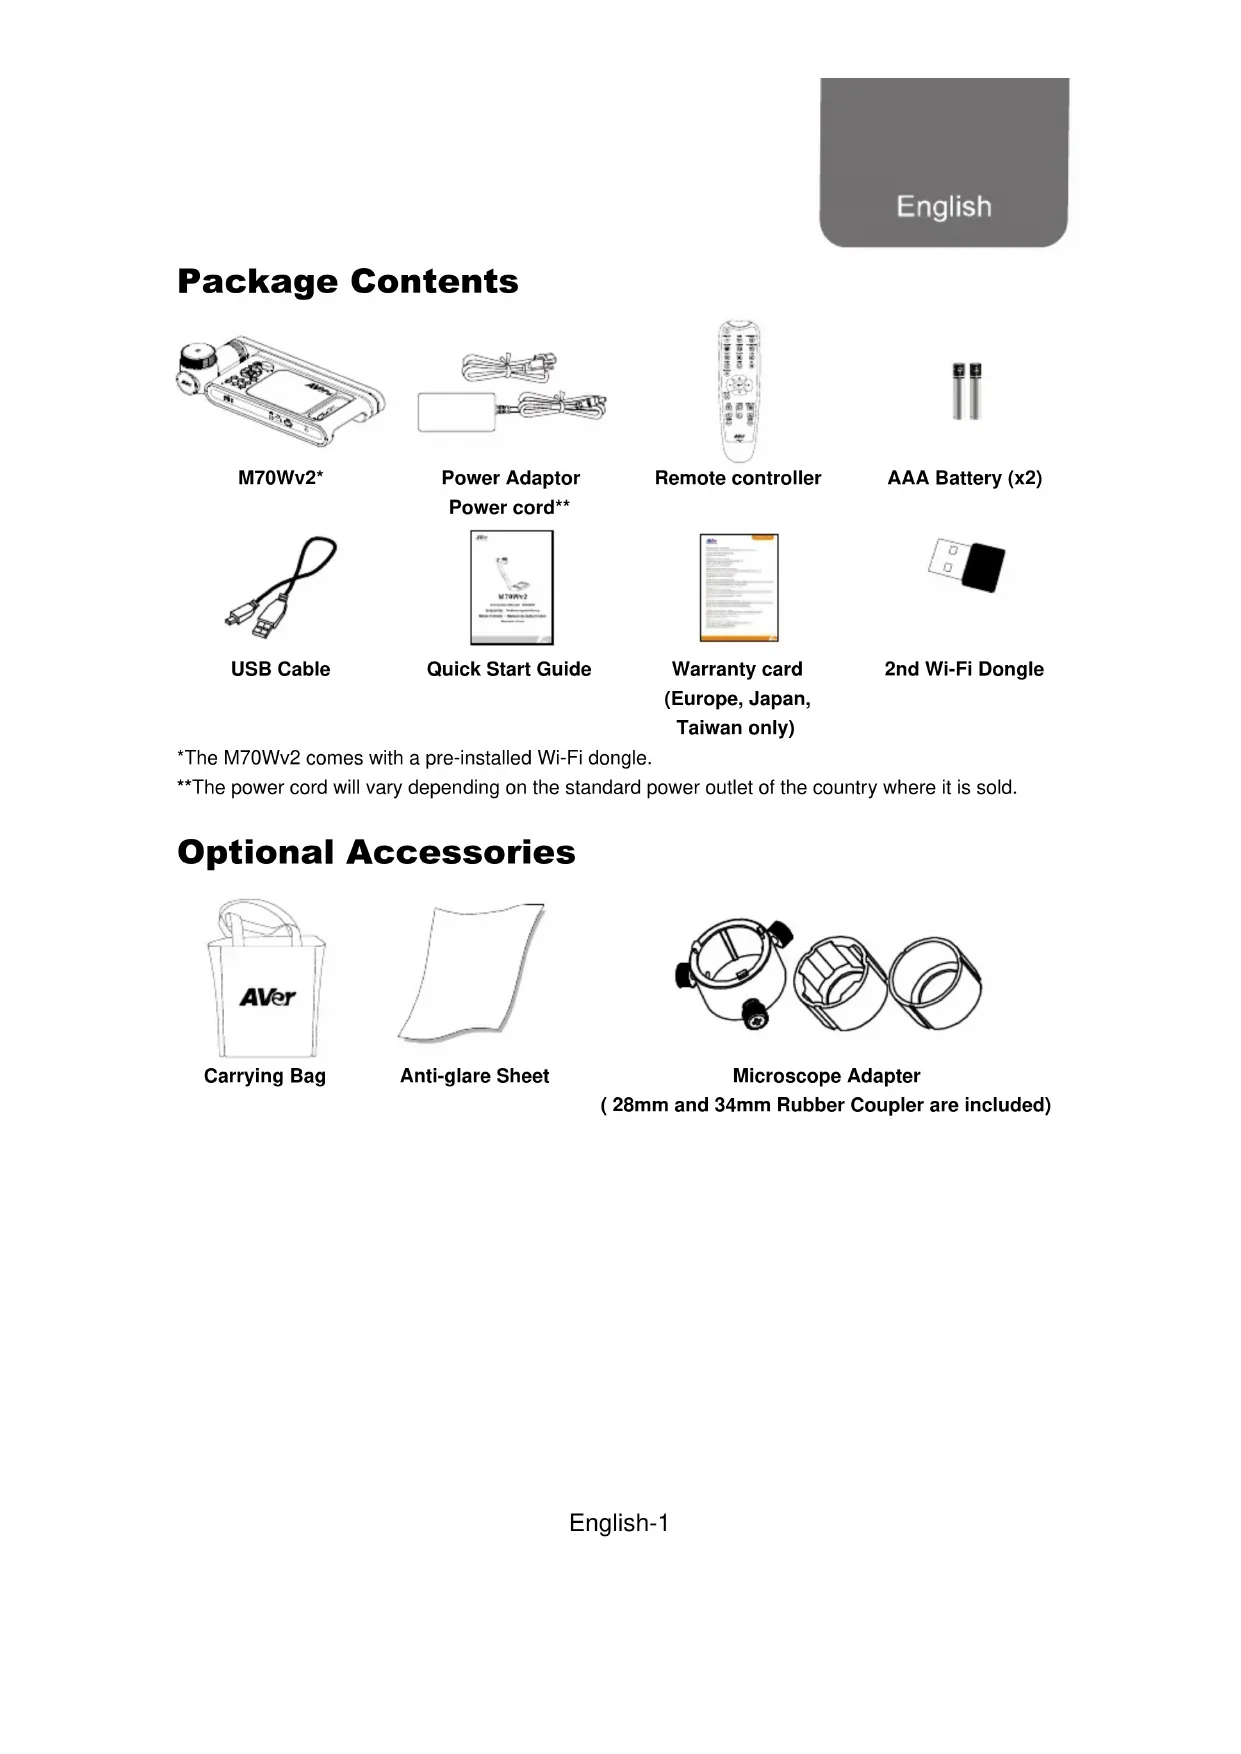
| Package Contents | M70Wv2, power adapter, power cable, USB cable, quick start guide, remote control, AAA batteries (x2), warranty card, 2nd Wi-Fi dongle |
Frequently Asked Questions - AVerVision M70W AVer
User questions about AVerVision M70W AVer
0 question about this device. Answer the ones you know or ask your own.
Ask a new question about this device
Download the instructions for your Document camera in PDF format for free! Find your manual AVerVision M70W - AVer and take your electronic device back in hand. On this page are published all the documents necessary for the use of your device. AVerVision M70W by AVer.
USER MANUAL AVerVision M70W AVer
Warranty card (Europe, Japan, Taiwan only)
2nd Wi-Fi Dongle
The M70Wv2 comes with a pre-installed Wi-Fi dongle.
*The power cord will vary depending on the standard power outlet of the country where it is sold.
Optional Accessories

Carrying Bag

Anti-glare Sheet
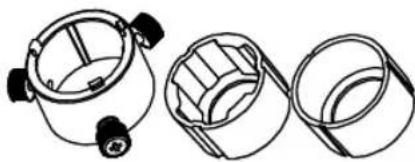
Microscope Adapter
(28mm and 34mm Rubber Coupler are included)
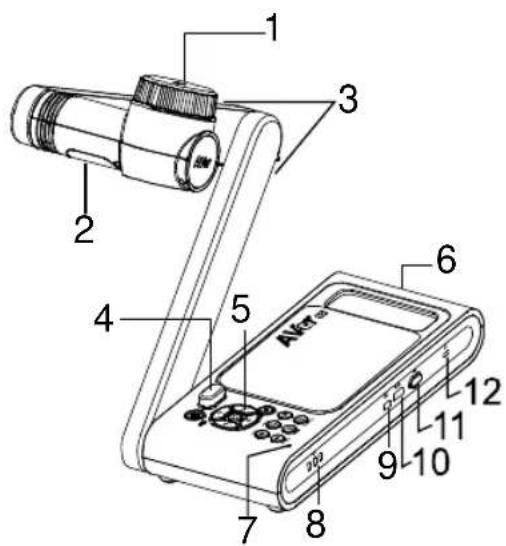
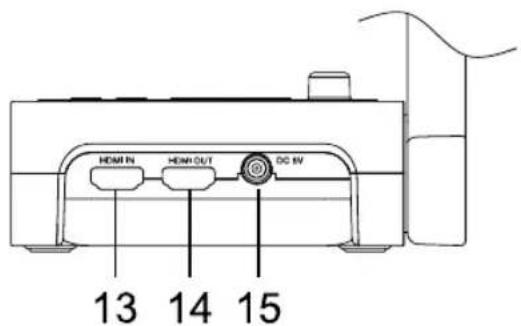
Parts Info
-
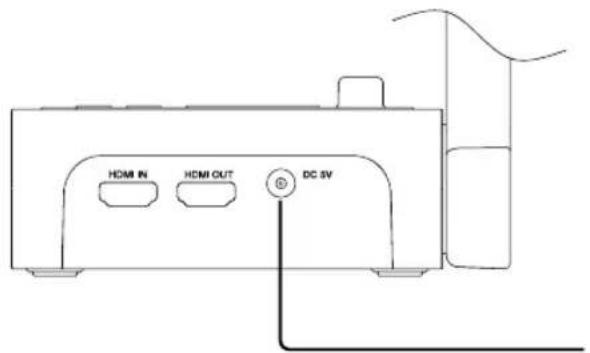
HDMI input
-
HDMI output
-
DC power jack
-
Camera head
- Built-in mic
- LED lamp
- Battery indicator
- Arm
- USB mini port
- IR sensor
- USB port
- Control panel
- Wi-Fi dongle
- Handle
- Kensington lock
Compound Key
FACTORY RESET

Reset to factory default settings.
RESOLUTION

With each press, cycle through the following resolutions:
- Auto detection (4K, 720P, 1080P)
- 1024x768 (in supported HDMI device)
- 4K 60Hz (in supported HDMI device)

With each press, cycle through Normal, Motion, High quality, Microscope, Infinity, and Marco modes.
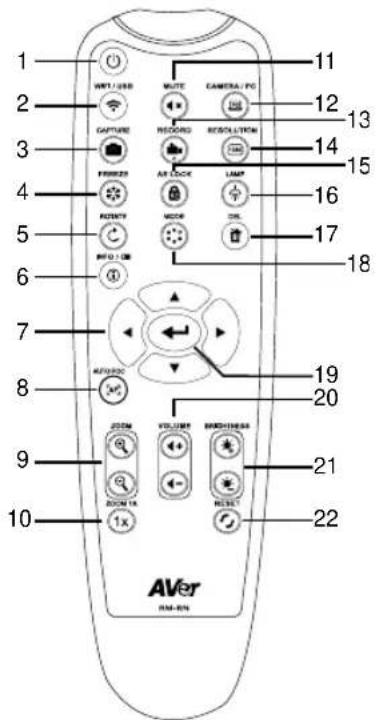
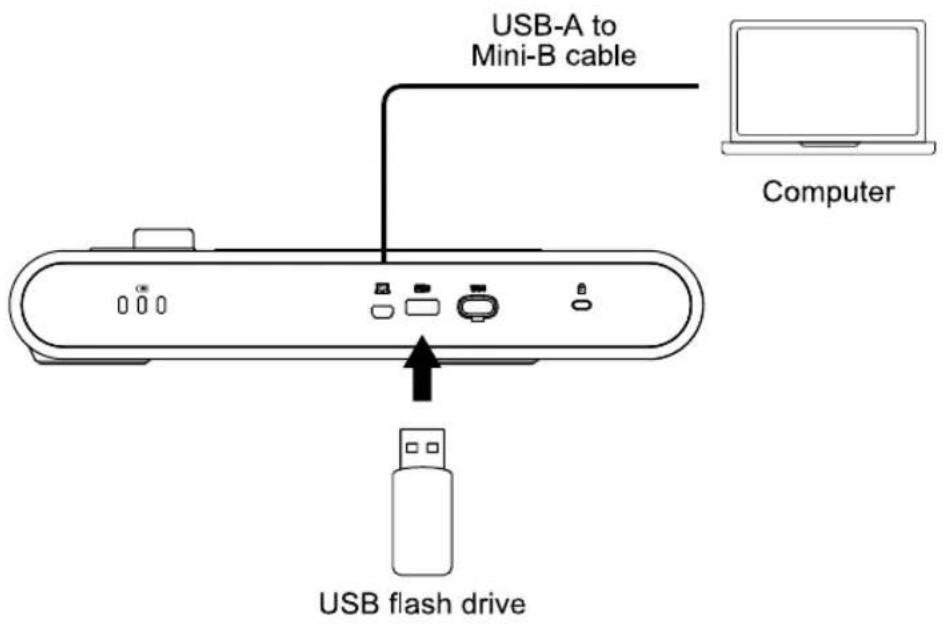
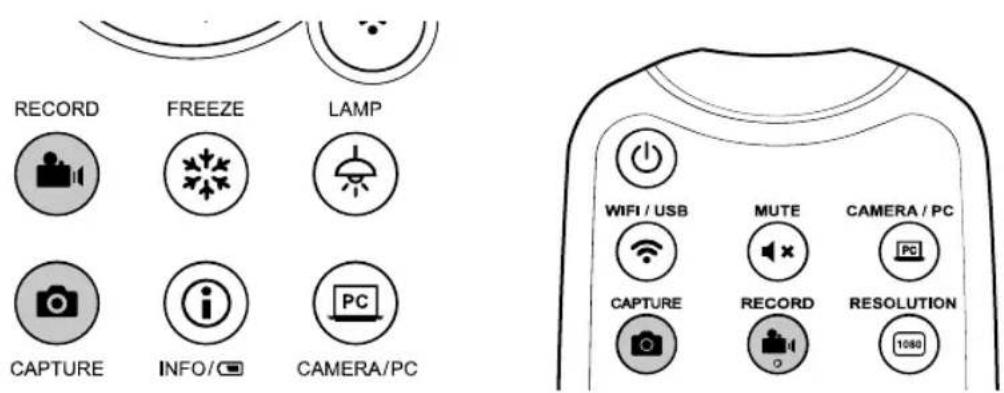
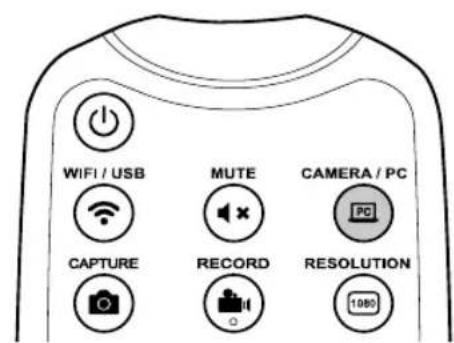
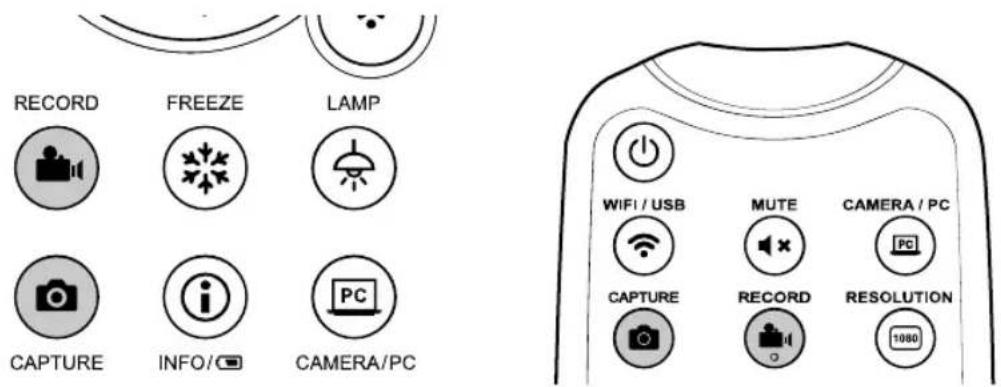
Remote Control
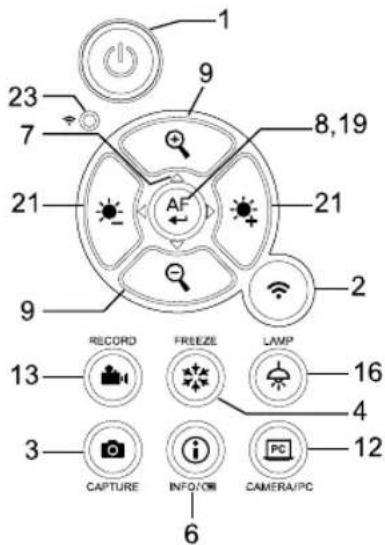
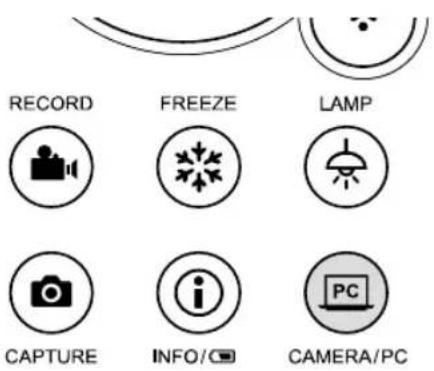
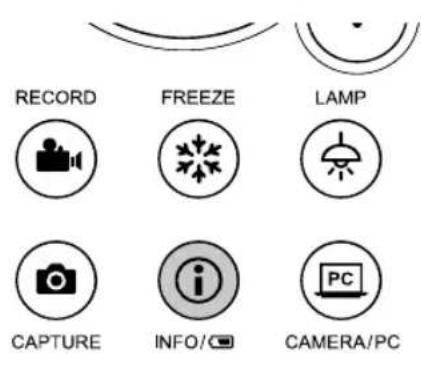
Control Panel
| Name | Function |
| 1. POWER | Turn the camera on or off. |
| 2. Wi-Fi/USB | Switch between Wi-Fi and USB modes. |
| 3. CAPTURE | Capture still image in Camera mode. In continuous capture mode, press this button again to stop. |
| 4. FREEZE | Freeze live images. |
| 5. ROTATE | Rotate the image by 0/180° in Camera mode. |
| 6. INFO/ | Press to view system information and battery power status. |
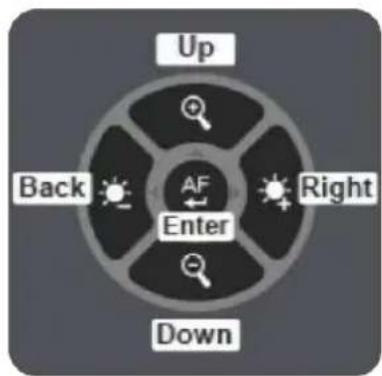
| 7. ▲, ▼, □, & ▲ | Pan and zoom-in image in live streaming. |
| 8. AUTO FOC | Adjust the focus automatically. |
| 9. ZOOM +/- | Increase/decrease the image magnification in camera mode. |
| 10. ZOOM 1X | Reset zoom level to 100%. |
| 11. MUTE | Set the volume to mute. |
| 12. CAMERA / PC | Switch the video signal between camera and computer from the HDMI Input port |
| 13. RECORD | Start/Stop audio & video recording. Video recording can only be saved in a USB flash drive. |
| 14. RESOLUTION | Press to switch between following modes: - Auto detects the best resolution(4K, 720P, 1080P) - 1024x768 (in supported HDMI device) - 4K 60Hz (in supported HDMI device) |
| 15. AE LOCK | Lock the exposure to stop M70Wv2 attempting to find optimal exposure. |
| 16. LAMP | Turn the overhead light on/off. |
| 17. DEL | Delete the selected picture/video inPlayback mode. |
| 18. MODE | Press to switch between Normal, High frame, and High quality, Microscope, Infinity, or Marco mode. |
| 19. | Make a selection. |
| 20. VOLUME +/- | Adjust the volume. |
| 21. BRIGHTNESS +/- | Adjust the brightness. |
| 22. RESET +/- | Reset to factory default setting. |
| 23. Wi-Fi Indicator | Wi-Fi status indicator: Refer to <LED Indicator>. |
LED Indicator
| Name | Status indicator |
| Power | Solid green: Power on No light: Power off Solid red: Standby (Camera is connected to power but not in operation.) |
| Battery | Solid green(x3): Battery is full(100%-60%) Solid green(x2): Battery is 60%-30% Solid green(x1): Battery is 30%-5% Solid red (x1): Battery is 5%-0% Flashing red (x1): Battery is out of power Solid orange(x3): Battery is abnormal |
| Wi-Fi | Solid blue: AP Mode Ready / STA connected Slow flashing blue: Software connection with camera Short flashing blue: Create AP mode / STA connecting Solid green: Miracast mode ready Slow flashing green: Miracast streaming start Quick flashing green: Miracast device scan / connecting |
[Note]
The battery will be exhausted for long-term usage. Do not replace the battery yourself. Please contact your dealer.
Device Connection
Charge Your Camera
Your camera comes with a built-in battery. Before using it for the first time, charge it for at least 3 hours. Connect to a power outlet using the included power adapter and power cord.
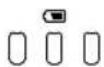
3 flashing green lights: Charging
3 solid green lights: Charged
Power adapter and power cord

-
You can also use a computer to charge your camera.
-
Your camera must not be in operation. A solid red light on the power button indicates that it is in Standby mode.
- Connect the included USB cable to the mini USB port on the camera and connect the other end to a USB port on a computer. Charging with a computer will be slower.
If your camera is frozen, press

- to restart.
USB Connection
Connect to a computer using the included USB cable to work with video conferencing software.
You can also plug in a USB flash drive to save images and videos. Press the Capture button to capture images and the Record button to record videos.
HDMI Connection
- By connecting a computer to the HDMI in port and a monitor or projector to the HDMI out port, images and videos from the computer can be projected.
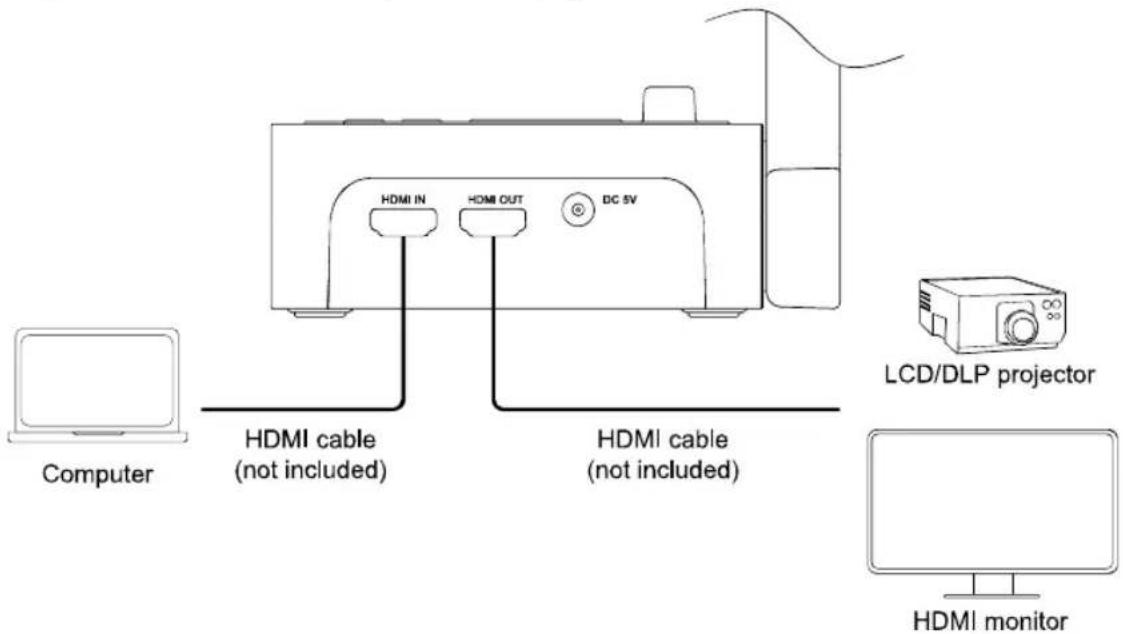
- Press the Camera/PC button to switch between camera input and computer input.
Peerto-Peer (P2P) Connection via Wi-Fi Dongle (Windows only)
Method 1
-
Download and install AVerTouch software to your computer from AVer Download Center. (https://www.aver.com/download-center).
-
Do not connect your camera to a computer with the included USB cable.
-
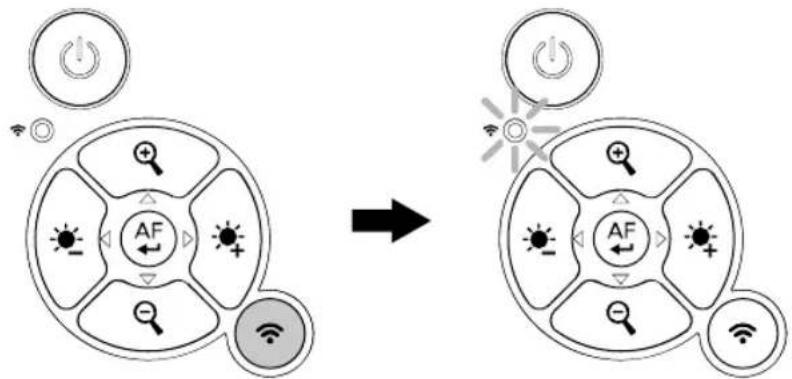
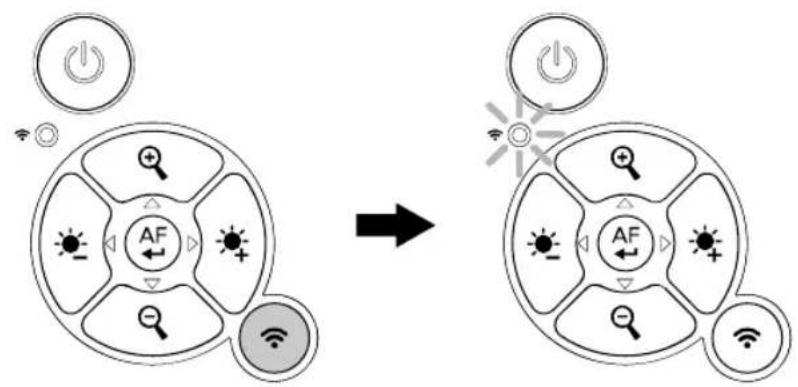
Press the Wi-Fi button to turn on Wi-Fi mode. The Wi-Fi indicator will be solid blue.
- Plug in the second Wi-Fi dongle to your computer.
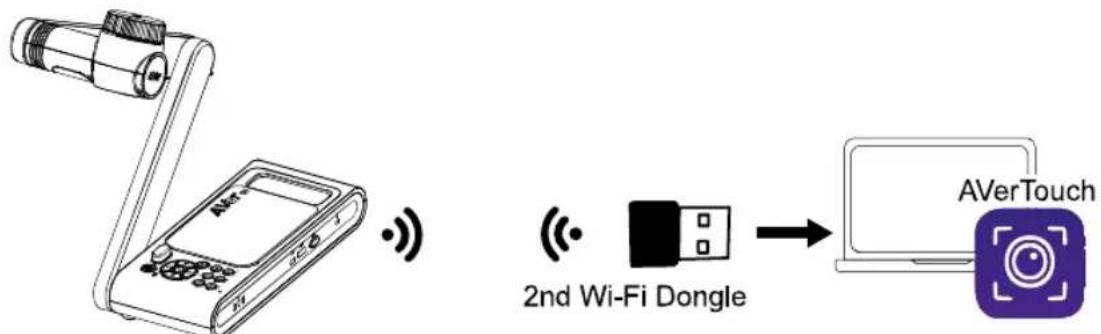
Your camera comes with 2 Wi-Fi dongles, one pre-installed in the camera. If you don't find a second dongle, it may be an optional accessory in your region or country. Contact your local reseller.
-
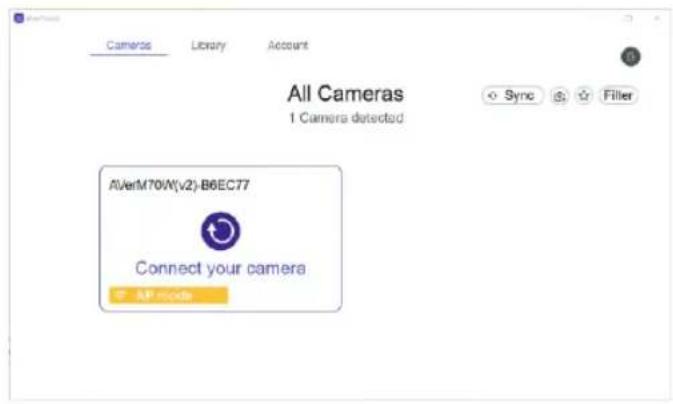
Open AVerTouch.
-
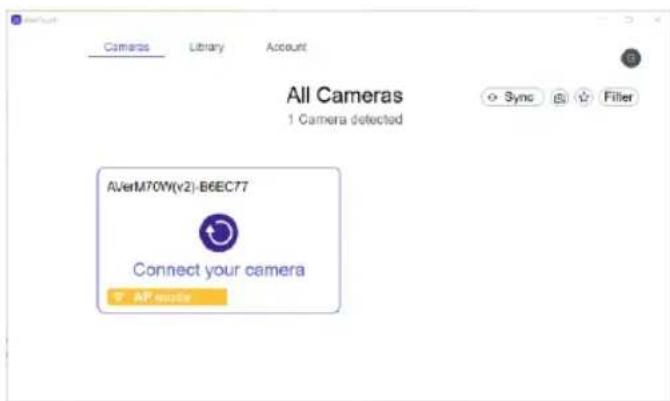
A white camera card will appear when your camera is detected.
- Your camera name is "AVer model name - Wi-Fi dongle MAC address". Find the MAC address on the bottom of your camera.
-
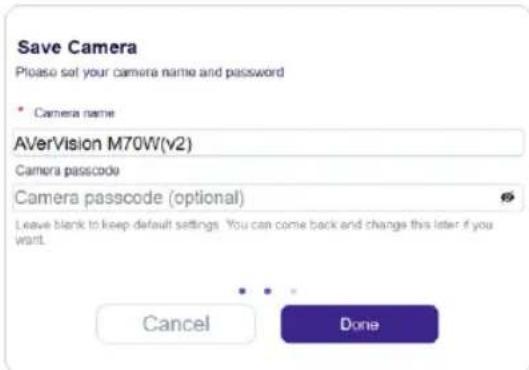
Click the Connect icon to connect your camera. When prompted, click Done.
-
If an IP conflict error message appears, see
to troubleshoot.
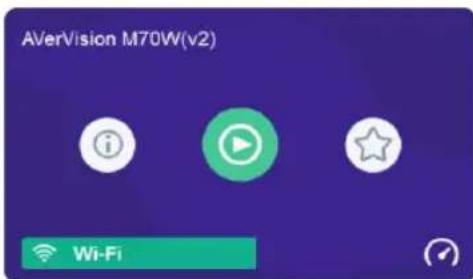
- Camera live view will start immediately. Or click the Play icon to start live view.

Method 2
-
Download and install AVerTouch software to your computer from AVer Download Center. (https://www.aver.com/download-center).
-
Do not connect your camera to a computer with the included USB cable.
-
Press the Wi-Fi button to turn on Wi-Fi mode. The Wi-Fi indicator will be solid blue.

- Plug in the second Wi-Fi dongle to your computer.
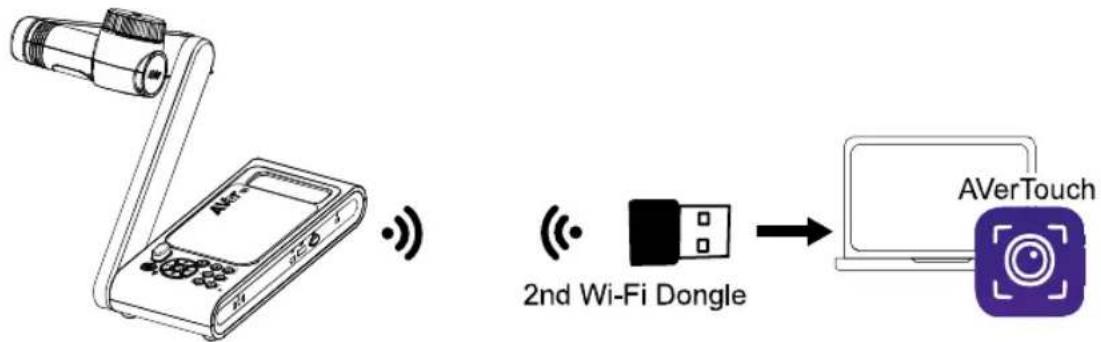
Your camera comes with 2 Wi-Fi dongles, one pre-installed in the camera. If you don't find a second dongle, it may be an optional accessory in your region or country. Contact your local reseller.
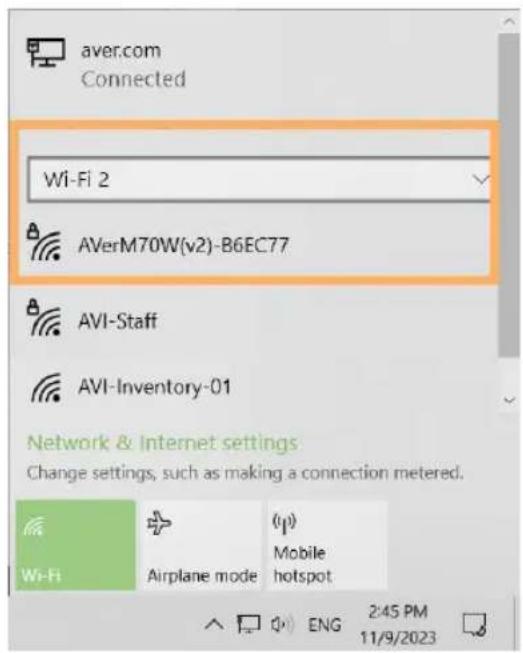
- Select the Network icon on the taskbar. The icon that appears depends on your current connection state.

-
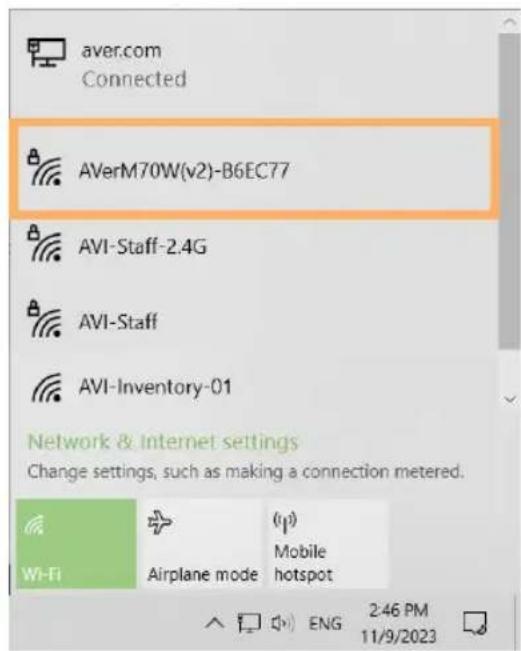
Choose your camera from the list of networks, then select Connect.
-
Make sure you select the network of the Wi-Fi dongle. If your computer has built-in Wi-Fi or you are also using other non-AVer Wi-Fi dongles, you may see a drop-down list (Wi-Fi 2, Wi-Fi 3 and so on).
- Your camera name is "AVer model name - Wi-Fi dongle MAC address". Find the MAC address on the bottom of your camera.
- Enter the network password AVeradmin, then select Next.
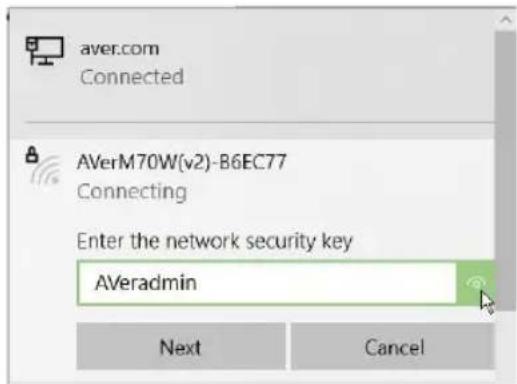
- Select Yes to allow your computer to be discoverable.
- Open AVerTouch. A purple camera card will appear when your camera is detected. Click the Play icon to start live view.

Troubleshooting Peer-to-Peer (P2P) Connection
Your camera remembers the connection setting last time you connected it wirelessly. If you are changing connection method, such as from Peer-to-Peer (P2P) to Wi-Fi, press the factory reset compound key to clear previous frequency band setting.
IP Conflict
- Connect your camera to the computer using the included USB cable.
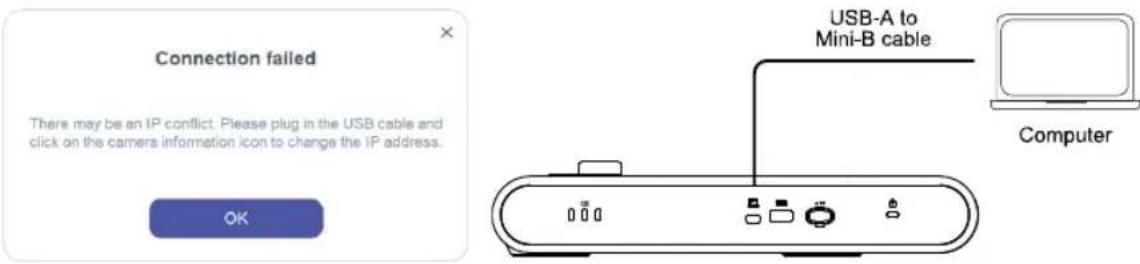
-
Open AVerTouch.
-
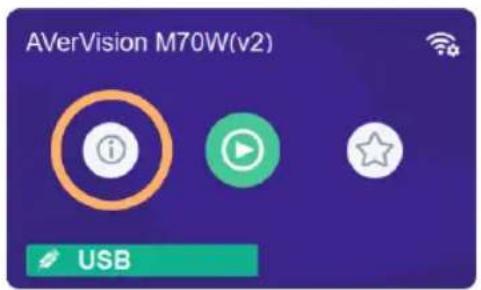
A purple camera card (USB mode) will appear when your camera is detected.
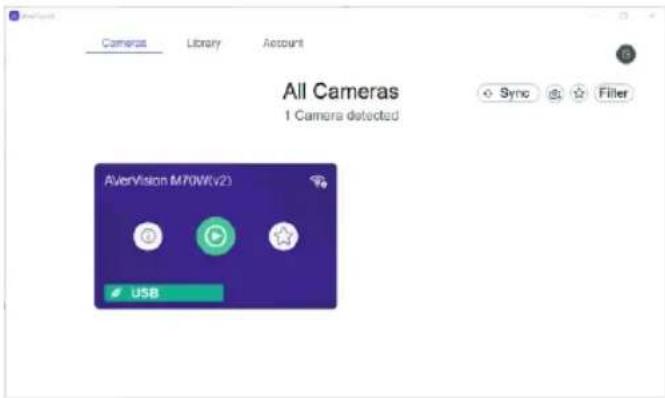
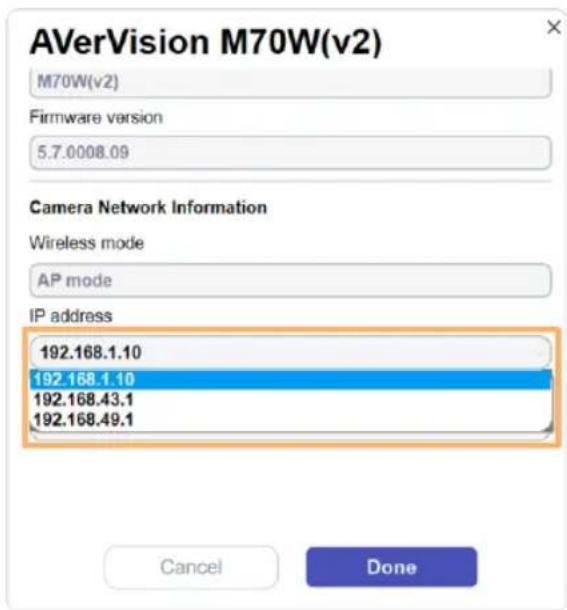
- Click the Camera information icon. Choose a different IP address from the IP address drop down list. Click Done
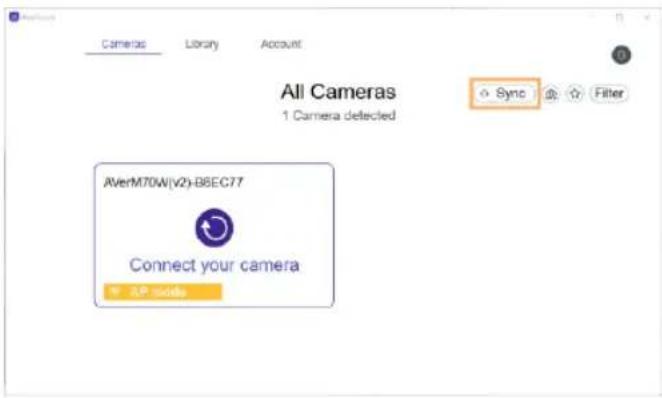
- Unplug the USB cable. Click Sync to refresh. A white camera card will appear when your camera is detected. Go back to Step 5 in
to connect again.
Wi-Fi Connection
- Download and install AVerTouch software to your computer from AVer Download Center. (https://www.aver.com/download-center).
Make sure your computer has Wi-Fi.
- Do not plug in the second Wi-Fi dongle to your computer.
- Do not connect your camera to a computer with the included USB cable.
- Press the Wi-Fi button to turn on Wi-Fi mode. The Wi-Fi indicator will be solid blue.
-
Open AVerTouch.
-
A white camera card will appear when your camera is detected.
- Your camera name is "AVer model name - Wi-Fi dongle MAC address". Find the MAC address on the bottom of your camera.
4. Click the Connect icon

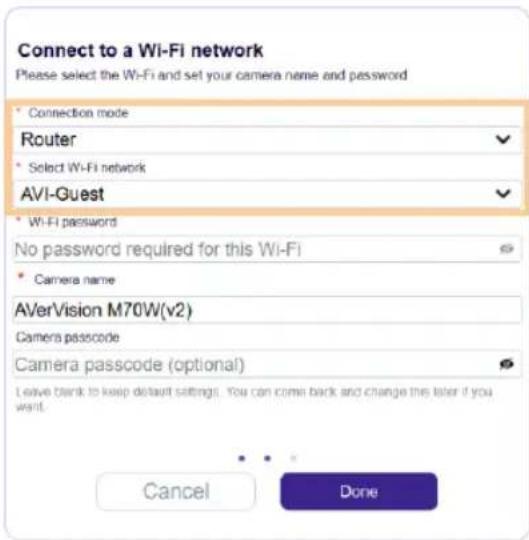
Connect your camera.
Choose Router from the Connection mode drop-down list. Then choose your Wi-Fi network and enter the password. Click Done.
- Camera live view will start immediately. Or click the Play icon to start live view.
Miracast Connection
Your display device must support Miracast. If the display device does not support Miracast, you can use a Miracast wireless display adapter that connects to an HDMI port on your device.
- Press the Info button to open the on-screen display menu.
- Go to Wireless > Mode > Miracast to turn on Miracast mode.

- Go back to Miracast Setup to select your display device.

Using the Camera
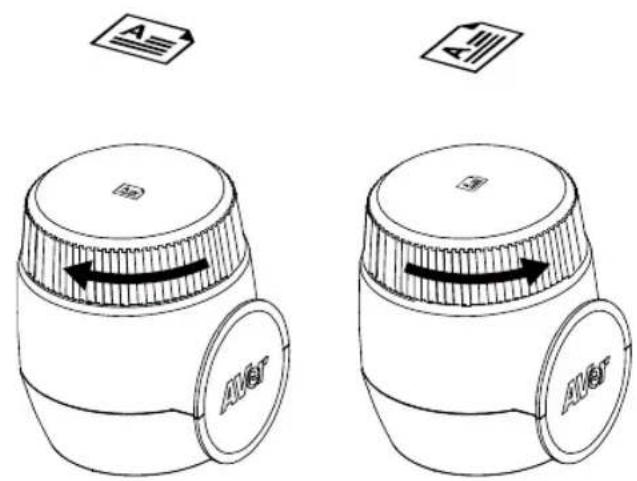
Orientation Ring
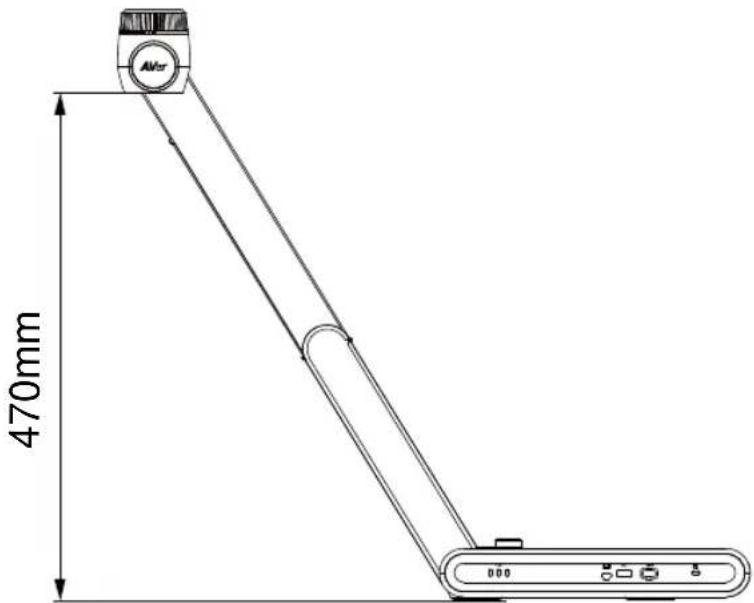
Shooting Area
When camera position is 470mm high, the shooting area will be A3 size.
Store the Camera

Mount the Camera on a Flat Surface
[Note] M4 screw x4, depth is5mm
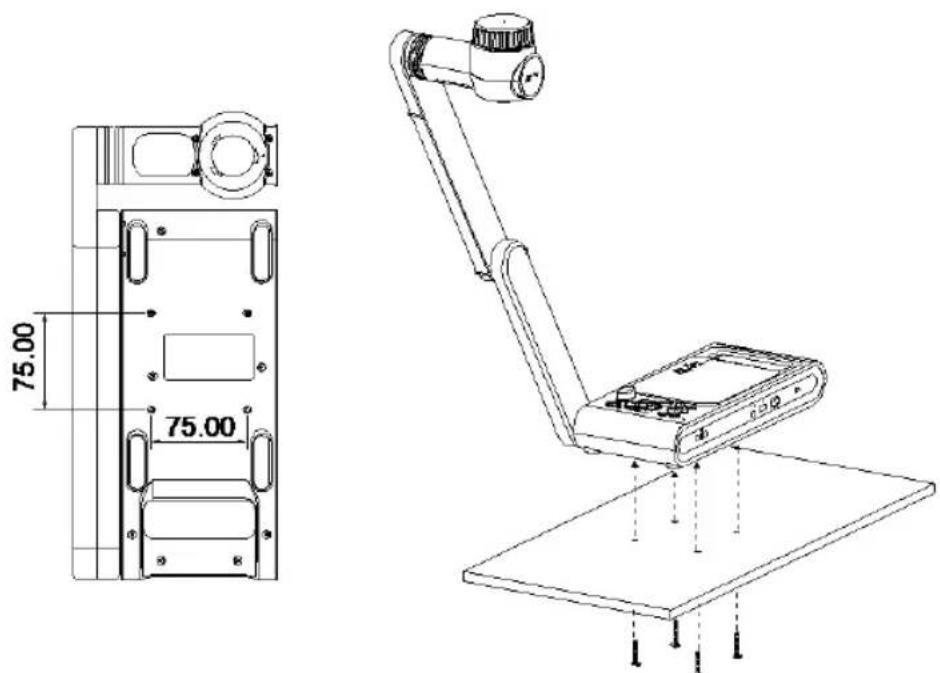
English-19
Specifications
| Sensor | 1/3.2 CMOS |
| Pixel Count | 13 megapixels |
| Frame Rate | 60 fps (max.) |
| Image mode | Normal / High Frame / High Quality/ Microscope/Infinity/Marco |
| Effect | Rotate / Freeze |
| HDMI Output | 4K; 1080p 60Hz; 720p 60Hz |
| Focusing | Auto / Manual/ Area (SW) |
| Shooting Area | 480mm x345mm @ 470 mm |
| Zooming | Total 33X maximum(10x AVerZOOM™ + 23X Digital zoom) |
| Dual Mode | AP / Station DHCP(Server/Client) |
| Wi-Fi Streaming | 1080P@30fps, up to 4K@30fps |
| Dual Band | 5GHz/2.4GHz |
| Miracast | Yes |
| Compatibility | 802.11a/b/g/n/ac (45 ft effective range) |
| Wireless Security | Support WEP, WPA/WPA2-PSK, WPA/WPA2-Enterprise* *EAP-PEAP, EAP-TLS |
| Power Source | DC5V/3A, AC 100-240V |
| Consumption | 13.7 Watts(lamp on) 12.7 Watts(lamp off) |
| Lamp Type | LED light |
| USB | USB2.0 Type-A x2 (Wi-Fi Dongle, USB storage) USB Type mini-B x 1 |
| DC 5V Input | Power Jack |
| MIC | Built-in |
| Operating | 587mm(L)*159 mm(W)*546mm(H) (+/-2mm include rubber foot) |
| Folded | 363.5mm(L)*159mm(W)*76.3mm(H) (+/-2mm include rubber foot) |
| Weight | 2.6 kg (about 5.7lbs) |
| Software Supported | ePTZ Image/ Area capture Picture by Picture Timer Cloud library Recording Annotation |
Warning
- To reduce the risk of fire or electric shock, do not expose this appliance to rain or moisture. Warranty will be void if any unauthorized modifications are done to the product.
- Do not drop the camera or subject it to physical shock.
- Use the correct power supply voltage to avoid the damaging camera.
- Do not place the camera where the cord can be stepped on as this may result in fraying or damage to the lead or the plug.
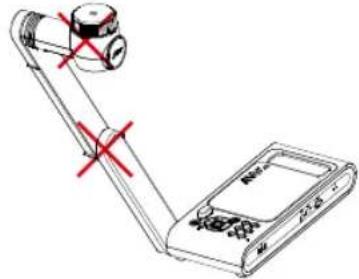
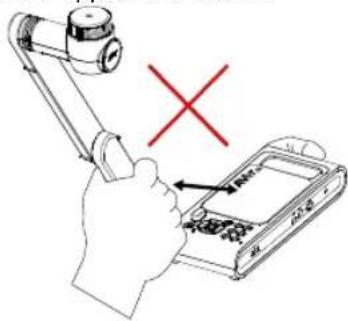
- Hold the bottom of the camera with both hands to move the camera. Do not grab the lens or Flexible arm to move the camera.
- Do not pull the mechanical arm and camera part in the opposite direction.
Radio Frequency
FOR PORTABLE DEVICE USAGE (<20m from body/SAR needed eg. BT dongle, smartphone) Radiation Exposure Statement:
The product comply with the FCC portable RF exposure limit set forth for an uncontrolled environment and are safe for intended operation as described in this manual. The further RF exposure reduction can be achieved if the product can be kept as far as possible from the user body or set the device to lower output power if such function is available.
FOR MOBILE DEVICE USAGE (>20cm/low power eq. AP routers)
Radiation Exposure Statement:
This equipment complies with FCC radiation exposure limits set forth for an uncontrolled environment. This equipment should be installed and operated with minimum distance 20cm between the radiator & your body.
Europe - EU Declaration of Conformity
This device complies with the essential requirements of the Radio Equipment Directive (2014/53/EU). The following test methods have been applied in order to prove presumption of conformity with the essential requirements of the Radio Equipment Directive (2014/53/EU)
Warning
This is a class A product. In a domestic environment this product may cause radio interference in which case the user may be required to take adequate measures.
Caution
Risk of explosion if battery is replaced by an incorrect type. Dispose of used batteries in a safe and proper manner.
DISCLAIMER
No warranty or representation, either expressed or implied, is made with respect to the contents of this documentation, its quality, performance, merchantability, or fitness for a particular purpose.
Information presented in this documentation has been carefully checked for reliability; however, no responsibility is assumed for inaccuracies. The information contained in this documentation is subject to change without notice.
In no event will AVer be liable for direct, indirect, special, incidental, or consequential damages arising out of the use or inability to use this product or documentation, even if advised of the possibility of such damages.
TRADEMARKS
"AVer" is a trademark owned by AVer Information Inc. Other trademarks used herein for description purpose only belong to each of their companies.
COPYRIGHT
© 2024 AVer Information Inc. All rights reserved. | January 10, 2024
All rights of this object belong to AVer Information Inc. Reproduced or transmitted in any form or by any means without the prior written permission of AVer Information Inc. is prohibited.
All information or specifications are subject to change without prior notice.
More Help
For FAQs, technical support, software and user manual download, please visit:
Headquarters
Download Center: https://www.aver.com/download-center
Technical Support: https://www.aver.com/technical-support
Europe Branch Office
Download Center: https://www.aveurope.com/download-center
Technical Support: https://www.aveereurope.com/technical-support
Contact Information
Headquarters
AVer Information Inc.
https://www.aver.com
8F, No.157, Da-An Rd., Tucheng Dist., New Taipei City 23673, Taiwan
Tel: +886 (2) 2269 8535
Europe Branch office
AVer Information Europe B.V.
https://www.avereurope.com
Westblaak 134, 3012 KM, Rotterdam, The Netherlands
Tel: +31 (0) 10 7600 550
Technical support: eu.rma@aver.com
Japan Branch Office
Vietnam Branch Office
Cong ty TNHH AVer Information (Viet Nam)
Tang 5, 596 Nguyen Dinh Chi Minh, P.3, Quan 3, Thanh pho Ho Chi Minh 700000, Viet Nam
Tel: +84 (0)28 22 539 211


包装内容物
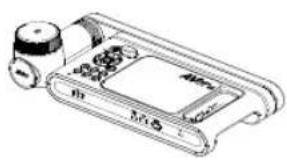
M70Wv2*
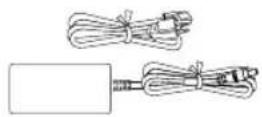
電源變壓器電源插頭*
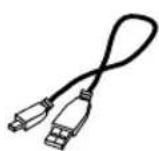
USB連接線
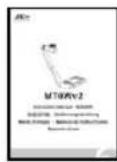
快速安装指南

遥控器

AAA電池(x2)
保固卡

第二個Wi-Fi接收器
(僅限歐洲、日本、台灣)
(https://www.aver.com/download-center).
https://www.aver.com
https://jp.aver.com/download-center
ルフSenた一
https://jp.aver.com/helpcenter

お問い合わせ先
アバーネインフモーニン株式会社
https://jp.aver.com
https://www.aveurope.com/download-center
https://www.aveurope.com/technical-support


Westblaak 134, 3012 KM, Rotterdam, The Netherlands
Tel: +31 (0) 10 7600 550
https://www.aveurope.com/download-center
Assistance Technique:
https://www.aveurope.com/technical-support


Westblaak 134, 3012 KM, Rotterdam, The Netherlands
Tel: +31 (0) 10 7600 550
Assistance technique: eu.rma@aver.com
Alternatively, you can use the Encounter system to create a new Encounter. This is a way to create an Encounter that will be used in the game. The Encounter will be created by the玩家 who has the highest score on the Encounter.
https://www.aveurope.com/download-center
Soporte technique:
https://www.aveurope.com/technical-support


Westblaak 134, 3012 KM, Rotterdam, The Netherlands
Tel: +31 (0) 10 7600 550
Soporte专业技术: eu.rma@aver.com
https://www.aveurope.com/download-center
Assistenza tecnica:
https://www.aveurope.com/technical-support


Westblaak 134, 3012 KM, Rotterdam, The Netherlands
Tel: +31 (0) 10 7600 550
- Optional Accessories
- Parts Info
- Compound Key
- Remote Control
- LED Indicator
- [Note]
- Device Connection
- Charge Your Camera
- USB Connection
- HDMI Connection
- Peerto-Peer (P2P) Connection via Wi-Fi Dongle (Windows only)
- Method 1
- Method 2
- Troubleshooting Peer-to-Peer (P2P) Connection
- IP Conflict
- Wi-Fi Connection
- Click the Connect icon
- Miracast Connection
- Using the Camera
- Orientation Ring
- Shooting Area
- Store the Camera
- Mount the Camera on a Flat Surface
- Specifications
- Warning
- Radio Frequency
- Caution
- DISCLAIMER
- TRADEMARKS
- COPYRIGHT
- More Help
- Headquarters
- Europe Branch Office
- Contact Information
- Japan Branch Office
- Vietnam Branch Office
- 包装内容物
- お問い合わせ先
Brand : AVer
Model : AVerVision M70W
Category : Document camera