USER MANUAL RoadJack 8 LD Systems
natural_image
Exterior view of a silver portable electronic device with a remote control, set against a wireframe abstract background (no text or symbols visible)
ROADJACK 8 / 10
BATTERY POWERED BLUETOOTH LOUDSPEAKER WITH MIXER
LDRJ8 / LDRJ10
You've made the right choice!
We have designed this product to operate reliably over many years. LD Systems stands for this with its name and many years of experience as a manufacturer of high-quality audio products.
Please read this User's Manual carefully, so that you can begin making optimum use of your LD Systems product quickly.
You can find more information about LD SYSTEMS at our Internet site WWW.LD-SYSTEMS.COM
Introduction
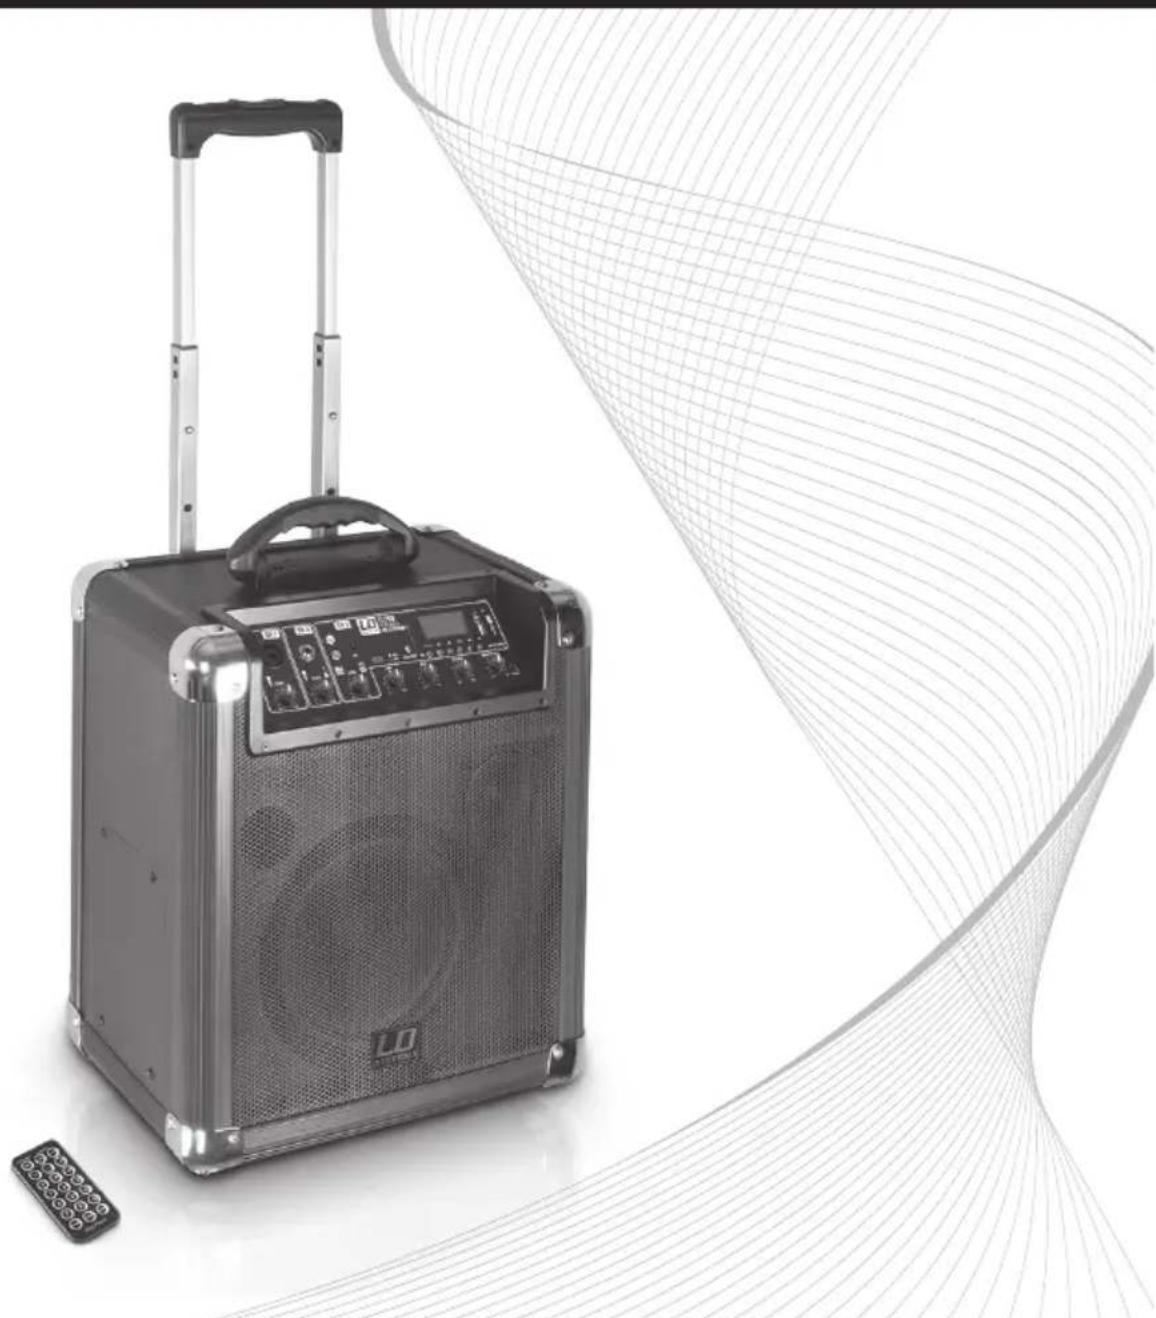
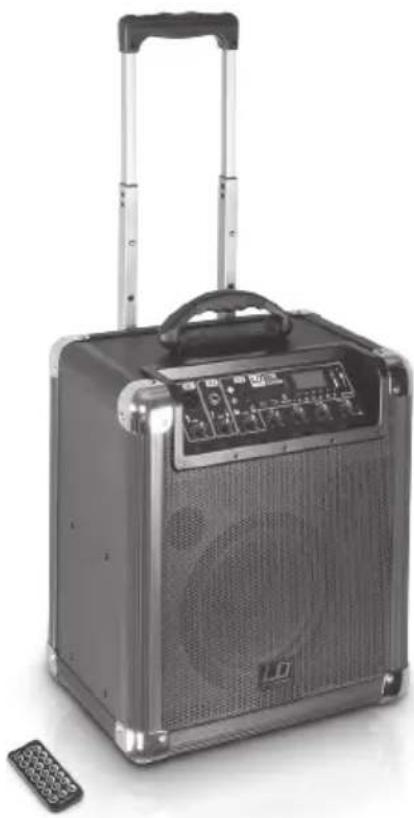
The active 2-way systems from the Road Jack series are equipped for easy transportation with integrated wheels and a pull-out handle. The built-in battery provides for a period of up to 20 hours of continuous operation.
The mixer provides three separately controllable input channels, a 2-band EQ, an adjustable echo and a controller for the overall volume. Through the combo-, 6.3 mm jack, RCA and 3.5 mm TRS mini jacks, a variety of input sources can be connected.
The outstanding feature is the built-in Bluetooth player that allows wireless streaming of audio content to the system. In addition, USB memory and SD cards can be used as storage media.
Both systems are supplied with a handy IR remote control and a convenient tripod adapter.
ROADJACK 8 / 10
BATTERY POWERED BLUETOOTH SPEAKERS WITH MIXER
LDRJ8 / LDRJ10
natural_image
Exterior view of a silver portable electronic device with a black handle and control panel, next to a remote control unit (no visible text or symbols)
PREVENTIVE MEASURES:
- Please read these instructions carefully.
- Keep all information and instructions in a safe place.
- Follow the instructions.
- Observe all safety warnings. Never remove safety warnings or other information from the equipment.
- Use the equipment only in the intended manner and for the intended purpose.
- Use only sufficiently stable and compatible stands and/or mounts (for fixed installations). Make certain that wall mounts are properly installed and secured. Make certain that the equipment is installed securely and cannot fall down.
- During installation, observ e the applicable safety regulations for your country.
- Never install and operate the equipment near radiators, heat registers, ovens or other sources of heat. Make certain that the equipment is always installed so that is cooled sufficiently and cannot overheat. Avoid direct sunlight!
- Never place sources of ignition, e.g., burning candles, on the equipment.
- Ventilation slits must not be blocked.
- Do not use this equipment in the immediate vicinity of water (does not apply to special outdoor equipment - in this case, observe the special instructions noted below. Do not expose this equipment to flammable materials, fluids or gases.
- Make certain that dripping or splashed water cannot enter the equipment. Do not place containers filled with liquids, such as vases or drinking vessels, on the equipment.
- Make certain that objects cannot fall into the device.
- Use this equipment only with the accessories recommended and intended by the manufacturer.
- Do not open or modify this equipment.
- After connecting the equipment, check all cables in order to prevent damage or accidents, e.g., due to tripping hazards.
- During transport, make certain that the equipment cannot fall down and possibly cause property damage and personal injuries.
- If your equipment is no longer functioning properly, if fluids or objects have gotten inside the equipment or if it has been damaged in anot her way, switch it off immediately and unplug it from the mains outlet (if it is a powered device). This equipment may only be repaired by authorized, qualified personnel.
- Clean the equipment using a dry cloth.
- Comply with all applicable disposal laws in your country. During disposal of packaging, please separate plastic and paper/cardboard.
- Plastic bags must be kept out of reach of children.
FOR EQUIPMENT THAT CONNECTS TO THE POWER MAINS:
-
CAUTION: If the power cord of the device is equipped with an earthing contact, then it must be connected to an outlet with a protective ground. Never deactivate the protective ground of a power cord.
-
If the equipment has been exposed to strong fluctuations in temperature (for example, after transport), do not switch it on immediately. Moisture and condensation could damage the equipment. Do not switch on the equipment until it has reached room temperature.
-
Before connecting the equipment to the power outlet, first verify that the mains voltage and frequency match the values specified on the equipment. If the equipment has a voltage selection switch, connect the equipment to the power outlet only if the equipment values and the mains power values match. If the included power cord or power adapter does not fit in your wall outlet, contact your electrician.
-
Do not step on the power cord. Make certain that the power cable does not become kinked, especially at the mains outlet and/or power adapter and the equipment connector.
-
When connecting the equipment, make certain that the power cord or power adapter is always freely accessible. Always disconnect the equipment from the power supply if the equipment is not in use or if you want
SAFETY:
to clean the equipment. Always unplug the power cord and power adapter from the power outlet at the plug or adapter and not by pulling on the cord. Never touch the power cord and power adapter with wet hands.
-
Whenever possible, avoid switching the equipment on and off in quick succession because otherwise this can shorten the useful life of the equipment.
-
IMPORTANT INFORMATION: Replace fuses only with fuses of the same type and rating. If a fuse blows repeatedly, please contact an authorised service centre.
-
To disconnect the equipment from the power mains completely, unplug the power cord or power adapter from the power outlet.
-
If your device is equipped with a Volex power connector, the mating Volex equipment connector must be unlocked before it can be removed. However, this also means that the equipment can slide and fall down if the power cable is pulled, which can lead to personal injuries and/or other damage. For this reason, always be careful when laying cables.
-
Unplug the power cord and power adapter from the power outlet if there is a risk of a lightning strike or before extended periods of disuse.

CAUTION:
Never remove the cover, because otherwise there may be a risk of electric shock. There are no user serviceable parts inside. Have repairs carried out only by qualified service personnel.

The lightning flash with arrowhead symbol within an equilateral triangle is intended to alert the user to the presence of uninsulated “dangerous voltage” within the product’s enclosure that may be of sufficient magnitude to constitute a risk of electrical shock.

The exclamation mark within an equilateral triangle is intended to alert the user to the presence of important operating and maintenance instructions.
CAUTION – HIGH VOLUME LEVELS WITH AUDIO PRODUCTS!
This equipment is intended for professional use. Therefore, commercial use of this equipment is subject to the respectively applicable national accident prevention rules and regulations. As a manufacturer, Adam Hall is obligated to notify you formally about the existence of potential health risks.
Hearing damage due to high volume and prolonged exposure: When in use, this product is capable of producing high sound-pressure levels (SPL) that can lead to irreversible hearing damage in performers, employees, and audience members. For this reason, avoid prolonged exposure to volumes in excess of 90 dB.
To prevent possible hearing damage, avoid listening at high volume levels over long periods of time. Even exposure to short bursts of loud noise can result in hearing loss. Please keep the volume constantly at a comfortable level.
CONNECTIONS, CONTROLS, AND INDICATORS:
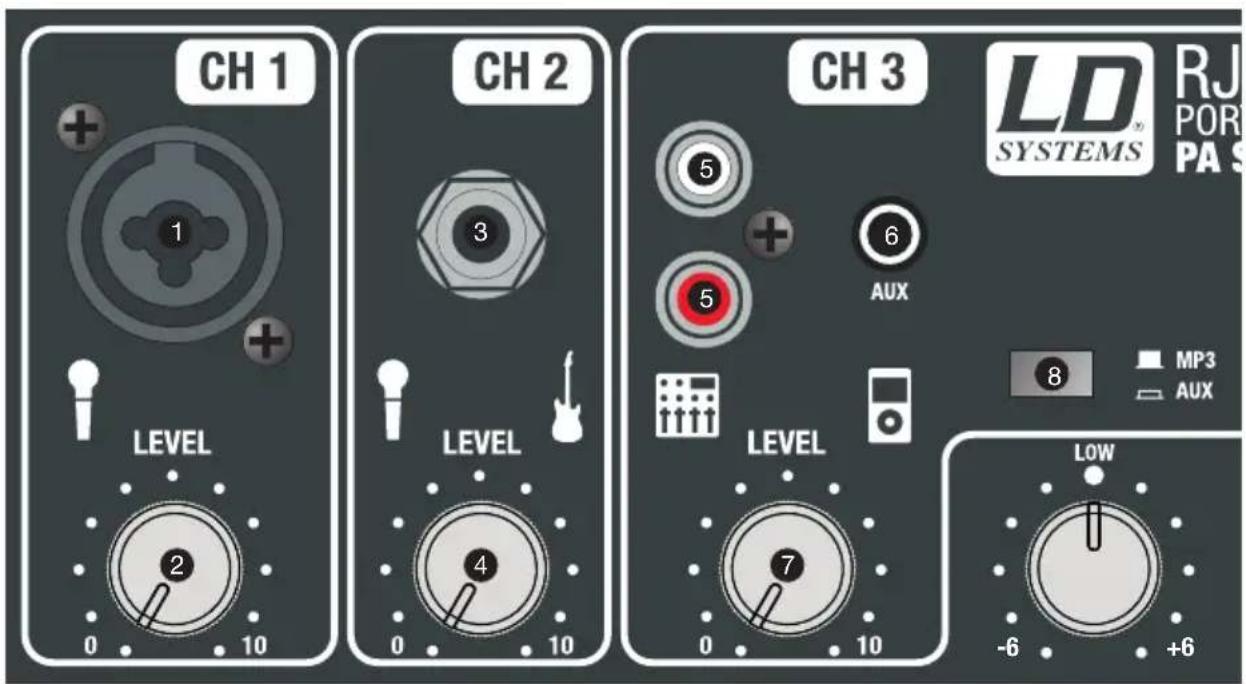
Balanced microphone input (XLR / 6.3 mm jack combo) It is also possible to use an unbalanced microphone cable (mono jack).
2 LEVEL CH 1
Volume controller for channel 1 (CH 1). Turning the knob to the right increases the volume and turning it to the left decreases it.
Unbalanced instrument/microphone input with 6.3 mm jack.
4 LEVEL CH 2
Volume controller for channel 2 (CH 2). Turning the knob to the right increases the volume and turning it to the left decreases it.
Unbalanced line input (RCA) for connecting an external audio source (e.g., CD player, MP3 player). An incoming stereo signal is mono summed internally. To activate the RCA input, switch 8 (MP3 / AUX) on the control panel must be depressed, the incoming signal is now on channel 3 (CH 3). If the socket of the mini-jack input is in use, the RCA jacks of channel 3 (CH 3) are muted.
CONNECTIONS, CONTROLS, AND INDICATORS:
Unbalanced line input with 3.5mm jack for connecting an external audio source (e.g. laptop, MP3 player). An incoming stereo signal is mono summed internally. To activate the mini-jack input, switch 8 (MP3 / AUX) on the control panel must be depressed, the incoming signal is now on channel 3 (CH 3). If the socket of the mini-jack input is in use, the RCA jacks of channel 3 (CH 3) are muted.
7 LEVEL CH 3
Volume controller for channel 3 (CH 3). Turning the knob to the right increases the volume and turning it to the left decreases it.
8 MP3 / AUX
Select the input source for channel 3 (CH 3). When the switch is not pressed, the MP3 player is selected as a signal source, when the switch is pressed, the RCA or mini-jack input is selected.
9 LOW
Equalizer low band for the summing channel (Master). When turned to the left, levels are lowered, when turned to the right, they are raised. In the centre position (resting point), the equalizer is inactive.
10 HIGH
Equalizer high band for the summing channel. When turned to the left, levels are lowered, when turned to the right, they are raised. In the centre position (resting point), the equalizer is inactive.
11 ECHO
Echo effect for the microphone channel 1 (CH 1). When the control knob is turned to the left, the effect is disabled, when turned to the right, it raises the volume of the echo effect.
12 MASTER VOL
Volume control for the summing channel. When turned to the left, levels are lowered, when turned to the right, they are raised.
13 POWER LED
Lights up when the device is properly connected to a power supply and is turned on, or is operated with the built-in rechargeable battery.

CONNECTIONS, CONTROLS, AND INDICATORS:
CONNECTIONS, CONTROLS, AND INDICATORS:
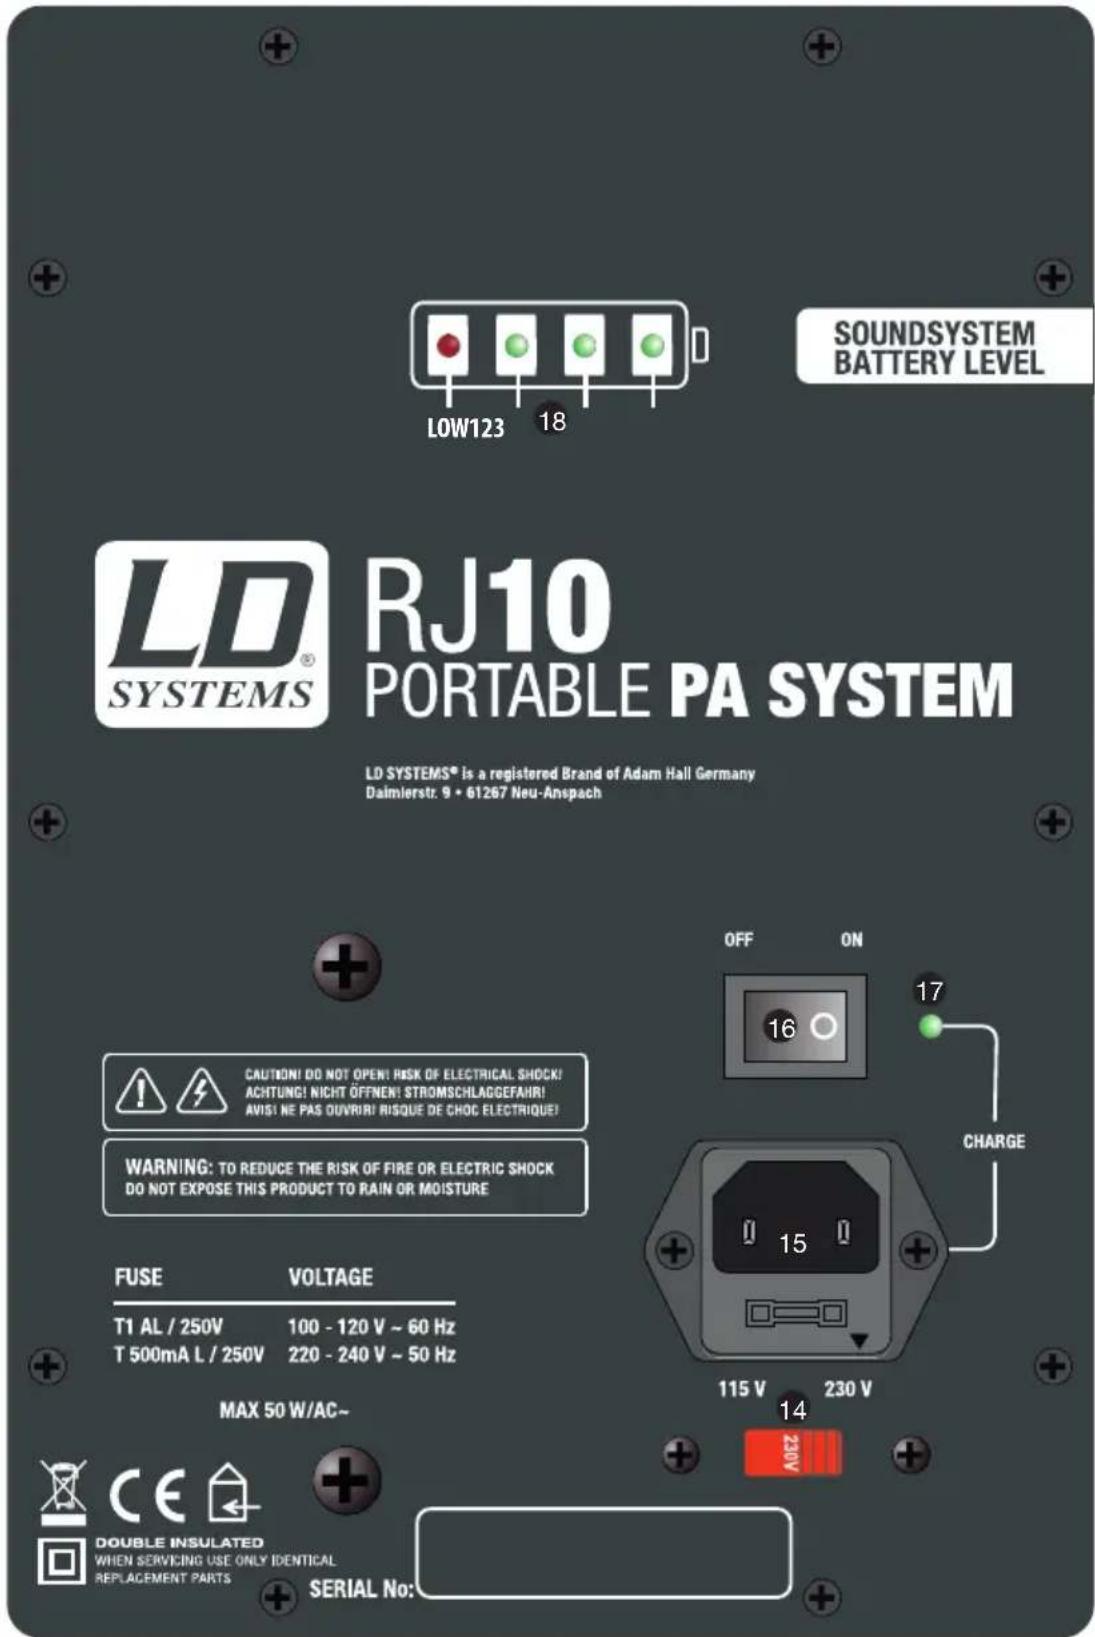
14 115 V / 230 V
Switch for setting the operating voltage. The mains voltage of your power supplier and the operating voltage of the device must be the same!
15 IEC POWER SOCKET WITH INTEGRAL FUSE HOLDER
Used to power the device. An appropriate power cord is included in the delivery.
IMPORTANT INFORMATION: BEFORE using this equipment, make certain that the mains voltage of your energy supplier and the operating voltage of the device match! Always replace the fuse with a fuse of the same type and rating according to the supply voltage (see label on the rear panel)!
If the fuse blows repeatedly, please contact an authorised service centre.
16 POWER ON / OFF
On / Off switch for the power supply of the device.
17 CHARGE-LED
Lights up while charging the internal battery. When the battery is fully charged, the CHARGE LED goes out. To charge the battery, an appropriate power cord must be connected to the power socket (No. 24) of the device.
18 BATTERY LEVEL LEDS
4-segment LED meter displays the charge status of the built-in battery. When all three green LEDs are lit, the battery is fully charged. The battery is discharged when the red LED is lit.
NOTE TO BATTERY CARE (LEAD BATTERY)
Recharge the battery fully at every opportunity. Never completely discharge a rechargeable lead battery or store it in discharged or semi-charged condition. During extended periods of disuse and storage, the battery must be recharged fully at regular intervals.
CONNECTIONS, CONTROLS, AND INDICATORS:
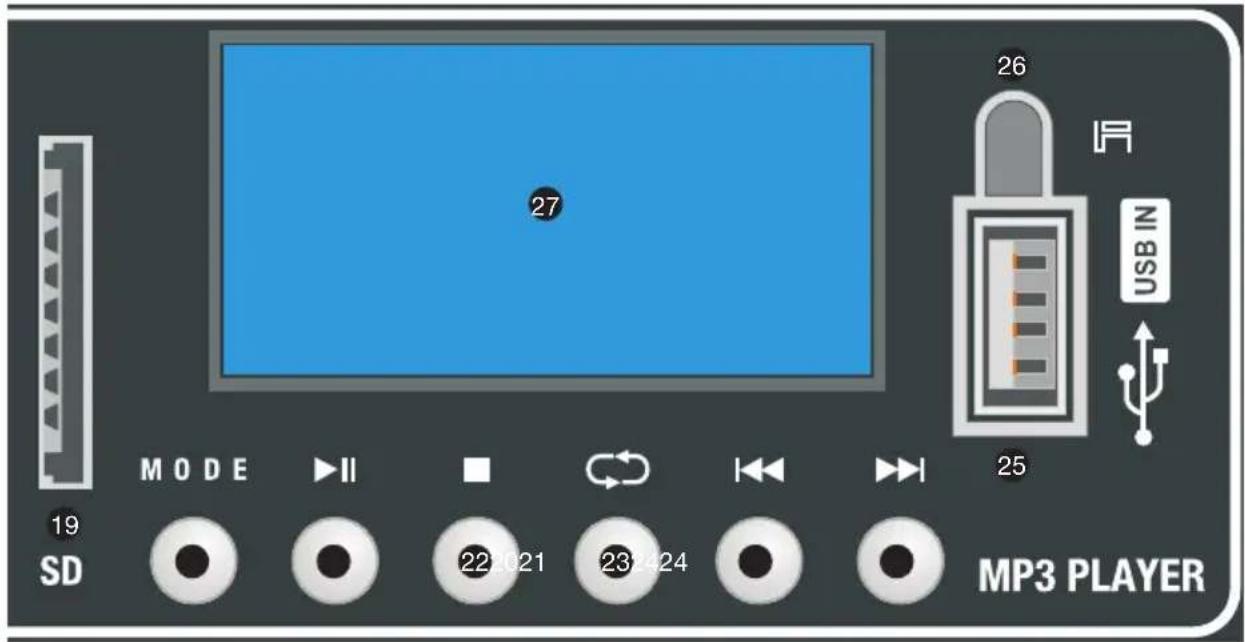
19 SD
Slot for SD memory card up to 32 GB capacity. Please make sure you insert the card in the right direction: the contact row of the SD memory card should be to the right. The choice of signal source for the MP3 player is made using the MODE button.
20 MODE
Choice of the signal source for the MP3 player (SD card / USB memory stick / Bluetooth), and other system settings.
21
Press the PLAY / PAUSE button to start playback of a track. Pressing again places the player in the pause mode, playback is stopped.
22
Playback of the current track is stopped by pressing the STOP button.
23
Six different playback modes are available for selection (Normal / Random / Browse / All / Repeat One / Repeat Folder).
24
Press briefly to select the previous or next track. By pressing and holding (> 1 sec) the volume of the MP3 player can be changed ( = quieter, ▶▶▶ = louder).
CONNECTIONS, CONTROLS, AND INDICATORS:
25 USB IN
Slot for USB memory stick up to 32 GB capacity. The choice of signal source for the MP3 player is made using the MODE button.
26 IR
Infrared interface. In order to control the MP3 player via the supplied remote control, be sure to position the infrared port of the remote control in direct visual contact with the infrared port of the Road Jack speaker.
27 DISPLAY
Multifunctional LC display with backlight.
DISPLAY MAIN SCREEN:
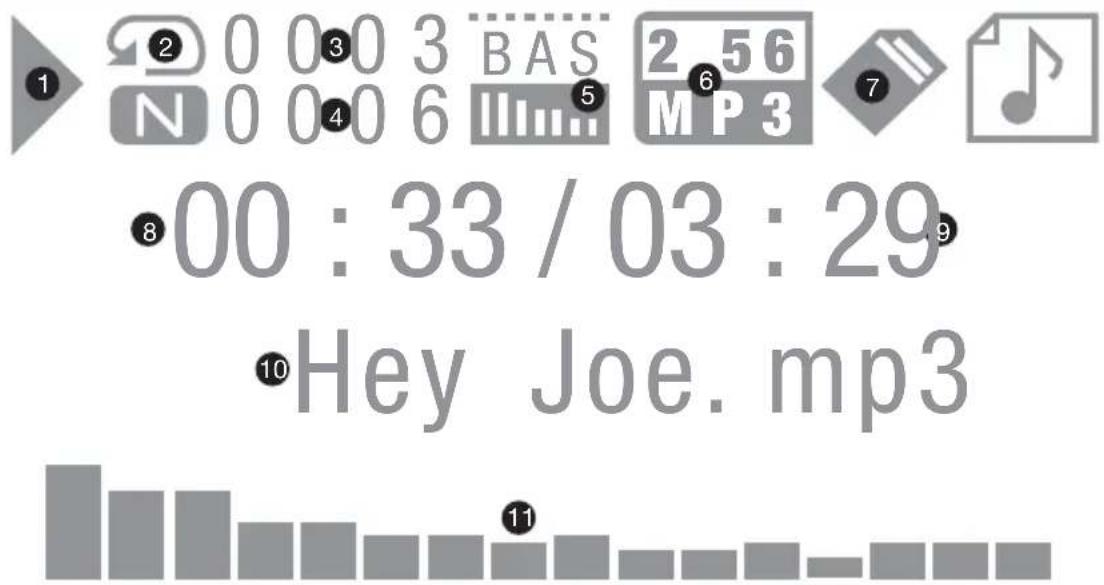
1 PLAYBACK STATUS
Play = ▶, Stop = , Pause =
② PLAYBACK MODE
N = Normal. All the tracks on the storage medium will be played back in sequence. After the last track has finished, playback stops.
R = Random. All the tracks on the storage medium will be played back in random order.
I = Browse. The first 10 seconds of each track contained on the storage medium are played in sequence.
A = All. All the tracks on the storage media will be repeated. If an SD memory card and a USB memory stick are both inserted in their slots, after all tracks have finished on one storage medium, the other storage medium is accessed automatically.
1 = Repeat One. The selected track is played back continuously.
F = Repeat Folder. All tracks in a folder on the storage medium are repeated.
3 TRACK NUMBER
Track number of the currently playing track.
4 NUMBER OF TRACKS
Number of tracks on the selected storage medium.
DISPLAY MAIN SCREEN:
5 EQUALIZER
Displays the currently selected equalizer presets.
Displays the file format of the currently playing track.
7 STORAGE MEDIUM
Displays the currently selected storage medium (SD memory card or USB memory stick).
8 PLAY TIME
Display of time elapsed for the currently playing track in minutes and seconds.
9 TRACK LENGTH
Display of total track duration for the currently playing track in minutes and seconds.
10 TRACK NAME
Displays the track name (if identified) and the file format for the currently playing track.
11 AUDIOANALIZER
OPERATION:
EQUALIZER (Eq)
To select one of seven equalizer presets, press and hold the MODE button for about 1 second. Using the 🔊 and 🔒 buttons, select the menu item "Eq" (bright background) and confirm by pressing the PLAY / PAUSE button ▶ Now you can activate one of seven equalizer presets by selecting it using the keys 🔊 and 🔒 confirm with the PLAY / PAUSE button ▶
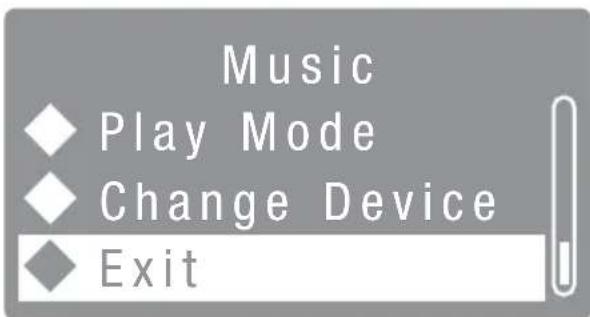
PLAYBACK MODE (Play Mode)
Six different playback modes are available for selection (Normal / Random / Browse / All / Repeat One / Repeat Folder). Press and hold the MODE button for about 1 second. Using the 📁 and buttons select the menu item "Play Mode" (bright background) and confirm by pressing the PLAY / PAUSE button ▶II . Now you can activate one of six playback modes by selecting it using the keys 📁 and confirm with the PLAY / PAUSE button ▶II
SOURCE SELECTION (Change Device)
Choice of signal source for the MP3 player.
-
Press and hold the MODE button for about 1 second. Using the 📂️ buttons select the menu item "Change Device" (bright background) and confirm by pressing the PLAY / PAUSE button ▶II Now you can select "SD Card" for SD memory card, or "UDISK" for USB memory stick using the keys 📋 and ▶is a signal source, and press the PLAY / PAUSE button ▶I confirm.
-
By briefly pressing the MODE button, the MP3 player changes its signal source (SD card slot / slot for USB memory sticks / Bluetooth). The activated signal source is shown on the display.
Music

Music

Music

OPERATION:
- To exit the menu, using the buttons ◀◀ and ▶▶I select the menu item "Exit" and confirm using the PLAY / PAUSE button ▶II .
- After about 8 seconds, the menu is automatically exited and the display will change to the main display.
BLUETOOTH
The MP3 player is equipped with Bluetooth, meaning that audio files from another Bluetooth device (e.g. Smartphone) can be played back on the Road Jack Speaker (maximum distance between the two devices is about 10 metres).
To pair the MP3 player with a Bluetooth device and connect to it, press briefly on the MODE button until "Bluetooth" and "BT NOT LINK" appears in the display. Activate Bluetooth on your Bluetooth device and search on the user interface for available devices. Select "LD SYSTEMS" and pair your Bluetooth device with the MP3 player. In the MP3 player display, "Connecting" appears and your Bluetooth device is then displayed (e.g. smartphone), and is therefore paired and connected. The playback can now start.
BT NOT LINK

Bluetooth
Smartphone

Bluetooth
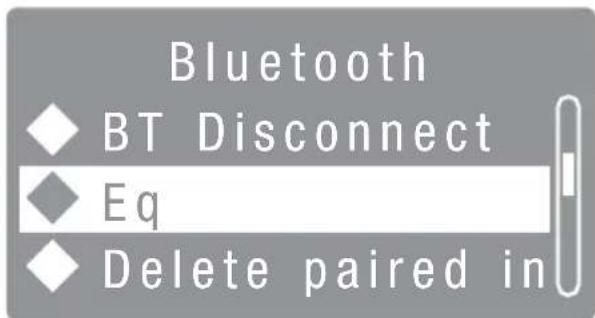
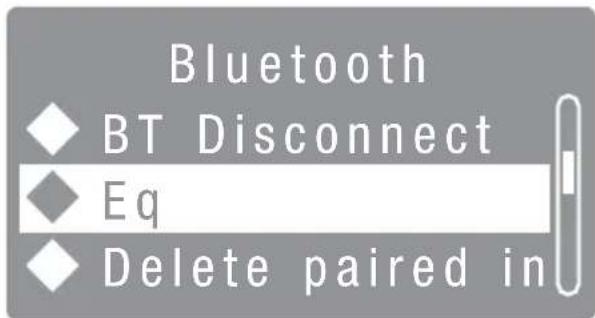
To terminate the connection to a Bluetooth device, in order to connect the MP3 player to another Bluetooth device, for example, press the MODE button for approx. 1 second, while the MP3 player is in Bluetooth mode, and use the I-and buttons to select the "BT Disconnect" (light background) menu item and confirm with the PLAY / PAUSE button. The display will show "BT NOT LINK" and you can now connect another Bluetooth device to the MP3 player.
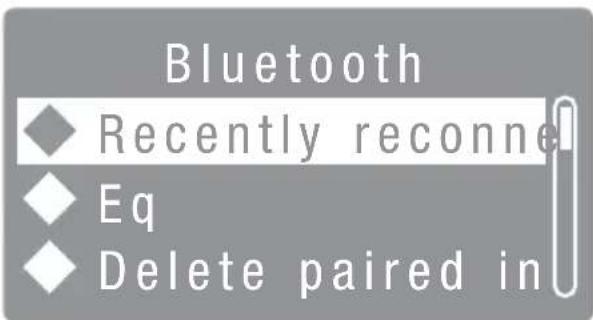
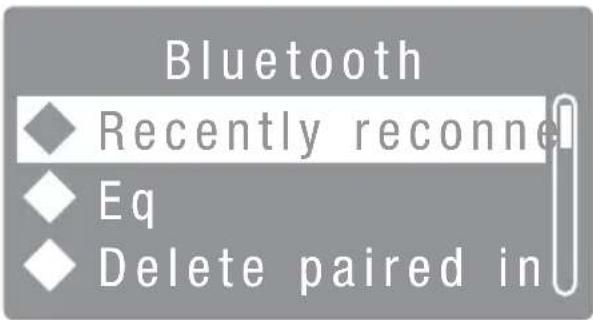
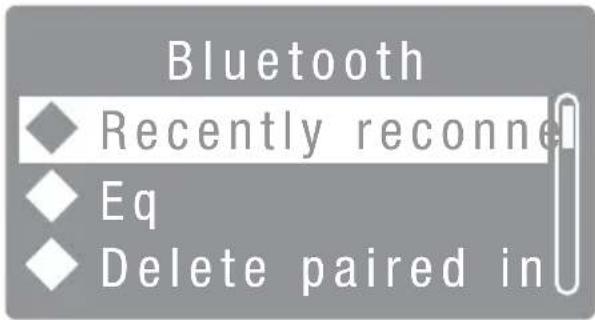
RECENTLY RECONNECTION
To reconnect the Bluetooth device, which was last connected to the MP3 player, press the MODE button for approx. 1 second, while the MP3 player is in Bluetooth mode, and use the Iand button to select the "Recently reconnection" (light background) menu item and confirm with the PLAY / PAUSE button.
EQUALIZER (Eq)
To select one of seven equalizer presets, press and hold the MODE button for about 1 second. Using the lock buttons select the menu item "Eq" (bright background) and confirm by pressing the PLAY / PAUSE button. Now you can activate one of seven equalizer presets by selecting it using the K and buttons and confirming with the PLAY / PAUSE button.


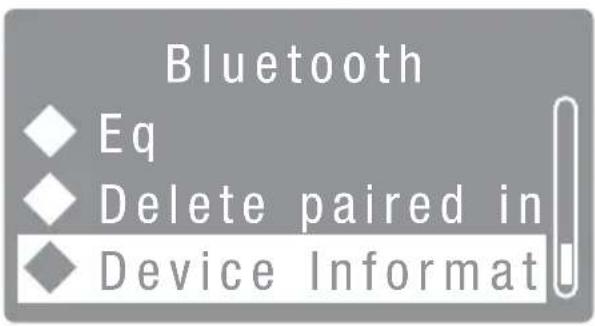
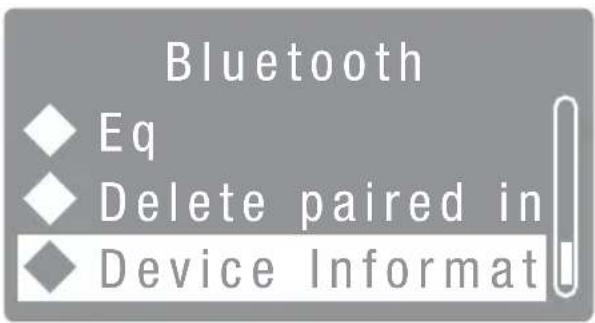
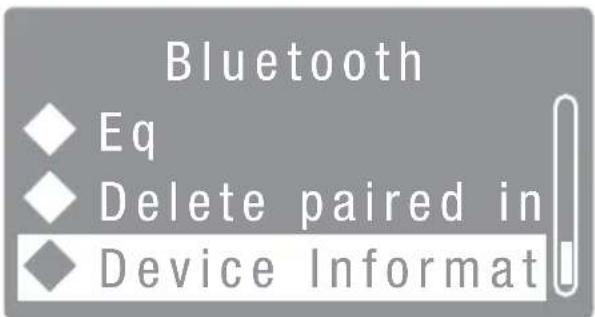
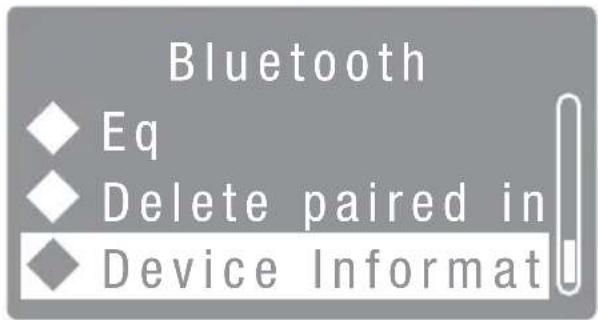
A paired Bluetooth device can be unpaired (remove pairing), while the MP3 player is in Bluetooth mode, by pressing the MODE button for approx. 1 second, then using the I-16 buttons to select the "Delete paired info" menu item. Confirm by pressing the PLAY / PAUSE button.
NOTE: As long as a Bluetooth device is connected to the MP3 player, the paired device cannot be unpaired.
Press the MODE button for approx. 1 second, while the MP3 player is in Bluetooth mode, and use the K and buttons to select the "Delete paired" menu item and confirm by pressing the PLAY / PAUSE button. The display now shows "Name: LD SYSTEMS". This name appears on the MP3-player of the Road Jack speakers on your Bluetooth device (smartphone, tablet).
NOTE:
The playback of the connected Bluetooth device can be interrupted by pressing the PLAY / PAUSE button of the MP3 player and started again.

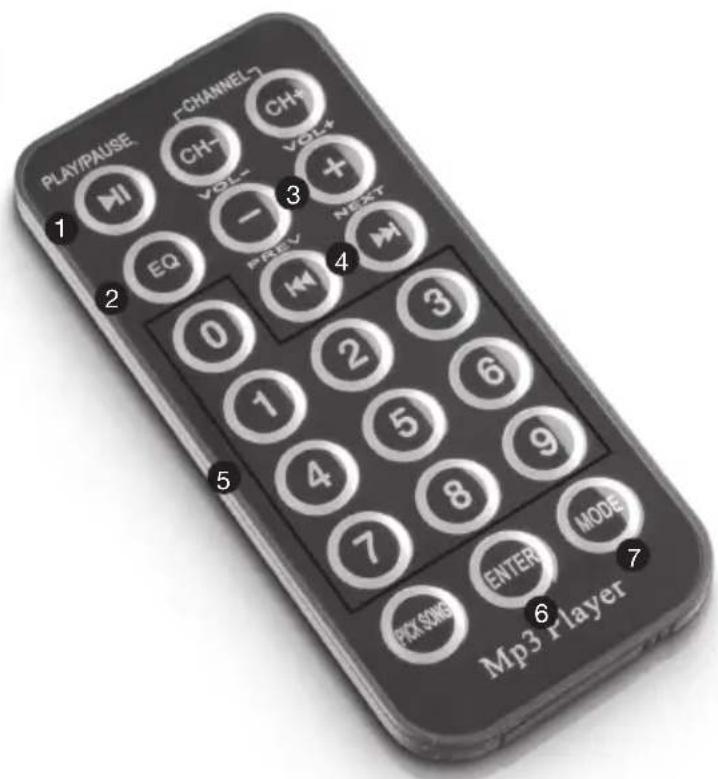
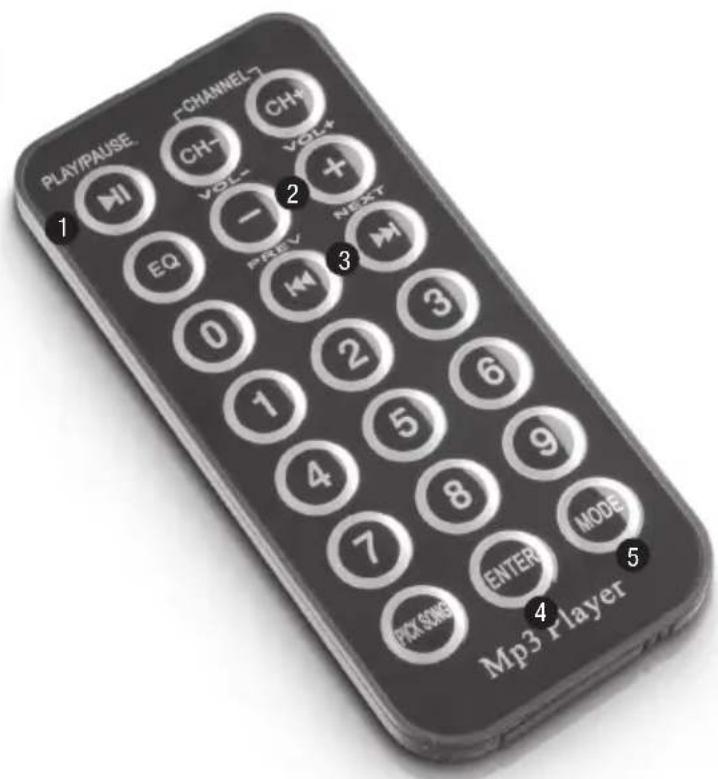
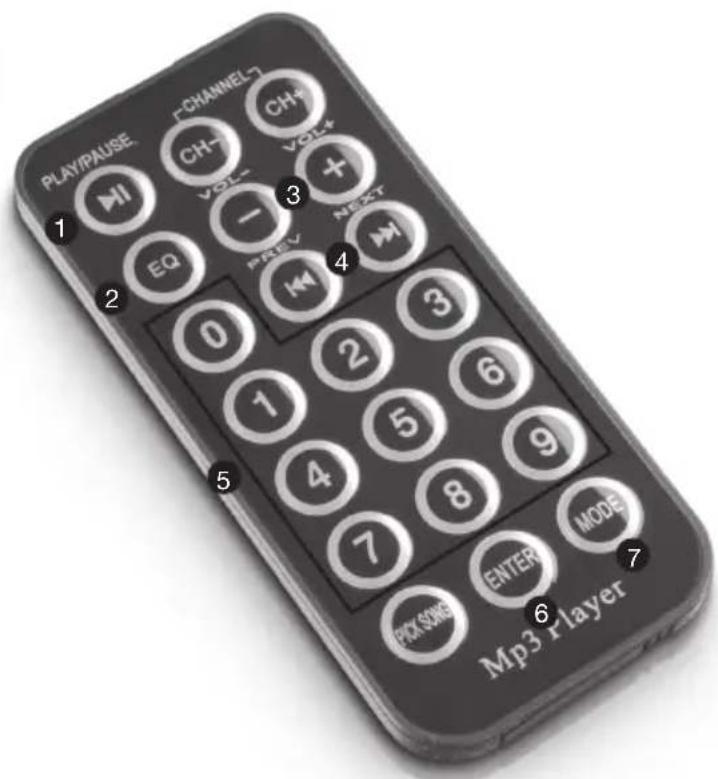
INFRARED REMOTE CONTROL (USB, SD-CARD):

Point the infrared remote control directly at the infrared sensor installed on the USB slot infrared sensor. The maximum range is about 8 metres.
1 PLAY / PAUSE
Press the PLAY / PAUSE button to start playback of a track. Pressing again places the player in the pause mode, playback is stopped.
2 EQ
Seven different equalizer settings are available and can be accessed by repeatedly pressing the button.
③ VOL-/VOL+
Volume of the MP3 player (0 to 15). Pressing VOL- lowers the volume, pressing VOL+ increases it.
4 PREV / NEXT
To select the previous track, press briefly on the PREV button; to select the next track, press briefly on the NEXT button. By pressing and holding the buttons, fast rewind and fast forward are activated.
5 DIRECT TRACK SELECTION
To select a track directly, use the numeric keys 0 to 9
For example: If you want to select track number 29, press briefly the button with the number 2, and then the button with the number 9 (the display shows "0029" for a short time).
INFRARED REMOTE CONTROL (USB, SD-CARD):
6 ENTER
Press the ENTER button to enter the menu to select the equalizer, the playback mode and the signal source.
EQUALIZER (Eq)
To select one of the seven equalizer presets, press the ENTER button, and using the PREV and NEXT buttons, select the menu item "Eq" (bright background) and confirm by pressing the PLAY / PAUSE button. Now you can activate one of seven equalizer presets by selecting it using the PREV and NEXT buttons, and confirm by pressing the PLAY / PAUSE button.
PLAYBACK MODE (Play Mode)
Six different playback modes are available for selection (Normal / Random / Browse / All / Repeat One / Repeat Folder). Press the ENTER button, and using the PREV and NEXT buttons, select the menu item "Play Mode" (bright background) and confirm by pressing the PLAY / PAUSE button. Now you can activate one of six playback modes by selecting it using the PREV and NEXT buttons, and confirm by pressing the PLAY / PAUSE button.
SOURCE SELECTION (Change Device)
Choice of the signal source for the MP3 player.
- Press the ENTER button, and using the PREV and NEXT buttons, select the menu item "Change Device" (bright background) and confirm by pressing the PLAY / PAUSE button. Now you can select "SD Card" for SD memory card, or "UDISK" for USB memory stick using the PREV and NEXT buttons, and confirm by pressing the PLAY / PAUSE button.
- By briefly pressing the MODE button, the MP3 player changes its signal source (SD card slot / slot for USB memory sticks / Bluetooth). The activated signal source is shown on the display.
- To exit the menu, using the PREV and NEXT buttons, select the menu item "Exit" and confirm by pressing the PLAY / PAUSE button.
- After about 8 seconds, the menu is automatically exited and the display will change to the main display.
7 MODE
- By briefly pressing the MODE button, the MP3 player changes its signal source (SD card slot / slot for USB memory sticks / Bluetooth). The activated signal source is shown on the display.
- Press this button for about 2 seconds, and the MP3 player is turned on or off.
The MP3 player may be turned on and off only by means of infrared remote control, not on the device itself
NOTE: The CHANNEL (CH-, CH+) and PICK SONG buttons have no function.
INFRARED REMOTE CONTROL (BLUETOOTH):
1 PLAY / PAUSE
Press the PLAY / PAUSE button to start the playback of a track. Pressing again places the player in the pause mode, playback is stopped.
② VOL-/VOL+
Volume of the MP3 player (0 to 15). Pressing VOL- lowers the volume, pressing VOL+ increases it.
3 PREV / NEXT
To select the previous track on an album, press the PREV button briefly, or the NEXT button to select the next track.
4 ENTER
Pressing the ENTER button will take you to the Bluetooth menu. Operation and adjustment are carried out as described in detail in the chapter "OPERATING IN THE BLUETOOTH MODE".
INFRARED REMOTE CONTROL (BLUETOOTH):
5 MODE
- By briefly pressing the MODE button, the MP3 player changes its signal source (SD card slot / slot for USB memory sticks / Bluetooth). The activated signal source is shown on the display.
- Press this button for about 2 seconds, and the MP3 player is turned on or off.
The MP3 player can only be turned on or off by using the infrared remote control, not by the MP3 player itself, but is activated automatically when the Road Jack speaker is switched on.
NOTE: The buttons CHANNEL (CH-, CH+), EQ, PICK SONG and the digit buttons 0-9 have no function in the Bluetooth mode.
SPECIFICATIONS:
| Model name LDRJ8 | |
| Product Type: portable PA speaker |
| Type: active | |
| Woofer Size: 8" | |
| Woofer Size: 203.2 mm | |
| Woofer Magnet: ferrite | |
| Woofer Brand: custom made | |
| HF Driver Size: 3" (wide range) | |
| HF Driver Size: 76.2 mm | |
| HF Driver Magnet: ferrite | |
| HF Driver Brand: custom made | |
| Amplifier: | class D |
| Power Output (RMS): | 25 W |
| Power Output (Peak): | 100 W |
| Frequency Response: | 90 - 18,000 Hz |
| SPL (1 W/1 m): | 94 dB |
| Max SPL: | 113 dB |
| Protection: | short circuit, overvoltage, overload protection |
| Controls: | Mic 1 Level, Mic 2 Level, CD / Tape IN Level, Low, High, Echo, Master Volume, AUX / MP3 switch |
| Indicators: | power, charge/battery status |
| Line Inputs: | 1 |
| Line Input Connectors: | 2 x RCA, 3.5 mm jack |
| Mic Inputs: | 2 (1x alternative to instrument input CH 2) |
| Mic Input Connectors: | XLR, 6.3 mm jack |
| Instrument Inputs: | 1 (alternative to Mic input CH 2) |
| Instrument Input Terminals: | 6.3 mm jack |
| Power Socket: | IEC power socket |
| Power Supply: | switching power supply |
| Operating Voltage: | 100 V AC - 120 V AC / 60 Hz, 220 V AC - 240 V AC / 50 Hz |
| Power Consumption (max.): | 50 W |
| Rechargeable Batteries: | 12 V / 5 Ah |
| Cabinet Material: | 15 mm MDF |
| Cabinet Type: | bass reflex |
| Width: | 385 mm |
| Height: | 450 mm |
| Depth: | 298 mm |
| Weight: | 13.8 kg |
| Other Features: | 36 mm pole mount, transport wheels, pull-out handle, carrying handle, IR remote control for Media Player |
SPECIFICATIONS:
| Model Name: LDRJ10 | |
| Product Type: portable PA speaker | |
| Type: active | |
| Woofer Size: 10" | |
| Woofer Size: 254 mm | |
| Woofer Magnet: ferrite | |
| Woofer Brand: custom made | |
| HF Driver Size: 3" (wide range) | |
| HF Driver Size: 76.2 mm | |
| HF Driver Magnet: ferrite | |
| HF Driver Brand: custom made | |
| Amplifier: class D | |
| Power Output (RMS): 25 W | |
| Power Output (Peak): 100 W | |
| Frequency Response: 65 - 18,000 Hz | |
| SPL (1 W/1 m): 96 dB | |
| Max SPL: | 117 dB |
| Protection: | short circuit, overvoltage, overload protection |
| Controls: | Mic 1 Level, Mic 2 Level, CD / Tape IN Level, Low, High, Echo, Master Volume, AUX / MP3 switch |
| Indicators: | power, charge/battery status |
| Line Inputs: | 1 |
| Line Input Connectors: | 2 x RCA, 3.5 mm jack |
| Mic Inputs: | 2 (1x alternative to instrument input CH 2) |
| Mic Input Connectors: | XLR, 6.3 mm jack |
| Instrument Inputs: | 1 (alternative to Mic input CH 2) |
| Instrument Input Terminals: | 6.3 mm jack |
| Power Socket: | IEC power socket |
| Power Supply: | switching power supply |
| Operating Voltage: | 100 V AC - 120 V AC / 60 Hz, 220 V AC - 240 V AC / 50 Hz |
| Power Consumption (max.): | 50 W |
| Rechargeable Batteries: | 12 V / 5 Ah |
| Cabinet Material: | 15 mm MDF |
| Cabinet Type: bass reflex | |
| Width: | 415 mm |
| Height: | 525 mm |
| Depth: | 328 mm |
| Weight: | 16.2 kg |
| Other Features: | 36 mm pole mount, transport wheels, pull-out handle, carrying handle, IR remote control for Media Player |
SPECIFICATIONS:
Media Player
Supported Media: Bluetooth, USB stick, SD card
Supported Formats: MP3 file, WAV, WMA
Media Player Controls: Mode (Menu / Bluetooth /SD / USB), Play / Pause, Stop, Repeat, Previous Track, Next Track)
Media Player Display Elements: lit multifunctional LC display
MANUFACTURER'S DECLARATIONS:
MANUFACTURER'S WARRANTY
This warranty extends to the LD SYSTEMS branded product you purchased from Adam Hall. The statutory warranty rights against the vendor shall not be affected by this warranty. Rather, this warranty gives you additional independent claims against Adam Hall.
With this warranty, Adam Hall ensures that products you have purchased from Adam Hall or Adam Hall partners, under normal use, are free of defects in material or workmanship for a period of 2 years from the date of purchase. The warranty period begins on the date of purchase. In order to assert a claim for warranty service, the proof of date of purchase is provided by the receipt bearing the date of purchase or the date of purchase on the delivery note. You are entitled to warranty service under the conditions and provisions set out in this document, if a repair within the warranty period is required.
This warranty applies only to the original purchaser of the products supplied by Adam Hall and is not transferable to any person to whom the property is transferred by the original purchaser.
Within the warranty period, the defective parts or the product from Adam Hall will be repaired or replaced. Under the terms of this warranty, all the replaced or removed components become the property of Adam Hall.
In the unlikely event that a product acquired from Adam Hall, repeatedly exhibits a defect, Adam Hall may decide, at its discretion, to replace this product with a comparable product of at least the same performance.
Adam Hall does not guarantee that the operation of this product will be uninterrupted or error-free. Adam Hall accepts no responsibility for any damage due to incorrect compliance with the instructions received in the delivery.
This warranty does not extend to:
- wearing parts (eg battery, tubes).
- devices that have had their serial number removed or damaged, or failed as a result of an accident
- inappropriate or abusive use or other external causes
- devices that were not used in accordance with the operating parameters defined in the user documentation shipped with the product
- devices that have been repaired using parts not made or distributed by Adam Hall
- devices that have been serviced, modified or repaired by someone other than Adam Hall or an authorised service partner. These terms and conditions constitute the complete and exclusive warranty agreement between you and Adam Hall regarding the Adam Hall branded product you have purchased.
This warranty is valid only within Europe. Outside of Europe please contact our official distributors.
MANUFACTURER'S DECLARATIONS:
LIMITATION OF LIABILITY
If your Adam Hall branded hardware product fails to work as warranted above, your sole and exclusive remedy shall be repair or replacement. Adam Halls' maximum liability under this limited warranty is expressly limited to the lesser of the price you have paid for the product or the cost of repair or replacement of any components that malfunction under conditions of normal use.
Adam Hall is not liable for any damages caused by the product or the failure of the product, including any lost profits or savings or special, incidental, or consequential damages. Adam Hall is not liable for any claim made by a third party or made by you for a third party.
This limitation of liability applies whether damages are sought, or claims are made, under this Limited Warranty or as a tort claim (including negligence and strict product liability), a contract claim, or any other claim, and cannot be rescinded or changed by anyone. This limitation of liability will be effective even if you have advised Adam Hall or an authorized representative of Adam Hall of the possibility of any such damages, but not, however, in the event of claims for damages in connection with personal injuries.
This manufacturer's warranty grants you specific rights; depending on jurisdiction (nation or state), you may be entitled to additional claims. You are advised to consult applicable state or national laws for a full determination of your rights.
REQUESTING WARRANTY SERVICE
To request warranty service for the product, contact Adam Hall or the Adam Hall authorized reseller from which you purchased the product.
The equipment marketed by Adam Hall complies (where applicable) with the essential requirements and other relevant specifications of Directives 1999/5/EC (R&TTE), 2004/108/EC (EMC) und 2006/95/EC (LVD). Additional information can be found at www.adamhall.com.
MANUFACTURER'S DECLARATIONS:
PROPER DISPOSAL OF THIS PRODUCT
(Valid in the European Union and other European countries with waste separation)

This symbol on the product, or the documents accompanying the product, indicates that this appliance may not be treated as household waste. This is to avoid environmental damage or personal injury due to uncontrolled waste disposal. Please dispose of this product separately from other waste and have it recycled to promote sustainable economic activity.
Household users should contact either the retailer where they purchased this product, or their local government office, for details on where and how they can recycle this item in an environmentally friendly manner. Business users should contact their supplier and check the terms and conditions of the purchase contract. This product should not be mixed with other commercial wastes for disposal.
ENVIRONMENTAL PROTECTION AND ENERGY CONSERVATION
Energy conservation is an active contribution to environmental protection. Please turn off all unneeded electrical devices. To prevent unneeded devices from consuming power in standby mode, disconnect the mains plug.
Adam Hall GmbH, all rights reserved. The technical data and the functional product characteristics can be subject to modifications. The photocopying, the translation, and all other forms of copying of fragments or of the integrity of this user's manual is prohibited.
natural_image
Exterior view of a silver portable electronic device with a black handle and control panel (no visible text or symbols)
BT NOT LINK

Bluetooth
Smartphone

Bluetooth
BEDIENUNG IN DER BLUETOOTH BETRIEBSART:
BT DISCONNECT

BEDIENUNG IN DER BLUETOOTH BETRIEBSART:
DELETE PAIRED INFO

INFRAROT FERNBEDIENUNG (USB, SD-CARD):

natural_image
Exterior view of a silver portable electronic device with a black handle and control panel (no visible text or symbols)
CHOIX DE LA SOURCE DE SIGNAL (Change Device)
BT NOT LINK

Bluetooth
Smartphone

Bluetooth
UTILISATION EN MODE BLUETOOTH :
DÉCONNEXION DU BLUETOOTH (BT DISCONNECT)

SUPPRIMER LES INFORMATIONS DE COUPLAGE
UTILISATION EN MODE BLUETOOTH :
TÉLÉCOMMANDE INFRAROUGE (USB, SD-CARD) :

CHOIX DE LA SOURCE DE SIGNAL (Change Device)
MISE AU REBUT DE CE PRODUIT
natural_image
Exterior view of a silver portable electronic device with a black handle and control panel (no visible text or symbols)
BT NOT LINK

Bluetooth
Smartphone

Bluetooth

MANDO A DISTANCIA INFRARROJOS (USB, TARJETA SD):

natural_image
Exterior view of a silver portable electronic device with a black handle and control panel, next to a remote control (no visible text or symbols)
ŚRODKI OSTROŻNOŚCI:
WYBÓR ŽRÓDŁA SYGNAŁU (Change Device)
BT NOT LINK

Bluetooth
Smartphone

Bluetooth
OBSŁUGA W TRYBIE BLUETOOTH:
BT DISCONNECT

OBSŁUGA W TRYBIE BLUETOOTH:
DELETE PAIRED INFO

PILOT NA PODCZERWIEŃ (USB, SD-CARD):
WYBÓR ŽRÓDŁA SYGNAŁU (Change Device)
GWARANCJA PRODUCENTA
DEKLARACJA ZGODNOŚCI WE
natural_image
Exterior view of a portable electronic device with a speaker grille and control panel, no visible text or symbols.
MISURE PRECAUZIONALI:
BT NOT LINK

Bluetooth
Smartphone

Bluetooth
FUNZIONAMENTO IN MODALITA' BLUETOOTH:
BT DISCONNECT


FUNZIONAMENTO IN MODALITA' BLUETOOTH:
DELETE PAIRED INFO
TELECOMANDO A INFRAROSSI (USB, SCHEDA SD):