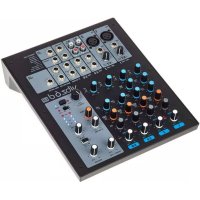
VIBZ 6 - Mixer LD Systems - Free user manual and instructions
Find the device manual for free VIBZ 6 LD Systems in PDF.



| Product type | Analog mixing console 6 channels (LDVIBZ6) or with built-in digital multi-effects (LDVIBZ6D) |
| Number of channels | 6 (2 mono + 2 stereo) |
| Microphone inputs | 2 x XLR balanced with switchable +48V phantom power |
| Mono line inputs (channels 1-2) | 2 x 6.35 mm TRS balanced jacks |
| Stereo line inputs (channels 3/4 and 5/6) | 2 x pairs of 6.35 mm unbalanced jacks (L mono compatible) |
| 2TK input | 1 x stereo RCA (cinch) pair |
| Main outputs | 2 x 6.35 mm unbalanced jacks (MAIN MIX OUT) |
| Control room output | 2 x 6.35 mm jacks (CTRL OUT) |
| Headphone output | 1 x 6.35 mm stereo jack (min. impedance 30 ohms) |
| Recording output | 1 x RCA (cinch) pair (2TK OUT) |
| Effect/AUX send | 1 x 6.35 mm unbalanced jack (AUX SEND, post-fader) |
| Effect return | 1 x pair of 6.35 mm TRS jacks (ST RETURN) |
| Mono channel EQ (1-2) | 3-band: High (12 kHz), Mid (2.5 kHz), Low (80 Hz), +/-15 dB |
| Stereo channel EQ (3/4, 5/6) | 2-band: High (12 kHz), Low (80 Hz), +/-15 dB |
| Digital multi-effects (model LDVIBZ6D) | 16 presets, footswitch mute control (optional footswitch) |
| Power supply | 18 V DC / 1 A, external adapter included |
| Dimensions (W x H x D) | 209 x 68 x 260 mm |
| Weight | 1.45 kg |
| Operating temperature | 0 °C to +45 °C |
| Ambient humidity | 10 to 80 % (relative) |
| Maintenance and cleaning | Use a dry cloth. Do not open the device. Disconnect before cleaning. |
| Safety | Do not expose to water, flames, or heat sources. Use stable supports. Disconnect during storms. |
| Repairability | Refer any repair to qualified personnel. Contains no user-serviceable parts. |
| Manufacturer warranty | Consult www.adamhall.com for warranty conditions. |
Frequently Asked Questions - VIBZ 6 LD Systems
User questions about VIBZ 6 LD Systems
0 question about this device. Answer the ones you know or ask your own.
Ask a new question about this device
Download the instructions for your Mixer in PDF format for free! Find your manual VIBZ 6 - LD Systems and take your electronic device back in hand. On this page are published all the documents necessary for the use of your device. VIBZ 6 by LD Systems.
USER MANUAL VIBZ 6 LD Systems
natural_image
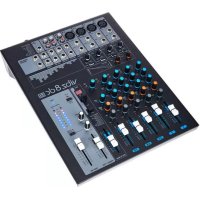
Black vibz 6d audio workstation with multiple knobs and control knobs (no readable text or symbols)VIBZ 6
6-CHANNEL MIXING CONSOLES
LDVIBZ6, LDVIBZ6D WITH DFX
CONTENTS / INHALTSVERZEICHNIS / CONTENU / CONTENIDO / TREŚĆ / CONTENUTO
ENGLISH
PREVENTIVE MEASURES 3-4
INTRODUCTION
QUICK START GUIDE WITH CABLING EXAMPLE 5
CONNECTIONS, CONTROLS AND INDICATORS 6-9
SPECIFICATIONS
MANUFACTURER'S DECLARATIONS 12
DEUTSCH
SICHERHEITSHINWEISE
EINFÜHRUNG
We have designed this product to operate reliably over many years. LD Systems stands for this with its name and many years of experience as a manufacturer of high-quality audio products. Please read this User's Manual carefully, so that you can begin making optimum use of your LD Systems product quickly.
You can find more information about LD-SYSTEMS at our Internet site WWW.LD-SYSTEMS.COM
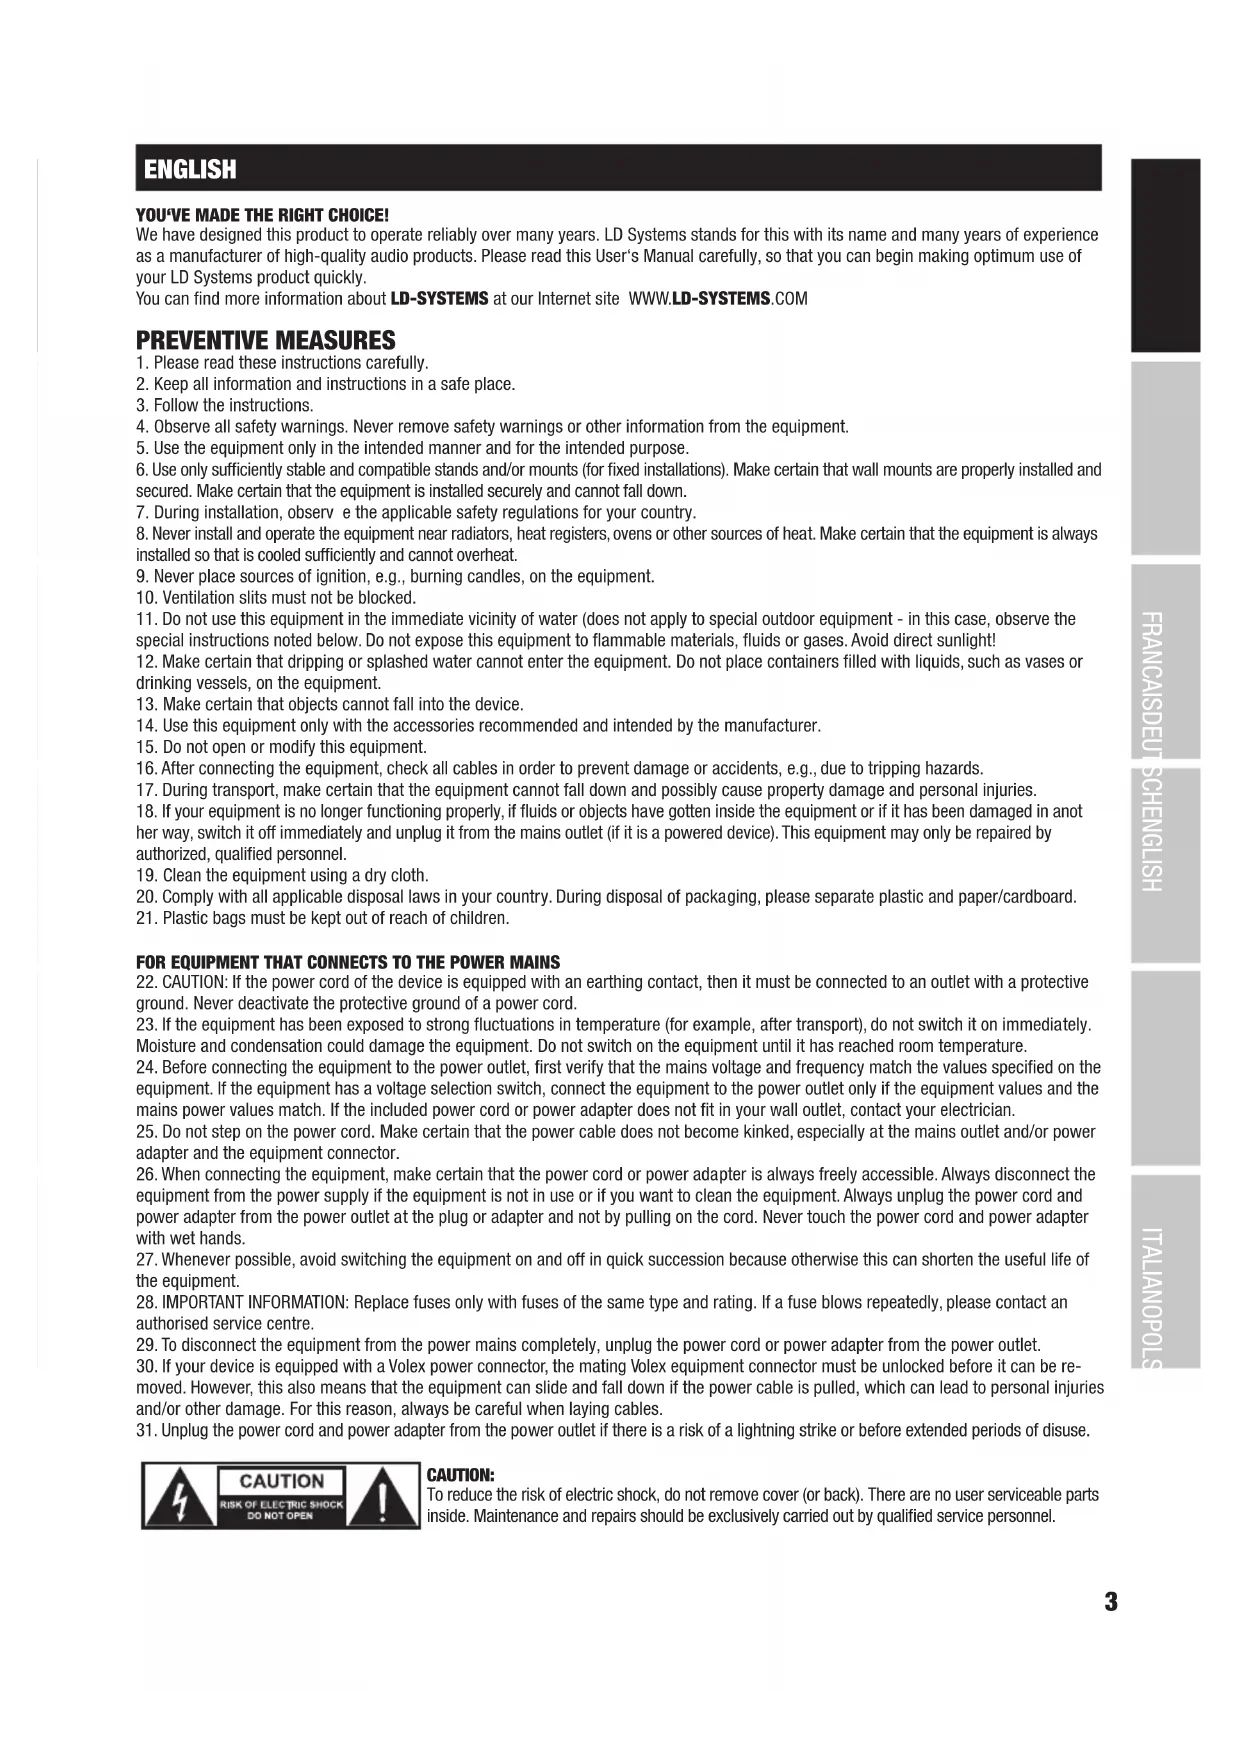
PREVENTIVE MEASURES
- Please read these instructions carefully.
- Keep all information and instructions in a safe place.
- Follow the instructions.
- Observe all safety warnings. Never remove safety warnings or other information from the equipment.
- Use the equipment only in the intended manner and for the intended purpose.
- Use only sufficiently stable and compatible stands and/or mounts (for fixed installations). Make certain that wall mounts are properly installed and secured. Make certain that the equipment is installed securely and cannot fall down.
- During installation, observ e the applicable safety regulations for your country.
- Never install and operate the equipment near radiators, heat registers, ovens or other sources of heat. Make certain that the equipment is always installed so that is cooled sufficiently and cannot overheat.
- Never place sources of ignition, e.g., burning candles, on the equipment.
- Ventilation slits must not be blocked.
- Do not use this equipment in the immediate vicinity of water (does not apply to special outdoor equipment - in this case, observe the special instructions noted below. Do not expose this equipment to flammable materials, fluids or gases. Avoid direct sunlight!
- Make certain that dripping or splashed water cannot enter the equipment. Do not place containers filled with liquids, such as vases or drinking vessels, on the equipment.
- Make certain that objects cannot fall into the device.
- Use this equipment only with the accessories recommended and intended by the manufacturer.
- Do not open or modify this equipment.
- After connecting the equipment, check all cables in order to prevent damage or accidents, e.g., due to tripping hazards.
- During transport, make certain that the equipment cannot fall down and possibly cause property damage and personal injuries.
- If your equipment is no longer functioning properly, if fluids or objects have gotten inside the equipment or if it has been damaged in another way, switch it off immediately and unplug it from the mains outlet (if it is a powered device). This equipment may only be repaired by authorized, qualified personnel.
- Clean the equipment using a dry cloth.
- Comply with all applicable disposal laws in your country. During disposal of packaging, please separate plastic and paper/cardboard.
- Plastic bags must be kept out of reach of children.
FOR EQUIPMENT THAT CONNECTS TO THE POWER MAINS
-
CAUTION: If the power cord of the device is equipped with an earthing contact, then it must be connected to an outlet with a protective ground. Never deactivate the protective ground of a power cord.
-
If the equipment has been exposed to strong fluctuations in temperature (for example, after transport), do not switch it on immediately. Moisture and condensation could damage the equipment. Do not switch on the equipment until it has reached room temperature.
-
Before connecting the equipment to the power outlet, first verify that the mains voltage and frequency match the values specified on the equipment. If the equipment has a voltage selection switch, connect the equipment to the power outlet only if the equipment values and the mains power values match. If the included power cord or power adapter does not fit in your wall outlet, contact your electrician.
-
Do not step on the power cord. Make certain that the power cable does not become kinked, especially at the mains outlet and/or power adapter and the equipment connector.
-
When connecting the equipment, make certain that the power cord or power adapter is always freely accessible. Always disconnect the equipment from the power supply if the equipment is not in use or if you want to clean the equipment. Always unplug the power cord and power adapter from the power outlet at the plug or adapter and not by pulling on the cord. Never touch the power cord and power adapter with wet hands.
-
Whenever possible, avoid switching the equipment on and off in quick succession because otherwise this can shorten the useful life of the equipment.
-
IMPORTANT INFORMATION: Replace fuses only with fuses of the same type and rating. If a fuse blows repeatedly, please contact an authorised service centre.
-
To disconnect the equipment from the power mains completely, unplug the power cord or power adapter from the power outlet.
-
If your device is equipped with a Volex power connector, the mating Volex equipment connector must be unlocked before it can be removed. However, this also means that the equipment can slide and fall down if the power cable is pulled, which can lead to personal injuries and/or other damage. For this reason, always be careful when laying cables.
-
Unplug the power cord and power adapter from the power outlet if there is a risk of a lightning strike or before extended periods of disuse.

CAUTION:
To reduce the risk of electric shock, do not remove cover (or back). There are no user serviceable parts inside. Maintenance and repairs should be exclusively carried out by qualified service personnel.

The warning triangle with lightning symbol indicates dangerous uninsulated voltage inside the unit, which may cause an electrical shock.

The warning triangle with exclamation mark indicates important operating and maintenance instructions.

Warning! This symbol indicates a hot surface. Certain parts of the housing can become hot during operation. After use, wait for a cool-down period of at least 10 minutes before handling or transporting the device.
CAUTION! HIGH VOLUMES IN AUDIO PRODUCTS!
This device is meant for professional use. Therefore, commercial use of this equipment is subject to the respectively applicable national accident prevention rules and regulations. As a manufacturer, Adam Hall is obligated to notify you formally about the existence of potential health risks. Hearing damage due to high volume and prolonged exposure: When in use, this product is capable of producing high sound-pressure levels (SPL) that can lead to irreversible hearing damage in performers, employees, and audience members. For this reason, avoid prolonged exposure to volumes in excess of 90 dB.
INTRODUCTION
LDVIBZ6 - 6-channel Mixer
The VIBZ 6 is a compact 6-channel mixer which is perfectly suited to entertainers, small bands, home recording and installations. It features two balanced microphone inputs with high-quality preamps, phantom power and 3-band EQ with +/-15 dB adjustment scope, two stereo line inputs with 2-band EQ, which are mono-compatible, and an effects loop.
The master section of the VIBZ 6 is equipped with adjustable monitor outputs and a headphone jack. The mixer also has inputs and outputs for recording and playback devices, is extremely easy to use and offers a warm differentiated sound. The external power supply can be screwed on tightly.
LDVIBZ6D - 6-channel Mixer with Digital Effects Device
The VIBZ 6 D is a compact 6-channel mixer which is perfectly suited to entertainers, small bands, home recording and installations. It features two balanced microphone inputs with high-quality preamps, phantom power and 3-band EQ with +/-15 dB adjustment scope, two stereo line inputs with 2-band EQ, which are mono-compatible, and an effects loop.
The master section of the VIBZ 6 D is equipped with adjustable monitor outputs, a headphone jack and 16 digital effects presets, which are foot-switchable. The mixer also has inputs and outputs for recording and playback devices, is extremely easy to use and offers a warm differentiated sound. The external power supply can be screwed on tightly.
QUICK START GUIDE WITH CABLING EXAMPLE
- Make sure that the mixer and all devices to be connected to the mixer, are turned off.
- Connect the devices to the mixer using appropriate cables.
- Adjust the input gain of the mono channels 1 and 2 and all level controllers channel-LEVEL and MAIN MIX to minimum (left stop). Place all equalizer controllers in the central position (stop). Adjust the volume controller on the active loudspeaker to minimum. Turn on the +48 V phantom power on the mixer only if you are using a condenser microphone.
- Turn on the devices in the following order: Microphone and keyboard (or other source devices), the mixer and lastly the active speakers.
- Always adjust the gain control of the mono channels so that the peak LED of the corresponding channel only lights up briefly when signal peaks occur. Avoid the permanent lighting of the peak LED by reducing the input gain (Gain).
- Channels 3/4 and 5/6: Adjust the output level of the keyboard (or other source devices) so that the peak LED above the corresponding channel only lights up briefly when signal peaks occur. Avoid the permanent lighting of the peak LED.
- Bring the level controllers (LEVEL) of the channels in use and of the sum channel MAIN MIX approximately to the 3 o'clock position.
- Now increase the volume of the active speakers for the incoming signal (e.g. speaking, singing, keyboard) to the desired level.
- Fine-tuning can now be achieved by adjusting the volume ratios of the channels and by using the equalizer and effects device (model LDVIBZ6D only) as desired.
NOTE: When turning off the devices, please follow these steps: First, set the volume of the active speakers to minimum and turn them off, then the mixer and connected devices can be switched off.

CONNECTIONS, CONTROLS AND INDICATORS

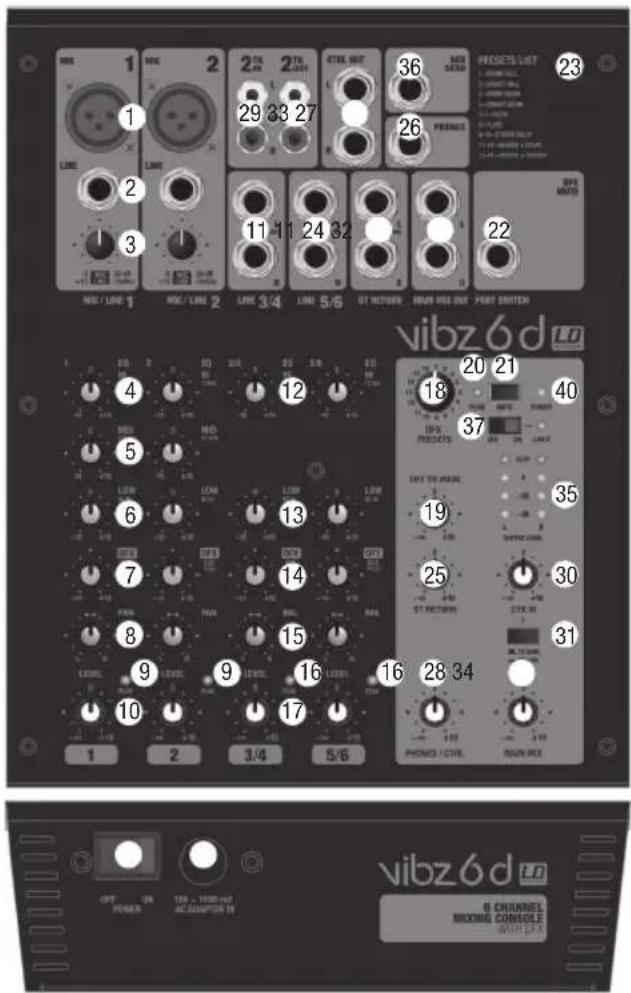
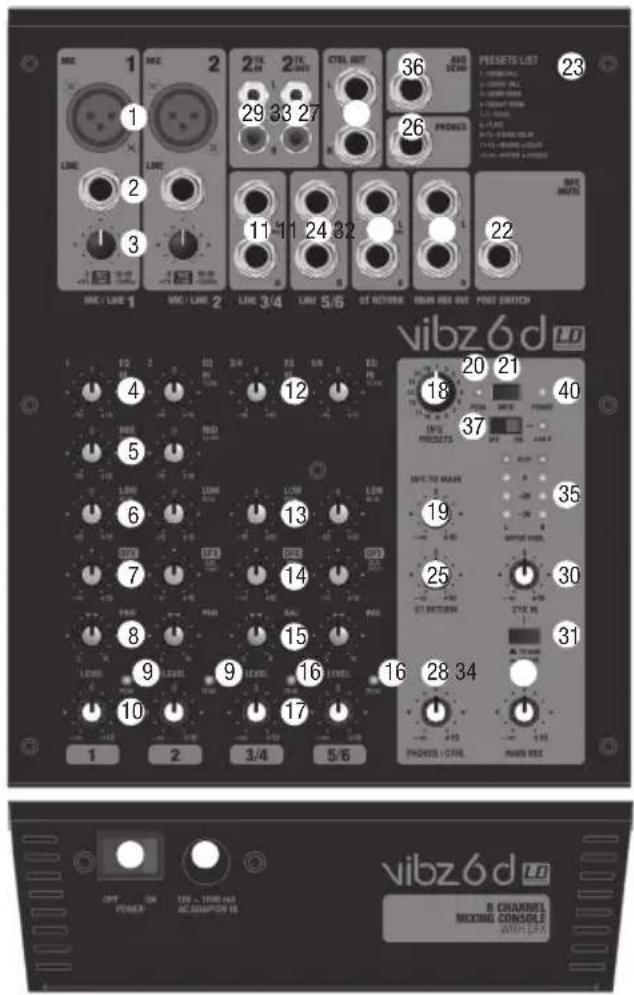
1 MIC IN CHANNEL 1 / 2
Balanced inputs of the mono channels 1 and 2 with 3-pin XLR sockets for connecting microphones. A 48 V phantom power supply is available for operating condenser microphones, and it can be switched centrally to the XLR sockets (N° 37). Please set the Gain controller (N 3) to minimum (left stop) before connecting or disconnecting a microphone; and switch on the phantom power only after connecting the microphone, or off before disconnecting.
2 LINE IN CHANNEL 1 / 2
Balanced inputs of the mono channels 1 and 2 with 6.3 mm jack to connect a source device with a line level. Please set the Gain controller (N 3) to minimum (left stop) before connecting or disconnecting jack cables.
3 GAIN CHANNEL 1 / 2
Adjusting the gain of the microphone input from 0 to 50 dB, or the sensitivity of the line input from +15 dBu to -35 dBu. Adjust the Gain controller so that the peak LED of the corresponding channel only lights up briefly when signal peaks occur. Avoid the permanent lighting of the peak LED by reducing the input gain or input sensitivity.
4 EQUALIZER HI CHANNEL 1 / 2
Equalizer high band for channels 1 or 2 (12 kHz, +/-15 dB). When turned to the left, levels are lowered, when turned to the right, they are raised. In the centre position (resting point), the equalizer is inactive.
5 EQUALIZER MID CHANNEL 1 / 2
Equalizer mid band for channels 1 or 2 (2.5 kHz, +/-15 dB). When turned to the left, levels are lowered, when turned to the right, they are raised. In the centre position (resting point), the equalizer is inactive.
6 EQUALIZER LOW CHANNEL 1 / 2
Equalizer bass band for channels 1 or 2 (80 Hz, +/-15 dB). When turned to the left, levels are lowered, when turned to the right, they are raised. In the centre position (resting point), the equalizer is inactive.
7 LEVEL DFX / AUX POST CHANNEL 1 / 2
Controller for adding the signal from channel 1 or 2 to the internal digital effects device (only on LDVIBZ6D), or to an external effect device. The effect way is switched post-fader, so the signal is taken after the channel level control. Use the Line Output AUX SEND (N 36) for activating an external effect.
8 PAN L / R CHANNEL 1 / 2
Using the Panorama controller, position the signal of the corresponding channel in the stereo field of the total signal (Centre position = perception of the signal in the middle of the stereo field).
9 PEAK-LED CHANNEL 1 / 2
Once the red Peak LED lights up, the corresponding channel is operating at the distortion limit. Adjust the Gain controller (N 3) so that the peak LED of the corresponding channel only lights up briefly when signal peaks occur. Avoid the permanent lighting of the peak LED by reducing the input gain or input sensitivity.
10 LEVEL CHANNEL 1 / 2
Volume controller for channels 1 or 2. Turning the dial to the right increases the volume and turning it to the left decreases it.
11 LINE IN L / R CHANNEL 3/4 OR 5/6
Unbalanced inputs for the stereo channels 3/4 or 5/6 with 6.3 mm jacks to connect external devices with line level (e.g. keyboard). If only the left input jack is used (L), the channel will be mono.
12 EQUALIZER HI CHANNEL 3/4 OR 5/6
Equalizer high band for channels 3/4 or 5/6 (12 kHz, +/-15 dB). When turned to the left, levels are lowered, when turned to the right, they are raised. In the centre position (resting point), the equalizer is inactive.
13 EQUALIZER LOW CHANNEL 3/4 OR 5/6
Equalizer bass band for channels 3/4 or 5/6 (80 kHz, +/-15 dB). When turned to the left, levels are lowered, when turned to the right, they are raised. In the centre position (resting point), the equalizer is inactive.
14 LEVEL DFX / AUX POST CHANNEL 3/4 OR 5/6
Controller for adding the signal from channel 3/4 or 5/6 to the internal digital effects device (only on LDVIBZ6D) or to an external effects device. The effect way is switched post-fader, so the signal is taken after the channel level control. Use the Line Output AUX SEND (N 36) for activating an external effect.
15 BAL L / R CHANNEL 3/4 OR 5/6
Use the balance controller to set the relative volume between the left and right part of the connected stereo signal. When only the left socket L (MONO) of the input is in use, the controller performs the function of a Panorama controller.
16 PEAK-LED CHANNEL 3/4 OR 5/6
Once the red Peak LED lights up, the corresponding channel is operating at the distortion limit. Adjust the output level of the source device so that the peak LED of the corresponding channel only lights up briefly when signal peaks occur. Avoid the permanent lighting of the peak LED.
17 LEVEL CHANNEL 3/4 OR 5/6
Volume controller for channels 3/4 or 5/6. Turning the dial to the right increases the volume and turning it to the left decreases it.
18 DFX PRESETS (MODEL LDVIBZ6D ONLY)
16 different effects presets are available to you. Use the rotary encoder to select one of the presets as desired.
19 DFX TO MAIN (MODEL LDVIBZ6D ONLY)
Volume controller for adding the effects signal of the internal effects device to the sum channel MAIN MIX. Turning the dial to the right increases the volume and turning it to the left decreases it.
20 DFX PEAK LED (MODEL LDVIBZ6D ONLY)
Once the red Peak LED lights up, the input of the internal effects device is operating at the distortion limit. Adjust the Effect Send controller of the input channels (N 7, N 14) so that the peak LED of the corresponding channel only lights up briefly when signal peaks occur.
21 DFX MUTE (MODEL LDVIBZ6D ONLY)
In order to mute the internal effects device, briefly press the DFX Mute button once, and again to turn mute off. If Mute is active, the DFX Peak LED lights up continuously.
22 DFX MUTE FOOTSWITCH (MODEL LDVIBZ6D ONLY)
6.3 mm jack socket for connecting a foot switch (pedal) to remotely activate and disable the mute function of the internal effects device (footswitch optional).
23 EFFECTS LIST (MODEL LDVIBZ6D ONLY)
List of effects programs for the internal effects device.
24 ST RETURN L / R
Unbalanced stereo line input with 6.3 mm jack sockets for connecting an external effects device (left input = mono), or another source device with a line level. Use the AUX SEND jack socket in order to activate an external effects device. When using the AUX SEND jack socket, the internal effects device (only on model LDVIBZ6D) is automatically bypassed, and is therefore not usable.
25 ST RETURN
Volume controller for the stereo line input ST RETURN (N 24). Turning the dial to the right increases the volume and turning it to the left decreases it.
26 PHONES
Headphone connection with 6.3 mm stereo jack. Output of the sum channel signal MAIN MIX. The volume can be adjusted via the PHONES / CTRL volume controller (N 28) and is independent of the volume of the MAIN MIX level controller. Use headphones with a minimum impedance of 30 ohms and make sure that the volume stays at a pleasant level, in order to avoid hearing damage caused by loud noise.
27 CTRL OUT L / R
Unbalanced stereo line output with 6.3 mm jack sockets to connect active monitors etc... Output of the sum channel signal MAIN MIX. The volume can be adjusted via the PHONES / CTRL volume controller (N 28) and is independent of the volume of the MAIN MIX level controller.
28 PHONES / CTRL
Volume controller for the stereo line output CTRL (N 27) and the headphone output PHONES (N 26). When using headphones, make sure that the volume stays at a pleasant level, in order to avoid hearing damage caused by loud noise.
29 2 TK IN
Unbalanced stereo line input with RCA sockets for connecting an external audio source with line level (e.g. MP3 player).
30 2 TK IN LEVEL
Volume controller for the stereo line input 2 TK IN (N 29). Turning the dial to the right increases the volume and turning it to the left decreases it.
31 2 TK IN TO MAIN / TO CTRL
This switch allows you to route the incoming signal of the stereo line input 2TK IN either to the stereo line output MAIN MIX OUT, CTRL OUT and the headphone output PHONES (not pressed down = TO MAIN), or exclusively to the stereo line output CTRL OUT and the headphone output PHONES (pressed down = TO CTRL).

MAIN MIX OUT
Unbalanced stereo line output with 6.3 mm jack sockets to connect an active PA system. Output of the master signal of the mixer.

2 TK OUT
Unbalanced stereo line output with RCA sockets for connecting an external recording device (e.g. laptop). Output of the master signal of the mixer.

MAIN MIX
Volume controller for the stereo line outputs MAIN MIX OUT (N 32) and 2 TK OUT (N 33) Turning the dial to the right increases the volume and turning it to the left decreases it. Before you turn on the power of the connected PA system, set the volume controller to minimum (left stop).

OUTPUT METER
4-segment LED level display for visualising the volume level of the stereo sum channel. To avoid distortion, reduce the volume level of the output channel as soon as the red CLIP LED lights up.

AUX SEND
Unbalanced mono line output with 6.3 mm jack sockets to activate an external effects device (POST fader). LDVIBZ6D: When using the AUX SEND jack socket, the internal effects device is automatically bypassed, and is therefore not usable.

+48V ON / OFF
+48 V phantom power supply for operating high-quality condenser microphones without own power supply. Move the switch to the ON position (red LED light is on) to turn on the phantom power for the XLR microphone inputs, and to the OFF position to turn it off (red LED light is off). Turn on the phantom power only after connecting a microphone, or off after disconnecting, and set the volume controller of the mono channels 1 and 2 to minimum (left stop) before this step.

DC ADAPTOR IN
Screewable low-voltage socket for the power supply of the mixer. Please use only the supplied AC power supply to avoid damage to the mixer. Turn on the mixer only after connecting the power supply to the mains and the low-voltage socket. The mains voltage of your power supplier and the operating voltage of the device must be the same!

POWER ON / OFF
On / Off switch for the power supply of the device.

POWER LED
The power LED lights up once the system is properly connected to the power mains and is switched on.
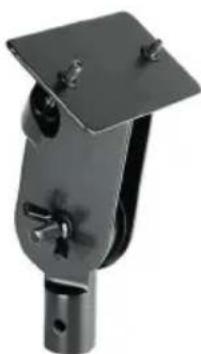
Note: A mounting point for the optional microphone stand adapter LDVIBZMSADAPTOR is located on the underside of the device.
natural_image
Mechanical clamp or bracket component with metallic pins and a flat top (no visible text or symbols)LDVIBZMSADAPTOR
SPECIFICATIONS
Model Name: LDVIBZ6 LDVIBZ6D
Product Type: analogue mixer analogue mixer
Type: Live / Home recording Live / Home recording
Number of Channels: 6 6
Mono Channels:
Mono Mic/Line Input Channels: 2 2
Mono Mic/Line Input Connections: 6.3 mm stereo jack, XLR 6.3 mm stereo jack, XLR
| Mono Mic Input Type: | electronically balanced, discreet design | electronically balanced, discreet design |
| Frequency Response Mono Mic Input: | 10 - 45,000 Hz | 10 - 45,000 Hz |
| Amplification Range Mono Mic Input: | 50 dB | 50 dB |
| Channel Crosstalk: | 62 dB | 62 dB |
THD Mono Mic Input: 0.0058% 0.0058%
Impedance Mono Mic Input: 4 kOhm 4 kOhm
S/N Ratio Mono Mic Input: 113 dB 113 dB
Mono Line Input Type: electronically balanced, discreet design electronically balanced, discreet design
Amplification Range Mono Line Input: 50 dB 50 dB
THD Mono Line Input: 0.0045% 0.0045%
Impedance Mono Line Input: 21 kOhm 21 kOhm
S/N Ratio Mono Line Input: 116 dB 116 dB
Mono Channel Equalizer Treble: +/-15 dB @ 12 kHz +/-15 dB @ 12 kHz
Mono Channel Equalizer Mids: +/-15 dB @ 2.5 kHz +/-15 dB @ 2.5 kHz
Mono Channel Equalizer Bass: +/-15 dB @ 80 Hz +/-15 dB @ 80 Hz
Phantom Power: +48 V DC switchable to XLR inputs +48 V DC switchable to XLR inputs
Control Elements Channel 1 - 2: Gain, EQ Hi, EQ Mid, EQ Low, Aux, Pan, Level Gain, EQ Hi, EQ Mid, EQ Low, DFX, Pan, Level
Stereo Channels:
Stereo Line Input Channels: 22
Stereo Line Input Connections: 2 x 6.3 mm stereo jack (Lmono, R) 2 x 6.3 mm stereo jack (Lmono, R)
Stereo Line Input Type: unbalanced unbalanced
Frequency Response Stereo Line Input: 10 - 45,000 Hz 10 - 45,000 Hz
Amplification Range Stereo Line Input: 50 dB 50 dB
Channel Crosstalk: 62 dB 62 dB
THD Stereo Line Input: 0.0045% 0.0045%
Impedance Stereo Line Input: 3.7 kOhm 3.7 kOhm
S/N Ratio Stereo Line Input: 116 dB 116 dB
Stereo Channel Equalizer Treble: +/-15 dB @ 12 kHz +/-15 dB @ 12 kHz
Stereo Channel Equalizer Bass: +/-15 dB @ 80 Hz +/-15 dB @ 80 Hz
Control Elements Channels 3/4 + 5/6 EQ Hi, EQ Low, Aux, Bal, Level EQ Hi, EQ Low, DFX, Bal, Level
Main Section:
AUX/Effect Send Channels: 11
AUX/Effect Send Connections: 6.3 mm stereo jack, unbalanced 6.3 mm stereo jack, unbalanced
Stereo AUX Return Channels: 11
Stereo AUX Return Connections: 2 x 6.3 mm stereo jack 2 x 6.3 mm stereo jack
Stereo 2 TK Output Channel: 1 x stereo 1 x stereo
Stereo 2 TK Output Channel Connections: 2 x RCA (Cinch) 2 x RCA (Cinch)
Stereo 2 TK Input Channel: 1 x stereo 1 x stereo
Stereo 2 TK Input Channel Connections: 2 x RCA (Cinch) 2 x RCA (Cinch)
Unbalanced Stereo Main Outputs: 1 1
Unbalanced Stereo Main Output Connections: 6.3 mm stereo jack, unbalanced 6.3 mm stereo jack, unbalanced
| Impedance Unbalanced Stereo Main Outputs: | 120 ohms 120 ohms | |
| Max. Level Unbalanced Stereo Main Outputs: | 20 dBV 20 dBV | |
| Stereo Control Room Outputs: 1 1 | ||
| Stereo Control Room Output Connections: 2 x 6.3 mm jack 2 x 6.3 mm jack | ||
| Headphone Output: 1 1 | ||
| Headphone Output Connections: 6.3 mm stereo jack 6.3 mm stereo jack | ||
| Minimum Headphone Impedance: 30 ohms 30 ohms | ||
| Digital Effects Processor: | n/a | yes |
| No. of Presets: | n/a | 16 |
| Foot Switch Connection DFX Mute: | n/a | 6.3 mm jack (foot switch optional) |
| Control Elements Main Section: | ST Return, 2 TK In, 2 TK In To Main/To CTRL, Phones/CTRL, Phantom Power +48V, Main Mix, Power | DFX Presets, DFX Mute, DFX to Main, ST Return, 2 TK In, 2 TK In To Main/To CTRL, Phones/CTRL, Phantom Power +48V, Main Mix, Power |
| Specifications: | ||
| Display Elements: | Channel Peak, Power, Phantom Power, 2 x 4-segment level display | Channel Peak, Effects Peak, Power, Phantom Power, 2 x 4-segment level display |
| Power Supply: | 18V DC / 1A, External PSU (included) | 18V DC / 1A, External PSU (included) |
| Temperature Range For Operation: | 0°C to +45°C | 0°C to +45°C |
| Humidity Range For Operation: | 10%rel - 80%rel | 10%rel - 80%rel |
| Width: | 209 mm | 209 mm |
| Height: | 68 mm 68 mm | |
| Depth: | 260 mm | 260 mm |
| Weight: | 1.45 kg | 1.45 kg |
| Other Features: | microphone stand adapter optional (LDVIB-ZMSADAPTOR) | microphone stand adapter optional (LDVIB-ZMSADAPTOR) |
MANUFACTURER'S DECLARATIONS
MANUFACTURER'S WARRANTY & LIMITATIONS OF LIABILITY
You can find our current warranty conditions and limitations of liability at: http://www.adamhall.com/media/shop/downloads/documents/manufacturersdeclarations.pdf. To request warranty service for a product, please contact Adam Hall GmbH, Adam-Hall-Str. 1, 61267 Neu Anspach / Email: Info@adamhall.com / +49 (0)6081 / 9419-0.

CORRECT DISPOSAL OF THIS PRODUCT
(valid in the European Union and other European countries with a differentiated waste collection system)
This symbol on the product, or on its documents indicates that the device may not be treated as household waste. This is to avoid environmental damage or personal injury due to uncontrolled waste disposal. Please dispose of this product separately from other waste and have it recycled to promote sustainable economic activity. Household users should contact either the retailer where they purchased this product, or their local government office, for details on where and how they can recycle this item in an environmentally friendly manner. Business users should contact their supplier and check the terms and conditions of the purchase contract. This product should not be mixed with other commercial waste for disposal.
FCC STATEMENT
- This device complies with Part 15 of the FCC Rules. Operation is subject to the following two conditions:
(1) This device may not cause harmful interference, and
(2) This device must accept any interference received, including interference that may cause undesired operation - any Changes or modifications not expressly approved by the party responsible for compliance could void the user's authority to operate the equipment.
NOTE: This equipment has been tested and found to comply with the limits for a Class B digital device, pursuant to Part 15 of the FCC Rules. These limits are designed to provide reasonable protection against harmful interference in a residential installation.
This equipment generates uses and can radiate radio frequency energy and, if not installed and used in accordance with the instructions, may cause harmful interference to radio communications. However, there is no guarantee that interference will not occur in a particular installation.
If this equipment does cause harmful interference to radio or television reception, which can be determined by turning the equipment off and on, the user is encouraged to try to correct the interference by one or more of the following measures:
- Reorient or relocate the receiving antenna.
- Increase the separation between the equipment and receiver.
- Connect the equipment into an outlet on a circuit different from that to which the receiver is connected.
- Consult the dealer or an experienced radio/TV technician for help.
CE COMPLIANCE
Adam Hall GmbH states that this product meets the following guidelines (where applicable):
R&TTE (1999/5/EC) or RED (2014/53/EU) from June 2017
Low voltage directive (2014/35/EU)
EMV directive (2014/30/EU)
RoHS (2011/65/EU)
The complete declaration of conformity can be found at www.adamhall.com.
Furthermore, you may also direct your enquiry to info@adamhall.com.
UKCA-CONFORMITY
Hereby, Adam Hall Ltd. declares that this product meets the following guidelines (where applicable)
Electrical Equipment (Safety) Regulations 2016
Electromagnetic Compatibility Regulations 2016 (SI 2016/1091)
The Restriction of the Use of Certain Hazardous Substances in Electrical and Electronic Equipment Regulation 2012 (SI 2012/3032)
Radio Equipment Regulations 2017 (SI 2016/2015)
UKCA-DECLARATION OF CONFORMITY
Products that are subject to Electrical Equipment (Safety) Regulation 2016, EMC Regulation 2016 or RoHS Regulation can be requested at info@adamhall.com.
Products that are subject to the Radio Equipments Regulations 2017 (SI2017/1206) can be downloaded from
www.adamhall.com/compliance/
EU DECLARATION OF CONFORMITY
Hereby, Adam Hall GmbH declares that this radio equipment type is in compliance with Directive 2014/53/EU.
The full text of the EU declaration of conformity is available at the following
internet address: www.adamhall.com/compliance/
DEUTSCH

1 MIC IN KANAL 1 / 2
RL OUT and the headphone output PHONES (not pressed down = TO MAIN), or exclusively to the stereo line output CTRL OUT and the headphone output PHONES (pressed down = TO CTRL).
32 MAIN MIX OUT
natural_image
Close-up of a black metal mechanical component with two protruding pins (no text or symbols visible)LDVIBZMSADAPTOR
TECHNISCHE DATEN
Bedienelemente Kanal 3/4 - 5/6: EQ Hi, EQ Low, Aux, Bal, Level EQ Hi, EQ Low, DFX, Bal, Level
Main Section:
APPAREILS RELIÉS AU SECTEUR
1 ENTRÉES MICRO VOIES 1 / 2
19 DFX TO MAIN (LDVIBZ6D UNIQUEMENT)
natural_image
Mechanical clamp or bracket component with black metal parts and a square top (no visible text or symbols)LDVIBZMSADAPTOR
CARACTÉRISTIQUES TECHNIQUES
(Valid in the European Union and other European countries with waste separation)
DÉCLARATION DE CONFORMITÉ CE
natural_image
Close-up of a black metal clamp or bracket with two clamps and a handle (no text or symbols visible)LDVIBZMSADAPTOR
CARACTERÍSTICAS TÉCNICAS
| Controles de canales 1 - 2: | Gain, EQ Hi, EQ Mid, EQ Low, Aux, Pan, Level | Gain, EQ Hi, EQ Mid, EQ Low, DFX, Pan, Level |
Canales estéreo:
natural_image
Close-up of a black metal mechanical component with mounting holes and a flat plate (no text or symbols visible)LDVIBZMSADAPTOR
PRZYŁĄCZA, WYMIARY I MONTAŻ
DEKLARACJA ZGODNOŚCI WE
natural_image
Black metal mechanical clamp or bracket with mounting holes and a flat top (no text or symbols visible)LDVIBZMSADAPTOR
DATI TECNICI
natural_image
Abstract geometric pattern with overlapping translucent planes (no text or symbols)
- CONTENTS / INHALTSVERZEICHNIS / CONTENU / CONTENIDO / TREŚĆ / CONTENUTO
- ENGLISH
- DEUTSCH
- PREVENTIVE MEASURES
- FOR EQUIPMENT THAT CONNECTS TO THE POWER MAINS
- CAUTION:
- CAUTION! HIGH VOLUMES IN AUDIO PRODUCTS!
- INTRODUCTION
- LDVIBZ6 - 6-channel Mixer
- LDVIBZ6D - 6-channel Mixer with Digital Effects Device
- QUICK START GUIDE WITH CABLING EXAMPLE
- CONNECTIONS, CONTROLS AND INDICATORS
- MIC IN CHANNEL 1 / 2
- LINE IN CHANNEL 1 / 2
- GAIN CHANNEL 1 / 2
- EQUALIZER HI CHANNEL 1 / 2
- EQUALIZER MID CHANNEL 1 / 2
- EQUALIZER LOW CHANNEL 1 / 2
- LEVEL DFX / AUX POST CHANNEL 1 / 2
- PAN L / R CHANNEL 1 / 2
- PEAK-LED CHANNEL 1 / 2
- LEVEL CHANNEL 1 / 2
- LINE IN L / R CHANNEL 3/4 OR 5/6
- EQUALIZER HI CHANNEL 3/4 OR 5/6
- EQUALIZER LOW CHANNEL 3/4 OR 5/6
- LEVEL DFX / AUX POST CHANNEL 3/4 OR 5/6
- BAL L / R CHANNEL 3/4 OR 5/6
- PEAK-LED CHANNEL 3/4 OR 5/6
- LEVEL CHANNEL 3/4 OR 5/6
- DFX PRESETS (MODEL LDVIBZ6D ONLY)
- DFX TO MAIN (MODEL LDVIBZ6D ONLY)
- DFX PEAK LED (MODEL LDVIBZ6D ONLY)
- DFX MUTE (MODEL LDVIBZ6D ONLY)
- DFX MUTE FOOTSWITCH (MODEL LDVIBZ6D ONLY)
- EFFECTS LIST (MODEL LDVIBZ6D ONLY)
- ST RETURN L / R
- ST RETURN
- PHONES
- CTRL OUT L / R
- PHONES / CTRL
- 2 TK IN
- 2 TK IN LEVEL
- 2 TK IN TO MAIN / TO CTRL
- MAIN MIX OUT
- TK OUT
- MAIN MIX
- OUTPUT METER
- AUX SEND
- +48V ON / OFF
- DC ADAPTOR IN
- POWER ON / OFF
- POWER LED
- SPECIFICATIONS
- MANUFACTURER'S DECLARATIONS
- MANUFACTURER'S WARRANTY & LIMITATIONS OF LIABILITY
- CORRECT DISPOSAL OF THIS PRODUCT
- FCC STATEMENT
- CE COMPLIANCE
- UKCA-CONFORMITY
- UKCA-DECLARATION OF CONFORMITY
- EU DECLARATION OF CONFORMITY
- MIC IN KANAL 1 / 2
- MAIN MIX OUT
- TECHNISCHE DATEN
- APPAREILS RELIÉS AU SECTEUR
- ENTRÉES MICRO VOIES 1 / 2
- DFX TO MAIN (LDVIBZ6D UNIQUEMENT)
- CARACTÉRISTIQUES TECHNIQUES
- DÉCLARATION DE CONFORMITÉ CE
- CARACTERÍSTICAS TÉCNICAS
- DEKLARACJA ZGODNOŚCI WE
- DATI TECNICI
Brand : LD Systems
Model : VIBZ 6
Category : Mixer