
GKS 140 Professional - Saw BOSCH - Free user manual and instructions
Find the device manual for free GKS 140 Professional BOSCH in PDF.
| Brand | Bosch |
| Model | GKS 140 Professional |
| Product type | Circular saw |
| Nominal power input | 1400 W |
| No-load speed | 6200 tr/min |
| Max. cutting depth (0°) | 64 mm |
| Max. cutting depth (45°) | 45 mm |
| Blade diameter | 184 mm |
| Max. blade thickness | 2.0 mm |
| Bore | 20 mm |
| Base plate dimensions | 290 x 150 mm |
| Weight | 3.7 kg |
| Sound pressure level | 96 dB(A) |
| Sound power level | 107 dB(A) |
| Vibration (sawing wood) | < 2.5 m/s² |
| Spindle lock | Yes |
| Depth adjustment | Yes, with clamping lever |
| Bevel angle adjustment | 0° to 45° |
| Protection guard | Pendulum action |
| Parallel guide | Yes |
| Dust extraction adapter | Yes, diameter 35 mm |
| Power supply type | Mains (corded) |
| Maintenance | Regular cleaning, guard check |
| Included accessories | Saw blade, hex key, parallel guide |
Frequently Asked Questions - GKS 140 Professional BOSCH
User questions about GKS 140 Professional BOSCH
0 question about this device. Answer the ones you know or ask your own.
Ask a new question about this device
Download the instructions for your Saw in PDF format for free! Find your manual GKS 140 Professional - BOSCH and take your electronic device back in hand. On this page are published all the documents necessary for the use of your device. GKS 140 Professional by BOSCH.
USER MANUAL GKS 140 Professional BOSCH
GKS 140 Professional
Robert Bosch Power Tools GmbH
70538 Sutpart
GERMANY
www.bosch-pt.com
160992A62L(2020.11)O/74

160992A62L
en Original instructions
fr Notice originale
pt Manual original
zh正本使用说明书
zh原始使用说明
th mtaaannnna
2
Petunipk-Petunikuntuk
Penggunaan Orisinal.
Bangc hongdan sucung
ar
fa 15nol15nimjaojiia

2
English Page 6
Francais.. Page 11
Portugues. Pagina 18
中文 页24
繁體中文. 29
Inu. 34
General Power Tool SafetyWarnings
WARNING
Read all safety warnings, instructions, illustrations and specifica
tions provided with this power tool. Failure to follow all instructions listed below may result in electric shock, fire and/ or serious injury.
Save all warnings and instructions for future reference.
The term "power tool" in the warnings refers to your mains-operated (corded) power tool or battery-operated (cordless) power tool.
Work area safety
- Keep work area clean and well lit. Cluttered or dark areas invite accidents.
Do not operate power tools in explosive atmospheres, such as in the presence of flammable liquids, gases or dust. Power tools create sparks which may ignite the dust or fumes. - Keep children and bystanders away while operating a power tool. Distractions can cause you to lose control.
Electrical safety
Power tool plugs must match the outlet. Never modify the plug in any way. Do not use any adapter plugs with earthed (grounded) power tools. Unmodified plugs and matching outlets will reduce risk of electric shock.
- Avoid body contact with earthed or grounded surfaces, such as pipes, radiators, ranges and refrigerators. There is an increased risk of electric shock if your body is earthed or grounded.
Do not expose power tools to rain or wet conditions. Water entering a power tool will increase the risk of electric shock.
Do not abuse the cord. Never use the cord for carrying, pulling or unplugging the power tool. Keep cord away from heat, oil, sharp edges or moving parts. Damaged or entangled cords increase the risk of electric shock.
When operating a power tool outdoors, use an extension cord suitable for outdoor use. Use of a cord suitable for outdoor use reduces the risk of electric shock.
If operating a power tool in a damp location is unavoidable, use a residual current device (RCD) protected supply. Use of an RCD reduces the risk of electric shock.
Personal safety
Stay alert, watch what you are doing and use common sense when operating a power tool. Do not use a power tool while you are tired or under the influence of drugs, alcohol or medication. A moment of inatten
tion while operating power tools may result in serious personal injury.
Use personal protective equipment. Always wear eye protection. Protective equipment such as a dust mask, non-skid safety shoes, hard hat or hearing protection used for appropriate conditions will reduce personal injuries.
Prevent unintentional starting. Ensure the switch is in the off-position before connecting to power source and/or battery pack, picking up or carrying the tool. Carrying power tools with your finger on the switch or energising power tools that have the switch on invites accidents.
- Remove any adjusting key or wrench before turning the power tool on. A wrench or a key left attached to a rotating part of the power tool may result in personal injury.
Do not overreach. Keep proper footing and balance at all times. This enables better control of the power tool in unexpected situations.
Dress properly. Do not wear loose clothing or jewellery. Keep your hair and clothing away from moving parts. Loose clothes, jewellery or long hair can be caught in moving parts.
If devices are provided for the connection of dust extraction and collection facilities, ensure these are connected and properly used. Use of dust collection can reduce dust-related hazards.
Do not let familiarity gained from frequent use of tools allow you to become complacent and ignore tool safety principles. A careless action can cause severe injury within a fraction of a second.
Power tool use and care
Do not force the power tool. Use the correct power tool for your application. The correct power tool will do the job better and safer at the rate for which it was designed.
Do not use the power tool if the switch does not turn it on and off. Any power tool that cannot be controlled with the switch is dangerous and must be repaired.
- Disconnect the plug from the power source and/or remove the battery pack, if detachable, from the power tool before making any adjustments, changing accessories, or storing power tools. Such preventive safety measures reduce the risk of starting the power tool accidentally.
- Store idle power tools out of the reach of children and do not allow persons unfamiliar with the power tool or these instructions to operate the power tool. Power tools are dangerous in the hands of untrained users.
- Maintain power tools and accessories. Check for misalignment or binding of moving parts, breakage of parts and any other condition that may affect the power tool's operation. If damaged, have the power tool repaired before use. Many accidents are caused by poorly maintained power tools.
- Keep cutting tools sharp and clean. Properly maintained cutting tools with sharp cutting edges are less likely to bind and are easier to control.
Use the power tool, accessories and tool bits etc. in accordance with these instructions, taking into account the working conditions and the work to be performed. Use of the power tool for operations different from those intended could result in a hazardous situation. - Keep handles and grasping surfaces dry, clean and free from oil and grease. Slippery handles and grasping surfaces do not allow for safe handling and control of the tool in unexpected situations.
Service
Have your power tool serviced by a qualified repair person using only identical replacement parts. This will ensure that the safety of the power tool is maintained.
Safety instructions for circular saws
Cutting procedures
BANGER: Keep hands away from cutting area and the blade. Keep your second hand on auxiliary handle, or motor housing. If both hands are holding the saw, they cannot be cut by the blade.
Do not reach underneath the workpiece. The guard cannot protect you from the blade below the workpiece.
Adjust the cutting depth to the thickness of the workpiece. Less than a full tooth of the blade teeth should be visible below the workpiece.
- Never hold the workpiece in your hands or across your leg while cutting. Secure the workpiece to a stable platform. It is important to support the work properly to minimise body exposure, blade binding, or loss of control.
Hold the power tool by insulated gripping surfaces, when performing an operation where the cutting tool may contact hidden wiring or its own cord. Contact with a "live" wire will also make exposed metal parts of the power tool "live" and could give the operator an electric shock.
When ripping always use a rip fence or straight edge guide. This improves the accuracy of cut and reduces the chance of blade binding.
Always use blades with correct size and shape (diamond versus round) of arbour holes. Blades that do not match the mounting hardware of the saw will run off-centre, causing loss of control.
- Never use damaged or incorrect blade washers or bolt. The blade washers and bolt were specially designed for your saw, for optimum performance and safety of operation.
Kickback causes and related warnings
-
kickback is a sudden reaction to a pinched, jammed or misaligned saw blade, causing an uncontrolled saw to lift up and out of the workpiece toward the operator;
-
when the blade is pinched or jammed tightly by the kerf closing down, the blade stalls and the motor reaction drives the unit rapidly back toward the operator;
- if the blade becomes twisted or misaligned in the cut, the teeth at the back edge of the blade can dig into the top surface of the wood causing the blade to climb out of the kerf and jump back toward the operator.
Kickback is the result of saw misuse and/or incorrect operating procedures or conditions and can be avoided by taking proper precautions as given below.
- Maintain a firm grip with both hands on the saw and position your arms to resist kickback forces. Position your body to either side of the blade, but not in line with the blade. Kickback could cause the saw to jump backwards, but kickback forces can be controlled by the operator, if proper precautions are taken.
When blade is binding, or when interrupting a cut for any reason, release the trigger and hold the saw motionless in the material until the blade comes to a complete stop. Never attempt to remove the saw from the work or pull the saw backward while the blade is in motion or kickback may occur. Investigate and take corrective actions to eliminate the cause of blade binding. - When restarting a saw in the workpiece, centre the saw blade in the kerf so that the saw teeth are not engaged into the material. If a saw blade binds, it may walk up or kickback from the workpiece as the saw is restarted.
Support large panels to minimise the risk of blade pinching and kickback. Large panels tend to sag under their own weight. Supports must be placed under the panel on both sides, near the line of cut and near the edge of the panel.
Do not use dull or damaged blades. Unsharpened or improperly set blades produce narrow kerf causing excessive friction, blade binding and kickback. - Blade depth and bevel adjusting locking levers must be tight and secure before making the cut. If blade adjustment shifts while cutting, it may cause binding and kickback.
Use extra caution when sawing into existing walls or other blind areas. The protruding blade may cut objects that can cause kickback.
Lower guard function
Check the lower guard for proper closing before each use. Do not operate the saw if the lower guard does not move freely and close instantly. Never clamp or tie the lower guard into the open position.If the saw is accidentally dropped, the lower guard may be bent. Raise the lower guard with the retracting handle and make sure it moves freely and does not touch the blade or any other part, in all angles and depths of cut.
Check the operation of the lower guard spring. If the guard and the spring are not operating properly, they must be serviced before use. Lower guard may operate
8 | English
sluggishly due to damaged parts, gummy deposits, or a build-up of debris.
The lower guard may be retracted manually only for special cuts such as "plunge cuts" and "compound cuts". Raise the lower guard by the retracting handle and as soon as the blade enters the material, the lower guard must be released. For all other sawing, the lower guard should operate automatically.
Always observe that the lower guard is covering the blade before placing the saw down on bench or floor. An unprotected, coasting blade will cause the saw to walk backwards, cutting whatever is in its path. Be aware of the time it takes for the blade to stop after switch is released.
Additional safety warnings
Do not allow the chip ejector to come into contact with your hands. You may be injured by rotating parts.
Do not use the saw above the level of your head. Doing so will mean you have inadequate control of the power tool.
Use suitable detectors to determine if utility lines are hidden in the work area or call the local utility company for assistance. Contact with electric lines can lead to fire and electric shock. Damaging a gas line can lead to explosion. Penetrating a water line causes property damage or may cause an electric shock.
Hold the power tool firmly with both hands and make sure you have a stable footing. The power tool can be more securely guided with both hands.
Do not operate the power tool when stationary. It is not suitable for operation with a saw table.
When performing plunge cuts which are not right-angled, secure the guide plate of the saw so that it will not shift sideways. In the event of a sideways shift, the saw blade may become jammed, which could lead to kickback.
- Secure the workpiece. A workpiece clamped with clamping devices or in a vice is held more secure than by hand.
Always wait until the power tool has come to a complete stop before placing it down. The application tool can jam and cause you to lose control of the power tool.
Do not use HSS saw blades. Such saw blades can easily break.
Do not saw any ferrous metals. Hot chips may ignite the dust extractor.
Wear a dust mask.
Products sold in GB only:
Your product is fitted with an BS 1363/A approved electric plug with internal fuse (ASTA approved to BS 1362). If the plug is not suitable for your socket outlets, it should be cut off and an appropriate plug fitted in its place by an authorised customer service agent. The replacement plug should have the same fuse rating as the original plug.
The severed plug must be disposed of to avoid a possible shock hazard and should never be inserted into a mains socket elsewhere.
Product Description and Specifications

Read all the safety and general instructions. Failure to observe the safety and general instructions may result in electric shock, fire and/or serious injury.
Please observe the illustrations at the beginning of this operating manual.
Intended use
The power tool is intended for making straight cuts in wood with and against the grain and litre cuts in wood while resting firmly against the workpiece.
Product Features
The numbering of the product features refers to the diagram of the power tool on the graphics page.
(1) On/off switch
(2) Lock-off function for on/off switch
3) Auxiliary handle (insulated gripping surface)
(4) Spindle lock button
(5) Scale for metre/bevel angles
(6) Wing bolt for metre/bevel angle preselection
(7) Wing bolt for parallel guide
(8) 45^ cut marl
(9) 0^ cut mark
(10) Parallel guide
(11) Retracting blade guard
(12) Base plate
(13) Adjusting lever for retracting blade guard
(14) Chip ejector
(15) Protective guard
(16) Handle (insulated gripping surface)
(17) Hex key
(18) Clamping bolt with washer
(19) Clamping flange
(20) Circular saw blade
(21) Saw spindle with mounting flange
(22) Clamping lever for cutting depth preselection
(23) Cutting depth scale
(24) Pair of screw clamps
(25) Dust extraction adapter
(26) Fastening screw for dust extraction adapter
A) Accessories shown or described are not included with the product as standard. You can find the complete selection of accessories in our accessories range.
B) Commercially available (not included in the scope of delivery)
Technical Data
| Hand-held circular saw GKS 140 | |
| Article number | 3601 FB30.. |
| Rated power input W 1400 | |
| No-load speed min | -1 6200 |
| Max. cutting depth with 184 mm saw blade diameter | |
| - at a 0° litre/bevel angle mm 64 | |
| - at a 45° litre/bevel angle mm 45 | |
| Spindle lock | |
| Base plate dimensions mm 290 x 150 | |
| Max./min. saw blade diameter | mm 184 |
| Max. base blade thickness mm 2.0 | |
| Locating bore mm 20 | |
| Weight according to EPTA-Procedure 01:2014 | kg 3.7 |
| Protection class | ☐/☐ |
The specifications apply to a rated voltage [U] of 230 V. These specifications may vary at different voltages and in country-specific models.
Turn-on transients cause brief drops in voltage. Interference with other tools may occur in the event of unfavourable conditions in the electricity supply. Malfunctions are not to be expected for system impedances below 1,539 ohm.
Noise/vibration information
Noise emission values determined according to EN 62841-2-5.
Typically, the A-weighted noise level of the power tool is: Sound pressure level 96 dB(A); sound power level 107 dB(A). Uncertainty K = 3 dB.
Wear hearing protection!
Vibration total values a, (triax vector sum) and uncertainty K determined according to EN 62841-2-5:
Sawing wood: a_h < 2.5 m/s^2 , K = 1.5 m/s^2
The vibration level and noise emission value given in these instructions have been measured in accordance with a standardised measuring procedure and may be used to compare power tools. They may also be used for a preliminary estimation of vibration and noise emissions.
The stated vibration level and noise emission value represent the main applications of the power tool. However, if the power tool is used for other applications, with different application tools or is poorly maintained, the vibration level and noise emission value may differ. This may significantly increase the vibration and noise emissions over the total working period.
To estimate vibration and noise emissions accurately, the times when the tool is switched off or when it is running but not actually being used should also be taken into account. This may significantly reduce vibration and noise emissions over the total working period.
Implement additional safety measures to protect the operator from the effects of vibration, such as servicing the power tool and application tools, keeping their hands warm, and organising workflows correctly.
Fitting
Only use saw blades the maximum permitted speed of which is higher than the no-load speed of the power tool.
Inserting/changing the circular saw blade
Pull the plug out of the socket before carrying out any work on the power tool.
Wear protective gloves when fitting the saw blade. Danger of injury when touching the saw blade.
Do not use abrasive wheels as the application tool under any circumstances.
Only use saw blades that match the specifications given in this operating manual and that are tested and marked in accordance with EN 847-1
Removing the saw blade (see figure A)
To change tools, we recommend that you place the power tool down on the front side of the motor housing.
- Press and hold the spindle lock button (4).
Do not press the spindle lock button (4) while the saw spindle is moving. The power tool may become damaged if this happens.
- Use the hex key (17) to undo the clamping bolt (18) in rotational direction 0.
- Swing the retracting blade guard (11) back and hold on to it firmly.
- Remove the clamping flange (19) and the saw blade (20) from the saw spindle with mounting flange (21).
Selecting the saw blade
You will find an overview of recommended saw blades at the end of these operating instructions.
Fitting the Saw Blade (see figure A)
To change tools, we recommend that you place the power tool down on the front side of the motor housing.
Clean the saw blade (20) and all the clamping elements to be fitted.
- Swing the retracting blade guard (11) back and hold on to it firmly.
- Place the saw blade (20) on the saw spindle with mounting flange (21). The cutting direction of the teeth (direction of the arrow on the saw blade) must match the rotational direction of the arrow on the protective guard (15).
10 | English
- Attach the clamping flange (19) and screw in the clamping bolt (18) in rotational direction. Ensure that the saw spindle with mounting flange (21) and clamping flange (19) are installed in the correct position.
- Press and hold the spindle lock button (4).
- Use the hex key (17) to tighten the clamping bolt (18) in rotational direction. The tightening torque should be 6–9 Nm, which corresponds to hand-tight plus 14 turn.
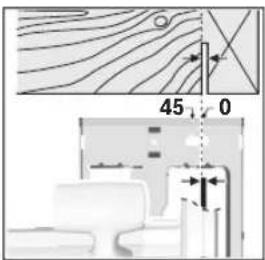
Dust/chip extraction
The dust from materials such as lead paint, some types of wood, minerals and metal can be harmful to human health. Touching or breathing in this dust can trigger allergic reactions and/or cause respiratory illnesses in the user or in people in the near vicinity.
Certain dusts, such as oak or beech dust, are classified as carcinogenic, especially in conjunction with wood treatment additives (chromate, wood preservative). Materials containing asbestos may only be machined by specialists.
- Use a dust extraction system that is suitable for the material wherever possible.
- Provide good ventilation at the workplace.
- It is advisable to wear a P2 filter class breathing mask.
The regulations on the material being machined that apply in the country of use must be observed.
- Avoid dust accumulation at the workplace. Dust can easily ignite.
Fitting the dust extraction adapter (see figure E)
Push the dust extraction adapter (25) onto the chip ejector (14) until it clicks into place. Then secure the dust extraction adapter (25) in place with the screw (26).
A dust extraction hose with a diameter of 35mm can be connected to the dust extraction adapter (25).
The dust extraction adapter must only be fitted if an external dust extraction system is connected. Otherwise the extraction duct can become clogged.
No dust bags should be connected to the dust extraction adapter. Otherwise the extraction system can become clogged.
To ensure optimum extraction, the dust extraction adapter (25) must be cleaned regularly.
Operation
Pull the plug out of the socket before carrying out any work on the power tool.
Operating modes
Setting the Cutting Depth (see figure B)
Adapt the cutting depth to the thickness of the workpiece. A space of less than the height of one full tooth should be visible under the workpiece.
Loosen the clamping lever (22). For a smaller cutting depth, pull the saw away from the base plate (12); for a larger cutting depth, push the saw towards the base plate (12). Adjust
the desired cutting depth at the cutting-depth scale. Retighten the clamping lever (22).
If you are unable to fully adjust the cutting depth after loosening the clamping lever (22), pull the clamping lever (22) away from the saw and swivel it downwards. Loosen the clamping lever (22) again. Repeat this process until the required cutting depth can be set.
If you are unable to adequately fix the cutting depth after tightening the clamping lever (22), pull the clamping lever (22) away from the saw and swivel it upwards. Loosen the clamping lever (22) again. Repeat this process until the cutting depth is fixed.
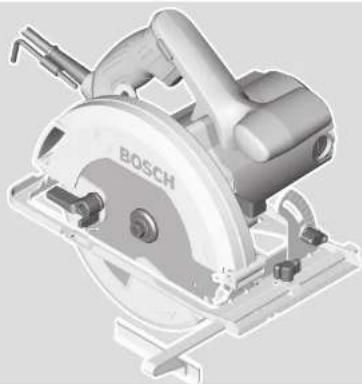
Adjusting the Mitre/Bevel Angle
We recommend that you place the power tool down on the front side of the protective guard (15).
Loosen the wing bolt (6). Swivel the saw to the side. Set the required litre angle on the scale (5). Retighten the wing bolt (6).
Note: When making litre cuts, the cutting depth is less than the value shown on the cutting depth scale (23).
Cut marks
The 0^ cut mark (9) indicates the position of the saw blade when making a right-angled cut. The 45^ cut mark (8) indicates the position of the saw blade when making a 45^ cut.
For a precise cut, place the circular saw against the workpiece as shown in the figure.
We recommend making a test cut.
Start-up
Pay attention to the mains voltage. The voltage of the power source must match the voltage specified on the rating plate of the power tool. Power tools marked with 230 V can also be operated with 220 V.
▶ Products that are only sold in AUS and NZ: Use a residual current device (RCD) with a nominal residual current of 30 mA or less.
Switching on/off
Make sure that you are able to press the On/Off switch without releasing the handle.
To start the power tool, first press the lock-off switch (2), then press and hold the on/off switch (1).
To switch off the power tool, release the on/off switch (1).
Note: For safety reasons, the on/off switch (1) cannot be locked; it must remain pressed during the entire operation.
Practical advice
Pull the plug out of the socket before carrying out any work on the power tool.
The width of cut varies depending on the saw blade used.
Protect saw blades against shock and impact.
Guide the power tool evenly, pushing it gently in the cutting direction. Applying too much pressure to the power tool when moving it in the cutting direction significantly reduces the service life of the application tools and can damage the power tool.
The sawing performance and the quality of the cut essentially depend on the condition and the tooth shape of the saw blade. This is why you should only use sharp saw blades that are suitable for the material being machined.
Sawing wood
Choosing the right saw blade depends on the wood type, wood quality and whether cuts with or against the grain are required.
Making cuts in spruce with the grain produces long, spiral-shaped chips.
Beech and oak dust is especially detrimental to health.
Therefore, work only with dust extraction.
Sawing with a parallel guide (see figure C)
The parallel guide (10) allows you to make precise cuts along the edge of a workpiece and cut strips with the same dimensions.
Loosen the wing bolt (7) and slide the scale of the parallel guide (10) through the guide in the base plate (12). Adjust the desired cutting width as a scale value at the corresponding (9) or (8) cut mark, see the section "Cut marks". Retighten the wing bolt (7).
Sawing with an auxiliary guide (see figure D)
For working on large workpieces or for cutting straight edges, you can securely fasten a board or rail to the workpiece as an auxiliary guide. The circular saw can be guided along the path of this auxiliary guide with the base plate.
Maintenance and Service
Maintenance and Cleaning
Pull the plug out of the socket before carrying out any work on the power tool.
To ensure safe and efficient operation, always keep the power tool and the ventilation slots clean.
In order to avoid safety hazards, if the power supply cord needs to be replaced, this must be done by Bosch or by an after-sales service centre that is authorised to repair Bosch power tools.
The retracting blade guard must always be able to move freely and retract automatically. It is therefore important to keep the area around the retracting blade guard clean at all times. Remove dust and chips with a paintbrush.
Non-coated saw blades can be protected against corrosion using a thin layer of acid-free oil. Remove the oil again before sawing as failure to do so will stain the wood.
Resin or glue residue on the saw blade has a detrimental effect on the quality of the cut. You should therefore clean saw blades straight after use.
After-Sales Service and Application Service
Our after-sales service responds to your questions concerning maintenance and repair of your product as well as spare parts. You can find explosion drawings and information on spare parts at: www.bosch-pt.com
The Bosch product use advice team will be happy to help you with any questions about our products and their accessories.
In all correspondence and spare parts orders, please always include the 10-digit article number given on the nameplate of the product.
Malaysia
Robert Bosch Sdn. Bhd.(220975-V) PT/SMY
No.8A,Jalan 13/6
46200 Petaling Jaya
Selangor
Tel.: (03) 79663194
Toll-Free: 1800 880188
Fax: (03) 79583838
E-Mail: kiathoe.chong@my.bosch.com
www.bosch-pt.com.my
You can find further service addresses at:
www.bosch-pt.com/serviceaddresses
Disposal
The power tool, accessories and packaging should be recycled in an environmentally friendly manner.

Do not dispose of power tools along with household waste.
Français
Robert Bosch Morocco SARL
53, Rue Lieutenant Mahroud Mohamed
20300 Casablanca
Tel.: +212 5 29 31 43 27
E-Mail: sav.outillage@ma.bosch.com
www.bosch-pt.com/serviceaddresses
www.bosch-pt.com/serviceaddresses
Eliminação
www.bosch-pt.com/serviceaddresses
处理废弃物
www.bosch-pt.com/serviceaddresses
廢棄物處理
yuuuunuunuunuunuunuunuunuunuunuunuunuunuunuunuunuunuunuunuunuunuunuunuunuunuunuunuunuunuunuunuunuunuunuunuunuunuunuunuunu
aunnnnnae nannnne nnnnne nnnnne nnnnne nnnnne nnnnne nnnnne nnnnne nnnnne nnnnne nnnnne nnnnne nnnnne nnnnne nnnnne nnnnne nnnnne nnnnne nnnnne nnnnne nnnnne nnnnne nnnnne nnnnne nnnnne nnnnne nannnee
nnaa nnuuauuunnnnauuuu uuuuuaauuuuuuuuuuuuuuuuuuuuuuuuuuuuuuuuuuuuuuuuuuuuuuuuuuuuuuuuuuuuuuuuuuuuuuuuuuuuuuuuuuuuuuuuuuuuuuuuuuuuuuuuuuuuuuuuuuuuuuuuuuuuuuuuuuuuuuuuuuuuuuuuuuuuuuuuuuuuuuuuuuuuuuuuuuuuuuuuuuuuuuuuuuuuuuuuuUU
Jnnaaunnnnnnnnnnnnnnnnnnnnnnnnnnnnnnnnnnnnnnnnnnnnnnnnnnnnnnnnnnnnnnnnnnnnnnnnnnnnnnnnnnnnnnnnnnnnnnnnnnnnnnnnnnnnnnnnnnnnnnnnnnnnnnnnnnnnn
nVvVvVvVv
nnaananaananaananaananaananaananaananaananaananaananaananaananaananaananaananaananaananaananaananaananaananaananaananaananaananaananaananaananaananaananaananaananaananaananaananaananaananaananaananaananaananaananaananaananaananaananaananaananaananaananaanaraannnnnnnnnnnnnnnnnnnnnnnnnnnnnnnnnnnnnnnnnnnnnnnnnnnnnnnnnnnnnnnnnnnnnnnnnnnnnnnnnnnnnnnnnnnnnnnnnnnnnnnnnnnnnnnnnnnn
nnnnnnnnnnnnnnnnnnnnnnnnnnnnnnnnnnnnnnnnnnnnnnnnnnnnnnnnnnnnnnnnnnnnnnnnnnnnnnnnnnnnnnnnnnnnnnnnnnnnnnnnnnnnnnnnnnnnnnnnnnnnnnn
nannnnn nnnnnnnnnnnnnnnnnnnnnnnnnnnnnnnnnnnnnnnnnnnnnnnnnnnnnnnnnnnnnnnnnnnnnnnnnnnnnnnnnnnnnnnnnnnnnnnnnnnnnnnnnnnnnnnnnnnnnnnnnnnnnnnnnnnnnnnnnn nn nannn nannn nannn nannn nannn nannn nannn nannn nannn nannn nannn nannn nannn nannn nannn nannn nannn nannn nannn nannn nannn nannn nannn nannn nannn nannn nannn nannn nannn nannn nannn nannn nannn nannn nn ann
y
Huaanwanaanaaaannn
aunnnnnaan nannnnae
y
Wnwnnnn nn nnnnnn nn nnnnnn nn nnnnnn nn nnnnnn nn nnnnnn nn nnnnnn nn nnnnnn nn nnnnnn nn nnnnnn nn nnnnnn nn nnnnnn nn nnnnnn nn nnnnnn nn nnnnnn nn nnnnnn nn nnnnnn nn nnnnnn nn nnnnnn nn nnnnnn nn nnnnnn nn nannnnn nn nannnnn nn nannnnn nn nannnnn nn nannnnn nn nannnnn nn nannnnn nn nannnnn nn nannnnn nn nannnnn nn nannnnn nn nannnnn nn nannnnn nn nannnnn nn nannnnn nn nannnnn nn nannnnn nn nannnnn nn nannnnn nn nannnnn nn nennnnn nn nannnnn nn nannnnn nn nannnnn nn nannnnn nn nannnnn nn nannnnn nn nannnnn nn nannnnn nn nannnnn nn nannnnn nn nannnnn nn nannnnn nn
aunauuulwwnnnnaanannnnaanennnnaan anananaan anan anan anan anan anan anan anan anan anan anan anan anan anan anan anan anan anan anan anan anan anan anan anan anan anan anan anan anan anan anan anan anan anan anan anan anan anan anan anan anan anan anan anan anan anan anan anan anan anan anan
aunnnnnae nannnne aen annnne
nnnnnnnnnnnnnnnnnnnnnnnnnnnnnnnnnnnnnnnnnnnnnnnnnnnnnnnnnnnnnnnnnnnnnnnnnnnnnnnnnnnnnnnnnnnnnnnnnnnnnnnnnnnnnnnnnnnnnnnnnnnnnnnnnnnnnnnnnnnnnnnnnnn
aaiiaaiiiaaiiaaaanannnnaaennnnn
Speed Steel, HSS)
aunauanannnnn an annanannnnn anannnnn anannnnn
yua:
#

nnaaannnnnnaanennnnnnaaannnnnnaanannnnnnaanannnnnnaanannnnnnaanannnnnnaanannnnnnaanannnnnnaanannnnnnaanannnnnnaanannnnnnaanannnnnnaanannnnnnaanannnnnnaanannnnnnaanannnnnnaanannnnnnaanannnnnnaanannnnnnaanannnnnnaanannnnnnaanannnnnna anannnnnnaanannnnnnaanannnnnnaanannnnnnaanannnnnnaanannnnnnaanannnnnnaanannnnnnaanannnnnnaanannnnnnaanannnnnnaanannnnnnaanannnnnnaanannnnnnaanannnnnnaanannnnnnaanannnnnnaanannnnnnaanannnnnnaanannnnnna
0°(9)
uunnnnnuuuuu uuuu
uuuuuuuuuuuuu
45°(8)
uunnnnnnuuuuuuuu
uuuuuuuuuuuuu
45°
uunnnnnnuuuuuuu uuuu
1
nssnnnnnnnn
Vivinaunuovulw! u
nwnnnnnae nwnnnnne nnnnne nnnnne nnnnne nnnnne nnnnne nnnnne nnnnne nnnnne nnnnne nnnnne nnnnne nnnnne nnnnne nnnnne nnnnne nnnnne nnnnne nnnnne nnnnne nnnnne nnnnne nnnnne nnnnne nnnnne nnnnne
nnaa
- 1
Jnnaaannnnnnae aenlwnnnae nnnnnae nnne 1 (1)
Daaeauoalwthauaunnaeunn (1)
HJH: 10000000000000000000000000000000000000000000000000000000000
yannnnn
Wanlwaanannnnaaunauuua
nannnnnnnnnnnnnnnnnnnnnnnnnnnnnnnnnnnnnnnnnnnnnnnnnnnnnnnnnnnnnnnnnnnnnnnnnnnnnnnnnnnnnnnnnnnnnn
nannnnnnnnnnnnnnnnnnnnnnnnnnnnnnnnnnnnnnnnnnnnnnnnnnnnnnnnnnnnnnnnnnnnnnnnnnnnnnnnnnnnnnnnnnnnnnnnnnnnnnnnnnnnnnnnnnnnnnnn
40|m
wnnnnnaeennnnnne nnnnnnne
n
nannnnnaanlunauangnanae
nannnnnaanlunauangnanae
nannnnnaanlunauangnanae
nannnnnaanlunauangnanae
nannnnnaanlunauangnanae
nannnnnaanlunauangnanae
nannnnnaanlunauangnanae
nannnnnaanlunauangnanae
nannnnnaanlunauANG
mnnnnaaannnnnnaaennn (nnnnnnnnae
nunnnnnnnu (10) nnnnnnnnnnnnnnnnnnnnnnnnnnnnnnnnnnnnnnnnnnnnnnnnnnnnnnnnnnnnnnnnnnnnnnnnnnnnnnnnnnnnnnnnnnnnnnnnnnnnnnnnnnnnnnnnnnnnnnnnnnnnnnnnnnnnnnnnnnnnnnnnnnnnnnnnnnnnnnnnnn nn (7) nannnnaaannnnaaannnnaaannnnaaannnnaaannnnaaannnnaaannnnaaannnnaaannnnaaannnnaaannnnaaannnnaaannnnaaannnnaaannnnaaannnnaaannnnaaannnnaaannnnaaannnnaaannnnaaannnnaaannnnaaannnnaaannnnaan
nnaeunnnnneennnnnneennnnnneennnnnneennnnnneennnnnneennnnnneennnnnneennnnnneennnnnneennnnnneennnnnneennnnnneennnnnneennnnnneennnnnneennnnnneennnnnneennnnnneennnnnneennnnnneennnnnneennnnnneennnnnneennnnnneennnnnneannnnnneannnnnneannnnnneannnnnneannnnnneannnnnneannnnnneannnnnneannnnnneannnnnneannnnnneannnnnneannnnnneannnnnneannnnnneannnnnneannnnnneannnnnneannnnnneannnnnneannnnnneannnnnneannnnnneannnnnneeannnnnneeannnnnneeannnnnneeannnnnneeann
T
7
Wanlwaonnnnnaaunauu
Wanwnnuuunnuuunnuuauuaaunnnnnae nnne nnnnne aannnnnne
nannnnnnaaennnnnnae nn nnnnne annnnnne Borsch
nnoanennnnnnnnnnnnae nn nnnnnnnnnnnnnnne
nllwnnBosch nnnnnnnnnnnnnnne
nannnnnnnnnnnnnnnnnne
unannnnnnnnnnnnnnnne
nuannnnnnnnnnnnnnnne
nuannnnnnnnnnnnnnnne
nuannnnnnnnnnnnnnnne
nuannnnnnnnnnnnnnnne
nuannnnnnnnnnnnnnnne
nuannnnnnnnnnnnnne
yannnnnnaaannnnnnaanennnnnnnnnnnnnnnnnnnnnnnnnnnnnnnnnnnnnnnnnnnnnnnnnnnnnnnnnnnnnnnnnnnnnnnnnnnnnnnnnnnnnnnnnnnnnnnnnnnnnnnnnnnnnnnnnnnnnnnnnnnn
nwnnnnnaaannnnnnaanrnnnnae
nannnnnnaaannnnnnaanennnnnnaanannnnnnaanannnnnnaanannnnnnaanannnnnnaanannnnnnaanannnnnnaanannnnnnaanannnnnnaanannnnnnaanannnnnnaanannnnnnaanannnnnnaanannnnnnaanannnnnnaanannnnnnaanannnnnnaanannnnnnaanannnnnnaanannnnnnaanannnnnnaanennnnaanannnnnnaanannnnnnaanannnnnnaanannnnnnaanannnnnnaanannnnnnaanannnnnnaanannnnnnaanannnnnnaanannnnnnaanannnnnnaanannnnnnaanannnnnnaanannnnnnaanannnnnnaanannnnnnaanannnnnnaanannnnnnaanannnnnnaanann
W
lny uyn Iuyn uyn uyn
Iowwnla uynon 1 u 5
Iayn 2525 nuwwwn4
uuynnnny uynon nnynn 10110
In: +66 20128888
wny: +66 20645800
www.bosch.co.th
yuuuunnnnnaaannnnnnnnnnnnnnnnnnnnnnnnnnnnnnnnnnnnnnnnnnnnnnnnnnnnnnnnnnnnnnnnnnnnnnnnnnnnnnnnnnnnnnnnnnnnnnnnnnnnnnnnnnnnnnnnnnnnnnnnnnnnnnnnnnnnnnnnnnnnnnnnnn
nunnnnnnnnnnnnnnnnnnnnnnnnnnnnnnnnnnnnnnnnnnnnnnnnnnnnnnnnnnnnnnnnnnnnnnnnnnnnnnnnnnnnnnnnnnnnnnnnnnnnnnnnnnnnnnnnnnnnnnnnnnnnnnnnnnnnnnnnnnnnn
Innwn 027587555
Wn027587525
nannnnnnaaennnnn nnnn
www.bosch-pt.com/serviceaddresses
m
Keselamatan personnel
Palma Tower 10th Floor
Jalan RA Kartini II-S Kaveling 6
Pondok Pinang, Kebayoran Lama
www.bosch-pt.com/serviceaddresses
Caramembuang
Lam trokhicat kim loai
Tônhtàldat dungcu diénlenmat truccua chan bao véluoi (15).
Hāy nha bu-long tai hong (6). Kéo nghiéng cua sang môt bèn. Činh dát co sau cat theo yèu cau trèn thuoc do (5). Siét chat lái bu-long tai hong (6).
Lu y: Khi cat mep vat, c sau cat se nho hon gi a tri duoc hien thi tren thuoc do c sau (23).
Cac Vach Cat

Dau cat 0^ (9) hien thi Viet tri cua luoi cua o vet cat vuong goc. Dau cat 45^ (8) hien thi Viet cua luoi cua o vet cat 45^ . De cat chinh xac, chinh dat may cua dia tua vao vatgia cong nuu da duoc trinh bay trong hinh. Ttot nhat la nen
www.bosch-pt.com/serviceaddresses
Su thai bo
May, linh kien vā bao bi phai duoc phan loai dé tāi che theo huóng than thien voi miǒ truǒng.

Khong duoc thai bó dung cu dien vao chung voi rac sinh hoat!
Iooal jno yolll Jaaowu yao
aJ 1000000000000000000000000000000000000000000000000
Uoal ju 10a caiaiJI JuiJ 0aLgU
Jol
oJg aaiuag ala lo g uaglg uas
auius ooc po siiu X. Jauu uua jy
jU Uo nglo sic gl uao ggl oia
oUuI psc.auggl gl uogll gl Udoall
sauuul oal siuul sic odal all
.ubuul Uu! Uy
sujlg .aaunll aauu Uuuu Uu
aauuul uljauu ulj uagl Uuuu uuu
uuu uauu g uauu no uagll elios aauu uuu
uwu uaglg g uagll uoo uagll
jua uauu uuuu uauu u
Jg Ss Jg Uj Ss Jg Uj 1 gS
Ig Jg g jg g jg jg ju
Jg Jg Jg Jg Jg Jg Jg Jg
g,12uill g 1c liaoLaiy uylSJI. gJgJgJg
j 1000g 1000000000000000000000000000000000000000000000000000000
Jnloa .aaabll jpcawllgolgi 13 1000000000000000000000000000000000000000000000000000000000000000
aJj jwglj wllj 1x kI bgs
.
auiuullgljll
gds 15 g jla bdo jdo
aJlJjQJLJSSWJLJIgJd.
auiu
sir jssll lks 1 s a jyjSJJ oedell cmoi
J 1 J 1 J 1 J 1 J 1 J 1 J 1 J 1 J 1 J 1 J 1 J 1 J 1 J 1 J 1 J 1 J 1 J 1 J 1 J 1 J 1 J 1 J 1 J 1 J 1 J 1 J 1 J 1 J 1 J 1 J 1 J 1 J 1 J 1 J
.
(AaJglljil)JiaJIJI 1
dAaJIJIgLgJgJgJgJgJgJgJgJgJgJgJgJgJgJgJgJgJgJgJgJgJgJgJgJgJgJgJgJgJgJgJgJgJgJgJgJgJgJgJgJgJgJgJgJgJgJgJgJgJgJg
aobclaw go gboJIgacdoIgao
C W 1 J U L J A a a a a a a a a a a a a a a a a a a a a a a a a a a a
gabllgac
aIJI Ugj
aLglllbcagcglccwlgssllgog
156
(6)
(5)
6 (6) 10
goc yu kUyull Uu uuUgBgSue:du
wqao 1g jwai aagaaa jao gab
234011gac
gbll lolc
(9)°0 boll aolc jug
1
aJg jgj gbaJI Jla
45°2b01 do1c (jw9
JUJI (8)
aui jabai dla
.45
Jc (sJJJ Juaiajj jS
jbiLos Jaiill aobg
Jol ojgall
jwJUaB.
.
J
auiy jaiy aaiy
JgSdJUuUgoJUglg
ai u jSauuJSL oJg a
aJooJI auiuSLLdIJI
.1220 230
abg
appologies . We are grateful to
-1waiol oaw uS
CwWl aWJg)21(oJj qIbUy
go (Juiiill Jui jie gwhll oil) jliwl
gJUUcJgUoljw)15.
-uuuulg
(19) wll aowlglg (21)
41g(4)jgljg0o cjjcbs
1bgsuo
17g
(18)
jIaJ 13g j0 j9-6 bjj pjc g
a 14 a9 0xLy 15g 11 p
JUJIJI/JUJIJI JUJU
15c 15g21s11111111111111
Jg jIg gglg
juc gluiu|glauoJ.aaJUoo gS
jglg/g aawwaa jy
pawI (SJgI paaaill SJS maiil jgl
JUSSU JUSSU JUSSU AGGG Uc bgla
P2 aaii iag lij
gall aunuul pssy g auiu1 pksj
gijlloo ygcjoll
jg.1JkJl jSj
aJggw oicSul
(EgJgljbl) LgQ 5
(14) 2020 (25) 2020
1
(26) _g_l_u_y (25)
baiuUgoojS)25(duoogp
35 0
uogj pui jI baiU I ge uSjj gaj 2
bolioligswuagglaab
g 1 g j 1 1 1 1 1 1 1 1
Robert Bosch Morocco SARL
gjoo ojJoll 53
LJ1J20300
+212529314327:
sav.outillage@ma.bosch.com:
:aa aal jglic jao jall
www.bosch-pt.com/serviceaddresses
auiyjSJI oJU Jn jalil
Ig gglgglg auljSllssl pui iaii Ic alglo aayb ylailld jso
Ulaill jaaauiu 1

(204
auiuJl aaiuJU 100 uuuuauuauuauuauuauuauuuuuuuuuuuuuuuuuuuuuuuuuuuuuuuuuuuuuuuuuuuuuuuuuuuuuuuuuuuuuuuuuuuuuuuuuuuuuuuuuuuuuuuuuuuuuuuuuuuuuuuuuuuuuuuuuuuuuuuuuuuuuuuuuuuuuuuuuuuuuuuuuuuuuuuuuuuuuuuuuuuuuUU
pui jg i 1001111111111111111111111111111
000s1giojgs jbsjbuoo 5u
10s s wil cbe 15uw u
y j 1j 1j 1j 1j 1j 1j 1j 1j 1j 1j 1j 1j 1j
- jjds jjgi g j
jSg ju sl uJ g o w qul ygs dU Jg gos JLdabq Jus CwI .CwI U
40u golw
JLaIgjUgWJbOJ
agji JLS Egi gSJS Jw g
.
slguo oaw di jbsolao jy jLac
.
1j jj j0a
dius .sis g jgjI sIg 12JU JUJIS g iio ojjol
Jai, Suu ojgaw
a aaoa a do bao jj JlJr Jy J
Jol sdy labe jg Egs 1s
Jai dsw sOla o lao i o laow
.
jugjw
JgS|IjG
wμglo
dsg g ygdo jI ggslaa w s dws gca w s. aJ dsj ggs oJ 1u da liy jggo dy u g SoS slw s Jol oI ow s gaa w s gs .siuiaiow Jd adw gdu law
62|
jui jai blaa sJSLac J ssis cy oJ sls .siya
"glgwhjyblg jyblg jyblg 11111111111111111111111111111111111111
.5iS yu
.5iL uac ulogil Ugdu
59j g j 10000000000000000000000000000000000000000000000000000000000000000000000000000000000000000000000000000
gai! sglalmjLw
Sjdi aJg j 1s ggsLgws
Jla Js glaawb l j gaa Jssi
.6e2000
Jiiis agsi Jls uu w sUo oJ L
SjI jLsOgdo gJlaaiaw J Sgag
Ldgl jnlg Lg yogao yolkss
Lg g sOlaWl Cwauu G
gJlaaiaw Cwauw lslg ksw
gJLcU wai.
gJg sGuaWl CwU nKoo Oy Ugauw
Jd glg Ls DwG gJr.
Ud glnSw gsw Jaacl Ccy slgwo
.00000000000000000000000000000000000000000000000000000000000000000000000000
wio oJ j0 (59) JSL (S1j jj
Gg a dS "Lacoc pIplipk 1
OJ slaiol dao s g w ooi plil 5goc
Ua css jn Jn jn Jn Jn Jn Jn Jn Jn Jn Jn Jn Jn Jn Jn Jn Jn Jn Jn Jn Jn Jn Jn Jn Jn Jn Jn Jn Jn Jn Jn Jn Jn Jn Jn Jn Jn Jn Jn Jn Jn Jn Jn Jn Jn Jn Jn Jn Jn Jn Jn Jn Jn
JL aBg asuJgws JI JSL abg
Ogduw g oosjLs joluea duw g
duoJi jntalao JSL abg,swu oWp
.ogw dwiSgi Cw sduw gdsil u,sgwu
Uus G yjI jI jI wls JI JI
.uyu Lg g JSL jI JOLgbl Oe
Jus g oJg JSL aBg auJssnJy I
.ogw laow cws JI JI
.5iSi o slawl HSS 5g9 (slj) j
.5iS u w CwJ Soo oJ (Slo daj dgSj
aai S (sglu J. SiSi oJ I (jim) UjL
Jc g sO si So J (sjgswt Ccy siIg
wliolololglilgi oolssuks. wluologjdi gJl bclcJg
10s 1000000000000000000000000000000000000000000000000
SsiL W, CwI UJ Js OJ da ds
UuUuUuuuUuuuUUuuuuuuuuuuuuuuuuuuuuuuuuuuuuuuuuuuuuuuuuuuuuuuuuuuuuuuuuuuuuuuuuuuuuuuuuuuuuuuuuuuuuuuuuuuuuuuuuuuuuuuuuuuuuuuuuuuuuuuuuuuuuuuuuuuuuuuuuuuuuuuuuuuuuuuuuuuuuuuuuuuuuUUUUUUUUUUUUUUUUUUUUUUUUUUUUUUUUUUUUUUUUUUUUUUUUUUUUUUUUUUUUUUUUUUUUUUUUUUUUUUUUUUUUUUUUUUUUUUUUUUUUUUUUUUUUUUUUUUUUUUUUUUUUUUUUUUUUUUUUUUUUUUUUUUUUUUUUUUUUUUUUUUUUUUUUUUUUUUUUUUUUUUUUUUUUUUUUUUUUUUUU
j 10000000000000000000000000000000000000000000000000000
JU 1 JU 1 JU 1 JU 1 JU 1 JU 1
J 1 1 1 1 1 1 1 1 1 1 1 1 1 1 1 1 1 1 1 1 1 1 1 1 1 1
LgU 15uuguaagl, gablaaess
Sg Sg
Jg g 1k 1 k 1 k j
o| d j n j s 1s b o j a j o a j
. sigu oik j j g
pss oJ uagj pabg g gac poaii .sis
oLswu wuyuog oJ dau JyS yuol
. jI s 89
.5sblal jg5blj uug 0j d
yIbIaSla
ooluo yg jds oilw s lal sl ojaw gao as wuy go yjuljuyd a bgo so
.0sold j
1(ωgla/(jωg)
2(wgo/(jwg)
3((gJcJgJgJ1
4(olSiusJooHj
5)5gogajSdu
6(jgogj
7(5jgo 5aiomj
8(μwμc45°
9(μμc0°
(10)
Sjooiaolbdo (11)
ay daa (12)
Siaia!blaaIpaiai (13)
duj Lg
150 15 (15)
(16)
JlJ (17)
μlgljg0 (18)
jLg jLg (19)
(20)
oJj jIg oJ I goo (21)
10goc ylaI sI yS Joo (22)
(23)
(24)
(25)
JgSio g Loo slj SjLwI g g Wu loi J aji
EN847-1ulgogo
.
gagd gaggj) aJ daaA
JgjI JwJg jg jg jg jg gJgJgJgJgJgJgJgJgJgJgJgJgJgJgJgJgJgJgJgJgJgJgJgJgJgJgJgJgJgJgJgJgJgJgJgJgJgJgJgJgJgJgJgJgJgJgJgJgJgJgJ
-0siiS(jaos)4(
.1s0
gj 4) siiSag d.
18 17 11
j0j jgoojj (20) 1g (19) jq jlq -
jdl
jI slqij j 1 o w aogj sl o j aji j J
gaa a gaw gga) aai aaiA(
JgjI JwI jqI IaIg gJJgJgai 1gJggo dJy (JgJgBw) JgJg
www.bosch-pt.com/serviceaddresses
olwJs jL oJjI
gduy,1 ydy duy g alao,
gajsj juiuujbuaaui
.
jla jduj lJ yI JJI
!jjljli

68

1600A014HJ
| € | ||
| de | EU-Konformitätserkläragung | |
| Handkreissäge | Sachnummer | |
| en | EU Declaration of Conformity | |
| Hand-held circu- lar saw | Article number | |
| fr | Déclaration de conformité UE | |
| Scie circulaire | N° d'article | |
| es | Declaración de conformidad UE | |
| Sierra circular portátil | N° de articulo | |
| pt | Déclaração de Conformidade UE | |
| Serra circular manual | N.° do produits | |
| it | Dichiarazione di conformità UE | |
| Sega circolare | Codice prodotto | |
| nl | EU-conformiteitsverklaring | |
| Cirkelzaag | Productnumber | |
| da | EU-overensstemmelseserklaerig | |
| Händrundsaiv | Typenummer | |
| sv | EU-konformitetsförklaring | |
| Handcirkelsäg | Produktnumber | |
| no | EU-samsvarserklæring | |
| Händsirkelsag | Produktnumber | |
| fi | EU-vaatimustemmukaisuusvakuutus | |
| Käsipyörösaha | Tuotenumero | |
| el | Δηλωση πιοτότητα EE | |
| Φρητό | Aριθμός ευρετηρίου | |
| tr | AB Uyguluk beyani | |
| Daire testere | Ürün kodu | |
| II | ||
| pl | Deklaracja zgodnosci UE | Oswiadzamy z pełna odpopiewiazlność, ze ninejsze produkty odpopiadaja wsystkim wymaganium ponižej wyszczególniych dyrektyw i Rozporjadzeń, oraz ze są zgodne z następućymi normami. Dokumentacja techniczna:* |
| Reczna pillarka Numer katalogowy tarczowa | ||
| cs | EU prohlásení oshodě | Prohlášujeme na výhradní zodpovednost, ze uvedený výrobek splůuje všechá na príslúsná ustanovení nizé uvedenych směrnic anářizení aje vsoulad snášedujúčími normami: Teknicke podklady u:* |
| Ručné okružné pila Objednaci cislo | ||
| sk | EU vyhlásenie ozhode | Vyhlasujeme na výhradní zodpovednost, ze uvedený výrobek splů na věskey príslúné ustanovenia nizé sie uvedenych směrnic anáriadeni aje vsúlade snášedujúčími normami: Teknicke podklady má spolocnost:* |
| Ručné kotúčová Vecné cislo pila | ||
| hu | EU konformitási nyilatkozat | Egyedūli felǒséggel kijelentjuk, hagy a megnevezett termék megfelelnek az alábbiakban felsorolára kerüló irányelvek és rendeletek valamennyi idevágó előirásainak és megfelelnek a kõvetkező szabányoknak. Mûszaki dokumentumok megörzési pontja:* |
| Kézi körfūróSZ Cikkszám | ||
| ru | 3aúběnéme o cootbětctbnu EC | Mbl 3aúběnéme pod naуо сдноючуо OTBETCTBEHNOCTB, чу noцьанье рожутсы COOTBETCTBYOT BCEM DečTCTBNUOUMпредпсаньим HIXKEYAZAHNBIX DIPEKTBIV NACPONPRAJEN, A TAKJE HIXKEYKAZAHNBIX HOPM. Texnúčka dokumetaху xpañtcya y:* |
| Рушия дисковая Товарный № плда | ||
| uk | 3aúbá propo bīdnoviidnictb EC | Mizuzaунам πíd naуо оduиошобу Вīdnoviidnich, сио naцьаньи вириби Вīdnoviidaют BCIM YUHINHM ПОJOSEHNМ HIXKEYAZAHNBIX DIPEKTBIV I POKYTRDEH, A TAKOJ HIXKEYOZHANHUM HOPM. Texnúca dokumetaху 3bepiračtcya y:* |
| Рушия дисковая Товарный Homepппка | ||
| kk | EO cāikeyctik maglumdamacbsi | Зз кayankершійкенибі BTаТУг�ані НИМДер Төмэнід Зынган DipeKTKNJIAPAR MEN JI KAPLBYK TAPDIN TINCI T KAFIDanapbya Na CAVKECTIRIN JXэнehem'deri HOPMANAPRAСАЕКИНБIDINIPeM. Texnúкалы Кжадтapor:* |
| Кор диски Биим Немірі apась | ||
| ro | Declaratie de conformitate UE | Declarãm pe proprie raspundere cà produselementionate corespund tutu-ror disposziţilor relevante ale directivero ŞI reglementariler enumerate in ce-lece urmează ŞI sunt'in conformitate cu urmätoarele standarde. Documentatie tehnica la:* |
| Ferăstrău circular Numâr de identificare manual | ||
| bg | EC Deçlapaşa за сьответсп�е | С пьлна OTROBOPHOCT HIX DeKLAPRIPAme, чу пооченITE рожукту OTROBAPAT Na BCSKY BAIANDH N3NCKBAHNA Na DIPEKTHBVTE и разрешendeпу.Tо-DOLу Na CBOTBETCTBA Na CLEDNHTE STANDPRTN. Texnúchecka dokumetaху р�:* |
| Рычесицулр Каталожен Homep | ||
| mk | EU-N3jaba за-coobpaэstc | Со лесся с одROBOPHOCT ИЗЯВуВаме, Дра КОПSHAANITPEПронЗBOДу СВОС LAOCHNCTСОпел�ВANTHДОр dedиНЯ на сеLDHITPEperулNTBIVи РожиСИСИСИСИСИСИСИСИСИСИСИСИСИСИСИСИСИСИСИСИСИСИСИСИСИСИСИСИСИСИСИСИСИСИСИСИСИСИСИСИСИСИСИСИСИСИСИСИСИСИСIу |
| Рача кружна Бroyя на дул./aptrinkл плда | ||
| sr | EU-izjava o usaglašenosti | Na sopstvenu odgovornost izjavljemu, da navedeni proizvodi odgovaraju svim dotićnim odredbama naknadno navedenih smernica u uredaba i da su skladu sa sledecim standardima. Tehnička dokumentacijs kod:* |
| Ručna kružna tes- Broj predmetata tera | ||
| sl | Izjava o skladnosti EU | Izjavljamo pod izklučno odgovornostjo, da je omenjen izdelek v skladu z vse-mi relevantnimi dolocili direktiv in uredb ter ustreza naslednjim standardom. Tehnična dokumentacijs pri:* |
| Ročna krožna Številka artikla zhaga | ||
| hr | EU izjava o sukladnosti | Pod punom odgovornošću izjavljemu da navedeni proizvodi odgovaraju svim relevantnimi odredbama direktiva i propisima navedenima u nastavku i da su sukladni sa sljedecim normama. Tehnička dokumentacijs se moze dobiti kod:* |
| Ručna kružna pila Kataloški br. | ||
| et | EL-vastavusdeklaratsion | Kinnitame ainuvastutajatena, et nimetatud tooted vastadav järgnevalt loettle-tud direktiviide ja määruste kõikidele asjaomastele nõuetele ja on kooskolas |
| Käsketassaag Tootenumber | ||
1609 92A 62L| (18.11.2020) Bosch Power Tools
| III | ||
| järgmiste normidega. Tehnilised dokumendid saadaval:* | ||
| Iv | Deklarăcija par atbilstibu ES standartiem | Mës ar pilnu atbildibu pazinojam, ka šeit aplūkotte izstrādăjumi atbilst visiem tãåk minētajās direktivās un rikojumos ietvertajām saistosajām nostădnēm, kã āri sekojsiem standartiem. Tehniskā dokumentăcija no:* |
| Rokas ripzăgis Izstrādăjuma numurs | ||
| It | ES atitikties deklaracija | Atsakingai pareiškiame, kad išvardty gaminiai atitinka visus privalomus ze-miu nuroydu direktyvū ir reglamentu reikalavimus ir šiuos standartus. Technîne dokumentacija saugoma:* |
| Rankinis diskinis Gaminio numeris pjūklas | ||
| GKS 140 3 601 FB3 0.. | 2006/42/EC EN 62841-1:2015 2014/30/EU EN 62841-2-5:2014 2011/65/EU EN 55014-1:2017+A11:2020 EN 55014-2:2015 EN IEC 61000-3-2:2019 EN 61000-3-3:2013+A1:2019 EN IEC 63000:2018 | |
| BOSCH * Robert Bosch Power Tools GmbH (PT/ECS) 70538 Stuttgart GERMANY | ||
| Henk Becker Helmut Heinzelmann Chairman of Executive Head of Product Certification Management i.v. k.m. | ||
| Robert Bosch Power Tools GmbH, 70538 Stuttgart, GERMANY Stuttgart, 01.10.2020 | ||

- GKS 140 Professional
- General Power Tool SafetyWarnings
- WARNING
- Work area safety
- Electrical safety
- Personal safety
- Power tool use and care
- Service
- Safety instructions for circular saws
- Cutting procedures
- Kickback causes and related warnings
- Lower guard function
- | English
- Additional safety warnings
- Products sold in GB only:
- Product Description and Specifications
- Intended use
- Product Features
- Technical Data
- Noise/vibration information
- Noise emission values determined according to EN 62841-2-5.
- Wear hearing protection!
- Fitting
- Inserting/changing the circular saw blade
- Removing the saw blade (see figure A)
- Selecting the saw blade
- Fitting the Saw Blade (see figure A)
- | English
- Dust/chip extraction
- Fitting the dust extraction adapter (see figure E)
- Operation
- Operating modes
- Setting the Cutting Depth (see figure B)
- Adjusting the Mitre/Bevel Angle
- Cut marks
- Start-up
- Switching on/off
- Practical advice
- Sawing wood
- Sawing with a parallel guide (see figure C)
- Sawing with an auxiliary guide (see figure D)
- Maintenance and Service
- Maintenance and Cleaning
- After-Sales Service and Application Service
- Malaysia
- You can find further service addresses at:
- Disposal
- Français
- Eliminação
- 处理废弃物
- 廢棄物處理
- nVvVvVvVv
- Huaanwanaanaaaannn
- yua:
- #
- nssnnnnnnnn
- nnaa
- yannnnn
- 40|m
- n
- mnnnnaaannnnnnaaennn (nnnnnnnnae
- T
- 7
- nwnnnnnaaannnnnnaanrnnnnae
- W
- nannnnnnaaennnnn nnnn
- m
- Keselamatan personnel
- Caramembuang
- Lam trokhicat kim loai
- Cac Vach Cat
- Su thai bo
- aIJI Ugj
- gbll lolc
- J
- JUJIJI/JUJIJI JUJU
- (EgJgljbl) LgQ 5
- :aa aal jglic jao jall
- auiyjSJI oJU Jn jalil
- jugjw
- wμglo
- 62|
- olwJs jL oJjI
Brand : BOSCH
Model : GKS 140 Professional
Category : Saw