Assoluta - Coffee machine Lavazza - Free user manual and instructions
Find the device manual for free Assoluta Lavazza in PDF.
| Product type | Espresso coffee machine with built-in grinder |
| Brand | Lavazza |
| Model | Assoluta |
| Dimensions (H x W x D) | 358 mm x 220 mm x 435 mm |
| Weight | 10 kg |
| Power supply | 220-240 V, 50-60 Hz |
| Water tank capacity | 1.5 L (1.3 L with filter) |
| Bean container capacity | Not specified (domestic use) |
| Pressure (not specified but typical) | 15 bar (estimate) |
| Coffee functions | Espresso, Lungo, Lungo XL, Free dose coffee |
| Milk functions | Cappuccino, Cappuccino XL, Latte Macchiato, Hot/Cold frothed milk |
| Settings | Aroma intensity, grind degree, temperature (Boost), froth (Boost) |
| Connectivity | Wi-Fi (2.4 GHz) and Bluetooth (2.402-2.480 GHz) |
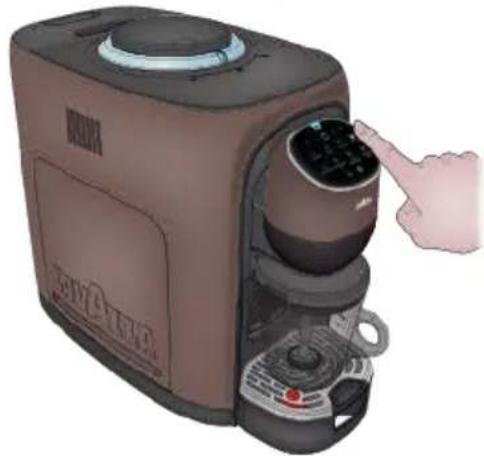
| User interface | Touch control panel with light ring |
| Maintenance | Daily cleaning of drip tray and grounds bin; descaling every 2-3 months with Lavazza descaler |
| Safety | Automatic shut-off, anti-drip protection, do not immerse, use by children >8 years under supervision |
| Included accessories | Milk jug, cleaning brush, espresso cup stand |
| Standby consumption (Low Power) | 0.47 W (not networked), 0.6 W (networked) |
| Spare parts and repairability | Repairs exclusively by Lavazza authorized centers; original parts recommended |
| General information | Intended for domestic and similar use; disposal in compliance with WEEE |
Frequently Asked Questions - Assoluta Lavazza
User questions about Assoluta Lavazza
0 question about this device. Answer the ones you know or ask your own.
Ask a new question about this device
Download the instructions for your Coffee machine in PDF format for free! Find your manual Assoluta - Lavazza and take your electronic device back in hand. On this page are published all the documents necessary for the use of your device. Assoluta by Lavazza.
USER MANUAL Assoluta Lavazza
Dear Customer, we congratulate you on choosing ASSOLUTA Lavazza, a technological and elegantly styled espresso machine.
Before putting the machine into service, we recommend that you attentively read the operating instructions that explain how to use and clean the machine and keep it perfectly efficient.
We trust you will enjoy many exquisite espresso coffees and delicious preparations thanks to
LAVAZZA
IT Pagina 47
Congratulations!
MACHINE SETTING STARTING THE MACHINE 13 FIRST START 14 LOADING COFFEE BEANS 15 ENERGY SAVING FUNCTION 15 WI-FI ENABLING/DISABLING 16 SWITCHING FROM WI-FI TO BLUETOOTH 16 RESETTING WI-FI CREDENTIALS 16
NETWORKING REGISTERING IN THE APP 17 CHANGING THE WI-FI NETWORK IN THE APP .20 FUNCTIONS OF THE "PIACERE LAVAZZA" APP 21
SETTING MACHINE FOR COFFEE SUPPLY GRIND SETTING SELECTOR 22 AROMA FEATURE 22 COFFEE DOSE PROGRAMMING 23 SETTING MACHINE FOR COFFEE CUPS 24 BOOST TEMPERATURE BUTTON 24
PREPARING THE COFFEE COFFEE BREWINGS 25
SETTING MACHINE FOR MILK-BASED BEVERAGES CLEANING CYCLE FOR Milk Mug 26 PROVISION FOR PREPARED THE MILK-BASED BEVERAGES.27 BOOST TEMPERATURE BUTTON 28 FOAM CONTROL BUTTON 28
PREPARING THE MILK-BASED BEVERAGES DELIVERING CAPPUCCINO 29 DELIVERING CAPPUCCINO XL 30 DELIVERING LATTE MACCHIATO 30 DELIVERING HOT FROTHED MILK .31 DELIVERING COLD FROTHED MILK .32
MAINTENANCE AND CLEANING DAILY CLEANING OF THE APPLIANCE 33 MANUAL RINSING . 35 CLEANING COFFEE POWDER OUTLET. 36 DESCALING PROCEDURE 37
TROUBLESHOOTING 41
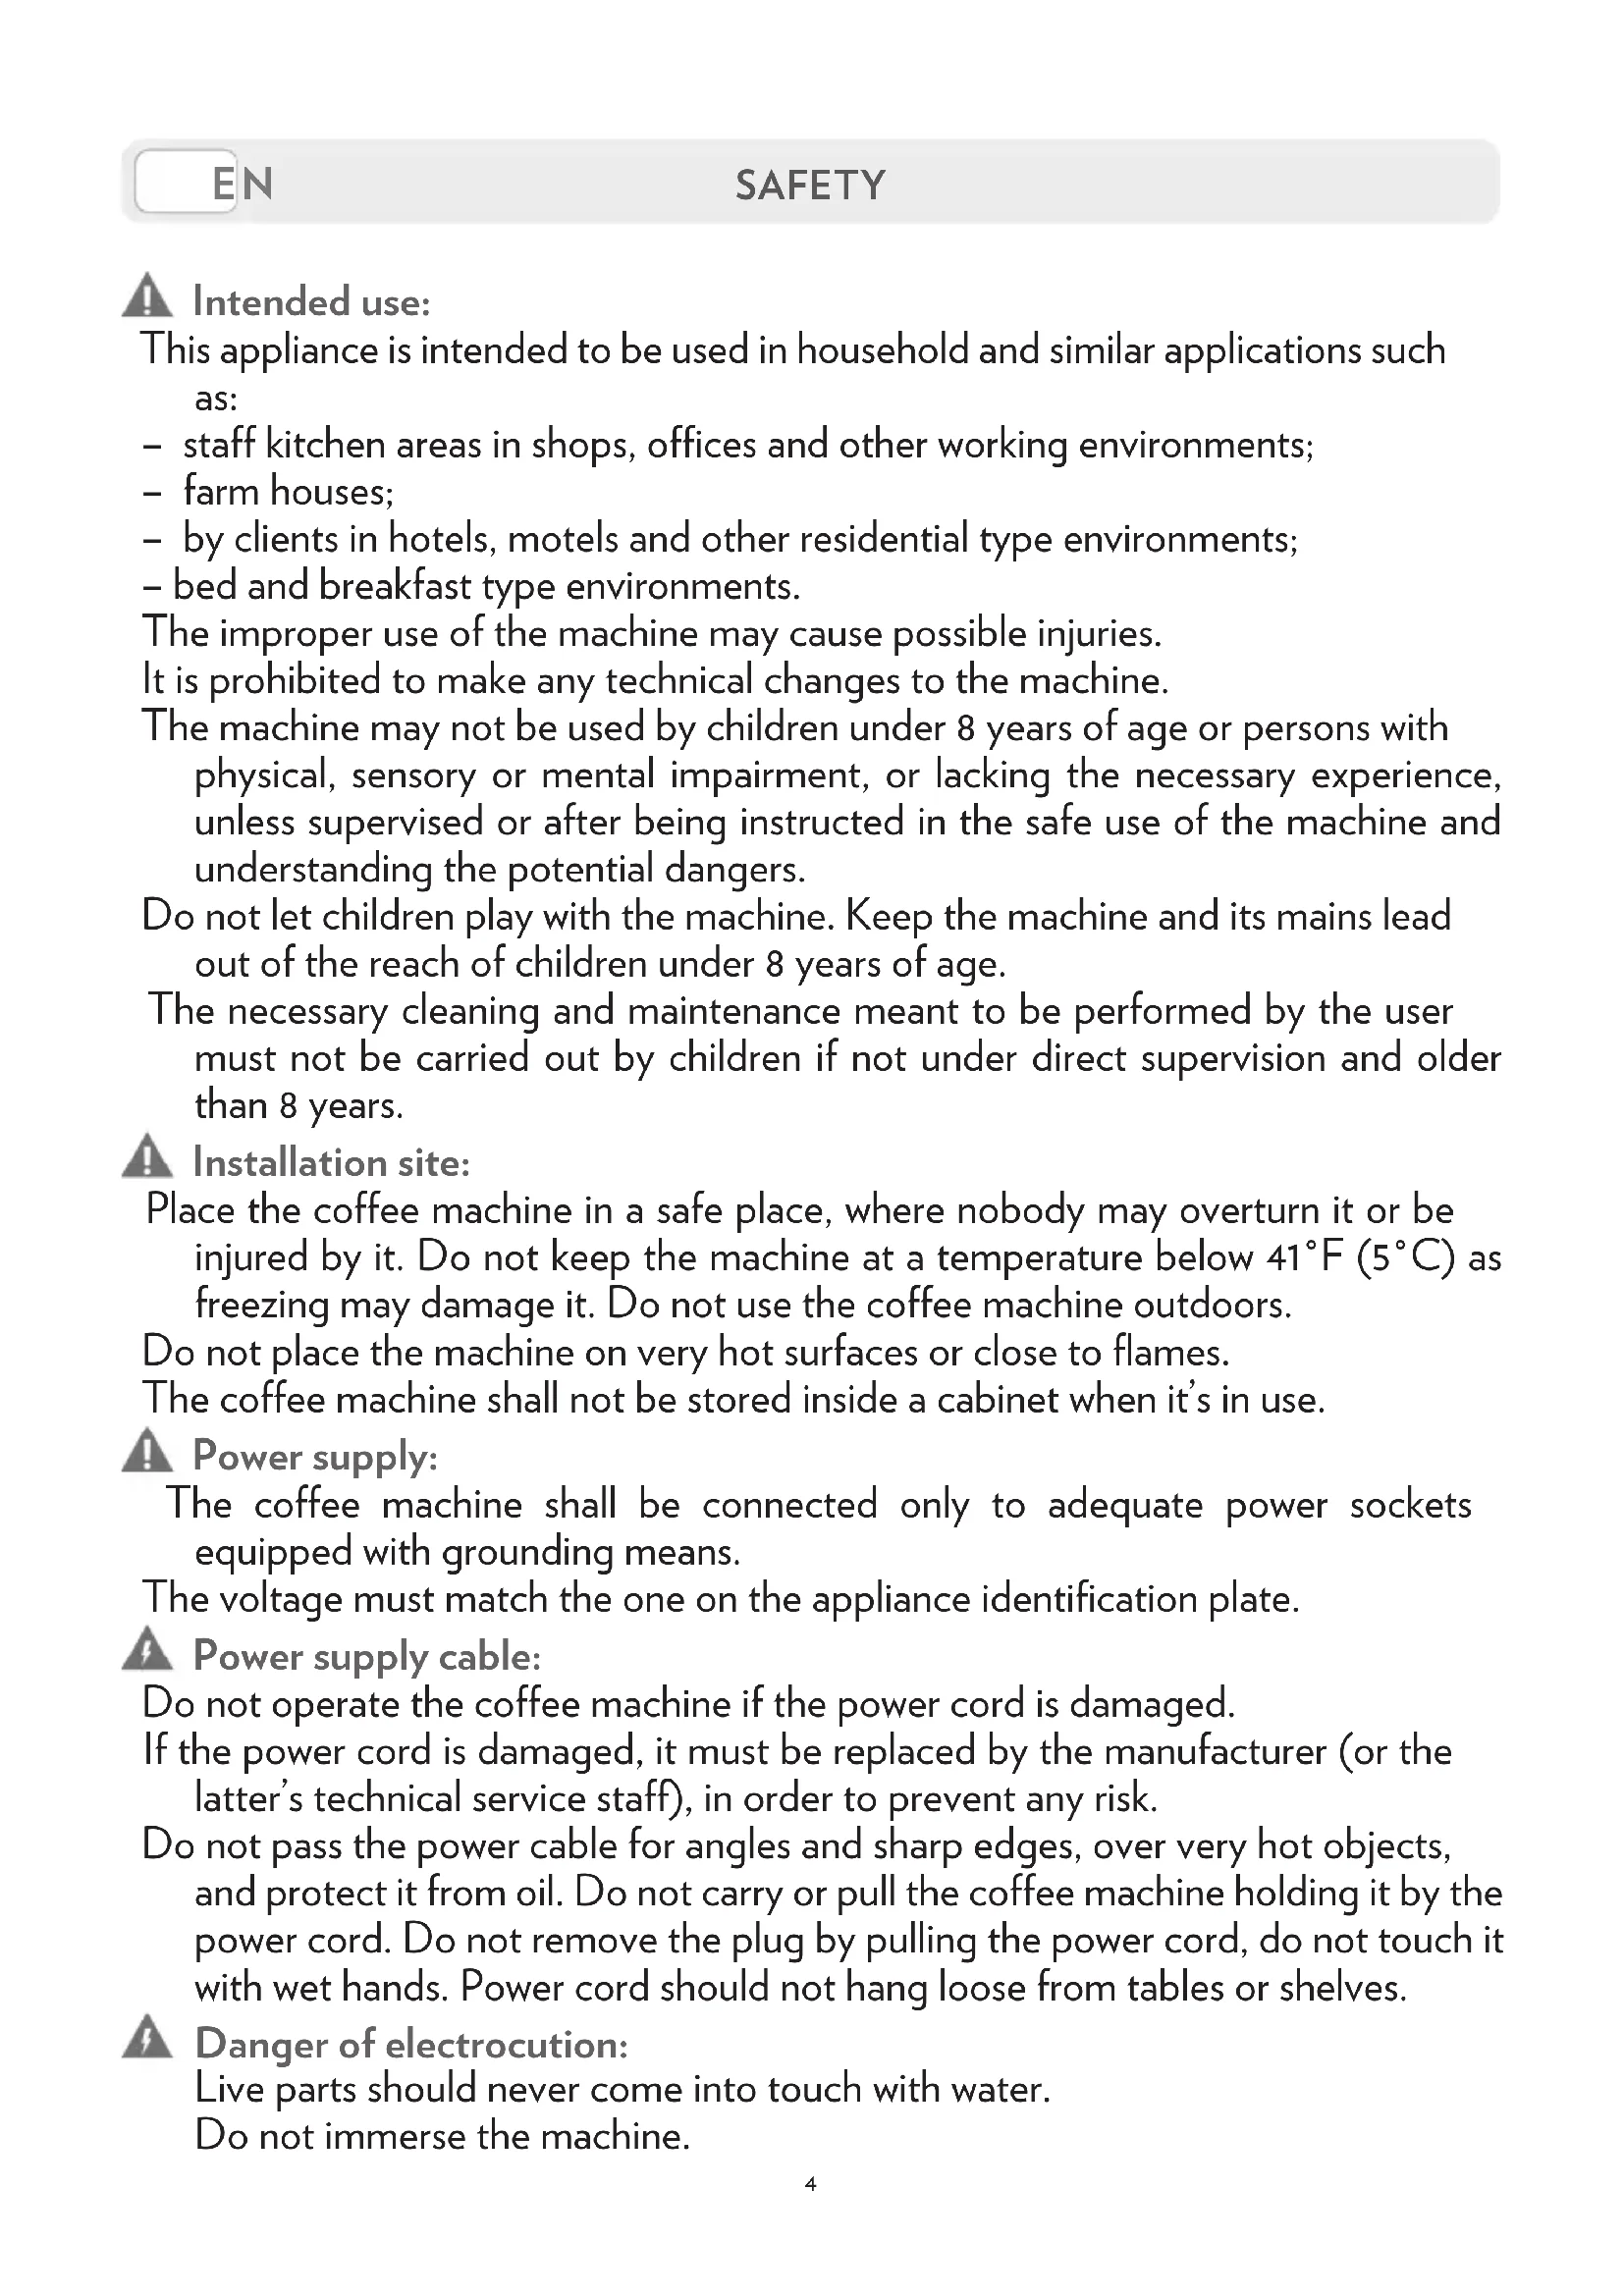
Intended use:
This appliance is intended to be used in household and similar applications such as:
-
staff kitchen areas in shops, offices and other working environments;
-
farm houses;
-
by clients in hotels, motels and other residential type environments;
-
bed and breakfast type environments.
The improper use of the machine may cause possible injuries.
It is prohibited to make any technical changes to the machine.
The machine may not be used by children under 8 years of age or persons with physical, sensory or mental impairment, or lacking the necessary experience, unless supervised or after being instructed in the safe use of the machine and understanding the potential dangers.
Do not let children play with the machine. Keep the machine and its mains lead out of the reach of children under 8 years of age.
The necessary cleaning and maintenance meant to be performed by the user must not be carried out by children if not under direct supervision and older than 8 years.
Installation site:
Place the coffee machine in a safe place, where nobody may overturn it or be injured by it. Do not keep the machine at a temperature below 41^ ( 5^ ) as freezing may damage it. Do not use the coffee machine outdoors.
Do not place the machine on very hot surfaces or close to flames.
The coffee machine shall not be stored inside a cabinet when it's in use.
Power supply:
The coffee machine shall be connected only to adequate power sockets equipped with grounding means.
The voltage must match the one on the appliance identification plate.
Power supply cable:
Do not operate the coffee machine if the power cord is damaged.
If the power cord is damaged, it must be replaced by the manufacturer (or the latter's technical service staff), in order to prevent any risk.
Do not pass the power cable for angles and sharp edges, over very hot objects, and protect it from oil. Do not carry or pull the coffee machine holding it by the power cord. Do not remove the plug by pulling the power cord, do not touch it with wet hands. Power cord should not hang loose from tables or shelves.
Danger of electrocution:
Live parts should never come into touch with water.
Do not immerse the machine.
Protect children under 8 years of age:
Prevent children from playing with the machine.
Children are not aware of the risks related to electric household appliances.
Do not leave the machine packaging materials within the reach of children.
Danger of burns:
Do not touch the hot parts of the machine immediately after use.
While dispensing the drink, pay attention to any possible splashes of hot liquid.
Cleaning:
Before cleaning, unplug the machine and let it cool down.
Do not immerse the machine in water! It is strictly forbidden to tamper with the internal parts of the machine. Change the water in the tank if not used for 3 days. To prevent damage to the appliance do not use alkaline cleaning agents when cleaning, use a soft cloth and a mild detergent.
Storing the machine:
If the machine remains inactive for a long time, unplug it and store it in a dry place out of reach of children. Keep it protected from dust and dirt.
Servicing / Maintenance:
In case of failure, problems or a suspected fault resulting from falling of the machine, immediately unplug the machine. Do not attempt to operate a faulty machine.
Only the authorized Lavazza Service Centres can carry out the necessary operations and repairs. Lavazza will not be responsible for possible damage resulting from repairs and operations not carried out by them.
Water tank:
Fill the tank only with fresh, non-sparkling, drinking water.
Do not operate the machine if the water is not at least above the minimum level indicated on the tank.
Machine disposal at the end of its operational life:
INFORMATION FOR THE USER: the symbol of the crossed-out wheeled bin on the appliance or its packaging indicates that the product must be disposed of separately from other waste at the end of its operational life.
The user must therefore take the appliance to be disposed of to an appropriate separate collection centre for electrical and electronic equipment.
Appropriate separate waste collection, in view of the decommissioned equipment's recycling, processing and environment-friendlyly disposal, helps avoiding possible adverse effects both on the environment and the public health and, also, promotes the reuse and/or recycling of the materials the machine is made up of. Specific administrative sanctions provided for by current regulations will be applied for illicit disposal of the product by the user
We are not liable for any damages in case of:
- incorrect use and other uses than the intended purposes;
- repairs not carried out at Lavazza authorized service centers;
tampering; - use of spare parts and accessories which are not original;
- failure to decalcify;
- storage in rooms below 39^ ( 4^ );
- use below 41^ F ( 5^ C );
- use over 104^ F ( 40^ C );
- use in places with relative humidity above 95% ;
In any of these cases, the warranty is cancelled.
In order to avoid a hazard due to inadvertent resetting of the thermal cut-out, this appliance must not be supplied through an external switching device, such as a timer, or connected to a circuit that is regularly switched on and off by the utility.
TECHNICAL DESCRIPTION
Power supply: 220-240 V; 50-60 Hz
Nominal power: 1550 W
- Dimensions: Height 14.09in (358 mm) - Width 8.66in (220 mm) - Length 17.12in (435 mm)
Water tank removable type : 50.7 fl oz (1.5 l) without filter - 43.9 fl oz (1.3 l) with filter
Weight: 22 lb (10 kg)
- Housing materials: painted plastic materials
COMMUNICATION MODULE
The installed communication module Wi-Fi/Bluetooth emits radio waves featuring the characteristics below:
- Bluetooth;
Frequency band: 2402 MHz - 2480 MHz
Max.output: +9.9 dBm
Wi-Fi;
Frequency band: 2400 MHz-2483.5 MHz
Max.output: +19.9 dBm
Connection mode: Dynamic (DHCP)
Hereby LUIGI LAVAZZA S.p.A. declares that this machine complies with the essential requirements and other relevant provisions established by directive 2014/53 / EU and by the UK PSTI Act.
The complete Declaration of Conformity and Statement are available at the address: www.lavazza.com.
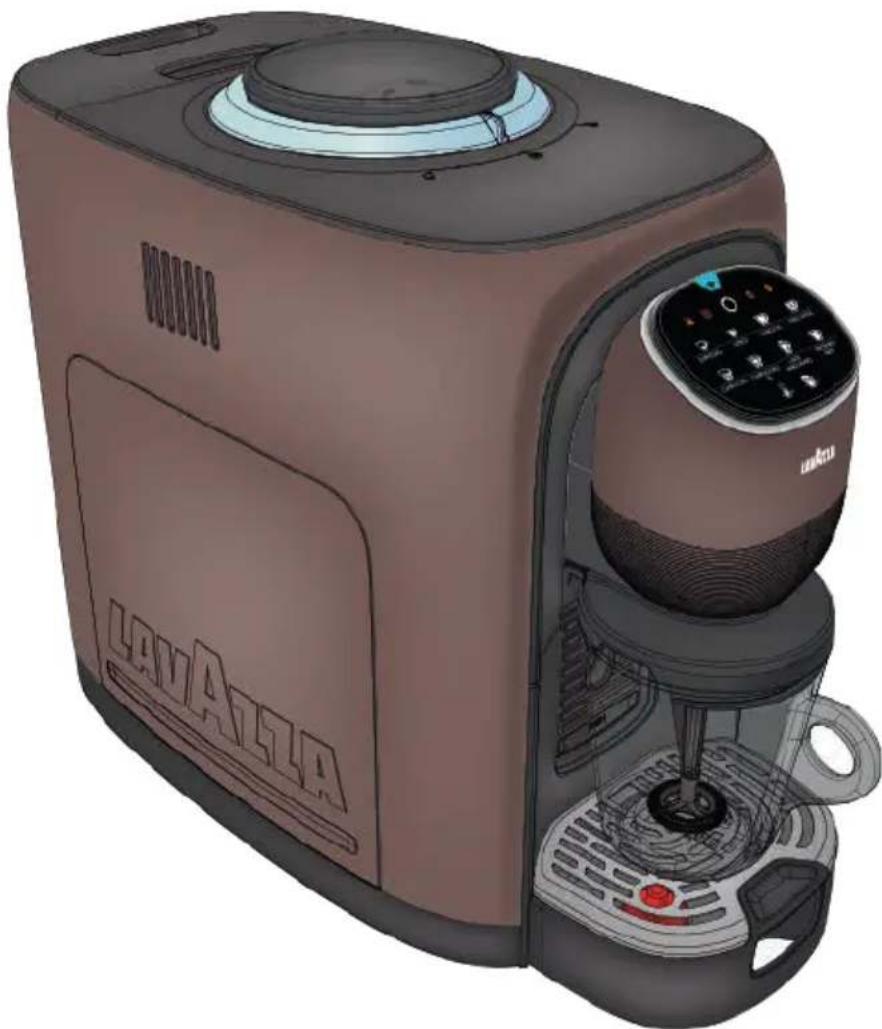
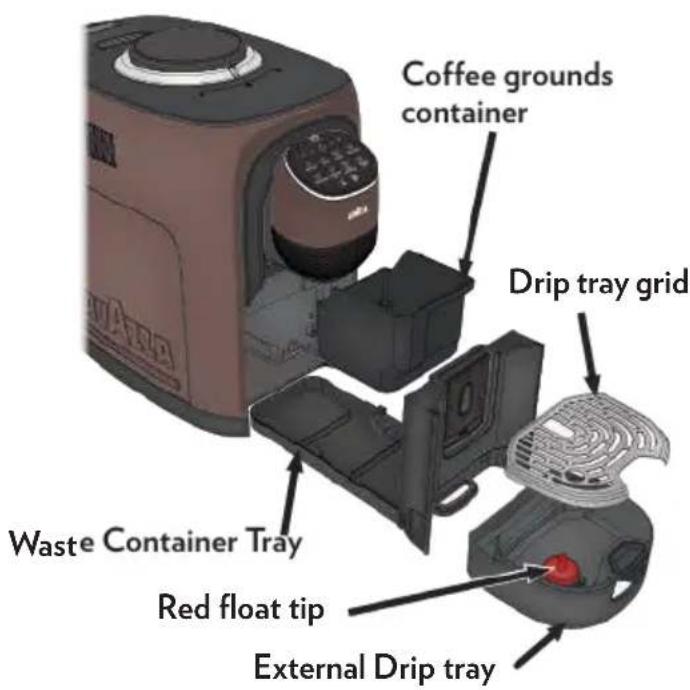
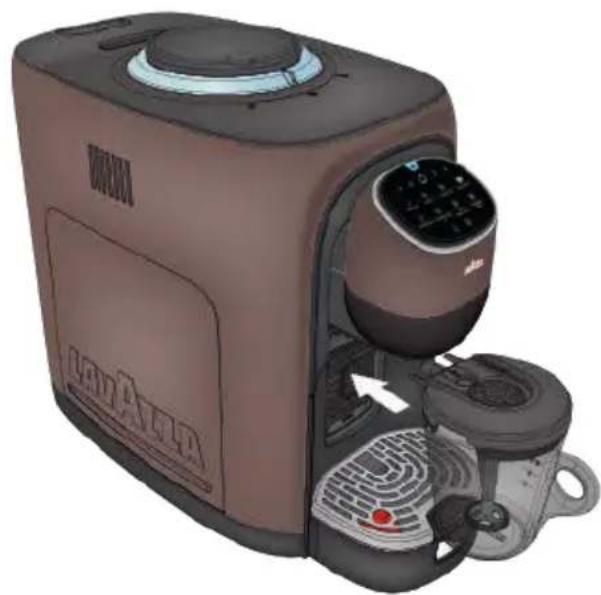
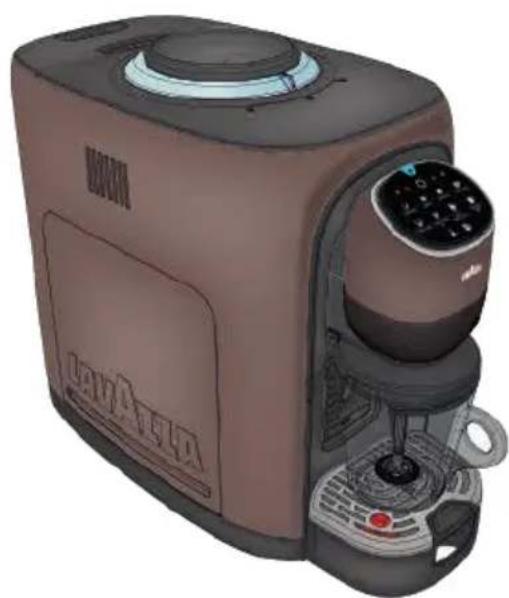
GENERAL DESCRIPTION
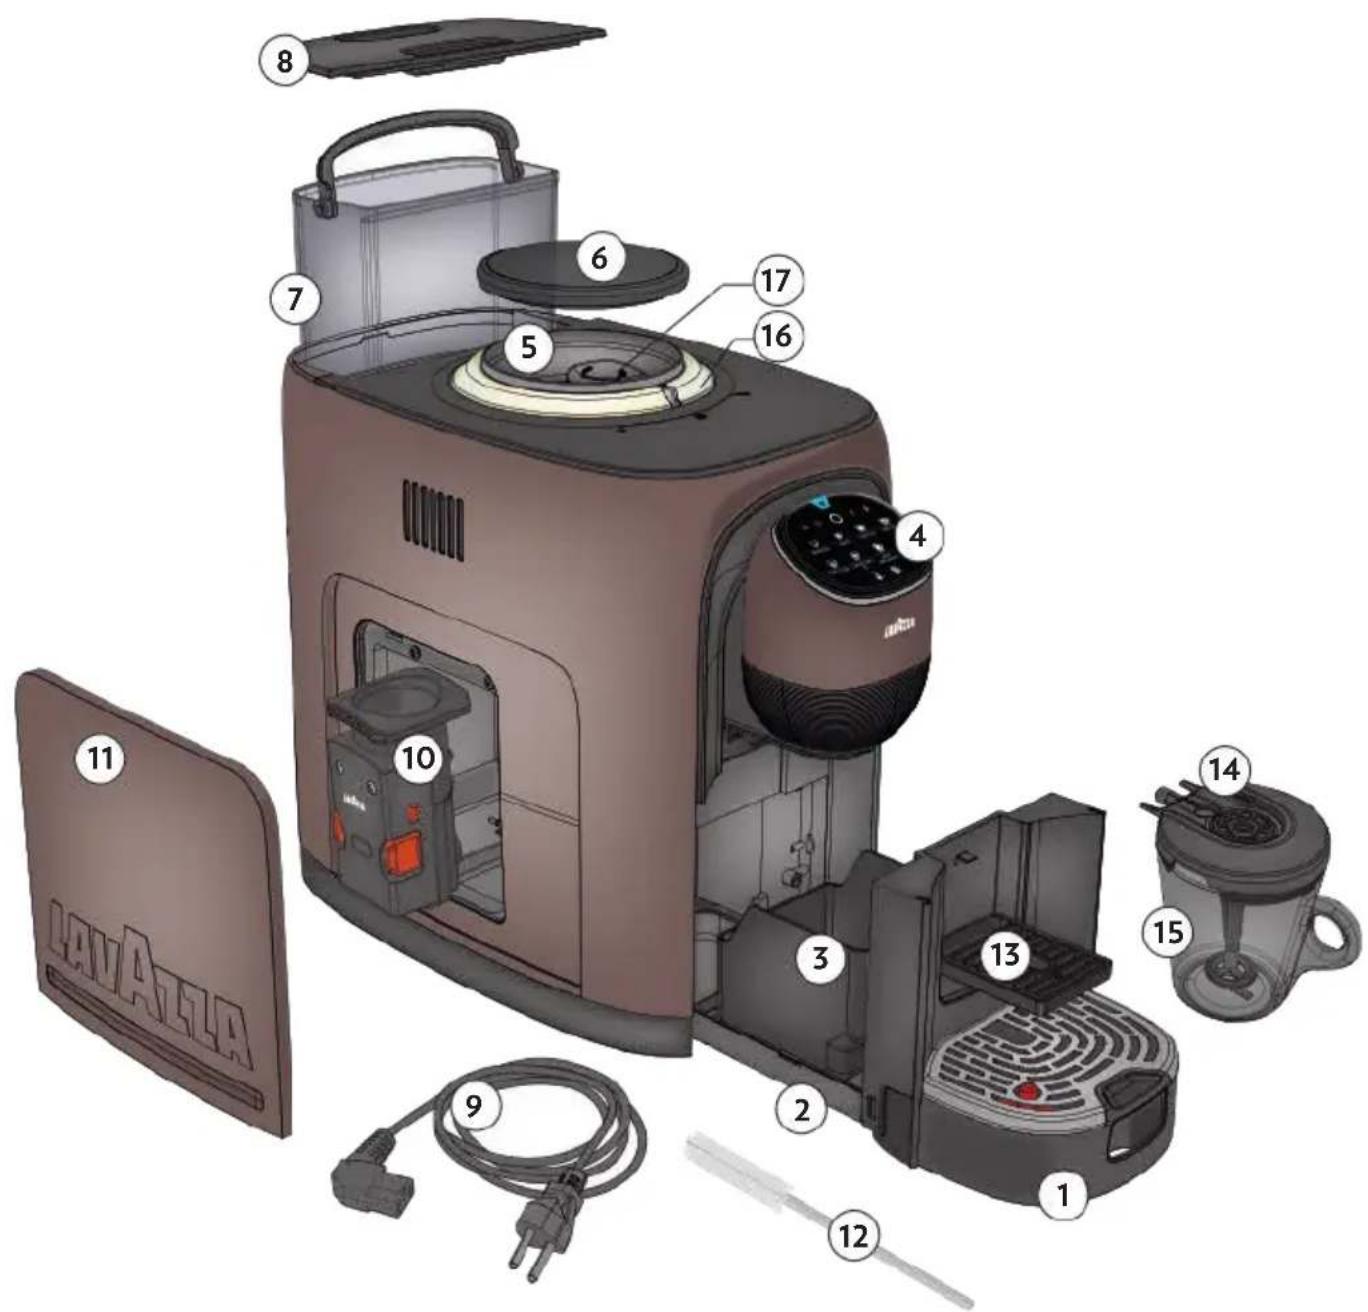
- External Drip Tray
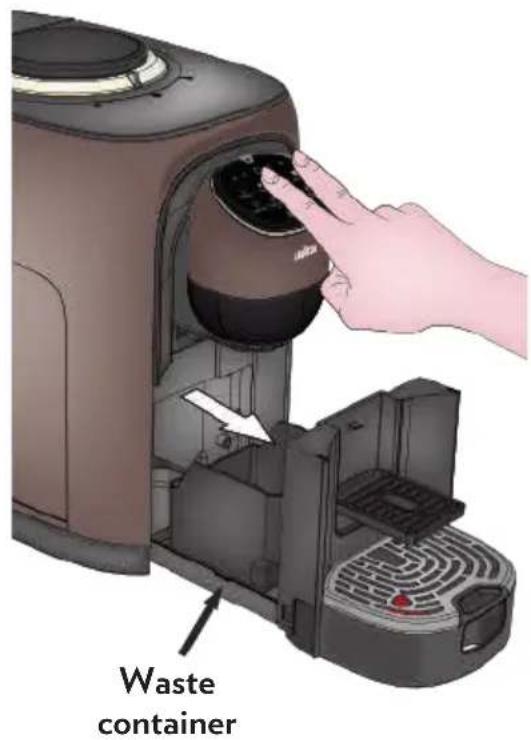
- Waste Container Tray
- Coffee Grounds Container
- User Interface
- Coffee Bean Container
- Coffee Beans Container Cover
- Water Tank
- Water Tank Cover
-
Power supply Cable
-
Brewing Unit
- Service Door
- Cleaning Brush
- Espresso Cup-stand
- Milk mug frothing cover
- Milk mug
- Aroma Setting Selector Ring
- Grind Setting Selector
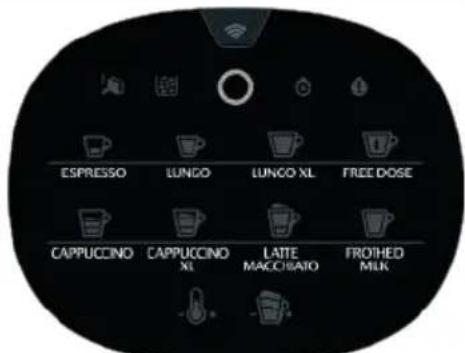
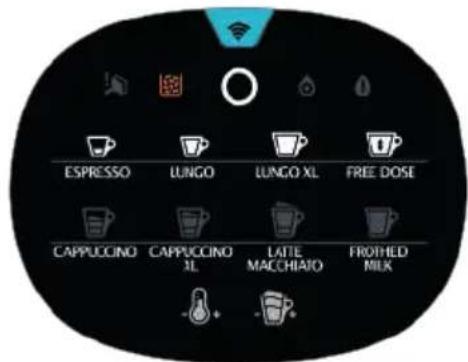
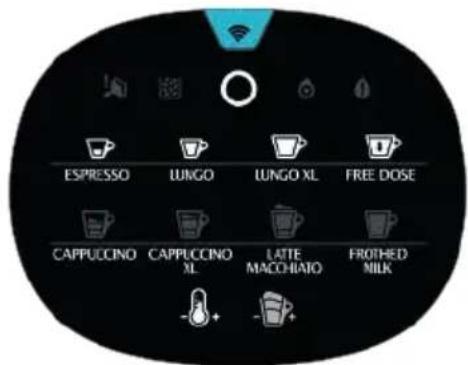
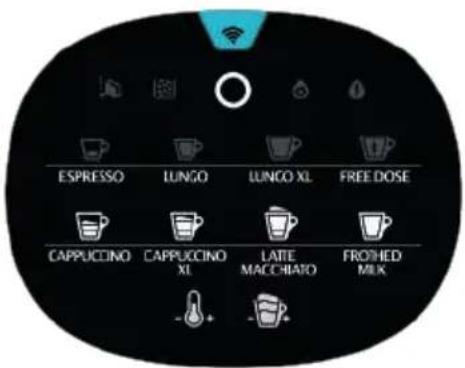
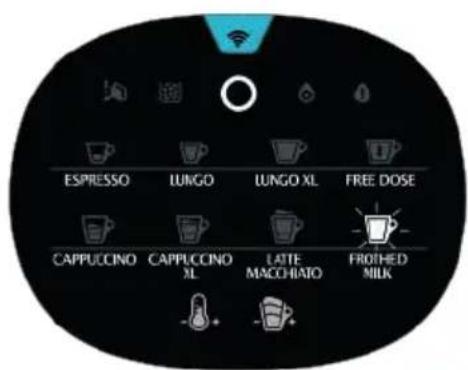
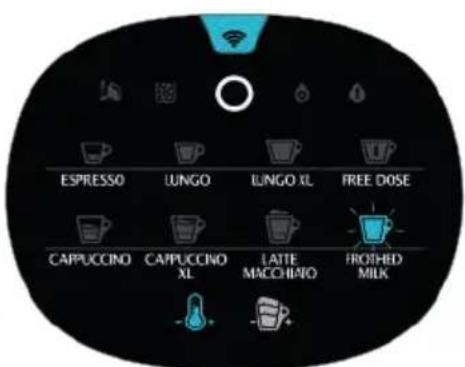
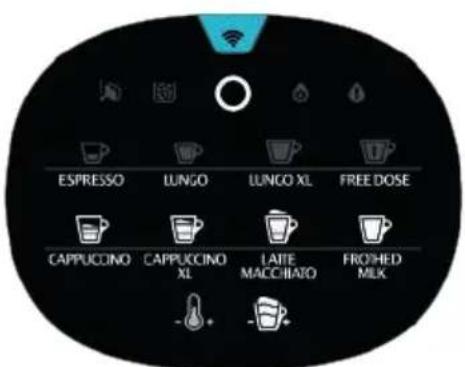
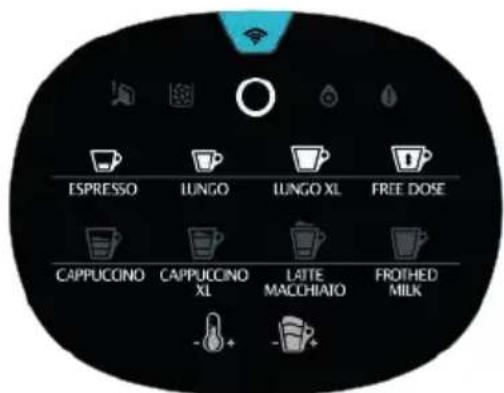
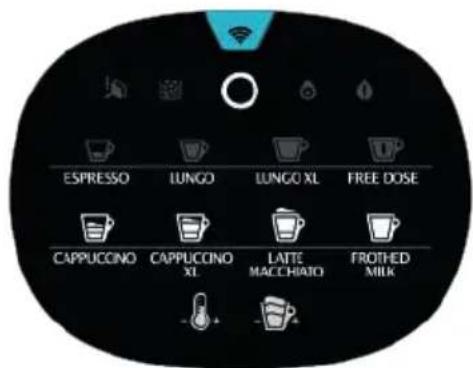
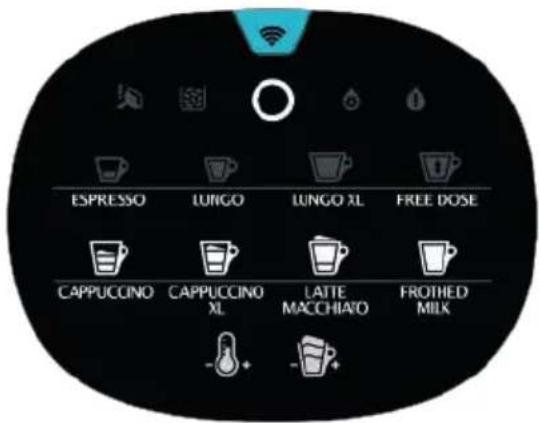
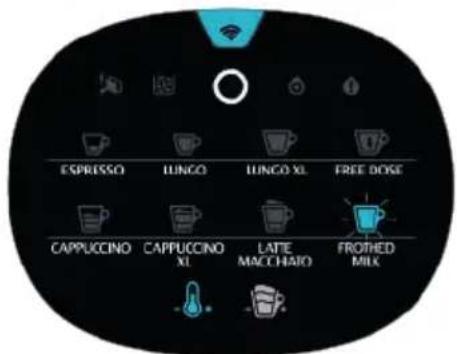
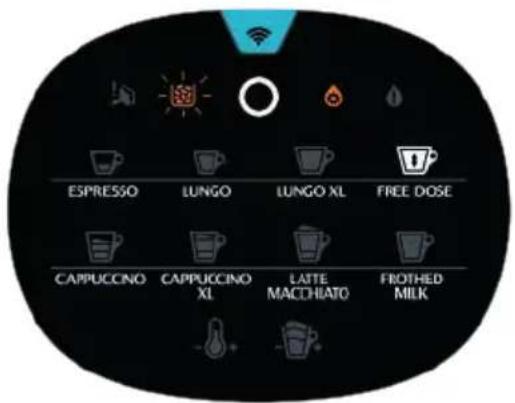
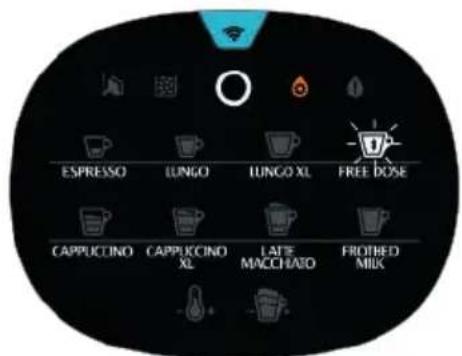
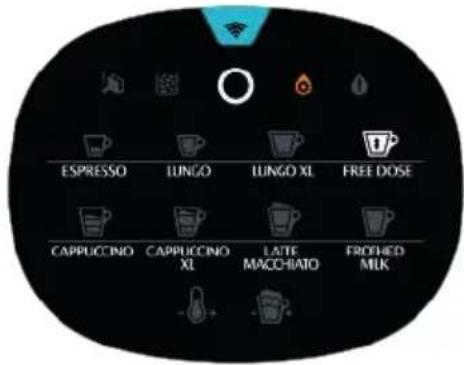
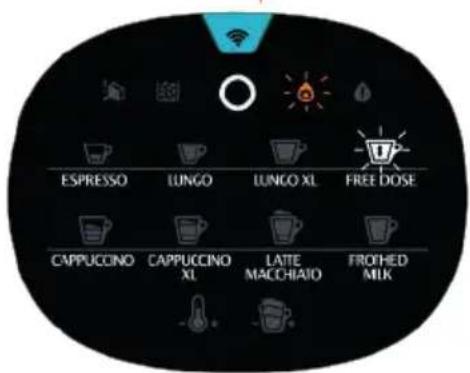
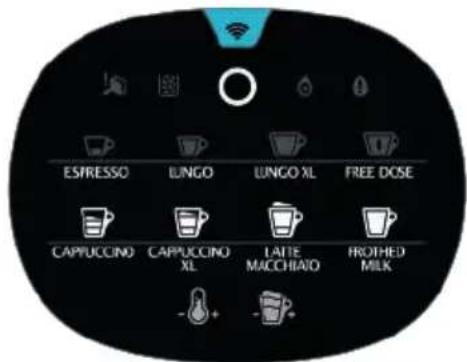
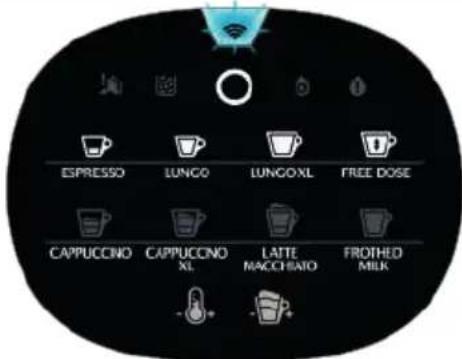
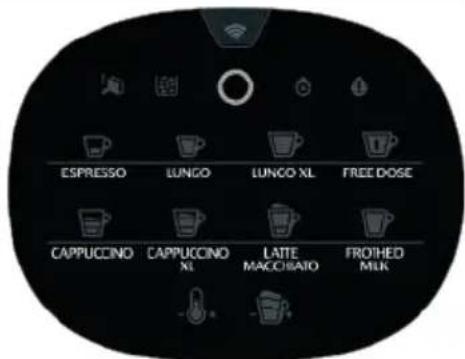
USER INTERFACE
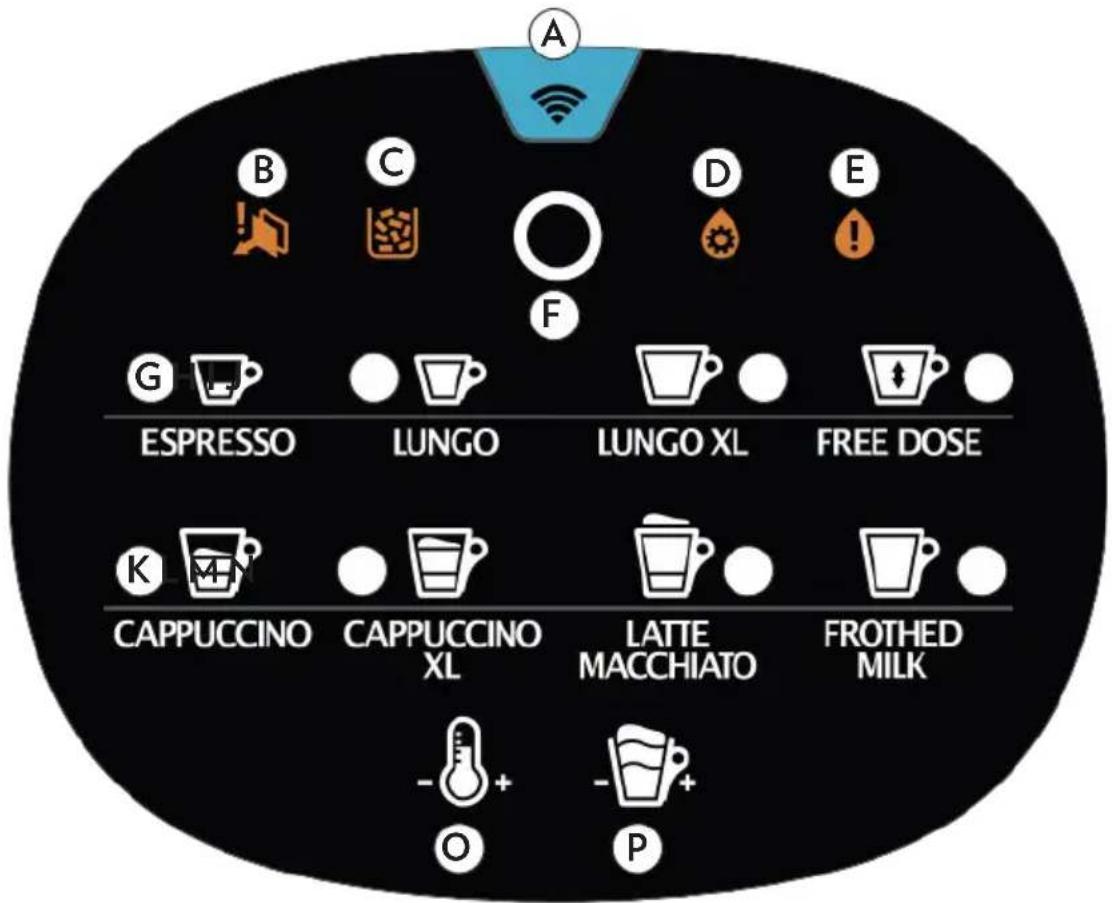
A Wi-Fi / Bluetooth connection
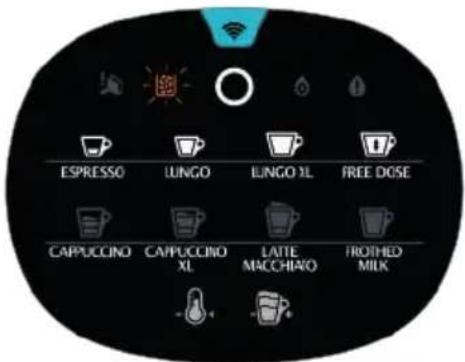
B Warning light - Service Door/Brewing Unit
C Warning light - Coffee Grounds Container
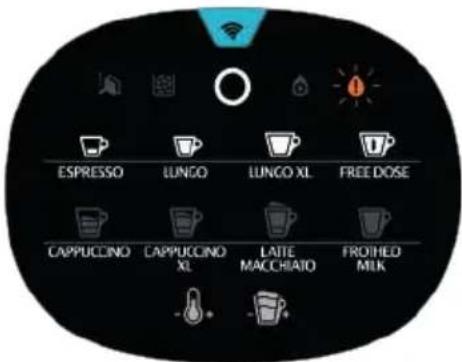
D Warning light - Descaling
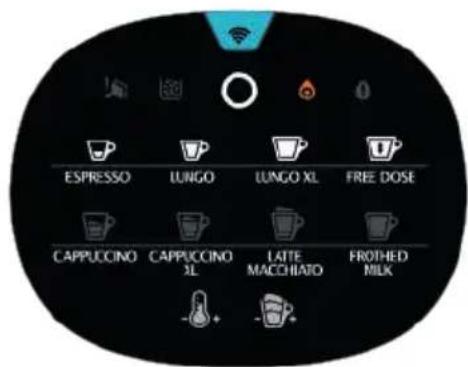
E Warning light - No water / No Tank
ON/ENERGY SAVING button
G Espresso button
H Espresso Lungo button
Lungo XL button
J Free Dose Coffee button
Cappuccino button
Cappuccino XL button
M Latte Macchiato button
N Frothed Milk button (Hot/Cold)
O TEMPERATURE Boost button
P FOAM Boost button

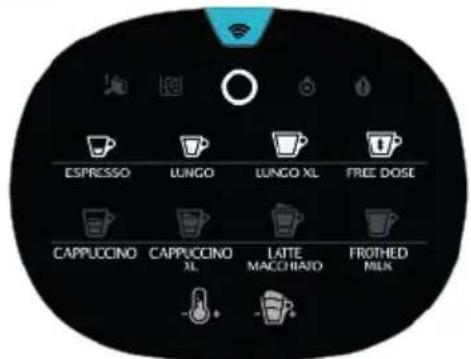
ON/Coffee brewers
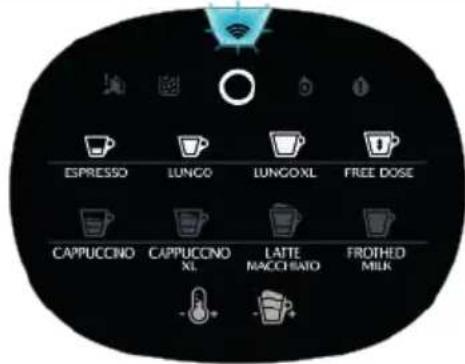
+Wi-Fi connection
+ Bluetooth connection
ON/ENERGY SAVINGON/Coffe
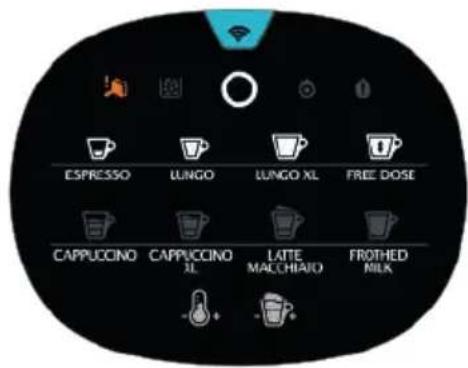
Missing or misinstalled Brewing Unit
side panel
Brewing Unit requires cleaningOpen c
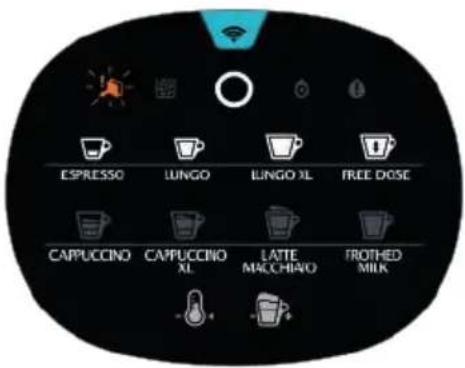
Coffee Grounds container full Coffee Grounds container missing
Water tank empty Water tank missing
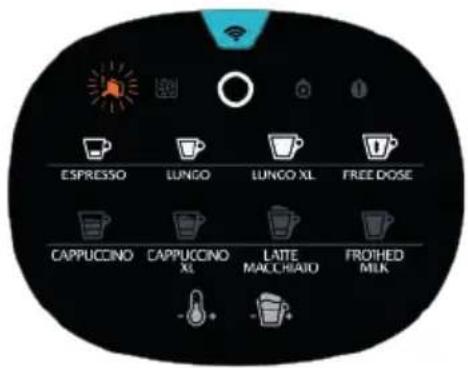
Dscaling required

Waiting for machine rinsing or machine rinsing in progress

Machine block
TEMPERATURE boost button activation
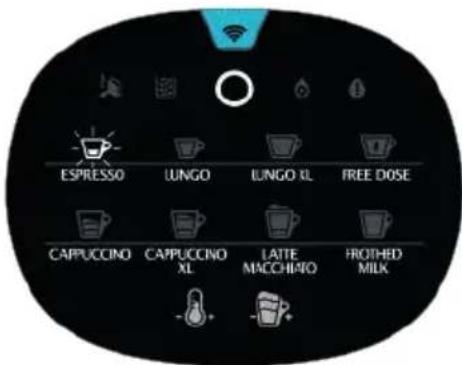
Delivering Espresso
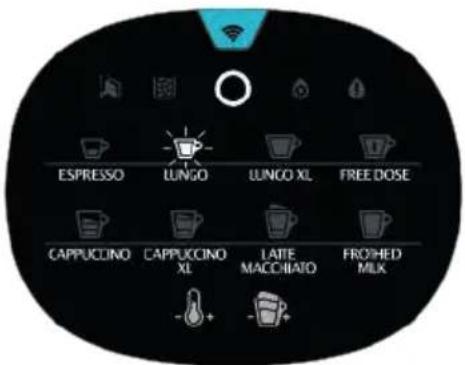
Delivering Espresso Lungo

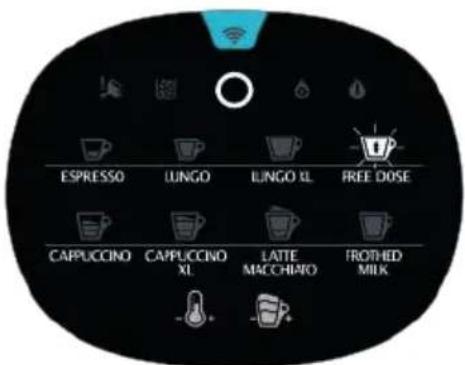
Delivering Free Dose CoffeeDelivering OngwixMilk Mug
Delivering Latte Macchiato Deliverin
Delivering Cold Frothed Milk Delivering GAtbostnukton
activation
LIGHT RING
AROMA SELECTOR
| MACHINE STATE | CONDITIONS | LIGHT RING EFFECT | COLOR |
| ENERGY SAVING - None | None | ||
| Enter Fade out White | |||
| Exit Fade in White | |||
| READY TO BREWING | Aroma Selector Standard | Steady White | |
| Aroma Selector turned leftwards | Clockwise rotation | White | |
| Aroma Selector turned rightwards | Counter rotation | White | |
| EMPTY BEANS | WARNING | Clockwise rotation | Orange |
| SIDE DOOR - Open Brewing Unit Removed/Needs Cleaning DRAWER Removed/Full WATER TANK Empty/Removed AIR LOCK | WARNING | Steady | Orange |
| BREWING/STEAMING | - | Clockwise rotation | White |
| RINSING | - | Clockwise rotation | White |
| DESCALING MODE ACTIVATED | Waste drawer removed, LUNG O and FREE DOSE pressed > 5 sec | Steady White | |
| DESCALING PHASE 1 | After FREE DOSE Pressed | Clockwise rotation | White |
| After FREE DOSE OR ON/ENERGY SAVING pressed | Steady White | ||
| Ready for washing phase | Steady White | ||
| DESCALING PHASE 2 Rinsing | After FREE DOSE Pressed | Clockwise rotation | White |
| After FREE DOSE OR ON/ENERGY SAVING pressed | Steady White | ||
| Machine back to ENERGY SAVING None None | |||
STARTING THE MACHINE
A Set the machine on a flat, stable surface, far away from water or heat sources.
Damage caused by failure to apply these instructions will void the guarantee.
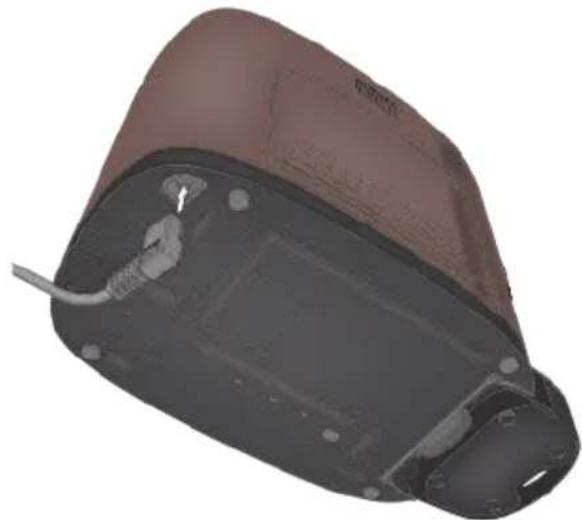
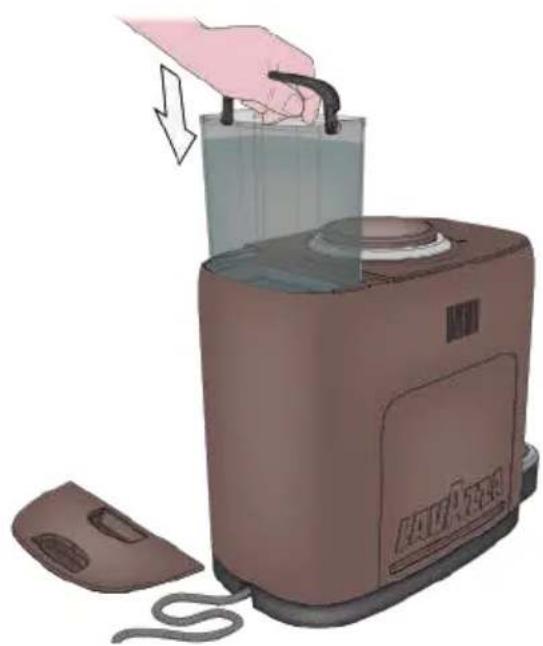
1 Turn the machine sideways, on one of the sides.
Plug the power cord into the socket located under the machine and place the cable in the appropriate guide.
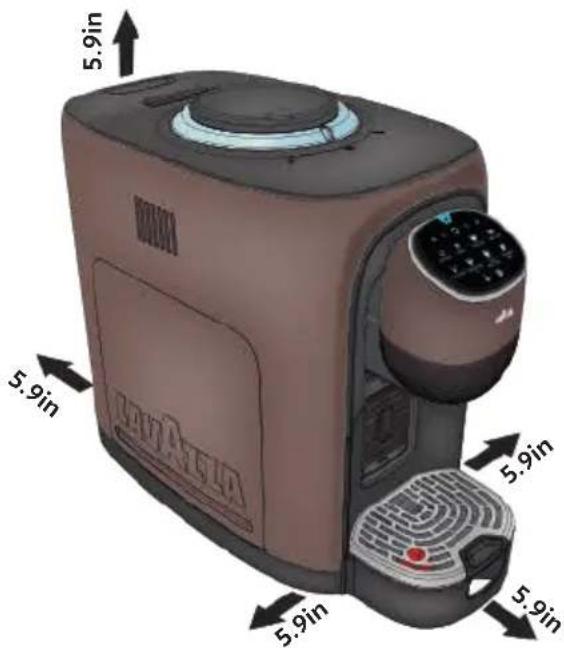
Place the machine on a steady level surface, far from water and heat sources.
Guarantee minimum clearance (5.9in-15cm) on machine sides as shown in figure.
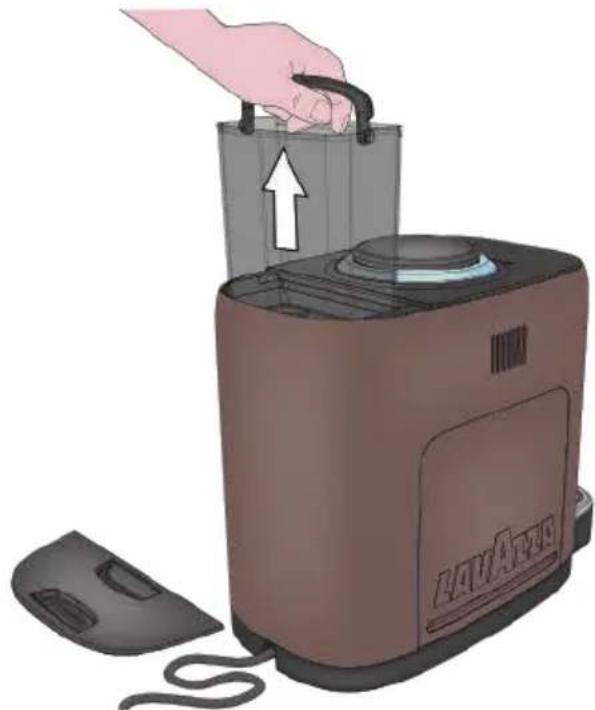
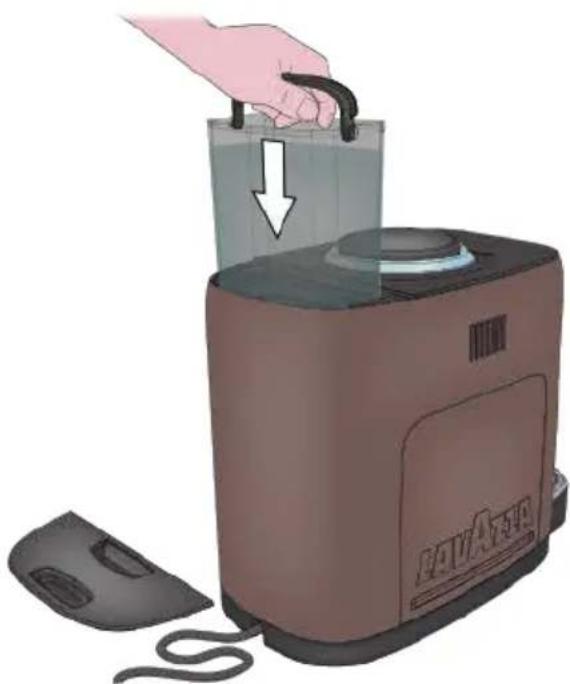
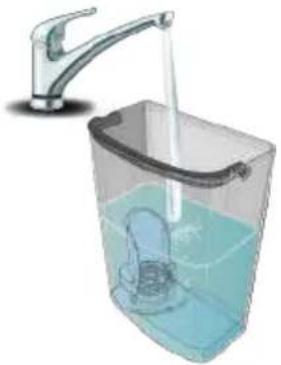
4 Insert the outer drip tray taking care to position it correctly.
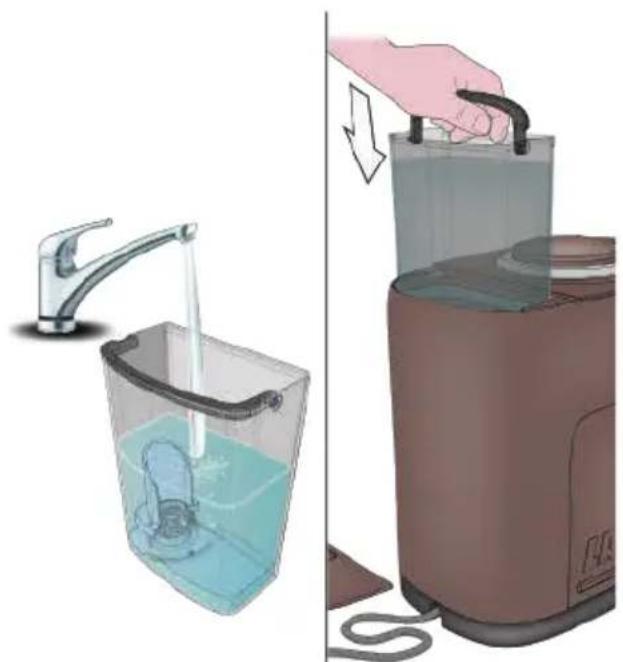
5 Lift and remove the water tank cover; take out the water tank using the handle.
6 Remove the Carton Spacer from under the tank before filling.
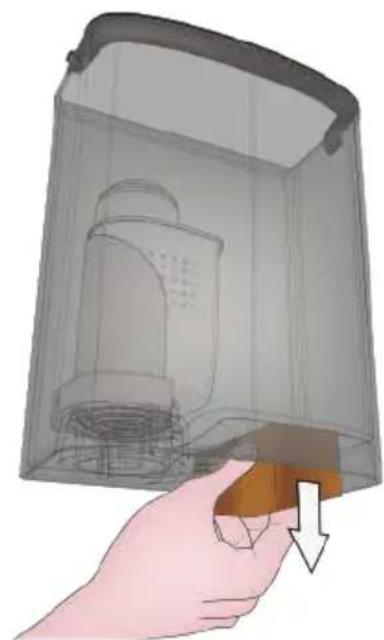
When you handle the water tank, the coffee bean container cover must be installed.
7 Rinse the water tank before using it.
8 Fill the water tank up to the MAX level indicated; use only fresh non-sparkling drinking water.
9 Reinstall the water tank using the handle, then close by using the cover.
In case of overflow, excess water is collected in the Waste Water Container.
The water level must never exceed the MAX mark. Use exclusively fresh non-sparkling drinking water.
Hot water and other liquids may damage the water tank and the machine.
Do not operate the machine without water; make sure that there is enough water in the water tank.
Make sure to properly and fully insert the Water Tank into its place
Make sure that the hands, the machine, the cord and the support surface of the machine are not wet.
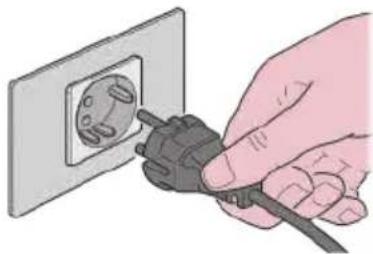
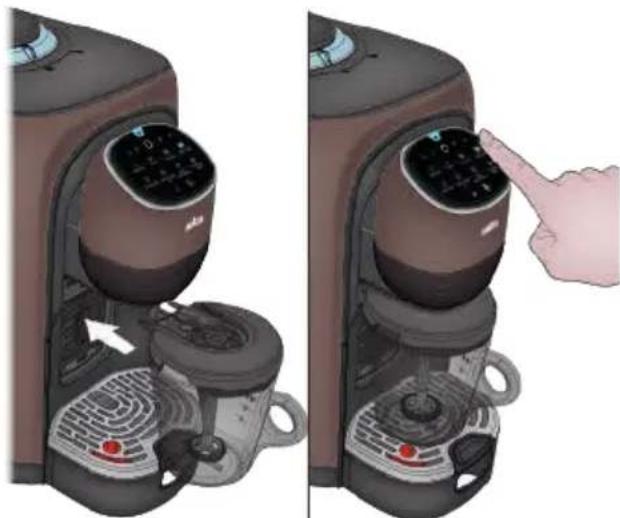
10 Insert the plug into the socket.
FIRST START
When started for the first time, the machine must INITIALLY fill the hydraulic circuit.
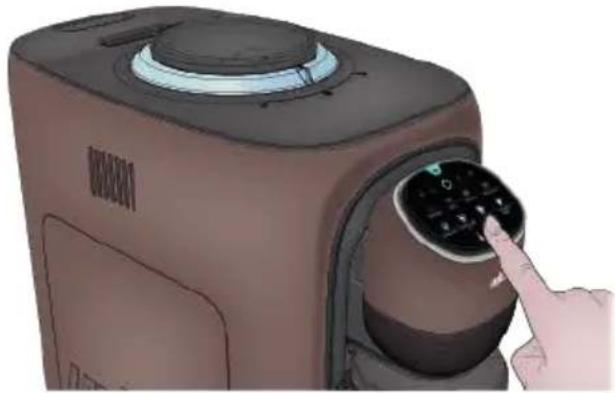
Press the button to switch on the machine. The machine will emit an acoustic signal.
The machine performs the AUTO-RISING cycle in the amount of a small cup of water.
3 Now the machine is ready to brew.
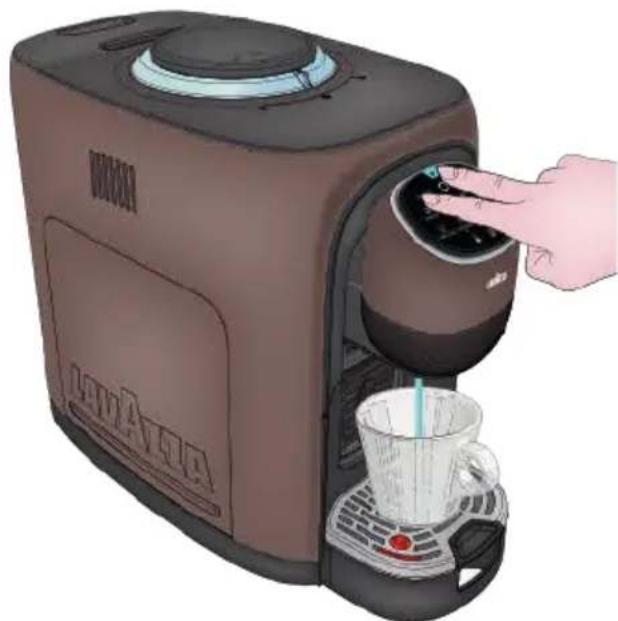
After switching on the machine for the first time and before using it, dispense at least half a litre of water (16.9fl oz/500 ml) to clean the circuit.
Place a cup under the dispenser spout.
Hold down the ESPRESSO button and the button at the same time for 2 seconds to start rinsing.
6 Every time are dispensed (8.4fl oz/250 ml) of water; therefore this passage 5 should be repeated twice. Remove and empty the cup every time at the end of dispensing.
7 At the end of the first washing, the machine is ready to be used.
LOADING COFFEE BEANS
All machines are factory-tested using coffee beans, therefore it may happen to find coffee traces in the coffee bean grinder.
We guarantee that the machine is new even if there are coffee traces.
1 Remove the coffee bean container cover.
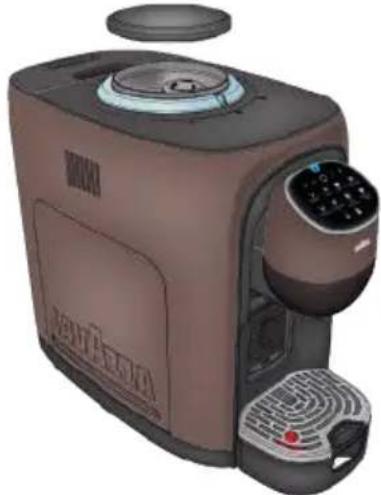
2 Fill the container with coffee beans.

Fill the container with coffee beans only. Being coffee of a natural origin, it can happen that impurities can be found into the beans (wooden sticks, small stones). We recommend to check the beans before filling the container.
Moreover, ground coffee, instant coffee, caramelised coffee and whatever other object can damage the machine and the coffee grinder.
3 Reposition the coffee bean container cover.
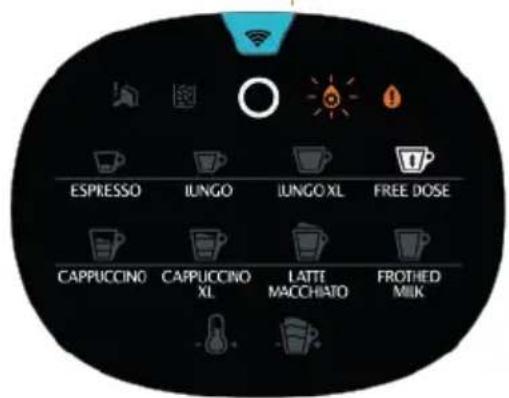
ENERGY SAVING FUNCTION
To guarantee ENERGY SAVING, after 3 minutes of not being used, the machine automatically switches to NETWORKED STANDBY mode when the machine is networked, or to LOW POWER* mode when the machine is not networked.
* LOW POWER is a mode in which the power consumption of the machine does not exceed 0.5 W.
1 The machine can be manually set to ENERGY SAVING within 3 minutes by pressing the button The machine will confirm with a beep.
In the ENERGY SAVING, the buttons will be off, and the button will come on to a less intense light.
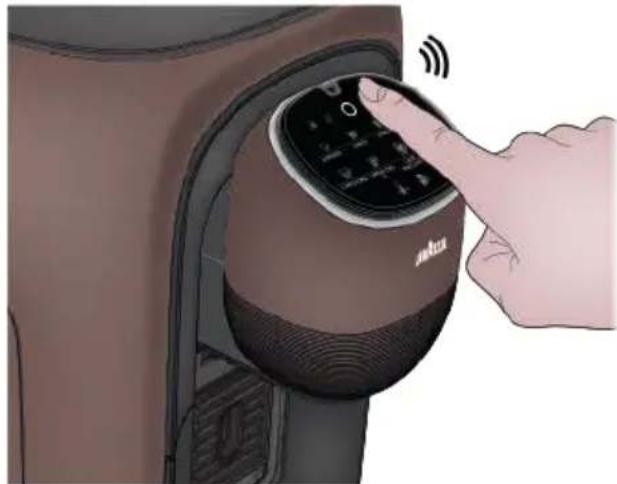
The machine can be activated again by pressing the button
In NETWORKED STANDBY mode the power consumption of the machine is 0.6 W. In LOW POWER mode the power consumption of the machine is 0.47 W.
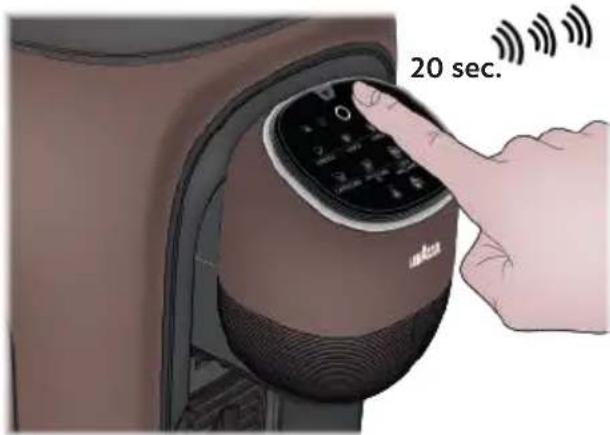
WI-FI ENABLING/DISABLING
1 To DISABLE the Wi-Fi connection, set the machine in ENERGY SAVING mode and hold down the button for minimum 20 seconds until:
- the machine emits 3 sound signals
the Wi-Fi icon flashes 3 times, which indicates that the Wi-Fi is disabled.
When the Wi-Fi connection is disabled, the Wi-Fi warning light remains turned off and would not flash even in case of Bluetooth connection
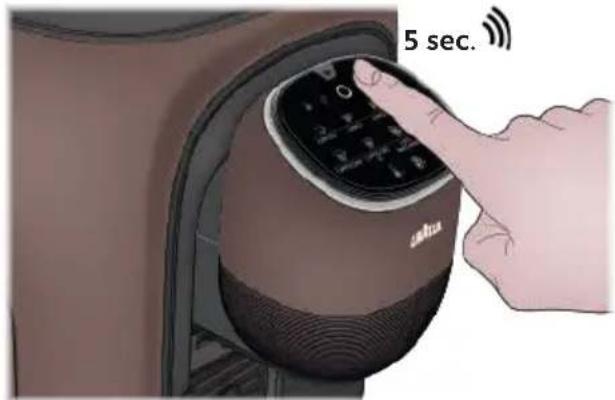
SWITCHING FROM WI-FI TO BLUETOOTH
1 Set the machine in ENERGY SAVING mode.
Hold down the button for minimum 5 seconds until you hear a sound signal
- If the machine is connected to a Wi-Fi network, this will be disconnected, the Bluetooth connection will be enabled and visible to surrounding devices.
- If no Bluetooth connection is available, after 4 minutes the machine will automatically reconnect to the Wi-Fi network.
To RE-ENABLE the Wi-Fi connection, set the machine in ENERGY SAVING mode.
Hold down the button for minimum 20 seconds until:
the machine emits 3 sound signals
the Wi-Fi icon flashes 3 times, which indicates that the Wi-Fi connection is re-enabled
Assoluta connects to a Wi-Fi network by acquiring the IP address from the router in dynamic mode (DHCP).
To connect the machine to a Bluetooth/Wi-Fi network, download the "Piacere Lavazza" app and follow the instructions.

Piacere Lavazza
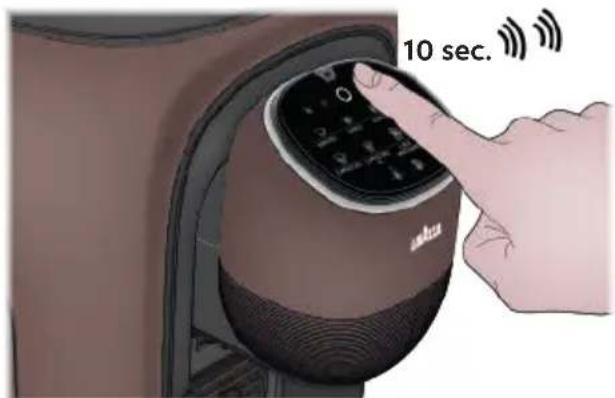
RESETTING WI-FI CREDENTIALS
1 Set the machine in ENERGY SAVING mode.
Take out the waste container tray and hold down the button for more than 10 seconds until you hear 2 sound signals
The machine is now disconnected from the Wi-Fi network and the credentials previously stored are removed.
The Bluetooth connection will be enabled and the machine will be visible to surrounding devices.
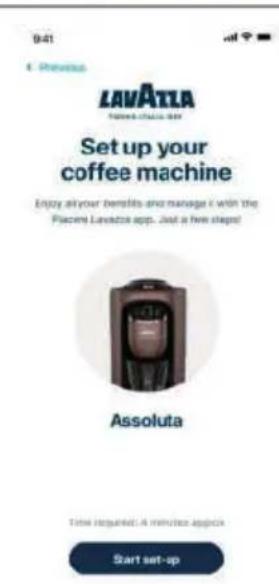
REGISTERING IN THE APP
The following chapter explains how to connect the espresso machine ASSOLUTA Lavazza to your house network.
If the machine is not connected, it can only be used as a manual coffee machine (standard).
What you need:
- Smartphone
Wi-Fi connection and password
"Piacere Lavazza" App

Piacere Lavazza

To guarantee a better experience, make sure that your "Piacere Lavazza" app is enabled to data connection at all times, even in the presence of an activated Wi-Fi.

APP Image Description
Create your Lavazza account, if you do not have it already.
Access the section dedicated to the registration of the espresso machine ASSOLUTA.
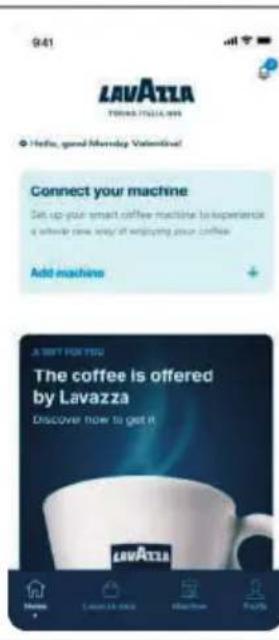
If you are already registered in the "Piacere Lavazza" app, click "Add Machine" in the widget to access machine registration directly from the home page.
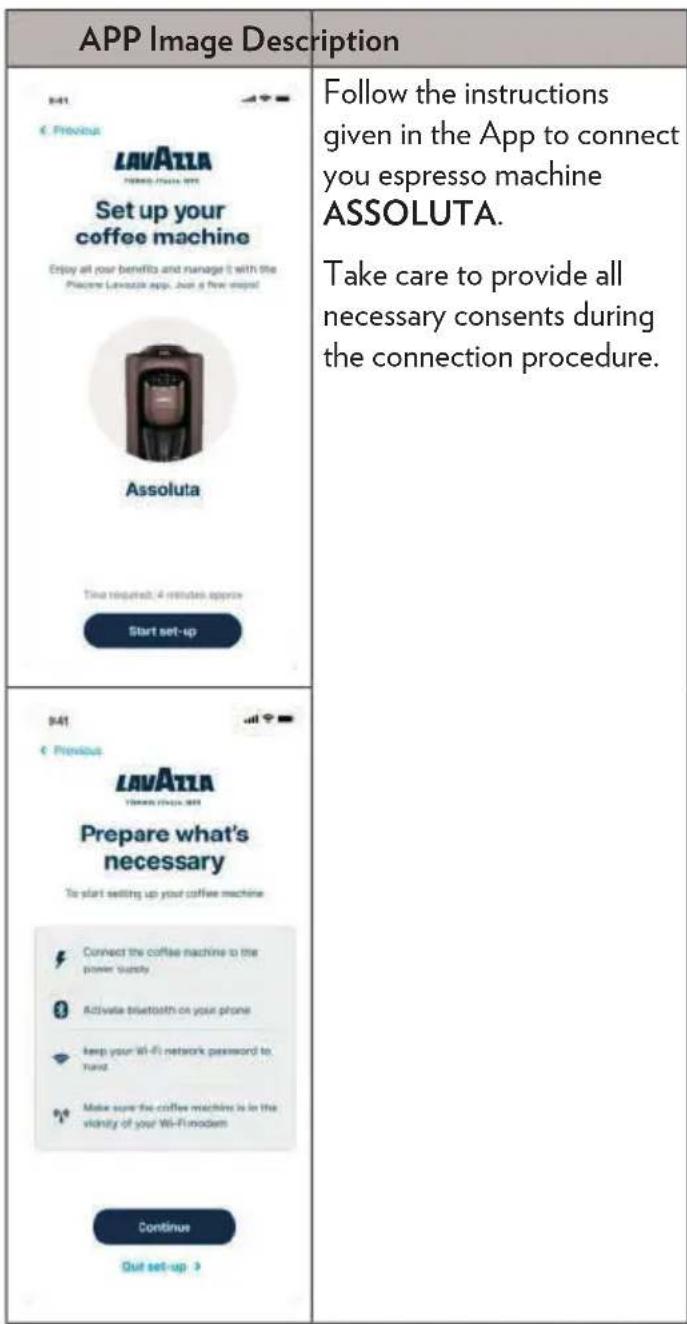
If you do not display the machine network, remove and reinsert the plug, and wait a few seconds
Here below are listed some of the problems you may encounter while connecting the machine and how to solve them:
| APP Image Description | |
| 941 LAVATAA No coffee machine found Make sure your coffee machine is properly and connected to the power supply and the Wi-Fi indicator is on and flashing Can't see the indicator fainting? The coffee machine you selected is Aurora. Select another coffee machine Error code:DP-507 Try again Quit set-up | You do not find your machine. Make sure that the Wi-Fi warning light on the machine is flashing. If the Wi-Fi warning light is off, switch off the machine, open the waste container tray and hold down the but- ton until you hear two sound signals |
| 841 LAVATAA Select your Wi-Fi network. To set up your coffee machine, you need to connect to your Wi-Fi router, determine your network from the list and continue. Available Wi-Fi networks. Item TAM-5138389 TAM-5138389 TAM-5138388 Try again Can't find your network? Quit set-up | You do not find your Wi-Fi network Make sure that the machine is close to the router and that this is a Wi-Fi router. Update the Wi-Fi list in the App. |
| 841 LAVATAA Something went wrong... It is not possible to continue with the Luozza machine setup at this moment. Please try the operation again if the problem persists, contact support. Need help? Contact support | An error is displayed after password input. If this is not a password typing error, take note of the error code displayed in the App and contact the customer service. |
You can always click the help button available in the right-hand top corner to have more details.
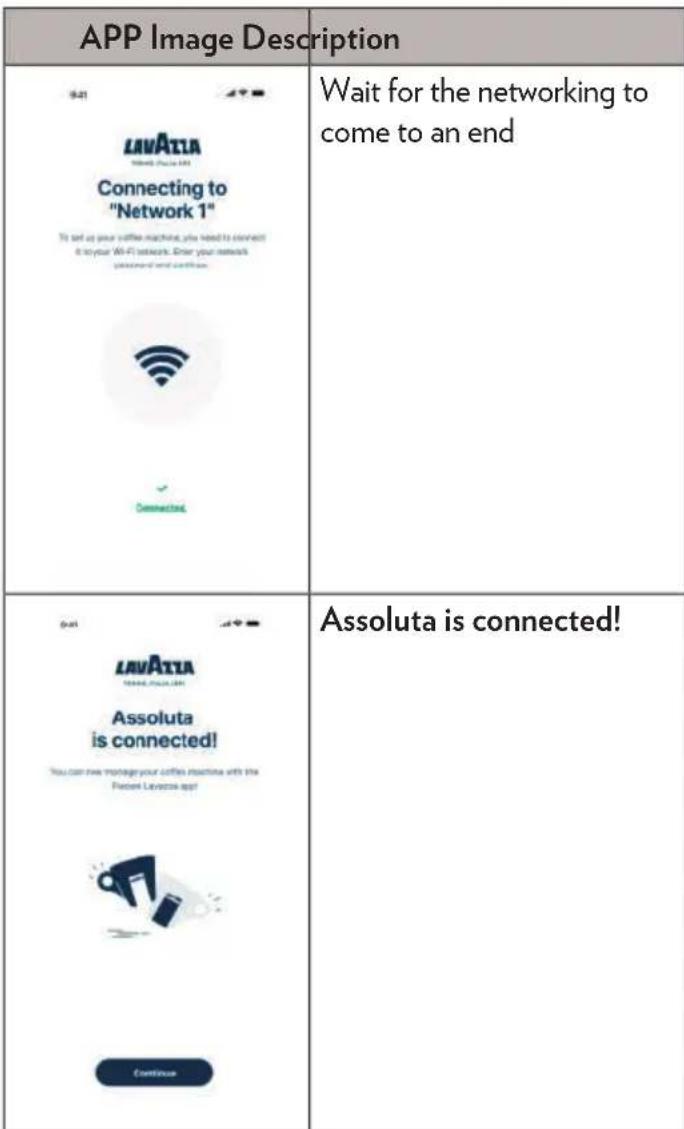
End of machine configuration.
When the machine is connected, the Wi-Fi warning light in the user interface of your Assoluta will turn light blue.
CHANGING THE WI-FI NETWORK IN THE APP
The following chapter explains how to change the Wi-Fi network where you express machine ASSOLUTA Lavazza is connected.
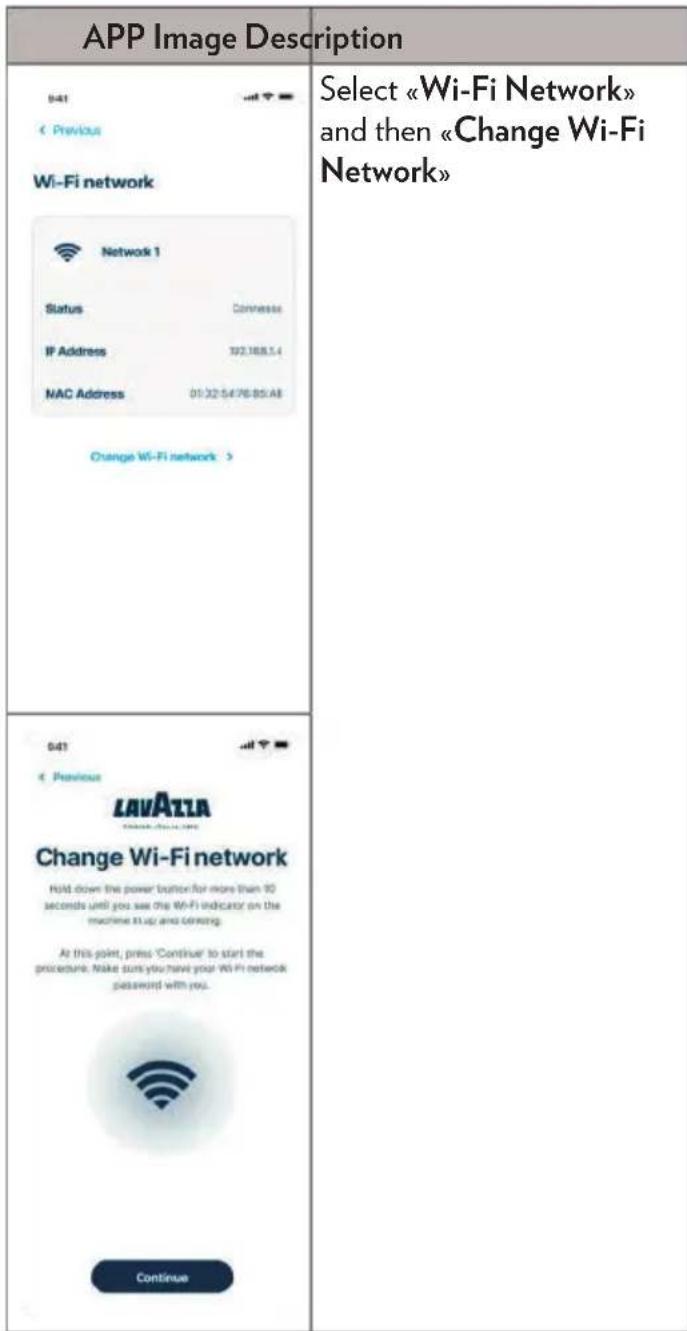
APP Image Description
| Select the Wi-Fi where you want to connect Assoluta and enter your password. | |
| < Previous LAVATLA NAME (NAME) > Select your Wi-Fi network To set up your coffee machine, you must connect to your Wi-Fi network. Select your network from the list and continue. | |
| Available Wi-Fi networks ■ Item 51388189 51388389 51388389 51388389 51388389 51388389 51388389 Can't find your network? Get set-up > | |
| You have successfully completed the change of the Wi-Fi network. |
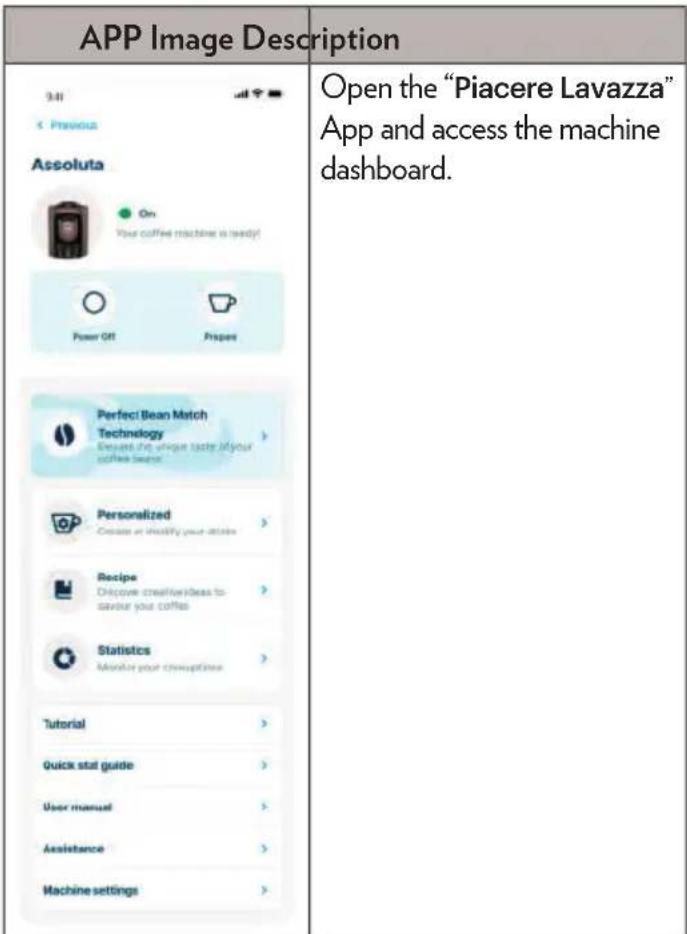
FUNCTIONS OF THE "PIACERE LAVAZZA" APP
The following chapter explains THE FUNCTIONALITIES AVAILABLE IN THE "Piacere Lavazza" app for your espresso machine ASSOLUTA.
REMOTE CONTROL
Through the "Piacere Lavazza" app you can switch the machine on and off and operate coffee delivery.
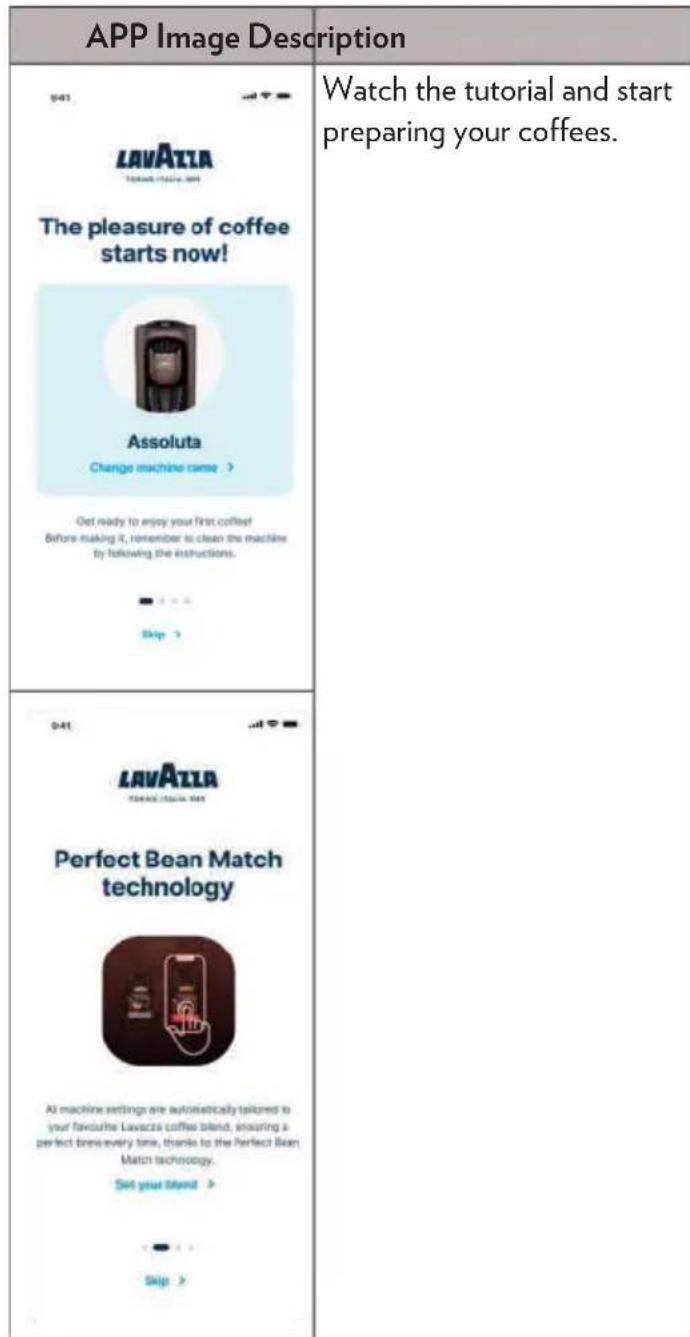
PERFECT BEAN MATCH
Through the "Piacere Lavazza" app you can rely on the Perfect Bean Match technology to optimise the parameters of your espresso machine ASSOLUTA and obtain the best in-cup performance.
Scan the bar code printed on the coffee beans packaging using the app to activate this technology.
RECIPES
Through the "Piacere Lavazza" app you can access a list of recipes specially meant for the new espresso machine ASSOLUTA.
Follow the descriptions step by step and find out new recipes to enjoy your coffee!
PERSONALISED COFFEES
Through the "Piacere Lavazza" app you can create, change and rename your drinks in accordance with your personal tastes.
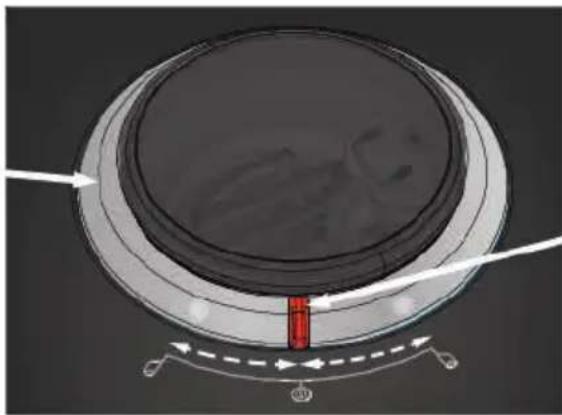
GRIND SETTING
The coffee grinder selector inside the coffee bean container enables optimising and guaranteeing the best in-cup results with all Lavazza coffee blends (both those suitable for Espresso preparations and Caffé Crema ones).
Select 1. for finer grinding of coffee beans, suitable for ESPRESSO type preparations.
Select 2. for coarser grinding of coffee beans, suitable for LUNGO XL type preparations.
- Coarser coffee powder
1. Riner coffee powder
Selector
In any case, both selections allow coffee to be delivered in all of the coffee recipes available.
A Move the selector ONLY when the grinder is grinding.
Never do the grinding adjustment when the grinder is not operating. It may damage the grinder.
Never place the selector between and because in this case the machine will not perform any delivery.
(User interface OFF, Aroma Setting Ring ON in orange only in the selector area).
AROMA INTENSITY SETTING
If you want less or more intense coffee, before delivery turn the Aroma Selector on the top machine to increase or decrease the amount of coffee to be used.

To increase the amount of coffee to be used, turn the selector anticlockwise towards the icon; a led will come on at the icon selected.

To decrease the amount of coffee to be used, turn the selector clockwise towards the icon; a led will come on at the icon selected.
The selection does not reset after delivery and remains enabled as long as it is not disabled by turning the ring in the opposite direction of the previous selection.
Aroma Selector

to decrease the amount of coffee

to increase the amount of coffee
Light ring ready for brewing:

Aroma Selector Standard - Steady white light

Aroma Selector turned leftwards - Clockwise rotation white.

Aroma Selector turned rightwards - Counter rotation white.
COFFEE DOSE PROGRAMMING
You can change the amount of coffee to be dispensed; the minimum settable dose is 0,67fl oz (20 ml).
Always press the same button while programming the coffee dose.
Do not operate the other buttons otherwise programming would be cancelled.
It is not possible to program the coffee dose in milk-based beverages.
Switch on the appliance by pressing the power button and make sure the drip tray under the dispenser spout and water tank with water inside.
The appliance will perform auto-rinsing for a small cup of water.
Make sure that there are coffee beans in the coffee bean container.
Now the machine is ready to brew.
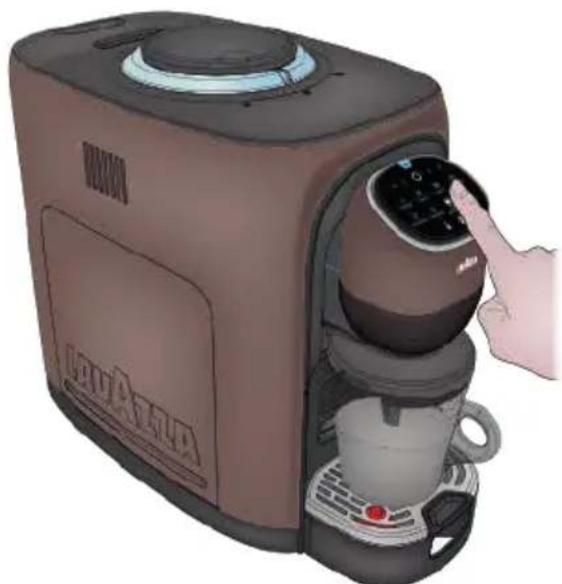
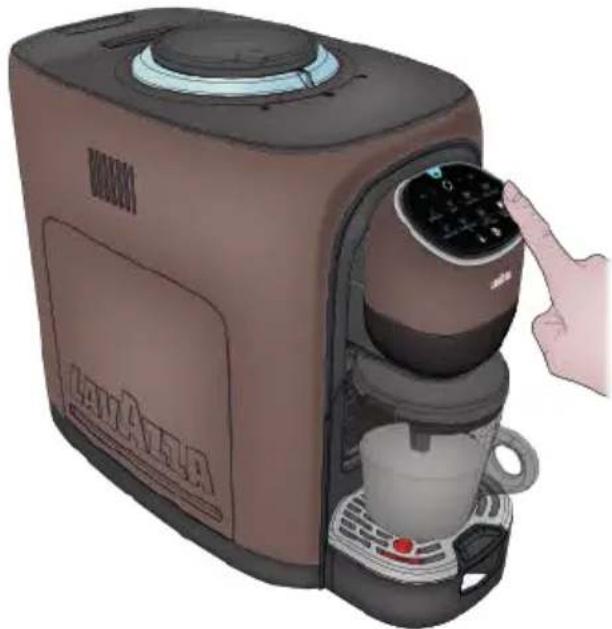
Place a cup under the dispenser spout.
4 To change the coffee dose:
Hold down the button you want to program for 3 seconds; release the button after the beep
Once in the programming mode, the icon you are programming starts flashing and the other 3 coffee preparation icons remain steadily lit.
Once obtained the amount of coffee desired, press the button again to store the amount.
Programming will be cancelled:
If the coffee dose EXCEEDS the maximum programmable amount;
If the coffee dose DOES NOT achieve the minimum quantity of 0,67fl oz (20 ml);
If power supply fails during programming, the machine stops, goes back to the ready condition and the last value programmed is held in the memory;
If during dose programming, a lack of water is signalled, the machine stops dispensing and the dose is not stored; The dose programming procedure should be repeated after topping up water in the tank.
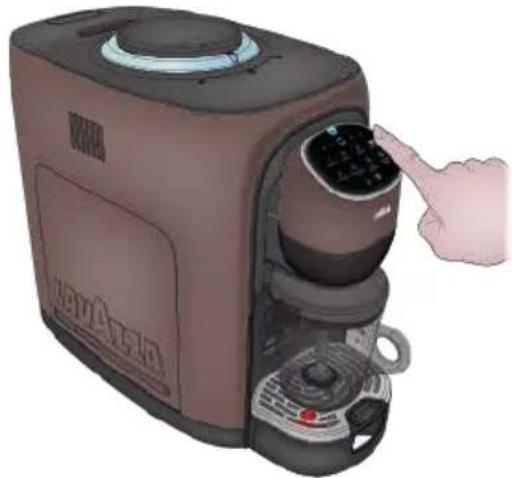
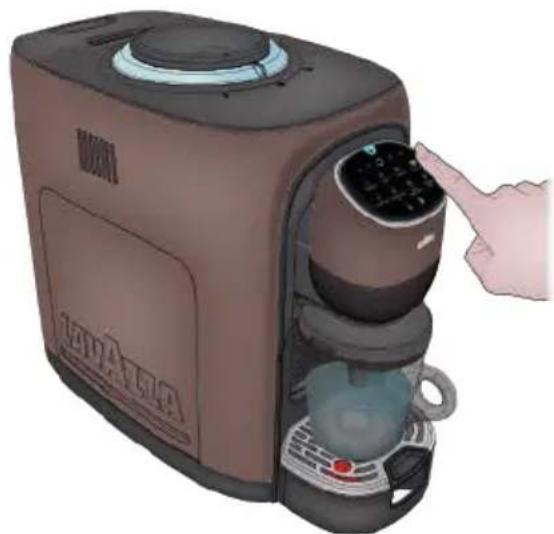
SETTING MACHINE FOR COFFEE CUPS
Switch on the appliance by pressing the power button and make sure the drip tray under the dispenser spout and water tank with water inside.
At start-up, with the machine cold, the appliance will perform auto-rinsing for a small cup of water, the circuit is rinsed with hot water to prepare the machine for use.
2 Now the machine is ready to brew.
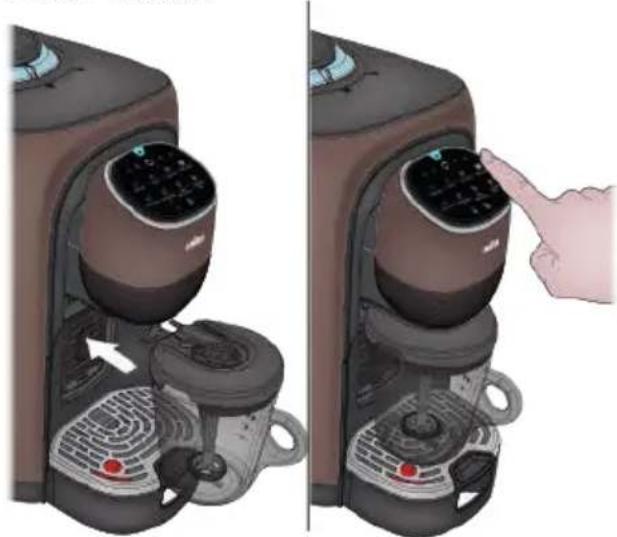
3 To use an espresso coffee cup, press PUSH under the dispenser spout and open the foldable Espresso cup stand.
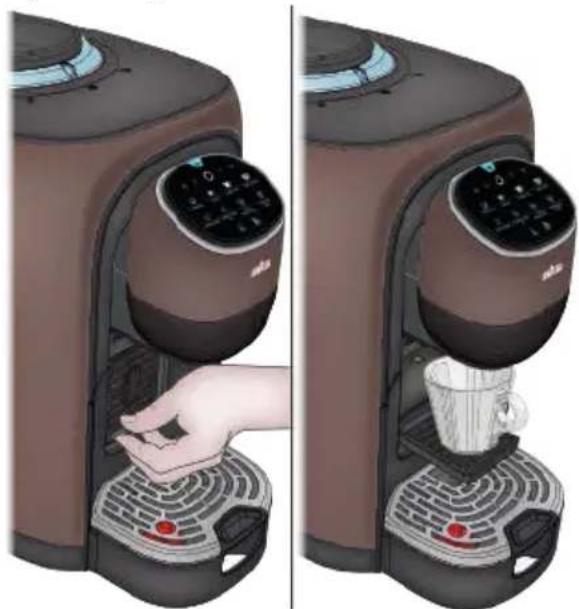
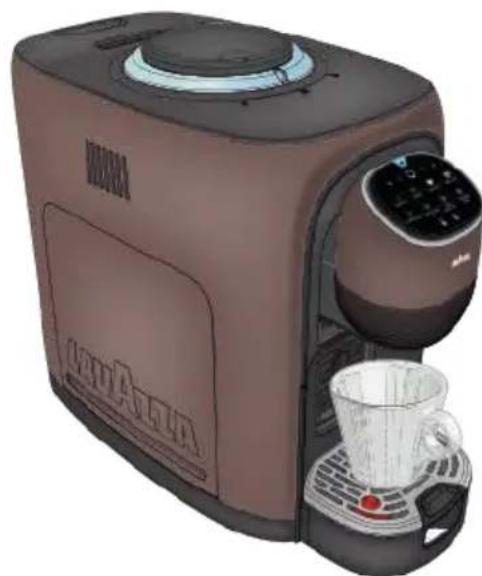
4 Alternatively, you can place a cup or glass directly on the drip tray grid under the dispenser spout.

OOST TEMPERATURE BUTTON
If you wish a hotter coffee, you can increase the beverage temperature by pressing the TEMPERATURE boost button.
The machine will, when the button is pressed, emit an acoustic signal and the button light will get brighter.
2 If you wish to go back to the standard temperature, press the TEMPERATURE boost button again.
The machine will, when the button is pressed, emit an acoustic signal and the button light will get dimmer.
The temperature cannot be changed during the supply phase.
COFFEE BREWINGS
If you want more or less intense coffee, you can increase or decrease the amount of coffee to be used by turning the adjust knob.
See the AROMA INTENSITY SETTING section for more information.
Always make sure that there are coffee beans in the Coffee Bean Container. If during dispensing, the amount of coffee beans in the container is not enough, the machine starts grinding, but it stops after a few seconds; the light ring turns orange while rotating clockwise.
Fill the container with coffee beans and repeat dispensing.
Open the side panel only to carry out maintenance operations to the brewing unit (see the MAIN- TENANCE AND CLEANING paragraph).
If coffee fails to be dispensed, check for illuminated alarm indicator lights.
Do no tamper with the Brewing Unit.
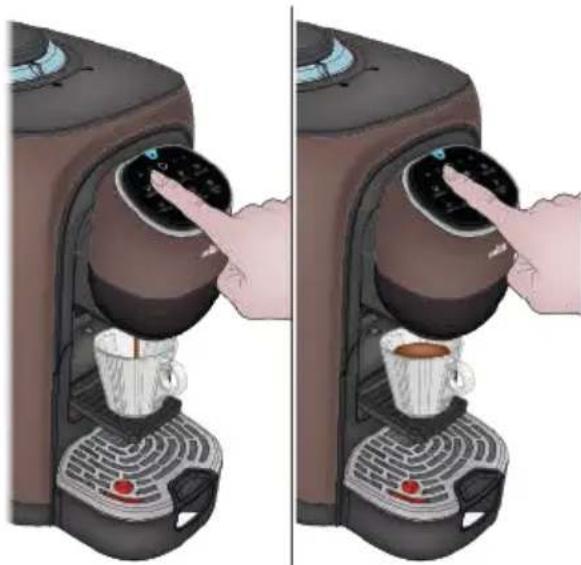
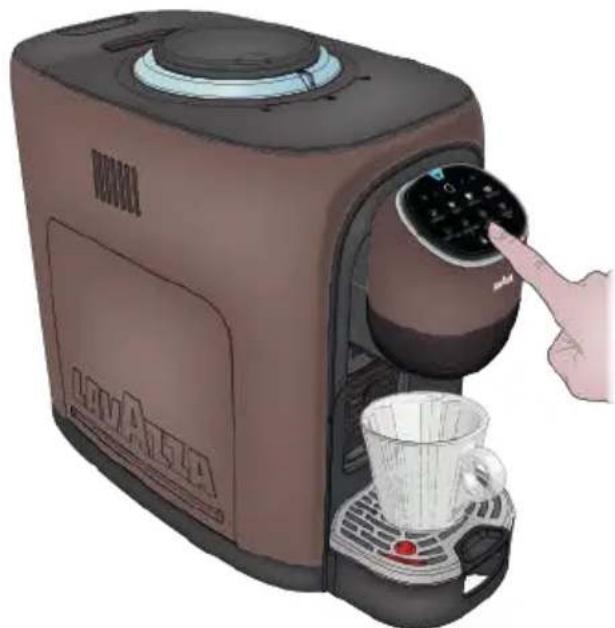
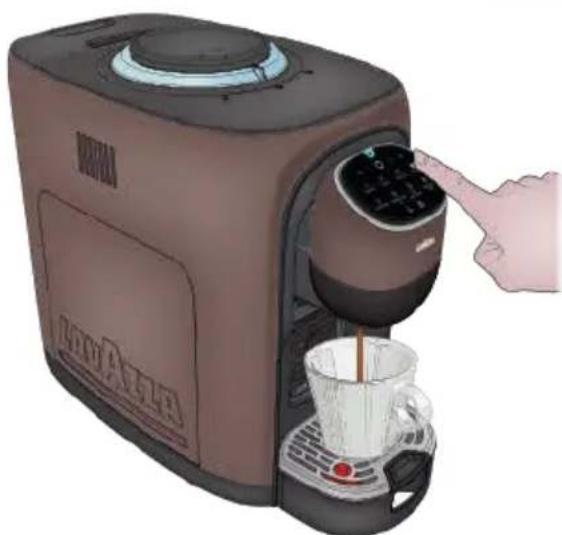
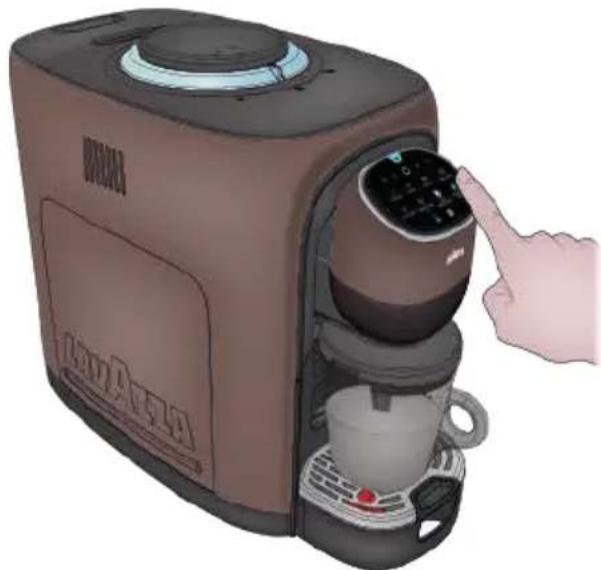
1 Place a cup under the dispenser spout.
Press the ESPRESSO button to dispense (1 fl oz/30 ml) of coffee.
Press the LUNGO button to dispense (2 fl oz/60 ml) of coffee.
Press the LUNGO XL button to dispense (3.5 fl oz/110 ml) of coffee.
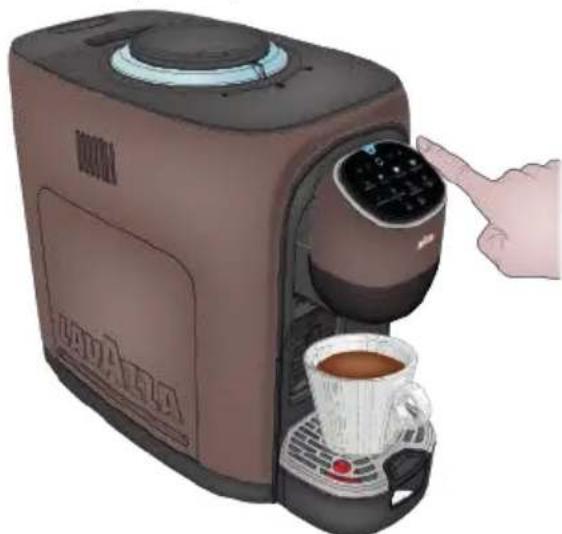
2 When the button being pressed will light on and the Aroma Selector ring will light up indicating that the appliance is preparing the cup of coffee.
You can stop supplying by pressing the supply button again.
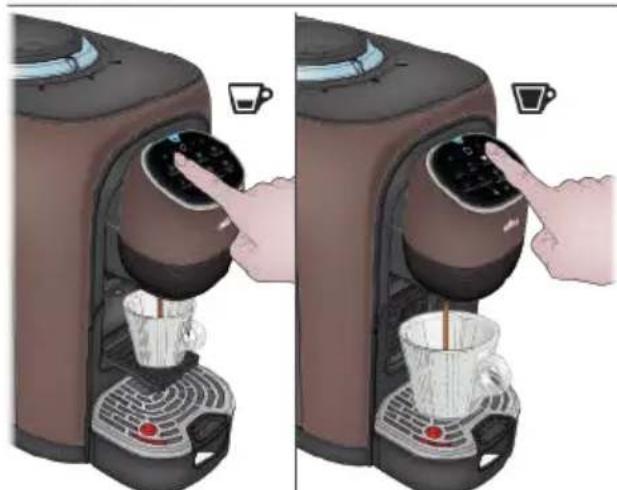
The machine will stop delivery automatically when the programmed dose is reached.
REE DOSE COFFEE DELIVERY
1 Place a cup under the dispenser spout.
Press the FREE DOSE COFFEE button to start delivery.
3 When the button being pressed will light on and the Aroma feature light ring will light up indicating that the appliance is preparing the cup of coffee.
The supply button will light up to a flashing white light when the product is being supplied.
Once the desired amount of brewed coffee is reached, press the button again to stop brewing (7.7 fl oz max /230 ml).
5 To supply again, wait until both the supply button and the button come on to a steady white light.
EN SETTING MACHINE FOR MILK-BASED BEVERAGES
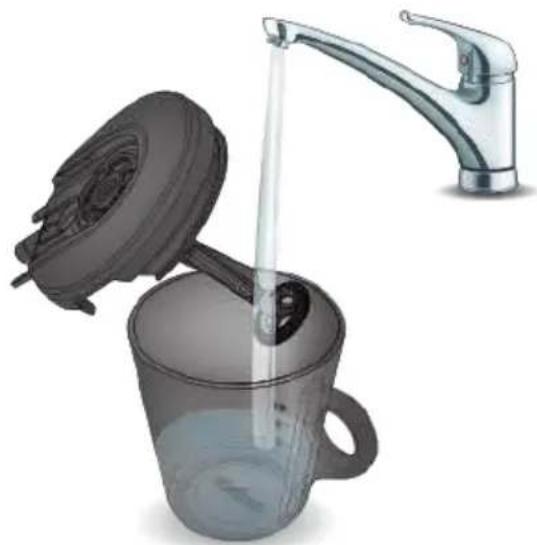
CLEANING CYCLE FOR MILK MUG
When using for the first time, carry out a cleaning cycle on the Milk Mug.
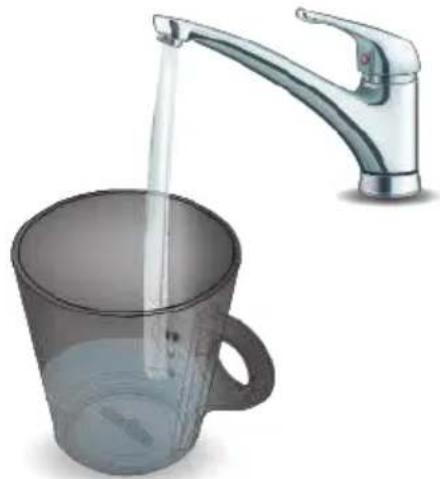
2 Open the Milk Mug and fill it with fresh, non-sparkling drinking water up to the LATTE MACCHIATO / LATTE MONTATO level sign.
Always follow the levels indicated inside the Milk Mug.
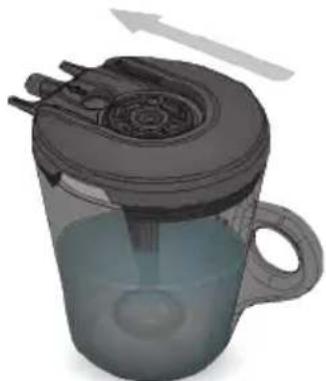
3 Close the Milk Mug with the cover and pay attention to the correct position and direction of the cover.
Switch on the appliance by pressing the power button and make sure to place drip tray under the dispenser spout and water tank with water inside.
The appliance will perform auto-rinsing for a small cup of water.
5 Now the machine is ready to brew.
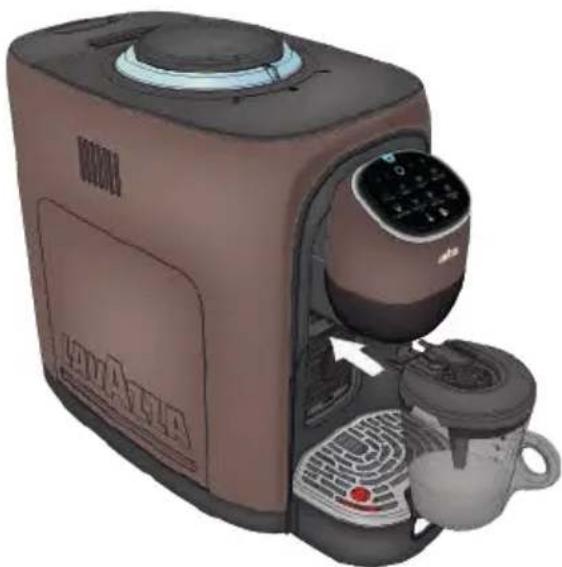
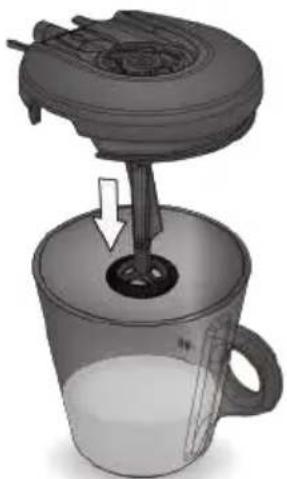
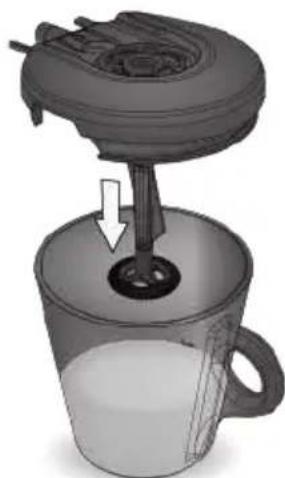
6 Insert the Milk Mug into the machine.
The machine will emit an acoustic signal to indicate the correct insertion of the Milk Mug.
When the Milk Mug is inserted, the machine will only turn on the milk-based beverage, supply buttons, and the TEMPERATURE boost and the FOAM Boost buttons with reduced brightness.
The coffee beverage lights will be OFF and the buttons will not work.
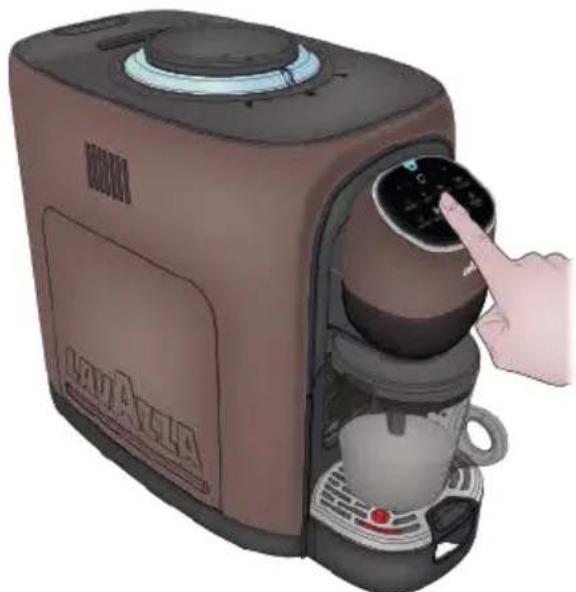
Press the FROTHED MILK button to start the cleaning cycle.
8 After cleaning remove the jug from the machine.
9 Wash all the components with cold or warm water, then dry them up and fit them back into place correctly.
PROVISION FOR PREPARED THE MILK-BASED BEVERAGES
The Milk Mug features three preparation levels sign:


ATTEMACCHIATO LATEMONTATO
Always follow the levels indicated inside the Milk Mug.
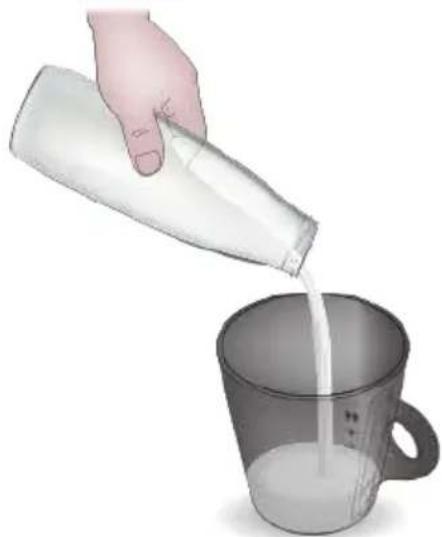
Pour the exact amount of milk indicated on the Mug.
Do not pour too much milk or too little milk.
Otherwise, hot milk may in both cases spill out of the container.
Open the side panel only to carry out maintenance operations to the brewing unit (see the MAIN- TENANCE AND CLEANING paragraph).
If coffee fails to be dispensed, check for illuminated alarm indicator lights.
Do no tamper with the Brewing Unit.
Use only cold milk at the fridge temperature 32^ - 39^(0 - 4^)
Do not use milk at room temperature. Using plant based beverage does not guarantee the best results.
Switch on the appliance by pressing the power button and make sure the drip tray under the dispenser spout and water tank with water inside.
At start-up, with the machine cold, the appliance will perform auto-rinsing for a small cup of water, the circuit is rinsed with hot water to prepare the machine for use.
2 Now the machine is ready to brew.
3 Insert the Milk Mug into the machine.
The machine will emit an acoustic signal to indicate the correct insertion of the Milk Mug.
When the Milk Mug is inserted, the machine will only turn on the milk-based beverage apply buttons, and the TEMPER-ATURE boost and the FOAM Boost buttons with reduced brightness. The coffee beverage lights will be OFF and the buttons will not work.

TEMPERATURE BOOST BUTTON
If you wish a hotter beverage, you can increase it by pressing the TEMPERATURE boost button
The machine will, when the button is pressed, emit an acoustic signal and the button light will get brighter.
2 If you wish to go back to the standard temperature, press the TEMPERATURE boost button again.
The machine will, when the button is pressed, emit an acoustic signal and the button light will get dimmer.
The temperature cannot be changed during the supply phase.

FOAM BOOST BUTTON
If you wish more foam in the beverage, you can increase the amount of the same by pressing the FOAM boost button.
The machine will, when the button is pressed, emit an acoustic signal and the button light will get brighter.
2 If you wish to go back to the normal foam amount, press the FOAM boost button again.
The machine will, when the button is pressed, emit an acoustic signal and the button light will get dimmer.
The foam amount cannot be changed when the beverage is being supplied.
Always make sure that there are coffee beans in the Coffee Bean Container. If during dispensing, the amount of coffee beans in the container is not enough, the machine starts grinding, but it stops after a few seconds; the light ring turns orange while rotating clockwise.
Fill the container with coffee beans and repeat dispensing.

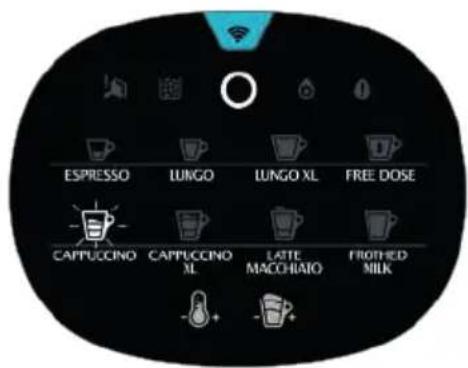
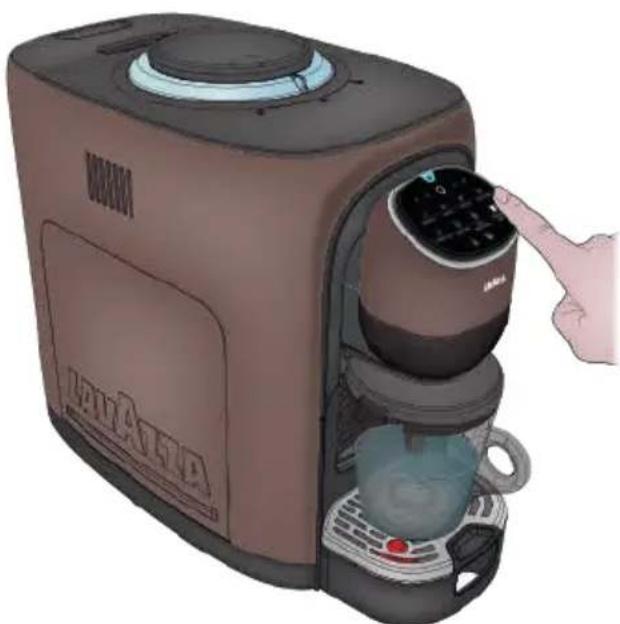
DELIVERING CAPPUCCINO
See the instructions in the BEFORE STARTING MILK-BASED BEVERAGES chapter.
1 Open the Milk Mug and fill it with milk up to the CAPPUCCINO Fivel sign.

2 Close the Milk Mug and fit it into the machine.
When the Milk Mug is correctly positioned, the machine emits a beep

3 Press the CAPPUCCINO 8fl oz (80 ml) button to start the machine.
After a few seconds the machine will start to warm and froth the milk.
When ready, the machine delivers the measure of coffee in the jug and stops automatically.
4 At cycle end, the machine stops and emits an acoustic signal
Remove the Milk Mug from the machine.
Always clean the Milk Mug components thoroughly after each use.

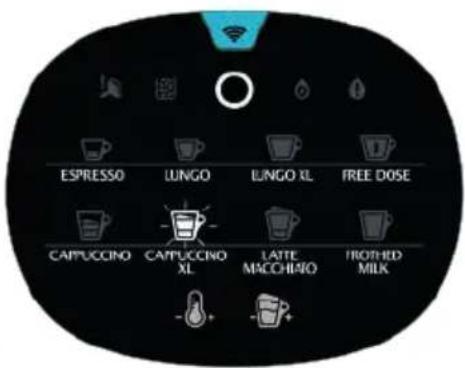
DELIVERING CAPPUCCINO XL
See the instructions in the BEFORE STARTING MILK-BASED BEVERAGES chapter.
1 Open the Milk Mug and fill it with milk up to the CAPPUCCINO XL vel sign.
2 Close the Milk Mug and fit it into the machine.
When the Milk Mug is correctly positioned, the machine emits a beep
Press the CAPPUCCINO XL 4.5 fl oz (130 ml) button to start the machine.
4 After a few seconds the machine will start to warm and froth the milk.
When ready, the machine delivers the measure of coffee in the jug and stops automatically.
5 At cycle end, the machine stops and emits an acoustic signal
Remove the Milk Mug from the machine.

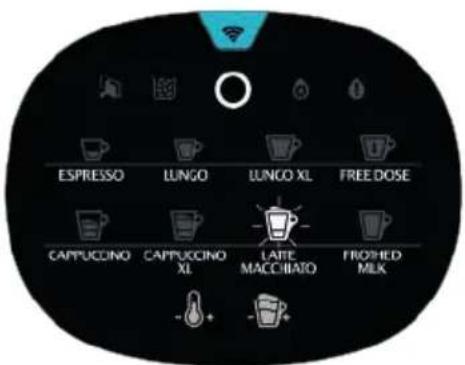
DELIVERING LATTE MACCHIATO
See the instructions in the BEFORE STARTING MILK-BASED BEVERAGES chapter.
1 Open the Milk Mug and fill it with milk up to the LATTE MACCHIATO / FROTHED MILK -Vel sign.
2 Close the Milk Mug and fit it into the machine.
When the Milk Mug is correctly positioned, the machine emits a beep
Press the LATTE MACCHIATO 6.1 fl oz (175 ml) button to start the machine.
4 After a few seconds the machine will start to warm and froth the milk.
When ready, the machine delivers the measure of coffee in the jug and stops automatically.
5 At cycle end, the machine stops and emits an acoustic signal
Remove the Milk Mug from the machine.

LIVERING HOT FROTHED MILK
1 Open the Milk Mug and fill it with milk up to the LATTE MACCHIATO / FROTHED MILK -ivel sign.

2 Close the Milk Mug and fit it into the machine.
When the Milk Mug is correctly positioned, the machine emits a beep

Press the FROTHED MILK button 6.1 fl oz (175 ml) to start the preparation.
4 After a few seconds the machine will start to warm and froth the milk.
When ready, the machine delivers the measure of coffee in the jug and stops automatically.
5 At cycle end, the machine stops and emits an acoustic signal
Remove the Milk Mug from the machine.
Always clean the Milk Mug components thoroughly after each use.

DELIVERING COLD FROTHED MILK
1 Open the Milk Mug and fill it with milk up to the LATTE MACCHIATO / FROTHED MILK
- Level sign.
2 Close the Milk Mug and fit it into the machine.
Press and hold the TEMPERATURE Boost button at least 3 seconds.
The machine will emit a double acoustic signal to indicate the shift to the cold beverage preparation.
Both the Temperature Boost button and the COLD FROTHED Milk icon will turn blue and the machine will only enable the COLD FROTHED MILK supply button
Press the COLD FROTHED MILK button 6.1 fl oz (175 ml) to start the preparation. After a few seconds, the machine will start whipping the milk.
When the beverage is being supplied, the selected button will be on with a flashing blue light.
5 At cycle end, the machine stops and emits an acoustic signal Remove the Milk Mug from the machine.
6 To deactivate COLD FROTHED MILK proceed as follows:
- Pressing the TEMPERATURE boost button
- The machine will emit an acoustic signal
- The user interface turn back on the milk-based beverages supply buttons, and the TEMPERATURE Boost and the FOAM Boost buttons with reduced brightness.
DAILY CLEANING OF THE APPLIANCE
Timely cleaning and maintenance of the appliance is very important to prolong the life of the appliance.
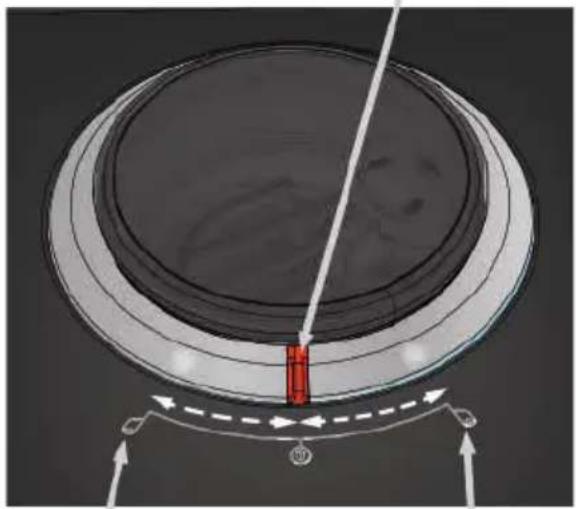
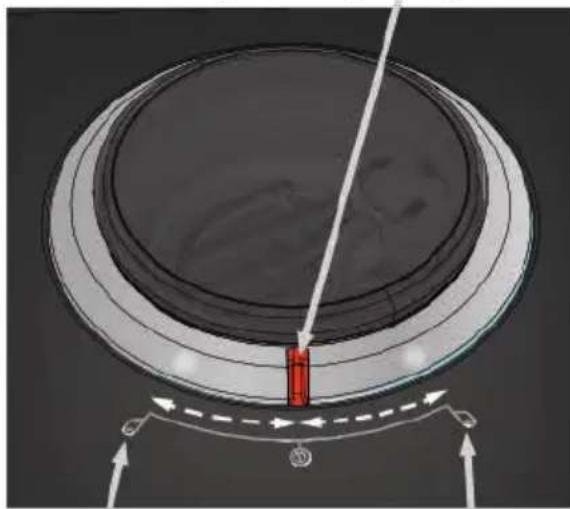
Empty and clean the drip tray every day.

When the external drip tray is full, the red float tip will be visible in the hole on the left side of the grid.
Cleaning the drip tray and coffee grounds container
- Pull the external drip tray out of the machine.
- Empty the water inside the drip tray in the sink and wash it with fresh water. Dry it afterwards.
- Slides open the waste container tray and the coffee grounds container.
- Empty the coffee grounds container and the waste container tray, rinse it with fresh water. Dry it afterwards.
- Place the coffee grounds container back in the drip tray.
- Place the external drip tray at it original position.

When lights up, the coffee grounds container needs to be empty.
When is flashing, the coffee grounds container is missing.
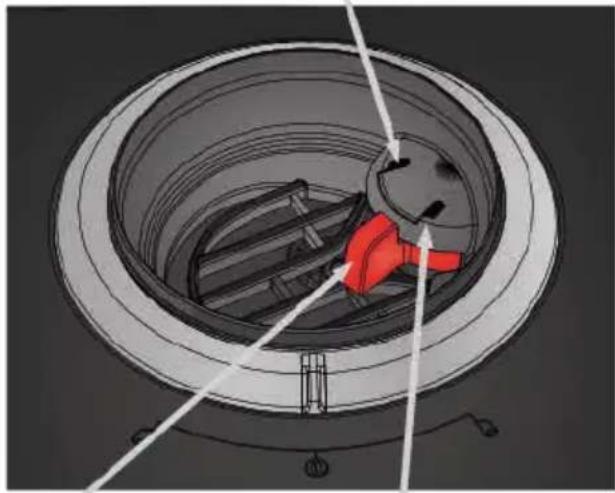
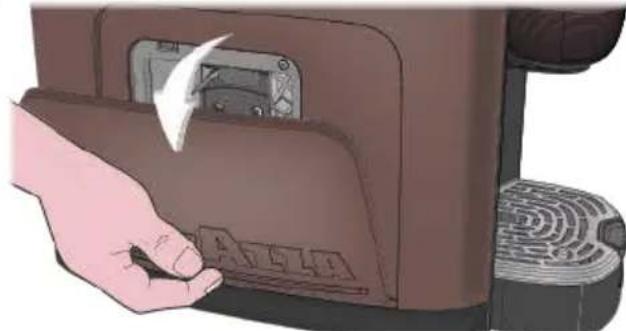
Cleaning the Brewer Unit
Slight press the bottom of the service door to open it.
2 Remove the service door.

Press the release knob of the brewer unit

Remove the brewer unit and rinse it under tap.

Insert back the brewer to its original position and install back the service door its original position.

When lightsup stably, it indicate that the Brewer is missing / installed improperly.
When is flashing, it indicates that the Service Door is missing/installed improperly.
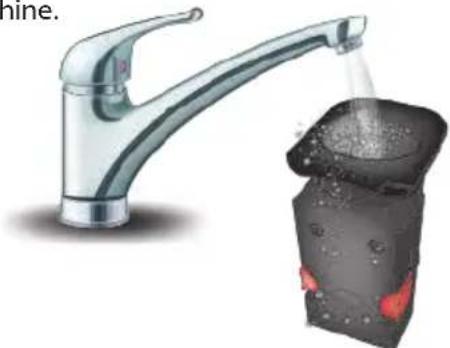
Cleaning the water tank
1 Lift the water tank out of the machine and clean it with fresh water.
2 Fill it with drinkable water up to the MAX level indication and place it back in the machine.
When you handle the water tank, the coffee bean container cover must be installed.

Cleaning the automatic milk froth system
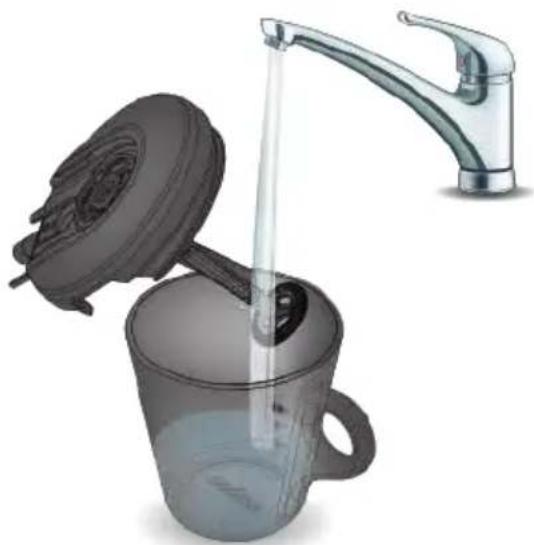
1 Remove the cover from the Milk Mug and separate the components.
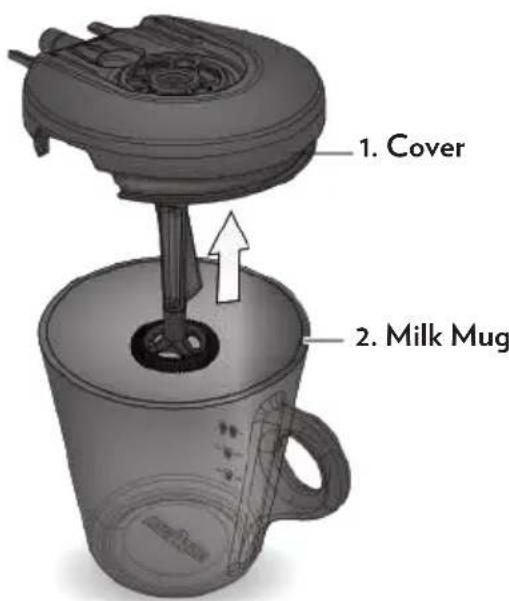
The Milk Mug cover (1) is composed of the following components:
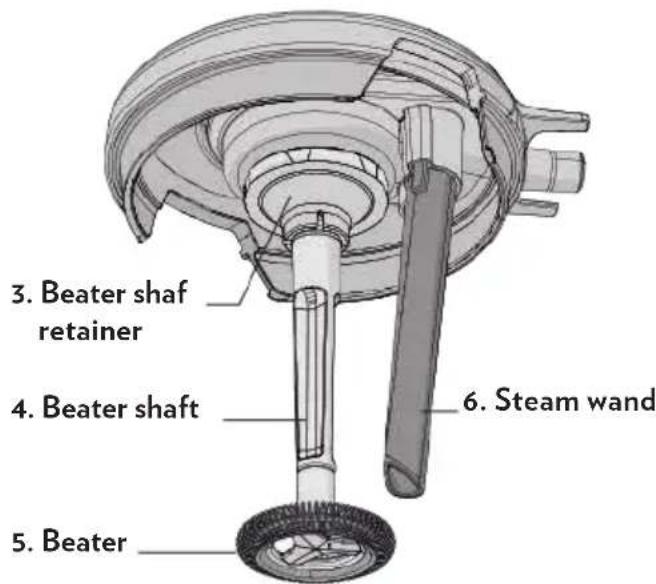
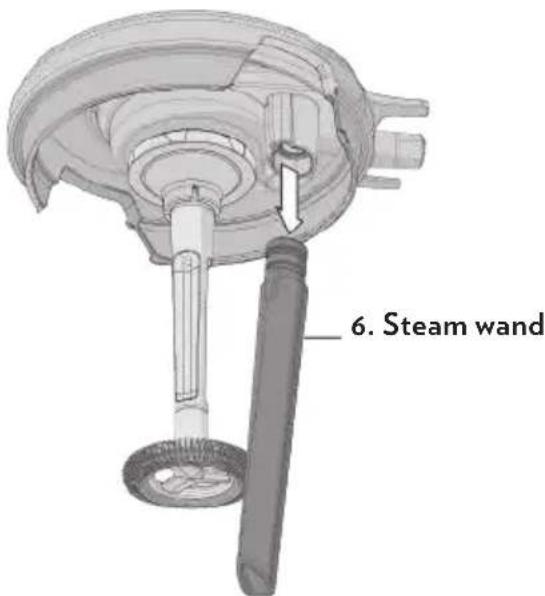
3 Disassemble the steam wand (6) from the Milk Mug cover (1). Wash all components in cold or lukewarm water.
Separating the other parts of the beater cover is not necessary.
- To prevent malfunctioning, avoid disassembling the beater shaft (4) and removing it from its original position.
- The Milk Mug (2), the beater cover (1) and the steam wand (6) can be washed in cold water or in the dishwasher at low temperature; wash the parts separately
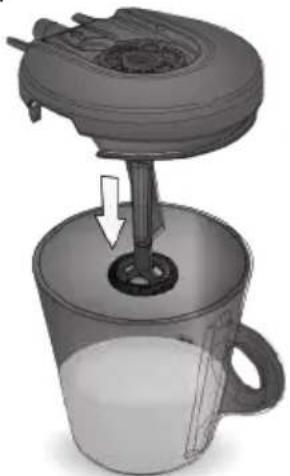
4 Reassemble the steam wand (6) in the Milk Mug cover (1).
Check correct positioning of the beater (5) in its seats in the beater shaft retainer.
After washing, make sure that all parts are installed correctly; the beater (5), in particular, should be firmly installed and free to rotate.

Fit the cover onto the Milk Mug.
6 Close the Milk Mug with its cover and pay attention to the correct position and direction of the cover.

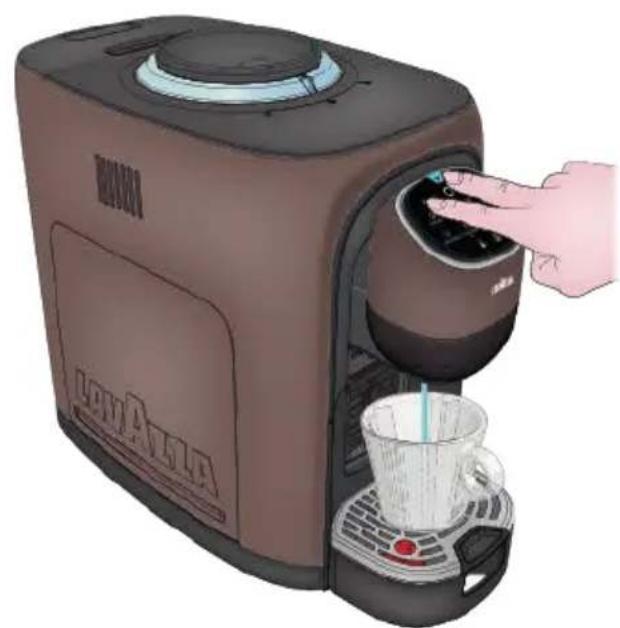
MANUAL RINSING
You can perform a manual rinsing cycle to clean the coffee nozzle after use.
It is also suggested to perform a manual rinsing if the appliance has not been used for a long period of time.
1 Place a Mug under the supply spout.
2 In ENERGY SAVING condition, press and hold the and ESPRESSO buttons together for 2 seconds.
3 Will be dispensed approximately 8.7fl oz (250 ml) of water.
Repeat the step a few times if necessary
The ESPRESSO button will be flashing during the rinsing.
4 Remove and empty the cup every time at the end of dispensing
Danger! Water comes out of the coffee nozzle is hot. Avoid contact with splashes of water.
5 After rinsing, the appliance will return to the ENERGY SAVING condition.
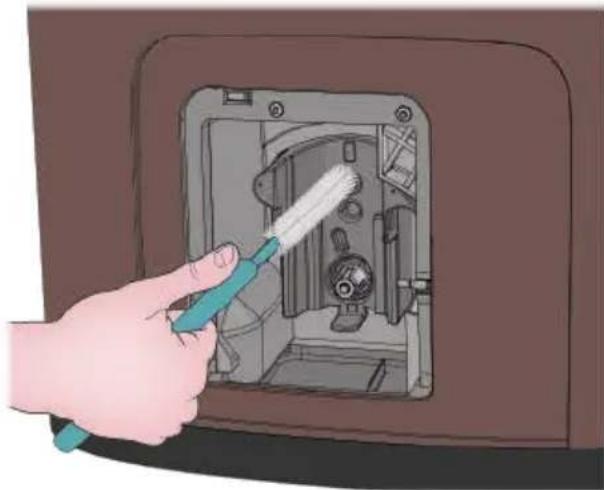
CLEANING COFFEE POWDER OUTLET
Coffee powder may stick on the wall of powder outlet for appliance after used a long period of time.

e warning light flashing rapidly for three times followed by a long pause means that the Brewing Unit needs cleaning.
It is suggested to clean the outlet by following step to ensure that coffee powder can come to Brewing Unit.
Proceed as follows:
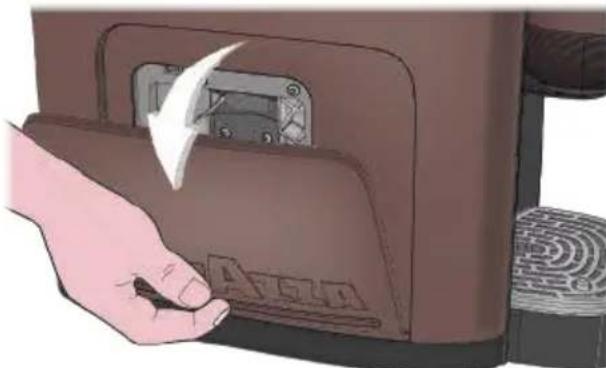
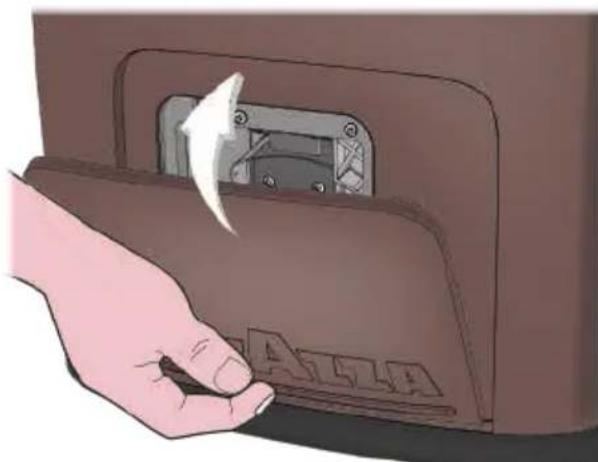
1 Open the service door by applying light pressure to the lower part.
2 Take out the service door.
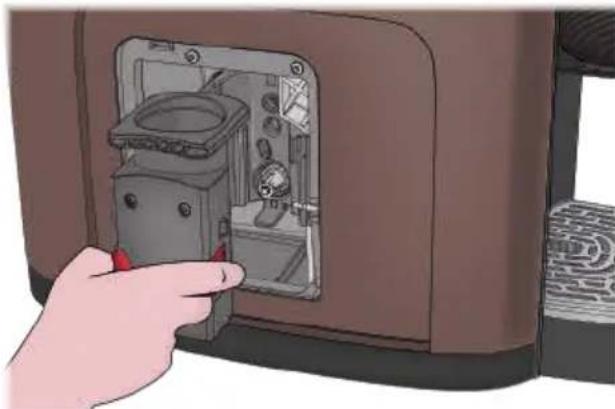
Press the release buttons (orange) to remove the Brewing Unit.

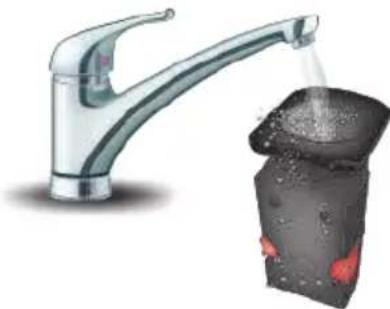
4 Rinse the Brewing Unit under running water. Let it dry completely before reassembling on the machine.
Use cleaning brush to clean the powder outlet and remove any coffee grounds or powder residues from the machine.
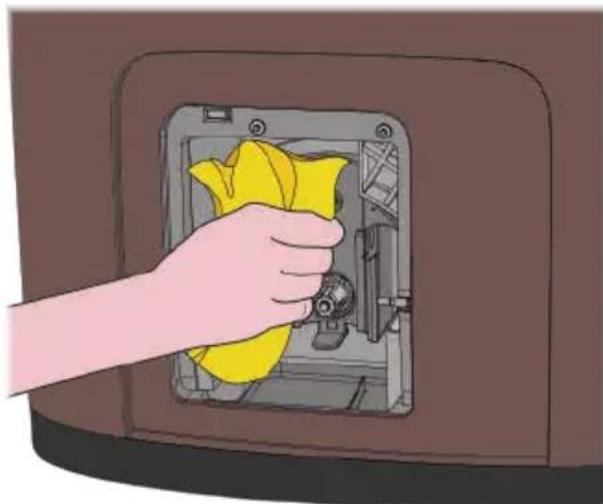
Use a cloth to clean inside of the machine thoroughly.
7 Insert back the brewer to its original position. Dry completely before closing the side door.
DESCALING PROCEDURE
Carefully read the descaling instructions.
Limescale normally builds up with extended use of the appliance; the machine needs descending every 2-3 months and/or whenever a reduction in water flow is noticed.
The descending cycle will be requested by the machine through the switching-on of the special warning lamp available.
A Do not switch the machine off when the descending cycle is under way.
The machine must be monitored during the descending cycle.
The cycle will have, once it has been started, to be performed completely.
Activation:
Put the machine in ENERGY SAVING mode, pressing the button User Interface turned off).
2 Remove the waste container.
Press and keep pressed for at least 5 seconds the LUNGO and FREE DOSE buttons until you hear a long acoustic signal
4 The following buttons on the UI will be turned on:
the button steady on white
FREE DOSE Ready white
- DESCALING icon steady orange
WASTE CONTAINER icon flashing orange
Before starting:
1 Lift and remove the water tank cover; take out the water tank using the handle.
2 Fill the tank with the LAVAZZA DESCALING agent 8.7fl oz (250 ml) and water 8.7fl oz (250 ml).
To decalcify the machine, It is recommended that the LAVAZZA DESCALING agent should be used.
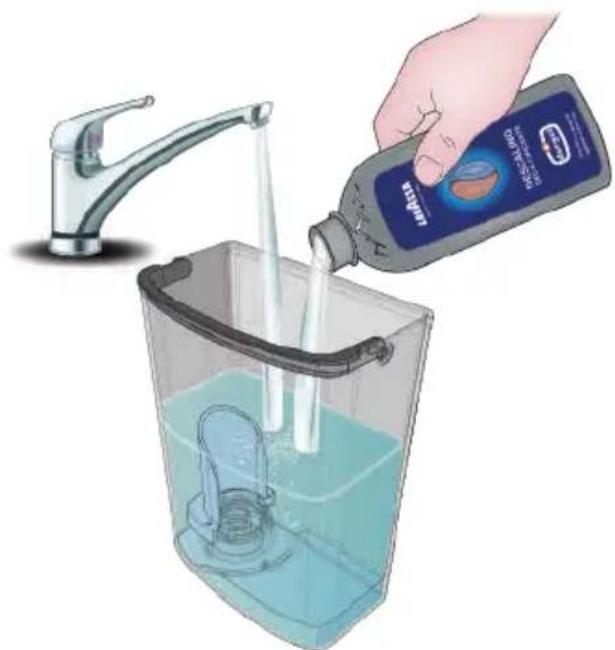
Do not drink the descending solution and products dispensed. Never use vinegar as a descending solution.
3 Reinstall the water tank using the handle, then close by using the cover.
4 Insert the Waste container again. The Waste container icon on the User Interface will be turned off.
5 Insert the Milk Mug.
Until this moment the user can abort the procedure by pressing the button Oagain and the machine will return into the ENERGY SAVING mode.
Step 1 - Start Descaling
1 After scrupulously carrying out all the preliminary operations, press the button FREE DOSE to start the descending cycle.
The machine will start the descending procedure, and the User Interface buttons will be as follows:
the button steady on white
FREE DOSE - button flashing white
- DESCALING icon steady on orange
The procedure can be temporarily paused to empty the Milk Mug by pressing the FREE DOSE the button.
4 When paused, the User Interface buttons will be as follows:
the button steady on white
- FREE DOSE Batton steady on white
- DESCALING icon steady on orange
5 To resume the procedure, press again the FREE DOSE button.
6 At the end of Step 1 the User Interface buttons will be:
the button steady on white
FREE DOSE Button steady on white
WATER TANK icon steady on orange
- DESCALING icon flashing orange
Step2 - Washing:
1 Remove the Water Tank.
2 Wash the Water Tank to remove any residual descaling solution.
3 Fill the Water Tank with clean water.
Put the Water Tank on the machine again.
5 Empty and insert the Milk Mug.
6 Press the FREE DOSE button on the UI.
The machine will start the washing phase, and the User Interface buttons will be as follows:
the button steady on white.
- FREE DOSE 1nton flashing white.
- DESCALING icon flashing orange.
The procedure can be temporarily paused to empty the Milk Mug by pressing the FREE DOSE the button
9 When paused, the User Interface buttons will be as follows:
the button steady on white
FREE DOSE Batton steady on white
- DESCALING icon flashing orange
To resume the procedure, press again the FREE DOSE button.
If the Water Tank gets empty and the washing phase is not over, the WATER TANK icon will be turned on flashing orange.
- Remove the Water Tank and refill it.
12 When the washing phase is over, the machine will stop and:
The DESCALING icon is turned off

- All the milk-based beverage supply buttons, and the Boost TEMPERATURE and the FOAM control button with reduced brightness, will be normally activated because the Milk Mug is inserted.
13 Empty and rinse the milk frothing jug.
Take out the water tank, wash it and fill it with non-carbonated fresh drinking water to the MAX level
Remove the external drip tray, the waste water container tray and the coffee grounds container. Wash all components.
Reinstall the coffee grounds container in the internal drip tray and reinsert the tray into the machine. Position the external drip tray.
Clean the machine using a lightly dampened soft cloth.
14 At cleaning end, the descending process is complete. The machine is ready to be used.
| Problem encountered Possible causes Solution | ||
| The machine will not switch on after the button is pressed. | 1. Machine is not connected to the power source. 2. The machine is connect to power strip not working. 3. Power supply not available in the electric/household mains. 4. Touch interface fails to respond. 5. Wrong simultaneous pressure of 2 buttons. | 1. Connected the machine to the power source. 2. Connected the machine directly to the power source. 3. Connect another device to check the power supply. 4. Verify that the interface surface and the user's hands are clean and dry. 5. Wait a few seconds, then press the button only. IF THE PROBLEM REMAIN PLEASE CONTACT LAVAZZA CUSTOMER SERVICE. |
| The coffee is not hot enough. 1. The brewing unit is too cold. 2. Ceramic cup too cold. 3. Slow delivery due to hydraulic circuit blocked with limescale. | 1. Rinse the appliance at least 3 times before making the coffee. 2. Make a preparation with the temperature boost activated. 3. Descale the machine using Lavazza Descaler. IF THE PROBLEM REMAIN PLEASE CONTACT LAVAZZA CUSTOMER SERVICE. | |
| The coffee cannot come out from spout. | 1. Verify that you have removed the Carton Spacer from the bottom of the water tank outlet. 2. There is no water in the water tank. 3. Water tank misinstalled. 4. No water flow in the hydraulic circuit (no activation). 5. Presence of limescale. | 1. Remove the Carton Spacer. 2. Fill the water tank use only fresh non-carbonated drinking water. 3. Install the water tank correctly and check for correct delivery. 4. Disconnect the power cable, wait 10 seconds and reconnect the cable. Switch on the machine and wait for warm-up to finish. Check for correct delivery (the machine automatically make attempts to fill the circuit). 5. Descale the machine using Lavazza Descaler. IF THE PROBLEM REMAIN PLEASE CONTACT LAVAZZA CUSTOMER SERVICE. |
| The first coffee after machine installation is of poor quality. | » During the first deliveries the system goes through a settling phase. | » Discard the first 3 deliveries, after which the system settles and will deliver coffee according to quality standards.IF THE PROBLEM REMAIN PLEASE CONTACT LAVAZZA CUSTOMER SERVICE. |
| Coffee has no cream. | » Coffee bean is not fresh. | » Use coffee from a new packet.IF THE PROBLEM REMAIN PLEASE CONTACT LAVAZZA CUSTOMER SERVICE. |
| The appliance takes too long time to warm up. | » Hydraulic circuit clogged with limescale. | » Descale the appliance.IF THE PROBLEM REMAIN PLEASE CONTACT LAVAZZA CUSTOMER SERVICE. |
| The water tank is removed / the water level is very low in the water tank but have no alert | » The area near the water tank level sensor is wet. | » Wipe dry the area around the tank and the tank housing.IF THE PROBLEM REMAIN PLEASE CONTACT LAVAZZA CUSTOMER SERVICE. |
| Internal drip tray is filled with a lot of water. | » Possible leak from the water tank or machine malfunctioning. | » Check for leaks from the water tank; if positive, contact Lavazza customer service.IF THE PROBLEM REMAIN PLEASE CONTACT LAVAZZA CUSTOMER SERVICE. |
| The machine does not dispense coffee smoothly. | 1. Probably, the machine is loading too much coffee for the coffee type that is being used.2. Hydraulic circuit clogged with limescale. | 1. We advise lowering the AROMASetting Selector by one level .(Ex.: if the AROMA Setting Selector is set to (+), decrease towards standard 0 .2. Descale the applianceIF THE PROBLEM REMAIN PLEASE CONTACT LAVAZZA CUSTOMER SERVICE. |
| » Difficulty in reinstalling the Brewing Unit in its seat. | » Brewing Unit buttons stuck | » Press several times the Brewing Unit orange buttons to release them.IF THE PROBLEM REMAIN PLEASE CONTACT LAVAZZA CUSTOMER SERVICE. |
| The milk-based beverage warning lights are OFF and the buttons won't work. | 1. Milk Mug missing or inserted wrongly. | 1. Insert the Milk Mug. The milk preparation warning lights will be turned on if the jug is inserted correctly |
| 2. Milk cover positioned with the nozzles facing the handle. | 2. Turn the milk cover so that the nozzle will face the direction opposite the handle. The milk preparation warning lights will be turned on if the jug is inserted correctly. IF THE PROBLEM REMAIN PLEASE CONTACT LAVAZZA CUSTOMER SERVICE. | |
| Milk does not foam. 1. Milk unsuitable for use. | 1. It is recommended that whole milk (pasteurized or UHT treated) and/or cold skimmed milk from the fridge 32°F-39°F(0-4°C) should be used. | 1. It is recommended that whole milk (pasteurized or UHT treated) and/or cold skimmed milk from the fridge 32°F-39°F(0-4°C) should be used. |
| 2. Use milk at the fridge temperature (i.e. ranging between 32°F and 39°F) (0-4°C). | 2. Use milk at the fridge temperature (i.e. ranging between 32°F and 39°F) (0-4°C). | |
| 3. Make sure that the beater coil has been fitted into place correctly. | 3. Make sure that the beater coil has been fitted into place correctly. | |
| 4. Perform the descaling procedure by means of the Lavazza descaling agent. | 4. Perform the descaling procedure by means of the Lavazza descaling agent. | |
| IF THE PROBLEM REMAIN PLEASE CONTACT LAVAZZA CUSTOMER SERVICE. | IF THE PROBLEM REMAIN PLEASE CONTACT LAVAZZA CUSTOMER SERVICE. | |
| The milk-based beverage temperature is too hot. | » Insufficient amount of milk fed with respect to the selected / desired amount. | Add more milk by following the indications of the icons on the Milk Mug. IF THE PROBLEM REMAIN PLEASE CONTACT LAVAZZA CUSTOMER SERVICE. |
| The milk-based beverage temperature is too cold. | 1. Excessive amount of milk fed with respect to the selected / desired amount. | 1. Decrease the amount of milk by following the indications of the icons on the Milk Mug. |
| 2. Water circuit clogged with scale deposits. | 2. Perform the descaling procedure by means of the Lavazza descaling agent. IF THE PROBLEM REMAIN PLEASE CONTACT LAVAZZA CUSTOMER SERVICE. | |
| The automatic milk frother is noisy during milk preparation. | 1. Milk frothing beater not correctly installed.2. Beater cover components not installed in their correct positions.3. Dirt. | 1. Position the milk frothing beater correctly as shown in the Manual.2. Make sure that the beater shaft retainer is correctly positioned.3. Clean all of the beater cover outer parts.IFTHEPROBLEMREMAIN PLEASE CONTACT LAVAZZA CUSTOMER SERVICE. |
| The automatic milk frother blocked. | 1. Milk frothing beater not correctly installed.2. Beater cover components not installed in their correct positions3. Dirt. | 1. Position the milk frothing beater correctly as shown in the Manual.2. Make sure that the beater shaft retainer is correctly positioned.3. Clean all of the beater cover outer parts.IFTHEPROBLEMREMAIN PLEASE CONTACT LAVAZZA CUSTOMER SERVICE. |
| No coffee available for preparing the cappuccinos and the milk with coffee. | 1. No coffee bean in the container2. Early removal of the Milk Mug. | 1. Fill the container with coffee beans.2. Wait for the acoustic signal the end of preparing the selected beverage.If THE PROBLEM REMAIN PLEASE CONTACT LAVAZZA CUSTOMER SERVICE. |
| Milk spilling out of the jug. 1. Milk Mug broken.2. Excessive Milk Mug filling (above the upper notch / icon).3. Insufficient Milk Mug filling (below the selected notch / icon).4. Selection of the same beverage used for the previous preparation. | 1. Check the integrity of the Milk Mug. In case of breakage, CONTACT THE LAVAZZA CUSTOMER SERVICE.2. Fill with the correct amount, as shown by the icons on the jug.3. Fill with the correct amount, as shown by the icons on the jug.4. Prepare the new desired beverage by eliminating the previous one and by applying one cycle ONLY IF THE PROBLEM REMAIN PLEASE CONTACT LAVAZZA CUSTOMER SERVICE. | |
| COLD FROTHED MILK beverage preparation hot. | » Wrong access procedure for the COLD FROTHED MILK beverage. | » Repeat the access procedure by keeping the Temperature boost button depressed until the icon turns BLUE IF THE PROBLEM REMAIN PLEASE CONTACT LAVAZZA CUSTOMER SERVICE. |
| The button red warning light with acoustic signal emitted when preparing a milk-based b everage | 1. Milk frothing beater not correctly installed. 2. Beater cover components not installed in their correct positions 3. Dirt. | 1. Position the milk frothing beater correctly as shown in the Manual 2. Make sure that the beater shaft retainer is correctly positioned. 3. Clean all of the beater cover outer parts. IF THE PROBLEM REMAIN PLEASE CONTACT LAVAZZA CUSTOMER SERVICE. |
| Unusual noises can be heard during coffee grinding. | » Being coffee of a natural origin, it can happen that impurities can be found into the beans (wooden sticks, small stones). | SWITCH OFF THE APPLIANCE AND PLEASE CONTACT LAVAZZA CUSTOMER SERVICE. |
| Failed machine connection by Wi-Fi or Bluetooth. | » Machine pairing error. | CONTACT LAVAZZA CUSTOMER SERVICE |
Contact Lavazza Customer Service for any problem or failure not included in the above list.
INDICE
SICUREZZA 48
CARATTERISTICHE TECNICHE
CARATTERISTICHE TECNICHE 51
MODULI DI COMUNICAZIONE 51
COMPONENTI E COMANDI
DESCRIZIONEGENERALE 52
INTERFACCIA COMANDI 53
SEGNALAZIONI 54
ANELLO LUMINOSO E AROMA FEATURE 56
PREDIPOSITIZIONEMACCHINA
PASSAGGIO DA CONNECTION WI-FI A BLUETHOOTH 60
RESET CREDENZIALI WI-FI 60
CONNECTION IN RETE
REGISTRAZIONE SU APP 61
CAMBIO RETE WI-FI SU APP 64
65
REGOLAZIONE CAFFÉ
REGOLAZIONE DELLA GRANULOSITA 66
AROMA FEATURE 66
PROGRAMMAZIONE DOSE CAFFE 67
PREDISPOSIZIONE PER LE EROGAZIONI CAFFÉ
IMPOSTAZIONI PER LE TAZZE DA CAFFE 68
1. BOOST TEMPERATURE 68
EROGAZIONI CAFFE 69
PRIMA DI EROGARE LE BEVANDE A BASE LATTE
PULIZIA DEL BRICCO MONTA LATTE 70
PREDISPOSIZIONE ALLA PREPARAZIONE DELLE BEVANDE A BASE LATTE....71
BOOST TEMPERATURE 72
REGOLAZIONE SCHIUMA. 72
PASSAGGIO DA CONNECTION WI-FI A BLUETHOOTH
RESET CREDENZIALI WI-FI
CAMBIO RETE WI-FI SU APP
| Imagine APP Descrizione | |
| Select your Wi-Fi network To set up your coffee machine, you must connect to your Wi-Fi network. Select your network from the list and continue. Available Wi-Fi networks • Beni • 51386389 • 51386389 • 51386389 • 51386389 • 51386389 • 51386389 • 51386389 • Can't find your network? Out set-up | Seleziona la rete Wi-F a cui desideri collegare Assoluta e insertisci la password. |
| You've changed the Wi-Fi network Now you can continue using your coffee machine Close | Hai correttamente concluso ilchio rete Wi-Fi. |
FUNZIONI APP PIACERE LAVAZZA
ON/Preparations café
- Connexion Wi-Fi
ON/Préparations café
- Connexion Bluetooth
ON/ÉCONOMIE D'ENERGIE

Beskyttelse af born under 8 ar.
Hold børn under opsyn for at hindre, at de benyttter apparatet som legetoj.
SKIFT FRA WI-FI TIL BLUETHOOOTH
1 Indstil apparatusi ENERGISPAREFUNKTION.
2 Hold knappen trykket nede i min. 5 sekunder, indtil der udsendes et lydsignal.
RESET AF WI-FI LOGINOPPLYSNINGER
Vaalger for regulating of Aroma
For at reducere kaffemaengdene
For at oge kaffemaengdene
Discover an exclusive experience