USER MANUAL H15 Pro Heat DREAME
Website: https://globaldreametech.com
Manufactured by: Drame Trading (Tianjin) Co.,Ltd.
Made in China
EU-A00
User Manual
The illustrations in this manual are for reference only. Please refer to the actual product.
DREAME
THANK YOU
FOR PURCHASING THIS DREAM WET AND DRY VACUUM
Quick Start Guide
Welcome to register a Dreame account by scanning the QR code. You are available for the User Manual and Special Offers.
The high-quality product is engineered for optimal performance.
If you have any questions on the product, please contact us: https://global.dreametech.com/pages/contact-us
Contents
EN User Manual 01
DE Benutzerhandbuch 17
FR Mode d'emploi 33
Manuale dell'utente 49
ES Manual de usuario 65
NL Gebruikershandleiding 81
PT Manual do utiliser 97

Please scan the QR code for the User Manual.
Important Safety Instructions
Please read this manual carefully before use and retain it for future reference. When using an electrical appliance, basic precautions should always be followed, including the following: READ ALL INSTRUCTIONS BEFORE USING THIS APPLIANCE). Failure to follow the warnings and instructions may result in electric shock, fire and/or serious injury.
WARNING - To reduce the risk of fire, electric shock, or injury.
Usage Restrictions
This appliance should not be used by children younger than 8 years old nor persons with physical, sensory, intellectual deficiencies, or limited experience or knowledge with out the supervision of a parent or guardian to ensure safe operation and to avoid any risks. Cleaning and maintenance shall not be performed by children without supervision.
- Plastic film can be dangerous. To avoid the danger of suffocation, keep it away from children. Children shall not play with the appliance.
Use indoors only, on non-carpeted floor surfaces such as vinyl, tile, sealed wood, etc. Be careful not to run over loose objects or the edges of area rugs. Staling the brush may result in premature belt failure.
Use only as described in this user guide. Use only manufacturer's recommended attachments.
- Do not expose the appliance to fire or excessive temperature. Exposure to fire or excessive temperature may cause an explosion.
- Do not use in extremely hot or cold environments (below 5^ / 41^ or above 40^ / 104^ ). Please charge the appliance in temperature above 5^ / 41^ and below 40^ / 104^ .
Do not immerse the appliance in liquid.
- Do not use to pick up flammable or combustible liquids, such as gasoline. Do not use in areas where flammable or combustible liquids may be present.
- Do not put any object into openings. Do not use the appliance when any opening is blocked. Keep free of dust, lint, hair, and anything that may inhibit air flow.
- Do not pick up toxic material (chlorine bleach, ammonia, drain cleaner, etc.). Do not pick up hard or sharp objects such as glass, nails, screws, coins, etc.
- Do not use the appliance in an enclosed space filled with vapor given off by oil-based paint, paint thinner, some moth-proofing substances, flammable dust, or other explosive or toxic vapour. Do not pick up anything that is burning or smoking, such as cigarettes, matches or hot ashes.
Do not use the appliance without filters in place.
- Keep hair, loose clothing, fingers, and all parts of the body away from openings and moving parts of the appliance and its accessories.
- Keep ground cables away from the appliance when using it. A hazard may occur if the appliance runs over a supply cord.
Use extra care when cleaning on stairs.
fety Instructions
Maintenance and Storage
- Prevent unintentional starting. Ensure the switch is in the OFF-position before picking up or carrying the appliance. Carrying the appliance with your finger on the switch or turning on the appliance may result in an accident.
- Ensure that the appliance is placed on a horizontal surface. Do not use the appliance at the same position if the appliance is equipped with a brush roller and the handle is not completely upright. Do not store the appliance in a place where it may freeze.
- Switch off and unplug the appliance when not in use, before cleaning, maintaining or servicing it, and before connecting or disconnecting it with a moving brush.
- Do not use an appliance that is damaged or modified. A damaged or modified appliance may exhibit unpredictable behavior resulting in fire, explosion, or risk of injury.
- Do not modify or attempt to repair the appliance except as indicated in the instructions for use and care.
- Do not use the appliance with a damaged attachment (eg: charging base, supply cord etc.). If the appliance or attachment has been dropped, damaged, left outdoors, dropped into water, or is not working as it should, never attempt to operate it. Please have it repaired at an authorized service center.
- Have servicing performed by a qualified repair person using only identical replacement parts. This will ensure that the safety of the appliance is maintained.
If the supply cord is damaged, it must be replaced by the manufacturer, its service agent or similarly qualified persons in order to avoid a hazard.
Battery and Charging
For the purpose of recharging the appliance, only use the charging base provided with this appliance. Use only with HCBAE charging base.
- Follow all charging instructions and do not charge the appliance outside of the temperature range specified in the battery as doing so increases the risk of fire.
- Charging base is equipped with drying function and only suitable for drying this appliance's brush.
- Keep the charging base cable away from heated surfaces. Do not handle the charging base plug or appliance with wet hands. To unplug, grasp the charging base plug, rather than the cable.
- Do not pull or carry charging base by cable, use cable as a handle, close door on cable, or pull cable around sharp edges or corners.
- Do not use any non-rechargeable battery pack. Failing to do so may cause the lithium-ion battery to catch fire. This appliance contains batteries that can only be replaced by qualified technicians or after-sales service.
- The lithium-ion battery pack contains substances that are hazardous to the environment. Before disposing of the appliance, please first remove the battery pack, then discard, or recycle it in accordance with local laws and regulations of the country or region it is used in.
- The appliance must be disconnected from the power supply when removing the battery. Keep batteries out of the reach of children. Never put batteries in mouth. If swallowed, contact your physician or local poison control.
- Under abusive conditions, never contact the battery from which the liquid may be ejected. If contact accidentally occurs, rinse with water. If liquid contacts eyes, seek medical help immediately. Liquid ejected from the battery may cause irritation or burns.
- The charging base is capable of charging the 6-cell 5000mAh battery pack. This charging base should not be used to charge non-rechargeable batteries. Failing to do so may cause the lithium-ion battery to catch fire.
The charging base is marked with a icon indicating "Caution: Hot Surface." Do not touch the roller brush, hot water, or heating module of the charging base while self-cleaning with hot water.
Symbols

Class II equipment

Time-lag miniature fuse-link where T 3.15A is the symbol for the time/ current characteristic
For indoor use only

Read operator's manual
Caution: Hot Surface
WEEE Information
All products bearing this symbol are waste electrical and electronic equipment (WEEE as in directive 2012/19/EU) which should not be mixed with unsorted household waste. Instead, you should protect human health and the environment by handing over your waste equipment to a designated collection point for the recycling of waste electrical and electronic equipment, appointed by the government or local authorities. Correct disposal and recycling will help prevent potential negative consequences to the environment and human health. Please contact the installer or local authorities for more information about the location as well as terms and conditions of such collection points.
We, Dreame Trading (Tianjin) Co., Ltd., hereby declares that this equipment is in compliance with the applicable Directives, European Norms, and amendments. The full text of the EU declaration of conformity is available at the following internet address: https://global.creametech.com
For detailed e-manual, please go to
https://global.dreametech.com/pages/user-manuals-and-faqs
Product Overview
Packing List
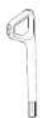
Handle
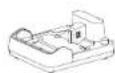
Charging Base
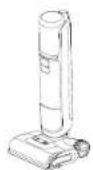
Main Body

Cleaning Brush

Spare Brush Roller

Replacement Filter
Product Overview
Vacuum
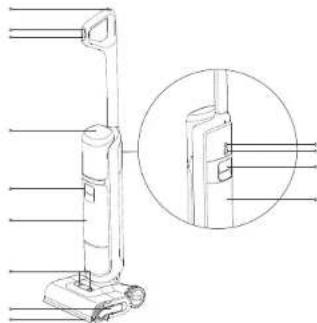

Self-Cleaning Button

Mode Switch

Display Screen

Clean Water Tank

Roller Brush Cover Release Buttons

Roller Brush Handle
9 Lifting Robotic Arm
10 Voice Prompt/Wi-Fi Button
Press briefly to activate the voice prompt or adjust the voice.
Press and hold to start Wi-Fi connection. Set languages via the APP

Omnidirectional Wheel

Used Water Tank Handle
13 Used Water Tank
Charging Base
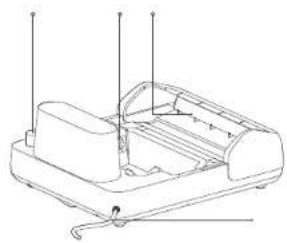
- Air-Drying Outlet
- Accessory Storage Slot
- Charging Contacts
- Power Cord
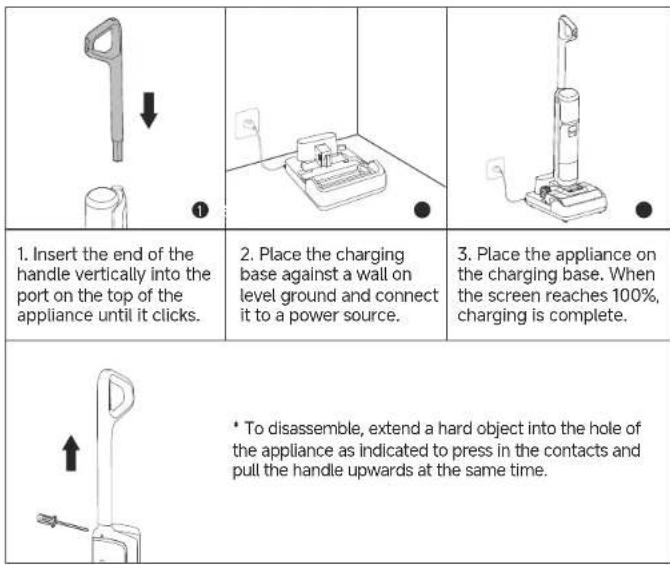
Installation & Charging C
Fully charge the appliance before first use.
Note:
- If there is no operation within 10 minutes of being fully charged, the appliance will enter sleep mode. Please restart the appliance if you need to use it.
To extend the battery life time, the battery keeps cooling down automatically after you have used the appliance for a long time.
Dreamehome App
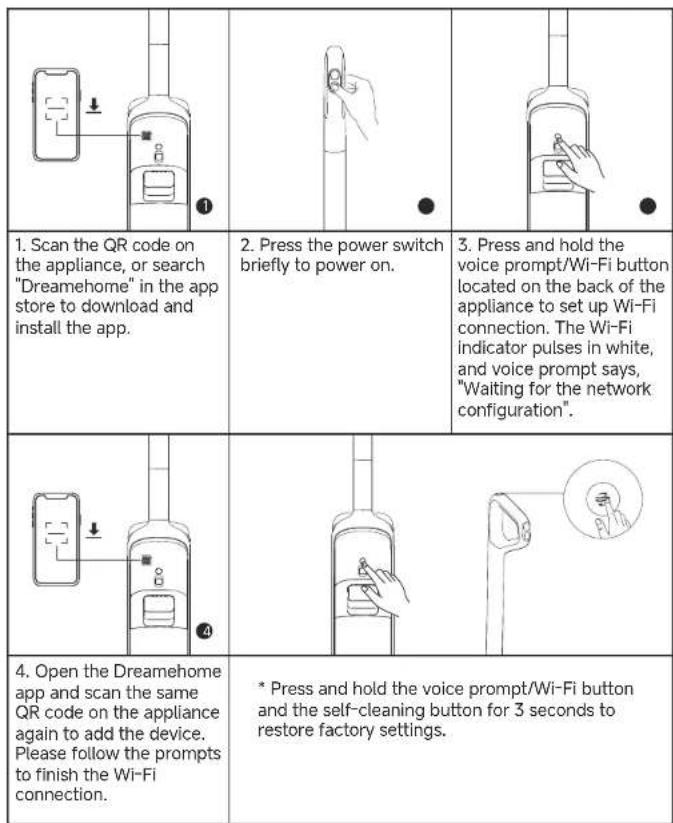
Note:
Only 2.4 GHz Wi-Fi is supported.
- Due to upgrades in the app software, the actual operations may differ from the directions in this manual. Please follow the instructions based on the current app version.
- The appliance will exit the network connection if there is no operation for 10 minutes, or if the network connection fails. To reset Wi-Fi, please repeat the steps above and complete the connection according to the prompts in the app.
Starting Cleaning
| 1. Pull the clean water tank handle to remove the clean water tank. | 2. Open the tank cover and fill the tank with clean water. | 3. Reinstall the clean water tank until it clicks. |
| 4. Gently step on the floor brush and and recline the appliance backwards. Briefly press the power switch (按钮 to start/stop operating. | 5. The appliance can lie flat at a 180-degree angle, allowing it to clean under low-profile furniture. | 6. Briefly press the mode switch (to switch modes according to your needs. |
Note:
- Do not vacuum any foamy liquids.
The appliance will be suspended in the upright position while running.
The appliance is suitable for cleaning floors, marble, tiles and other hard surfaces.
- Do not lift or move the appliance while it is operating to prevent dirty water from flowing back into the motor.
Display Screen
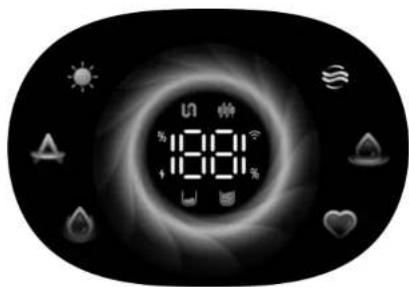

Smart Mode
The appliance will detect the stain level and intelligently adjust the suction power and water flow accordingly.
Hot Water Mode
Suitable for cleaning moderate stains, with the water temperature gradually rising to the hot water level.
Custom Mode
Suction power, water volume, etc. can be adjusted within the APP. The main body will start working according to the settings in the APP.
Suction Mode
Dry vacuum only without water dispensing.
Self-Cleaning Mode
Drying Mode

Charging Indicator
Orange Breathing: Battery level ≤ 20%
(charging)
Green Breathing: Battery level 20% (charging)
Solid Green: Full charged

Wi-Fi Indicator
- Breathing: To be connected
- Blinking: Connecting/OTA upgrading
- On: Connected

Insufficient water in the clean water tank
Fill the clean water tank.

The used water tank is full
Empty the used water tank.

Roller brush stuck
Clean the roller brush with the provided cleaning brush.

Blocked tube
Clean the tube and dirt sensor.

The roller brush and tube are dirty
Place the appliance back onto the base

for self-cleaning.
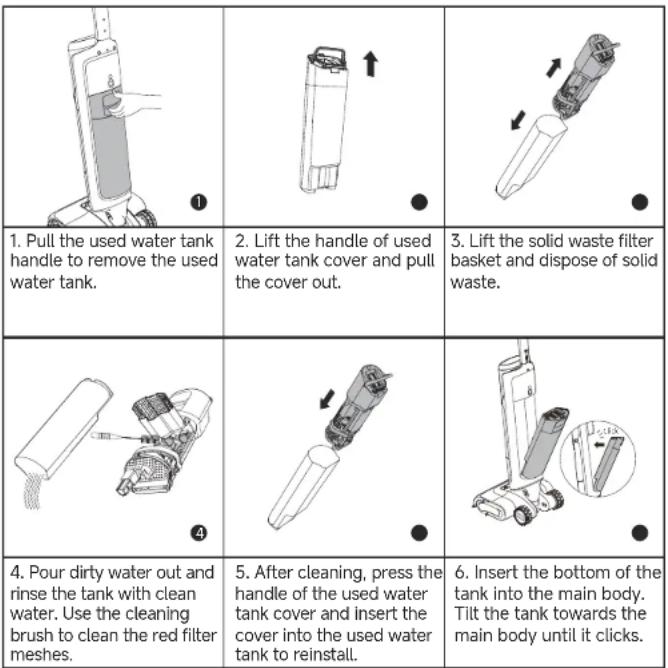
Emptying the Used Water Tank
Self-Cleaning with Hot Water &Drying Mode
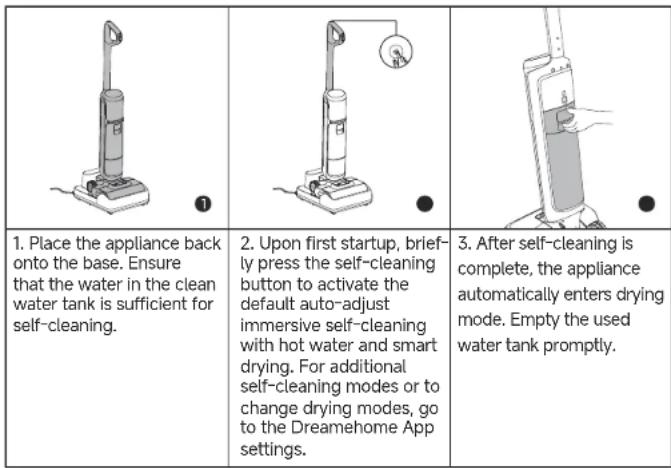
Note:
- Self-cleaning can be enabled only when the appliance is being charged and the battery level is more than 20% .
- Do not touch the roller brush, hot water, or heating module of the charging base while self-cleaning with hot water.
Care & Maintenance
Tips:
- Turn off the appliance before maintenance. Do not touch the power switch.
- Replace parts if needed. The parts must be replaced by those available from the manufacturer or its service agent.
- If the appliance is not used for an extended period, fully charge it, unplug the power plug, and store the appliance in a cool, low-humidity environment away from direct sunlight. To avoid over-discharge of the battery, charge the appliance at least once every 3 months.
| 1. Pour dirty water out, remove the filter, and rinse tank, tank cover and solid waste filter basket with clean water. | 2. Gently knock off the floating dust on the filter surface. When the filter is dirty and needs washing, rinse it with water. | 3. After fully drying the filter, reinstall it into the used water tank cover. Insert used water tank cover into the tank. |
| 4. Gently wipe the tube with a wet cloth before use. Do not rinse the tube. | 5. Insert bottom of tank into main body. Tilt tank towards main body until it clicks. | 6. Press the roller brush cover release button inward to remove the cover. |
| 7. Pull up the roller brush handle to remove the roller brush. | 8. Remove any hair or debris tangled on the roller brush with the provided cleaning brush. Rinse the roller brush with clean water. | 9. Wipe the suction inlet with a dry cloth or wet tissue. Do not rinse the brush assembly with water. |
| 10. After fully drying the roller brush, hold the roller brush handle and reinstall it. | 11. Flip the brush roller cover, pull out the lifting robotic arm, and push the scraper to the left to remove it. | 12. Rinse the scraper with clean water. |
| 13. After fully drying the scraper, align it with the slot and push it to the right to reinstall. | 14. Align the brush cover with the brush. Press down until cover clicks into place. | |
Note:
- Replacing the filter every 3 to 6 months is recommended.
Clean as needed. Replacing the brush roller every 3 to 6 months is recommended.
Troubleshooting
If an error occurs, the appliance will stop working. Please refer to the following table for troubleshooting. If the problem persists, please contact customer service.
| Error Possible Cause | Solution | |
| The appliance does not work | The appliance is out of battery or its battery level is low | Fully charge its battery before use |
| The appliance is in the upright position | Recline the appliance backwards |
| Blockage activated overheat protection mode | Clear the blockage and wait until the temperature returns normal |
| The Used Water Tank is full Empty the Used Water Tank | |
| The handle, roller brush, or Used Water Tank is not properly installed | Ensure the handle, roller brush, or Used Water Tank are all properly in place |
| The appliance charges slowly | The temperature of the battery is too low or too high | Wait until the battery's temperature returns normal |
| The suction power of the appliance is weak | The filter is clogged Cleaning the filter | |
| The suction inlet or tube is blocked by a foreign object | Clean the tube and the suction inlet |
| The motor is making a strange noise | There is too much used water in the Used Water Tank | Empty the Used Water Tank |
| The suction inlet is blocked | Clear any blockage in the suction inlet |
| The display screen does not light up while charging | The charging base cable is not plugged into the electrical outlet | Make sure the charging base cable is plugged in |
| The appliance is not placed onto the charging base properly | Make sure the appliance is placed onto the charging base properly |
Troubleshooting
| No water is coming out of the appliance | The Clean Water Tank is not properly installed in place, or the water in the Clean Water Tank is insufficient | Re-install or fill the Clean Water Tank |
| It takes 30 seconds to dampen the roller brush | Tum on the appliance and check again in 30 seconds |
| The vent leaks water | A collision or a sharp pull causes water to enter the motor | Move the appliance gently back and forth while it is turned on |
| The filter is not completely dry after being cleaned | Dry the filter completely before use |
| Self-cleaning fails | The roller brush may be jammed by large debris | Open the roller brush cover to check and clean the roller brush |
| The appliance is not placed onto the charging base properly | Make sure the appliance is being charged before self-cleaning |
| Self-cleaning cannot be enabled if the battery level is lower than 20% | The self-cleaning function can only be enabled when the appliance is being charged and the battery level is more than 20% |
| The Used Water Tank is not installed in place, or the Used Water Tank is full | Re-install or empty the Used Water Tank |
| The Clean Water Tank is not installed in place, or the water in the Clean Water Tank is insufficient | Re-install or fill the Clean Water Tank |
| Poor drying performance | The air outlet and air inlet of the charging base may be blocked. | Check and clear the blockage of air outlet and air inlet. |
| | |
| |
| |
| |
For additional services, please contact us via https://global.dreametech.com/pages/contact-us Website: https://global.dreametech.com
Error Prompts and Solutions
If the appliance is not working properly, the screen display will show an error message. Please refer to the troubleshooting table to find your solution.
| Troubleshooting Code | Possible Cause Solution | |
| E1-E7 | Error | Restart the appliance for troubleshooting. If the problem persists, please contact customer service |
| F1-F6 |
| H1-H6 |
| H7 Battery overheating | Wait until the battery's temperature returns normal |
Specifications
| Vacuum |
| Model HHR48A | | Charging Time approx. 4 hours |
| Run Time | 72 min (Quiet Mode) |
| Rated Voltage 21.6 V | --- | Rated Power 400 W |
| Clean Water Tank Capacity | 800 mL | Used Water Tank Capacity | 650 mL |
| Charging Base |
| Model HCBAE | | | |
| Rated Input | 220-240 V~50-60 Hz | Rated Output | 27.0 V----1.6 A |
- The rated input power refers to the power measured during a representative cycle for entering the drying
- When the appliance is fully charged, it automatically enters standby mode after 10 minutes, with a power consumption of 0.8 W (with network standby) or 0.4 W (without network standby).
Battery Disposal and Removal
The built-in lithium-ion battery contains substances that are hazardous to the environment. Before disposing of the battery, make sure the battery is removed by qualified technicians and discarded at an appropriate recycling facility.
- the battery must be removed from the appliance before it is scrapped;
- the appliance must be disconnected from the supply mains when removing the battery;
- the battery is to be disposed of safely.
Removal Guide
- Remove the screw plug at the top of the back of the appliance and remove the screw by a screwdriver.
- Use a proper tool to remove the display assembly and disconnect the cables.
- Use a screwdriver to remove all the fixing screws from the body.
- Remove the screws on the battery pack assembly and then remove the battery cover.
- Disconnect the battery pack's connector cables and remove the battery from the battery pack assembly.
CAUTION:
Before removing the battery, disconnect the power and run out the battery as much as possible.
- Unneeded batteries should be discarded at an appropriate recycling facility.
Do not expose to high temperature environment to avoid risks of explosion.
Under abusive conditions, liquid may be ejected from the battery. If contact occurs, flush with water and seek medical help.
Website: https://globaldreametech.com
Attention: surface chaude.
De vuiltwatertank is vol.
Maak de vuilwatertank leeg.

Borstelrol zit vast