CG30354525 - Grill plate Char-Griller - Free user manual and instructions
Find the device manual for free CG30354525 Char-Griller in PDF.

| Product type | Gas grill plate (plancha) |
| Brand | Char-Griller |
| Model | CG30354525 |
| Fuel type | Propane gas (G31) or butane (G30) |
| Number of burners | 4 |
| Total power | 16 kW (4 × 4 kW) |
| Power supply | 1.5 V battery (AA, not included) for igniter |
| Dimensions (approx.) | Cooking surface approximately 70 × 40 cm |
| Weight (approx.) | Approximately 25 kg |
| Material | Steel with painted coating |
| Use | Outdoor only, domestic |
| Maintenance and cleaning | Manual cleaning after each use; regular seasoning with oil |
| Safety | Leak test mandatory before each use; flame detector; automatic shut-off in case of extinction |
| Spare parts and repairability | Parts available through Char-Griller customer service; 1 year warranty on all parts |
| Warranty | 1 year for parts (excluding surface rust and paint) |
Frequently Asked Questions - CG30354525 Char-Griller
User questions about CG30354525 Char-Griller
0 question about this device. Answer the ones you know or ask your own.
Ask a new question about this device
Download the instructions for your Grill plate in PDF format for free! Find your manual CG30354525 - Char-Griller and take your electronic device back in hand. On this page are published all the documents necessary for the use of your device. CG30354525 by Char-Griller.
USER MANUAL CG30354525 Char-Griller
CG30354525, CG30354625
Flat Iron 4 Burner Premium Gas Griddle with Hinged Lid Plancha au gaz à 4 brûleurs Flat Iron Premium avec couvercle à charnière Plancha de gas plana premium de 4 quemadores con tapa con bisagra Flat Iron, hoogwaardige bakplaat op gas met 4 branders en deksel met scharnier Premium-Gasgrillplatte aus Flacheisen mit 4 Brennern und Klappdeckel Piastra a gas Flat Iron a 4 bruciatori con coperchio incernierato Gasgrill med stekhäll och 4 brännare med gångjärnsförsett lock
FOR OUTDOOR USE ONLY. NOT FOR COMMERCIAL USE.
This product does not come with Gas Cylinder, Charcoal or Wood Chunks

DANGER

! DANGER
IF YOU SMELL GAS:
- Shut off gas to the appliance.
- Extinguish any open flame.
- Open lid.
- If odor continues, keep away from the appliance and immediately call your gas supplier or your fire department.
WARNING
- Do not store or use gasoline or other flammable liquids or vapors in the vicinity of this or any other appliance.
- An LPG cylinder not connected for use shall not be stored in the vicinity of this or any other appliance.

WARNING

• This manual contains important information necessary for the proper assembly and safe use of the appliance.
- Read and follow all warnings and instructions before assembling and using the appliance.
- Keep this manual for future reference.

CARBON MONOXIDE HAZARD

Failure to follow these instructions could result in fire, explosion or burn hazard which could cause property damage, personal injury, or death.
- Do not use the barbecue in a confined and/or habitable space e.g. houses, tents, caravans, motor homes, boats. Danger of carbon monoxide poisoning fatality.
- USE ONLY OUTDOORS where it is well ventilated.
• FOLLOW THESE GUIDELINES TO PREVENT THIS COLORLESS, ODORLESS GAS FROM POISONING YOU, YOUR FAMILY OR OTHERS.
- Know the symptoms of carbon monoxide poisoning: headache, dizziness, weakness, nausea, vomiting, sleepiness, and confusion. Carbon monoxide reduces the blood's ability to carry oxygen. Low blood oxygen levels can result in loss of consciousness and death.
- See a doctor if you or others develop cold or flu-like symptoms while cooking or in the vicinity of this appliance. Carbon monoxide poisoning, which can easily be mistaken for a cold or flu, is often detected too late.
- Alcohol consumption and drug use increase the effects of carbon monoxide poisoning.
- Carbon monoxide is especially toxic to mother and child during pregnancy, infants, the elderly, smokers, and people with blood or circulatory system problems, such as anemia, or heart disease.

WARNINGS AND IMPORTANT SAFEGUARDS

READ ALL INSTRUCTIONS
- Read the instructions before using the appliance.
- Do not leave product unattended.
• Product is for OUTDOOR HOUSEHOLD USE ONLY. - Use outdoors only.
- Do not use indoors!
- Do not use product in high winds!
- Do not alter this product in any manner.
- Never use product for anything other than its intended use. This unit is NOT for commercial use.
- Make sure to empty grease tray after every use once completely cooled.
• Always use product in accordance with all applicable local, state, and federal fire codes. - Potential damage to product or harm to user may result from failure to follow warnings.
- If flame goes out during cooking, turn control knob OFF or controller off, turn gas cylinder valve OFF, wait 5 minutes, then open door(s) or lids and wait 5 additional minutes before repeating ignition instructions.
- If gas goes out wait till smoke has stop before opening door. Opening door(s) or lids can cause embers to ignite gas trapped in body. Never stand in front of door(s) or lids while opening.

WARNINGS AND IMPORTANT SAFEGUARDS

- Never use inside enclosed areas such as patios, garages, buildings, or tents.
- Never use inside or on recreational vehicles or boats.
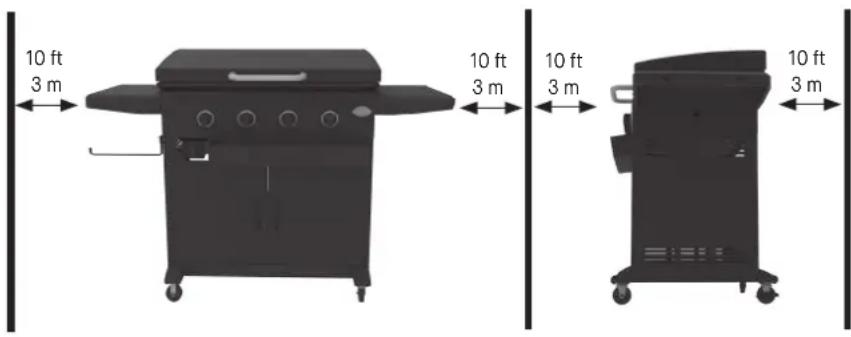
- Maintain a minimum distance of 3m (10ft) from overhead construction, walls, rails or other structures.
- Keep a minimum 3m (10ft) clearance of all combustible materials such as wood, dry plants, grass, brush, paper.
- Never operate product under overhead construction such as roof coverings, carports, awnings, or overhangs. (SEE STRUCTURAL PROXIMITY REQUIREMENTS)
- Keep product clear and free from combustible materials such as gasoline and other flammable vapors and liquids.
- Use product on a level, non-combustible, stable surface such as dirt, concrete, brick, or rock. An asphalt surface (blacktop) may not be acceptable for this purpose.
- Do not use product on wooden or flammable surfaces.
- Product MUST be on the ground. Do not place product on tables or counters. Do NOT move product across uneven surfaces.
- Product should only be rolled on smooth surface.
- Product should never be rolled up/downstairs or uneven surface.
- Never use this product as a heater (READ CARBON MONOXIDE HAZARD).
- Never use this product for anything other than its intended use. This product is NOT for commercial use.
- Keep a fire extinguisher accessible at all times while operating product.
- When cooking with oil or grease, have a type BC or ABC fire extinguisher readily available.
- In the event of an oil or grease fire do not attempt to extinguish with water. Immediately call the fire department. A type BC or ABC fire extinguisher may, in some circumstances, contain the fire.
- Before each use check all nuts, screws, and bolts to make sure they are tight and secure.
- A gas leak test must be performed before every use. Check and clean all venturis before every use for spider webs or debris.
- Use of alcohol, prescription, or non-prescription drugs may impair user's ability to properly assemble or safely operate product.
- Keep children and pets away from product at all times. Do NOT allow children to use product. Close supervision is necessary when children or pets are in the area where product is being used.
- Do NOT allow anyone to conduct activities around product during or following its use until it has cooled.
- DO NOT bump or impact the product to prevent personal harm, damage to product, or spillage/splashing of hot cooking liquid.
- Extreme caution must be used when moving an appliance containing hot oil or other hot liquids.
- Never move product when in use. Allow product to cool completely (45°C (below 115°F)) before moving, cleaning or storing.
- Never move Product with oils or charcoal or wood until fuel is completely cooled.
- The product is HOT while in use and will remain HOT for a period of time afterwards and during cooling process. Use CAUTION. Wear protective gloves/mitts.
- Do not touch HOT surfaces. Use handles or knobs.
- Never use glass, plastic, or ceramic cookware in product. Never place empty cookware in product while in use.
- Accessory attachments not supplied by Char Griller are not recommended and may cause injury.
- Be careful when removing food from product. All surfaces are HOT and may cause burns. Use protective gloves/mitts or long, sturdy, cooking tools for protection from hot surfaces or splatter from cooking liquids.
- Product is hot during use. Keep face and body away from door(s) and vents. Steam and hot air are expelled during use.
- DO NOT obstruct flow of combustion and ventilation.
- Do not cover cooking racks/surfaces with metal foil or items that block 75% of cooking rack. This will trap heat/gases and may cause damage to the product.
- Product has an open flame. Keep hands, hair, and face away from flame. Do NOT lean over inside product when lighting. Loose hair and clothing may catch fire.
- Use protective gloves when handling this product or working with fire.
- If it is evident there is excessive abrasion or wear, or the hose is cut, it must be replaced prior to the outdoor cooking gas appliance being put into operation. The replacement hose assembly shall be specified by the manufacturer.
- WARNING: The cover/lid/hood MUST be open when the appliance is in use.
- WARNING: DO NOT put the LPG cylinder under or in this appliance.

WARNINGS AND IMPORTANT SAFEGUARDS

- WARNING! This barbecue will become very hot, do not move it during operation.
- WARNING! Keep children and pets away.
- Do not use the barbecue in a confined and/or habitable space e.g. houses, tents, caravans, motor homes, boats. Danger of carbon monoxide poisoning fatality.
• Before each use inspect gas hose for signs of damage. - Keep fuel supply hose away from any heated surface.
- Keep fuel supply hose away from unit while in operation.
- Regulator and hose assembly supplied with unit MUST be used. For replacement parts, if needed, contact Char Griller.
- Use gas cylinder that has protective collar (cylinder not included with unit).
- Keep ventilation openings of cylinder enclosure free and clear of debris.
- Never use gas cylinder if there is evidence of dents, gouges, bulges, fire damage, erosion, leakage, excessive rust, or other forms of visible external damage. This may be hazardous and cylinder should be taken to a liquid propane supplier to be checked.
- Never attach/disconnect gas cylinder, move or alter gas fittings when unit is in operation.
• Always disconnect gas cylinder from unit when not in use.
• This product will NOT operate with natural gas. - When use is complete, always, first turn the burner control valve OFF or controller, then turn the gas cylinder valve OFF, and finally disconnect the cylinder.
• Gas MUST be turned off at the supply cylinder when not in use. - Cylinder MUST be stored outdoors, out of children's reach and must NOT be stored in a building, garage, or any other enclosed area.
- Do NOT store spare LPG gas cylinder under or near unit. Gas cylinder safety relief valve may overheat allowing gas to release causing fire which may cause death or serious injury.
- Never fill cylinder over 80% full or cylinder may release gas causing fire which may cause death or serious injury.
- Place a dust cap on cylinder valve outlet whenever cylinder is not in use. Only install dust cap provided with cylinder. Other caps or plugs may cause leaks.
- If you smell, hear or see gas escaping, immediately get away from gas cylinder and call the Fire Department.
• Fire may cause death or serious injury.
• Reference ignition steps before use. - Never use lighter fluid with propane.
- Check grease tray often during cooking. Empty grease tray before it gets full. Grease tray may need to be emptied periodically during cooking.
- When outside temperature is cooler than 65^ F ( 18^ C) and/or altitude is above 3,500 feet (1067m), additional cooking time may be required. To insure that meat is completely cooked use a meat thermometer to test internal temperature.
- Storage of an outdoor cooking gas appliance indoors is permissible only if the cylinder(s) is (are) disconnected and removed from the outdoor cooking gas appliance.
• DO NOT SPRAY AEROSOLS IN THE VICINITY OF THIS APPLIANCE WHILE IT IS IN OPERATION. - DO NOT SPRAY OR USE ALCOHOL BASE PRODUCTS IN THE VICINITY OF THIS APPLIANCE WHILE IT IS IN OPERATION.
• DO NOT USE OR STORE FLAMMABLE MATERIALS IN OR NEAR THIS APPLIANCE.
• DO NOT PLACE ARTICLES ON OR AGAINST THIS APPLIANCE.
• DO NOT MODIFY THIS APPLIANCE. - SERVICING SHALL BE CARRIED OUT BY AUTHORIZED PERSONNEL ONLY, AND THE APPLIANCE SHALL NOT BE MODIFIED.
- This appliance must be kept away from flammable materials during use.
- DO NOT move the appliance during use.
- Turn off the gas supply at the gas cylinder after use.
- DO NOT modify the appliance. Parts sealed by the manufacturer or his agent must not be altered by the user.
- Filling and exchange cylinder shall be carried out away from any source of ignition.
- Any modification of the appliance may be dangerous.
- Only to be used outdoors.
- WARNING: accessible parts may be very hot. Keep young children away.

STRUCTURAL PROXIMITY REQUIREMENTS

Maintain a minimum distance of 10 ft (3 m) from rear, sides and top of unit, walls, rails or other combustible construction materials.
Before using Product check wind direction and place cylinder DOWNWIND 12" in upright position. This is necessary so that cylinder supply system is arranged for vapor withdrawal and prevent cylinder from striking unit if tipped.
This clearance provides adequate space for proper combustion, air circulation and venting. Grill should not be used on combustible materials like wood decks or other combustible materials. The outdoor cooking gas appliance shall not be used under overhead combustible construction.

WARNING

Hose is a trip hazard that could cause supply cylinder to tip
SAVE THESE INSTRUCTIONS
This product does not come with Gas Cylinder
GRIDDLE
OPERATING INSTRUCTIONS
Operating Instructions:
SETTING UP
Set grill up on solid, flat surface with adequate wind shelter.
Do not move grill while hot, and do not leave unattended during operation.
The appliance must be used in a well ventilated area. Do not obstruct the flow of combustion air to the burner when in use. ONLY USE THIS APPLIANCE OUTDOORS.
This appliance is designed for use outdoors, away from any flammable materials. It is important that there are no overhead obstructions and that there is a minimum distance of 10 feet (3 m) from the side or rear of the appliance. It is important that the ventilation openings of the appliance are not obstructed. The barbecue must be used on a level, stable surface. The appliance should be protected from direct drafts and positioned or protected against direct penetration by any trickling water (e.g. rain).
Protect LPG cylinder from direct sunlight and keep away from heat sources. Position gas cylinder next to device such that hose is not bent, twisted, subject to tension, or touching any hot parts of appliance. DO NOT place gas cylinder directly under burners.
REGULATOR and HOSE
These items are supplied with the appliance, but replacements are available from your equipment retailer or an authorized LPG gas supplier. The life expectancy of the regulator is estimated as 10 years. It is recommended that the regulator is changed within 10 years of the date of manufacture.
The use of the wrong regulator or hose is unsafe; always check that you have the correct items before operating the appliance.
The hose used must conform to the relevant standard for the country of use. Worn or damaged hose must be replaced. Ensure that the hose is not obstructed, kinked, or in contact with any part of the barbecue other than at its connection.
CONNECTING the HOSE to the APPLIANCE
Before connection, ensure that there is no debris caught in the head of the gas cylinder, regulator, burner, and burner ports. Spiders and insects can nest within and clog the burner/venturi tube at the orifice. A clogged burner can lead to a fire beneath the appliance.
ALWAYS clean burner holes with a heavy-duty pipe cleaner.
If the hose is replaced it must be secured to the appliance and regulator connections with hose clips.
Disconnect the regulator from the cylinder (according to the directions supplied with the regulator) when the appliance is not in use.
| CG30354525 | Destination Countries | Gas Category | Gas Type | Injector Diameter | Heat Input / Total Power | Electrical Supply |
| ES, PT, CY, CZ, SI, SK, BE, LT, LV, TR, GB, IE, GR, IT, CH, | I 3+(28 - 30 / 37) | G30 (Butane): 28 - 30 mbar G31 (Propane): 37 mbar | 0.96mm | 4KW x 4Total Power: 16KW (G31 = 1143 g/h)(G30 = 1163 g/h) | 1.5 V Battery | |
| SE, IS, EE, BG, CY, FI, CZ, SI, SK, BE, HR, LT, LV, RO, HU, TR, GB, NL, FR, GR, IT, MK, DK, NO, MT | I 3B/P(30) | G30 (Butane), G31 (Propane) or their mixtures: 28 - 30 mbar | ||||
| CG30354625 | DE, AT | I 3B/P(50) | G30 (Butane), G31 (Propane) or their mixtures: 50 mbar | 0.84mm |
Operating Instructions:
CONNECTING THE LPG GAS CYLINDER TO THE GRILL:
- Inspect the propane tank valve rubber seal for cracks, wear or deterioration prior to use. A damaged rubber seal can cause a gas leak, possibly resulting in an explosion, fire or severe bodily harm. Do not use a propane tank with a damaged rubber seal.
- Attach or detach regulator to the LPG gas cylinder only when cylinder is sitting in tank holder.
- Check that the cylinder valve is closed by turning the knob clockwise.
- Check that the grill's burner control knobs are in the "OFF" positions.
- Visually inspect the hose assembly prior to each use for evidence of damage, excess wear, or deterioration. If found, replace the assembly before using your grill. Only the manufacturer's supplied replacement should be used.
- Remove the protective plastic cap from the cylinder valve.
- Check that the hose does not contain kinks, does not contact sharp edges, and does not contact surfaces that may become hot during use.
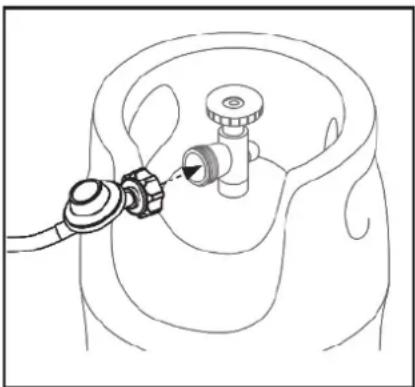
- Hold regulator and insert the brass nipple into the LPG cylinder valve outlet. Ensure that the device is centered properly.
- Turn the large coupling nut clockwise by hand and tighten to a full stop. Take care not to cross thread the coupling nut onto the cylinder valve. Do not use tools to tighten connection. Note: If you are unable to make the connection, repeat Steps 7-8.
Note: The regulator and hose must be connected correctly to the appliance. A spanner must be used to tighten the nut onto the connection thread. If using a fuel clamp, attach the hose barb to the gas rail. (Barb is left hand thread)
- If the hose is replaced it must be secured to the appliance and regulator connections with hose clips.
- Check the rubber O-ring on the regulator end of the hose assembly at least once a year. If it appears worn or cracked, have it replaced.
- Disconnect the regulator from the cylinder (according to the directions supplied with the regulator) when the appliance is not in use.
natural_image
Line drawing of a medical device with a stethoscope inserted into a patient's ear (no text or symbols)Align the regulator with the valve outlet.
DO NOT cross thread the connection.
If connection cannot be completed, disconnect regulator and repeat this step.
natural_image
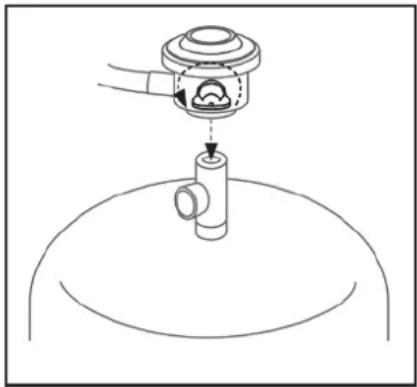
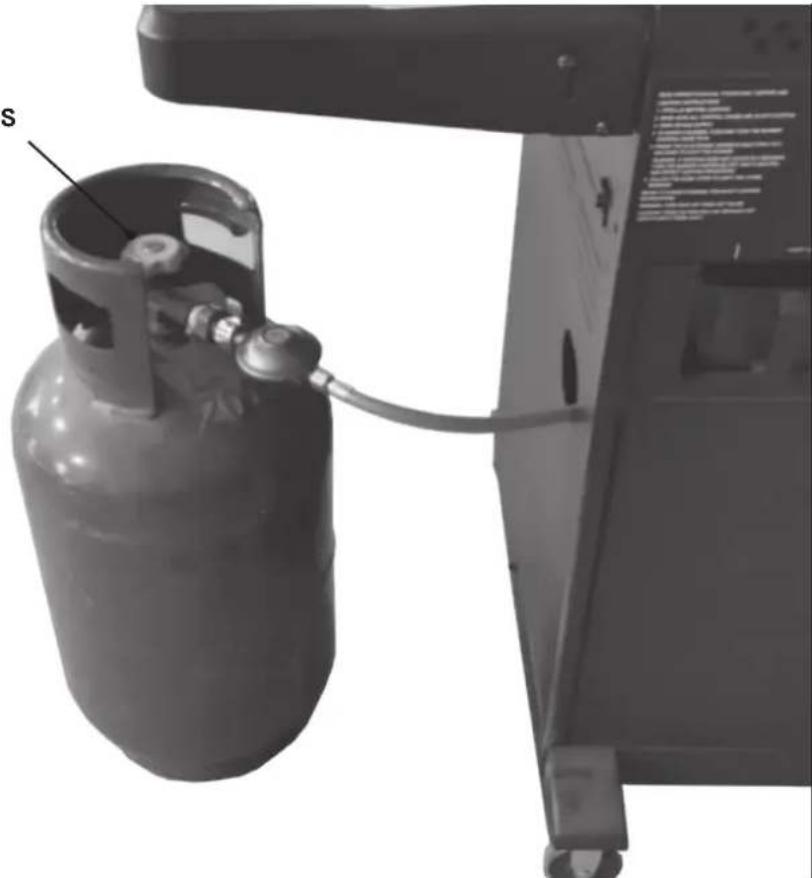
Line drawing of a mechanical component being inserted into a sink (no text or symbols)LPG GAS CYLINDER LOCATION:
GAS CYLINDER TANK

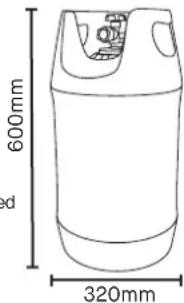
LPG CYLINDER REQUIREMENTS
EUROPE
11-15 kg cylinders
• The maximum size of the gas
cylinder should be Dia. 320 mm,
Height: 600mm
(regulator included).
UK
8-13 kg cylinders
- Use a suitable regulator that is certified to EN 16129. Make sure the regulator and flexible hose comply with local code.
- The length of flexible hose shall not exceed 1.5m, In Finland, the length shall not exceed 1.2m. The hose should be certified according to applicable EN16436 and comply with local code.
Please consult your LPG dealer for information regarding a suitable regulator for the gas cylinder.
! WARNING !
The use of the wrong regulator or hose is unsafe; always check that you have the correct items before operating the appliance.
This appliance is only suitable for use with low-pressure butane or propane gas or LPG mixtures, fitted with the appropriate low-pressure regulator via a flexible hose.
The life expectancy of the regulator and hose is estimated as 2 years.

WARNING: SOAPY WATER TEST

PERFORM "SOAPY WATER TEST" BEFORE EACH USE.
EXTINGUISH ALL OPEN FLAMES BEFORE CONNECTING REGULATOR TO GAS CYLINDER. TURN OFF GAS AFTER EACH USE.
WARNINGS:
- Soapy Water Test MUST be performed each time gas cylinder is connected to burner/hose or each time it is used.
- Soapy Water Test MUST be performed outdoors in well-ventilated area.
- When performing Soapy Water Test keep unit away from open flames, sparks or lit cigarettes.
- Never use an open flame to test for gas leaks.
PREPARATION:
- Remove any cookware and accessories from unit.
- Make sure gas cylinder valve and burner control knob or controller are turned to the OFF position.
- Prepare soapy water solution: (1) part dish washing liquid (or more if desired), (3) parts water.
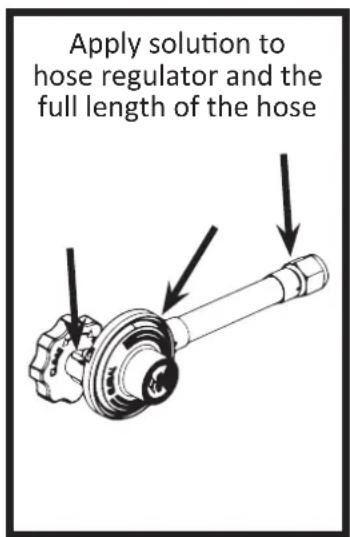
- Apply soapy water solution to gas cylinder valve, regulator and hose length up to burner control valve.
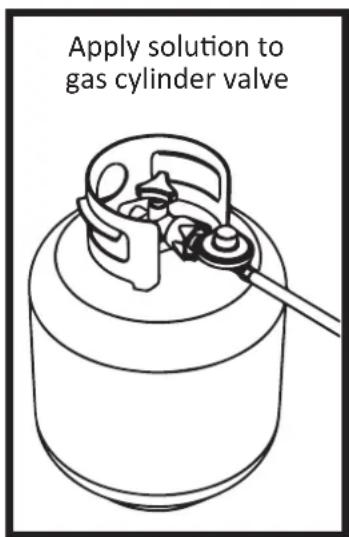
TESTING GAS CYLINDER VALVE:
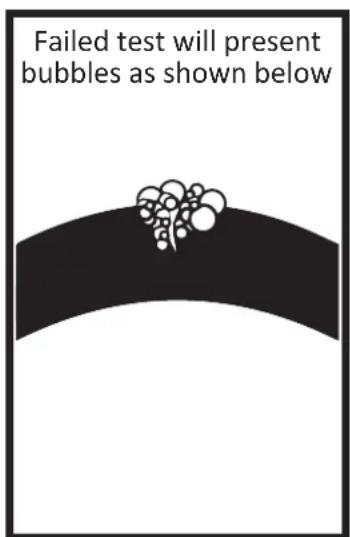
- Turn gas cylinder valve ON and watch for bubbles. DO NOT LEAVE GAS ON MORE THAN 12 SECONDS. If bubbles appear, stop, turn gas cylinder valve OFF and retighten fitting. Repeat test.
TESTING REGULATOR AND HOSE:
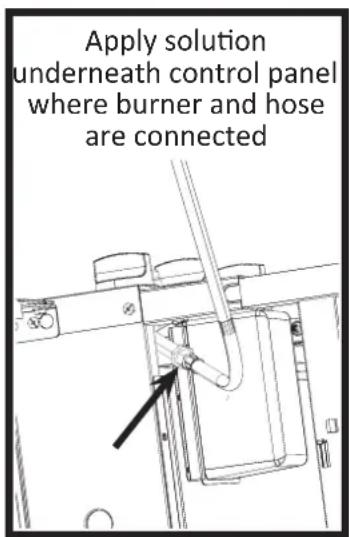
- AFTER gas cylinder valve has passed Soapy Water Test, turn gas cylinder valve ON and check for bubbles at regulator location, along full length of hose and at burner control valve. DO NOT LEAVE GAS ON MORE THAN 12 SECONDS. If bubbles appear, stop, turn gas cylinder valve OFF and retighten the connection that is leaking gas. If hose is source of leak, STOP, do not use unit. Hose must be replaced.
- WHEN TEST IS COMPLETE, AND THERE ARE NO LEAKS, WAIT MINIMUM OF 5 MINUTES FOR GAS FUMES TO DIMINISH BEFORE LIGHTING Product.
- ALWAYS VISUALLY CHECK BURNER VENTURI TUBE FOR BLOCKAGE BEFORE EVERY USE.
-
BLOW OUT WITH COMPRESS AIR TO ENSURE VENTURI TUBE IS CLEAR.
-
DURING ANY PORTION OF SOAPY WATER TEST IF BUBBLES CONTINUE TO APPEAR, STOP, DO NOT USE UNIT. CONTACT LOCAL GAS DEALER OR CUSTOMER SERVICE.
- Note: Use gas cylinder that has a protective collar with this unit. Cylinder NOT included with this unit.
LIGHTING INSTRUCTIONS: MAIN BURNERS
MAIN BURNERS
- Make sure there are no obstructions of airflow to gas unit. Spiders and insects can nest within and clog the burner tube. A clogged burner tube can lead to a fire beneath appliance.
- Open grill lid.
- Make sure all burner knobs are in OFF position.
- Open valve on LPG gas cylinder.
- To ignite a burner, push in and rotate knob to "HIGH," then push and hold Electronic Ignition Button until burner lights. If burner does not light in 5 seconds, turn burner OFF, wait 5 minutes for gas to clear and repeat procedure.
- Repeat for all desired burners. Light only burners intended for use.
- Adjust knobs to desired cooking setting. After lighting, observe burner flame and make sure all burner ports are lit. If burner flame goes out during operation, immediately turn gas off on control panel and gas cylinder valve. Open hood and let gas clear for 5 minutes before relighting.
- Clean grill after each use. DO NOT use abrasive or flammable cleaners, as they damage parts and can lead to fire.
NOTE:
- After lighting, observe burner flame and make sure all burner ports are lit.
- Use caution when cooking on windy days to ensure the flame does not blow out. If you suspect or experience a flame blow out, first turn control knob OFF, turn gas cylinder valve OFF, wait 5 minutes, then open lids and wait 5 additional minutes before following the IGNITION INSTRUCTIONS to reignite burner. Adjust the grill control knob setting for a higher flame to prevent further blowouts. Never ignite grill with the lid closed.
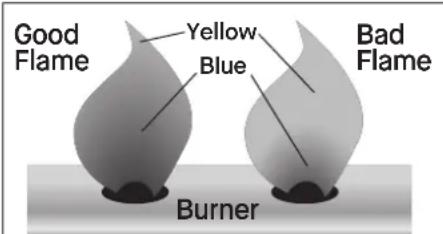
Observe flame height when lit. A good flame should be blue with yellow tip color between 1-2" when burner is on "LIGHT".
LIGHTING INSTRUCTIONS: USING A MATCH
MATCH LIGHT
- Open grill lid.
- Push in and rotate knob to HIGH position.
- Place match in match holder installed on side of grill housing.
- Once lit, place flame through cooking grates near burner ports, as shown. Burner should light immediately.
- Adjust knobs to desired cooking settings.
- Clean grill after each use. DO NOT use abrasive or flammable cleaners, as they damage parts and can lead to fire.
NOTE:
- After lighting, observe burner flame and make sure all burner ports are lit.
- Use caution when cooking on windy days to ensure the flame does not blow out. If you suspect or experience a flame blow out, first turn control knob OFF, turn gas cylinder valve OFF, wait 5 minutes, then open lids and wait 5 additional minutes before following the IGNITION INSTRUCTIONS to reignite burner. Adjust the grill control knob setting for a higher flame to prevent further blowouts. Never ignite grill with the lid closed.
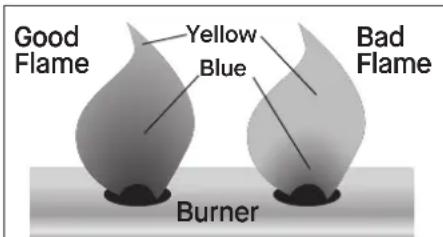
Observe flame height when lit. A good flame should be blue with yellow tip color between 1-2" when burner is on "LIGHT".
Operating Instructions:
PRE SEASONING
IMPORTANT! Pre-Seasoning will rid your grill of chemicals and oils left over by the manufacturing process, allowing them to burn off. PRE-SEASON GRILL PRIOR TO FIRST USE.
- Perform soapy water test, see SOAPY WATER TEST WARNINGS AND PROCEDURES.
- Lightly coat ALL INTERIOR SURFACES (including grates, and inside of grill) with cooking oil.
- Start the grill according to lighting instructions, set all burners to medium - low heat. Close the lid.
- Maintain Med-Low heat 250 °F (212°C) for 2 hours.
- NEVER exceed 400°F (204°C).
- Allow unit to cool COMPLETELY.
- Reapply light coat of cooking oil on ALL INTERIOR SURFACES (including grates, and inside of grill).
- Frequent seasoning prevents rusting. If rusting occurs, clean with a steel brush, apply cooking oil or vegetable shortening and heat as indicated above.
NOTE: GRILL MAY DRIP OIL DURING THIS PROCESS AND FOR SEVERAL USES AFTERWARDS. THIS IS NORMAL.
NOTE: NEVER EXCEED A COOKING TEMPERATURE OF 400°F (204°C) BECAUSE THIS WILL DAMAGE THE FINISH AND CONTRIBUTE TO RUST. PAINT IS NOT WARRANTED AND WILL REQUIRE TOUCH-UP. THIS UNIT IS NOT WARRANTED AGAINST RUST.
SHUT DOWN
SHUTTING OFF BURNERS
- Turn knob(s) clockwise to HIGH position, then push in and turn to OFF. Never force knob without pushing in, as this can damage valve and knob.
- For side burner, push in and turn to OFF.
- Promptly close gas cylinder valve.
- Close grill lid and allow to cool to the touch before moving or cleaning.
DISCONNECTING THE GAS CYLINDER
- Turn all control knobs to the OFF position.
- Turn the handle on the gas cylinder clockwise until it stops.
- Turn coupling nut on regulator in a counter-clockwise direction until regulator is released from threaded gas cylinder valve nozzle.
- Place the protective cap over gas cylinder gas nozzle.
- Close grill lid and allow to cool to the touch before moving or cleaning.

WARNING
In the event of a gas leak that cannot be stopped, or if a fire occurs due to a gas leak, contact the fire department.
TROUBLESHOOTING GUIDE
| Symptom Cause Possible Solution | ||
| Gas leaking from cracked, cut or burned hose Damaged hose Turn off | gas at LPG cylinder. | |
| Replace hose. | ||
| Gas leaking from LPG cylinder | Failure due to rust or mishandled equipment | Replace LPG cylinder. |
| Gas leaking from gas cylinder valve Failure of valve due to rust, mechanical failure or mishandled equipment | Turn off gas cylinder valve and return cylinder to gas provider/supplier. | |
| Gas leaking between LPG cylinder and regulator connection Improper | installation, connection not tight enough, damaged threads or bad rubber seal | Turn off gas cylinder valve, then re-attach regulator to cylinder. |
| Turn off gas cylinder valve and return cylinder to gas provider/supplier. | ||
| Visually inspect rubber seal for damage. | ||
| Fire under control panel | Fire in tube of burner due to burner blockage | Turn off both grill control knob and gas cylinder valve. Once the fire is out and burner has cooled, remove and inspect burner for spiders, nests, rust or other debris. |
| Grease fire or excessive/continuous flame | Grease build up on or around burner area | Turn off both grill control knob and gas cylinder valve. Allow flames to extinguish and time for unit to cool down. Clean grease/food particles from/around burner or burner area and surrounding surfaces. |
| Flame does not remain lit after igniting* | Flame sensor wire is loose | Turn off gas. Disconnect LPG cylinder. Tighten flame sensor wire to valve. |
| Low flame output* | Out of fuel | Refill or replace with full LPG cylinder. |
| Flames blow out* | Low on LPG gas | Refill LPG cylinder. |
| Flare-up | Excessive grease buildup | Clean burner and inside unit. |
| Excessive fat on meat | Trim fat off of meat. | |
| Cooking temperature too high | Adjust or lower temperature accordingly. | |
| Persistent grease fire | Grease trapped by food buildup around burner system | Turn grill control knob and gas cylinder valve off. Allow fire to extinguish and the unit to cool down. Once cool, remove and clean parts. |
| Flashback (fire in burner tube) | Burner and/or burner tube has blockage | Turn grill control knob and gas cylinder valve off. Clean burner and/or burner tube. |
| Slower than expected cooking times* | Valve not properly aligned to burner | Check to see if valve is centered in burner tube. |
* Also see Troubleshooting solutions: "Causes" Low or No Flow/Vapor lock/Excess flow below.
TROUBLESHOOTING SOLUTIONS: "CAUSES" LOW OR NO FLOW/VAPOR LOCK/EXCESS FLOW
| Symptom | Cause | Possible Solution |
| Burner doesn't light after pressing ignitor button | Low/no gas flow | 1. Turn grill control knob to “Off” position.2. Turn gas cylinder valve knob to OFF.3. Disconnect regulator from cylinder to relieve vapor lock.4. Reconnect regulator to cylinder by hand turning until tight.5. Slightly open the gas cylinder valve slowly and then open further by turning 1 full turn.6. You are now ready to light the grill.7. Turn the grill control knob to high and light with ignitor. |
| Vapor lock at coupling nut to LP cylinder | ||
| Low flame output | Excess flow valve tripped | |
| Vapor lock at coupling nut/LP cylinder connection | ||
| Flames blow out | Excess flow valve tripped | |
| Slower than expected cooking times Vapor lock |
Cleaning and Care:
GRIDDLE DEEP CLEANING
• Always clean your Griddle by hand.
- Never soak your Griddle in water.
- Frequent cleaning and seasoning of your griddle will prevent rusting.
- You are not required to deep clean your griddle after every use.
- Use extreme caution when cleaning your griddle. Griddle will be extremely hot.
- Turn the griddle off.
- Allow the grill to cool to a safe temperature for cleaning. The grill should still be warm.
- Use a soft griddle scraper or wooden utensil with a flat edge to remove excess food or grease from the cooking surface.
- Apply a small amount of warm water to the griddle top.
- Use clean cloth or paper towels to rub water over griddle top. This will remove any remaining food particles. Be sure to use tongs and hot food gloves when cleaning the griddle top.
- Dry griddle thoroughly.
- Finish the cleaning process by seasoning your griddle.
- After every cook, all cleaning and maintenance should be carried out. Clean the appliance when cool and everything is turned OFF.
CLEANING BURNER ASSEMBLY
In order to keep your grill in the best shape regular cleaning and maintenance is required. The best way to protect your grill from the elements is with a grill cover.
- ALWAYS MAKE SURE UNIT IS COOL TO THE TOUCH BEFORE CLEANING AND STORING.
- Turn gas off at control knobs and gas tank.
- Remove cooking grates and heat shield.
- Remove grease collector.
- Remove burner by unscrewing self-taping screw using Phillips-head screwdriver.
- Lift burner up and away from gas valve orifice. 6. Clean inlet (venture) of burner with small bottle brush or compressed air.
- Remove all food residue and dirt on outside of burner surface.
- Clean any clogged ports with stiff wire (such as a straightened paper clip).
- Inspect burner for any damage (cracks or holes). If damage is found, replace with new burner. To reinstall burner, ensure that gas valve orifices are correctly position inside burner inlet (venture). Also check position of spark electrode.
- Ensure that there is no debris caught in the head of the gas cylinder, regulator, burner, and burner ports. Spiders and insects can nest within and clog the burner/venturi tube at the orifice. A clogged burner can lead to a fire beneath the appliance.
- Perform a soapy water test before each use.
- Turn gas valve off after cooking.
- Store grill away from sun in a well ventilated, cool, dry, place.
- Store grill away from any source of ignition.
TROUBLESHOOTING
| PROBLEM POSSIBLE CAUSE POSSIBLE SOLUTION | ||
| Burner will not light using knobs. | Wires and/or electrode covered with cooking residue | Clean wire and/or electrode with rubbing alcohol |
| Electrode and burners are wet Wipe | dry with cloth | |
| Electrode cracked or broken-sparks at crack | Replace electrode | |
| Wire loose or disconnected Reconnect wire or replace elec-trode/wire assembly | ||
| Burner will not light with match. | No gas flow Check if propane tank is empty. If propane tank is not empty, refer to “Sudden drop in gas flow or reduced flame height.” If empty, replace or refill. | |
| Coupling nut and regulator not connected | Turn the coupling nut about one-half full connected to three quarters ad-ditional turn until solid stop. Tighten by hand only. Do not use tools. | |
| Obstruction of gas flow Clean burner tubes AND Check for bent or kinked hose | ||
| Disengagement of burner to valve Re-engage burner and valve | ||
| Insects in venturi (burner insert) Clean venturi | ||
| Burner ports clogged or blocked Clean burner ports | ||
| Sudden drop in gas flow or reduced flame | Out of gas Change propane tank | |
| Excess flow safety device may have been activated. | Turn off knobs, wait 30 sec onds and light grill. If flames are still too low. Reset the excessive flow safety device by turning off knobs and pro-pane tank valve. Disconnect regula-tor. Turn burner control knobs off. Reconnect regulator and leak check connections. Turn propane tank valve on slowly, wait 30 seconds and then light the grill. | |
| Irregular flame pattern, flame does not run the full length of burner. | Burner ports are clogged or blocked. | Clean Burner ports |
| Flame is yellow or orange. | New burner may have residual Manufacturing oils. | Burn Grill for 15 minutes with the lid closed |
| Insect nests, food residue, grease, or seasoning in venturi. | Clean venturi. | |
| Poor alignment of valve to burner venturi. | Assure burner venturi is properly engaged with valve. | |
| Flame blows out High or gusting winds | Turn front of grill to face wind or increase flame height. (Recommended to not using grill during high winds) | |
| Flame blows out Low gas pressure | Change propane tank | |
| Flare-Up | Grease build-up Clean grill | |
| Excessive fat in meat Trim fat before grilling | ||
| Excessive cooking temperature Lower temperature accordingly. | ||
| Grease trapped by food buildup around burner system. | Turn knobs to OFF. Turn gas OFF. Clean burner and tubes. | |
| Flashback (fire in burner tube(s)) | Burner and/or burner tubes dirty. | Turn knobs to OFF. Turn gas OFF. Clean burner and tubes. |
| Inside of lid appears to be peeling | Baked on grease buildup has turned to carbon and is flaking off. | Clean inside of lid thoroughly. The lid is not painted on the inside. Re-coat with vegetable oil per earlier directions. |
WARRANTY INFORMATION
A COPY OF THE DATED PROOF OF PURCHASE (RECEIPT) IS REQUIRED WHEN REGISTERING OR SUBMITTING A WARRANTY CLAIM. PLEASE RETAIN A COPY OF THE RECEIPT FOR YOUR RECORDS.
Char-Griller® will replace any defective part of its grillers/smokers, under warranty, as outlined below.
| Charcoal / Pellet / Kamado Grills | |
| Grill - Hood AND Bottom(excludes removable Ash Pan) | 5 years from date of purchase for rust through / burn through |
| Ash Pan AND Defective Parts 1 year from date of purchase | |
| Gas Grills | |
| Grill Hood (TOP half) AND Main Burner Tubes(excludes Side Burner) | 5 years from date of purchase for rust through / burn through |
| Grill Body (BOTTOM half) AND Side BurnerAND Defective Parts | 1 year from date of purchase |
| Dual Fuel Grills (Gas & Charcoal) | |
| Charcoal Grill - Hood AND Bottom ANDGas Grill - Hood (TOP half) AND Main Burner Tubes(excludes Ash Pan and Side Burner) | 5 years from date of purchase for rust through / burn through |
| Ash Pan AND Defective Parts AND Gas GrillBody (BOTTOM half) AND Side Burner | 1 year from date of purchase |
| Griddles | |
| All defective parts 1 year from date of purchase | |
| MISC | |
| Parts, Accessories, and Grill Covers 1 year from date of purchase | (seam tears only for covers) |
SURFACE RUST IS NOT CONSIDERED A MANUFACTURING OR MATERIALS DEFECT
Char-Griller ^® grills are made of steel and if exposed to the elements rust will occur naturally. Please refer to the manual to review how to care for your grill properly.
Surface issues such as scratches, dents, corrosion or discoloring by heat, abrasive and chemical clearers, surface rust or the discoloration of steel surfaces are NOT covered under these warranties.
Warranties are for the replacement of defective parts only. Char-Griller ^® is not responsible for damage resulting from accident, alteration, misuse, abuse, hostile environments, improper installation, and installation not in accordance with local codes of service of unit.
AUSTRALIA AND NEW ZEALAND RESIDENTS ONLY: Our goods come with guarantees that cannot be excluded under the Australian or New Zealand Consumer Law. You are entitled to a replacement or refund for a major failure and compensation for any other reasonably foreseeable loss or damage. You are also entitled to have the goods repaired or replaced if the goods fail to be of acceptable quality and the failure does not amount to a major failure.
EUROPEAN RESIDENTS ONLY: Char-Griller® warrants all of its products to be free from defects in material and workmanship under proper assembly, normal use and recommended care for 2 years from the date of original retail purchase.
Excluded Under ALL Warranties
Paint; Surface Rust; Heat Damage; Incorrect Parts ordered by customer, including shipping; Worn Parts; Missing or damaged parts not reported within two (2) months of purchase date; Defective parts not reported within one (1) year of purchase date; Fading grill cover.
*NOTE: For warranty claims, photos and prepaid return of the item in question may be required. Misuse, abuse or commercial use nullifies all warranties.
PLEASE READ THIS INFORMATION IN DETAIL AND IF YOU HAVE ANY QUESTIONS CONTACT CUSTOMER SERVICE AT:
DO NOT RETURN TO RETAILER!
For assembly assistance, missing or damaged parts, please contact Char Griller Customer Service.
Char Griller ^® Premier Specialty Brands, LLC, 5367 New Peachtree Road, Suite 150, Chamblee, GA 30341
Char Griller ^® Kamado Joe Europe, Lange Voorhout 86, 2514 EJ, Den Haag, Netherlands
Char Griller ^® Kamado Joe UK Limited, Cheyenne House West Street, Farnham GU9 7EQ
Australia & New Zealand: Please contact your retailer
www.chargriller.com/pages/customer-support
www.chargriller.com/pages/customer-support
www.chargriller.com/pages/customer-support

FRENCH
natural_image
Line drawing of a medical device with a stethoscope inserted into a patient's ear (no text or symbols)natural_image
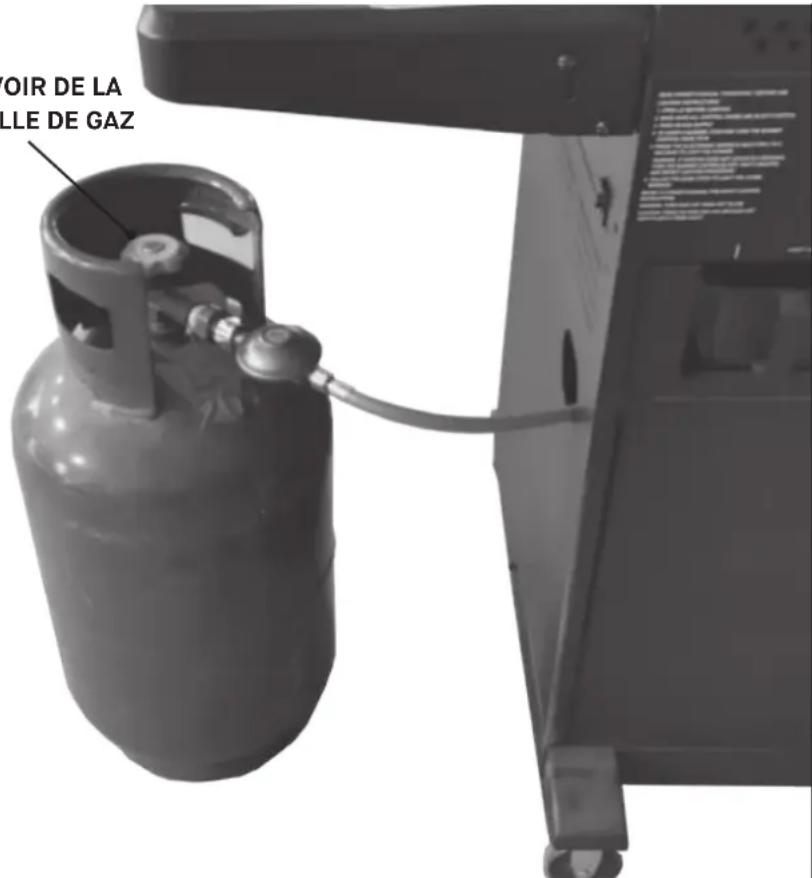
Line drawing of a mechanical component being inserted into a sink (no text or symbols)EMPLACEMENT DE LA BOUTEILLE DE PROPANE :
RÉSERVOIR DE LA BOUTEILLE DE GAZ
EXIGENCES RELATIVES AUX BOUTEILLES DE PROPANE
EUROPE
INSTRUCTIONS D'ALLUMAGE : BRÛLEURS PRINCIPAUX
BRÛLEURS PRINCIPAUX
Char Griller® Premier Specialty Brands, LLC, 5367 New Peachtree Road, Suite 150, Chamblee, GA 30341
Char Griller® Kamado Joe Europe, Lange Voorhout 86, 2514 EJ, La Haye, Pays-Bas
Char Griller® Kamado Joe UK Limited, Cheyenne House West Street, Farnham GU9 7EQ
www.chargriller.com/pages/customer-support
www.chargriller.com/pages/customer-support
www.chargriller.com/pages/customer-support

SPANISH
natural_image
Line drawing of a medical device with a stethoscope inserted into a patient's ear (no text or symbols)natural_image
Line drawing of a mechanical component being inserted into a sink (no text or symbols)natural_image
Line drawing of a cylindrical gas cylinder with side ports and a 320 mm height dimension label (no text or symbols on the object itself)Char Griller ^® Premier Specialty Brands, LLC, 5367 New Peachtree Road, Suite 150, Chamblee, GA 30341
Char Griller ^® Kamado Joe Europe, Lange Voorhout 86, 2514 EJ, Den Haag, Netherlands
Char Griller ^® Kamado Joe UK Limited, Cheyenne House West Street, Farnham GU9 7EQ
www.chargriller.com/pages/customer-support
www.chargriller.com/pages/customer-support
www.chargriller.com/pages/customer-support

DUTCH
UITSLUITEND VOOR GEBRUIK BUITENSHUIS. NIET VOOR COMMERCIEEL GEBRUIK.
natural_image
Two black outdoor grill machines with 3-meter height cutouts, shown from front and side views (no text or symbols on the devices themselves)
WAARSCHUWING

BAKPLAAT INSTRUCTIES VOOR DE WERKING
natural_image
Line drawing of a medical device with a stethoscope inserted into a patient's ear (no text or symbols)natural_image
Line drawing of a mechanical component with a valve and handle, no text or symbols presentPLAATS VAN DE LPG-FLES:
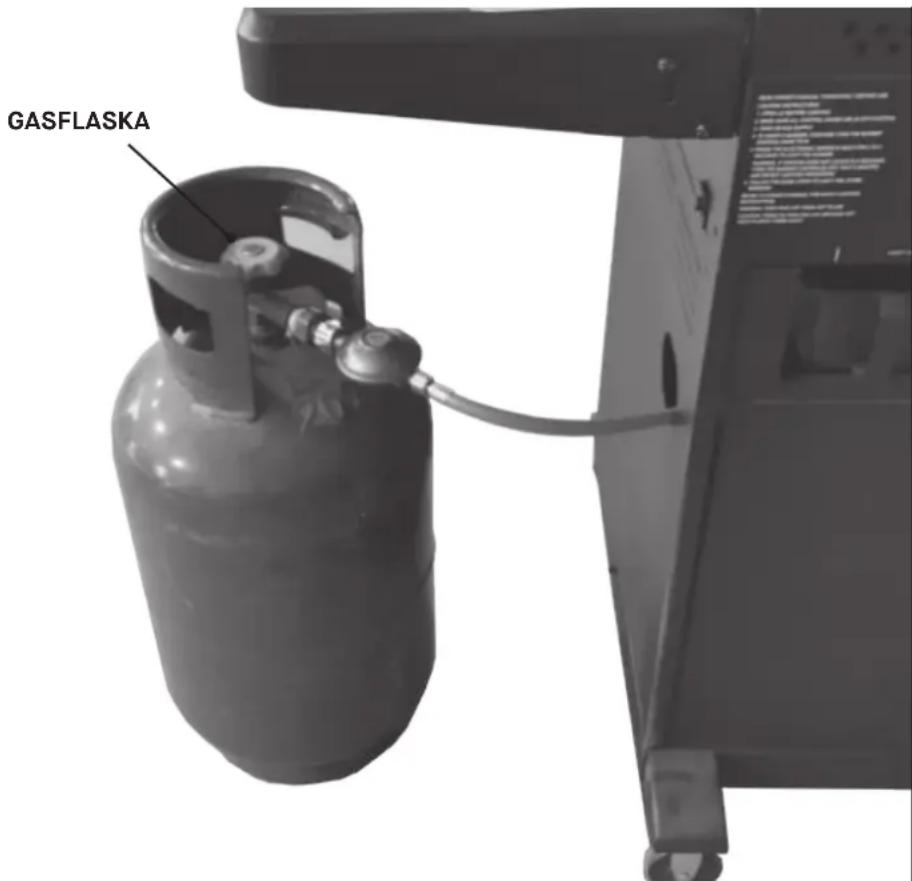
GASFLES
natural_image
Close-up of a gas cylinder with attached pipe and valve, no visible text or symbolsVEREISTEN VOOR LPG-FLES
EUROPA
! WAARSCHUWING: ZEEPWATERTEST !
DOE EEN ZEEPWATERTEST VÓÓR ELK GEBRUIK.
Char Griller ^® Premier Specialty Brands, LLC, 5367 New Peachtree Road, Suite 150, Chamblee, GA 30341, VS
Char Griller ^® Kamado Joe Europe, Lange Voorhout 86, 2514 EJ Den Haag, Nederland
Char Griller ^® Kamado Joe UK Limited, Cheyenne House West Street, Farnham GU9 7EQ, VK
www.chargriller.com/pages/customer-support
www.chargriller.com/pages/customer-support
www.chargriller.com/pages/customer-support

GERMAN
natural_image
Line drawing of a medical device with a stethoscope inserted into a patient's ear (no text or symbols)natural_image
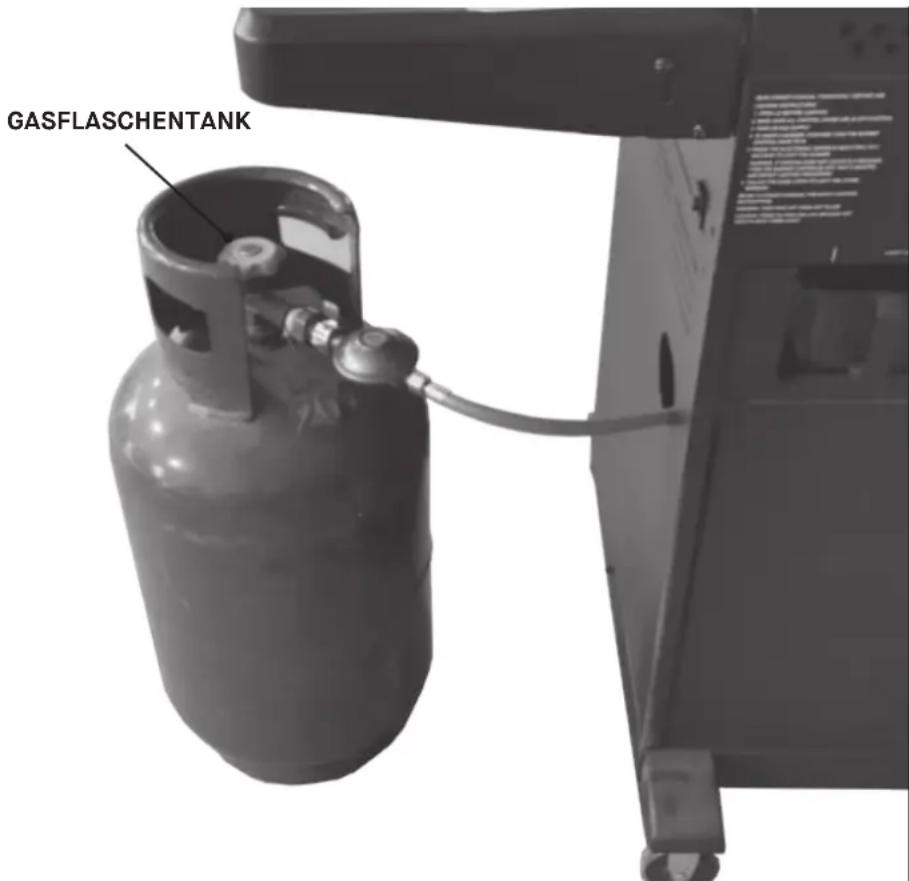
Line drawing of a mechanical component being inserted into a sink (no text or symbols)STANDORT DER LPG-GASFLASCHE:
Char Griller ^® Premier Specialty Brands, LLC, 5367 New Peachtree Road, Suite 150, Chamblee, GA 30341
Char Griller® Kamado Joe Europe, Lange Voorhout 86, 2514 EJ, Den Haag, Niederlande
Char Griller ^® Kamado Joe UK Limited, Cheyenne House West Street, Farnham GU9 7EQ
www.chargriller.com/pages/customer-support
www.chargriller.com/pages/customer-support
www.chargriller.com/pages/customer-support

ITALIAN
SOLO PER USO ALL'APERTO. NON PER USO COMMERCIALE.
natural_image
Two black outdoor grill machines with 3-meter height cutouts, shown from front and side views (no text or symbols on the devices themselves)
AVVERTIMENTO

natural_image
Line drawing of a medical device with a stethoscope inserted into a patient's ear (no text or symbols)natural_image
Line drawing of a hand pouring liquid into a pipe at a sink (no text or symbols)POSIZIONE BOMBOLA GPL:
BOMBOLA DEL GAS

ACCENSIONE CON FIAMMIFERO
Char Griller ^® Premier Specialty Brands, LLC, 5367 New Peachtree Road, Suite 150, Chamblee, GA 30341
Char Griller ^® Kamado Joe Europe, Lange Voorhout 86, 2514 EJ, Den Haag, Netherlands
Char Griller ^® Kamado Joe UK Limited, Cheyenne House West Street, Farnham GU9 7EQ
www.chargriller.com/pages/customer-support
www.chargriller.com/pages/customer-support
www.chargriller.com/pages/customer-support

SWEDISH
natural_image
Line drawing of a medical device with a stethoscope inserted into a patient's ear (no text or symbols)natural_image
Line drawing of a mechanical component with a valve and handle, no text or symbols presentGASFLASKANS PLACERING:
KRAV PÅ GASFLASKA
EUROPA
Char Griller ^® Premier Specialty Brands, LLC, 5367 New Peachtree Road, Suite 150, Chamblee, GA 30341
Char Griller ^® Kamado Joe Europe, Lange Voorhout 86, 2514 EJ, Den Haag, Nederländerna
Char Griller ^® Kamado Joe UK Limited, Cheyenne House West Street, Farnham GU9 7EQ
www.chargriller.com/pages/customer-support
www.chargriller.com/pages/customer-support
www.chargriller.com/pages/customer-support

natural_image
Diagram of a grid-like structure with rectangular elements, no text or symbols presentA:28
natural_image
Diagram of five identical test tubes with varying liquid levels, no text or symbols presentB:8
natural_image
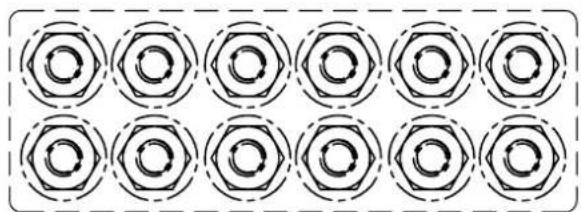
Repeating pattern of 12 identical hexagonal nut icons enclosed in a dashed border (no text or symbols)C:12

natural_image
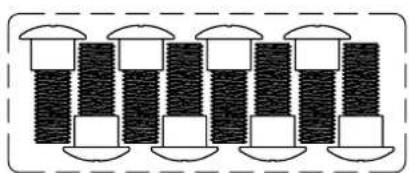
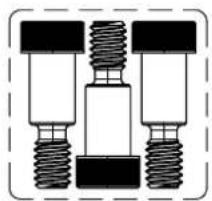
Illustration of five identical screw-like components arranged in a row, enclosed in a dashed border (no text or symbols)E:6
natural_image
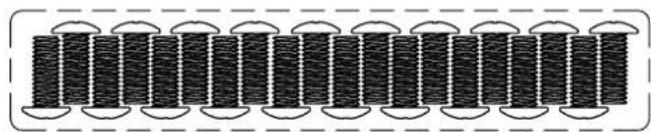
Repeating pattern of black cylindrical objects with cloud-like top caps, no text or symbols presentG:19
natural_image
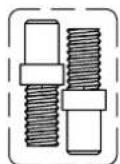
Pure mechanical assembly diagram showing three bolts with threaded ends, no text or symbols presentJ:3
H:8
D:16
1:2
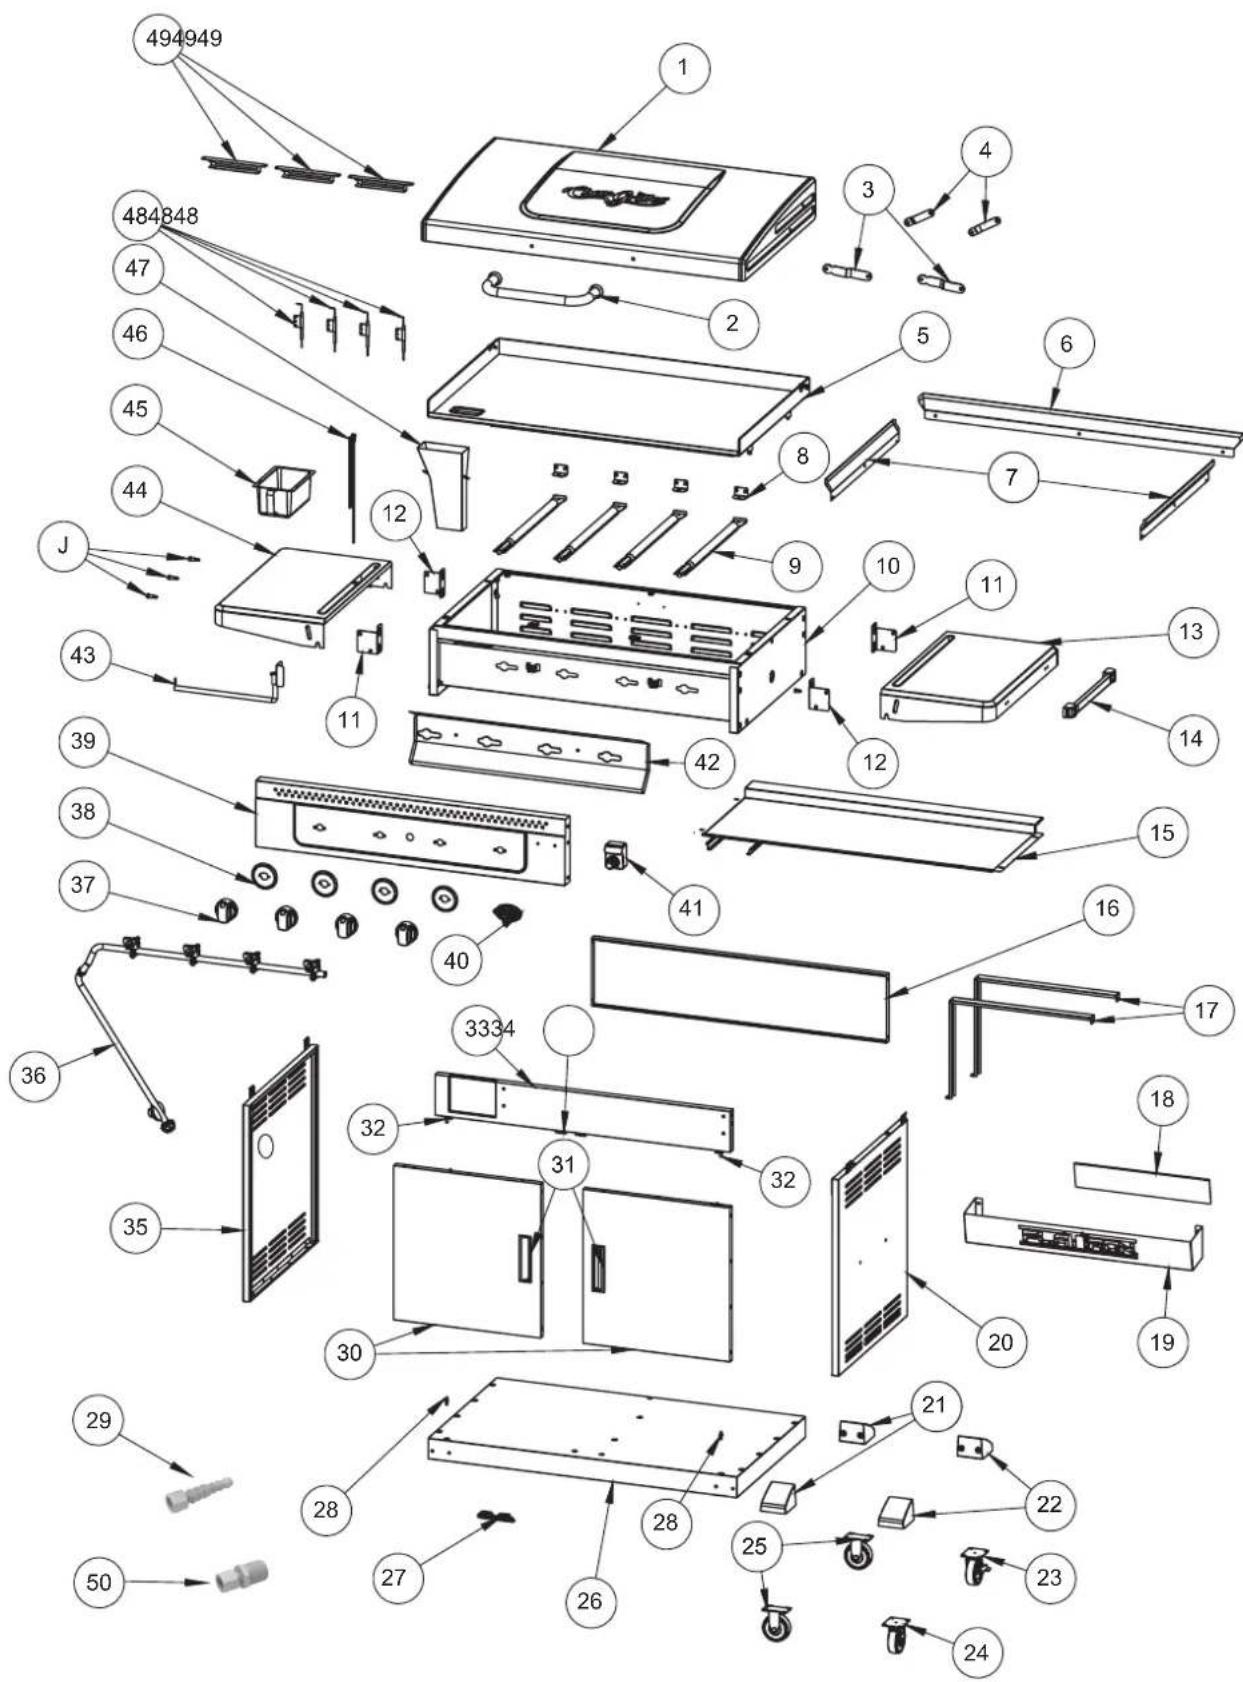
Parts List
| NO. | QTY. | DESCRIPTION | NO. | QTY. | DESCRIPTION |
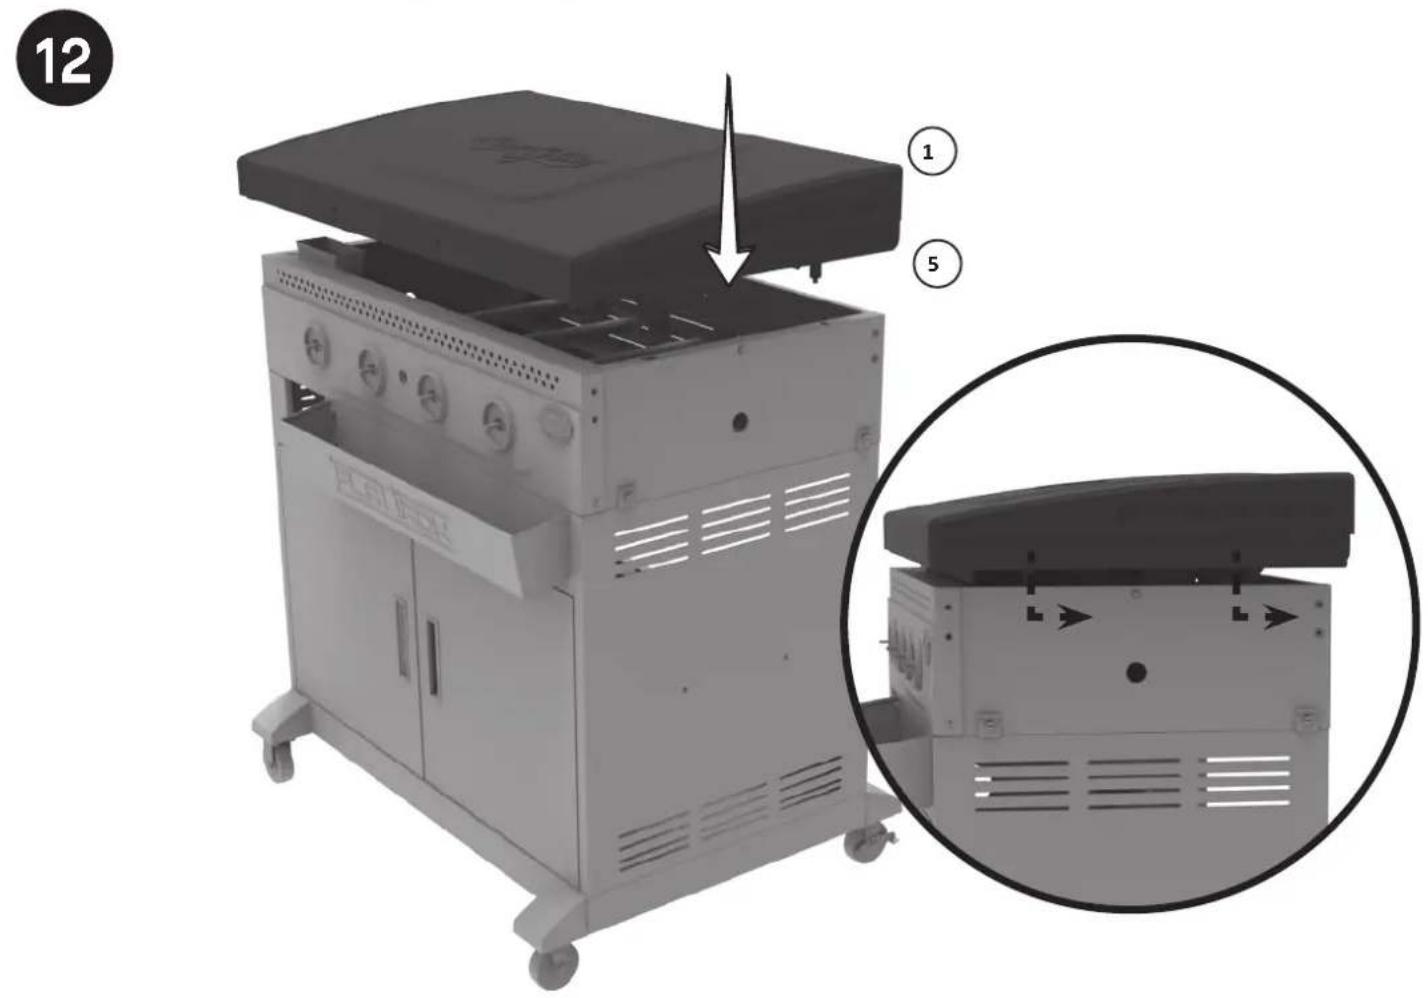
| 1 | 1 | HINGED LID | 26 | 1 | BOTTOM SHELF |
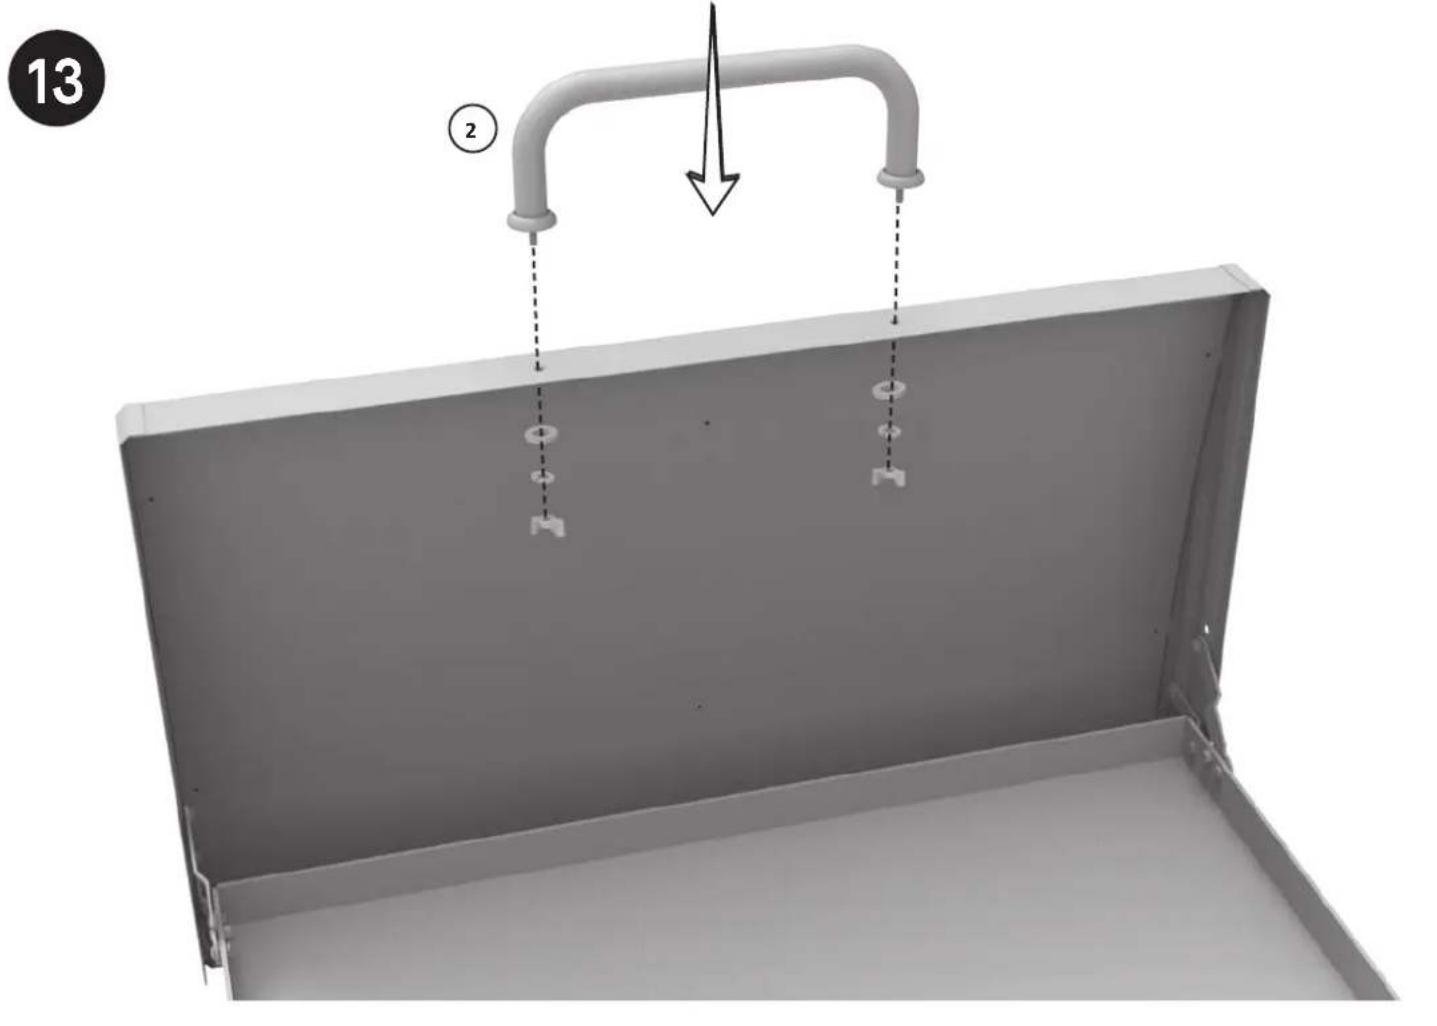
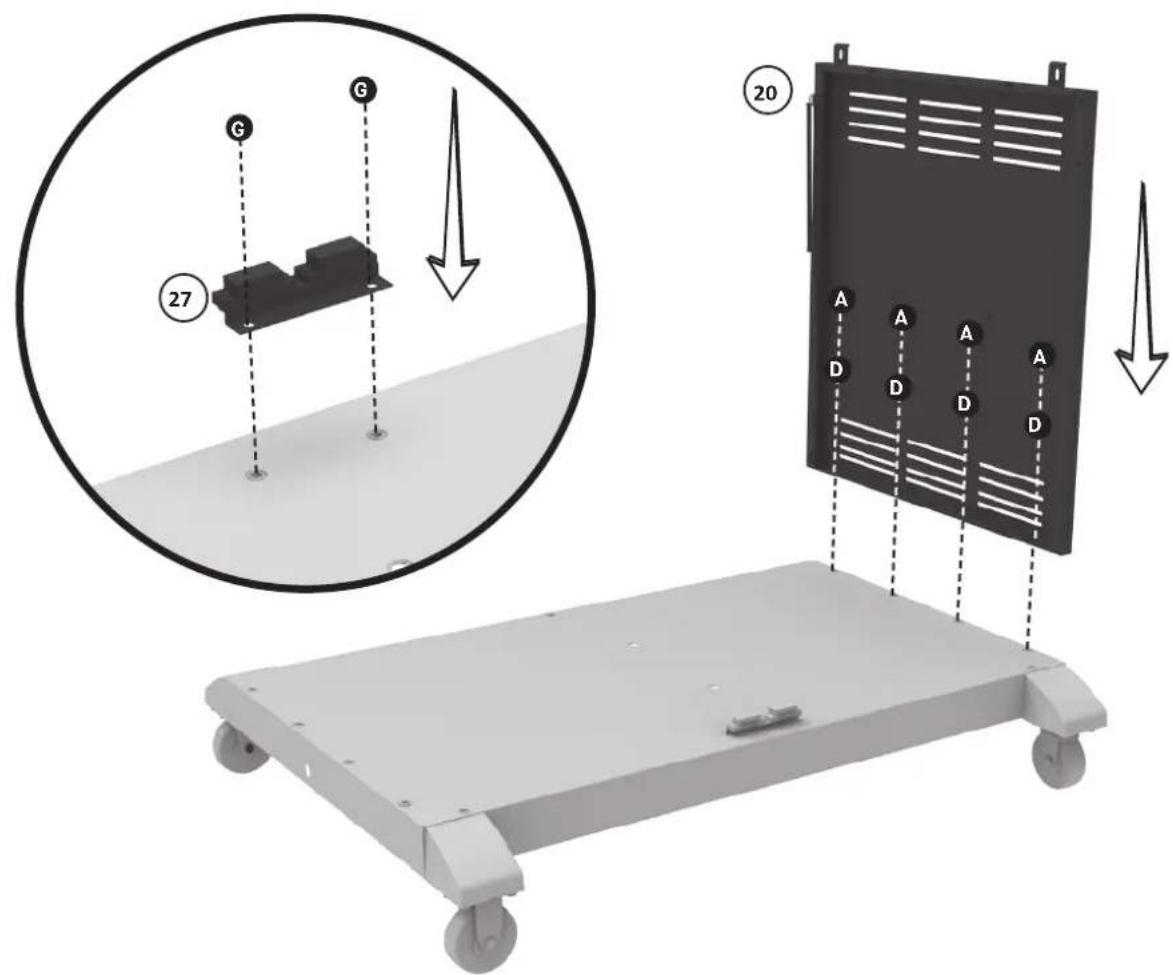
| 2 | 1 | LID HANDLE | 27 | 1 | BOTTOM SHELF DOOR MAGNET |
| 3 2 | LOWER LID HINGE | 28 | 2 | DOOR SUPPORT PIN | |
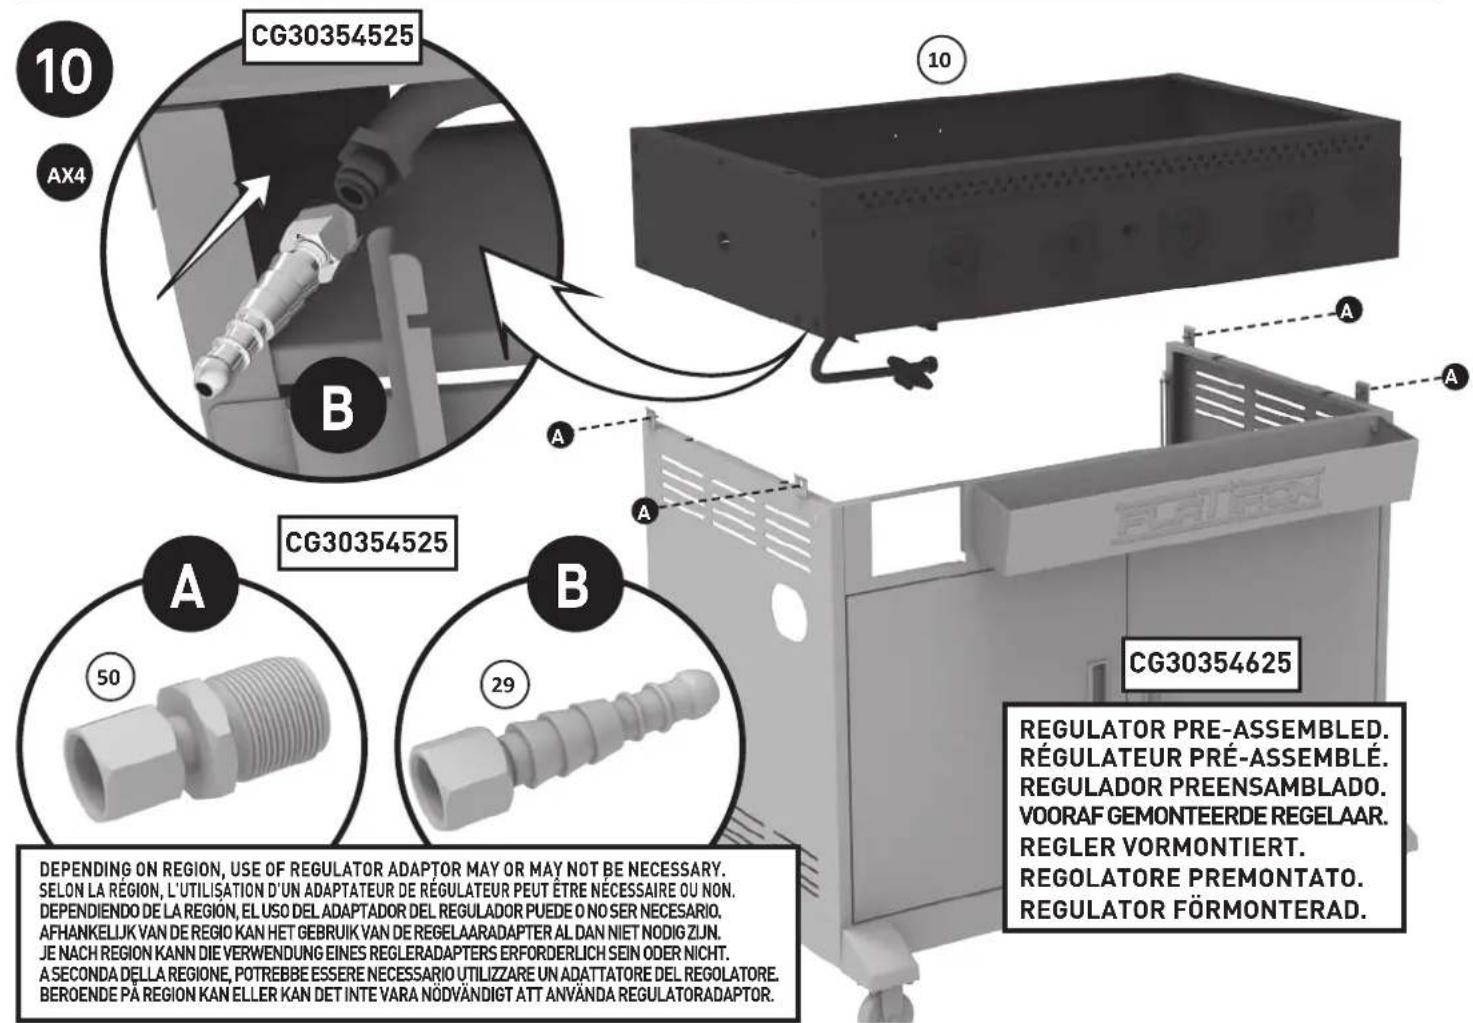
| 4 2 | UPPER LID HINGE | 29 | 1 | HOSE/REGULATOR ADAPTOR (CG30354525) | |
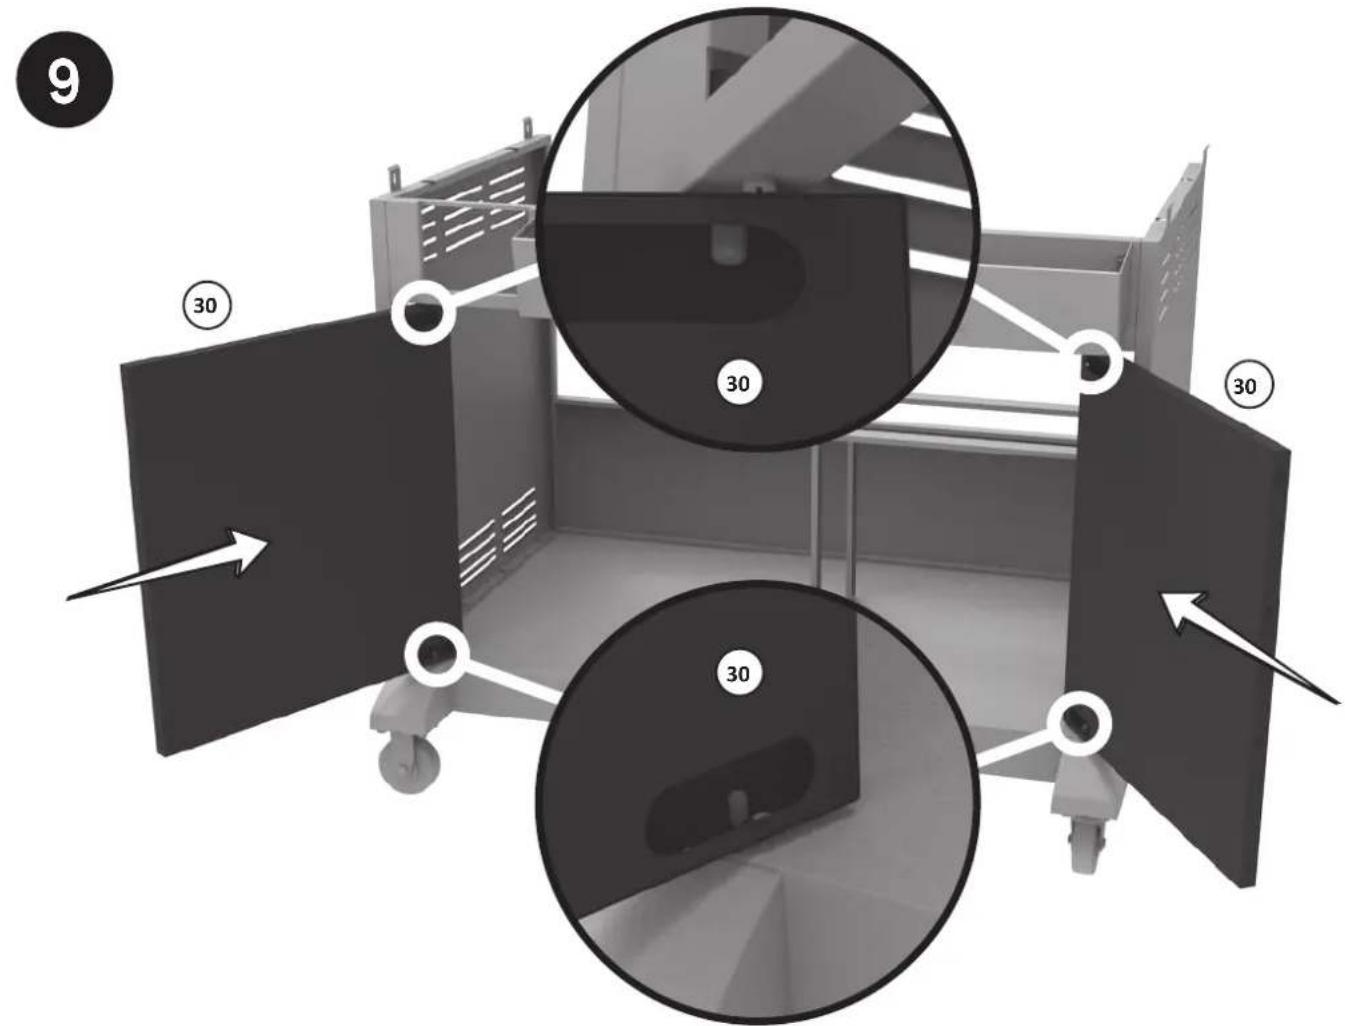
| 5 1 | GRIDDLE | 30 | 2 | FRONT DOOR | |
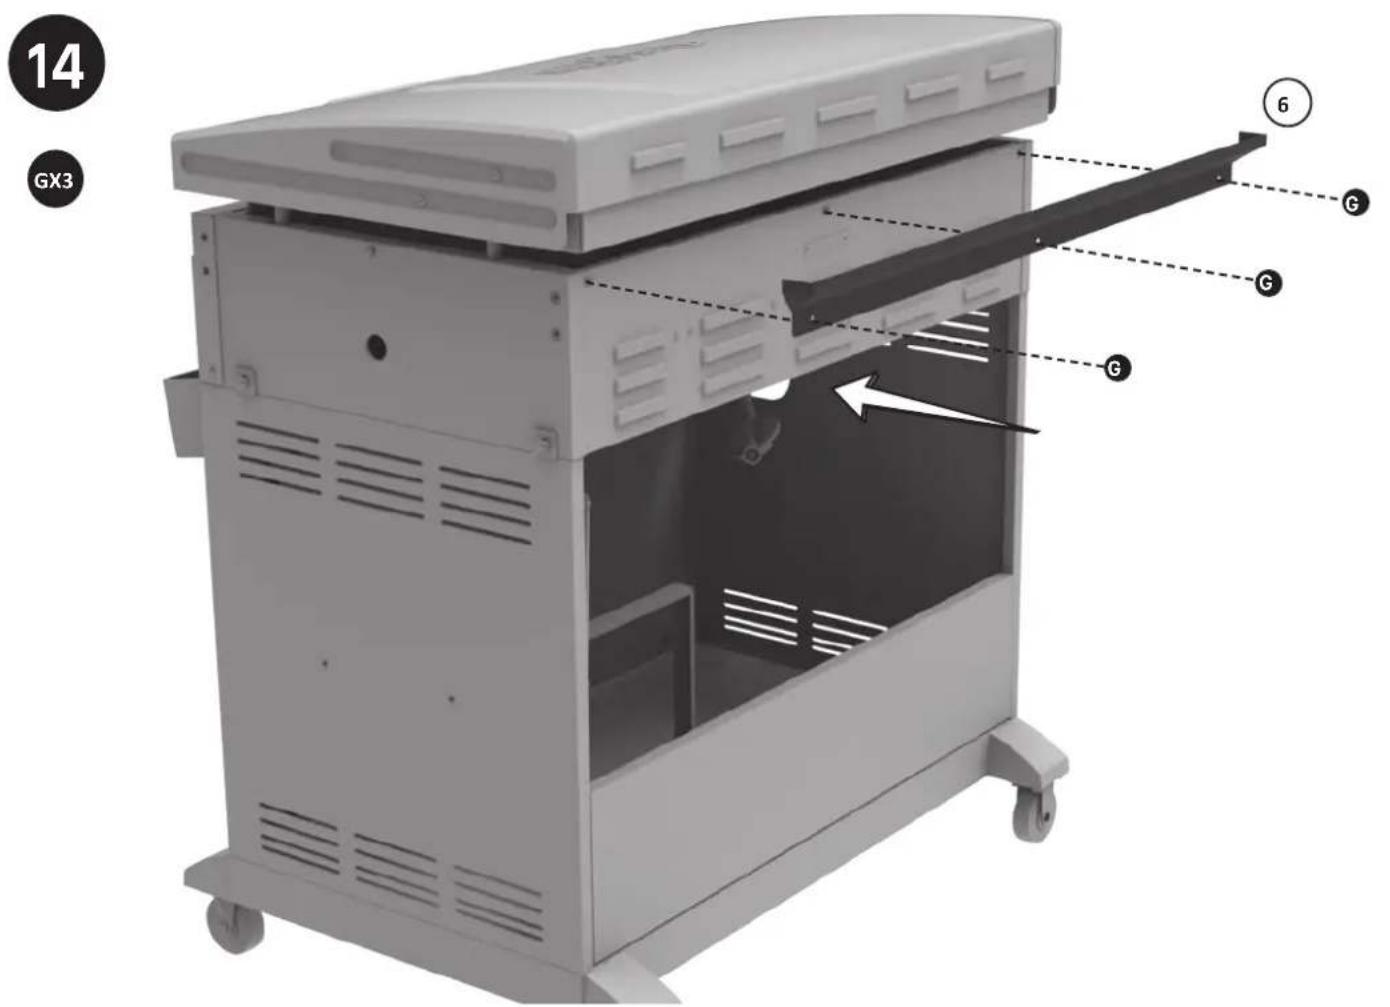
| 6 1 | REAR WIND SHIELDS | 31 | 2 | DOOR HANDLE | |
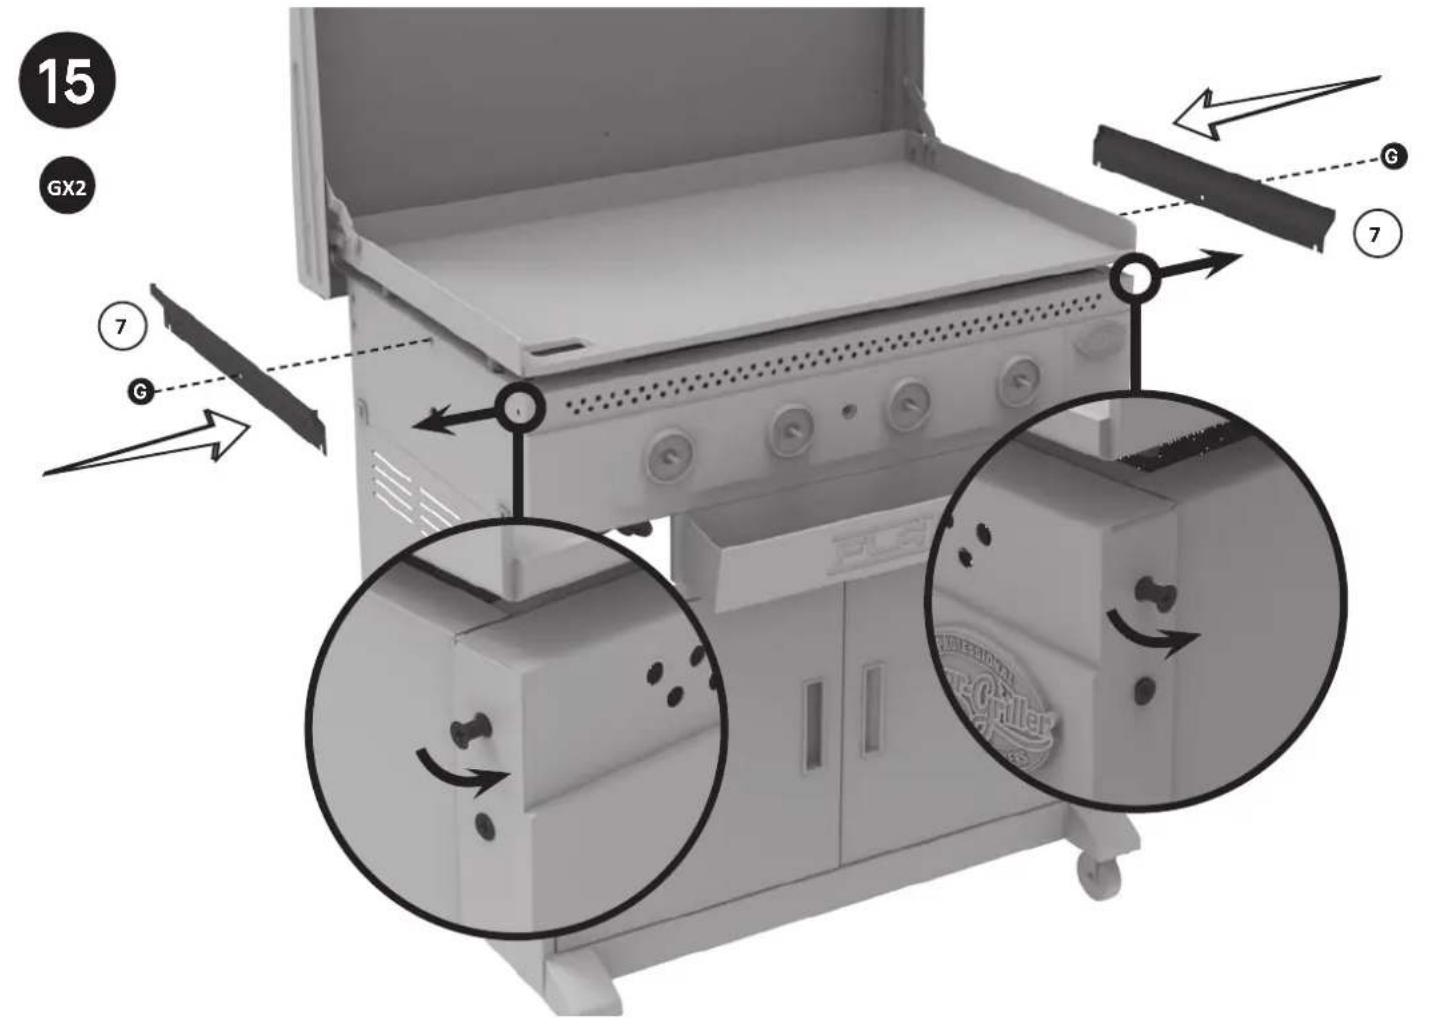
| 7 2 | SIDE WIND SHIELDS | 32 | 2 | UPPER DOOR SOCKET | |
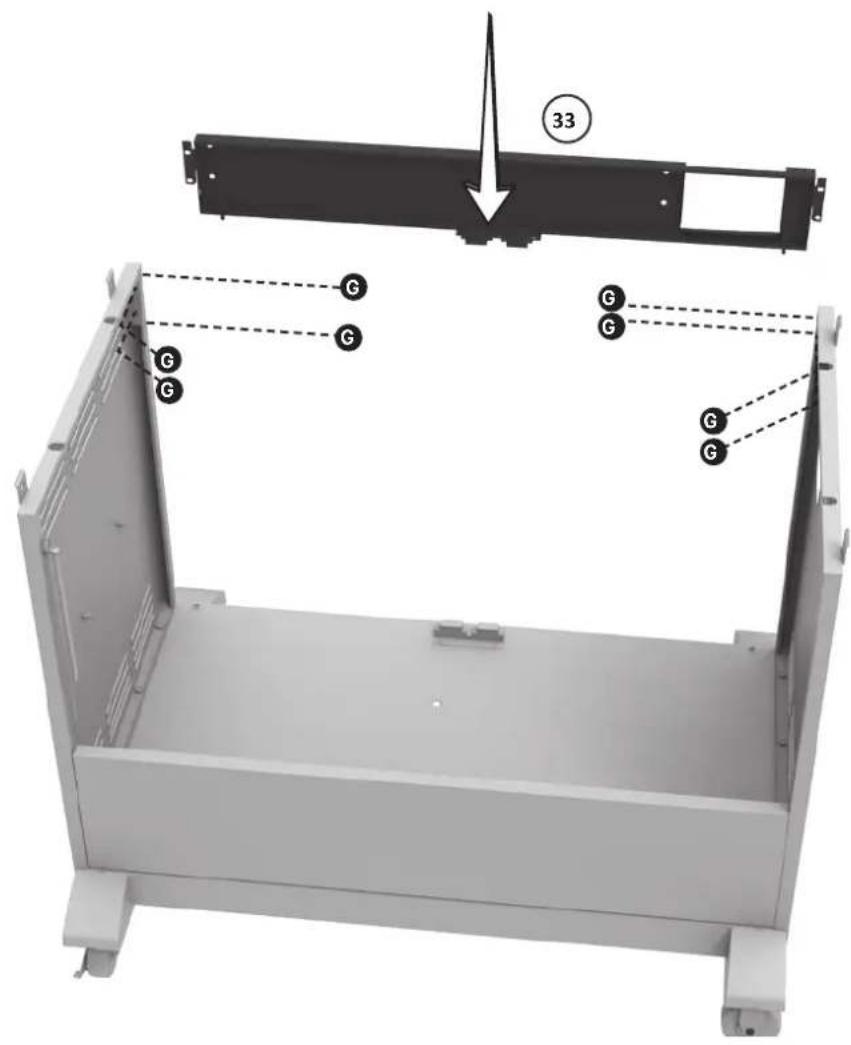
| 8 | 4 | BURNER SUPPORT BRACKET | 33 | 1 | UPPER FRONT BRACE |
| 9 | 4 | BURNER | 34 | 1 | DOOR MAGNET |
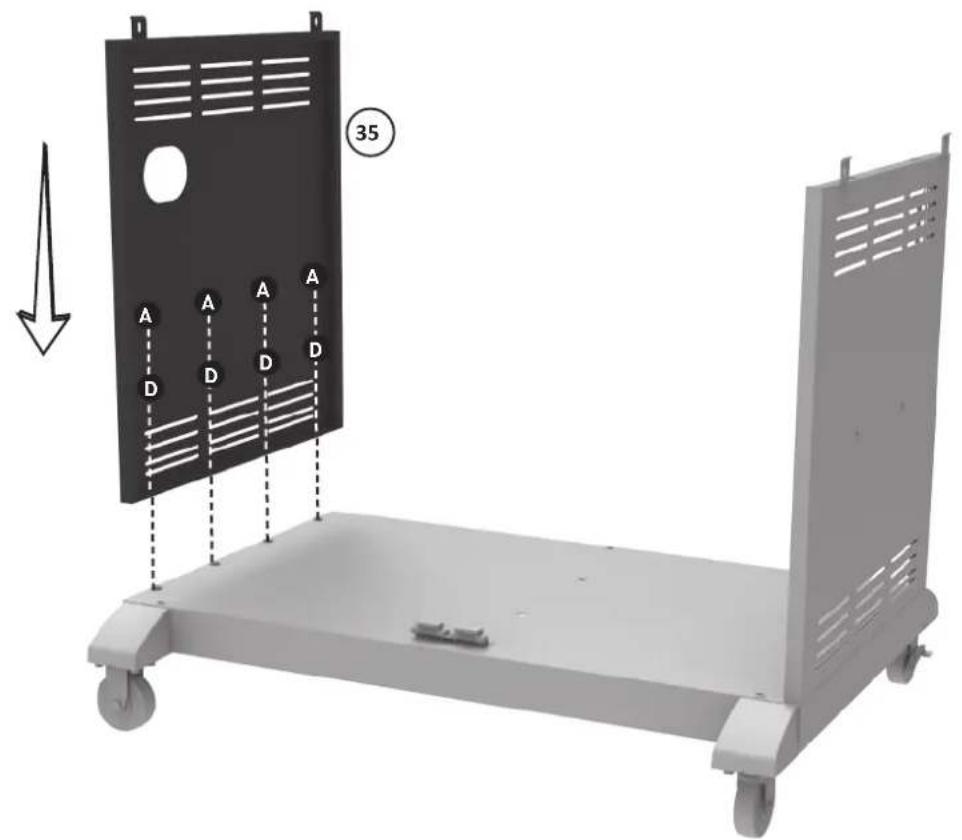
| 10 | 1 | MAIN GRIDDLE BODY | 35 | 1 | CART LEFT PANEL |
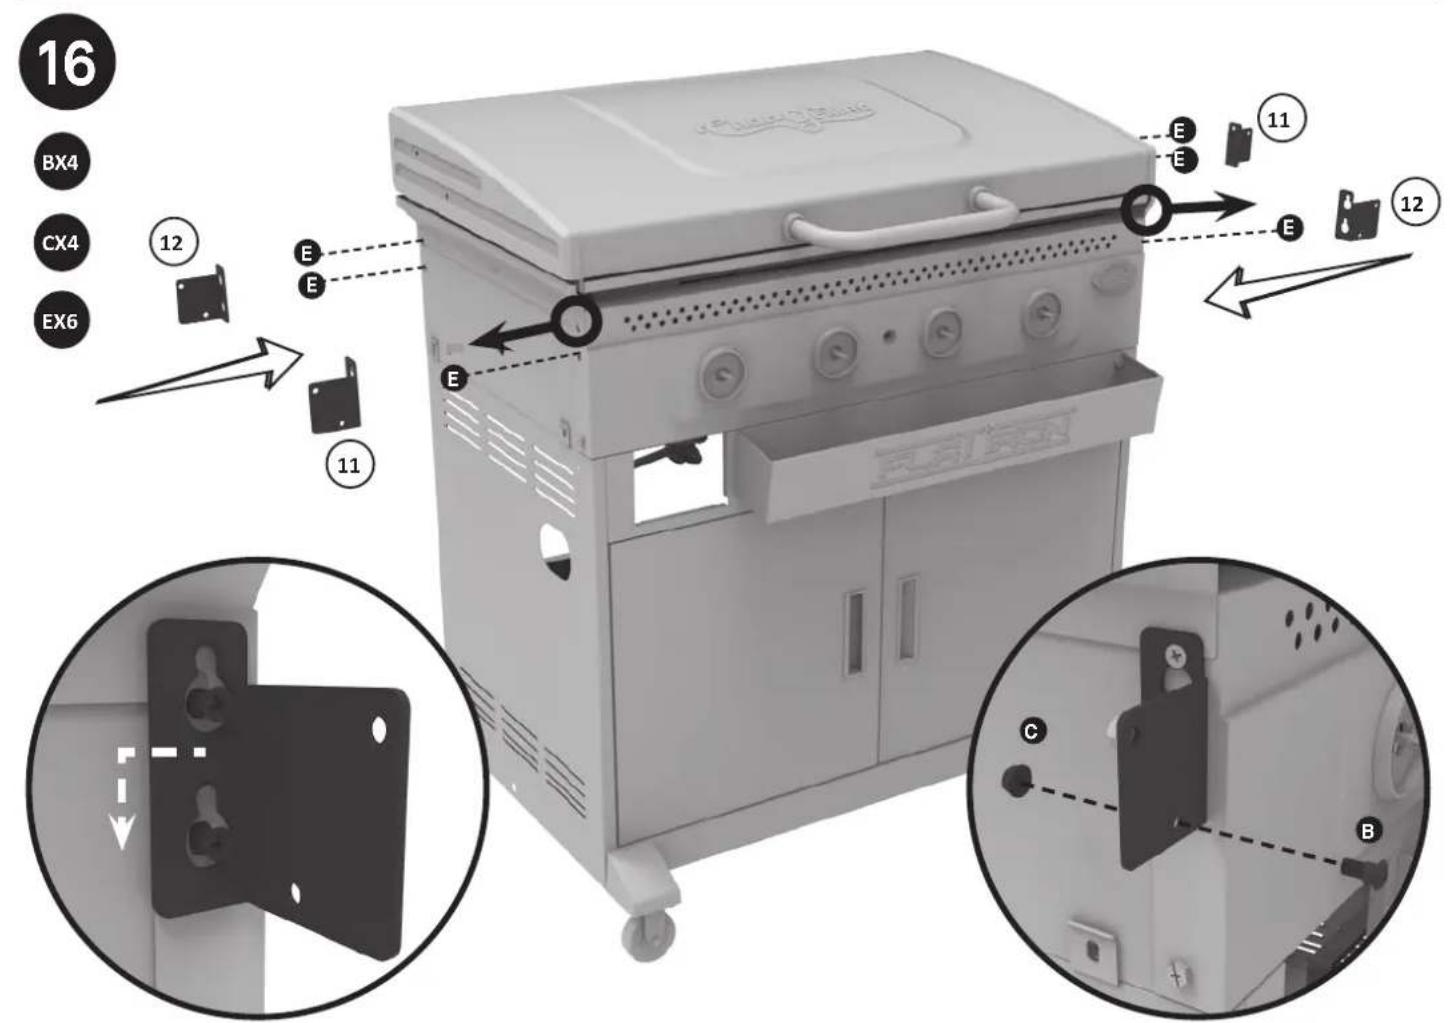
| 11 | 2 | SIDE SHELF BRACKET (FRONT LEFT, REAR RIGHT) | 36 | 1 | HOSE/VALVE/REGULATOR ASSEMBLY (CG30354625) |
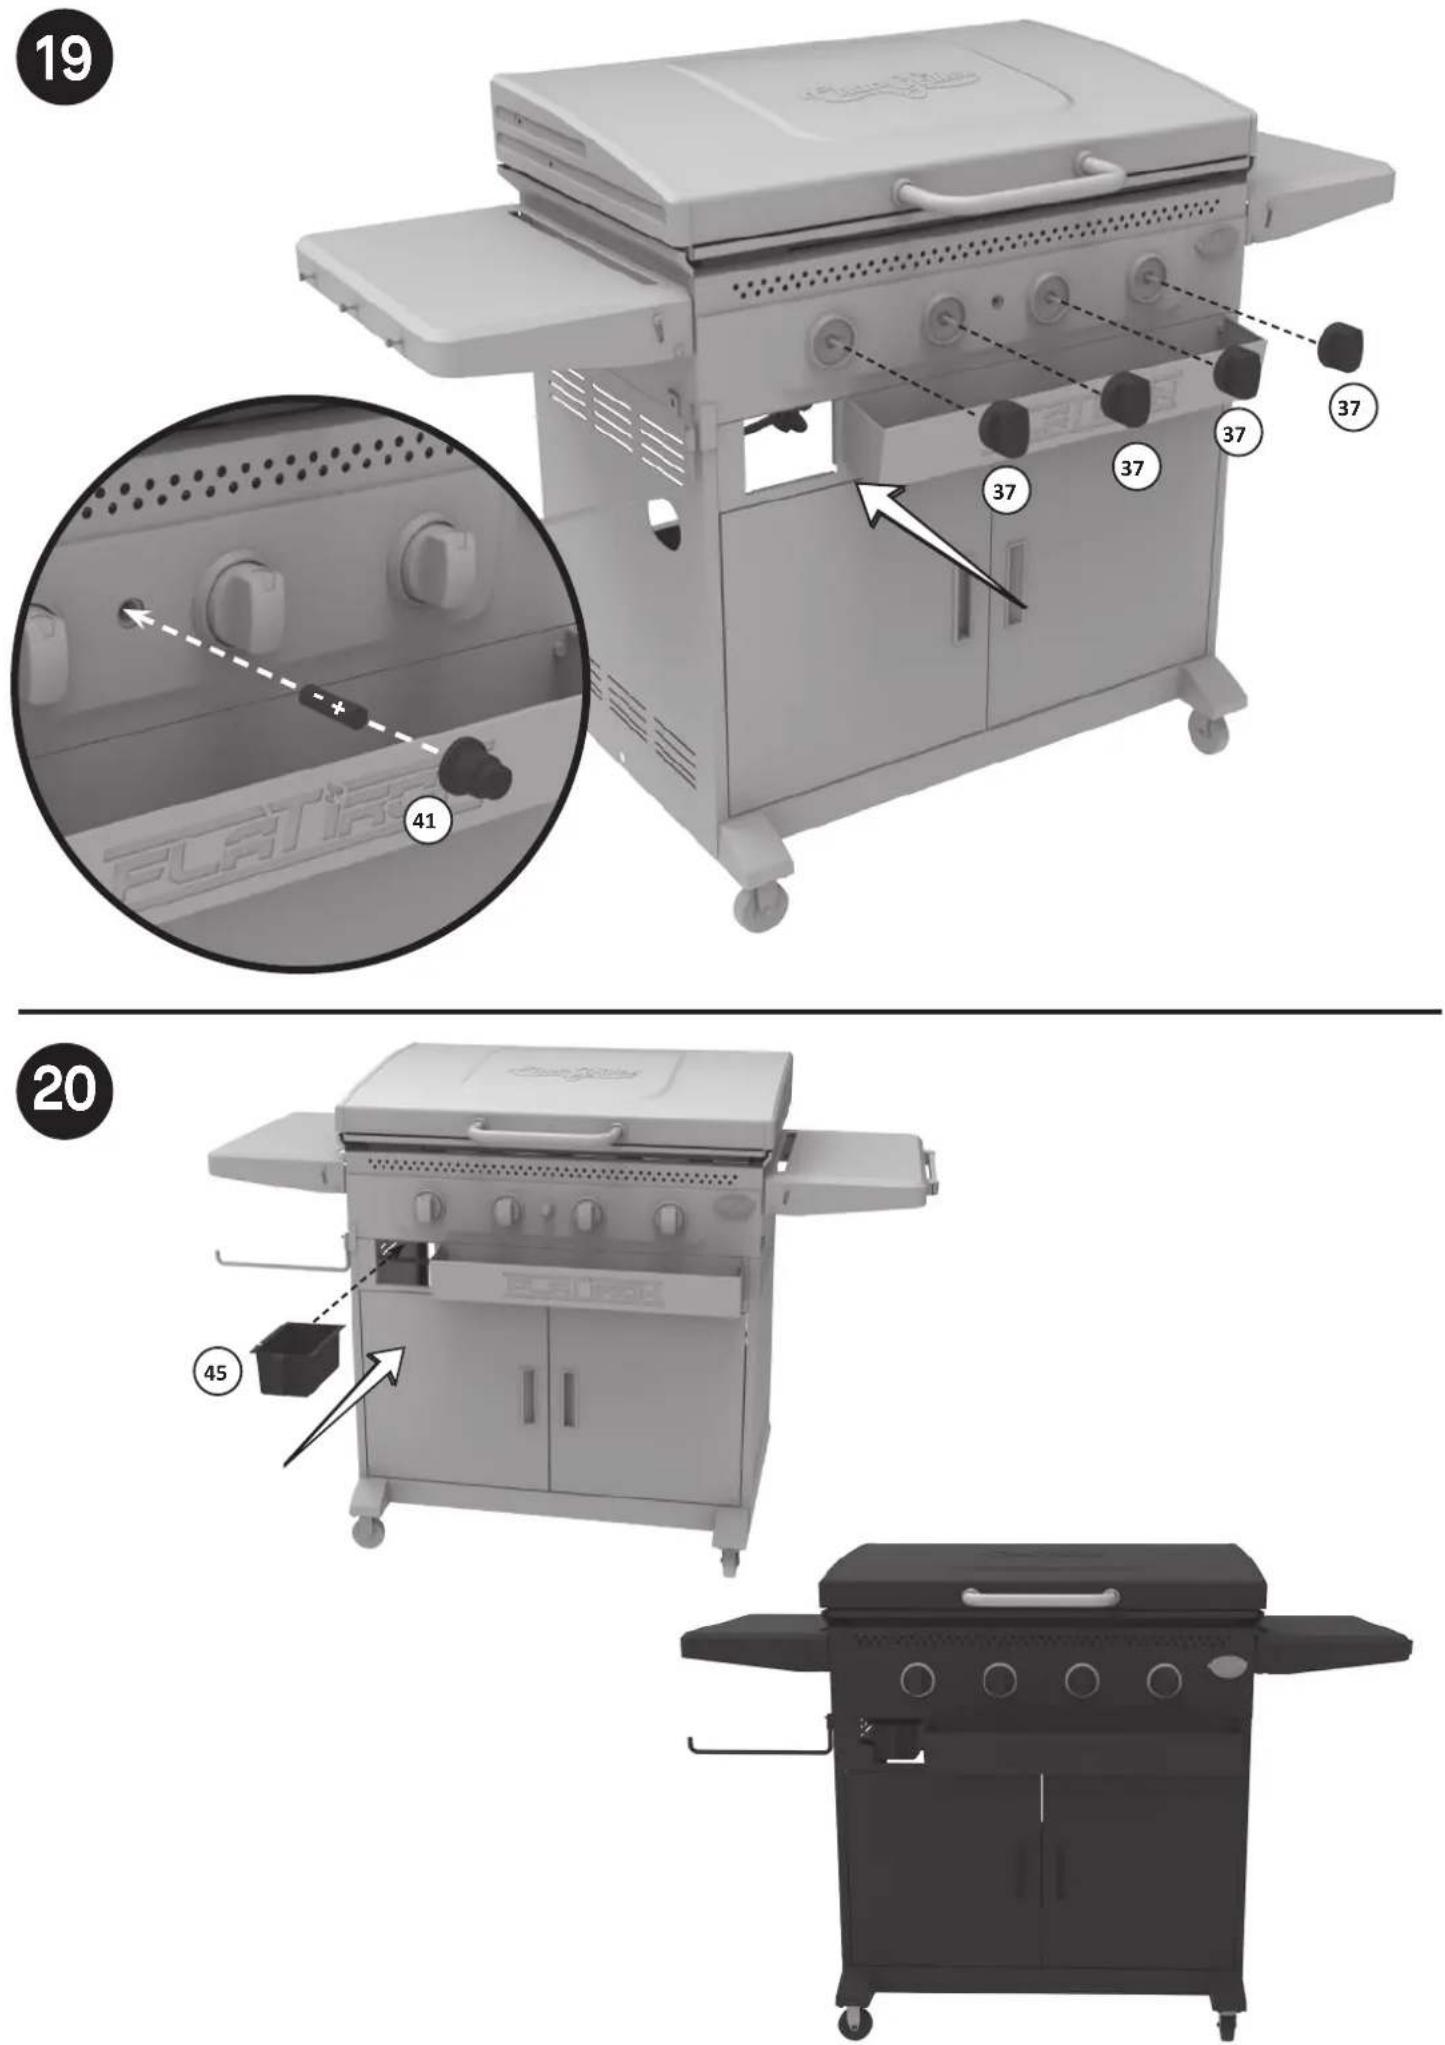
| 12 | 2 | SIDE SHELF BRACKET (FRONT RIGHT, REAR LEFT) | 37 | 4 | KNOBS WITH RED INDICATOR |
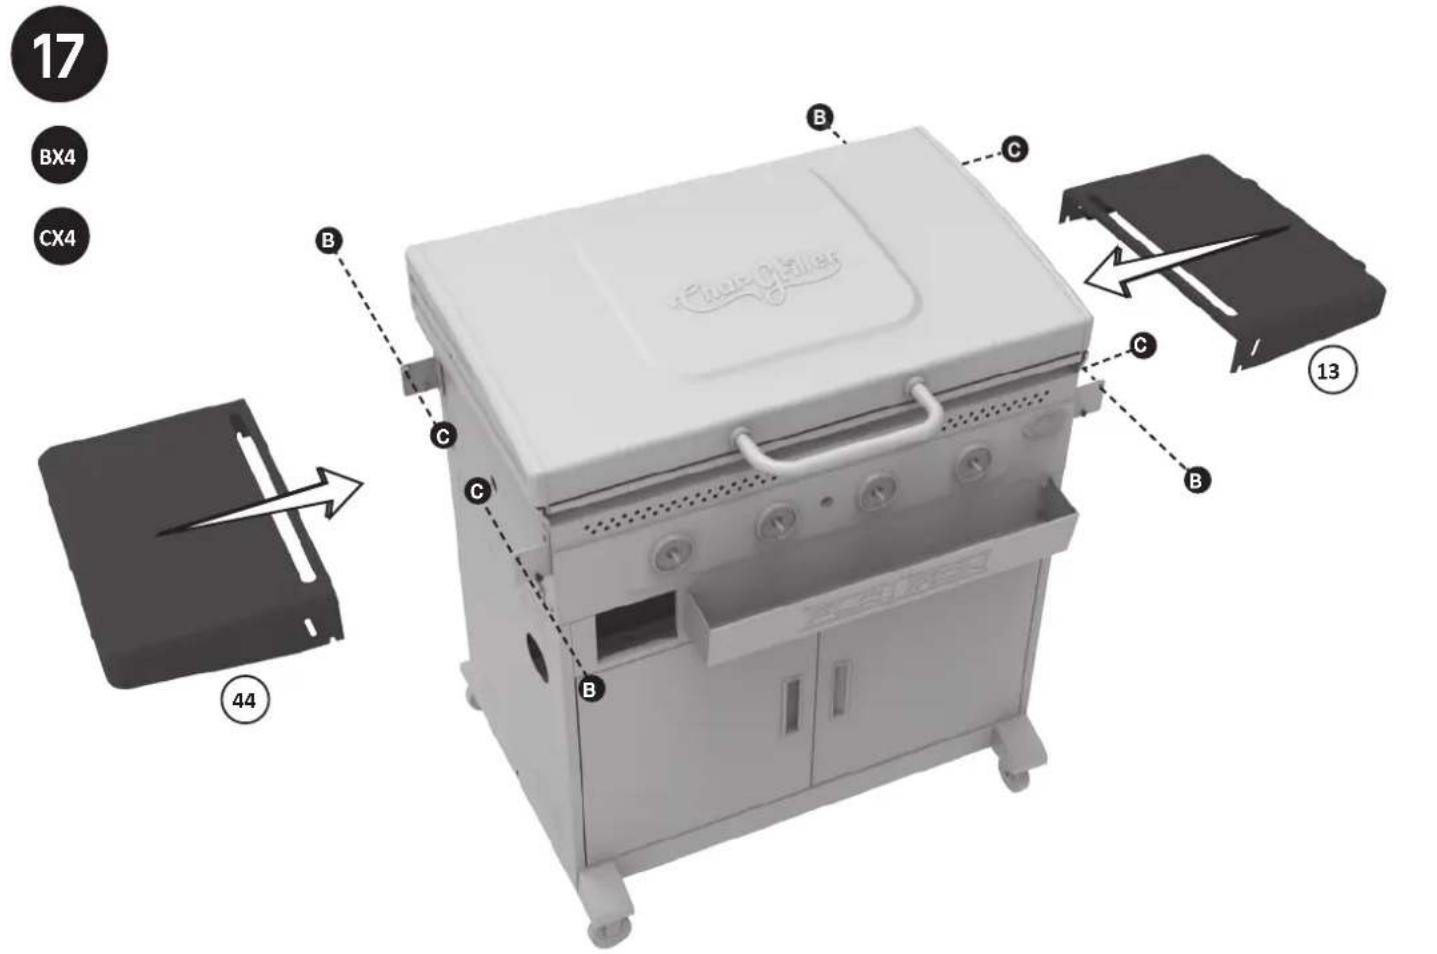
| 13 | 1 | RIGHT FOLDING SIDE SHELF | 38 | 4 | KNOB BEZELS |
| 14 | 1 | MAGNETIC TOOL HOLDER | 39 | 1 | CONTROL PANEL |
| 15 | 1 | PARTICLE SHIELD | 40 | 1 | CHAR-GRILLER® LOGO PLATE |
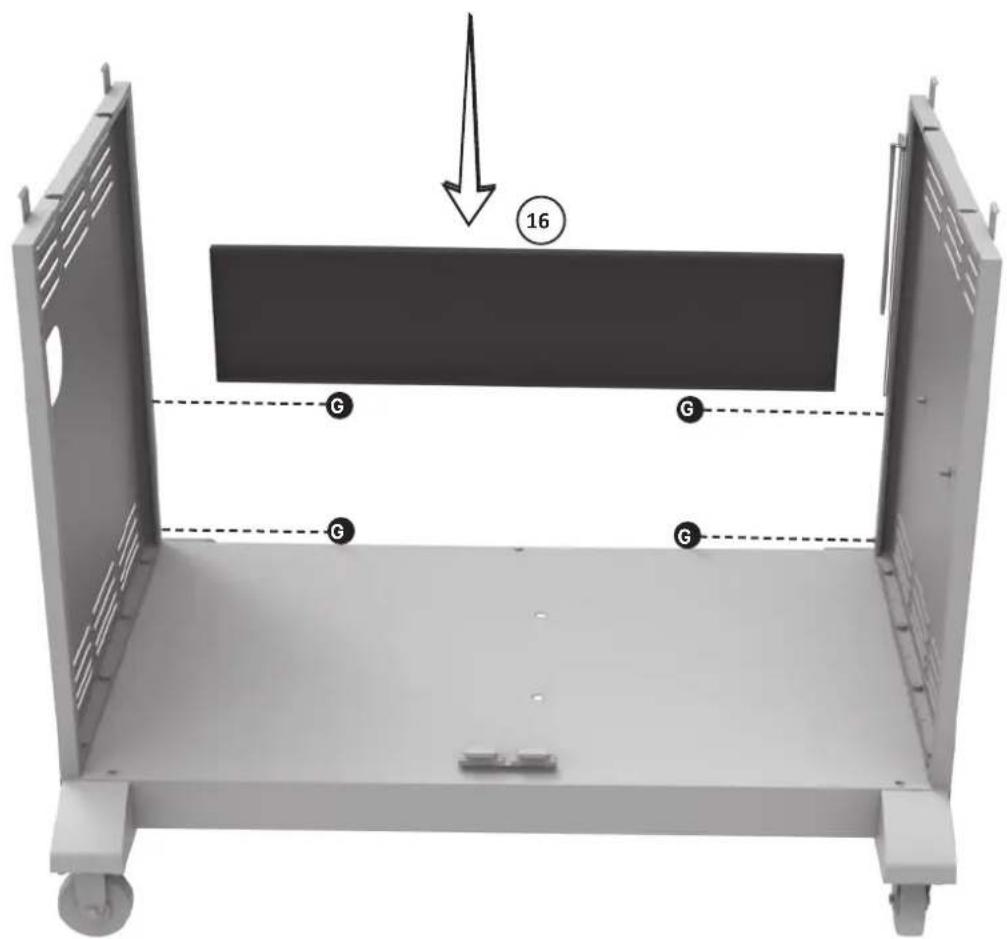
| 16 | 1 | CART BACK PANEL | 41 | 1 | IGNITER |
| 17 | 2 | TANK EXCLUSION WIRE | 42 | 1 | HEAT SHIELD |
| 18 | 1 | CONDIMENT BASKET LOGO BACKPLATE | 43 | 1 | PAPER TOWEL HOLDER |
| 19 | 1 | CONDIMENT BASKET | 44 1 | LEFT SIDE SHELF | |
| 20 | 1 | CART RIGHT PANEL | 45 | 1 | GREASE CUP |
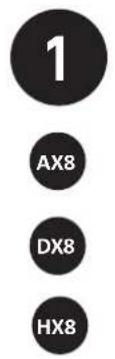
| 21 | 2 | LEFT CASTER BRACKETS | 46 | 1 | MATCH HOLDER |
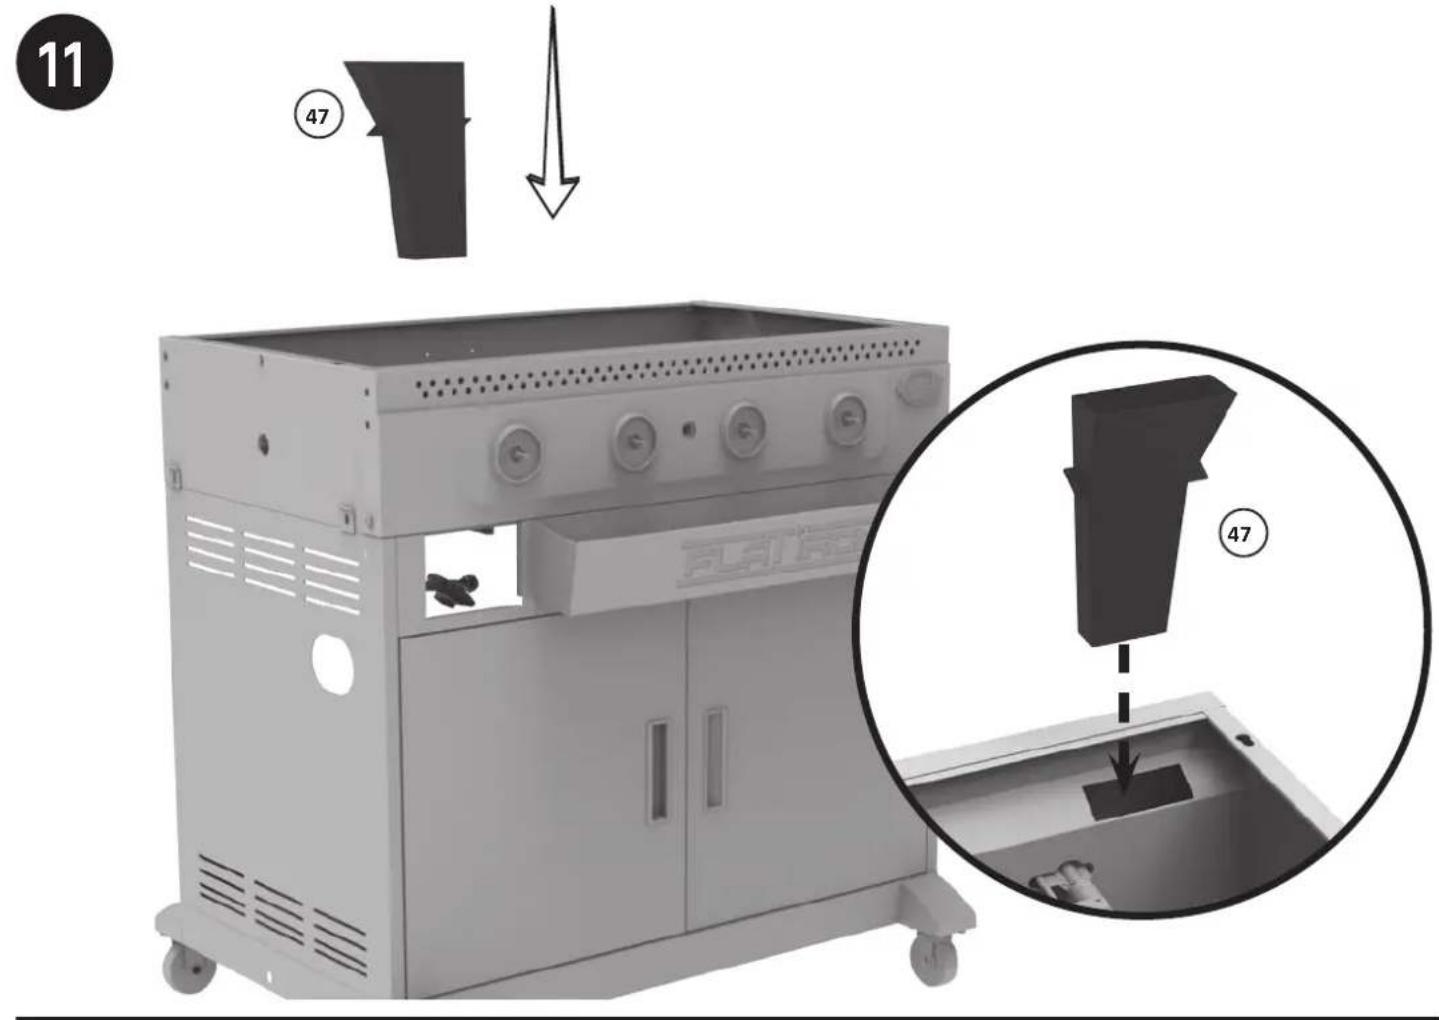
| 22 | 2 | RIGHT CASTER BRACKETS | 47 | 1 | GREASE FUNNEL |
| 23 1 | LOCKING CASTER WHEEL | 48 | 4 | SPARK TIPS WITH WIRE | |
| 24 | 1 | SWIVEL CASTER WHEEL | 49 | 3 | CROSS OVER TUBE |
| 25 | 2 | FIXED CASTER WHEEL | 50 | 1 | HOSE/REGULATOR ADAPTOR (CG30354525) |
BEFORE ASSEMBLY READ ALL INSTRUCTIONS CAREFULLY
- Assemble on a clean flat surface.
- Recommend assembling on cardboard to avoid residue on floors or scratches.
- Gloves recommended for assembly.
- Tools needed: Phillips head screwdriver and adjustable wrench.
• Approximate assembly time: 1 hour. - Recommend two people assemble to increase ease and reduce assembly time.
• Actual product may differ from picture shown. - It is possible that some assembly steps have been completed in the factory.
- Remove all advertisement stickers before use.
- Igniter requires AA battery (BATTERY NOT INCLUDED)
DO NOT RETURN TO RETAILER!
For assembly assistance, missing or damaged parts, please contact Char Griller Customer Service.
Char Griller ^® Premier Specialty Brands, LLC, 5367 New Peachtree Road, Suite 150, Chamblee, GA 30341
Char Griller ^® Kamado Joe Europe, Lange Voorhout 86, 2514 EJ, Den Haag, Netherlands
Char Griller ^® Kamado Joe UK Limited, Cheyenne House West Street, Farnham GU9 7EQ
Australia & New Zealand: Please contact your retailer
www.chargriller.com/pages/customer-support
www.chargriller.com/pages/customer-support
www.chargriller.com/pages/customer-support
| N° | QTÉ DESCRIPTION | N° | QTÉ DESCRIPTION | ||
| 1 1 | COUVEROLE À CHARNIÈRE | 26 | 1 ÉTAGÈRE INFÉRIEURE | ||
| 2 1 | POIGNÉE DU COUVERCLE | 27 1 | AIMANT DE PORTE DE L'ÉTAGÈRE INFÉRIEURE | ||
| 3 2 | CHARNIÈRE DU COUVERCLE INFÉRIEUR | 28 2 | AXE DE SUPPORT DE PORTE | ||
| 4 2 | CHARNIÈRE DU COUVERCLE SUPÉRIEUR | 29 | 1 ADAPTATEUR TUYAU/RÉGULATEUR (CG30354525) | ||
| 5 1 | PLANCHA | 30 2 | PORTE AVANT | ||
| 6 1 | PARE-VENT ARRIÈRE | 31 | 2 POIGNÉE DE PORTE | ||
| 7 2 | PARE-VENT LATÉRAUX | 32 2 | DOUILLE SUPÉRIEURE DE LA PORTE | ||
| 8 4 | SUPPORT DE BRÛLEUR | 33 | 1 CONTREVENT SUPÉRIEUR AVANT | ||
| 9 4 | BRÛLEUR | 34 1 | AIMANT DE PORTE | ||
| 10 1 | CORPS DE LA PLANCHA PRINCIPALE | 35 | 1 PANNEAU DE GAUCHE DU CHARIOT | ||
| 11 | 2 | SUPPORT DE L'ÉTAGÈRE LATÉRALE (AVANT GAUCHE,ARRIÈRE DROITE) | 36 | 1 | ASSEMBLAGE TUYAU/ROBINET/REGULATEUR(CG30354625) |
| 12 | 2 | SUPPORT DE L'ÉTAGÈRE LATÉRALE (AVANT DROITE,ARRIÈRE GAUCHE) | 37 | 4 BOUTONS AVEC INDICATEUR ROUGE | |
| 38 4 | COLLERETTES DES BOUTONS | ||||
| 13 1 | ÉTAGÈRE LATÉRALE RABATTABLE DE DROITE | 39 | 1 PANNEAU DE COMMANDE | ||
| 14 | 1 PORTE-OUTILS MAGNÉTIQUE | 40 | 1 PLAQUE DE LOGO CHAR-GRILLER® | ||
| 15 1 | ÉCRAN ANTI-PARTICULES | 41 | 1 ALLUMEUR | ||
| 16 1 | PANNEAU ARRIÈRE DU CHARIOT | 42 1 | ÉCRAN THERMIQUE | ||
| 17 2 | FIL D'EXCLUSION DE BOUTEILLE | 43 1 | PORTE-ESSUIE-TOUT | ||
| 18 | 1 | PLAQUE ARRIÈRE DU PANIER À CONDIMENTS AVECLOGO | 44 | 1 ÉTAGÈRE DE GAUCHE | |
| 45 | 1 RÉCIFIENT À GRAISSE | ||||
| 19 1 | PANIER À CONDIMENTS | 46 | 1 PORTE-ALLUMETTES | ||
| 20 | 1 PANNEAU DE DROITE DU CHARIOT | 47 | 1 ENTONNOIR À GRAISSE | ||
| 21 | 2 SUPPORTS DES ROULETTES DE GAUCHE | 48 | 4 POINTES D'ÉTINCELLES AVEC FIL | ||
| 22 2 | SUPPORTS DES ROULETTES DE DROITE | 49 3 | TUBE TRANSVERSAL | ||
| 23 | 1 ROULETTE PIVOTANTE BLOQUANTE | 50 | 1 | ADAPTATEUR TUYAU/RÉGULATEUR (CG30354525) | |
| 24 | 1 ROULETTE PIVOTANTE | ||||
| 25 2 | ROULETTE FIXE | ||||
AVANT L'ASSEMBLAGE, LIRE ATTENTIVEMENT TOUTES LES INSTRUCTIONS
Char Griller® Premier Specialty Brands, LLC, 5367 New Peachtree Road, Suite 150, Chamblee, GA 30341
Char Griller® Kamado Joe Europe, Lange Voorhout 86, 2514 EJ, La Haye, Pays-Bas
Char Griller® Kamado Joe UK Limited, Cheyenne House West Street, Farnham GU9 7EQ
www.chargriller.com/pages/customer-support
www.chargriller.com/pages/customer-support
www.chargriller.com/pages/customer-support
| N.° | CANT. | DESCRIPCIÓN | N.° | CANT. | DESCRIPCIÓN |
| 1 1 | TAPA CON | BISAGRA | 26 1 | REPISA | INFERIOR |
| 2 1 | ASA DE LA | TAPA | 27 1 | MÁN PARA | LA PUERTA DE LA REPISA INFERIOR |
| 3 2 | BISAGRA | DE LA TAPA INFERIOR | 28 | 2 PIN | DE SOPORTE DE LA PUERTA |
| 4 2 | BISAGRA | DE LA TAPA SUPERIOR | 29 | 1 | ADAPTADOR DE LA MANGUERA/REGULADOR (CG30354525) |
| 5 1 | PLANCHA | ||||
| 6 1 | PROTECT | ORES CONTRA EL VIENTO TRASEROS | 30 | 2 PUERTA DELANTERA | |
| 7 2 | PROTECT | ORES CONTRA EL VIENTO LATERALES | 31 2 | ASA DE LA | PUERTA |
| 8 4 | ABRAZADERA | DERA DE SOPORTE DEL QUEMADOR | 32 | 2 CLAVIJA | DA LA PUERTA SUPERIOR |
| 9 4 | QUEMADOR | 33 1 | SOPORTE | DELANTERO SUPERIOR | |
| 10 1 | CUERPO | DE LA PLANCHA PRINCIPAL | 34 1 | MÁN DE LA | PUERTA |
| 11 | 2 | ABRAZADERA DE LA REPISA LATERAL (DELANTERA IZQUIERDA, TRASERA DERECHA) | 35 1 | PANEL IZQUIERDO DEL CARRO | |
| 36 | 1 | ENSAMBLAJE DE LA MANGUERA/VÁLVULA/ REGULADOR (CG30354625) | |||
| 12 | 2 | ABRAZADERA DE LA REPISA LATERAL (DELANTERA DERECHA, TRASERA IZQUIERDA) | 37 4 | PERILLAS | CON INDICADOR ROJO |
| 13 1 | REPISA | LATERAL DERECHA PLEGABLE | 38 | 4 BISELES DE LA PERILLA | |
| 14 1 | PORTAHE | ERRAMIENTAS MAGNÉTICO | 39 1 | PANEL DE CONTROL | |
| 15 1 | PROTECTOR | CONTRA PARTÍCULAS | 40 1 | PLACA CON LOGO CHAR-GRILLER® | |
| 16 1 | PANEL TRASERO DEL CARRO | 41 1 | ARRANCADOR | ||
| 17 2 | ALAMBRE | DE EXCLUSIÓN DEL TANQUE | 42 1 | PROTECTOR DE CALOR | |
| 18 | 1 | CESTA DE CONDIMENTOS PLACA POSTERIOR CON LOGO | 43 1 | SUJETADOR DE TOALLAS DE PAPEL | |
| 44 1 | REPISA LATERAL IZQUIERDA | ||||
| 19 1 | CESTA PARA | CONDIMENTOS | 45 1 | TAZA DE GRASA | |
| 20 1 | PANEL DERECHO DEL CARRO | 46 1 | SUJETADOR DE FÓSFOROS | ||
| 21 2 | ABRAZADERAS DE LA RUEDA IZQUIERDA | 47 1 | EMBUDO DE GRASA | ||
| 22 | 2 ABRAZADERAS DE LA RUEDA DERECHA | 48 | 4 PUNTAS DE CHISPA CON CABLE | ||
| 23 1 | RUDECILLA CON BLOQUEO | 49 | 3 TUBO ENTRECRUZADO | ||
| 24 1 | RUDECILLA OSCILANTE | 50 | 1 | ADAPTADOR DE LA MANGUERA/REGULADOR (CG30354525) | |
| 25 | 2 RUDECILLA FIJA | ||||
Char Griller ^® Premier Specialty Brands, LLC, 5367 New Peachtree Road, Suite 150, Chamblee, GA 30341
Char Griller ^® Kamado Joe Europe, Lange Voorhout 86, 2514 EJ, Den Haag, Netherlands
Char Griller ^® Kamado Joe UK Limited, Cheyenne House West Street, Farnham GU9 7EQ
www.chargriller.com/pages/customer-support
www.chargriller.com/pages/customer-support
www.chargriller.com/pages/customer-support
| nr. | AANTAL OMSCHRIJVING | nr. | AANTAL | OMSCHRIJVING | |
| 1 1 | DEKSEL MET | SCHARNIER | 26 1 | ONDERSTE PLANK | |
| 2 1 | HANDGREEP | VOOR DEKSEL | 27 | 1 | MAGNEET AAN ONDERPLANKDEUR |
| 3 2 | ONDERSTE | DEKSELSCHARNIER | 28 2 | STEUNPEN | VAN DEUR |
| 4 2 | BOVENSTE | DEKSELSCHARNIER | 29 1 | ADAPTOR VOOR SLANG/REGELAAR (CG30354525) | |
| 5 1 | BAKPLAAT | 30 2 | VOORSTE DEUR | ||
| 6 1 | BESCHERMING | TEGEN WIND, ACHTER | 31 2 | HANDGREEP DEUR | |
| 7 2 | BESCHERMING | TEGEN WIND, ZIJKANT | 32 2 | HOUDER DEUR, BOVEN | |
| 8 4 | BRANDERBEUGEL | 33 1 | VOORBEUGEL, BOVEN | ||
| 9 4 | BRANDER | 34 1 | MAGNEET DEUR | ||
| 10 1 | HOOFDGEDE | DEELTE BAKPLAAT | 35 1 | LINKERPANEEL KAR | |
| 11 | 2 | ZIJPLANKBEUGEL (LINKERVOORKANT, RECHTERACHTERKANT) | 36 | 1 | GEHEEL VAN SLANG/KRAAN/REGELAAR (CG30354625) |
| 12 | 2 | ZIJPLANKBEUGEL (RECHTERVOORKANT, LINKERACHTERKANT) | 37 4 | KNOPPEN MET RODE AANDUIDING | |
| 38 4 | VATTING VAN KNOPPEN | ||||
| 13 1 | INKLAPBAPE | PLANK AAN RECHTERKANT | 39 1 | REGE-PANEEL | |
| 14 1 | GEREEDSO | HAPSHOUDER MET MAGNEET | 40 1 | CHAR-GRILLER®-BEELDMERKPLAATJE | |
| 15 1 | AFSCHERMING | VAN DEELTJES | 41 | 1 | ONTSTEKER |
| 16 1 | ACHTERPANEEL KAR | 42 1 | HITTEPLAAT | ||
| 17 2 | FLESAFSLUITINGSDRAAD | 43 1 | KEUKENPAPIERHOUDER | ||
| 18 1 | ACHTERPLAATJE | MET LOGO VAN KRUIDENREK | 44 1 | PLANK AAN LINKERKANT | |
| 19 1 | KRUIDENREK | 45 1 | VETBLIK | ||
| 20 1 | RECHTERPANEEL KAR | 46 1 | LUCIFERHOUDER | ||
| 21 2 | LINKERWIELBEUGELS | 47 | 1 | VETTRECHTER | |
| 22 | 2 RECHTERWIELBEUGELS | 48 4 | VONKTOPPEN MET DRAAD | ||
| 23 1 | BLOKKEERBAAR WIELTJE | 49 3 | OVERSTEEKBUIS | ||
| 24 1 | ZWENKWIELTJE | 50 1 | ADAPTOR VOOR SLANG/REGELAAR (CG30354525) | ||
| 25 | 2 VAST WIELTJE | ||||
LEES ALLE INSTRUCTIES AANDACHTIG, VOORDAT U BEGINT AAN DE MONTAGE.
Char Griller ^® Premier Specialty Brands, LLC, 5367 New Peachtree Road, Suite 150, Chamblee, GA 30341, VS
Char Griller ^® Kamado Joe Europe, Lange Voorhout 86, 2514 EJ Den Haag, Nederland
Char Griller ^® Kamado Joe UK Limited, Cheyenne House West Street, Farnham GU9 7EQ, VK
www.chargriller.com/pages/customer-support
www.chargriller.com/pages/customer-support
www.chargriller.com/pages/customer-support
Char Griller® Premier Specialty Brands, LLC, 5367 New Peachtree Road, Suite 150, Chamblee, GA 30341
Char Griller® Kamado Joe Europe, Lange Voorhout 86, 2514 EJ, Den Haag, Niederlande
Char Griller ^® Kamado Joe UK Limited, Cheyenne House West Street, Farnham GU9 7EQ
www.chargriller.com/pages/customer-support
www.chargriller.com/pages/customer-support
www.chargriller.com/pages/customer-support
Elenco delle parti
| N. Q.TÀ. DESCRIZIONE | N. | Q.TÀ. DESCRIZIONE | |||
| 1 1 | COPERCHIO CON CERNIERA | 26 1 | RIPIANO | INFERIORE | |
| 2 1 | MANIGLIA DEL COPERCHIO | 27 1 | MAGNETE | SPORTELLO RIPIANO INFERIORE | |
| 3 2 | CERNIERA DEL COPERCHIO INFERIORE | 28 | 2 PERNO SUPPORTO | SPORTELLO | |
| 4 2 | CERNIERA DEL COPERCHIO SUPERIORE | 29 1 | ADATTATORE | TUBO/REGOLATORE (CG30354525) | |
| 5 1 | PIASTRA | 30 | 2 | SPORTELLO ANTERIORE | |
| 6 1 | PARAVENTO POSTERIORI | 31 2 | MANIGLIA | SPORTELLO | |
| 7 2 | PARAVENTO LATERALI | 32 | 2 | SOCKET SPORTELLO SUPERIORE | |
| 8 4 | STAFFA DI SUPPORTO BRUCIATORE | 33 1 | RINFORZO | ANTERIORE SUPERIORE | |
| 9 4 | BRUCIATORE | 34 1 | MAGNETE | SPORTELLO | |
| 10 1 | CORPO PIASTRA DI COTTURA PRINCIPALE | 35 1 | PANNELLO | SINISTRO CARRELLO | |
| 11 | 2 | STAFFA PER RIPIANO LATERALE (ANTERIORE SINISTRA, POSTERIORE DESTRA) | 36 1 | GRUPPO | TUBO/VALVOLA/REGOLATORE (CG30354625) |
| 37 4 | MANOPOLE | CON INDICATORE ROSSO | |||
| 12 | 2 | STAFFA PER RIPIANO LATERALE (ANTERIORE DESTRA, POSTERIORE SINISTRA) | 38 | 4 | HERE MANOPOLE |
| 39 1 | PANNELLO | COMANDI | |||
| 13 1 | RIPIANO | LATERALE PIEGHEVOLE DESTRO | 40 1 | TARGHETTA | LOGO CHAR-GRILLER® |
| 14 1 | PORTAUTENSILI MAGNETICO | 41 1 | ACCENDITORE | ||
| 15 1 | PROTEZIONE ANTIPARTICELLE | 42 1 | SCUDO TERMICO | ||
| 16 1 | PANNELLO POSTERIORE CARRELLO | 43 1 | PORTAROTOLO | ||
| 17 2 | FILO ESCULSIONE SERBATOIO | 44 1 | RIPIANO | LATERALE SINISTRO | |
| 18 | 1 | PIASTRA POSTERIORE CON LOGO DEL CESTELLO PORTACONDIMENTI | 45 1 | VASCHETTA | RACCOGLI GRASSO |
| 19 1 | CESTELLO PORTACONDIMENTI | 46 1 | PORTAFIAMMIFERI | ||
| 20 1 | PANNELLO DESTRO CARRELLO | 47 1 | CONDOTTO | PER GRASSO | |
| 21 2 | STAFFE PER ROTELLA PIROETTANTE SINISTRA | 48 | 4 | PUNTE DELL'ACCENDITORE CON CAVO | |
| 22 | 2 STAFFE PER ROTELLA PIROETTANTE DESTRA | 49 | 3 | TUBO DI COLLEGAMENTO | |
| 23 1 | ROTELLA | PIROETTANTE BLOCCABILE | 50 1 | ADATTATORE | TUBO/REGOLATORE (CG30354525) |
| 24 1 | ROTELLA | PIROETTANTE | |||
| 25 | 2 ROTELLA PIROETTANTE FISSA | ||||
PRIMA DEL MONTAGGIO LEGGERE ATTENTAMENTE LE ISTRUZIONI
Char Griller ^® Premier Specialty Brands, LLC, 5367 New Peachtree Road, Suite 150, Chamblee, GA 30341
Char Griller ^® Kamado Joe Europe, Lange Voorhout 86, 2514 EJ, Den Haag, Netherlands
Char Griller ^® Kamado Joe UK Limited, Cheyenne House West Street, Farnham GU9 7EQ
www.chargriller.com/pages/customer-support
www.chargriller.com/pages/customer-support
www.chargriller.com/pages/customer-support
Reservdelslista
| Nr. ANTAL. BESKRIVNING | Nr. ANTAL. BESKRIVNING | ||||
| 1 1 | HÄNGANDE | LOCK | 26 1 | NEDERSTA HYLLAN | |
| 2 1 | LOCKHANDTAG | 27 | 1 | BOTTENHYLLA DÖRRMAGNET | |
| 3 2 | NEDRE | LOCKETS GÅNGJÄRN | 28 | 2 | DÖRRSTÖDSTIFT |
| 4 2 | ÖVRE | LOCKETS GÅNGJÄRN | 29 1 | ADAPTER FÖR SLANG/REGULATOR (CG30354525) | |
| 5 | 1 STEKHÄLL | 30 | 2 | FRAMDÖRR | |
| 6 | 1 BAKRE | VINDSKYDD | 31 2 | DÖRRHANDTAG | |
| 7 | 2 | SIDOVINDSKYDD | 32 | 2 | ÖVRE DÖRRHYLSA |
| 8 4 | FÄSTE | FÖR BRÄNNARSTÖD | 33 1 | ÖVRE FRÄMRE STAG | |
| 9 4 | BRÄNNARE | 34 1 | DÖRRMAGNET | ||
| 10 | 1 HUVU | DSTEKHÄLLENS STOMME | 35 1 | VAGNENS VÄNSTRA PANEL | |
| 11 | 2 | FÄSTE FÖR SIDOHYLLA (FRAM VÄNSTER, BAK HÖGER) | 36 | 1 | MONTERING AV SLANG/VENTIL/REGULATOR (CG30354625) |
| 12 | 2 | FÄSTE FÖR SIDOHYLLA (FRAM HÖGER, BAK VÄNSTER) | 37 | 4 | VRED MED RÖD INDIKATOR |
| 38 | 4 | VRED-BEZEL | |||
| 13 | 1 HÖGRA | FÄLLBARA SIDOHYLLAN | 39 | 1 | KONTROLLPANEL |
| 14 | 1 MAG | NETISK VERKTYGSHÄLLARE | 40 | 1 | CHAR-GRILLER® LOGOTYPSKYLT |
| 15 | 1 PART | IKELSKYDD | 41 | 1 | TÄNDARE |
| 16 | 1 VAGNENS | BAKRE PANEL | 42 1 | VÄRMESKYDD | |
| 17 | 2 | TANKENS AVSTÄNGNINGSLEDNING | 43 1 | HÄLLARE FÖR PAPPERSHANDDUK | |
| 18 | 1 TILLE | EHÖRSKORG LOGOTYP BAKPLATTA | 44 | 1 | HYLLA PÅ VÄNSTER SIDA |
| 19 | 1 TILLE | EHÖRSKORG | 45 1 | FETTSKÅL | |
| 20 | 1 VAGNENS | HÖGRA PANEL | 46 | 1 | TÄNDSTICKSHÄLLARE |
| 21 | 2 | VÄNSTER HJULFÄSTE | 47 | 1 | FETTSKÅL |
| 22 | 2 | HÖGER HJULFÄSTE | 48 | 4 | GNISTSPETSAR MED TRÅD |
| 23 | 1 LÅSE | ARA LÄNKHJUL | 49 | 3 | ÖVERKORSNINGSRÖR |
| 24 | 1 SVÄN | GBART LÄNKHJUL | 50 | 1 | ADAPTER FÖR SLANG/REGULATOR (CG30354525) |
| 25 | 2 | FAST LÄNKHJUL | |||
LÄS ALLA INSTRUKTIONER NOGGRANT FÖRE MONTERING
Char Griller ^® Premier Specialty Brands, LLC, 5367 New Peachtree Road, Suite 150, Chamblee, GA 30341
Char Griller ^® Kamado Joe Europe, Lange Voorhout 86, 2514 EJ, Den Haag, Nederländerna
Char Griller ^® Kamado Joe UK Limited, Cheyenne House West Street, Farnham GU9 7EQ
www.chargriller.com/pages/customer-support
www.chargriller.com/pages/customer-support
www.chargriller.com/pages/customer-support


natural_image
3D rendering of a flatiron industrial machine with labeled components and directional arrows indicating assembly or movement (no text or symbols beyond branding)