
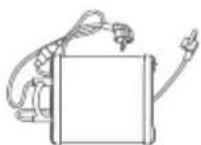
eScooter E150S - Electric scooter SEGWAY - Free user manual and instructions
Find the device manual for free eScooter E150S SEGWAY in PDF.

| Product type | Electric scooter |
| Brand and model | Segway eScooter E150S |
| Dimensions (L × W × H) | 1 859 × 691 × 1 161 mm |
| Weight (without battery) | 97 kg |
| Wheelbase | 1 360 mm |
| Battery | Li-ion, 74 V, 27 Ah (2 000 Wh), IPX7 |
| Charger | 200-240 V AC, 50-60 Hz, 84 V DC, 12 A |
| Charging time (one battery) | Approximately 2.5 hours |
| Maximum speed | 45 km/h |
| Range (WMTC, one battery) | 57 km |
| Maximum motor power | 3.6 kW |
| Maximum torque | 138 N·m |
| Brakes | Front: 220 mm disc, Rear: 200 mm disc, dual-channel ABS |
| Tires | Front: 90/80-12 tubeless (200 kPa), Rear: 110/70-12 tubeless (220 kPa) |
| Suspensions | Front: hydraulic and spring, Rear: adjustable spring |
| Vehicle IP rating | IPX5 |
| Connectivity | Wi-Fi (2.4/5 GHz), Bluetooth 5.3, 4G LTE |
| Smart functions | NFC, AirLock, navigation, GPS, OTA, cruise control, regulator, reverse, hill hold |
| Maintenance and cleaning | Clean with water and neutral detergent, do not use corrosive solvents |
| Safety | Wear a helmet and protective gear, do not drive under influence, check brakes and tires before each trip |
| Spare parts and repairability | Use only parts approved by Ninebot/Segway, contact an authorized repairer |
| Warranty | Limited warranty, see maintenance and service document |
Frequently Asked Questions - eScooter E150S SEGWAY
User questions about eScooter E150S SEGWAY
0 question about this device. Answer the ones you know or ask your own.
Ask a new question about this device
Download the instructions for your Electric scooter in PDF format for free! Find your manual eScooter E150S - SEGWAY and take your electronic device back in hand. On this page are published all the documents necessary for the use of your device. eScooter E150S by SEGWAY.
USER MANUAL eScooter E150S SEGWAY
Thank you for choosing Segway eScooter. This product can be registered as a scooter vehicle.
Combining advanced wireless positioning technology and smart app control, the Segway eScooter promises a brand-new riding experience.
natural_image
Line drawing of a scooter with front wheel, backrest seat, and visible engine components (no text or symbols)
Segway Mobility app
Please read the user manual carefully to fully understand the vehicle's usage and maintenance methods. Please note that the pictures shown are for illustration purposes only. The pictures do not refer to a specific product. The actual product may vary. No legal claims can be made on the basis of data in this manual.
Contents
- Overview 002
- Package and Functions 007
- Advanced 019
- First Use 024
- Learn to Ride 027
- Installation of Lithium-ion Battery 028
- Installation of Additional Battery (optional) 031
- Charge 033
- Common Faults and Solutions 034
- Maintenance 038
- Specifications 041
- Certifications 042
- Trademark and Legal Statement 043
1. Overview
IMPORTANT
For the purpose of emphasis, the words and symbols of "WARNING" (⚠️) "CAUTION" (⊗), and "NOTE (*)" have special meanings. Pay extra attention to information highlighted by these signals:
WARNING indicates a potential hazard that could result in death or serious injury.
CAUTION ✗ indicates a potential hazard that could result in minor or moderate injury.
NOTE (*) indicates information that makes installation and maintenance easier.
\*NOTE
You must thoroughly understand the user manual before riding the Segway eScooter. This manual should be considered a permanent part of the vehicle and should remain with the vehicle if or when ownership is changed.
\*NOTE
Read the Service and Maintenance Record carefully to understand your vehicle's coverage, as well as your rights and responsibilities.
WARNING
- Check and obey all local laws or regulations on motorcycle driving in your region or country.
- Do not ride through deep water, submerge the vehicle, or wade in water for a long time. The battery will be damaged, and it will cause serious damage to the scooter.
- You must wear a helmet and protective gear when riding at all times.
- Improper decorations and modifications may result in fatal injury. We strongly advise that you do not modify your Segway eScooter or remove any original equipment. Changing its original design or operation will be dangerous and will void the warranty.
- Do not use a high-pressure washer hose directly on the electrical components.
Riding Safety
● Remember that whenever you ride this product, you risk injury from loss of control, collisions, and
falls. To reduce the risk, you must read and follow all "CAUTION" and "WARNING" notices. Please understand that you can reduce the risk by following the instructions and warnings in this manual, but you cannot eliminate all the risks. Please use common sense when riding.
- In order to master riding skills, practice is necessary. Use with caution to avoid falls or collisions causing injury to yourself or others. Neither Ninebot Inc., which means Ninebot (Beijing) Tech Co., Ltd. and its subsidiaries and affiliates, nor Segway Inc. would be responsible or liable for any injuries, damage, or legal disputes caused by the rider's inexperience or fault in following the instructions indicated in this manual.
- When entering public places, always comply with the local laws and regulations.
- Do not modify the scooter or change parts by yourself. Use only Ninebot or Segway-approved parts and accessories. Any modifications to your scooter could interfere with its operations, result in serious injury and/or damage, or void the Limited Warranty. If you need to replace any component, please contact after-sales service or an authorized dealer.
- If the scooter makes abnormal sounds or signals an alarm, stop riding immediately. Contact after-sales service for advice.
Who Should Not Ride:
Those who should not ride the Segway eScooter include:
I. Underaged people (according to local laws and regulations).
II. Anyone under the influence of alcohol, drugs, or intoxicants.
III. Anyone who suffers from diseases that put them at risk if they engage in strenuous physical activity.
IV. Pregnant women.
V. Those with compromised mental abilities who cannot understand the risks and proper operation of the vehicle.
Riding Surfaces and Environments:
- It is highly recommended not to drive in extreme weather conditions for your safety.
- Slow down and ride with care on complex road conditions. Segway eScooter might lose control if ridden at high speeds to pass obstacles, on bumpy roads, low-traction surfaces (including, but not limited to, wet ground, loose sand, loose gravel, and ice), and when riding on slopes or making sharp turns.
- When riding in rainy or snowy weather, the traction is reduced and the braking distance is increased. For your safety, please drive slower and brake earlier to reduce the risks of loss of control and falls.
Before Riding:
- DO NOT carry objects on the handlebar. Any load attached to the handlebar will affect the stability of the vehicle.
● Always wear appropriate shoes, clothing, and protective gear when riding. Use an approved motorcycle helmet that fits properly with the chin strap in place and protects the back of your head. - Before each ride, inspect the brakes system and tire conditions and make sure there are no loose or damaged parts.
- DO NOT allow anyone to ride the scooter on their own unless they have carefully read this manual. The safety of a new rider is your responsibility. Assist new riders until they are comfortable with the basic operations. Make sure each new rider has gone through the New Rider Tutorial and is made fully aware of the safety precautions.
- When the remaining battery is less than 20% , charge the scooter in time with the original charger. Please regularly check the lights, tire pressure, tire tread, brake cable, rear-view mirrors, and other components to ensure they function properly.
Instructions on Riding and Usage:
- Be cautious and always keep a safe distance between you and others when riding. In all cases, take care of yourself and others.
● DO NOT touch moving or spinning tires.
● To ride safely, you must be able to see what is in front of you and you must be visible to others. - Riders must be able to hear the environment around them.
● ONLY ride on flat, paved surfaces. DO NOT accelerate or brake abruptly when driving. - Stay alert when driving and always keep a safe distance from other vehicles. Slow down when entering a new environment.
-
Please hold the handlebar with both hands to avoid serious injuries due to loss of balance or falling. DO NOT use a cell phone, camera, headphones, or earbuds, or perform any other activities while riding.
-
Slow down when approaching intersections, motorways, corners, doors, etc. Yield the right of way for pedestrians, bicycles, and motor vehicles.
- If any abnormality occurs, stop riding immediately and contact the after-sales service in time. DO NOT ride before the cause of the abnormality is found out and repaired.
● Always park the vehicle on a flat surface after turning it off. Otherwise, the vehicle may slip and cause harm to you or others.
After Each Ride:
- Allow the eScooter to cool down before charging. DO NOT attempt to charge the eScooter, if the power outlet is wet.
- As with any electronic device, use a surge protector when charging to help protect your eScooter from damage due to power surges and voltage spikes.
- DO NOT touch the brake system, it could cause injuries due to sharp edges. The brake may become hot in use, DO NOT touch after use.
Others:
- For a better riding experience, it is recommended to conduct regular maintenance of the product.
- If the eScooter makes an abnormal sound or signals an alarm, stop riding immediately and DO NOT use it until the cause of the noise/alarm has been identified and corrected. Contact after-sales service for assistance.
- The use of the machine results in the transmission of vibrations throughout the rider's body.
- WARNING! As with any mechanical component, a vehicle is subject to high stresses and wear. The various materials and components may react differently to wear or fatigue. If the expected service life for a component has been exceeded, it may break suddenly, therefore causing injuries to the user. Cracks, scratches and discoloration in the areas subject to high stresses indicate that the component has exceeded its service life and should be replaced.
- Accessories and any additional items which are not approved by the manufacturer shall not be used.
Warnings and Precautions
Potential safety hazards involved.
Avoid all dangerous driving activities!
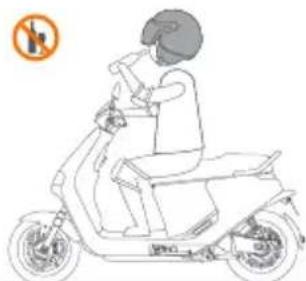
natural_image
Line drawing of a person riding an electric scooter with a no-smoking symbol (no text or labels)
DO NOT drive under the influence of alcohol, drugs, or intoxicants!
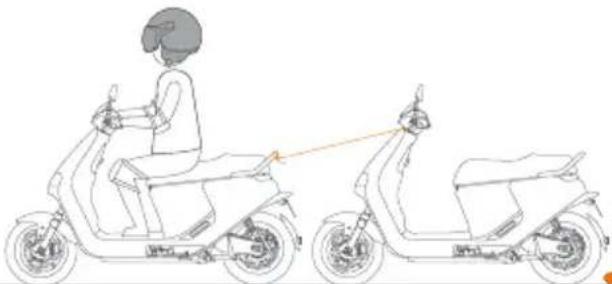
natural_image
Line drawing of a person riding an electric scooter, showing front and side views (no text or symbols)
Do not tow other vehicles.
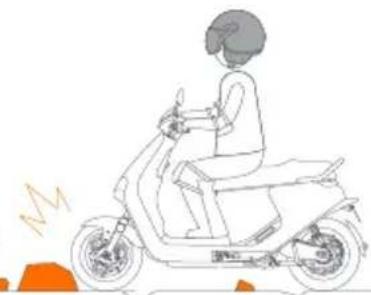
natural_image
Line drawing of a person riding a scooter with motion lines indicating speed (no text or symbols)
Slow down and ride with care on complex road conditions.
natural_image
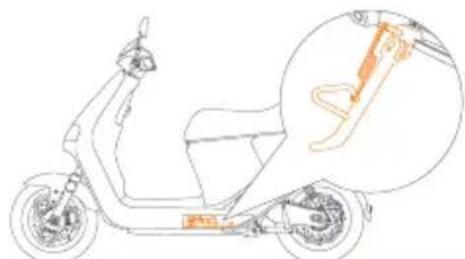
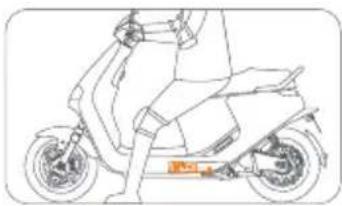
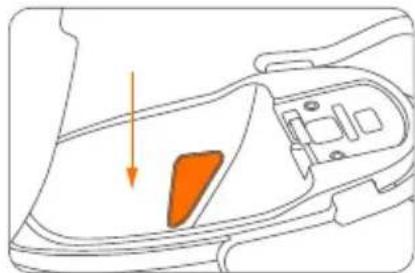
Line drawing of a scooter with a highlighted section showing the blade and seat (no text or symbols)
Always park the vehicle on a flat surface; otherwise, the vehicle may slip or tip over, causing harm to yourself or others.
natural_image
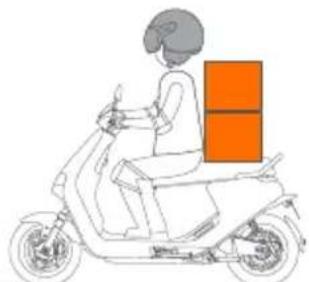
Line drawing of a person riding a scooter with an orange box on the back (no text or symbols)
Never use the Segway eScooter to carry any cargo.
natural_image
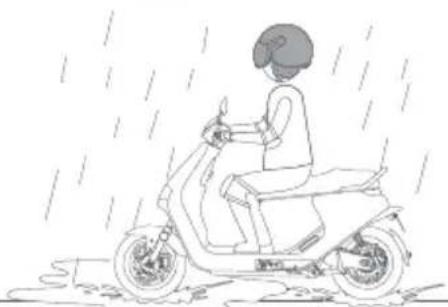
Line drawing of a person riding a scooter in rain, no text or symbols present
DO NOT drive during bad weather or when fatigued.
[Non-Text]
Slow
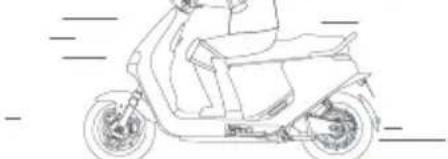
natural_image
Line drawing of a scooter with visible wheels and seat (no text or symbols)
Ride slowly and attentively.

Always slow down before making a turn.
natural_image
Top-down schematic of a boat's interior layout with no visible text or symbols
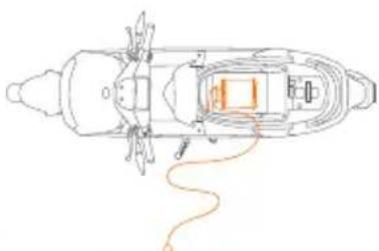
Never charge with the battery charger left in the seat bucket.
natural_image
Line drawing of a person riding a scooter with a handheld device (no text or symbols)
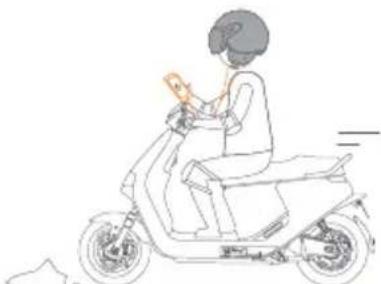
DO NOT use mobile phones, cameras, headphones, earplugs, and the like when riding.
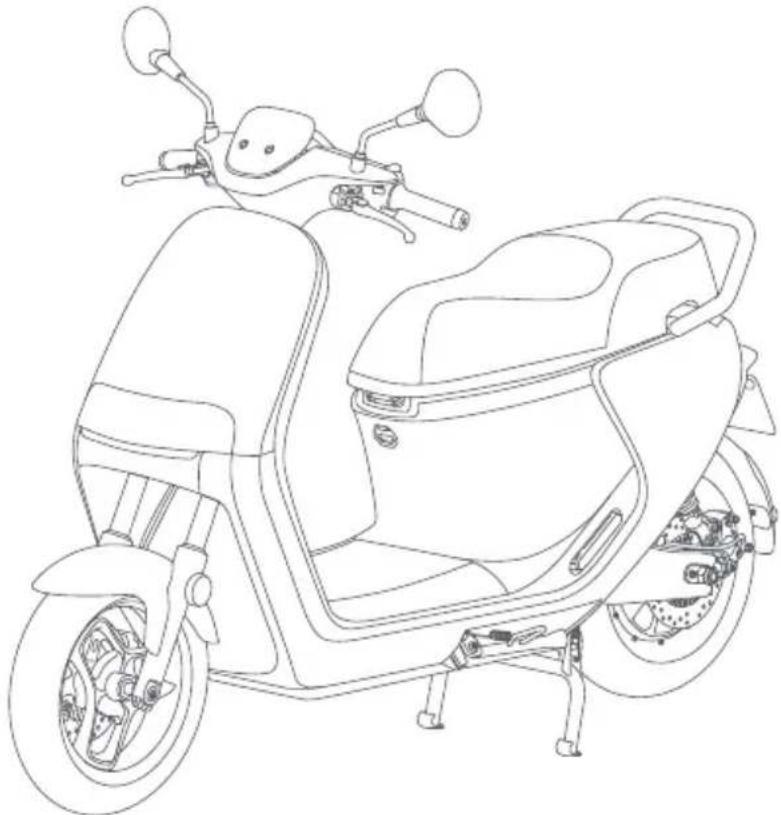
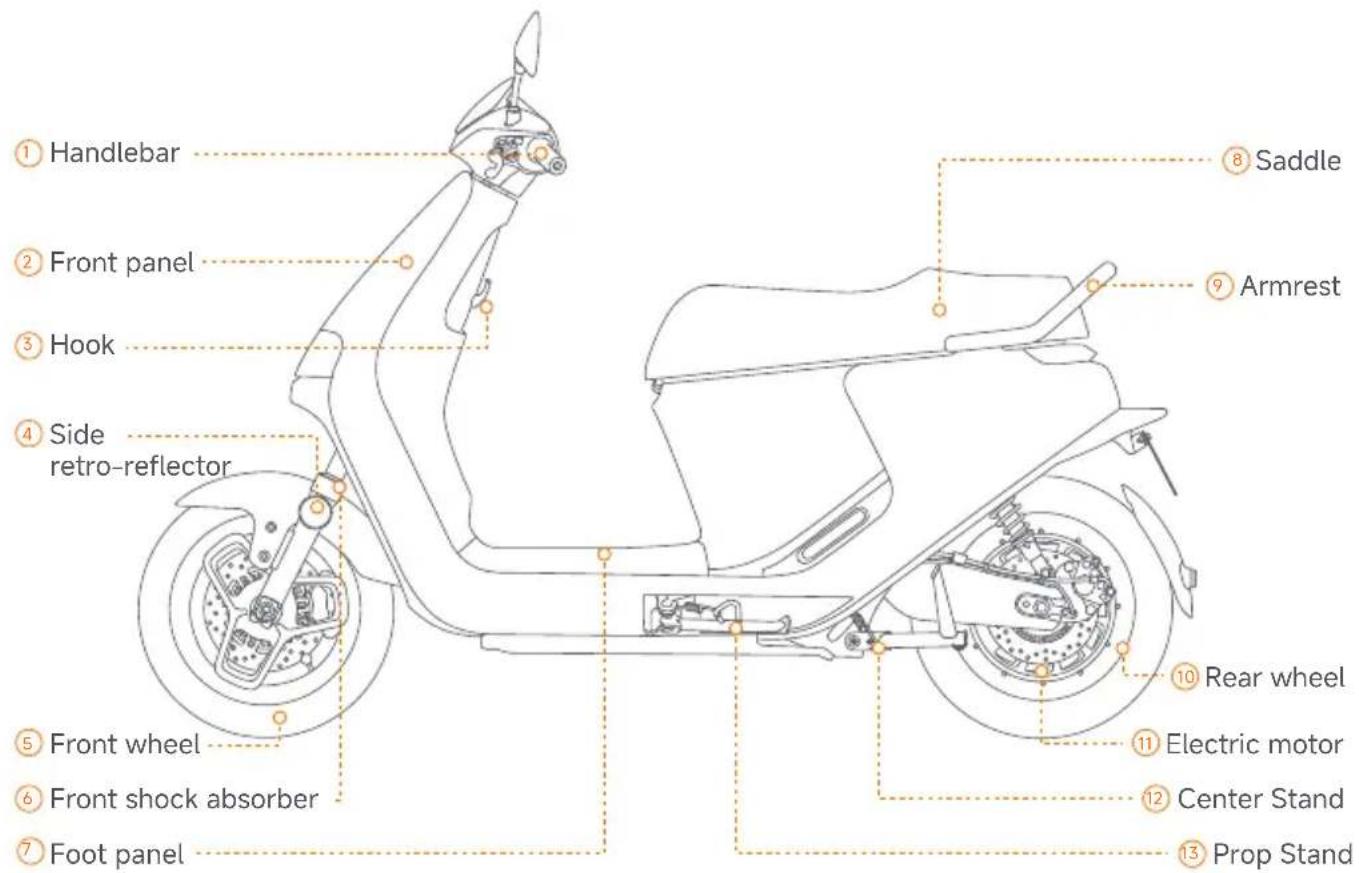
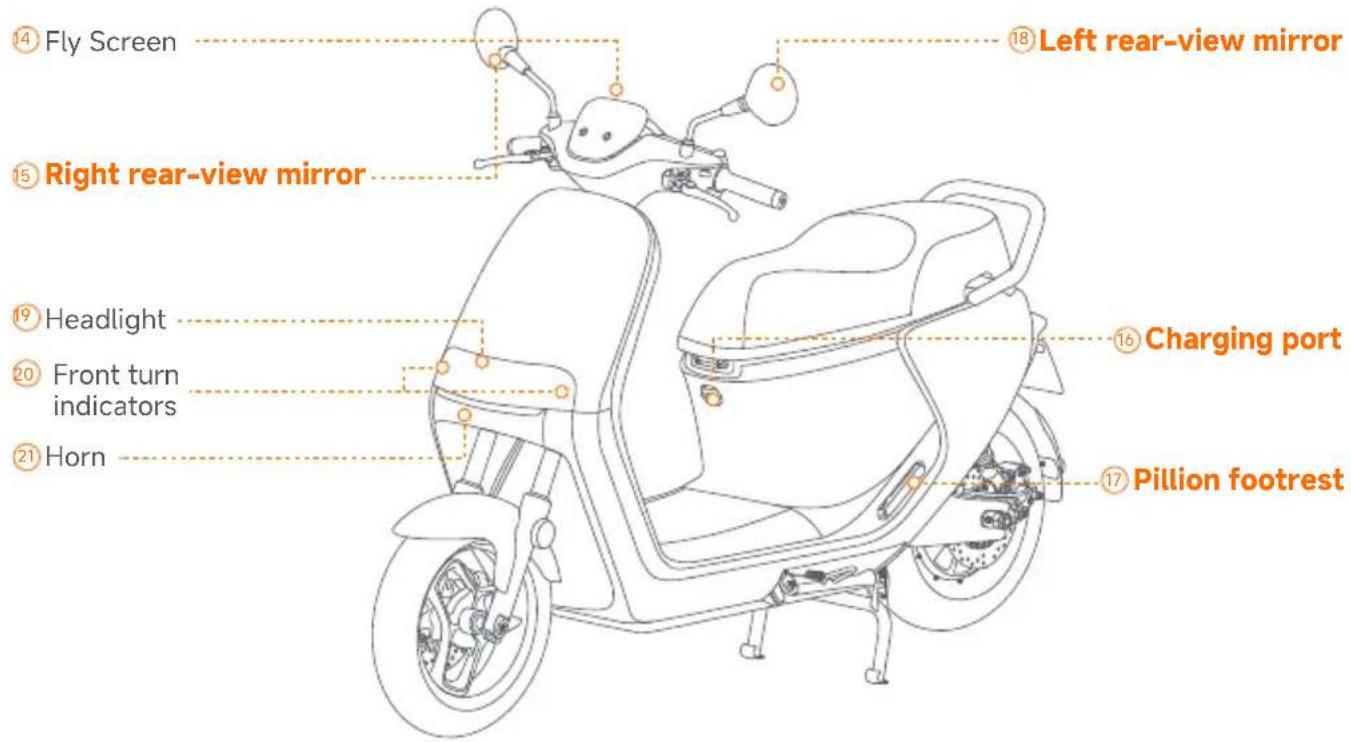
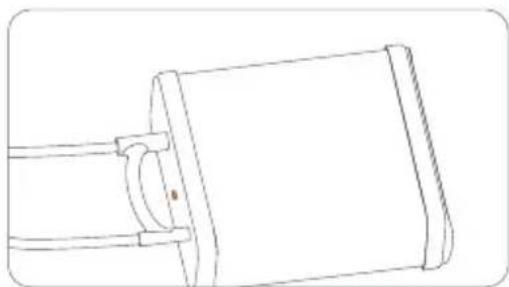
2. Package and Functions
Vehicle
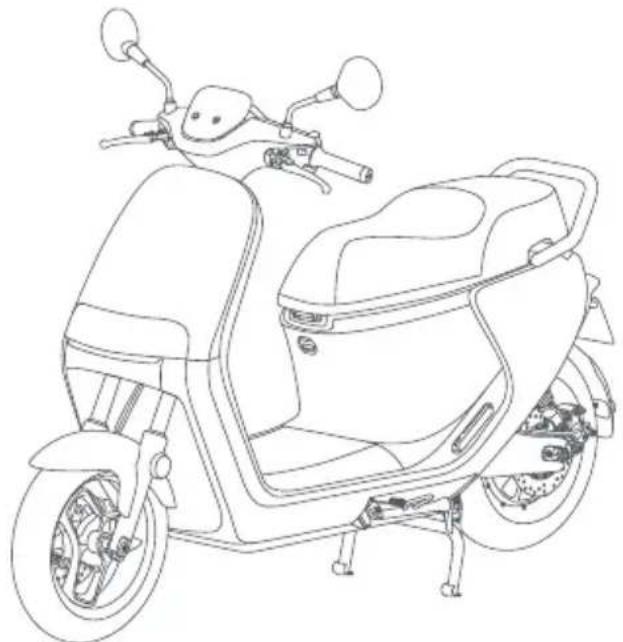
natural_image
Line drawing of a scooter with front wheel, rear seat, and side-mounted sensors (no text or symbols)Accessories

User manual × 1 CoC × 1 RightArefteareMaiminamarel
Record × 1


Portable NFC card × 1NFC card × 1

Key× 1 Spare key× 2

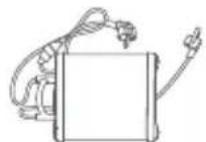
Battery charger × 1
• The battery charger may differ in each country.
When unpacking, please check if all items are in good condition. If there are any missing or defective parts, please contact your dealer or the after-sales service.
To avoid damage to vehicle parts or to avoid accidents, please consult with your dealer for service and vehicle adjustment.
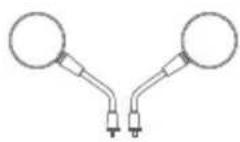
Parts and Functions
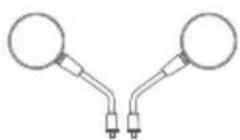
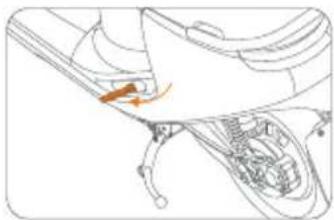
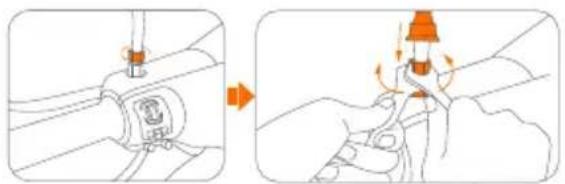
⑤⑧ Rear-view mirror installation
a. Unscrew bolt B, as shown in the picture.
b. Mount onto the handlebar and affix the bolt.
c. Screw the rear-view mirror into the bolt counterclockwise. Turn bolt A until it comes into contact with bolt B.
d. Tighten the bolts in the opposite direction with the wrenches. Slide down the protector to cover the bolts.
natural_image
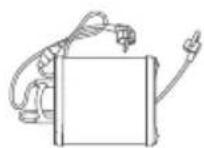
Illustration showing two-step cable installation process: one with a valve and switch, the other with a plug inserted into a socket (no text or symbols)⑥ Charging port
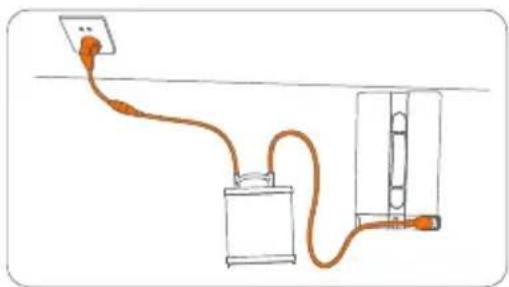
Charge the Vehicle
Please power off the Segway eScooter before charging.
natural_image
Diagram of a mechanical device with orange components and motion arrows, no visible text or symbolsThe charger indicator turns green when the battery pack is fully charged.
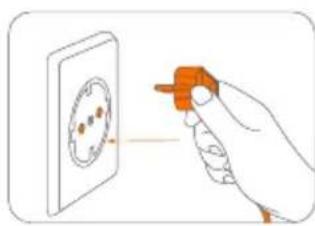
natural_image
Illustration of a hand holding an orange tool near a wall-mounted socket (no text or symbols)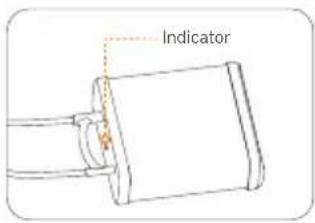
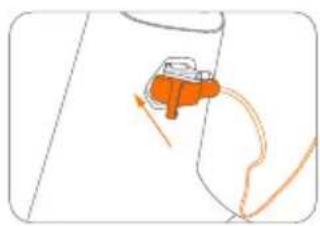
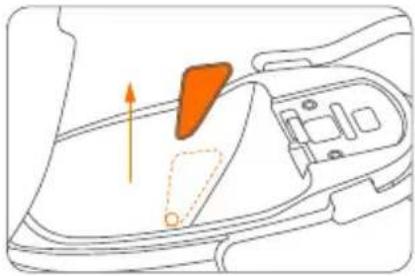
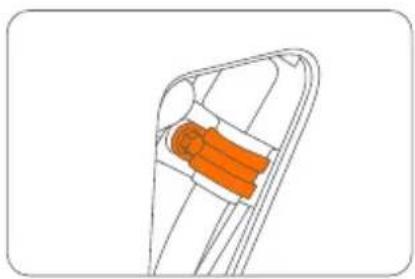
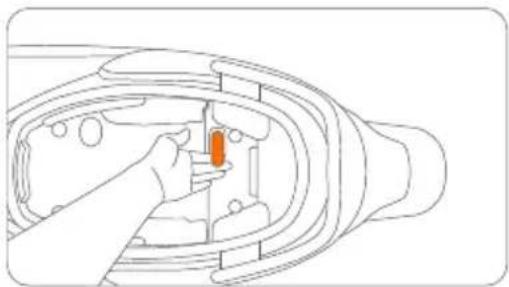
17 Pillion footrest
Open:
Push the footrest, and it will pop out automatically.
natural_image
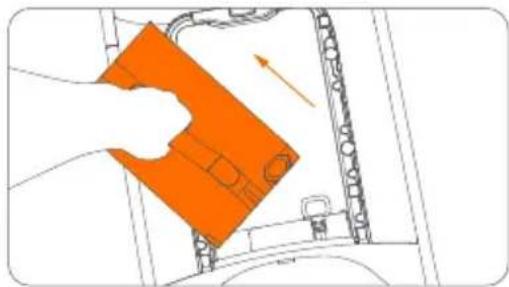
Diagram of a car's engine compartment showing internal components and a highlighted orange arrow (no text or labels)Close:
Push the footrest inward.

natural_image
Technical line drawing of a mechanical component with an orange arrow indicating a specific part (no text or symbols present)
Combination lock
*After unlocking with the key, be sure to remove the key! This is to prevent accidental locking and ensure a smooth ride.
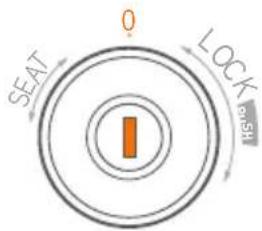
0
Vehicle in normal condition
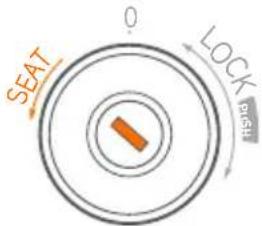
Turn left
The seat cushion pops open, and the key automatically resets
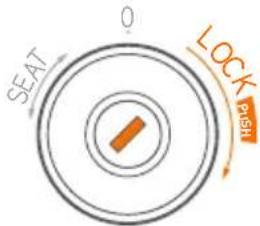
Turn right to the end
1 Turn the key right to the end until you hear a click and the key will stay in the most right position, then the handlebar lock will be disenganged.
② Press the key down into the lock, the key will automatically reset it's position to the middle and handlebar lock will be engaged.
Dashboard Language
Operation instructions
Tap "More Functions" in the APP → Tap "Dashboard Language" → Select the corresponding language → Complete the dashboard language setting


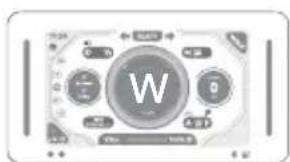
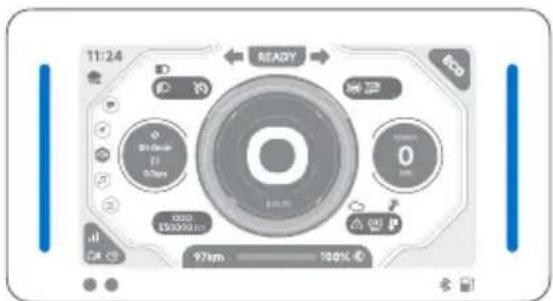
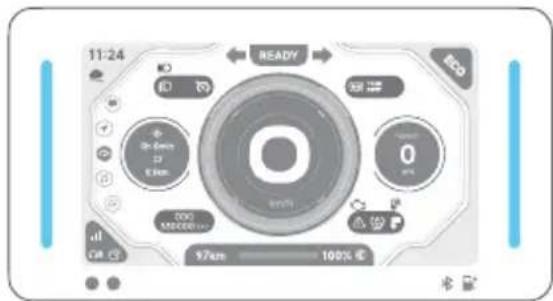
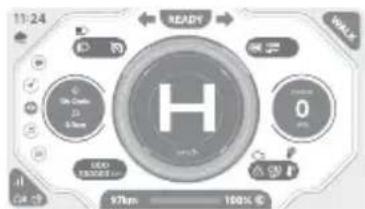
Dashboard
*Dashboard layout is subject to change via over the air software updates. Particular content may differ per region.
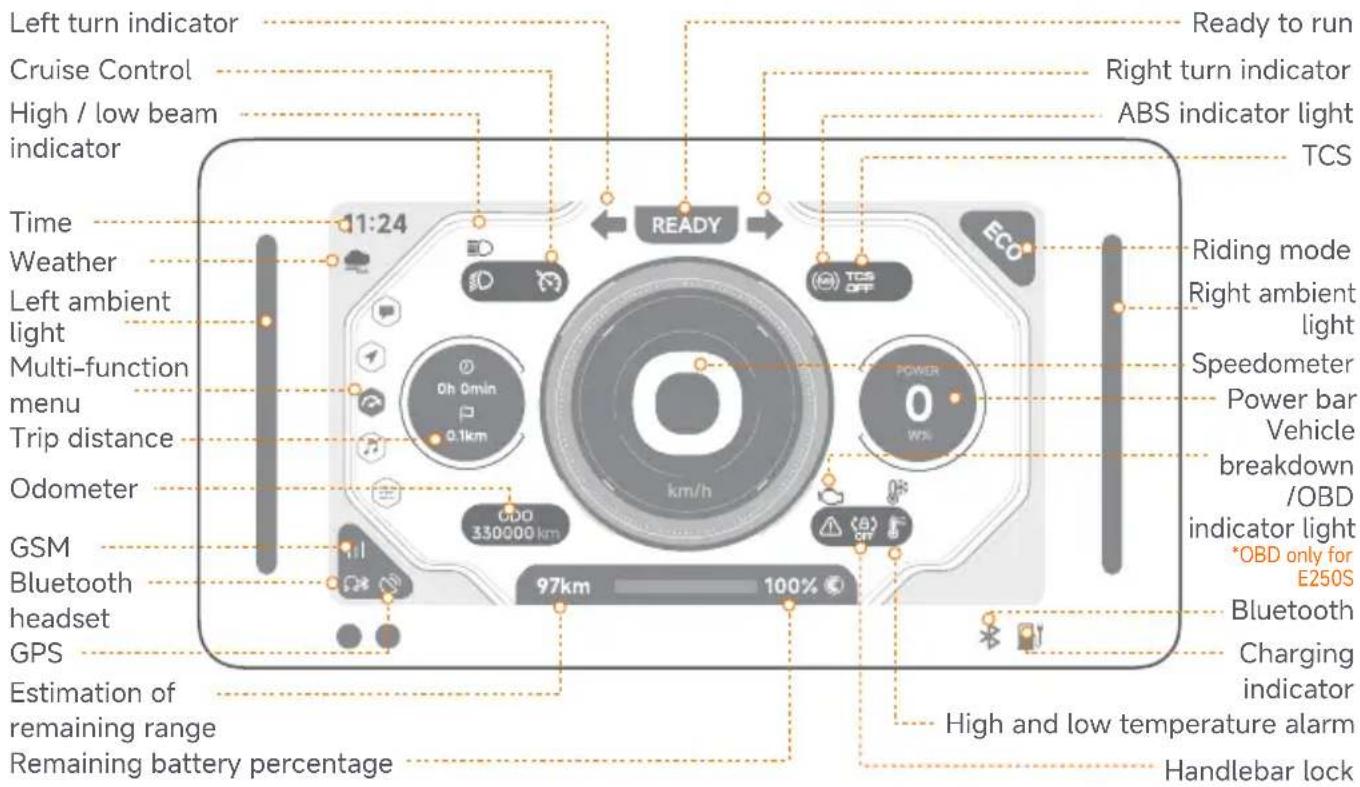
Riding mode details
【Walk Assist Mode】
- push assistance
-3 km/h speed limit
·full torque driven
natural_image
Close-up of a digital camera interface with no visible text or symbols on the device itself.【Eco Mode】
· better mileage performance
· self-adaptive torque driven
· automatic energy recovery
natural_image
Close-up of a control panel with rotary buttons and a central dial (no readable text or symbols)【Sport Mode】
·for cruising in city
·full torque driven
· passive energy recovery

-for furious riding
-full torque driven
·active energy recovery
*Available under parking state only
Display ambient light
[Orange] Pre-start/Not ridden/Side stand not retracted
[Red] Vibration alarm/fault/throttle not ready
[Green] Recovering energy
[Light blue] Ready to ride
[Dark blue] Riding/Sensor Unlocking/Push Assist
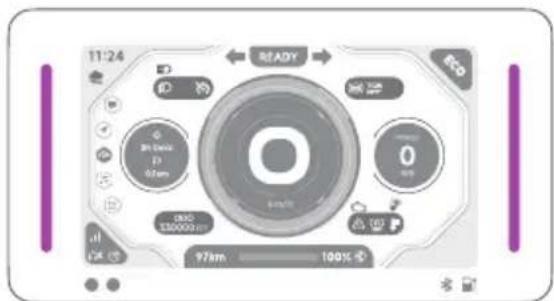
[Purple]
Cruise Control/Boost
*Note: The colors shown in the printed manual (Orange, Green, Red, etc.) are for reference only. The actual vehicle color may vary.
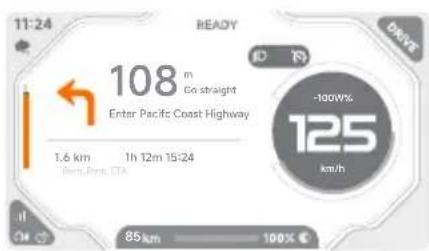
| Dashboard symbols | Symbol name | Symbol explanation |
| [60K4] | Bluetooth | The vehicle is connected to a phone when it lights up. |
| [BK3X] | Charging indicator | It lights up red when charging and turns off when fully charged. |
 | Ready to run | When this indicator is on, it indicates the vehicle is ready to ride. |
  | Turn indicators | The left indicator light flashes for a left turn, the right indicator light flashes for a right turn, and both flash simultaneously for hazard warning lights. |
 | Low beam | The indicator light comes on when the vehicle's low beam headlights are on. |
 | High beam | The indicator light comes on when the vehicle's high beams are on. |
| [X3S8] | ABS indicator | The indicator light is off when the vehicle is working normally.If the symbol stays on when the speed is ≥ 5 km/h, it means there is an error in the ABS. |
| [H27C] | System fault indicator light | This indicator light comes on when there is a fault in the vehicle system. |
 | Vehicle breakdown / OBD error | This indicator will flash once when powering on; This indicator will light up when the vehicle has an electric malfunction, and the error code will be displayed on the dashboard. |
| [6W30] | Handlebar lock | This indicator comes on when the handlebar lock is disabled. |
 | High temperature warning | When the red indicator light is on, the battery temperature is higher than 53°C. |
 | Low temperature warning | When the blue indicator light is on, the battery temperature is below -10°C. |
| [844K] | Weather | Displays real-time weather forecast for your current location.If the weather cannot be obtained, it will not be displayed. |
 | GSM | Displays the mobile network signal strength, supporting three levels of strength and no-signal status. |
  | Bluetooth headset | The indicator light comes on when the Bluetooth headset is connected to the vehicle.Displays GPS signal, supporting two levels of strength and no-signal status.GPS |
| ODO | Odometer ODO | shows total distance travelled by the vehicle. |
| TRIP | Trip distance | TRIP shows the accumulated distance traveled since the vehicle was powered on. |
 | Remaining range | The estimated range that can be traveled with the current remaining power is indicated.There are two types of estimated range: regular estimated range and precise endurance, and users can switch between them in the app. |
| Remaining battery percentage | Displays the current remaining battery percentage and turns red when the battery is less than 20%. | |
 | Gear display | Indicates the current gear. |
 | Speedometer | Speedometer displays current vehicle speed.When vehicle mode is being changed a letter symbolising the mode is displayed briefly instead of speed. Following letters can be shown:A - push assistH - hill parkingP - parkingR - reverse riding |
| [6994] | Power output Displays the current power. | |
 | Cruise mode | It indicates that the vehicle is in cruise mode. |
 | Clock Indicates local time based on data from mobile network. | |
 | TCS | Traction Control System prevents wheels from slipping.When the indicator light turns on, it means the TCS system is turned off. TCS can be enabled in the Segway Mobility app. |

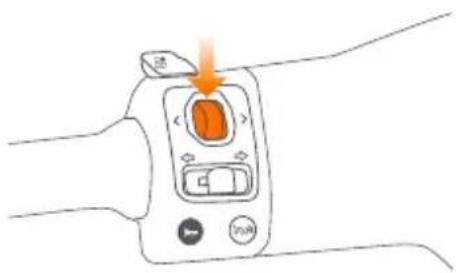
Controller switch
Left combination switch Right combination switch
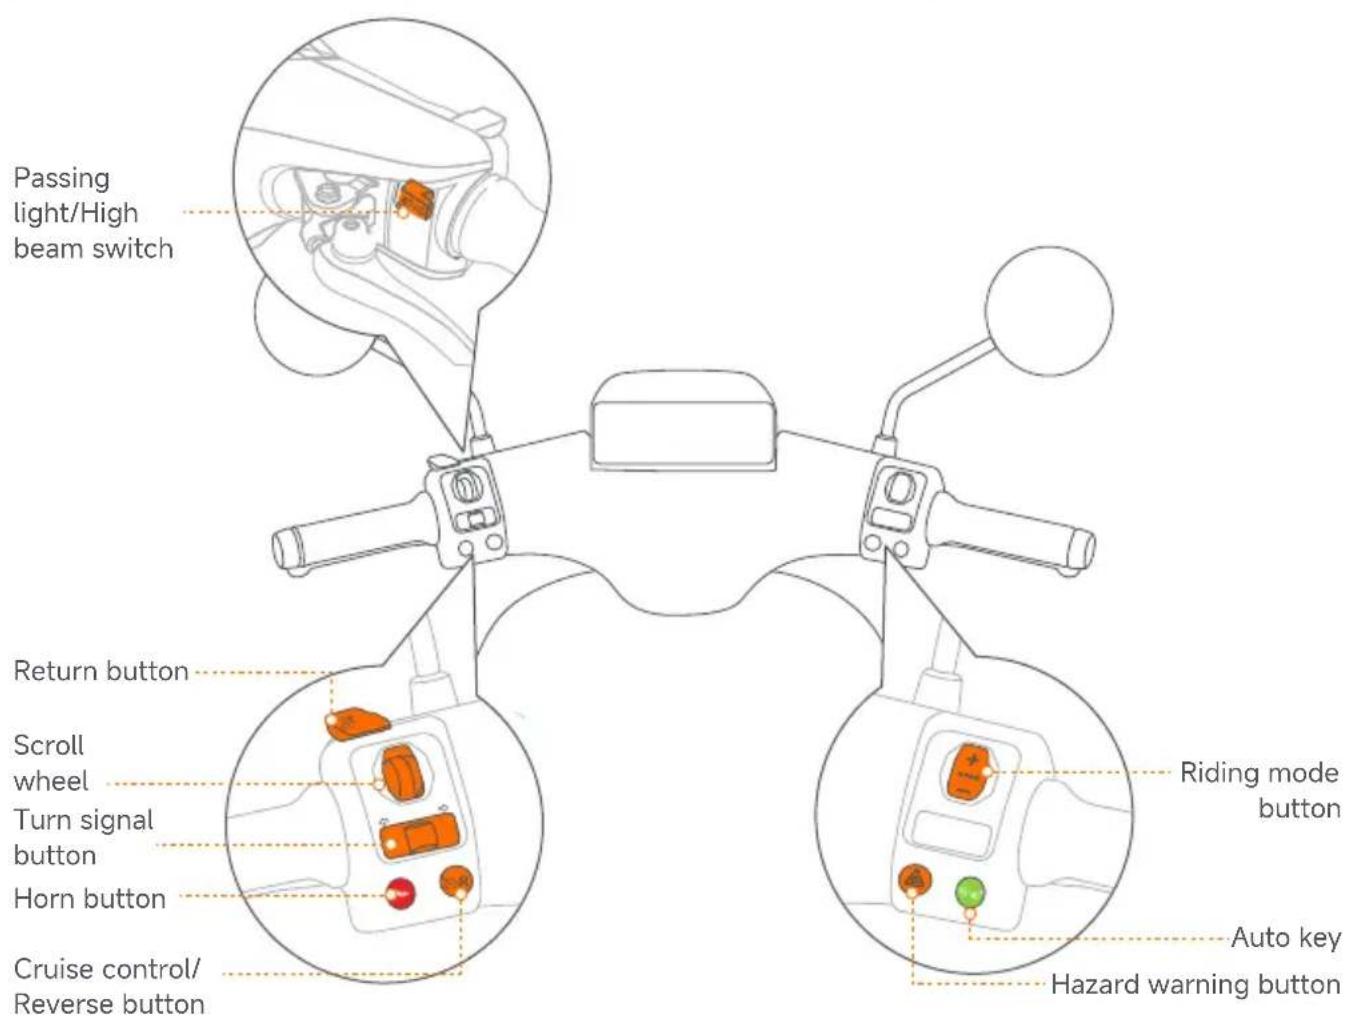
| Button Button formation explanation | ||
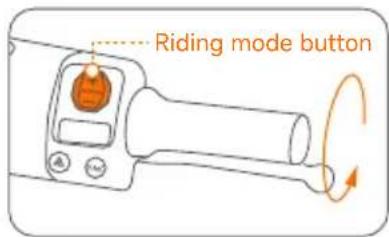
 | Riding mode button | While the vehicle is running: Briefly press upward to upshift, increasing the vehicle's acceleration.Press down to downshift, and the vehicle acceleration will decrease.The modes are arranged in following order: Assist, Eco, Coast, Fur |
 | Hazard warning button | Pressing this button activates simultaneous flashing of the vehicle's left and right turn indicator lights to alert pedestrians and other vehicles. |
 | Auto key | When the vehicle is on, double-press to open the seat bucket or press and hold to switch off the vehicle. If the AirLock is enabled in the App, hold this button while the paired phone is within range to turn on the vehicle. When the side stand is folded up and the rider is on the seat, press this key and READY indicator is on. |
 | Passing light/High beam switch | In default position low beam headlights are turned on. High beam headlights are turned on by pushing away the switch. Pulling the switch back to it's default position will turn off the high beam headlights. Briefly pressing the switch towards the rider will flash the high beam headlights. |
 | Scroll wheel | Scroll up: Move up Shift left: Move leftScroll down: Move down Shift right: Move rightPress the scroll wheel down:select menu item |
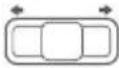 | Turn signal button | When the button is moved to a side, the turn indicator light of that side is activated.Upon release the button comes back to the middle position with turn indicator light still being active. Pressing the button in the middle position turns off the turn indicator light. |
 | Horn button Press this button to sound the horn to alert pedestrians or vehicles. | |
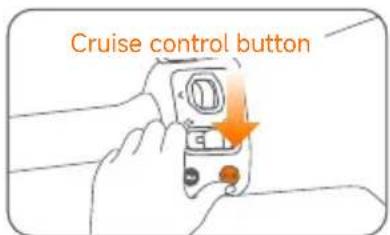
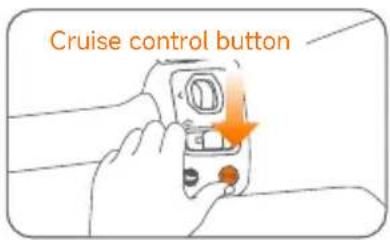
 | Cruise control/Reverse button | While riding, single press will start cruise control, and the vehicle will move forward at the current speed even after throttle is released to it's original position.When stopped, single press will activate hill parking mode, press and hold will activate reverse riding mode and triple click with long press the third time will activate emergency riding mode. |
 | Return button | When a pop-up window appears, press return button to close it.After the multimedia is enlarged, press return button to minimize the multimedia.When the multimedia is minimized, press return button to return to the dashboard. |
3. Advanced
Scroll wheel
natural_image
Line drawing of a hand holding an orange device with control buttons and a scroll (no text or symbols)Function introduction:
● The scroll wheel supports up and down scrolling, left and right shifting, and pressing the button.
- When the multimedia is zoomed in, the scroll wheel controls the multimedia functions on the interface.
- When the multimedia is not magnified, scrolling the wheel up or down can switch between different multimedia functions.
- In the music playback interface, left and right shifts are supported for switching tracks.
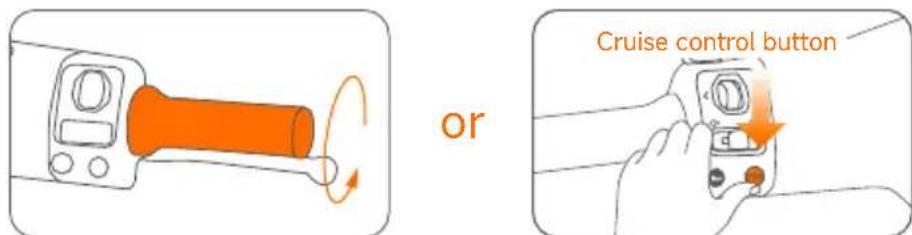
Auto Slope Parking
* This function is intended for temporary parking on complex roads, such as slopes, and is not a substitute for mechanical parking.
a. Press Cruise control button once or squeeze and hold brake lever for 3 seconds under 0 km/h.
b. Auto Slope Parking function is on while "H" appears on dashboard.
or
2. Disable
- Press the Cruise control button or twist the throttle to exit. (*Switching to parking mode or powering off will exit hill parking mode. Please use it with caution.)
or
natural_image
Diagram of a mechanical lever with orange shaft and circular head, showing rotational motion (no text or symbols)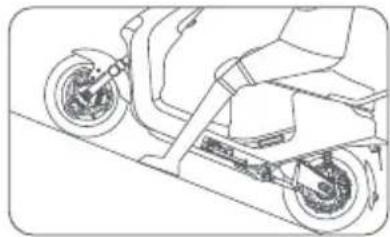
natural_image
Line drawing of a scooter on a ramp, showing wheel and suspension components (no text or symbols)Smart Cruising
* The max speed of Smart Cruising is 5 km/h lower than the max speed of the Walk Mode, Eco Mode, Drive Mode, Sport Mode, respectively.
1. Enable
Press the Cruise control button to enter Cruise Mode while riding.
2. Adjust the speed
In Cruise Mode, each press of the Riding mode button adjusts the speed by 5 km/h.
Pressing and holding the Riding mode button can adjust the speed by 1 km/h continuously.
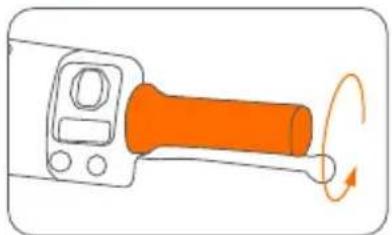
natural_image
Illustration of a handheld device with an orange handle and circular motion arrows indicating rotation (no text or symbols)3. Accelerating
Under Cruise Mode, the user can accelerate the vehicle by twisting the throttle without exiting Cruise Mode. The vehicle will decelerate to the set cruise speed if the rider releases the throttle after accelerating.
4. Exit
Press the Cruise control button again or pull either brake lever to exit Cruise Mode.
Reverse function
*When reversing, the vehicle speed limit is 3 km/h.
1. Enable
Press and hold Cruise control button at zero speed. When a "beep beep" sound is heard, the vehicle has entered reverse mode.
2. Reversing
Twist the throttle to reverse the vehicle.
3. Exit
After reversing to the appropriate position, release the Cruise control button and the throttle, then twist the throttle again to ride forward.
Emergency Riding Mode
This mode is designed by Segway to provide users with a restricted riding function, allowing them to ride the vehicle to a designated location (e.g., a service point or desired location) even when the vehicle is unable to function normally in certain situations.
This mode is applicable to situations including, but not limited to:
a. When the vehicle experiences partial malfunctions, such as Fault Code 14, etc.
b. When the display goes black or certain functions fail.
c. Other electronic malfunctions that prevent the vehicle from functioning normally.
*In Emergency Riding Mode, the vehicle's maximum speed will be limited to ≤21 km/h, with slight variations depending on vehicle conditions.
*Prolonged use of this mode may result in equipment damage and safety risks. (In cases of severe damage to the motor, controller, or wiring harness, Emergency Riding Mode cannot be activated to prevent potential safety issues from prolonged use. Please contact your local after-sales service center or call customer service for assistance.)
Operating method
- Start emergency riding: First, double-click the "Cruise Control button," then press and hold the "Cruise Control button" for 3 seconds. A beep sound indicates that you have entered Cruise Control Mode. (The display's ambient light will turn red, and the display will indicate that the Emergency Riding Mode has been activated.)
- Emergency riding method: Twist the twist grip or press and hold the "Cruise Control button" to activate Emergency Riding Mode (riding speed ≤ 21 km/h).
- Exit emergency riding: In Emergency Riding Mode and when the display speed is 0, double-click the "Cruise Control button" to exit Emergency Riding Mode.
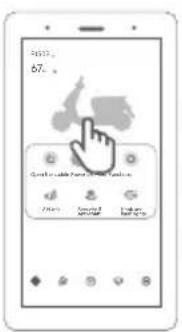
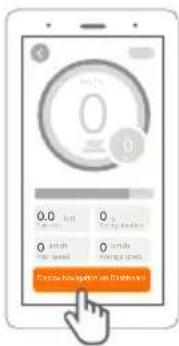
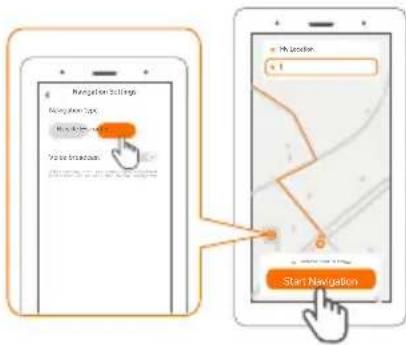
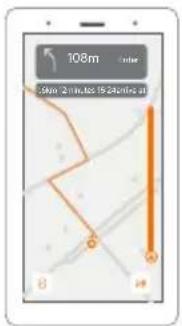
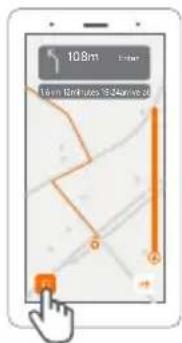
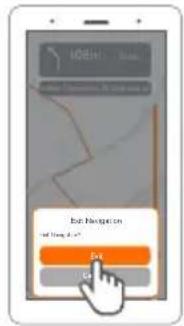
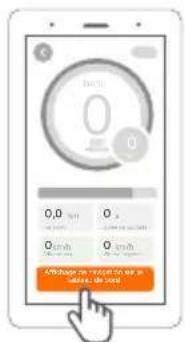
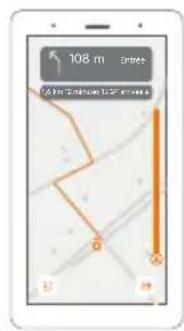
Navigation
Operation instructions
*Note: The instrument only supports displaying intersection information. Detailed maps and routes need to be viewed in the app.
- Open the Segway Mobility app to the homepage.→ Click on the vehicle image → Tap "Display Navigation on Dashboard" → Enter the destination address and select the route → Tap "Start Screen Projection Navigation" → Screen projection navigation starts.
① ②

③ ④ ⑤ ⑥
-
After starting navigation, the vehicle screen displays simple navigation information.
-
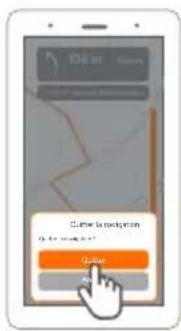
After reaching the destination, the screen projection navigation will exit automatically. You can also tap the icon in the bottom-left corner to exit navigation at any time during the journey.
① ②
4. First Use
For your safety, please go through the New Rider Tutorial in the Segway mobility app.
① Turn on
natural_image
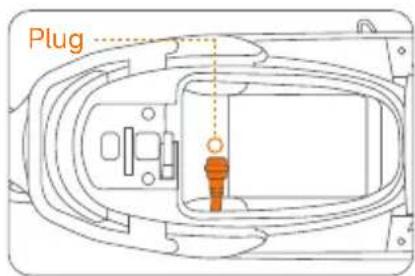
Line drawing of a hand inserting a component into an electrical outlet (no text or symbols)a. Open the seat bucket with your key and pull the foot panel switch to unlock it.
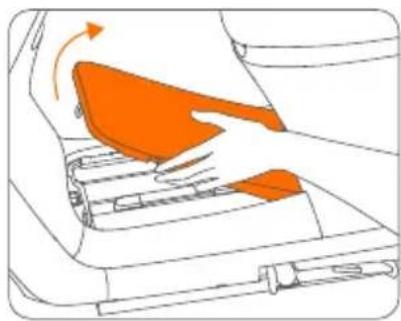
natural_image
Diagram of a device interior showing orange highlighted areas and directional arrows (no text or symbols)b. Lift the lid.
natural_image
Technical line drawing of a vehicle interior with orange components, no text or symbols presentc. Connect the battery plug and snap on the rubber cover.
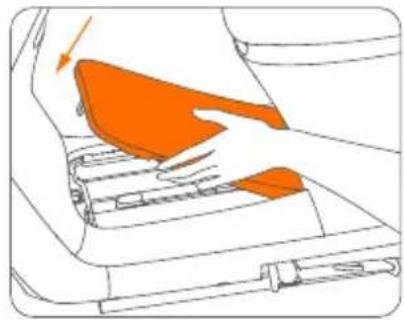
natural_image
Diagram of a hand pressing down on a mechanical component with an orange highlighted area (no text or symbols)d. Close the lid.
② Powering-on and activation
a. Power on:
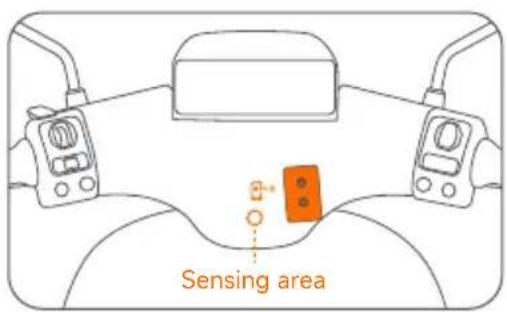
Touch the NFC card to the NFC sensing area, hear the prompt tone, and the startup is complete.
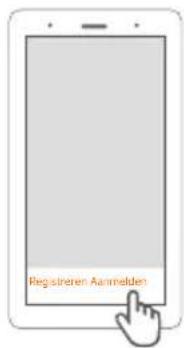
b. Activation:
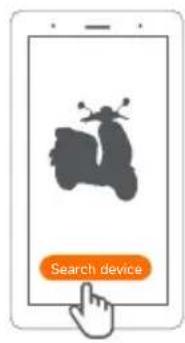
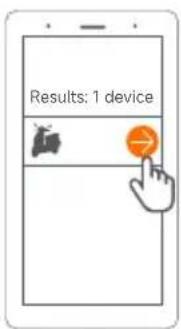
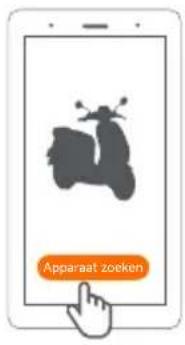
Enable Bluetooth on your phone, scan the QR code on the dashboard to download and install the app > register and log in > click "Search device" > connect. Follow the instructions to bind your Segway eScooter.

natural_image
Simple icon of a smartphone with a wireless symbol (no text or labels)

③ How to power on/lock the vehicle after activation
Power-on method (any of the following)
- NFC card power-on: Use the NFC card to touch the NFC sensing area, hear the prompt tone, and the startup is complete.
- App power-on: [See app tutorial for details]
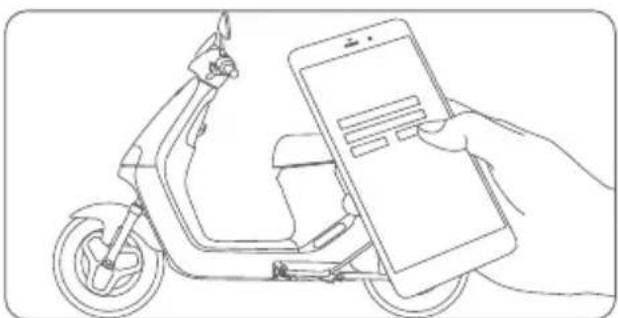
a. Click the power button on the vehicle interface in the app.
b. Click "OK" when the window pops up.
c. The display panel will pre-light. Press and hold the Auto key to power on or lock the vehicle.
natural_image
Line drawing of a hand holding a smartphone next to an electric scooter (no text or symbols)
- Password power on: Press and hold the Auto key for 3 seconds. If no other unlocking is triggered and a power-on password has been set, the password interface will appear.
a. Digital input method: Riding mode button or scroll wheel input.
b. Digital confirmation method: Press the scroll wheel or the Auto key to confirm.
c. Delete current number: Press Return button You can clear the current number and move it one place to the left.
d. After confirming the fourth digit, verify if the password is correct. If correct, turn on the device.
*If 5 consecutive incorrect attempts are made, the user will be blocked from further tries. It will automatically shut down after 5 seconds, and the user cannot attempt again within 2 minutes.
● AirLock power-on: Turn on the Bluetooth of your mobile phone, log in to the app, and activate the function. When approaching a vehicle and Bluetooth is connected, the Bluetooth indicator light will turn on. The display ambient light will turn blue when the vehicle is ready to be unlocked. The vehicle will automatically unlock when the user presses and holds the Auto key or sits on the seat.
natural_image
Line drawing of a hand holding a smartphone next to an electric scooter, no text or symbols present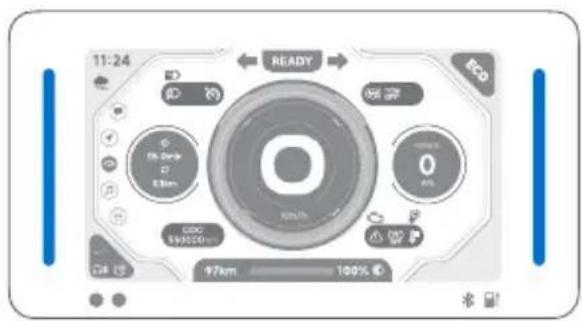
5. Learn to Ride
a. When powered on via the app, sit on the cushion and retract the side stand.
b. Press the Auto Key.
natural_image
Line drawing of a person riding a scooter with visible wheels and seat (no text or symbols)
natural_image
Line drawing of a hand holding a medical device with a green button (no text or symbols)c. The "Ready" indicator lights up. d. Squeeze the throttle inwards to go.
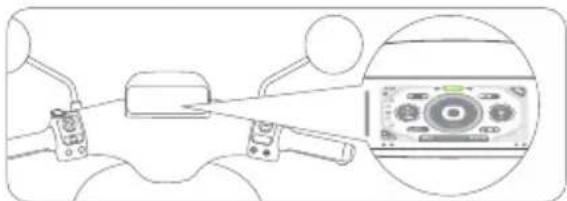
natural_image
Diagram showing a device with lever and control panel, plus an inset close-up of a control panel (no text or symbols)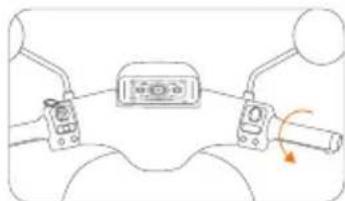
natural_image
Diagram of a vehicle's steering wheel and dashboard with no text or symbolsThere is a risk of falling and injury during the learning process, so please wear a helmet and protective gear at all times. Please adhere to traffic regulations and avoid behaviors such as riding in the wrong direction or running red lights.
Powering on
You can power on the device via NFC card, AirLock function, or Auto key/Custom key. Once the self-check is completed, you will hear the power-on prompt sound.
*Before riding, please check the battery indicator light. If the battery is too low, charge it immediately.
Riding
Retract the side stand, sit on the saddle, put your feet on the ground, turn the throttle handle slightly inward, and start your journey.

natural_image
Line drawing of a scooter with visible suspension and battery compartment (no text or symbols)
natural_image
Diagram of a motorcycle's front wheel and steering wheel with orange-handled grip (no text or symbols)6. Installation of Lithium-ion Battery
\*The following installation steps apply to E150S
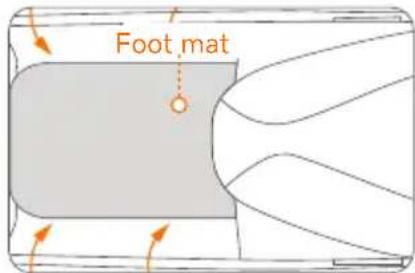
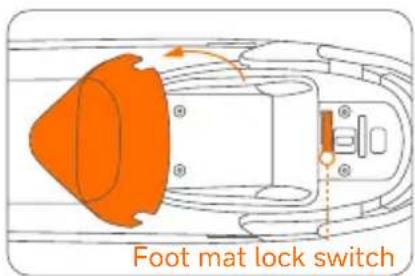
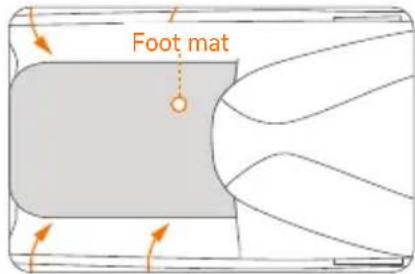
a. Open the seat, pull the foot mat lock switch, the foot mat will pop up, and then remove the foot mat.
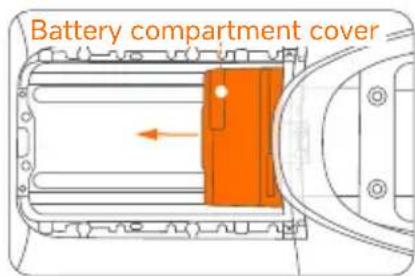
b. Tear off the tape at the bottom of the battery compartment cover to make it adhere to the base of the battery compartment, and press the buckle above the cover against the lower edge of the seat bucket.
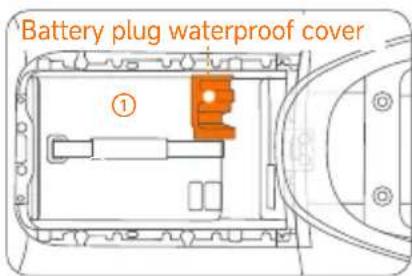
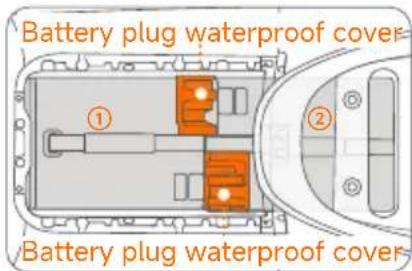
c. Insert the battery into the battery compartment, plug in the power plug, and install the battery plug waterproof cover.
d. Reinstall the foot mat, and the installation is complete.
\*The following installation steps are apply to E250S
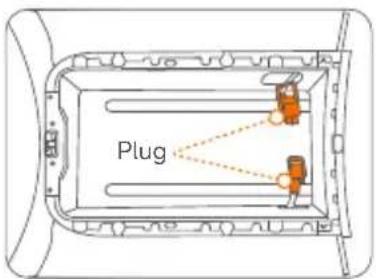
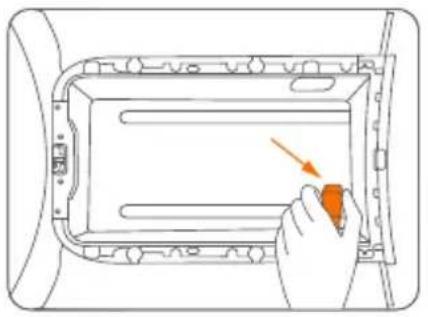
Note: Before installation, make sure there are two plugs and no foreign objects in the battery compartment.
a. Stuff the two plugs into the plug holes on both sides of the battery compartment, and place battery ② into the compartment.
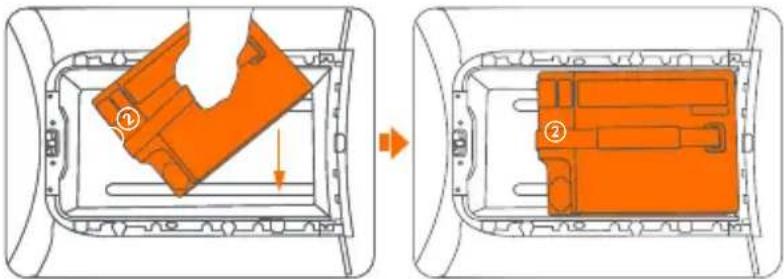
b. Gently push battery ② backwards into the inner end of the compartment, and take out the plug on the same side as the port of battery ②.
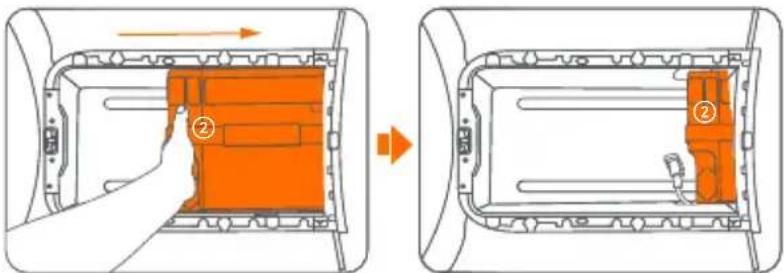
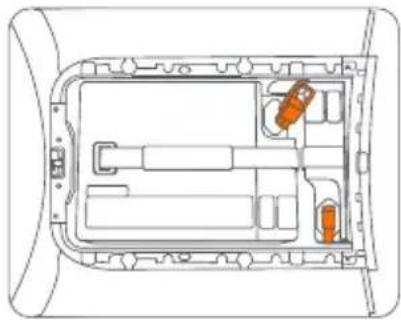
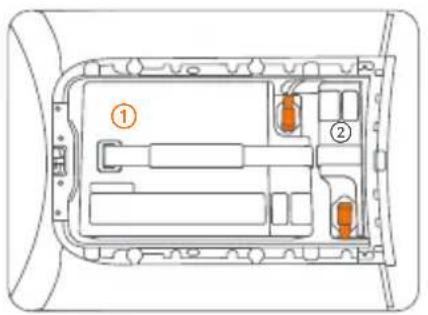
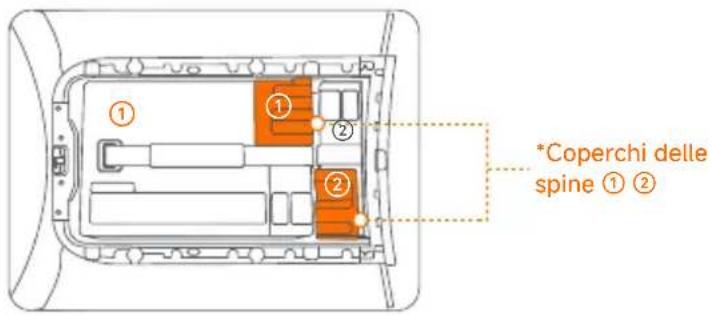
*The eScooter contains two identical batteries, shown as ① and ②.
c. Insert the plug into battery ②'s port.
d. Place battery ① into the compartment, and take out the plug on the same side as the port of battery ①.
natural_image
Diagram of a hand placing an orange button into a rectangular device component (no text or symbols visible)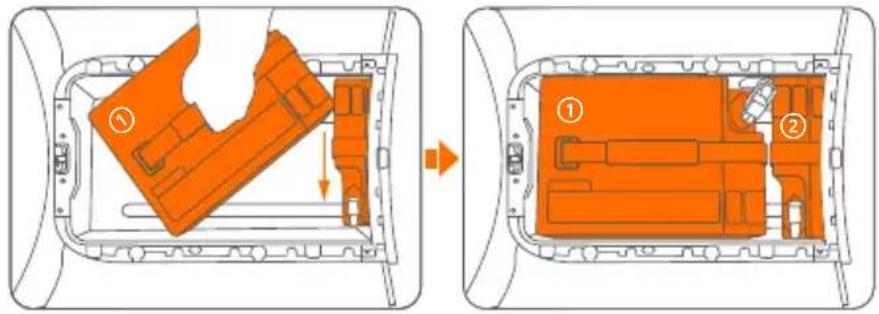
e. Insert the plug into battery ②'s port. f. Install the plug covers on the plugs.
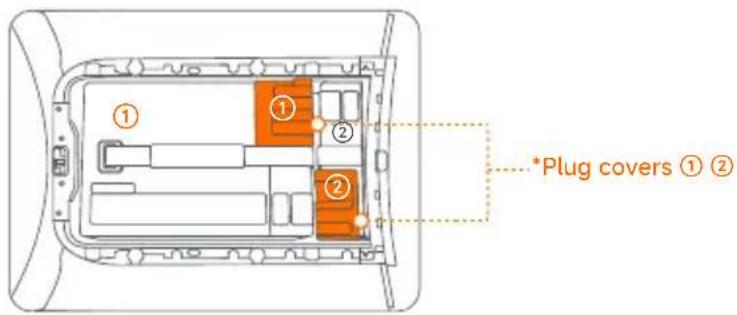
*The eScooter contains two identical batteries, shown as ① and ②.
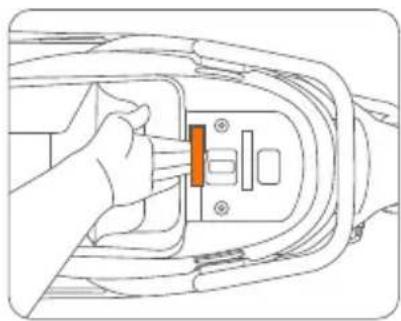
7. Installation of Additional Battery (optional)
*The following installation steps apply to E150S (single battery upgrade to dual battery)
a. Open the seat, pull the foot mat lock switch, the foot mat will pop up, and then remove the foot mat.
b. First remove the battery plug waterproof cover, unplug the power plug, and take out battery No. ①.
c. Remove the battery compartment cover.
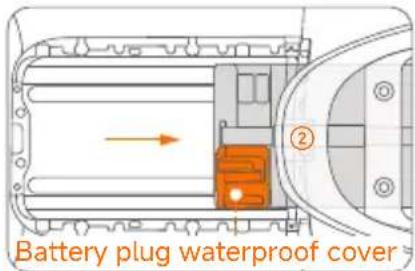
d. Insert battery No. ②, press it against the rear of the battery compartment, plug in the power plug, and install the battery plug waterproof cover.
e. Insert battery No. ① into the battery compartment, plug in the power plug, and install the battery plug waterproof cover.
f. Reinstall the foot mat and the installation is complete.
*The following installation steps are applicable to E150S (single battery upgrade to dual battery/triple battery)/E250S (dual battery upgrade to triple battery.)
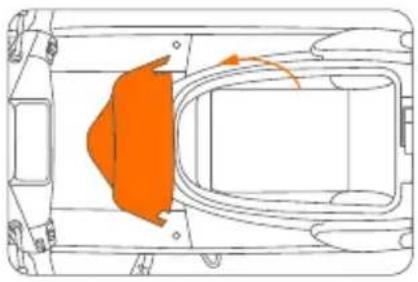
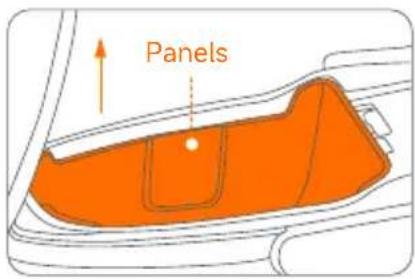
a. Open the seat. c. Remove the side panel. Remove the panels.
natural_image
Top-down schematic of a vehicle chassis with highlighted orange component (no text or symbols)d. Use a 10# hexagonal socket to remove the screw as shown in the picture, then detach the power plug buckle.
e. Take out the plug.
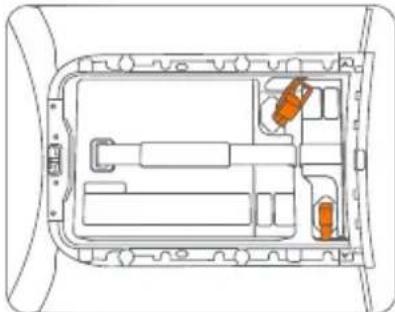
a round hole as shown below.
natural_image
Diagram of a car interior showing a handle, seat, and dashboard with an orange arrow indicating direction (no text or symbols)f. Place the additional battery into the seat bucket.
natural_image
Diagram of a mechanical component with an orange cylindrical part inside, no visible text or symbolsg. Insert the plug into the battery port.
h. Install the side panels of the seat bucket.

natural_image
Diagram of a device interior with orange components and a white hand holding a tool (no text or symbols)i. Place the battery protective cover onto the battery.
natural_image
Diagram of a car interior showing a highlighted orange area and directional arrow (no text or symbols)
natural_image
Top-down schematic of a vehicle interior with orange highlighted components (no text or symbols)*For details, please refer to the instructions for installing the lithium-ion battery.
8. Charge
① Charge the vehicle
See [Charging Port] on page 8.
② Charge the Battery
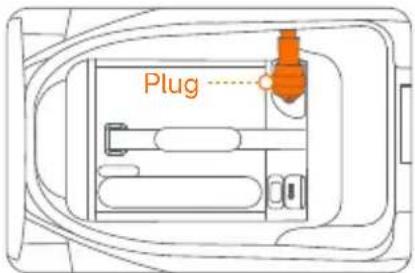
a. Use the key to open the seat bucket and pull the foot panel switch to unlock it.
natural_image
Line drawing of a hand inserting a small orange object into a mechanical component (no text or symbols)c. Connect the charging cable to the charging port on the battery and then plug it into a power socket.
natural_image
Simple line drawing of a cable routing from a power outlet to a battery and switch (no text or symbols)b. Open the foot panel, which is also the battery compartment lid, and take out the battery.
natural_image
Illustration of a hand cleaning a car interior with an orange plastic container (no text or symbols visible)* The indicator on the battery charger shows solid red when charging and turns green when finished.
natural_image
Line drawing of a mechanical component with a cylindrical body and flanged ends (no text or symbols)Note: When the battery level is lower than 20%, it is recommended to charge it. (The charging indicator light on the display lights up, indicating that charging is required.)
9. Common Faults and Solutions
| Fault Code Display Cause of failure Solution | ||
| Fault Code 10 | Display and controller communication abnormality | Please restart the vehicle. If the problem is not resolved, please contact the after-sales service or designated authorized service outlets. |
| Fault Code 11 | Battery undervoltage protection | Please charge in time. |
| Fault Code 12 | Motor problem | Please contact the after-sales service or designated authorized service outlets. |
| Fault Code 13 | Motor controller abnormality | |
| Fault Code 14 | Throttle lever abnormality | Please check whether the throttle is retracted when starting up. If the problem is not resolved, please contact the after-sales service or designate an authorized service outlets. |
| Fault Code 15 | Brake switch abnormality | Please check whether the brake is pressed when starting up. If the problem is not resolved, please contact the after-sales service or designated authorized service outlets. |
| Fault Codes 16, 17, 33, 34, and 40 | Display abnormality | Please contact the after-sales service or designated authorized service outlets. |
| Fault Codes 19, 23, and 27 | Battery problem | Please contact the after-sales service or designated authorized service outlets. |
| Fault Code 20 | Lithium battery 1 communication abnormality | Please plug and unplug the battery to restart the vehicle. If the problem is not resolved, please contact the after-sales service or designated authorized service outlets. |
| Fault Code 24 | Lithium battery 2 communication abnormality | |
| Fault Code 28 | Lithium battery 3 communication abnormality | |
| Fault Codes 21, 22, 25, 26, 29, and 30 | Lithium battery abnormality | Please contact the after-sales service or designated authorized service outlets. |
| Fault Codes 31, 32, and 44 | Vehicle serial number or code abnormalities | |
| Fault Code Display | Cause of failure Solution | |
| Fault Code 35 | Display and Cloud Box communication abnormal | Please restart the vehicle. If the problem is not resolved, please contact the after-sales service or designated authorized service outlets. |
| Fault Code 36 | Please park your vehicle in an open signal weak | en area outdoors. |
| Fault Code 37 | Ninebot ECU internal battery low | Please plug in the battery and keep the air switch open for more than 5 hours. |
| Fault Code 38 | Electric door lock opening abnormality | Please contact the after-sales service or designated authorized service outlets. |
| Fault Code 41 | Handlebar lock not retracted into place | Please restart the vehicle and move the handlebar to retract the lock pin. If the problem is not resolved, please contact the after-sales service or a designated authorized service outlets. |
| Fault Code 42 | Ninebot ECU abnormality | Please contact the after-sales service or designated authorized service outlets. |
| Fault Code 43 | Vehicle crash or severe vibration detected | If no accident occurs, please contact the after-sales or designated authorized service outlets. |
| Fault Code 45 | Vehicle has entered Lost Mode | -Ninebot app. |
| Fault Code 46 | Motor controller cooling fan fault | Please contact the after-sales service or designated authorized service outlets.t |
| Fault Code 47 | Software overcurrent fault | |
| Fault Code 48 | Overvoltage fault | |
| Fault Code 49 | Motor controller Level 2 overtemperature protection | Please minimize long and intense riding. |
| Fault Code 50 | Motor Level 2 overtemperature protection | |
| Fault Code 52 | Motor controller Level 1 overtemperature protection | |
| Motor Level 1 overtemperature protection | Please minimize long and intense riding.Fault Code 53 | |
| Fault Code 54 Twist | strip needs calibration | Please follow the Segway-Ninebot app for twist grip calibration. |
| Fault Code 55 | ABS communication abnormality | Please contact the after-sales service or designated authorized service outlets. |
| Fault Code 68 | Left combination switch communication abnormality | Please restart the vehicle. If the problem is not resolved, please contact the after-sales service or designated authorized service outlets. |
| Fault Code 69 | Right combination switch communication abnormality | |
| ABS | ||
| Fault Code C4001 | ABS power supply too high | Please check whether the ABS power supply voltage is too high and exceeds 16.5V. If the problem is not resolved, please contact the after-sales service or designated authorized service outlets. |
| Fault Code C4002 | ABS power supply too low | Please check whether the ABS supply voltage is too low and lower than 9.5V and check the ABS fuse. If the problem is not resolved, please contact the after-sales service or designated authorized service outlets. |
| Fault Code C4003 | Front wheel speed sensor open circuit or short circuit | Please replace the front wheel speed sensor and test or contact the after-sales service or designated authorized service outlets. |
| Fault Code C4004 | Front wheel speed sensor signal is unstable/overleveraged/ intermittent | Check to see if the front wheel speed sensor probe is not in magnetic contact with the gear ring and is misaligned. If the problem persists, please contact the after-sales service or a designated authorized service outlets. |
| Fault Code C4005 | No signal from front wheel speed sensor | Check whether the installation clearance of the front wheel sensor is greater than 1.2 mm. If the problem is not resolved, please contact the after-sales service or designated authorized service outlets. |
| Fault Code C4006 | Rear wheel speed sensor open circuit or short circuit | Please replace the rear wheel speed sensor and test or contact the after-sales service or designated authorized service outlets. |
| Fault Code C4007 | Rear wheel speed sensor signal is unstable/overleveraged/ intermittent | Check to see if the rear wheel speed sensor probe is not in magnetic contact with the gear ring and is misaligned. If the problem persists, please contact the after-sales service or a designated authorized service outlets. |
| Fault Code C4008 | No signal from rear wheel speed sensor | Check whether the installation clearance of the rear wheel sensor is greater than 1.2 mm. If the problem is not resolved, please contact the after-sales service or designated authorized service outlets. |
| Fault Code C4009 | Valve relay fault | Please restart the vehicle. If the problem is not resolved, please contact the after-sales service or designated authorized service outlets. |
| Fault Code C4010 | Front wheel oil inlet valve coil fault | |
| Fault Code C4011 | Front wheel oil drain valve coil fault | |
| Fault code C4012 | Rear wheel oil inlet valve coil fault | |
| Fault Code C4013 | Rear wheel oil drain valve coil fault | |
| Fault Code C4014 | Motor open circuit fault | |
| Fault Code C4015 | Motor overcurrent fault | |
| Fault Code C4016 | ABS pump failure | |
10. Maintenance
Cleaning and maintenance
Cleaning
Wash with water and neutral detergent and use a soft and wet cloth to clean.
CAUTION
DO NOT clean with alcohol, gasoline, acetone, or other corrosive/volatile solvents. These substances may damage the appearance and internal structure of the vehicle. DO NOT rub with sandpaper or a metal brush.

WARNING
Before cleaning, make sure the vehicle is powered off.
Storage
Store in a dry and cool place indoors and avoid sunlight and rain so as to prevent oxidation and shortening of the service life. Disconnect the battery plug for long-term storage to prevent over-discharge.
Motor
- When driving through puddles or pools of water, make sure that the water level does not exceed the central axis of the rear wheel.
- Regularly check the motor. In case of any loose objects, tighten immediately.
- Clean the vehicle regularly to prevent particles from entering the motor and affecting its normal function. Do not spray water directly during cleaning.
- Inspect if there are any scratches on the motor and whether there is any abnormal noise when the motor is running. In case of any abnormality, contact after-sales service or your dealer.
Battery
- In case of any malfunction with the battery, please contact the after-sales service or an authorized dealer.
-
DO NOT drain the battery. It is recommended to keep the battery level above 20%. Charge after each ride to prolong the service life of the battery.
-
It is strictly prohibited to disassemble the battery. There is a danger of electric shock, short circuiting, fire, explosion, etc.
- When the battery indicator bars are all lit up or the charger indicator turns green, it means the battery is fully charged.
- If you are not going to use the vehicle for a long time, take out the battery after it is fully charged, place it in a dry and well-ventilated place, and charge it every two months.
- DO NOT store the battery in a place where there is a risk of falling. Falling may cause battery damage and short circuiting, fire, and explosion.
Battery Charger
Before charging:
- The charger should ONLY be used to charge the original vehicle. It is strictly prohibited to charge non-rechargeable batteries.
- To prevent the electronic components inside the charger from loosening, DO NOT place the charger inside the vehicle.
- The power supply voltage should be 200-240V AC.
- Should you discover any wire damage or loose connector, stop using the Segway eScooter.
- DO NOT use a cable different from the original.
- Batteries should not be charged if they are wet or in damage.
During charging:
- Place the vehicle in a safe place away from the elements.
- Connect to the battery or vehicle charging port first, and then plug into the power socket.
- When there is an unusual smell, sound, or light display, stop charging immediately and contact after-sales service.
After charging:
- When the battery is full, disconnect from the power socket first and then unplug from the battery/vehicle.
- After the charger cools down, place it in a safe place inaccessible to children.

WARNING
- Ensure good ventilation during charging. Stay away from fire or explosive materials!
- High voltage in the charger! DO NOT disassemble or replace parts of the charger.
- DO NOT connect the charger to the power supply for a long time. Unplug from the power socket when not charging. DO NOT use the charger to charge multiple vehicles.
- Regularly inspect the charger for damage to the cord, plug, enclosure, and other parts. If any damage is found, stop using it until it is repaired or replaced.
- The external cable of the charger cannot be replaced; if the cord is damaged, the charger must be discarded and replaced by a new one.
- The charger should be handled with care.
Others
- Tires supplied with the product are to be mounted on the wheel by a professional repairer. Removing the wheels is complicated, and incorrect assembly can lead to instability and malfunctions.
- You may find the limited warranty information in the service and maintenance record booklet.
- Efforts have been made to simplify wording in the User Manual for users. Where an action appears too complicated for a user, he/she is advised to contact an authorized or specialized repairer or customer service.
- For maintenance records and limited warranty, please refer to the Segway eScooter Service and Maintenance Record.
NOTICE: INSURANCE
YOUR INSURANCE POLICIES MAY NOT PROVIDE COVERAGE FOR ACCIDENTS INVOLVING THE USE OF THIS ESCOOTER. TO DETERMINE IF COVERAGE IS PROVIDED, PLEASE CONTACT YOUR INSURANCE COMPANY OR AGENT.
- Specifications
| Item | Parameter | ||
| Vehicle Parameters | Name | E150S E250S | |
| Model | SGW2700DT | SGW5000DT | |
| Dimensions (L×W×H) | 1859×691×1161mm | 1891×691×1158mm | |
| Vehicle Weight (batteries not included) 97 kg 104 kg | |||
| Wheelbase | 1360 mm | ||
| Max. Speed | 45 km/h 90 km/h | ||
| WMTC Range* | 57km (one battery)114km (two batteries)171km (three batteries) | 105km (two batteries)160km (three batteries) | |
| Energy Consumption | 35Wh/km (one battery)40Wh/km (two batteries)47Wh/km (three batteries) | 46Wh/km (two batteries)54Wh/km (three batteries) | |
| Max. Motor Output Power | 3.6 KW 7.5 KW | ||
| 30 mins max continuous output power | 2.2kW 5 KW | ||
| Max. Torque | 138 N.m 235 N.m | ||
| IP Rating | IPX5 | ||
| Space Under Seat | 34L | ||
| Seats | 2 | ||
| Battery | Battery Type | Li-ion | |
| Charging Time | About 2.5 hrs (one battery) About 5 hrs (two batteries) | ||
| IP Rating | IPX7 | ||
| Capacity | 27Ah | 54 Ah | |
| Weight | 13 kg 13 kg*2 | ||
| Rated Voltage | 74V | ||
| Battery Energy | 2000Wh | 4000Wh (2000Wh*2) | |
| Charger | Nominal Power | 1008W | |
| Charger Input Voltage | 200-240V AC 50-60Hz | ||
| Charger Output Voltage | 84V DC 12A | ||
| Tire | Tire Type | Front: 90/80-12,tubeless tyreRear: 110/70-12,tubeless tyre | Front: 100/70-12,tubeless tyreRear: 120/70-12,tubeless tyre |
| Standard Tire Pressure | Front:200kPa Rear:220kPa Front:200kPa Rear:220kPa | ||
| Brakes | Front brake | 220mm disc | |
| Rear brake | 200mm disc | ||
| Suspensions | Front suspension | Hydraulic & Spring shock absorber | |
| Rear suspension | Spring shock absorber (Adjustable) | ||
| ABS | Yes, Dual channel ABS | ||
| Smart features | Name E150S E250S | ||
| Wireless connectivity | Wi-Fi IEEE 802.11 a/b/g/n (2.4GHz & 5GHz), Bluetooth 5.3, 4G LTE(FDD-LTE: B1/B3/B5/B7/B8/B20/B28) | ||
| USB connection | Yes | ||
| Smart handlebar lock | Yes | ||
| Airlock | Yes | ||
| NFC card | Yes | ||
| Parking sensor | Yes | ||
| Seat sensor | Yes | ||
| Electric Controlled Unlock of Seat Bucket | Yes | ||
| Navigation | Yes | ||
| OTA | Yes | ||
| GPS | Yes | ||
| AHRS | Yes | ||
| Remote Control(Lock & unlock) | Yes | ||
| Black Box + SOS | Yes | ||
| Cruise mode | Yes | ||
| Smart BMS 6.0 | Yes | ||
| Light sensor | Yes | ||
| Wheel speed sensor | Yes | ||
| Gyroscope | Yes | ||
*WMTC STAGE 3 criteria: 75 kg load ± 5 kg, 1.75 m ± 0.05 m, max wind speed of 3 m/s with a minimum air temperature of 5°C and a maximum of 35°C.
12. Certifications
This product is certified to REGULATION (EU) No 168/2013. The battery complies with UN/DOT 38.3.
- Go to www.segway.com for this product's compliance documents in accordance with REGULATION (EU) 2023/1542.
- This product has a battery data reset function; please resort to the dealer for detailed operation of the battery reset.
- Please go to www.segway.com to see compliance documents.
13. Trademark and Legal Statement
Ninebot, Ninebot AirLock, and RideyGo! are trademarks of Ninebot (Beijing) Tech Co., Ltd.; Segway and the Rider Design are the registered trademarks of Segway Inc. App Store is a trademark of Apple Inc., registered in the U.S. and other countries. IOS is a trademark of Cisco in the U.S. and other countries and is used under license. Android, Google Play, and the Google Play logo are trademarks of Google LLC. The Bluetooth® word mark and logos are registered trademarks owned by Bluetooth SIG, Inc., and any use of such marks by Segway-Ninebot is under license. Other trademarks and trade names are those of their respective owners.
We have attempted to include descriptions and instructions for all the functions of the Segway eScooter at the time of printing. However, due to the constant improvement of product features and design changes, your Segway eScooter may differ slightly from the one shown in this document. Visit the Apple App Store (iOS) or the Google Play Store (Android) to download and install the app.
Please note that there are multiple models with different functions, and some of the functions mentioned herein may not be applicable to your unit. The manufacturer reserves the right to change the design and functionality of the Segway eScooter product and documentation without prior notice.
© 2025 Seqway-Ninebot. All rights reserved.
Legal Statement:
-
Please read the User Manual carefully and learn how to ride the Segway eScooter. As a means of transport, Segway eScooter carries all the same potential risks as those of any other vehicle. There are risks of losing control, collisions, and falls when riding. In order to minimize the risks, you're obliged to read the User Manual carefully before riding. It covers most knowledge about how to ride the eScooter safely and how to take appropriate precautions. If it is difficult for you to fully follow the riding instructions in the User Manual, please do not attempt to ride your eScooter.
-
Please check and obey your local laws or regulations. It is the User's responsibility to comply with all laws pertaining to the use of electric scooters in your jurisdiction. Various countries or regions have different laws and regulations about electric scooters; please note:
(1) A helmet may be legally required by local law or regulation in your jurisdiction.
(2) A scooter driving and/or vehicle license may be legally required by local law or regulations in your area.
(3) Your scooter may not be allowed to be driven on motorways or highways.
(4) Carrying pillion passenger(s) may be restricted in your jurisdiction. You can gain further guidance from the (local) government in your country or region.
-
Please insure yourself timely upon purchase of the product to minimize the risks of use.
-
Please check whether your eScooter and its accessories are in good condition immediately when you receive them.
-
All components of the Segway eScooter must be properly installed as per the User Manual. Inappropriate installation may lead to loss of control, collisions, and falls.
-
The product may contain removable components and small parts. Please keep it out of the reach of children to avoid choking hazard.
- Before using your eScooter, please check its tire pressure, battery level, vehicle installation status, and all functional parts. Check whether the front and rear brakes function properly and ensure that the brake cable is not damaged. Brake cable should have the right tension. Screws, nuts, bolts, and other fasteners must be checked. Make sure there's no loose part. If any abnormality is found, please stop using it immediately and contact our after-sale service for help.
- You should always be cautious and maintain a proper speed when riding. Avoid speeding, overloading, or performing stunts of any kind. Do not try to touch the tires with your hands or feet when riding.
- Do not dispose of this product in a landfill, by incineration, or by mixing with household trash. Serious danger/injury can occur because of the electrical components and the battery. For information about battery and electrical waste, please contact your household waste disposal service, your local or regional waste management office, or your point of sale.
- Don't use any non-original accessories, and never dismantle or modify the product without authorization. All damage and loss arising therefrom will be your sole responsibility.
- Segway is subject to no compensation responsibility for any claim, liability, or loss that arises (or may arise) from violating any of the abovementioned clauses. The User(s) should undertake all and any unpredictable or inevitable risks during riding.
- After purchase, you may either use the Product according to the abovementioned clauses or return the Product as per the "Warranty Policies." In the case of a return, please ensure that both the Product and the packaging thereof are in good condition for resale.
- This document should be considered a permanent part of the Product and should remain with the vehicle when it is resold.
Thank you again for choosing Segway eScooter!

Raccolta Carta

The manufacturer reserves the right to make changes to the product, release firmware updates, and update this manual at any time. Visit www.segway.com or check the Segway Mobility app to download the latest user materials. In order to activate your Segway eScooter and obtain the latest updates and safety instructions, you must install the Segway Mobility app.

SEGWAY

natural_image
Line drawing of a scooter with front wheel, backrest seat, and side-mounted sensors (no text or symbols)
Segway Mobility App
natural_image
Line drawing of a scooter with a highlighted section showing the blade and seat (no text or symbols)natural_image
Line drawing of a person riding a scooter with an orange box on the back (no text or symbols)natural_image
Line drawing of a person riding a scooter through rain, no text or symbols presentnatural_image
Top-down schematic of a boat with internal compartments and a rope, no text or symbols presentnatural_image
Line drawing of a person riding a scooter with a helmet and holding an object (no text or symbols)natural_image
Line drawing of a scooter with front wheel, rear seat, and side-mounted sensors (no text or symbols)Accessoires


natural_image
Illustration showing two-step installation of a mechanical component, one being inserted and the other holding a tool (no text or symbols present)⑯ Port de charge
natural_image
Diagram of a hand holding an orange device with a curved arrow indicating motion (no text or symbols)⑰ Repose-pied passager
Ouvrir :
natural_image
Mechanical assembly diagram showing a lever mechanism with no visible text or symbolsnatural_image
Technical line drawing of a mechanical assembly with no visible text or symbols
natural_image
Illustration of a digital audio workstation interface with no visible text or symbols on the screen or background【Mode Eco】
【Mode Sport】
natural_image
Line drawing of a hand holding a device with an orange button and control buttons (no text or symbols)natural_image
Illustration of a mechanical lever with orange handle and circular motion indicator (no text or symbols)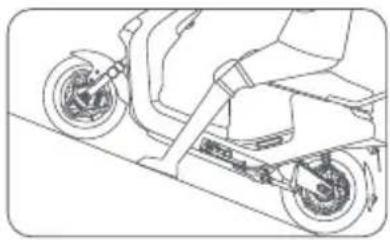
natural_image
Line drawing of a scooter with wheels and suspension components (no text or symbols)natural_image
Illustration of a handheld device with an orange handle and circular motion arrows indicating rotation (no text or symbols)3. Accélérer
①
②

③ ④

6
①
②
natural_image
Line drawing of a hand inserting a component into a mechanical housing (no text or symbols)natural_image
Diagram of a device interior with orange highlighted area indicating motion or movement (no text or symbols)natural_image
Top-down schematic of a vehicle interior layout with orange components (no text or labels)natural_image
Diagram of a mechanical device with orange highlighted component (no text or symbols)natural_image
Line drawing of a hand holding a smartphone next to an electric scooter (no text or symbols)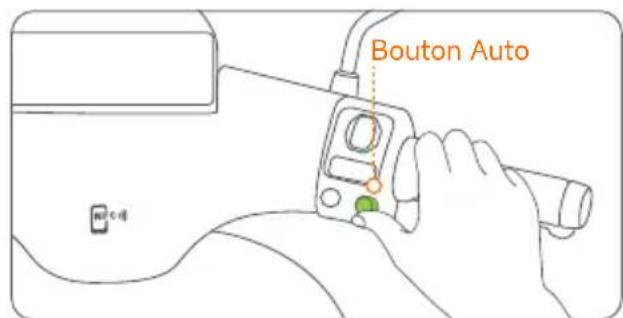
natural_image
Line drawing of a hand holding a smartphone next to an electric scooter, no text or symbols present
natural_image
Line drawing of a person riding an electric scooter (no text or symbols)
natural_image
Line drawing of a person using a handheld device (no text or symbols)natural_image
Diagram of a device with a control panel and an inset close-up of its screen (no text or symbols)
natural_image
Diagram of a mechanical device with two actuators and a central control unit, showing no text or symbols.natural_image
Line drawing of a person riding an electric scooter with visible battery compartment (no text or symbols)
natural_image
Diagram of a mechanical device with two arms and a highlighted orange component (no text or symbols)natural_image
Diagram of a hand inserting a carrot into a rectangular device frame (no text or symbols)
natural_image
Top-down schematic of a vehicle showing a highlighted orange area and internal components (no text or symbols)natural_image
Diagram of a car interior showing a highlighted orange area and directional arrow (no text or symbols)natural_image
Diagram of a mechanical component with orange internal structure (no text or symbols)natural_image
Diagram of a device interior with orange components and a hand holding a tool (no text or symbols)natural_image
Diagram of a car interior showing a highlighted orange area and directional arrow (no text or symbols)
natural_image
Top-down schematic of a vehicle's internal components, showing orange highlighted areas and no text or symbolsnatural_image
Line drawing of a hand inserting a small orange object into a mechanical component (no text or symbols)natural_image
Simple line drawing of a battery connected to a cable with an orange wire, no text or symbols present.natural_image
Illustration of a hand holding an orange rectangular object with a directional arrow, next to a mechanical component (no text or symbols visible)natural_image
Technical line drawing of a mechanical component with no visible text or symbolsSegway Mobility App
natural_image
Line drawing of a scooter with visible engine and wheel assembly (no text or symbols)natural_image
Line drawing of a scooter with a highlighted hand tool (no text or symbols)natural_image
Line drawing of a person riding a scooter with an orange cargo box on the back (no text or symbols)natural_image
Line drawing of a person riding a scooter through rain, no text or symbols presentnatural_image
Top-down schematic of a boat's internal structure with no visible text or symbolsnatural_image
Line drawing of a person riding a scooter with a helmet and scooter (no text or symbols)natural_image
Line drawing of a scooter with front wheel, rear seat, and side mirror (no text or symbols)Accessoires


flowchart
graph LR
    A["Device with magnifying glass"] --> B["Inserted cable"]
    B --> C["Close-up of wristwatch"]
    C --> D["Bout ABout-B"]

natural_image
Illustration showing two-step installation of a mechanical component with orange arrows indicating motion (no text or symbols)16 Laadpoort
natural_image
Simple line drawing of a hand holding an orange object with motion lines (no text or symbols)natural_image
Illustration of a hand holding an orange tool near a circular device with three dots, no text or symbols present.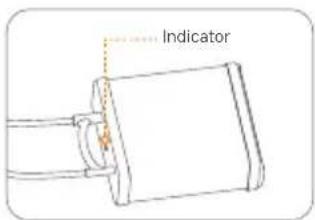
⑰ Voetsteun passagier
Openen:
natural_image
Mechanical assembly diagram showing a component with an arrow indicating rotation (no text or labels)Sluiten:
natural_image
Technical line drawing of a mechanical assembly with no visible text or symbols
Combinatieslot
Draai naar links


Dashboard
natural_image
Front view of a digital audio workstation interface with control knobs and a central dial (no readable text or symbols)【Eco-modus】
【Sportmodus】
natural_image
Top-down view of a digital device interface with circular buttons and a central display (no readable text or symbols)[Groen]
Energie recupereren
natural_image
Line drawing of a hand holding a device with an orange button and control buttons (no text or symbols)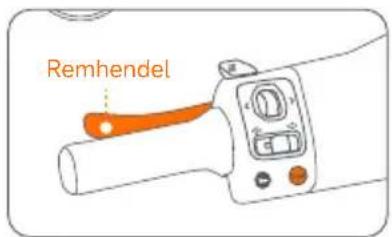
2. Uitschakelen
of
natural_image
Illustration of a mechanical lever with an orange handle and rotating arrow (no text or symbols)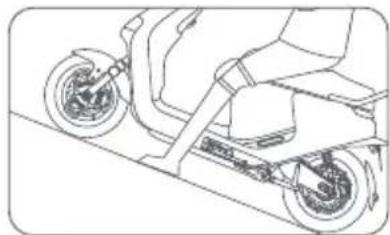
natural_image
Line drawing of a scooter with wheels and suspension (no text or symbols)Smart Cruising
1. Inschakelen
natural_image
Illustration of a handheld device with an orange handle and circular motion arrows indicating rotation (no text or symbols)3. Versnellen
4. Eerste gebruik
natural_image
Line drawing of a hand inserting a component into a vehicle electrical socket (no text or symbols)natural_image
Diagram showing a hand pressing down an orange object on a mechanical component (no text or symbols)natural_image
Top-down schematic of a vehicle interior showing internal compartments and structural elements (no text or labels)natural_image
Diagram of a hand pressing down on an orange-colored object inside a vehicle (no text or symbols visible)natural_image
Smartphone icon with a wireless signal symbol (no text or numbers)
natural_image
Line drawing of a hand holding a smartphone next to an electric scooter (no text or symbols)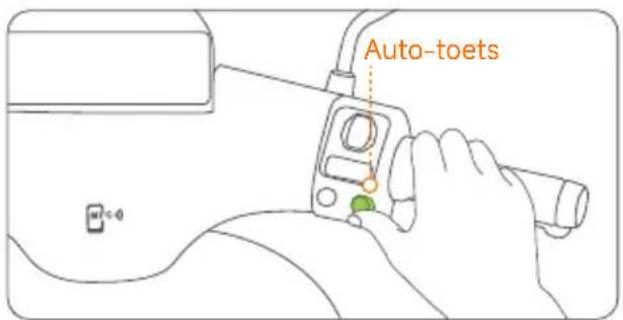
natural_image
Line drawing of a hand holding a smartphone displaying a warning symbol next to an electric scooter (no text or symbols present)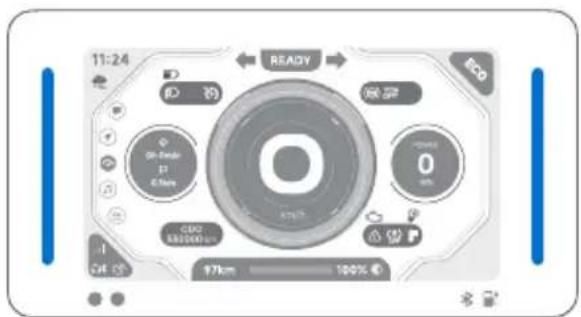
5. Leren rijden
natural_image
Line drawing of a scooter with visible wheels and side-mounted sensors (no text or symbols)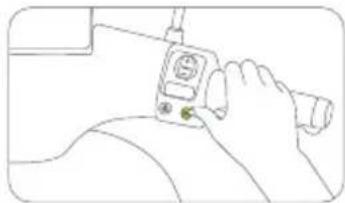
natural_image
Line drawing of a person holding a medical device with a tool (no text or symbols)natural_image
Line drawing of a control panel with an inset close-up of the screen (no text or symbols)
natural_image
Diagram of a mechanical device with lever and handle (no text or symbols)natural_image
Line drawing of a scooter with visible battery compartment and side-mounted wheels (no text or symbols)
natural_image
Diagram of a motorcycle's front view showing steering wheel, grip, and dashboard (no text or labels)natural_image
Line drawing of a hand inserting a carrot into a rectangular device (no text or symbols)
e. Steek de stekker in de poort van de accu ②. f. Monteer de stekkerdoppen op de stekkers.
natural_image
Top-down schematic of a vehicle chassis with orange highlighted component and directional arrow (no text or symbols)natural_image
Diagram of a car interior showing a handle, seatbelt, and directional arrow (no text or symbols)natural_image
Diagram of a mechanical component with orange internal structure (no text or symbols)g. Steek de stekker in de accupoort.
natural_image
Diagram of a device interior with orange components and a white hand holding a tool (no text or symbols)natural_image
Diagram of a car interior showing a highlighted orange area and directional arrow (no text or symbols)
natural_image
Top-down diagram of a vehicle's internal compartments, showing orange zones and structural elements (no text or labels)8. Opladen
natural_image
Line drawing of a hand inserting a small orange object into a curved mechanical component (no text or symbols)natural_image
Illustration of a hand holding an orange device with arrows indicating motion (no text or symbols)natural_image
Simple line drawing of a simple electrical circuit with a power outlet, battery, and switch (no text or symbols)
natural_image
Technical line drawing of a mechanical component with no visible text or symbolsSegway Mobility App
natural_image
Line drawing of a scooter with visible engine compartment and front wheel (no text or symbols)natural_image
Line drawing of a scooter with a highlighted section showing the blade and seat (no text or symbols)natural_image
Line drawing of a person riding a scooter with an orange box on the back (no text or symbols)natural_image
Line drawing of a person riding a scooter through rain, no text or symbols presentnatural_image
Top-down schematic of a boat's interior layout with no visible text or symbolsnatural_image
Line drawing of a person riding a scooter with a helmet and holding an object (no text or symbols)natural_image
Line drawing of a scooter with front wheel, rear seat, and side-mounted sensors (no text or symbols)Accesorios

natural_image
Illustration showing two-step installation of a mechanical component, one being adjusted and the other holding a tool (no text or symbols present)⑯ Puerto de carga
Cargue el vehículo
natural_image
Diagram showing a hand holding an orange object with motion arrows indicating movement (no text or symbols)natural_image
Illustration of a hand holding an orange tool near a wall-mounted circular component (no text or symbols)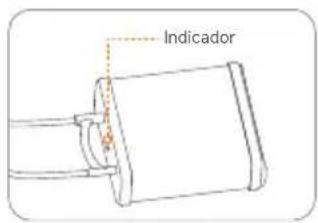
natural_image
Technical line drawing of a mechanical component with an orange arrow indicating a directional change (no text or symbols present)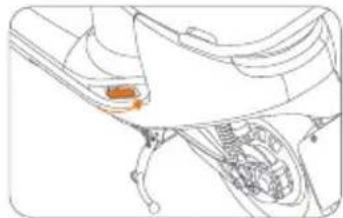
natural_image
Technical line drawing of a mechanical assembly with no visible text or symbols
Panel de control
【Modo Eco】
【Modo Conducción】
natural_image
Diagram of a mechanical lever with orange handle and circular motion arrow (no text or symbols)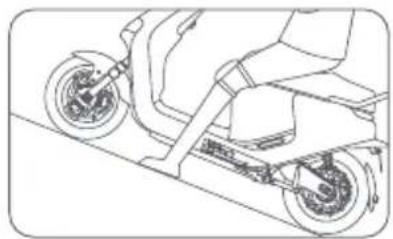
natural_image
Line drawing of a scooter with wheels and suspension (no text or symbols)Crucero inteligente
natural_image
Illustration of a handheld device with an orange handle and circular motion arrows indicating rotation (no text or symbols)3. Acelerando
natural_image
Line drawing of a hand inserting a component into a vehicle electrical socket (no text or symbols)natural_image
Diagram of a device interior with an orange highlighted area indicating a movement or change, showing no text or symbols.b. Levante la tapa.
natural_image
Top-down schematic of a vehicle interior layout with no visible text or symbolsnatural_image
Diagram showing a hand pressing down an orange-colored object on a mechanical component (no text or symbols visible)d. Cierre la tapa.
natural_image
Line drawing of a hand holding a smartphone next to an electric scooter (no text or symbols)natural_image
Line drawing of a hand holding a smartphone next to an electric scooter, with no text or symbols present.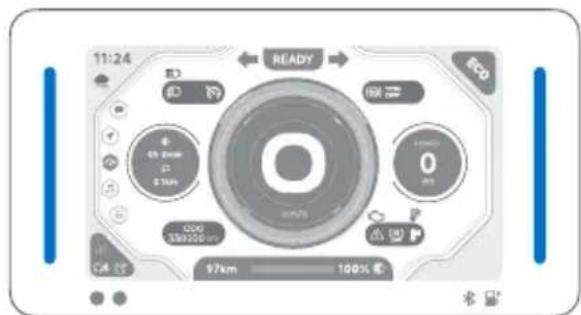
natural_image
Line drawing of a scooter with visible rear wheel and side panel (no text or symbols)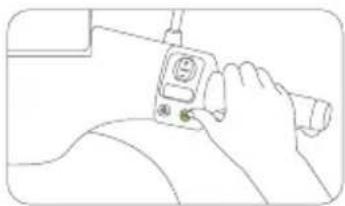
natural_image
Line drawing of a person using a handheld device (no text or symbols)natural_image
Diagram of a vehicle's steering wheel and dashboard with an inset close-up showing the dashboard (no text or symbols present)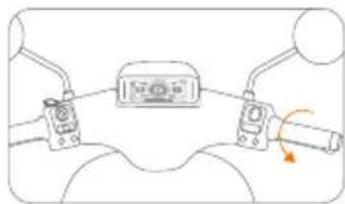
natural_image
Diagram of a mechanical device with two actuators and a belt, showing no text or symbolsnatural_image
Line drawing of a person riding an electric scooter with visible battery compartment (no text or symbols)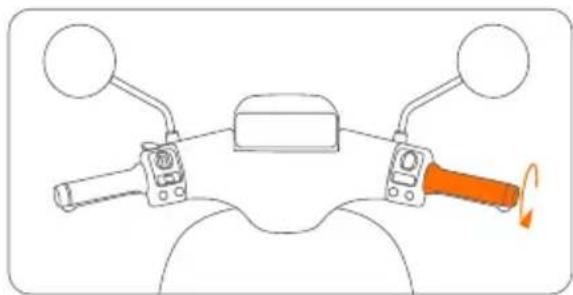
natural_image
Diagram of a motorcycle's front wheel and side-mounted grip mechanism (no text or labels)natural_image
Diagram showing two views of an orange plastic housing inside a transparent casing, with no visible text or symbols.natural_image
Diagram of a hand placing a carrot into a rectangular device frame (no text or symbols)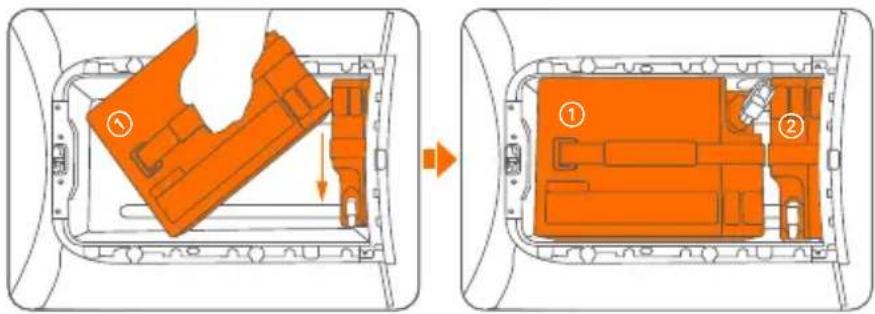
natural_image
Top-down schematic of a vehicle interior showing internal compartments and structural elements (no text or labels)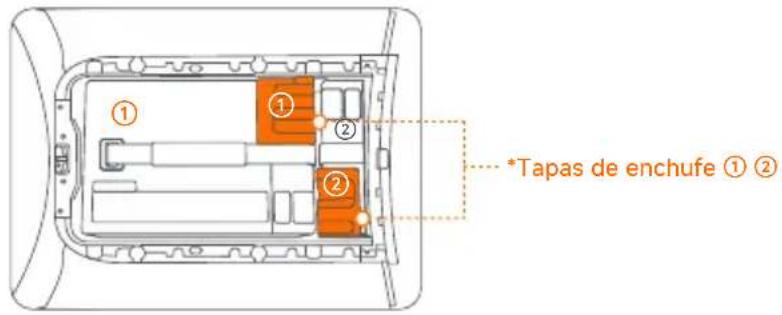
natural_image
Top-down schematic of a vehicle showing a highlighted orange area and internal structure (no text or symbols)natural_image
Diagram of a car interior showing a highlighted orange object and directional arrow (no text or symbols)natural_image
Pure diagram of a mechanical component with orange internal structure, no text or symbols presentnatural_image
Diagram of a device interior with orange highlighted components and a white hand holding a tool (no text or symbols)natural_image
Diagram of a device interior with an orange highlighted area and an arrow indicating direction (no text or symbols)
natural_image
Top-down diagram of a vehicle interior showing orange highlighted components (no text or symbols)natural_image
Line drawing of a hand inserting a small orange object into a mechanical component (no text or symbols)natural_image
Simple line drawing of a power cord connected to a battery and switch (no text or symbols)natural_image
Illustration of a hand cleaning an orange plastic bag inside a container (no text or symbols visible)natural_image
Technical line drawing of a mechanical component with no visible text or symbolsSegway Mobility App
natural_image
Line drawing of a scooter with visible engine and wheel assembly (no text or symbols)natural_image
Line drawing of a scooter with a highlighted orange section showing the blade and seat (no text or symbols)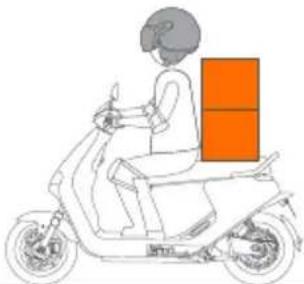
natural_image
Line drawing of a person riding a scooter with an orange cargo box on the back (no text or symbols)
natural_image
Line drawing of a person riding a scooter through rain, no text or symbols present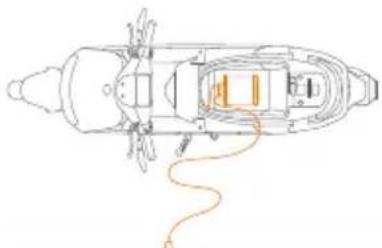
natural_image
Top-down schematic of a ship's internal structure with no visible text or symbols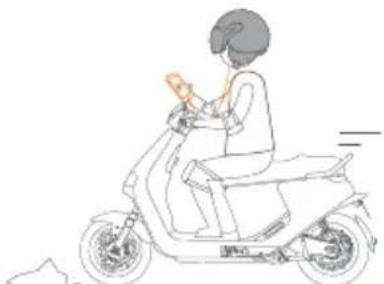
natural_image
Line drawing of a person riding a scooter with a handheld device (no text or symbols)natural_image
Line drawing of a scooter with front wheel, rear seat, and side-mounted sensors (no text or symbols)Accessori

flowchart
graph LR
    A["Initial Cable"] --> B["Assembly Step"]
    B --> C["Plug Connection"]
    C --> D["Final Assembly"]

    subgraph Section 1
        A -->|Arrow to| B
    end

    subgraph Section 2
        B -->|Arrow to| C
    end

    subgraph Section 3
        C -->|Arrow to| D
    end

    note right of C Bullone ABullone B
natural_image
Illustration showing two-step cable installation procedure: one with a valve and cable connector, the other with a handle and cable attachment (no text or symbols)⑯ Porta di ricarica
natural_image
Simple line drawing of a bottle with an orange liquid bag attached to the cap (no text or symbols)natural_image
Diagram of a mechanical component with an arrow indicating rotation or force direction (no text or symbols present)Chiusura:
natural_image
Technical line drawing of a mechanical assembly with no visible text or symbols
30 Cruscotto
【Modalità Eco】
【Modalità Sport】
natural_image
Hand holding a device with an orange button and control buttons, no text or symbols visiblenatural_image
Diagram of a mechanical lever mechanism with orange shaft and circular motion indicator (no text or symbols)
natural_image
Line drawing of a scooter with wheels and suspension (no text or symbols)Smart Cruising
natural_image
Illustration of a handheld device with an orange handle and circular motion arrows indicating rotation (no text or symbols)3. Accelerazione
③

④
⑤
6
①

②
4. Primo utilizzo
natural_image
Line drawing of a hand inserting a component into a vehicle electrical socket (no text or symbols)natural_image
Diagram of a hand pressing down an orange object on a mechanical component (no text or symbols)natural_image
Top-down schematic of a vehicle interior showing internal compartments and structural elements (no text or labels)natural_image
Diagram of a device interior showing orange highlighted areas and arrows indicating movement (no text or symbols)natural_image
Simple line drawing of a smartphone with a wireless signal icon (no text or symbols)

natural_image
Line drawing of a hand holding a smartphone next to an electric scooter (no text or symbols)natural_image
Line drawing of a hand holding a smartphone next to an electric scooter, with no text or symbols present.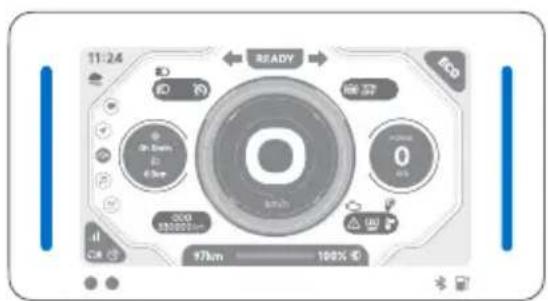
natural_image
Line drawing of a person riding an electric scooter (no text or symbols)natural_image
Diagram of a device with control panel and an inset close-up of a circular display (no text or symbols)natural_image
Line drawing of a person holding a device with a magnifying glass (no text or symbols)natural_image
Diagram of a mechanical device with lever and adjustment knob (no text or symbols)natural_image
Line drawing of a person riding an electric scooter (no text or symbols)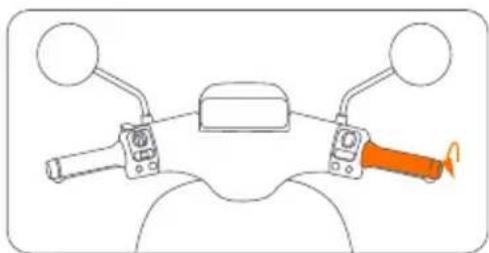
natural_image
Diagram of a motor handle with two arms and a central head (no text or symbols)natural_image
Diagram of a hand inserting a component into a vehicle chassis frame (no text or symbols visible)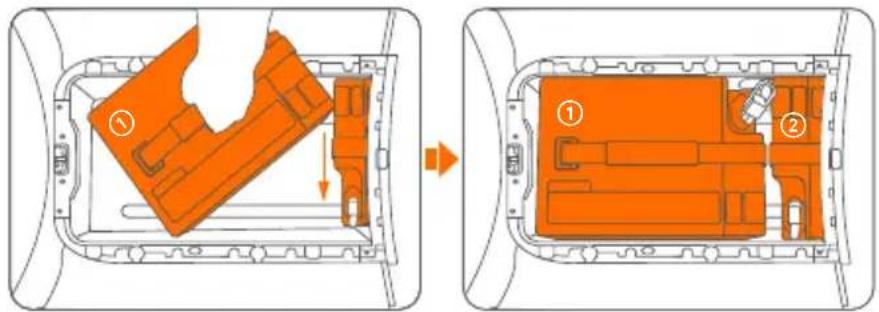
natural_image
Top-down schematic of a vehicle's rearview and side profile showing orange highlighted component (no text or symbols)natural_image
Diagram of a car interior showing a highlighted orange area and directional arrow (no text or symbols)natural_image
Diagram of a mechanical component with an orange cylindrical part inserted, no text or symbols presentnatural_image
Diagram of a device interior with orange components and a hand holding a tool (no text or symbols)natural_image
Diagram of a car interior showing a highlighted orange area and directional arrow (no text or symbols)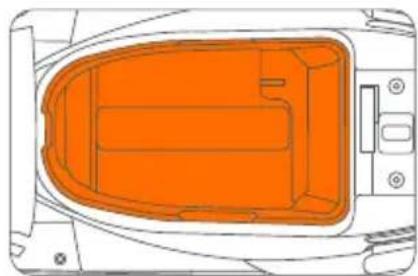
natural_image
Top-down diagram of a vehicle interior showing orange highlighted components (no text or symbols)natural_image
Line drawing of a hand inserting a small orange component into a mechanical housing (no text or symbols)natural_image
Illustration of a hand cleaning an orange plastic bag inside a vehicle (no text or symbols visible)natural_image
Simple line drawing of a cable or wire connection between two devices, one connected to a power outlet (no text or symbols)
natural_image
Line drawing of a mechanical component with a cylindrical body and attached rod (no text or symbols)natural_image
Line drawing of a scooter with front wheel, rear seat, and visible engine components (no text or symbols)
Segway Mobility App
natural_image
Line drawing of a scooter with a highlighted section showing the blade and seat (no text or symbols)natural_image
Line drawing of a person riding a scooter with an orange box on the back (no text or symbols)natural_image
Line drawing of a person riding a scooter through rain, no text or symbols presentnatural_image
Top-down schematic of a boat's interior layout with no visible text or symbolsnatural_image
Line drawing of a person riding a scooter with a helmet and seatbelt (no text or symbols)natural_image
Line drawing of a scooter with front wheel, rear seat, and side-mounted sensors (no text or symbols)Zubehör
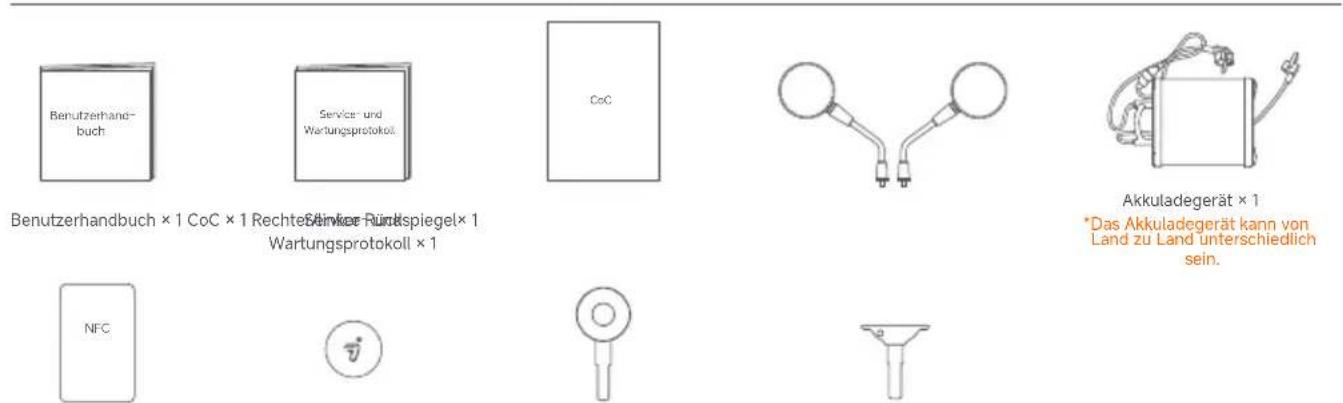
natural_image
Illustration showing two-step cable installation process: one with a clamp and cable connector, the other with a valve and cable attachment (no text or symbols)16 Ladeanschluss
Fahrzeug aufladen
natural_image
Simple line drawing of a mechanical device with orange components and a curved handle (no text or symbols)⑰ Sozius-Fußablage
Öffnen:
natural_image
Mechanical assembly diagram showing a component with an arrow indicating rotation (no text or labels)natural_image
Illustration of a hand using a tool to clean or install a circular component (no text or symbols visible)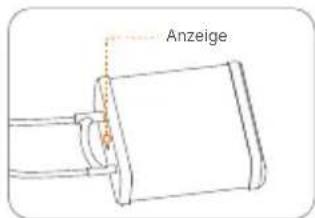
Schließen:
natural_image
Technical line drawing of a car's front wheel and dashboard (no text or symbols)
Kombinationsschloss

【Eco--Modus】
【Sport-Modus】
natural_image
Illustration of a digital audio workstation interface with no visible text or symbols on the screen or buttons.natural_image
Line drawing of a hand holding an orange device with control buttons and a scroll (no text or symbols)natural_image
Illustration of a handheld device with an orange handle and circular motion arrows indicating rotation (no text or symbols)3. Beschleunigen
①
②

③ ④ ⑤ ⑥

②
4. Erstgebrauch
natural_image
Line drawing of a hand inserting a component into a vehicle electrical socket (no text or symbols)natural_image
Diagram of a car interior showing a highlighted orange object interacting with the dashboard (no text or symbols present)natural_image
Top-down schematic of a vehicle interior layout with orange components (no text or labels)natural_image
Diagram of a car interior showing a highlighted orange area on the backrest, with no visible text or symbols.natural_image
Line drawing of a hand holding a smartphone next to an electric scooter (no text or symbols)natural_image
Line drawing of a hand holding a smartphone next to an electric scooter, no text or symbols present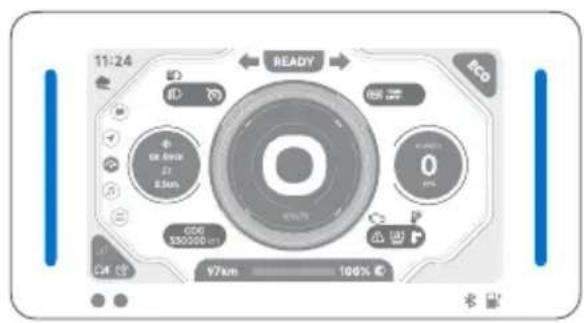
5. Fahren lernen
natural_image
Line drawing of a scooter with visible wheels and seat, no text or symbols presentnatural_image
Diagram of a device with a control panel and an inset close-up of its screen (no text or symbols visible)natural_image
Line drawing of a person using a handheld device (no text or symbols)natural_image
Diagram of a mechanical device with two actuators and a belt, no text or symbols presentnatural_image
Line drawing of a person riding an electric scooter with visible battery pack (no text or symbols)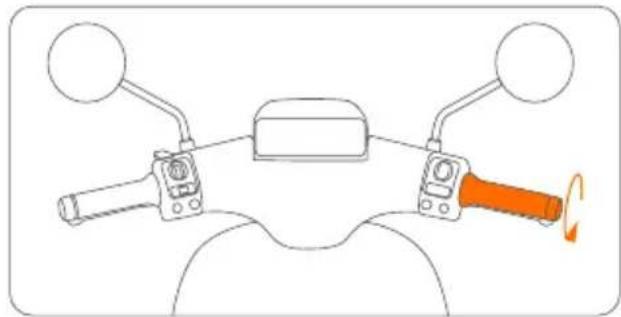
natural_image
Diagram of a motorcycle's front view showing steering wheel, grip, and dashboard (no text or labels)natural_image
Diagram of a hand inserting a component into a vehicle chassis frame (no text or symbols)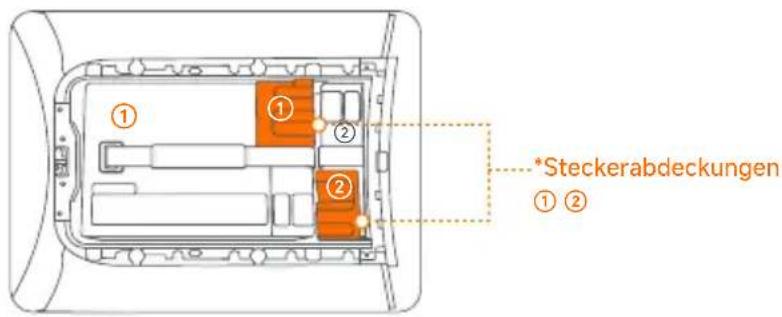
natural_image
Top-down schematic of a vehicle chassis with orange highlighted component (no text or symbols)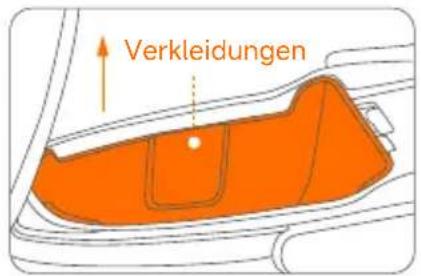
natural_image
Diagram of a hand holding a device with an orange arrow indicating direction (no text or symbols present)natural_image
Diagram of a mechanical component with an orange cylindrical part inserted, enclosed in a wire frame (no text or symbols)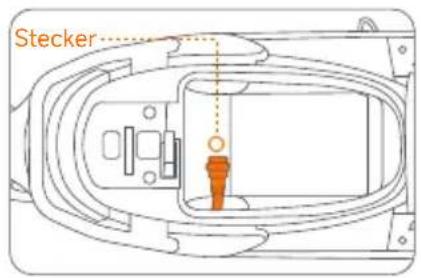
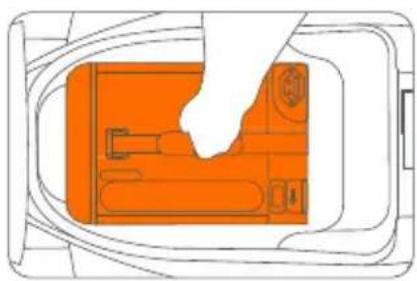
natural_image
Diagram of a device interior with orange components and a hand holding a tool (no text or symbols)natural_image
Diagram of a car interior showing a highlighted orange area and directional arrow (no text or symbols)
natural_image
Top-down diagram of a vehicle's internal compartments, showing orange zones and mounting points (no text or labels)natural_image
Line drawing of a hand inserting a small orange object into a cylindrical device (no text or symbols)natural_image
Illustration of a hand cleaning a car interior with an orange cover (no text or symbols)natural_image
Simple line drawing of a cable or wire connection between two devices, one with a power outlet and the other with a device (no text or symbols)
natural_image
Line drawing of a mechanical component with a cylindrical body and two horizontal rods (no text or symbols)natural_image
Line drawing of a three-wheeled scooter with visible seats and front wheel (no text or symbols)
natural_image
Line drawing of an electric scooter with a highlighted cable detail (no text or symbols)natural_image
Line drawing of a person riding a scooter with an orange cargo box on the back (no text or symbols)
Nunca utilize a Segway eScooter para transportar qualquer carga.
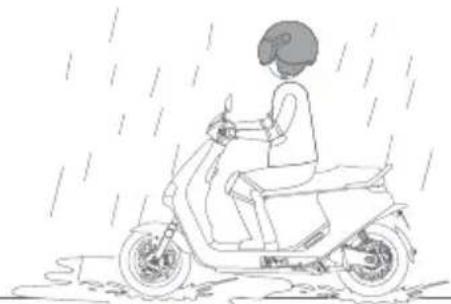
natural_image
Line drawing of a person riding a scooter through rain, no text or symbols presentnatural_image
Top-down schematic of a boat's side view showing hull, hull, and structural elements (no text or labels)natural_image
Line drawing of a person riding a scooter with a handheld device (no text or symbols)natural_image
Line drawing of a scooter with front wheel, rear seat, and side-mounted sensors (no text or symbols)Acessórios

natural_image
Illustration showing two-step cable installation process: one with a clamp and cable connector, the other with a valve and handle (no text or symbols)
Porta de carregamento
Carregar o Veículo
Por favor, desligue a Segway eScooter antes de carregar.
natural_image
Diagram of a mechanical device with orange components and motion arrows, no visible text or symbols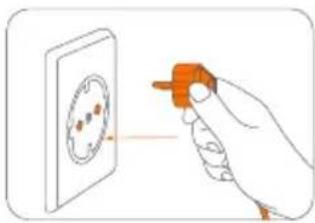
natural_image
Illustration of a hand holding an orange tool near a circular component (no text or symbols)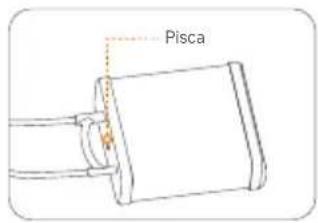

natural_image
Technical line drawing of a mechanical component with an orange arrow indicating rotation (no text or symbols)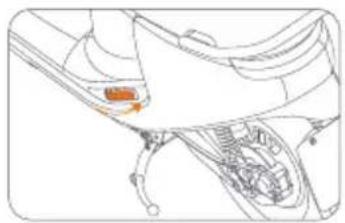
natural_image
Technical line drawing of a mechanical component with an orange arrow pointing to a specific part (no text or symbols present)
Painel
natural_image
Front view of a control panel with rotary buttons and a central dial (no readable text or symbols)natural_image
Line drawing of a hand holding a device with an orange button and control buttons (no text or symbols)natural_image
Diagram of a mechanical lever with orange shaft and circular motion arrow (no text or symbols)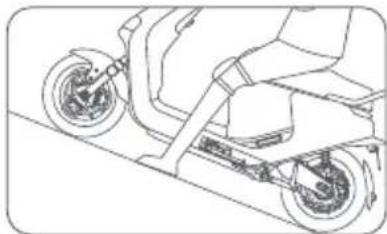
natural_image
Line drawing of a scooter with wheels and suspension (no text or symbols)Smart Cruising
natural_image
Illustration of a handheld device with an orange handle and circular motion arrows indicating rotation (no text or symbols)3. Acelerar
natural_image
Diagram of a mechanical lever with orange handle and circular motion arrow (no text or symbols)ou
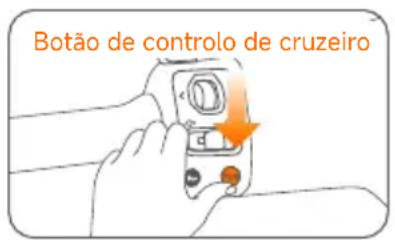
③ ④ ⑤ ⑥
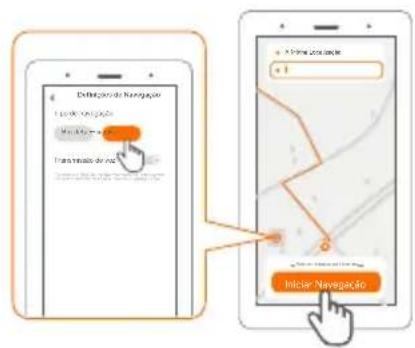
①
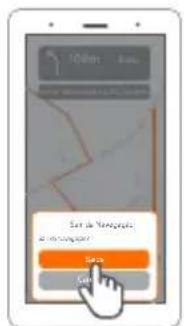
natural_image
Line drawing of a hand inserting a component into a vehicle electrical socket (no text or symbols)natural_image
Illustration of a hand pressing down on a device component with an orange tool, no text or symbols presentb. Levante a tampa.

natural_image
Top-down schematic of a vehicle dashboard with orange components (no text or labels)c. Ligue a ficha da bateria e encaixe na tampa de borracha.
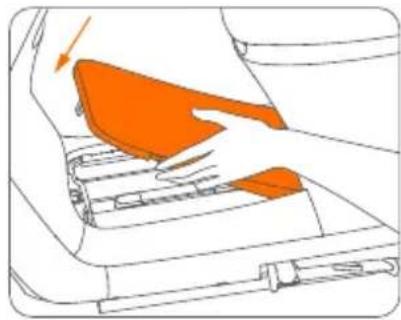
natural_image
Diagram of a car interior showing orange areas and mechanical components (no text or symbols)d. Feche a tampa.
natural_image
Line drawing of a hand holding a smartphone next to an electric scooter (no text or symbols)natural_image
Line drawing of a hand holding a smartphone displaying a QR code on its screen, next to an electric scooter (no text or symbols present)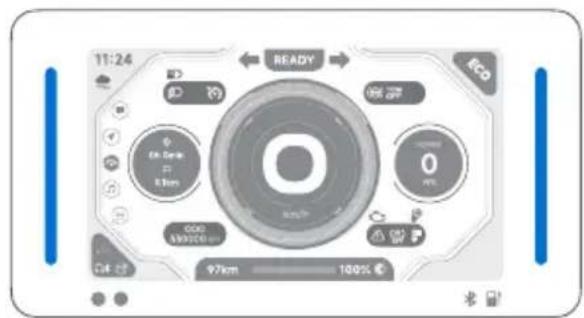
natural_image
Line drawing of a scooter with visible wheels and side-mounted sensors (no text or symbols)b. Prima a tecla Auto.
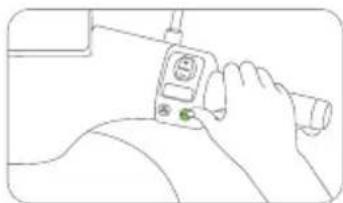
natural_image
Line drawing of a hand holding a device with a green button (no text or symbols)natural_image
Diagram of a vehicle dashboard with steering wheel and control panel, showing a close-up inset (no text or symbols)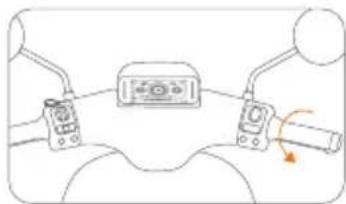
natural_image
Diagram of a steering wheel with two control switches and a speedometer (no text or symbols)natural_image
Line drawing of a scooter with visible suspension and wheelbase (no text or symbols)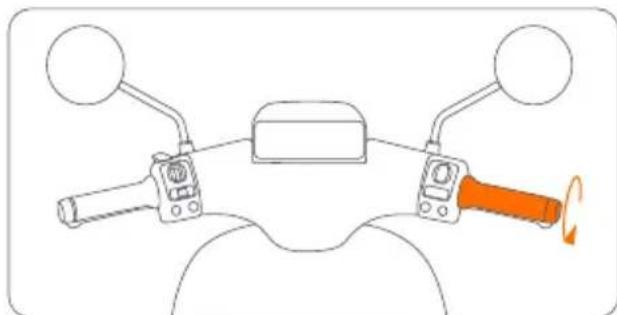
natural_image
Diagram of a motorcycle's front wheel and steering wheel with orange-handled grip (no text or symbols)natural_image
Line drawing of a hand placing a small orange object into a rectangular device (no text or symbols)
natural_image
Top-down schematic of a vehicle interior showing internal compartments and structural elements (no text or labels)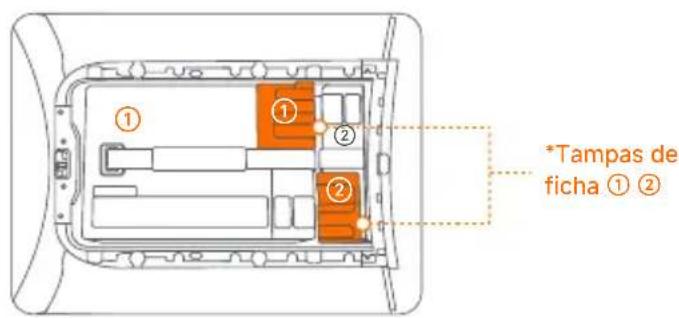
natural_image
Top-down diagram of a car interior showing orange structural elements and a central rectangular area (no text or symbols)natural_image
Diagram of a car interior showing a highlighted orange object and directional arrow (no text or symbols)natural_image
Diagram of a mechanical component with an orange cylindrical part inserted, no text or symbols presentnatural_image
Diagram of a device interior with orange components and wiring, no visible text or symbolsnatural_image
Diagram of a car interior showing a highlighted orange area and an arrow indicating direction (no text or symbols)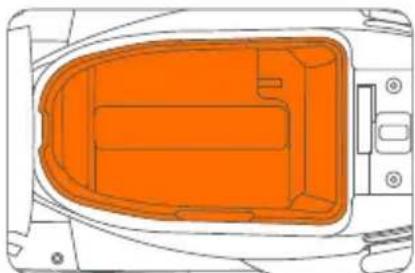
natural_image
Top-down diagram of a vehicle's internal compartments, showing orange zones and structural elements (no text or labels)8. Carga
natural_image
Line drawing of a hand inserting a small orange component into a mechanical housing (no text or symbols)natural_image
Simple line drawing of a battery connected to a cable with an orange wire, no text or symbols presentnatural_image
Illustration of a hand placing an orange object into a mechanical component (no text or symbols visible)natural_image
Line drawing of a mechanical component with a cylindrical body and two horizontal rods (no text or symbols)| Fault Code Display Cause of failure Solution | ||
| Fault Code 10 | Display and controller communication abnormality | Please restart the vehicle. If the problem is not resolved, please contact the after-sales service or designated authorized service outlets. |
| Fault Code 11 | Battery undervoltage protection | Please charge in time. |
| Fault Code 12 | Motor problem | Please contact the after-sales service or designated authorized service outlets. |
| Fault Code 13 | Motor controller abnormality | |
| Fault Code 14 | Throttle lever abnormality | Please check whether the throttle is retracted when starting up. If the problem is not resolved, please contact the after-sales service or designate an authorized service outlets. |
| Fault Code 15 | Brake switch abnormality | Please check whether the brake is pressed when starting up. If the problem is not resolved, please contact the after-sales service or designated authorized service outlets. |
| Fault Codes 16, 17, 33, 34, and 40 | Display abnormality | Please contact the after-sales service or designated authorized service outlets. |
| Fault Codes 19, 23, and 27 | Battery problem | Please contact the after-sales service or designated authorized service outlets. |
| Fault Code 20 | Lithium battery 1 communication abnormality | Please plug and unplug the battery to restart the vehicle. If the problem is not resolved, please contact the after-sales service or designated authorized service outlets. |
| Fault Code 24 | Lithium battery 2 communication abnormality | |
| Fault Code 28 | Lithium battery 3 communication abnormality | |
| Fault Codes 21, 22, 25, 26, 29, and 30 | Lithium battery abnormality | Please contact the after-sales service or designated authorized service outlets. |
| Fault Codes 31, 32, and 44 | Vehicle serial number or code abnormalities | |
| Fault Code Display | Cause of failure Solution | |
| Fault Code 35 | Display and Cloud Box communication abnormal | Please restart the vehicle. If the problem is not resolved, please contact the after-sales service or designated authorized service outlets. |
| Fault Code 36 | Please park your vehicle in an open signal weak | en area outdoors. |
| Fault Code 37 | Ninebot ECU internal battery low | Please plug in the battery and keep the air switch open for more than 5 hours. |
| Fault Code 38 | Electric door lock opening abnormality | Please contact the after-sales service or designated authorized service outlets. |
| Fault Code 41 | Handlebar lock not retracted into place | Please restart the vehicle and move the handlebar to retract the lock pin. If the problem is not resolved, please contact the after-sales service or a designated authorized service outlets. |
| Fault Code 42 | Ninebot ECU abnormality | Please contact the after-sales service or designated authorized service outlets. |
| Fault Code 43 | Vehicle crash or severe vibration detected | If no accident occurs, please contact the after-sales or designated authorized service outlets. |
| Fault Code 45 | Vehicle has entered Lost Mode | -Ninebot app. |
| Fault Code 46 | Motor controller cooling fan fault | Please contact the after-sales service or designated authorized service outlets.t |
| Fault Code 47 | Software overcurrent fault | |
| Fault Code 48 | Overvoltage fault | |
| Fault Code 49 | Motor controller Level 2 overtemperature protection | Please minimize long and intense riding. |
| Fault Code 50 | Motor Level 2 overtemperature protection | |
| Fault Code 52 | Motor controller Level 1 overtemperature protection | |
| Motor Level 1 overtemperature protection | Please minimize long and intense riding.Fault Code 53 | |
| Fault Code 54 Twist | strip grip needs calibration | Please follow the Segway-Ninebot app for twist grip calibration. |
| Fault Code 55 | ABS communication abnormality | Please contact the after-sales service or designated authorized service outlets. |
| Fault Code 68 | Left combination switch communication abnormality | Please restart the vehicle. If the problem is not resolved, please contact the after-sales service or designated authorized service outlets. |
| Fault Code 69 | Right combination switch communication abnormality | |
| ABS | ||
| Fault Code C4001 | ABS power supply too high | Please check whether the ABS power supply voltage is too high and exceeds 16.5V. If the problem is not resolved, please contact the after-sales service or designated authorized service outlets. |
| Fault Code C4002 | ABS power supply too low | Please check whether the ABS supply voltage is too low and lower than 9.5V and check the ABS fuse. If the problem is not resolved, please contact the after-sales service or designated authorized service outlets. |
| Fault Code C4003 | Front wheel speed sensor open circuit or short circuit | Please replace the front wheel speed sensor and test or contact the after-sales service or designated authorized service outlets. |
| Fault Code C4004 | Front wheel speed sensor signal is unstable/overleveraged/ intermittent | Check to see if the front wheel speed sensor probe is not in magnetic contact with the gear ring and is misaligned. If the problem persists, please contact the after-sales service or a designated authorized service outlets. |
| Fault Code C4005 | No signal from front wheel speed sensor | Check whether the installation clearance of the front wheel sensor is greater than 1.2 mm. If the problem is not resolved, please contact the after-sales service or designated authorized service outlets. |
| Fault Code C4006 | Rear wheel speed sensor open circuit or short circuit | Please replace the rear wheel speed sensor and test or contact the after-sales service or designated authorized service outlets. |
| Fault Code C4007 | Rear wheel speed sensor signal is unstable/overleveraged/ intermittent | Check to see if the rear wheel speed sensor probe is not in magnetic contact with the gear ring and is misaligned. If the problem persists, please contact the after-sales service or a designated authorized service outlets. |
| Fault Code C4008 | No signal from rear wheel speed sensor | Check whether the installation clearance of the rear wheel sensor is greater than 1.2 mm. If the problem is not resolved, please contact the after-sales service or designated authorized service outlets. |
| Fault Code C4009 | Valve relay fault | Please restart the vehicle. If the problem is not resolved, please contact the after-sales service or designated authorized service outlets. |
| Fault Code C4010 | Front wheel oil inlet valve coil fault | |
| Fault Code C4011 | Front wheel oil drain valve coil fault | |
| Fault code C4012 | Rear wheel oil inlet valve coil fault | |
| Fault Code C4013 | Rear wheel oil drain valve coil fault | |
| Fault Code C4014 | Motor open circuit fault | |
| Fault Code C4015 | Motor overcurrent fault | |
| Fault Code C4016 | ABS pump failure | |
10. Manutenção
- Contents
- Overview
- IMPORTANT
- \*NOTE
- WARNING
- Riding Safety
- Who Should Not Ride:
- Riding Surfaces and Environments:
- Before Riding:
- Instructions on Riding and Usage:
- After Each Ride:
- Others:
- Warnings and Precautions
- Package and Functions
- ⑤⑧ Rear-view mirror installation
- ⑥ Charging port
- Charge the Vehicle
- Pillion footrest
- Combination lock
- Dashboard Language
- Operation instructions
- Dashboard
- Controller switch
- Advanced
- Scroll wheel
- Auto Slope Parking
- Disable
- Smart Cruising
- Enable
- Adjust the speed
- Accelerating
- Exit
- Reverse function
- Reversing
- Exit
- Emergency Riding Mode
- Operating method
- Navigation
- First Use
- ① Turn on
- ② Powering-on and activation
- Power-on method (any of the following)
- Learn to Ride
- Installation of Lithium-ion Battery
- \*The following installation steps apply to E150S
- \*The following installation steps are apply to E250S
- Installation of Additional Battery (optional)
- Charge
- Common Faults and Solutions
- Maintenance
- Cleaning and maintenance
- CAUTION
- Storage
- Motor
- Battery
- Battery Charger
- Before charging:
- During charging:
- After charging:
- Others
- NOTICE: INSURANCE
- Certifications
- Trademark and Legal Statement
- Legal Statement:
- ⑯ Port de charge
- ⑰ Repose-pied passager
- Accélérer
- Laadpoort
- ⑰ Voetsteun passagier
- Combinatieslot
- Uitschakelen
- Inschakelen
- Versnellen
- Eerste gebruik
- Leren rijden
- Opladen
- ⑯ Puerto de carga
- Cargue el vehículo
- Panel de control
- Crucero inteligente
- Acelerando
- ⑯ Porta di ricarica
- Cruscotto
- Accelerazione
- Primo utilizzo
- Ladeanschluss
- Fahrzeug aufladen
- ⑰ Sozius-Fußablage
- Kombinationsschloss
- Beschleunigen
- Erstgebrauch
- Fahren lernen
- Porta de carregamento
- Carregar o Veículo
- Painel
- Acelerar
- Carga
- Manutenção
Brand : SEGWAY
Model : eScooter E150S
Category : Electric scooter