Ninebot E+ - Electric scooter SEGWAY - Free user manual and instructions
Find the device manual for free Ninebot E+ SEGWAY in PDF.


| Product Type | Electric Scooter |
| Brand | Segway |
| Model | Ninebot E+ |
| Dimensions (folded) | 1080 x 430 x 1180 mm |
| Deck Dimensions | 540 x 150 mm |
| Net Weight | 12.5 kg |
| Max Speed | 20 km/h |
| Range | 20 km |
| Climbing Angle | 15° |
| Motor Power | 300 W |
| Battery Type | Lithium-ion |
| Battery Capacity | 36 V / 5.2 Ah |
| Charging Time | 3-4 hours |
| Tire Size | 8.5 inches (pneumatic) |
| Brake System | Electronic + Rear Disc Brake |
| Max Load | 100 kg |
| Water Resistance | IPX4 |
| Lighting | Front LED Headlight, Rear Reflector |
| Display | LCD (speed, battery, mode) |
| Connectivity | Bluetooth 4.0 |
| App Compatibility | Segway-Ninebot App (iOS/Android) |
| Frame Material | Aluminum Alloy |
| Folding Mechanism | Yes (one-click folding) |
| Certifications | CE, FCC, UL |
| Recommended Age | 14+ years |
Frequently Asked Questions - Ninebot E+ SEGWAY
User questions about Ninebot E+ SEGWAY
0 question about this device. Answer the ones you know or ask your own.
Ask a new question about this device
Download the instructions for your Electric scooter in PDF format for free! Find your manual Ninebot E+ - SEGWAY and take your electronic device back in hand. On this page are published all the documents necessary for the use of your device. Ninebot E+ by SEGWAY.
USER MANUAL Ninebot E+ SEGWAY
Personal Transportation Robot [PTR]
Model E

Ninebot
Website: www.malotamerica.com
E-mail: customeroperations@segney.com
Telephone: 1-603-222-8J00
WARNING
Whenever you ride the Ninebot Personal Transportation Robot (PTR), you risk death or serious injury from loss of control, collisions, and falls. It is your responsibility to learn how to safely ride the PTR in order to reduce this risk. To ride safely, you must follow all instructions
in the user materials, including the User Manual and Safety Training video. These materials are available at www.hinebotamericas.co. Always wear a helmet when riding. Use an approved bicycle or skateboard helmet that fits properly with the chin strap in place, and provides protection for the back of your head.
Never place anything on the Mats except your feet. Doing so could allow the PTR to travel on its own, risking running into a person or property and causing injury or damage.
Avoid obstacles and slippery surfaces that could result in a loss of balance or traction and cause a fall.
Pay attention to all Warnings and Alerts from the PTR. They may indicate unsafe operating conditions. Refer to the User Manual for more information on the Intelligent Safety Warning system.
Do not get back on the PTR after a warning is triggered until the condition that caused the warning has been identified and corrected.
Never let go of the PTR when it is in Balance Mode because it will travel some distance on its own. If you let go of a PTR while in Balance Mode, you risk injury to others and damage to the PTR.
Never restart and ride your PTR after it has indicated an empty battery condition. The PTR may not have enough power to keep you balanced, especially if you demand a lot of power at once. If you restart and continue riding, you risk falling. Also, you risk damaging your batteries, resulting in reduced battery life and capacity.
While the PTR is designed to keep you upright under a variety of conditions, you can overpower the balancing capability of your PTR by aggressively leaning into and ignoring the Speed Limiter.
Do not insert the charging cord if the PTR is wet.
Use a surge protector when charging the PTR to help protect it from damage due to power surges and voltage spikes.
Always shut down your PTR and unplug the charging cord before performing any maintenance or installing any part or accessory.
All PTR parts must be properly installed. Never attempt to ride your PTR without the Operation Bar attached and secured. Using your PTR without all parts properly installed could damage your PTR and result in serious injury from loss of control, collisions, and falls.
Use only Ninebot approved parts and accessories. Do not modify the PTR. Modifications to the PTR could interfere with the operation of the PTR, could result in serious injury and/or damage, and could void the Ninebot Limited Warranty.
Ninebot™ PTR
User Manual
24859-00001 ac
Trademark and Legal Statement
Copyright© 2015 Ninebot. All rights reserved.
Ninebot™ and the shape icon are registered trademarks of Ninebot [Tianjin] Technology Co., Ltd.; ARM®, that of ARM company; iPhone, iOS, that of Apple Inc. Android, that of Google Inc. The owners reserve all the rights of their trademarks referred to in this manual, and Ninebot reserves all the rights of Ninebot™ and the shape icon.
Ninebot holds various patents relating to Ninebot personal transportation robots, with other patents pending. This manual is prepared by Ninebot, who reserves all its copyrights. No institute or individual shall copy or disseminate this manual in whole or in part, or make use of the aforesaid patents without the prior written consent of Ninebot.
Please note that there are various Ninebot models with different functions, and some of the functions mentioned in this document may not be applicable to your unit. Ninebot reserves the right to change the design and functionality of its products and documentation without prior notice.
We have tried as much as possible to include descriptions and instructions for all the functions of Ninebot at the time of printing, but there may still be discrepancies with the Ninebot that you have bought because of improvement and change in functional design. Please visit www.ninebotamericas.com to obtain the latest Ninebot user materials.
Download the App from the Ninebot international website:


About this Manual
Thank you for purchasing a Ninebot Personal Transportation Robot. This manual includes instructions for the Ninebot™ E model, which may help you to:
- Learn basic operation and safe riding techniques.
- Understand operation modes as well as regular maintenance procedures.
- Enjoy your Ninebot to the fullest in a safe manner.
To be sure you have the latest version of this manual, visit www.ninebotamericas.com.
Safety Messaging
Make sure you read and understand the following safety messaging conventions used throughout this manual:
| ⚠ WARNING | Warns you about actions that could result in death or serious injury. |
| ⚠ CAUTION | Warns you about actions that could result in minor or moderate injury. |
| NOTICE | Indicates information considered important, but not related to personal injury. Examples include messages regarding possible damage to the Ninebot PTR or other property, or usage tips. |
The Risk of Injury
WARNING
The PTR is a self-balancing personal transportation robot that uses patented balancing technology. Balancing technology cannot prevent injury if you do not ride the PTR safely. It is impossible to predict and warn against every possible harm or hazard that exists. Thus, users must also use their own intuition and common sense to help avoid physical injury or damage to their Ninebot. To reduce risk of injury, users must also watch and follow all instructions and warnings in the Safety Instruction Video before they ride. The video provides important information on how to use the PTR.
Table of Contents
Trademark and Legal Statement 2
About this Manual 3
Safety Messaging 3
The Risk of Injury 3
Obey all Laws and Regulations 7
California Warning 7
Regulatory Statements 7
Introduction 8
What is a Ninebot PTR? 8
Ninebot PTR E Features 9
Ninebot PTR E Diagram 10
Ninebot Assembly 11
Unpacking Ninebot 11
Serial Number/Limited Warranty Sheet 13
Assembling a New Ninebot 14
Guide for Safe Riding 18
Before Riding 18
While Riding 19
Intelligent Safety Warning System 21
Your First Ride 23
Preparation 23
Power-On the PTR 24
Before Stepping On 25
Stepping On and Maintaining Balance 26
Riding Forward/Backward 27
Stopping the PTR 28
Table of Contents
Turning the PTR 29
Stepping Off the PTR 30
Power Assistant Mode 31
Speed Limiter 31
Locking the PTR 32
Power-Off the PTR 32
PTR Modes 33
Remote Keyfob and Dashboard 34
Basic Functions 35
Extended Functions 38
Dashboard Icons 40
Charge Level Lights 41
Other Functions 42
Your Car Companion 42
Parking Stand 43
Remote Control [R/C] Mode 44
USB Charge Port 45
Changing the Operation Bar 46
Changing the Tire/Wheel 47
Sensor Calibration 48
Daily Maintenance 49
Cleaning and Storage 49
Ninebot PTR Battery Pack 50
Battery Transportation, Shipping, and Disposal 52
Fasteners 53
Lifting Ninebot PTR 54
Table of Contents
Tire Pressure 55
Regular Maintenance 55
Ninedroid App 58
Appendix — Specifications 59
Contact Us 62
Obey all Laws and Regulations
Many governmental authorities regulate use of Electric Personal Assistive Mobility Devices or Personal Motorized Mobility devices on public roads and sidewalks. In addition to other requirements, these laws and regulations may prescribe minimum ages for Ninebot PTR users and may set speed limits and mandate protective gear for riders. Some governmental authorities prohibit use of Ninebot PTRs on public roads and sidewalks. You should consult local authorities to become familiar with applicable laws and regulations.
California Warning
This product contains chemicals, including lead, known to the State of California to cause cancer, birth defects, or other reproductive harm.
Regulatory Statements
This equipment has been tested and found to comply with the limits for a Class B digital device, pursuant to part 15 of the FCC Rules. These limits are designed to provide reasonable protection against harmful interference in a residential installation. This equipment generates, uses and can radiate radio frequency energy and, if not installed and used in accordance with the instructions, may cause harmful interference to radio communications. However, there is no guarantee that interference will not occur in a particular installation. If this equipment does cause harmful interference to radio or television reception, which can be determined by turning the equipment off and on, the user is encouraged to try to correct the interference by one or more of the following measures:
—Reorient or relocate the receiving antenna.
—Increase the separation between the equipment and receiver.
—Connect the equipment into an outlet on a circuit different from that to which the receiver is connected.
—Consult the dealer or an experienced radio/TV technician for help.
CAN ICES-3 [B]/NMB-3[B]
FCC ID Information
Ninebot ONE: 2ABUDMODELE
Ninebot PTR: 2ABUD9999
Introduction
What is a Ninebot PTR?
The Ninebot Personal Transportation Robot (PTR) is a new form of intelligent electric balancing vehicle. The rider can stand on the vehicle to operate it by moving his/her body, or control it using a smart mobile device. Ninebot boasts the following features:
- Zero turning radius.
- Rider controls the PTR with his/her body posture instead of an accelerator or a brake, thus making it natural and comfortable to ride.
Thanks to the PTR's precision posture sensor, the on-board high-speed CPU ensures the vehicle is in balance in the forward and backward direction at the rate of 200 times per second. If not, the CPU activates

Figure 1: Riding Forward and Backward
both motors to quickly achieve balance. The Ninebot can balance itself automatically, so that if the rider stands on it and leans forward, the wheels move forward—the wheels move backward if the rider leans back. The rider can also turn right and left simply by leaning the steering bar in the corresponding direction.
Ninebot has a projected usage envelope similar to that of a person with high maneuverability, meaning it has access to most of the places where walking is possible, including paths, sidewalks, corridors, rooms, and lifts/elevators. Thus, as a transportation device, it lies somewhere in between driving a vehicle and walking. However, in terms of riding method and the places Ninebot can go, riding Ninebot is more like walking than driving a vehicle. Ninebot is a great choice for you to go somewhere that is either too far for walking or too near for driving a vehicle.
Ninebot PTR E Features
Table 1: Ninebot PTR E Features
| Model Features Notes | ||
| PTR E High cost/performance ratio | Powerful motor, maximum speed 20km/h (12.4 mph)Range ≥ 20km (12.4 mi)High-capacity batterySupports remote Bluetooth controlIncludes 1 parking stand, 1 accessory rack, 2 keyfobsOperation bar/dashboard | Balanced performance, affordable price, and practical configuration. |
Ninebot PTR E Diagram
Figure 2: Ninebot PTR E Diagram
Ninebot Assembly
Unpacking Ninebot
While unpacking, take out the handlebar assembly, the packing materials for the handle bar, and the mainframe in that order. Not shown is the separate operation bar box.


Figure 3: Unpacking
NOTICE
Remove the mainframe with another person's help [Figure 4]. Be sure to grasp its front and rear ends instead of using the fender, to avoid pinching a finger.

Figure 4: Lifting the Mainframe
Please check whether the following parts are included in the package. Contact your reseller immediately if any parts are missing.
Table 2: Parts List
| PTR E | |
| Mainframe (including tires, bolts for rapid disassembly of operation bar) | 1x |
| Battery pack 1x 620 Wh | |
| Battery charger 1x 120 W | |
| Steering bar 1x | |
| Standard operation bar 1x | |
| Remote keyfob 2x | |
| Fasteners and tools 6 pack of fasteners & a hex driver set | |
| User Materials 1x | |
| Parking stand Included | |
| Accessory rack 1x | |
| Storage case Optional | |
| Color kit Optional | |
| Atmosphere lights Included | |
Serial Number/Limited Warranty Sheet
The limited warranty sheet includes warranty item details, contact information for gaining access to maintenance and accessory service, the effective date of warranty signed by your reseller, and the contact information and stamp of your reseller. In addition, a unique serial number label is applied to the first page of your warranty sheet.
The serial number is a combination of 14 letters and numbers which you can find:
• On the first page of the warranty sheet. • At the battery mounting location on the bottom of the mainframe. • On the exterior of the Ninebot shipping package.

Figure 5: Serial number label and code explanation
NOTICE
The serial number—which is unique to every Ninebot—and the limited warranty sheet are required for obtaining warranty service. Please verify the serial numbers at the above-mentioned places are identical. If there is any absence or inconsistency, please contact your reseller immediately.
Please see Contact Us for service contact information.
Assembling a New Ninebot
Assemble your new Ninebot by following the procedures in this section.
WARNING
Always power OFF your Ninebot and unplug the charging cord before cleaning, performing any maintenance procedures, or installing any part or accessory. Failure to do so could lead to serious injury.
Preparation
Before assembling a new Ninebot, first find the hex driver set supplied with the product. Keep these tools handy for any future maintenance or disassembly. This hex driver set features standard metric sizes, so you may use any standard metric hand tools.
We suggest wearing gloves during assembly to help avoid minor injury and to keep the Ninebot and your hands clean.
CAUTION
Refer to the "Fasteners" chapter while following these procedures. If you are not capable of following the assembly procedures, please contact the location where you purchased your Ninebot.
Mounting the Operation Bar
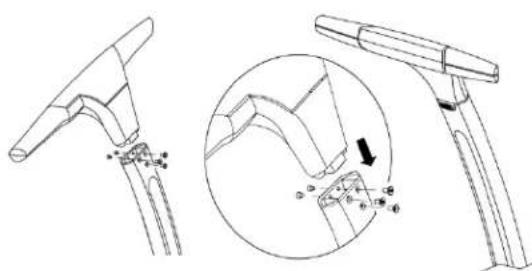
Figure 6: Attach the handlebar.
- Mount the handlebar to the operation bar by fastening the six M4 x 8 hexagon flat cap head screws using the appropriate hex wrench included with the Ninebot.
- Insert the operation bar, with handlebar attached, into the mainframe.
- Secure the operation bar by tightening the quick release knob in the clockwise direction [2-4 Nm].

Figure 7: Mount the Operation Bar to the Mainframe.
NOTICE
When you install the operation bar, remove the quick release knob first so you can ensure correct alignment of the operation bar and mainframe mount. See illustration below for proper operation bar alignment. The holes in the mounting base and operation bar both should be concentric so the mounting bolt can be inserted correctly.


Figure 8: Correct Alignment Figure 9: Incorrect Alignment
Install the Battery Pack
Use soft cloth and/or plastic foam to protect the steering bar and mainframe from scratches when laying the mainframe flat. After installing the battery pack, make sure all fasteners are tightened securely.
Use the large hex wrench to install the M5 x 12 socket cap head screw through the hole in the middle of the battery to the mainframe. Use the smaller hex wrench to install the two M5 x 16 socket cap head screws through the two side/edge battery holes to the mainframe.
Charge the battery pack
WARNING
Do not insert the charging cord plug if the Charging Port, charging cord, or AC Power outlet is wet.
- Put your PTR in a clean, dry place, within the recommended charging temperature range [see Ninebot PTR Battery Pack], then pull back the Charging Port silicone gasket.
- Plug one end of the charging cord [provided with your PTR] into a grounded AC outlet [100V-240V; 50Hz-60Hz], then plug the other end of the cord into the Charging Port.
- Verify the riding platform LED indicators light up [C, E, T] and the battery charge indicator appears on the dashboard [E, T only].
- When charging is complete, disconnect the charging cord from the Charging Port, then disconnect the cord from the grounded AC outlet. Replace the Charging Port silicone gasket.
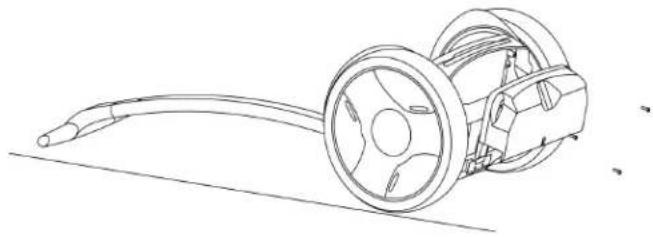
Figure 10: Installing the Battery

Figure 11: Charging the Battery
Guide for Safe Riding
WARNING
Whenever you ride the Ninebot PTR, you risk death or serious injury from loss of control, collisions, and falls. To reduce risk of injury, you must read and follow all instructions and warnings in the user materials. To reduce risk of injury, users must also watch and follow all instructions and warnings in the Safety Instruction Video before they ride.
This section describes how to ride the Ninebot PTR. It discusses riding for the first time and gives guidelines and helpful hints for all rides. It is important that you practice these riding instructions in a controlled, familiar environment until you are comfortable using your PTR and Keyfob.
Before Riding
• Understand and comply with local traffic rules. • Always wear an approved helmet that fits properly with the chin strap in place. Consider using additional protective gear. • Do not wear loose clothing or jewelry that could get caught in the PTR. • Make sure your PTR is correctly assembled and the battery is charged. See Ninebot Assembly. • Check your Ninebot to make sure that there are no loose/damaged parts/fasteners, and that the tires are properly inflated. - Check the battery charge level with the remote keyfob before each ride. Be aware of the charge level while riding and do not attempt long trips with less than 40% charge level remaining. - If you encounter any abnormal sounds or safety warnings during riding, stop and investigate. Do not proceed until the situation that prompted the safety warning has been resolved. - You must be mentally alert to safely ride a PTR. Do not attempt to ride if you are ill or if you cannot fully comply with the instructions and warnings in this User Manual. Do not ride under the influence of alcohol or drugs. - Do not place any objects on the Mats. This could cause the PTR to move on its own in Balance Mode, possibly damaging your PTR and rendering it unsafe for use. Instead, place them in approved front or side storage cases, or in a backpack. • Do not allow anyone to ride the PTR unless they have carefully read this Manual and watched the Safety Instruction Video. - Do not use the PTR in hazardous environments. The PTR has not been certified for use in hazardous atmospheres as defined in NFPA 70, National Electric Code. Hazardous environments are locations where fire or explosion hazards may exist due to flammable gases, vapors, liquids, dust, or fibers.
While Riding
WARNING
NEVER lean your body against the Operation Bar. Doing so may result in a crash and/or injury to yourself or the PTR. Always keep your body at least 5 cm (2 in) from the Operation Bar.
- Do not add more than 5 kg (11 lb) in weight to the Operation Bar. This can affect the self-balancing functionality of the PTR.
- Avoid slippery surfaces, loose materials, steep slopes, and obstacles. If you cannot avoid a slippery surface, loose material, steep slope, or obstacle, then you must step off and use Power Assistance Mode to move across it. Be especially careful when riding in confined spaces or near obstructions.
- Do not ride where prohibited by local laws or regulations. Do not ride in locations with holes/cracks, slopes of 15 degrees or above, or pooled water more than 3 cm [1.2 in] deep.
- Keep relaxed during riding with your knees and elbows bent slightly and your head raised.
- Remember, when you are on a PTR you are 20 cm [7.9 in] or more taller than usual, so watch your head as you approach a door frame, a door, tree branches, or other low barriers above you.
- Do not ride on stairs. Do not ride on the road shoulder or near curbs where one wheel could drop off the path.
- Do not try to "jump" the PTR off the ground in any situation (such as riding over a deceleration strip or speed bump).
- Do not ride on the motorway, highways, or streets.
- The PTR is for one rider only. Do not ride double or carry any passengers. Do not carry a child in your arms or in a child carrier

Figure 12: Watch your head.

Figure 13: Do not lean against the Operation Bar.
while riding. Expectant mothers should not ride the PTR.
- Do not take both of your hands off the operation bar.
- Do not let the young [under the age of 14] or the aged [above the age of 65] ride a PTR alone; they must be accompanied during riding and have met all the riding requirements outlined herein.
- Ride the PTR at a moderate speed, keeping a safe distance between pedestrians and the PTR. Do not accelerate or decelerate aggressively. Be ready to stop at any time.
- Avoid riding backward, except for the purpose of avoiding obstacles. Do not ride backward at high speed or make sharp turns.
• Do not use a smart phone or any other gadget or device while riding a PTR. - Respect pedestrians' right of way. When you are behind someone, announce yourself first, then pass them at a moderate pace. - Avoid riding on crowded sidewalks or walkways. If you are surrounded by pedestrians, slow down and match their pace. - When you ride with other PTR riders, keep a safe distance between yourselves in all directions. - Do not park the PTR in a location that would block pedestrians or the disabled. - Do not ride the PTR in the dark. If you must ride in low visibility conditions, slow down, ride cautiously, and use external lights. To ride safely, you must be able to clearly see what is in front of you and you must be clearly visible to others.

Figure 14: Avoid slopes and obstacles.

Figure 15: Avoid loose surfaces, slopes, speed bumps, and curbs.
Intelligent Safety Warning System
In the following cases, Ninebot will limit its maximum speed.
- Excessive Speed: When riding the PTR at excessive speeds [4~12 km/h (2.5-7.5 mph) in limit speed mode, and 18~22 km/h (11-13.6 mph) in balance mode], the Operation Bar leans back, pushing the rider backward and preventing acceleration. Adjust your body to keep at least a fist's distance from the Operation Bar. The PTR may lose balance and you can lose control, fall, or have a collision if you keep pushing forward against the Operation Bar.
- Overloading or Staying on a Slope for an Extended Time: An intelligent safety warning will be triggered and the Operation Bar will lean back to remind the rider to get off when the payload or performance requirements of the PTR surpass specified safety limits. If this happens, the rider must immediately dismount and push Ninebot ahead using power assistant mode. If the rider does not dismount, and the overload conditions remain, the PTR will enter stand-by mode (non-balancing) after 5 seconds. It may happen in the following cases: stopping/maintaining position on a steep slope, PTR payload capacity exceeded [see Appendix A – Specifications].
- Low Battery Power: When the battery charge level is less than 40%, the maximum speed in balance mode will be limited to around 14 km/h (8.7 mph).

Figure 16: Automatic Speed Limiting
- Critical Battery Power: When the battery charge level is 10% or less, an intelligent safety warning [audible tone and vibration] is triggered and the Operation Bar leans back. You must dismount immediately and charge the PTR before proceeding.
- Power Assistant Mode: If a rider is not mounted on the PTR and lets go of the Operation Bar while in power assistant mode, an intelligent safety warning will be triggered after rolling ahead on its own for a certain distance. The PTR will enter stand-by mode within a few seconds if there is no speed reduction after the warning. Never let go of the Operation Bar.
- Internal Fault: An intelligent safety warning will be triggered when the PTR detects any internal fault (such as a battery fault or balance sensor fault). The rider should immediately dismount the PTR and contact an authorized service provider. If you hear an alarm just after power-up, it may be caused by a low battery charge level. Charge the battery and power-up again. If you hear the same alarm, contact an authorized service provider.
If the Ninedroid App is installed on your smart device, you can use the "Intelligent Diagnostics" function to determine what the problem is and how to solve it. A specific fault code is shown on the PTR dashboard and displayed along with the wrench icon.

Figure 17: Pay attention to all Safety Warnings.
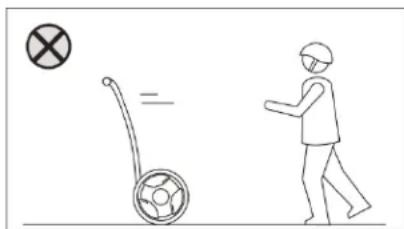
Figure 18: Do not let go of the Ninebot.

Figure 19: Fault Indication
Your First Ride
Preparation
- You should be proficient in using all the functions of the remote keyfob before attempting to ride the PTR.
- Wear an approved helmet and other protective gear to minimize any possible injury.
- Be sure your PTR's battery is fully charged.
- For your first ride, you should choose an appropriate place, either indoor or outdoor, with an area of at least 16 square meters [4 m × 4 m, 13.1 × 13.1 ft]. In addition, it should be flat without any wet or slippery surfaces, barriers, automobiles, bikes, pets, children, or other objects that could distract you.
- Practice with an experienced instructor [coach] who has read this manual or watched the safety video instructions and warnings.
- Begin your ride in the center of the designated riding area.
- During your first ride, take your time and practice the instructions in this section.

Figure 20: Learn with an instructor.

Figure 21: Wear appropriate safety gear.
Power-On the PTR
Using the remote key, press the "Power ON/OFF" button to power-on the PTR [see Remote Keyfob and Dashboard]. When you hear the starting tone, the dashboard icons light up and fade out in sequence, then the battery charge level and speed indicator are shown. This indicates a normal start up.
NOTICE
During start up, please keep the foot mats level. If all five LED lights (between the foot mats) are lit up, the PTR is level.
Figure 22: ON/OFF Button
Before Stepping On
- Stand behind the PTR and hold onto the Operation Bar. Center the Operation Bar, and level the foot mats. When level, there will be 5 LED lights on the steering base, indicating the PTR is now level and in stand-by mode. If the operation bar leans in one direction or the foot mats are not level, the LED lights on the steering base will go out, which means the PTR is not level. You must adjust the PTR foot mats until they are level and the LED lights are all properly lit up.
- Tap on the rear of a foot mat and you will hear a "beep" — this indicates the PTR is now in power assistant mode and will balance. The rider can now step on the PTR.
WARNING
Do not step on if the PTR is not powered on and in balance mode. You WILL fall over. NEVER step on the PTR if the Operation Bar has been removed.
NOTICE
If the PTR looks visually level but the LED lights do not indicate it is in balance mode, DO NOT ride the PTR. Refer to the "Sensor Calibration" section of this User Manual.

Figure 23: Make sure the PTR is in balance mode.
Stepping On and Maintaining Balance
Your instructor should stand in front of the PTR and hold the Operation Bar securely with both hands.
- Hold onto the operation bar with both hands, and look straight ahead.
- Place one of your feet on the foot mat.
- Slowly transfer your weight to your foot on the mat, and step up onto the other mat [similar to walking up stairs].
- Do not move the operation bar while stepping on the PTR. Stay calm and relaxed, and keep looking forward. The PTR will balance for you, and may move slightly forward and backward. Try not to lean forward or backward, but keep your balance and weight centered. If you keep the steering base/foot mats level, you will not travel forward or back, but remain stationary.
NOTICE
The more relaxed you are, the easier you can maintain balance. If you feel unstable, step off the PTR, one foot at a time, and pause before stepping back on. Your instructor should continue holding the Operation Bar firmly the entire time, and be prepared to keep the PTR from moving as you step on or off.

Figure 24: Stepping On and Maintaining Balance
Riding Forward/Backward
- With your instructor available to assist you, slowly lean forward and feel the PTR move forward. Then stop leaning forward and feel it slow down and stop. Do this a few times.
WARNING
Your first movements should be slow and gentle, and your body should be relaxed. Rocking back and forth may cause a loss of traction and could result in a fall.
- Look behind you and then slowly lean back and feel the PTR move backward. Then stop leaning back and feel it slow down and stop. Do this a few times until it feels comfortable.
NOTICE
You should not ride backward except to maneuver a few feet. Instead, turn in place, then ride forward. If you ride backward too fast, a safety alarm will be triggered, telling you to slow down.

Figure 25: Riding Forward and Backward

Figure 26: Do not rock forward and backward.
Stopping the PTR
The PTR can be stopped by leaning backward, away from the direction of travel:
- While you are riding forward, gently shift your hips back and down [as if you are preparing to sit down] to stop the PTR.
- After the PTR stops, distribute your body weight equally on the foot mat to remain stationary. If you continue leaning back after you are stopped, you will move backward.
- Practice stopping by choosing a spot on the ground and coming to a smooth, controlled stop at that spot.
WARNING
Avoid abrupt and uncontrolled stops. Do not move your body aggressively, instead smoothly shift your weight away from the direction of travel. Never make abrupt movements or accelerate or brake sharply on limited traction surfaces. The wheels may slide or lose traction, which could result in a fall.

Figure 27: Lean backward to brake.
Turning the PTR
You turn the PTR by leaning the Operation Bar left or right in the direction you want to travel.
- Practice turning in place. Slowly lean the Operation Bar in the direction you wish to turn. The PTR will rotate in that direction, while remaining in place. Practice turning left and right while remaining in place.
- Practice making turns while riding. Try slowly riding forward and turning at the same time. Keep your knees slightly bent and lean in the direction of the turn. Always move the Operation Bar smoothly and slowly.
WARNING
Never move the Operation Bar abruptly, whether you are turning in place or while riding. You may lose balance and fall.


Figure 28: Turning Left and Right Figure 29: Turning While Riding
Stepping Off the PTR
When you are ready to step off the PTR for the first time, ask your instructor to hold the Operation Bar.
- While holding the Operation Bar with both hands, step backward off the foot mats, one foot at a time. Keep your body centered and upright, and do not move the Operation Bar left or right while stepping off. Do not pull the Operation Bar back toward you when you step off.
- Do not let go of the Operation Bar until the PTR is turned off. The PTR can move forward on its own.
NOTICE
Stay relaxed and at ease while stepping off the PTR. This will help you avoid moving the Operation Bar.


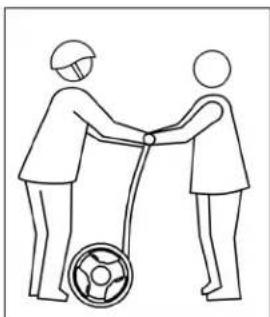
Figure 30: Stepping Off the PTR
Power Assistant Mode
When you step off the PTR, it enters power assistant mode. You can also enter power assistant mode by tapping on a foot mat while in the standby mode—you will hear a "beep". In power assistant mode, the PTR's movement rates are damped, meaning it responds slower than while in balance mode. Use power assistance mode to move the PTR over curbs, bumps, stairs, or terrain where it is unsafe or undesirable to ride.
If you step onto the PTR while it is in power assistance mode, it will automatically transition into balance mode.
CAUTION
When the PTR is in power assistant mode, do not let go of the Operation Bar. After driving forward on its own for a few seconds, the PTR will trigger a safety alarm and then switch over to stand-by mode, which will cause it to fall down, possibly causing damage to itself or others.
Speed Limiter
The PTR features two speed limiter settings; upper and lower. See Remote Keyfob and Dashboard for more information.
If a rider has activated the lower speed limiter function by pressing the speed limiter button on the keyfob, the "speed limiter" icon is displayed on the dashboard. The speed limiter lower and upper settings can be adjusted through the Ninedroid App or using the keyfob.

Figure 31: Going Up and Down the Stairs

Figure 32: The Speed Limiter Icon
Locking the PTR
The PTR includes a temporary lock mode designed to discourage people from disturbing the PTR when the rider must leave it for a short time, such as when entering a store.
The lock mode features an audible and tactile alarm, and uses the motors to make it difficult to move the PTR. To enter lock mode, press the "lock mode button" on the keyfob to lock the PTR [see Remote Keyfob and Dashboard]. If someone attempts to move the PTR while it is locked, the PTR will vibrate and beep. In addition, it will be difficult to move the PTR because the motors work to prevent the wheels from being rotated.
Since the PTR can be ridden in indoor environments, it may be a good idea to park the PTR inside if you need to leave it for a short time. If you are riding in a public place and need to leave the PTR for just a moment, lock the PTR and be sure to take the keyfob with you. Stay within sight or hearing distance of the alarm.
NOTICE
Lock mode is intended for temporary use only. In order to conserve battery power, the PTR will power down automatically if left in lock mode for longer than one hour.
Power-Off the PTR
Using the remote key, press and hold the "Power ON/OFF" button to power-off the PTR (see Remote Keyfob and Dashboard). A tone will sound, and the dashboard icons will fade out. This indicates a normal shut down.
NOTICE
Press the ON/OFF button lightly; do not attempt to press the button past its natural detent.
Figure 33: ON/OFF Button
PTR Modes
The PTR features the following "status" modes:
- Power OFF: In power off mode, all the electronic control systems are dormant, with the remote module alone standing by for start-up operation.
- Stand-by Mode: In stand-by mode, the PTR is powered on, but not balancing. In this mode, most systems are activated, with the motor control system dormant waiting for user-initiated activation. • Power Assistant Mode: In power assistant mode the PTR balances, but the motion systems operate at half power. • Balance Mode: In balance mode, the PTR balances and all systems work in full power. This includes normal operation with a rider and operation in limited speed with a rider.
- Lock Mode: In lock mode, the PTR motor is locked, thus unable to be operated [unless unlocked via the keyfob] and it is difficult to drag/push the PTR.
![graph TD A["Power Off"] --> B["Standby Mode"] B --> C["Power Assistant Mode"] C --> D["Limit Speed Mode"] C --> E["Balance Mode"] D <--> E E <--> C F["Lock Mode"] --> C](/content/2026/06/1351922/images/426864292045d6f215a546df25b8077cc4b7c1e5ac3500743018ed84c77ac047.jpg)
Figure 34: PTR Modes
Remote Keyfob and Dashboard
Figure 38 shows the remote keyfob and the basic function of each button. Use the included keychain to keep your remote keyfob safe.
Each of the four buttons can be operated in two ways:
- short press (<1.5 s)
- long press (>1.5 s)
NOTICE
Press the remote keyfob buttons lightly; do not attempt to press the buttons past their natural detent.

Figure 35: Remote keyfob buttons
Basic Functions
Table 3: Remote Keyfob Basic Functions
| Function Button Input Dashboard Display Remarks | ||||
| Power On |  Power Button Power Button | Short press | All the dashboard lights turn ON in sequence. Then most of the lights turn OFF, leaving the battery status and current speed illuminated. | — |
| Power Off |  Power Button Power Button | Long press | First all the dashboard lights turn ON, and then they turn OFF in sequence. | The PTR will not power off if a rider is present |
| Standby |  Power Button Power Button | Short press | The dashboard returns to its default setting.16.0kph | Transition from power assistant mode to stand-by mode |
| Lock |  Lock Button Lock Button | Short press | The lock icon appears on the display. If someone tries to move the PTR, the warning icon will flash. | The PTR will not lock if a rider is present |
| Unlock |  Lock Button Lock Button | Short press | The dashboard returns to its default setting.16.0kph | — |
| Limit Max Speed |  Speed Limit Button Speed Limit Button | Short press | The Speed Limit icon appears on the display.The current speed limit appears for 3 seconds. | Speed Limit cannot be set if the PTR is locked |
| Exit Speed Limit |  Speed Limit Button Speed Limit Button | Short press | The Speed Limit icon disappears from the display. The current speed limit appears for 3 seconds. | — |
| Enable Bluetooth |  Speed Limit Button Speed Limit Button | Long press | The Bluetooth icon blinks until a smartphone connects to the PTR. | Bluetooth will not turn ON if the PTR is locked. |
| Disable Bluetooth |  Speed Limit Button Speed Limit Button | Long press | The Bluetooth icon disappears. | Bluetooth will not turn OFF if the PTR is locked. |
| Information Display | [83w8]Info Button | Short press | Scroll through the available information. | Kph — the real-time speedkmS — the mileage for the current ridekmT — the total mileageTim — the elapsed time [hours-minutes] since the PTR was powered ON°C — the internal temperature of the PTRVf — the firmware version |
Extended Functions
Table 4: Remote Keyfob Extended Functions
| Function Button Operation Method Display Remarks | |||||
| Enter Remote Control [R/C] Mode |  Info Button Info Button | Long press | None: the operation bar must be removed. | Only available when operation bar is removed or knee control bar is installed. | |
| Exit R/C Mode |  Info Button Info Button | Long press | Dashboard reverts back to the default display.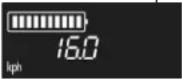 | You can also exit R/C Mode by tapping the foot mat in R/C mode | |
| Adjust the upper speed limit | [xwkz] Lock Button |  Speed Limit Button Speed Limit Button | With the speed limit icon OFF, press the lock button. Then use the speed limit button and info button to change the speed limit value. | Lock screen displays the current set value. | Increase speed limit value.Maximum 20km/h [12.4 mph] |
 Info Button Info Button | Decrease speed limit value.11km/h minimum [6.8 mph] | ||||
| Adjust the lower speed limit |  Lock Button Lock Button |  Speed Limit Button Speed Limit Button | With the speed limit icon ON, press the lock button. Then use the speed limit button and info button to change the speed limit value. | Lock screen displays the current set value. | Increase speed limit value.Max 10km/h [6.2 mph] |
 Info Button Info Button | Decrease speed limit value.4km/h minimum [2.5 mph] | ||||
| Calibrate the steering sensor |  Lock Button Lock Button |  Power Button Power Button | Press the lock button, then press the power button 4 times. | The lights on the base light in sequence as you press the power button. When the test is complete, only the center light remains lit. | The PTR must be keep absolutely stationary with the operation bar centered when calibrating. |
| Calibrate the attitude sensor |  Lock Button Lock Button |  Speed Limit Button Speed Limit Button | Press the lock button, then long press the speed limit button. | The PTR beeps twice when calibration begins and again beeps twice when calibration is complete. | The PTR must be keep absolutely level and stationary when calibrating. |
Dashboard Icons
Table 5: Dashboard Icons
| Name Description Display Remarks | ||||
| Default display | The only info shown is the battery charge level and the current speed. |  | ||
| Alarm info | Low power alarm | When the battery is empty, the battery icon and the warning triangle blink. |  | Check the Ninedroid App or contact Customer Service for more information. |
| High temp alarm | When the internal temperature gets too high, the “temperature alarm icon” blinks, and the current temperature is displayed. |  | ||
| Other alarm | For all other alarms, the warning triangle blinks and the alarm code is displayed. Different codes have different meanings. |  | ||
| Fault Information | When a fault occurs, the fault icon blinks and the fault code is displayed. |  | ||
Charge Level Lights
While charging, the three center LEDs on the Ninebot base show the battery state of charge.
Table 6 describes the LED status:
- = LED is ON
- = LED is blinking x = LED is OFF
Table 6: Charge Level Lights
| Power LEDs | |
| 90% - 100% | ●●● |
| 80% - 90% | ○●● |
| 60% - 80% | ×●● |
| 40% - 60% | ×○● |
| 20% - 40% | ××● |
| 0% - 20% | ××○ |
Other Functions
Your Car Companion
Use Ninebot PTR for short commutes: with a range of 20–40 km (12–25 miles)—depending on battery type, riding style, and payload—the PTR is ideal for commutes up to 10 km (6 miles) each way. You can ride smoothly past traffic jams, secure in the knowledge that your zero-emission vehicle is not contributing to air pollution. And because of its small size, the PTR easily fits into the trunk of your car. Bring your PTR with you on longer trips and use it to get around after you have parked your car.
Parking Stand
Some Ninebot PTR models come equipped with a parking stand. On other models it is an optional accessory. Use the parking stand to prop the PTR upright without leaning it against a wall.
WARNING
Only use the parking stand when the PTR is powered OFF, in lock mode, or in standby mode. Never use the parking stand when the PTR is in power assistant mode, remote control mode, or otherwise balancing.
WARNING
Do not stand on or try to ride the PTR while the parking stand is deployed. This could result in personal injury or damage to the PTR or the parking stand.

Figure 36: Deploying the parking stand
Remote Control [R/C] Mode
Minimum Requirements
• Apple iOS device [iPhone 4s, iPad 3, iPod Touch 5] with Bluetooth 4.0 • Android device (Android 4.3 or newer) with Bluetooth 4.0
To connect to your Ninebot PTR:
- Install the Ninedroid App and turn on Bluetooth.
- Use the remote keyfob to turn ON your PTR, then press and hold the Speed Limit button to enable Bluetooth. The Bluetooth icon will appear and start blinking.
- Open the Ninedroid App on your iOS or Android device, and click the Bluetooth icon near the center of the screen. Click the "9" icon to connect to your PTR. The Bluetooth icon on the PTR will stop blinking and remain on.
- Remove the PTR operation bar. Using the remote keyfob, press and hold the Info button to enter R/C Mode.
- Select "Remote Control" in the Ninedroid App. Drag the "9" icon to drive your PTR.
WARNING
Do not use R/C mode in crowded areas or where there is a potential risk of endangering people or property if operated in an unsafe manner. Do not install the Operation Bar or place any weight on the PTR when the PTR is in R/C mode. The PTR may accelerate forward and cannot be stopped using the Ninedroid App. Do not stand on the PTR when it is in R/C mode. Doing so risks serious personal injury or damage to the PTR.
NOTICE
In R/C mode the default maximum speed is 5 km/h [3.1 mph], but you can change the max speed in the Ninedroid App. The PTR Bluetooth has a range of 10–15 meters [33–49 ft]. If the keyfob is outside Bluetooth range, the PTR will stop moving in R/C mode.
USB Charge Port
There is a USB charge port near the top of the operation bar (Figure 40). This port provides 5V / 1A current for charging small devices that charge via a USB cable.
NOTICE
This USB port only supplies power when the PTR is powered ON. It cannot transmit data.
WARNING
Do not connect any USB devices that draw greater than 1A when charging [e.g. an iPad]. If such a device is connected, it may cut power to the dashboard. If that happens, the PTR will trigger a Safety Warning, indicating the rider must dismount the PTR.
WARNING
Do not attempt to ride the PTR while a device is plugged into the USB charge port. It could disconnect and fall, causing a distraction, which could lead to a fall or collision resulting in serious injury.
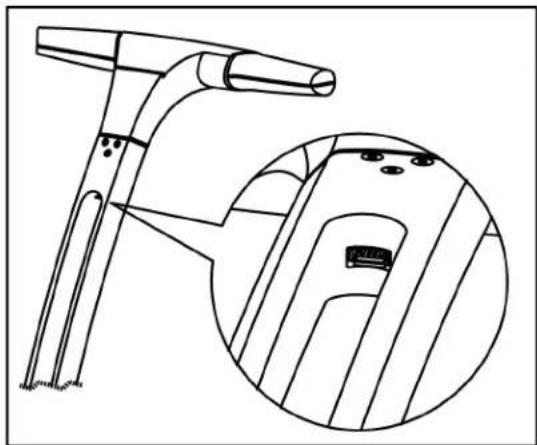
Figure 37: USB charge port
Changing the Operation Bar
There are three sizes of operation bar available: Standard, Large, and Small. If you are shorter or taller than the recommended size for the standard operation bar, we recommend that you purchase the appropriate operation bar [large or small] for your size.
Instructions for changing the operation bar are included with your new operation bar. If you do not feel comfortable changing the operation bar yourself, your Ninebot dealer can do it for you.
Table 7: Operation Bar Sizes
| Size Bar Height Rider Height | ||
| Large 104 | 0 mm [41 in] 1.7-2 | 1 m [5'7"-6'10"] |
| Standard | 900 mm [35 in] 1.5- | 1.9 m [5'0"-6'2"] |
| Small 790 | mm [31 in] 1.3-1.7 | m [4'3"-5'7"] |
Changing the Tire/Wheel
Install a new tire when the tread is less than 1.0 mm [0.04 inches] deep or when the tire is punctured.
CAUTION
It is recommended that you bring your tire/wheel assembly to a Ninebot authorized service center when installing a new tire on the wheel. Performing this repair without the proper tools could result in damaging the wheel.
If you cannot bring your PTR to a Ninebot authorized service center, we suggest you replace the whole tire/wheel assembly. Follow the steps below to remove the tire/wheel assembly.
- Make sure the PTR is unplugged and powered off.
- Raise the PTR on blocks so the wheels are off the ground.
- Use a flathead screwdriver to pry loose the wheel cap.
- Use a 10 mm socket wrench to remove the three nuts.
- Remove the tire/wheel assembly.
- Install the tire/wheel assembly in the reverse order of removal.
- Make sure the tire is inflated to the specified pressure (see Tire Pressure).

Figure 38: Removing the Tire/Wheel Assembly
Sensor Calibration
The internal attitude sensor and steering shaft sensor of every Ninebot PTR have been accurately calibrated during manufacture. Under normal operation these sensors will never need to be recalibrated. However, in some situations (extreme temperature fluctuations or strong magnetic fields) the sensors may experience "drift." In such cases, the internal sensors should be recalibrated.
Calibrate the Steering Sensor
Follow this procedure if you notice the PTR turns slowly, even when the operation bar is vertical (and not moving), or the PTR does not turn smoothly.
- Lean the PTR against a wall or use the parking stand. Make sure the operation bar is vertical. Keep the PTR absolutely still throughout the calibration process.
- Turn the PTR ON and press the lock button.
- Press the power button four times. You will hear four beeps and see the LED lights in the base light up one by one.
- If calibration is successful, the four outside LEDs will turn off leaving only the center LED lit. If calibration fails, you will hear five beeps, and the LEDs will blink five times. Try again, making sure the PTR remains absolutely still during calibration.
Calibrate the Attitude Sensor
Follow this procedure if Ninebot tends to "drift" forward or backward while riding.
- Ensure the PTR mainframe is absolutely horizontal by placing it on blocks. Use a level to verify the PTR mainframe is horizontal. Keep the PTR absolutely still throughout the calibration process.
- Turn the PTR ON and press the lock button.
- Press and hold the speed limit button until you hear two beeps. This signifies that calibration has begun.
- When calibration is complete, you will hear another two beeps.
NOTICE
You can also use the Ninedroid App to calibrate the attitude sensor.
Daily Maintenance
Cleaning and Storage
For best performance, clean your PTR after each use.
- Make sure the PTR is unplugged, powered off, and the rubber cap on the charge port is tightly sealed.
- Gently clean your PTR with soap and water and a soft cloth.
- For difficult-to-remove dirt or scratches, scrub with a toothbrush and toothpaste. Wipe clean with a wet cloth.
- Allow the PTR to air dry, then store it indoors.

Figure 39: Avoid Submersion
WARNING
Do not wash your PTR with a power washer or high pressure hose. Avoid getting water into the charge port. Always close the charge port cover after charging. Avoid exposure to heavy downpours or extended periods of heavy rain (including during riding, storage, or when transporting). Clean with soap and water and a soft cloth. Make sure that the charge port is dry before you plug in the power cord. Failure to follow these instructions could expose you to electric shock, injury, burns, or cause a fire.
CAUTION
Do not clean the PTR with alcohol, gas, diesel, acetone, or other corrosive and volatile chemical solvents. These substances may damage the appearance and internal components of the PTR.
CAUTION
Do not store outdoors or in the direct sun. Exposure to extreme temperatures and sunlight can affect the appearance of your PTR.
Ninebot PTR Battery Pack
It is important to take good care of the battery pack on your Ninebot PTR. A well-maintained battery pack can continue to operate at peak performance even after many miles of riding, whereas a poorly-maintained battery pack may no longer be able to hold a full charge after only a few months.
To prolong the life of your battery pack, perform the following regular maintenance:
- Observe and follow all safety information on the warning label found on the battery pack.
- Do not store battery pack at temperatures below 0°C (32°F) or above 40°C (104°F). Exposing a battery pack to temperatures below -20°C (-4°F) or above 50°C (122°F) will decrease its service life.
- Always store battery packs in a cool, dry environment. In humid environments, water may condense inside the battery pack, resulting in rapid damage. If you must store your battery pack in a humid environment, seal the battery pack inside an air-tight bag before storage.
- Do not allow the battery pack to completely discharge; instead, charge the battery pack when it reaches 10–20% charge.
- Keep the PTR/battery plugged in when not riding. Charging frequently will not influence the capacity and service life of the battery pack, but frequently draining the battery pack will.
Table 8: Battery Specifications
| Battery Specifications | |
| Charging Time | |
| before first use: 12 hours | |
| recharge from empty: 3-4 hours | |
| Temperature Ranges | |
| operating: -15°-45°C [5°-113°F] | |
| charging: -15°-45°C [5°-113°F] | |
| storage and transport: 0°-40°C [32°-104°F] | |
| damage threshold: -20°-50°C [-4°-122°F] | |
| General | |
| capacity and voltage: 620 Wh, 55.5 volts | |
| dimensions: | 42 × 22 × 13 cm(16.5 × 8.7 × 5.1 in) |
| weight: 3.8 kg [8.4 lbs] | |
- The wireless receiver on the PTR always consumes a small amount of battery power, even when the PTR is powered OFF. This is to allow the remote keyfob to power ON the PTR. Therefore:
a. Fully charge the battery pack before storage. b. If storing for more than 30 days, remove the battery pack after charging and store it in a cool, dry place. c. When storing for more than 180 days, charge the battery pack every 3–4 months.
WARNING
- Failure to charge the battery pack could result in permanent damage. If allowed to fully discharge, the battery may no longer be able to hold a full charge and could result in permanent damage.
- Do not use battery pack if the casing is broken or if the battery pack emits an unusual odor, smoke, excessive heat, or leaks any substance. Avoid contact with any substance seeping from the battery pack.
- Keep out of reach of children and pets. Exposure to battery voltage could result in death or serious injury.
- The cells within the battery pack contain toxic substances. Do not attempt to open the battery pack. Do not insert any object into the battery pack or use any device to pry at the battery pack casing. If you insert an object into any of the battery pack ports or openings you could suffer electric shock, injury, burns, or cause a fire. Attempting to open the battery pack casing will damage the casing and could release toxic and harmful substances, and will render the pack unusable.
- Do not submerge the battery pack or PTR in water. If you suspect the battery pack or PTR has been submerged or experienced water intrusion, call Segway Technical Support immediately at 1-866-473-4929, prompt #2. Until you receive further instructions, store the PTR upright, outdoors, and away from flammable objects. Do not attempt to remove the battery pack. Do not plug the power cord into the PTR. Failure to follow these instructions could expose you to electric shock, injury, burns, or cause a fire. • As with all rechargeable batteries, do not charge near flammable materials.
Battery Transportation, Shipping, and Disposal
If you are transporting your Ninebot PTR, protect the battery packs to avoid damage. Do not expose the battery packs to direct heat or moisture, and avoid heavy vibration during transportation.
WARNING
Do not use or transport a battery pack if the casing breaks open, leaks any substance, becomes excessively hot, or if you detect an unusual odor. Do not handle a damaged or leaking battery pack unless you are wearing disposable rubber gloves, eye protection, and are in a well-ventilated area. Dispose of the rubber gloves and damaged battery pack properly in accordance with regulations governing disposal of toxic materials.
Shipping Li-ion Battery Packs
Li-ion Batteries are regulated as "Hazardous Materials" by the U.S. Department of Transportation. For information on shipping Li-ion Batteries, contact the U.S. Department of Transportation at www.phmsa.dot.gov/hazmat/regs or call 1-800-467-4922.
If you need to arrange air shipment of your Ninebot PTR and/or Li-ion Batteries, contact an authorized Ninebot Dealer or Distributor for assistance.
You must comply with all local, federal, and individual country laws when transporting Ninebot PTR Li-ion Batteries.
Battery Disposal
The Li-ion Batteries used in the Ninebot PTR can be recycled. Recycle or dispose of Batteries in accordance with local environmental regulations. Do not place in fire or incinerate. For more information, contact Segway at 1-866-473-4929/www.ninebotamericas.com.
Fasteners
The Ninebot PTR features fasteners with threadlock applied so they will not loosen over time. However, you must still take care to avoid damaging fasteners during removal and installation.
- Make sure the hex wrench slides all the way to the bottom of the hex socket [see Figure 43].
- Always install fasteners in a staggered fashion [see Figure 44].
- Install all the fasteners, then go back and tighten them.
- Tighten until the fastener feels snug, then continue turning for 1/3 to 1/2 turn.
For your safety it is important to periodically verify that the fasteners are tight. Ensure the fasteners are tight in these locations: wheel, operation bar, battery pack, fender, foot mat, and handlebar. Grip these components with your hands and try to move them. If they wiggle or make noise, they are loose and you must tighten their fasteners.

Figure 40: Fully Insert Hex Wrench
![graph TD A["●"] --> B["×"] C["●"] --> B D["●"] --> E["↑"] F["●"] --> E](/content/2026/06/1351922/images/c434e5adba122b964f8e108a9006c2570623dfd41b18adbe6522be17eee0adbe.jpg)
Figure 41: Tighten in a Cross Pattern
Lifting Ninebot PTR
Use proper lifting techniques to safely lift the PTR for loading into a car trunk or for other purposes:
- Make sure the PTR is OFF.
- Remove the operation bar if you intend to place the PTR in the car trunk.
- If the mainframe is too heavy to move by yourself, please find someone to help (see Figure 45).
- To lift the PTR alone, use one of these two methods:
a. Lift with your legs! b. Lift the PTR with one hand on the front of the mainframe and the other hand around the battery.

Figure 42: Lifting Together

Figure 43: Lifting Alone
Tire Pressure
Under normal conditions, the tire pressure should be kept between 10-15 psi (70-100 kPa). Tire pressure should not exceed 25 psi (170 kPa). Higher tire pressure may lower the frictional resistance, prolonging the mileage; but may cause poor damping effects, while lower tire pressure will shorten the mileage of battery, but it is suitable for rugged roads. Both of these two cases may quicken the wear of tires.
Regular Maintenance
The only maintenance users should perform is checking fastener tightness, checking tire pressure, changing the tire/wheel, changing the fenders, and installing/removing the battery. For all other maintenance, contact your Ninebot Authorized Service Center.
Please bring your PTR to your dealer or Ninebot Authorized Service Center for regular maintenance and safety inspection. This will ensure that your PTR continues to operate at its best. The following table offers the maintenance items and schedule.
WARNING
Do not disassemble the PTR. Doing so will void your warranty and may result in electric shock. Only Ninebot authorized personnel may disassemble Ninebot products. Ninebot shall bear no responsibility for any damage, fault, property loss, or personal injury caused by unauthorized persons disassembling it. Judgment of unauthorized disassembly shall be based on the relevant marks provided on the Ninebot PTR.
NOTICE
To locate a dealer or Ninebot Authorized Service Center, visit www.ninebotamericas.com or check your Limited Warranty Sheet.
Table 9: Maintenance Schedule
| Item | 3 months or 2,000 km | 1 year or 5,000 km | 2 years or 10,000 km | 3 years or 15,000 km | Every 6 months or 3,000 km | Comments |
| Surface cleaning · · · | · · | |||||
| Damaged foot mat · · | · · · | |||||
| Loose fasteners · · · | · · | |||||
| Gearbox oil change · · | · · · | |||||
| Change of battery and remote key | · · · · | |||||
| Check battery service life | · · · · · | |||||
| Calibrate balance sensor | · · · · · | |||||
| Upgrade firmware · · | · · · | |||||
| Inspect tire tread · · | ||||||
| Inspect lights · · | ||||||
| Change foot mat panel · | 2 years/10,000 km [6,200 mi] | |||||
| Inspect steering shaft · | 2 years/10,000 km [6,200 mi] | |||||
| Inspect internal wiring · | · | 2 years/10,000 km [6,200 mi] | ||||
| Inspect motor · · | 2 years/10,000 km [6,200 mi] | |||||
| Inspect seals · · · | 3 years/10,000 km [12,400 mi] | |||||
| Change gearbox and coupler | . | 3 years/10,000 km [12,400 mi] | ||||
| Other | As suggested by Ninebot service center technicians |
Ninedroid App
• The Ninedroid App provides the following functions:
Real-time dashboard, including speed, mileage, power output, machine temperature, and travel distance. - Diagnostics for warnings and faults: the Ninedroid App can pull data from the PTR and upload it to a service center, so service technicians can quickly diagnose problems. • Remote Control: use the remote control interface to control your PTR in R/C mode. See Remote Control [R/C] Mode. - Customizations: adjust light, sound, and performance tuning parameters. Save and share with others. - Share with your social network [Facebook, Twitter, and others]: riding data, logs, settings, and customized tuning parameters.
• How to install the Ninedroid App:
For iOS devices (iPhone, iPad, iPod touch), visit the Apple App Store to download the latest Ninedroid App. For Android devices, visit the Google Play store to download the latest Ninedroid App. Alternatively, you may also visit www.ninebot.com and go to the "Support & Service" channel to download the installer package.
- Ninebot periodically releases SDK and Communication API materials, as well as third party demos. If you are a maker or developer, these materials can help you transform your Ninebot PTR into a personalized or intelligent robot. • Please visit www.ninebotamericas.com to stay up to date on the latest accessories, firmware upgrades, and promotions.
Appendix — Specifications
Table 10: Specifications
| Parameter PTR E Comments | ||
| Appearance Anodized silver + porcelain | white + lime green Color kit optional | |
| Main materials Magnesium alloy + alum | minum alloy + LEXAN resin — | |
| Gross weight 23.5 kg (51.8 lbs) — | ||
| Vehicle size | 390 × 590 × 1100-1400 mm[15.4 × 23.2 × 43.3-55.1 inches] | L × W × H |
| Weight without operation bar 22.0 kg [48.5 lbs] | Does not include handlebar nor charger | |
| Size without operation bar | 390 × 590 × 400 mm[15.4 × 23.2 × 15.7 inches] | Does not include handlebar nor charger |
| Recommended rider height | The operation bar is available in 3 sizes.Large: 1.8-2.1 m [5'7"-6'10']Standard: 1.5-1.9 m [5'0"-6'2"]Small: 1.3-1.7 m [4'3"-] | Large and small operation bars must be purchased separately. |
| Mainframe package size | 620 × 444 × 470 mm[24.4 × 17.5 × 18.5 inches] | |
| Operation bar package size | —1140 × 140 × 95 mm[44.9 × 5.5 × 3.7 inches] | — |
| Max. payload on flat ground 100 kg (220 lbs) | This value may be influenced by terrain, riding habits, and battery level. | |
| Max. power 2.7 kW | Maximum power is generated for no more than 10s. | |
| Max. speed | 20 km/h(12 mph) | Maximum speed depends on the current battery charge level. |
| Typical mileage | >20 km(>12 miles) | Based on a 75kg (165 lb) rider, travelling on flat ground, at 15km/h (9 mph). |
| Max. slope | 20° | Based on a 75kg (165 lb) rider with full battery charge level on an asphalt road. |
| Terrain | Suitable for concrete, asphalt, flat packed dirt, flat grass/lawn. Not suitable for slippery surfaces, mud, sand, or rugged roads. | |
| Speed limit mode | The default speed limit is 5 km/h [3 mph] in Speed limit mode. The speed limit can be set using the keyfob or Ninedroid App. | Range is 4-12 km/h[2.5-7.5 mph] |
| Voltage / battery capacity 55.5 V / 620 | Wh Rated for 1000 cycles. | |
| Tire/rim size 85/50-12 custom tire with a 12 × 2.75 Resin/Steel wheel — | ||
| Parameter PTR E Comments | |||
| Remote key 2x | The effective distance is 5-10 m [16-32 ft], line of sight. | ||
| Battery charge time | 1x charger, 120 W~4 hours to full charge | 110 V / 220 V | |
| Working modes | Stand-by mode, power assistant mode, limit speed mode, balance mode, remote control mode, lock mode | — | |
| Wireless connection | Bluetooth connection | Firmware update, remote dashboard, and access to settings [via Ninedroid App] | — |
| Remote control | Enter remote control mode via keyfob or Ninedroid App. Drive using Ninedroid App. | — | |
| Dashboard | Readable in sunlightAutomatic luminance adjustment | — | |
| Lights [general] | Rear stop lamp, front atmosphere lamp, foot mat LED indicators | — | |
| Lights [special] Operation bar atmosphere light — | |||
| Included accessories | 1x accessory rack1x parking stand | — | |
Contact Us
Ninebot Americas:
Segway Inc.
14 Technology Drive, Bedford, NH 03110, USA
Tel: 1-603-222-6000
Fax: 1-603-222-6001
Toll Free: 1-866-473-4929
Email Sales: customeroperations@segway.com
Email Service: technicalsupport@segway.com
Website: www.ninebotamericas.com
Ninebot Worldwide:
Ninebot
1F, A1 Bldg. Zhongguancun Dongsheng Technology Park [Northern Territory], 66 Xixiaokou Rd., Haidian Dist., Beijing, China Tel: +86-010-84828002
Fax: +86-010-84828002-800
Email [inquiry]: sales@ninebot.com
Email [Global service]: service@ninebot.com
Skype [Global service]: service@ninebot.com
Website: www.ninebot.com




- NINEBOT
- WARNING
- NINEBOT™ PTR
- USER MANUAL
- TRADEMARK AND LEGAL STATEMENT
- ABOUT THIS MANUAL
- SAFETY MESSAGING
- THE RISK OF INJURY
- TABLE OF CONTENTS
- OBEY ALL LAWS AND REGULATIONS
- CALIFORNIA WARNING
- REGULATORY STATEMENTS
- INTRODUCTION
- WHAT IS A NINEBOT PTR
- NINEBOT PTR E FEATURES
- NINEBOT ASSEMBLY
- UNPACKING NINEBOT
- NOTICE
- SERIAL NUMBER/LIMITED WARRANTY SHEET
- ASSEMBLING A NEW NINEBOT
- PREPARATION
- CAUTION
- MOUNTING THE OPERATION BAR
- INSTALL THE BATTERY PACK
- CHARGE THE BATTERY PACK
- GUIDE FOR SAFE RIDING
- BEFORE RIDING
- WHILE RIDING
- INTELLIGENT SAFETY WARNING SYSTEM
- YOUR FIRST RIDE
- POWER-ON THE PTR
- BEFORE STEPPING ON
- STEPPING ON AND MAINTAINING BALANCE
- RIDING FORWARD/BACKWARD
- STOPPING THE PTR
- TURNING THE PTR
- STEPPING OFF THE PTR
- POWER ASSISTANT MODE
- SPEED LIMITER
- LOCKING THE PTR
- POWER-OFF THE PTR
- PTR MODES
- REMOTE KEYFOB AND DASHBOARD
- BASIC FUNCTIONS
- EXTENDED FUNCTIONS
- DASHBOARD ICONS
- CHARGE LEVEL LIGHTS
- OTHER FUNCTIONS
- YOUR CAR COMPANION
- PARKING STAND
- REMOTE CONTROL [R/C] MODE
- MINIMUM REQUIREMENTS
- TO CONNECT TO YOUR NINEBOT PTR
- USB CHARGE PORT
- CHANGING THE OPERATION BAR
- CHANGING THE TIRE/WHEEL
- SENSOR CALIBRATION
- CALIBRATE THE STEERING SENSOR
- CALIBRATE THE ATTITUDE SENSOR
- DAILY MAINTENANCE
- CLEANING AND STORAGE
- NINEBOT PTR BATTERY PACK
- BATTERY TRANSPORTATION, SHIPPING, AND DISPOSAL
- SHIPPING LI-ION BATTERY PACKS
- BATTERY DISPOSAL
- FASTENERS
- LIFTING NINEBOT PTR
- TIRE PRESSURE
- REGULAR MAINTENANCE
- NINEDROID APP
- APPENDIX — SPECIFICATIONS
- CONTACT US
- NINEBOT AMERICAS
- SEGWAY INC
- NINEBOT WORLDWIDE
Brand : SEGWAY
Model : Ninebot E+
Category : Electric scooter