Serie 4 MAFS2462B - Deep fryer BOSCH - Free user manual and instructions
Find the device manual for free Serie 4 MAFS2462B BOSCH in PDF.

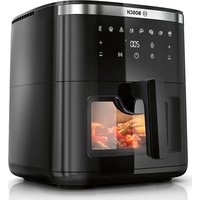
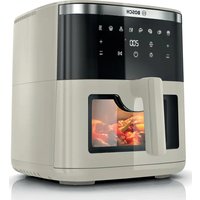
| Product type | Oil-free fryer (air fryer) |
| Brand | Bosch |
| Model | Serie 4 MAFS2462B |
| Adjustable temperature | 40 °C to 200 °C (in 5 °C increments) |
| Timer | 1 to 60 minutes (extendable up to 8 hours for keep warm) |
| Number of programs | 9 |
| Preset programs | Fries, Poultry, Meat, Fish, Vegetables, Bread, Small pastries, Keep warm, Defrost |
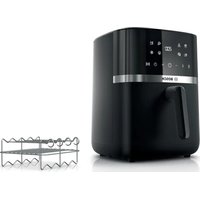
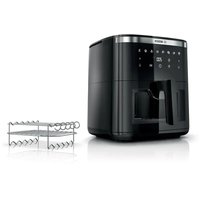
| Included accessories | Basket, combined grill, 4 skewers |
| Cleaning | Basket and combined grill dishwasher safe; exterior housing cleanable with damp cloth |
| Safety | Automatic shut-off when basket is removed; cooling function; hot surfaces |
| Standby mode | Yes, for energy saving |
| Display | Digital screen with temperature and time |
| Control | Touch buttons |
| Power supply | 220-240 V ~, 50/60 Hz (standard) |
| Maximum altitude for use | 2000 m |
| Cooking type | Hot air circulation (top and bottom heating elements, fan) |
| Basket material | Metal with non-stick coating |
| Use | Reheat, cook, roast, and fry with hot air circulation |
| After-sales service | Original spare parts available for up to 10 years |
| Combined grill and skewers | Yes, included |
Frequently Asked Questions - Serie 4 MAFS2462B BOSCH
User questions about Serie 4 MAFS2462B BOSCH
0 question about this device. Answer the ones you know or ask your own.
Ask a new question about this device
Download the instructions for your Deep fryer in PDF format for free! Find your manual Serie 4 MAFS2462B - BOSCH and take your electronic device back in hand. On this page are published all the documents necessary for the use of your device. Serie 4 MAFS2462B by BOSCH.
USER MANUAL Serie 4 MAFS2462B BOSCH
now at MyBosch and enjoy benefits free of charge:
bosch-home.com/welcome
Serie | 4
MAF4... MAFS24...
https://digitalguide.bsh-group.com/?mat-no=8001339956
[en] You can find additional information and explanations online. Scan the QR code on the title page.
2
3
4
5
6
7
8
9

10
natural_image
Illustration of a hand using a tool to clean or remove a device from a paper liner (no text or symbols visible)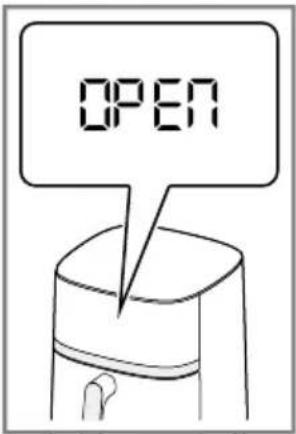
11

natural_image
Illustration of a hand holding a cleaning tool inside a container with arrows indicating upward motion (no text or symbols)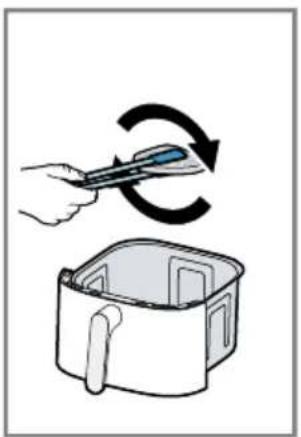
natural_image
Illustration of a hand using a tool to rotate or rotate a circular arrow around a container (no text or symbols)12

natural_image
Line drawing of a hand pressing down on a water dispenser (no text or symbols)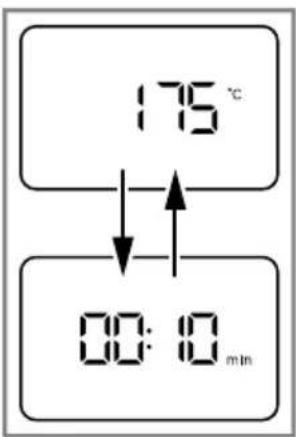
m = 311
flowchart
graph TD
    A["00:00 min"] --> B["End"]
14
natural_image
Hand placing a blue tool into an air fryer with a checkmark indicating inspection (no text or symbols on the device itself)15
natural_image
Illustration of a hand using a tool to remove leafy vegetables from a tray (no text or symbols)16
natural_image
Illustration showing a cooking step: adding a plate to a small dish using a tool (no text or symbols)m = 311
natural_image
Isometric line drawing of a rectangular grid structure with wavy top and bottom edges (no text or symbols)1

natural_image
Five identical black metal rods with loop ends, arranged diagonally (no text or symbols)2
18
19
The image is too blurry to recognize any text content.
 | √ | √ | × | × | × | × | × | × |
 | √ | √ | × | × | × | √ | √ | √ |
 | √ | √ | × | × | × | √ | √ | √ |
⚠ Sicherheit
- Read this instruction manual carefully.
- Keep the instruction manual and the product information safe for future reference or for the next owner.
Only use this appliance:
■ with genuine parts and accessories.
■ for warming, cooking, baking and frying with hot air.
■ under supervision.
■ for normal processing quantities and for normal processing times for domestic use.
■ in private households and in enclosed spaces in a domestic environment at room temperature.
■ up to an altitude of max. 2000 m above sea level.
The appliance must always be disconnected from the mains after each use, whenever the appliance is unsupervised, before cleaning and in the event of an error.
This appliance may be used by children aged 8 or over and by people who have reduced physical, sensory or mental abilities or inadequate experience and/or knowledge, provided that they are supervised or have been instructed on how to use the appliance safely and have understood the resulting dangers.
Do not let children play with the appliance.
Children must not perform cleaning or user maintenance unless they are at least 8 years old and are being supervised.
Keep children under the age of 8 years away from the appliance and power cable.
▶ Never operate a damaged appliance.
▶ Never operate an appliance with a cracked or fractured surface.
▶ Never pull on the power cord to unplug the appliance. Always unplug the appliance at the mains.
- If the appliance or the power cord is damaged, immediately unplug the power cord or switch off the fuse in the fuse box.
▶ Call customer service.→Page 23
- Connect and operate the appliance only in accordance with the specifications on the rating plate.
- Connect the appliance to a power supply with alternating current only via a properly installed socket with earthing.
- The protective conductor system of the domestic electrical installation must be properly installed.
▶ Never equip the appliance with an external switching device, e.g. a timer or remote control.
- Repairs to the appliance should only be carried out by trained specialist staff.
▶ Only use genuine spare parts when repairing the appliance.
- If the power cord of this appliance is damaged, it must be replaced by the manufacturer, the manufacturer's Customer Service or a similarly qualified person in order to prevent any risk.
▶ Never immerse the appliance or the power cord in water or clean in the dishwasher.
▶ Only use the appliance in enclosed spaces.
▶ Never expose the appliance to intense heat or humidity.
- Do not use steam- or high-pressure cleaners to clean the appliance.
▶ Never let the power cord come into contact with hot appliance parts or heat sources.
▶ Never let the power cord come into contact with sharp points or edges.
▶ Never kink, crush or modify the power cord.
▶ Never place the appliance on or near hot surfaces.
- Never place the appliance on or near flammable materials, e.g. curtains or tablecloths.
▶ Always maintain a safety distance of at least 10 cm to walls and other objects to avoid a build-up of heat.
▶ Never cover the appliance or set other objects down on it.
- Do not store or deposit objects in the basket or the cooking compartment.
▶ Never leave the appliance unattended while it is switched on.
▶ Never fill oil or fat into the basket.
▶ Never heat food containing high-proof alcohol or other highly flammable constituents in the appliance.
▶ Take note of the maximum permitted capacity. Never fill food beyond the upper edge of the basket.
- Do not use loose pieces of baking paper or lightweight ingredients that could be sucked in by the fan, e.g. dry herbs.
- If dark smoke comes out of the appliance, disconnect it from the mains immediately. Do not take the basket out until the amount of smoke has decreased.
The appliance becomes hot during operation. Never touch the hot surfaces.
- Allow the appliance to cool down before cleaning or transporting.
▶ Never reach into the hot cooking compartment.
▶ Never touch the hot grill rack or the hot skewers with bare hands. Use suitable tools and equipment, e.g. potholders or cooking utensils.
- Be careful when taking out the basket as hot air and steam may escape.
▶ Do not lean over the appliance.
▶ Always keeps your hands and face away from the air outlets.
▶ To avoid injuries, only use the appliance for its intended purpose.
▶ Take care when handling the skewers.
- Keep packaging material away from children.
▶ Do not let children play with packaging material.
- Keep small parts away from children.
▶ Do not let children play with small parts.
▶ Follow the cleaning instructions.
- Clean surfaces which come in contact with food before each use.
▶ To prevent the development of acrylamide, do not cook the food to the point where it is too dark and remove any burnt residues.
▶ Never heat fresh potatoes to over 180 °C.
Avoiding material damage
- Do not use sharp, pointed or metal cooking utensils. Only use cooking utensils made of wood or heat-resistant plastic.
- Place the skewers in the basket carefully to avoid scratching or damaging the basket.
▶ Never stand the hot basket on heat-sensitive surfaces. Use a heat-resistant base underneath, e.g. a heat or table mat.
▶ Never fill water or other liquids into the basket.
▶ Never use the grill rack or skewers in the microwave.
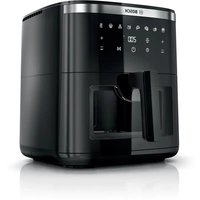
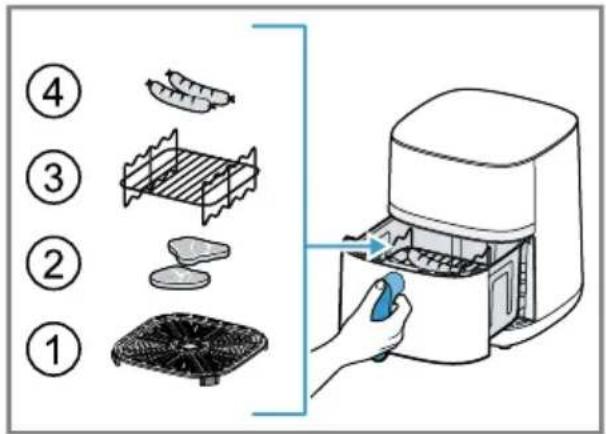
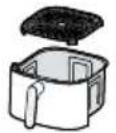
Familiarising yourself with your appliance
Overview
After unpacking all parts, check for any damage in transit and completeness of the delivery.
→Fig. 1

Main unit

Basket

Grilling set ^1
→ "Grilling set", Page 21

Cooking compartment
| 2 | Control panel |
| 3 | Air inlet |
| 4 | Air outlet |
| 5 | Power cord |
| 6 | Top heating element and fan |
| 7 | Bottom heating element |
| 8 | Handle |
| 9 | Grid |
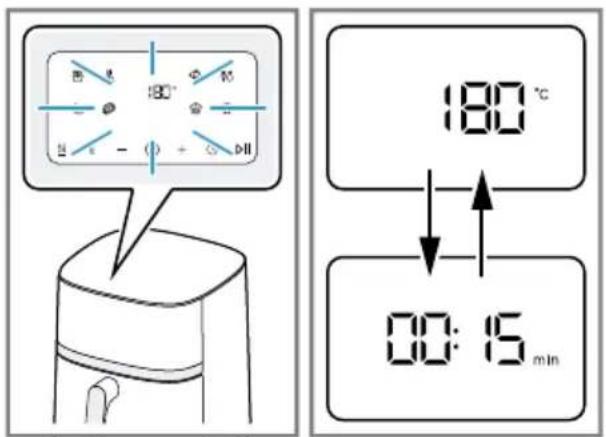
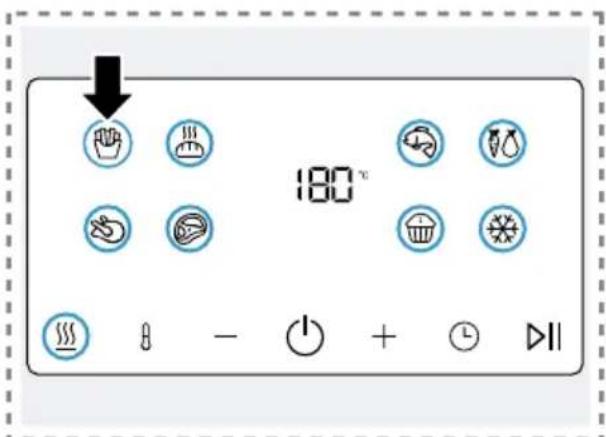
Control panel
You can find an overview of the control panel here.
Note: Press the buttons with your fingers without wearing rubber/oven gloves. Do not operate buttons with objects, e.g. a wooden spoon.
Display elements and function buttons
| Symbol Function | |
| Standby modeActivate and deactivate standby mode or cancel the cooking process | |
| DII | Start/PauseStarting or pausing cooking |
| 00:00 | DisplayWhen °C lights up, the display shows the temperature.When min lights up, the display shows the time. |
| Temperature displayIncrease the temperature with+or reduce it with-Settings range: 40-200 °C in 5-degree stepsNote: If a time of more than 60 minutes has been set, the maximum temperature is 80 °C. | |
| Time displayIncrease the cooking time with+or reduce it with-Settings range: 1-60 minutesNote: If a temperature of 40-80 °C has been set, the cooking or keep-warm time can be extended to up to 8 hours. | |
Programme buttons
| Symbol Programme | |
| French fries | |
| Poultry | |
| Meat | |
| Fish | |
| Vegetables | |
| Bread | |
| Small pastries | |
| Keep warm | |
| Defrost | |
Standby mode
If the appliance is not used for a certain period of time before or after preparation, it will switch to standby mode, will light up and the display will show--. The appliance only consumes a small amount of energy when in standby mode.
Press ⏻ to deactivate standby mode and use the appliance.
Before using for the first time
Prepare the appliance for use.
Cleaning the appliance before using it for the first time
- Remove any packaging material.
- Remove any stickers or film.
- Make sure a window is open and allow the appliance to heat up without food for 30 minutes at the highest temperature setting and then cool down.
- Clean all parts that come into contact with food before using for the first time.
Note: Slight smoke or odour emission during initial use is normal.
Operation
General information
Please bear this information in mind so that you can get the best out of your appliance.
■ To change these values faster, hold down the settings buttons.
en Operation
- To change the temperature or time during cooking, press▶|change the values and then resume cooking with▶|
Setting up appliance
- Place the appliance on a stable, horizontal, flat and heat-resistant work surface. Always maintain a safety distance of at least 10 cm to walls and other objects.
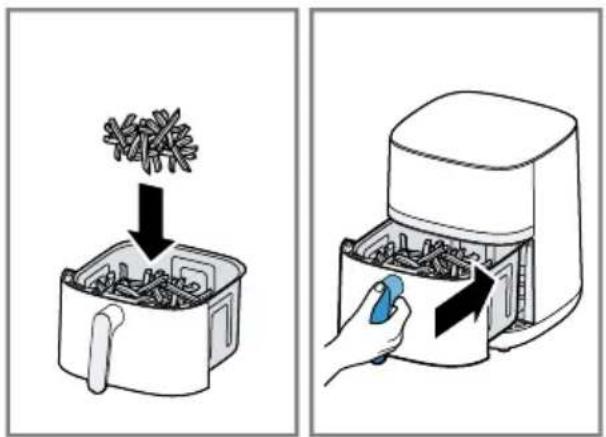
Adding food to the basket
- Take the basket out, put the grid in the basket and it press down.
$$ \rightarrow \text { Fig. } 2 $$
The spacers on the grid must be facing down.
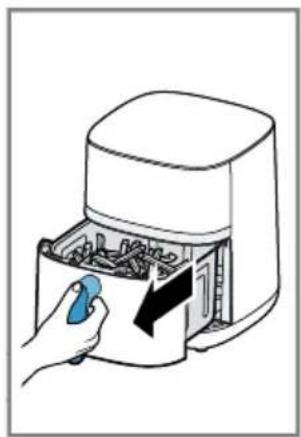
- Add the food to the basket and push the basket fully into the appliance.
$$ \rightarrow \text { Fig. } 3 $$
Never fill food beyond the upper edge of the basket.
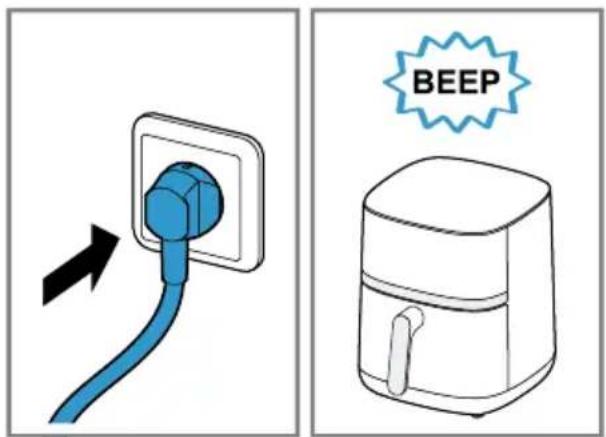
Starting cooking
- Insert mains plug.
$$ \rightarrow \text { Fig. } 4 $$
√ A signal tone sounds and the control panel is active.
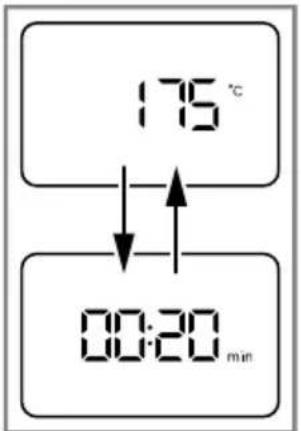
√ The display alternately shows the preset temperature and the cooking time for manual cooking.
$$ \rightarrow \text { Fig. } 5 $$
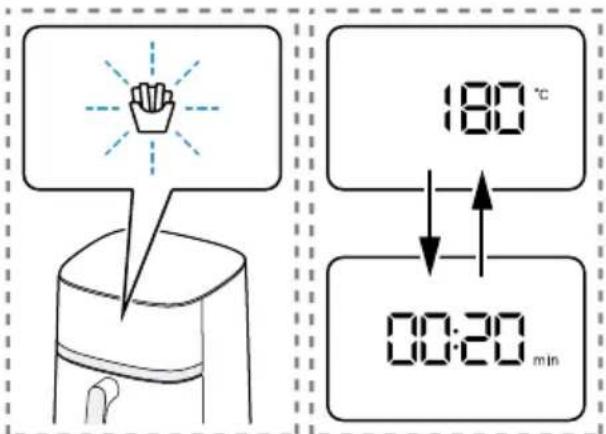
- To use a programme, press the required symbol on the control panel, e.g.
French fries.
$$ \rightarrow \text { Fig. } 6 $$
√ The programme symbol flashes and the display alternately shows the preset temperature and the cooking time for the programme.
$$ \rightarrow \text { Fig. } \boxed {7} $$
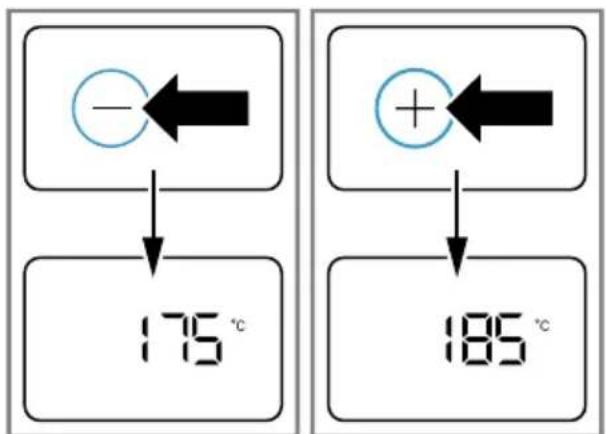
-
To return to manual cooking mode, press the flashing programme symbol again.
-
Adjust the displayed temperature or the displayed cooking time using—or +. →Fig. 8
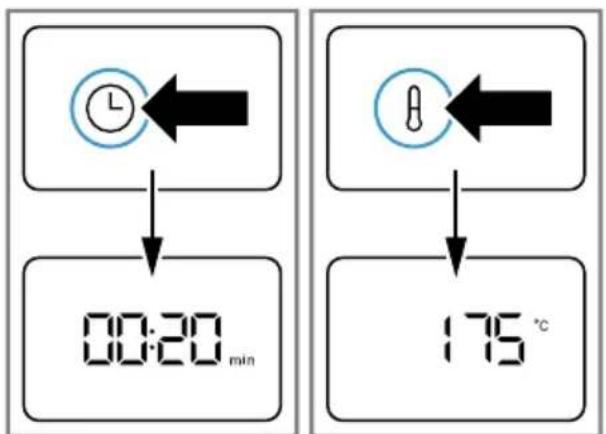
√ After a certain period of time, the display will alternate automatically between the temperature and time.
- To manually view the time or temperature on the display, press ^① or ②.
$$ \rightarrow \text { Fig. } 9 $$
- Start cooking with ▷IStart/Pause.
$$ \rightarrow \text {Fig.} \boxed {1 0} $$
√ The display alternately shows the selected temperature and the remaining cooking time.
Shaking or turning food
To ensure an even cooking result, certain foods should be turned halfway through the cooking time.
- Take the basket out of the appliance halfway through the cooking time.
$$ \rightarrow \text { F i g . } \boxed {1 1} $$
√ Cooking is paused and the display shows OPEN as long as the basket is removed.
- Shake the food in the basket. Turn large items of food or delicate foods using cooking utensils made of wood or heat-resistant plastic.
$$ \rightarrow \text { Fig. } 1 2 $$
- Push the basket fully into the appliance.
$$ \rightarrow \text {Fig.} \boxed {1 3} $$
√ Cooking will continue automatically and the display alternately shows the selected temperature and the remaining cooking time.
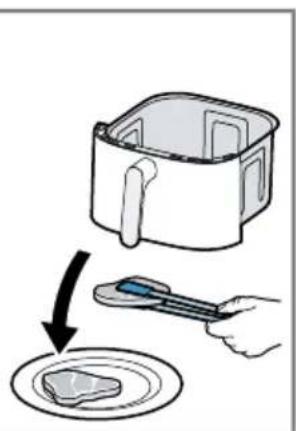
Taking cooked food out
-
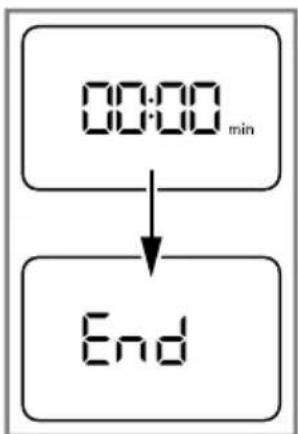
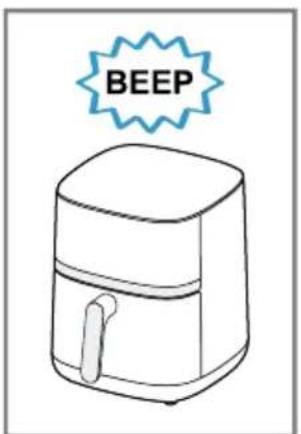
When cooking has ended, End flashes on the display. An acoustic signal sounds and all symbols light up on the control panel. →Fig. 14
-
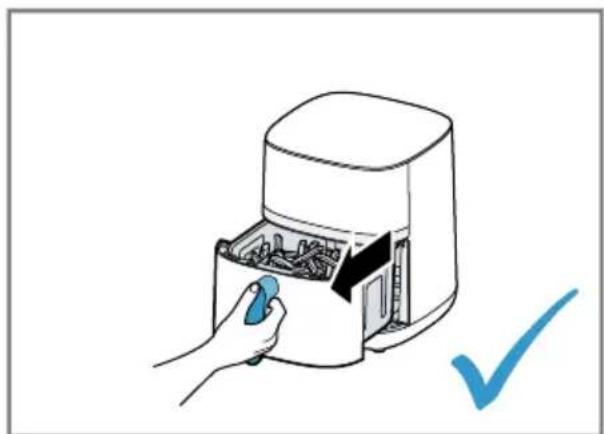
Take out the basket with the cooked food.
$$ \rightarrow \text { Fig. } 1 5 $$
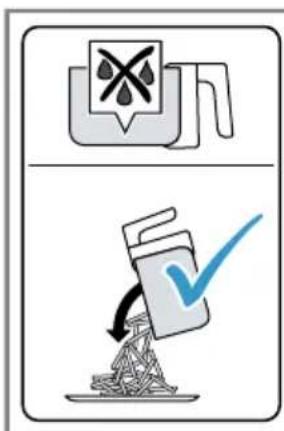
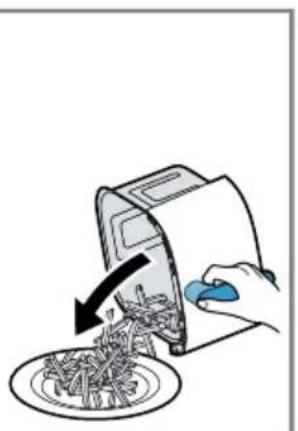
- With food that has not given off any excess fat, e.g. french fries, shake it out of the basket or take the food out with a cooking utensil.
$$ \rightarrow \text { F i g . } \boxed {1 6} $$
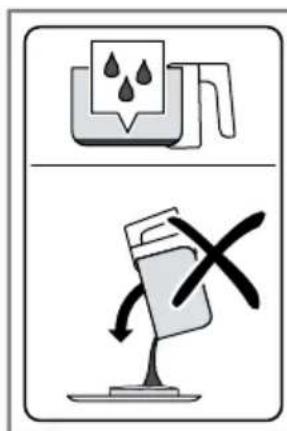
- With food that has given off excess fat, e.g. marbled meat or pieces of poultry, take it out of the basket with a cooking utensil. To prevent fat running out of the basket onto the cooked food, do not tip the basket out.
$$ \rightarrow \text { F i g . } \boxed {1 7} $$
Dispose of the hot excess fat carefully or leave it to cool down in the basket.
Note: If you have cancelled the current cooking process manually with ⏻, the dis-
play shows COOL and the fan will run for a certain period of time. Do not remove the basket until COOL has disappeared.
Tip: You can now directly cook additional portions or other food with the appliance.
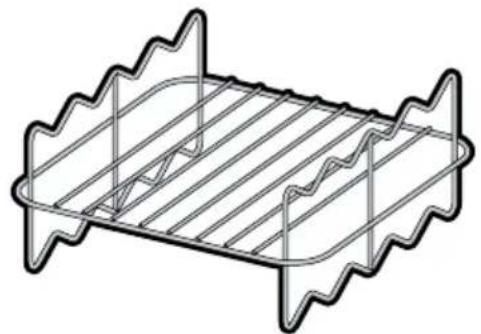
Grilling set
Grill food on the grill rack or cook skewers.
Overview
→Fig. 18
1 Grill rack
2 Skewers, 4 pieces
Using the grilling set
-
To cook food on the grill rack, proceed as follows.
-
Place the grid in the basket.
- Place the grill rack in the basket.
▶ Place the food on the grill rack.
→Fig. 19
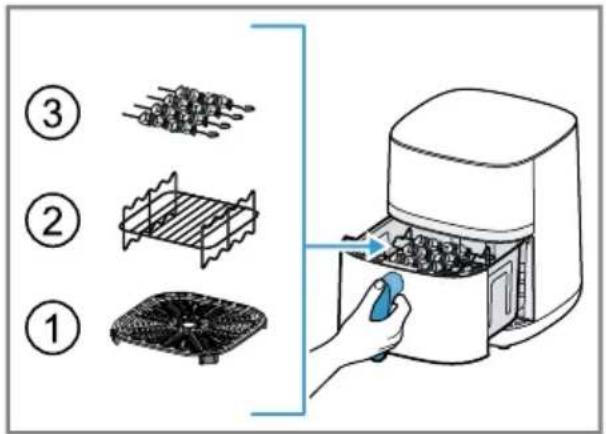
- To cook skewers, proceed as follows:
▶ Place the grid in the basket.
- Place the grill rack in the basket.
- Place the prepared skewers into the designated recesses.
→Fig. 20
-
Push the basket fully into the appliance.
-
Start cooking.
→ "Starting cooking", Page 20
Application examples
Your appliance offers 9 different preset programmes. Select a suitable programme depending on the food.
Note: The values specified here are recommendations. As foods differ in terms of origin, size, shape, condition and brand, an optimal setting for your food may diverge from these values.
| Food Presetting Information | ||
| Frozen french fries, 10 x 10 mm, 400 g | French fries 180 °C 20 min. | |
| Chicken legs, 4 pcs, each 125 g | Poultry 200 °C 23 min. | Shake or turn the food halfway through the cooking time |
| Beef steak, 2 pcs, approx. 3 cm thick | Meat 200 °C 18 min. | Preheat the appliance for 4 min.Shake or turn the food halfway through the cooking time |
| Salmon fillet, 2 pcs, each weighing 150 g | Fish 160 °C 13 min. | Shake or turn the food halfway through the cooking time |
| Grilled vegetables, 400 g | Vegetables 180 °C 16 min. | Cut the vegetables into large pieces and mix with max. 1 tsp. of oil |
| Small cakes or muffins, 6 pcs | Small pastries 160 °C 18 min. | |
| Frozen pre-baked bread rolls | Bread 160 °C 10 min. | |
| Keeping cooked food warm | Keep warm 80 °C 30 min. | |
Food Presetting Information
| Defrosting frozen food | ※ Defrost 40 °C30 min. |
Tips
■ If the size of the food diverges from those in the table, shorten or lengthen the cooking time.
■ If the food is not cooked after the selected cooking time, extend the cooking time or increase the temperature.
■ To ensure an even cooking result, shake or turn the food in the basket halfway through the cooking time.
- If the food is not as crispy as you would like, apply a little oil to the food before cooking, e.g. with a brush or oil spray. Allow excess oil to drip away or wipe it off.
Overview of cleaning
Clean all parts immediately after use so that residues do not dry on.
- Do not use cleaning agents containing alcohol or spirits.
- Do not use sharp, pointed or metal objects.
- Do not use abrasive cloths or cleaning agents.
▶ Only clean the control panel and the display using a damp microfibre cloth.
Clean the individual parts as indicated in the table.
→Fig. 21
Cleaning the appliance and parts
- Clean the main unit with a damp cloth and dry.
Use a damp microfibre cloth for the display. - If necessary, clean the cooking compartment with warm water and a soft cloth or sponge.
- Remove remnants of food on the heating element with a soft brush.
- Remove any excess fat and oil from the basket.
- If there are stubborn fat residues in the basket, add a little warm water and a few drops of washing-up liquid to the basket to pre-clean it and leave to act.
- Clean the basket and the grid with detergent solution and a soft cloth or sponge or put in the dishwasher.
Troubleshooting
Fault Cause and troubleshooting
| The appliance is not working. | Appliance has no power supply.▸ Check whether your appliance is supplied with power. |
| Appliance automatically resumes cooking following an interruption to the power supply. | Appliance saves the aborted cooking process for a certain period of time.1. If the power supply has been interrupted, unplug the mains plug.2. Once the power supply has been restored, plug in the mains plug.√ The aborted cooking process is resumed.3. Select one of the following options:▸ Allow the cooking process to run until the end.▸ Press ▷to interrupt the cooking process in order to change the values, e.g. increase the temperature.▸ Cancel the cooking process with○.Note:If the power supply was interrupted for a prolonged period of time, the cooking process will not resume automatic-ally. |
| Fault Cause and troubleshooting | |
| Cooking does not start or continue and the display shows OPEN. | Basket has not been properly inserted in the appliance.► Push the basket fully into the appliance. The basket should not protrude from the housing. |
| Basket cannot be fully pushed into the appli-ance. | Food or objects in the cooking compartment.► Remove food or objects from the cooking compartment. Food or objects in the cooking compartment become hot during cooking. Use heat-resistant cooking utensils and proceed with care. |
| An error code appears on the display, e.g. Ex. | The electronics have detected a fault.1. Pull out the mains plug.2. Re-insert the mains plug in the socket.3. If the fault persists, call Customer Service.→ "Customer Service", Page 23 |
| White smoke escapes from the appliance. | Dripping fat and residues of fat in the basket or cooking com-partment produce white smoke during heating.► Clean the basket, grid and cooking compartment thor-oughly after each use to remove all residues of fat.Note: White smoke caused by residues of fat does not affect the cooking result or the appliance. |
Disposing of old appliance
- Dispose of the appliance in an environmentally friendly manner. Information about current disposal methods are available from your specialist dealer or local authority.
This appliance is labelled in accordance with European Directive 2012/19/EU concerning used electrical and electronic appliances (waste electrical and electronic equipment - WEEE).
The guideline determines the framework for the return and recycling of used appliances as applicable throughout the EU.
Customer Service
You can obtain function-relevant and storable genuine spare parts from our Customer Service for up to 10 years from the date on which your appliance was placed on the market.
For more information, please contact our Customer Service team.
Detailed information about the warranty period and the warranty conditions in your
country is available via the QR code on the enclosed document on service contacts and warranty conditions, from our customer service or on our website.
You can find the information required as per Regulation (EU) 2023/826 online at www.bosch-home.com on the product and service pages for your appliance, in the area of user manuals and additional documents.
4Sécurité
▶ Ring service.→Sid. 75
e-mail: ala-infokz@bshg.com
Many thanks for choosing a Bosch home appliance!
Register your new appliance now on MyBosch and benefit directly from:
- Expert advice and tips to make the most of your appliance
- Options for warranty extension
• Discounts on spare parts and accessories
• Digital information for use and all appliance data to hand - Easy access to Bosch Home Appliance Service
Simple to register, free of charge – including on mobile devices: www.bosch-home.com/welcome
BOSCH HOME APPLIANCES SERVICE
Need some help? You can find it here.
Expert advice on your Bosch home appliances, help with problems or repairs by professionals from Bosch.
Discover all the different ways Bosch can assist you:
www.bosch-home.com/service
The contact details of all countries are listed in the attached service directory.
BSH Hausgeräte GmbH
Carl-Wery-Straße 34
81739 München, GERMANY
www.bosch-home.com
A Bosch Company
Valid within Great Britain:
Imported to Great Britain by
BSH Home Appliances Ltd.
Grand Union House
Old Wolverton Road
Wolverton, Milton Keynes
MK12 5PT
United Kingdom

8001339953 (051029)
de, en, fr, it, nl, da, no, sv, fi, es, pt, el, tr, pl, uk, ru, ar