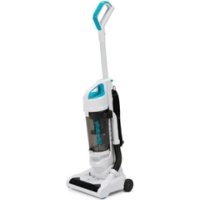
SVPET - Vacuum Cleaner Simplicity - Free user manual and instructions
Find the device manual for free SVPET Simplicity in PDF.


| Brand | Simplicity |
| Model | SVPET |
| Device type | Upright vacuum cleaner |
| Rated power | 750 W |
| Voltage / Frequency | 120 V AC, 60 Hz |
| Noise level | ≤ 78 dB(A) |
| Suction power | ≥ 72 IOW |
| Dust bin capacity | 2 liters |
| Height adjustment | Manual (rotating brush) |
| Power cord length | 7.6 m (25 ft) |
| Filtration system | Multi-stage cyclonic: HEPA post-filter + electrostatic cotton pre-filter |
| Dimensions (L x W x H) | 33 x 27 x 115 cm |
| Weight | Approx. 5.5 kg (estimate) |
| Included accessories | Crevice tool, upholstery brush, pet tool, tool clip, extension hose |
| Filter maintenance | Monthly cold water wash; replace every 6 to 12 months |
| Safety | Motor thermal protection, polarized cord |
| Key replacement parts | Filter SFSVPET, belt SVPBELT, brush SVPBR |
| Warranty | Manufacturer's warranty (see manual for details) |
| Intended use | Domestic, floor and surface cleaning, ideal for pet hair |
Frequently Asked Questions - SVPET Simplicity
User questions about SVPET Simplicity
0 question about this device. Answer the ones you know or ask your own.
Ask a new question about this device
Download the instructions for your Vacuum Cleaner in PDF format for free! Find your manual SVPET - Simplicity and take your electronic device back in hand. On this page are published all the documents necessary for the use of your device. SVPET by Simplicity.
USER MANUAL SVPET Simplicity
Important Safety Instructions 2
Two-Wire Polarized Cord. 3
Product Specifications.. 3
Getting Started
Vacuum Overview 4
How to Assemble the Vacuum 5
How to Use the Vacuum 6
How to Adjust the Brushroll Height 6
How to Clean with Attachments 7
Emptying Dust Container 8
Care and Maintenance
Vacuum Maintenance. 9
Cleaning Instructions 10
Cleaning the Post Motor Filter 11
Removing Debris from the Brushroll. 11
For Best Performance 12
Thermal Motor Protection 12
Customer Support
Troubleshooting 13
How to Contact Your Authorized Retailer 13
Key Replacement Parts 13
Warranty 14
IMPORTANT SAFETY INSTRUCTIONS
When using an electrical appliance, basic precautions should always be followed, including the following:
READ ALL INSTRUCTIONS BEFORE USING THIS APPLIANCE. FOR HOUSEHOLD USE ONLY.
IMPORTANT:
caused when the appliance is not used according to the instructions, or for uses other than those for which it was intended.
WARNING:
To reduce the risk of fire, electric shock, damage or injury:
- Do not leave appliance unattended when plugged in. Unplug from outlet when not in use and before servicing.
WARNING: ELECTRIC SHOCK COULD OCCUR IF USED OUTDOORS OR ON WET SURFACES. - Do not allow to be used as a toy. Close attention is necessary when used by or near children.
- Use only as described in this manual. Use only manufacturer's recommended attachments.
- Do not use with damaged cord or plug. If appliance is not working as it should, has been dropped, damaged, left outdoors or dropped into water, return it to a service center.
- Do not pull or carry by cord, use cord as a handle, close a door on cord, or pull cord around sharp edges or corners. Do not run appliance over cord. Keep cord away from heated surfaces.
-
Do not unplug by pulling on cord. To unplug, grasp the plug, not the cord.
-
Do not handle plug or appliance with wet hands.
- Turn off all controls before unplugging.
- Do not put any object into openings. Do not use with any opening blocked; keep free of dust, lint, hair and anything that may reduce air flow.
- Keep hair, loose clothing, fingers and all parts of body away from openings and moving parts.
- Do not pick up anything that is burning or smoking, such as cigarettes, matches or hot ashes.
- Do not use without vacuum filters in place.
- Use extra care when cleaning on stairs.
- Do not use to pick up flammable or combustible liquids such as gasoline or use in areas where they may be present.
- Do not attempt to service the unit while appliance is plugged in.
SAVE THESE INSTRUCTIONS
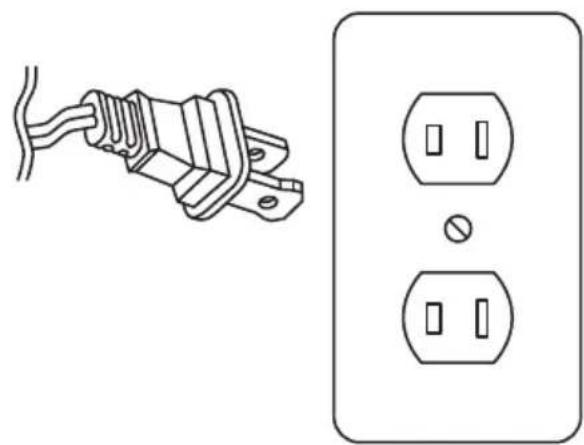
Power Cord, 2-Wire Polarized Cord
To reduce the risk of electric shock, the vacuum is equipped with a polarized alternating current line plug (a plug having one blade wider than the other). This plug will fit into the power outlet only one way. This is a safety feature. If you are unable to insert the plug fully into the outlet, try reversing the plug. If the plug should still fail to fit, contact a qualified electrician to replace the obsolete outlet. Do not defeat the safety purpose of the polarized plug.
PRODUCT SPECIFICATIONS
Power:750W
Voltage/Frequency: 120V AC 60Hz
- Noise Level: ≤ 78 dB(A)
- Suction Power: ≥ 72 IOW
- Dust Canister Capacity: 8.45 cups/2 liters
- Height Adjustment: Manual
- Cord Length: 25 ft
- Filtration: Multi-Stage Cyclonic Filtration with HEPA post-filter and H10 electrostatic cotton pre-filter
- Dimensions: 12.99 × 10.63 × 45.28 inches
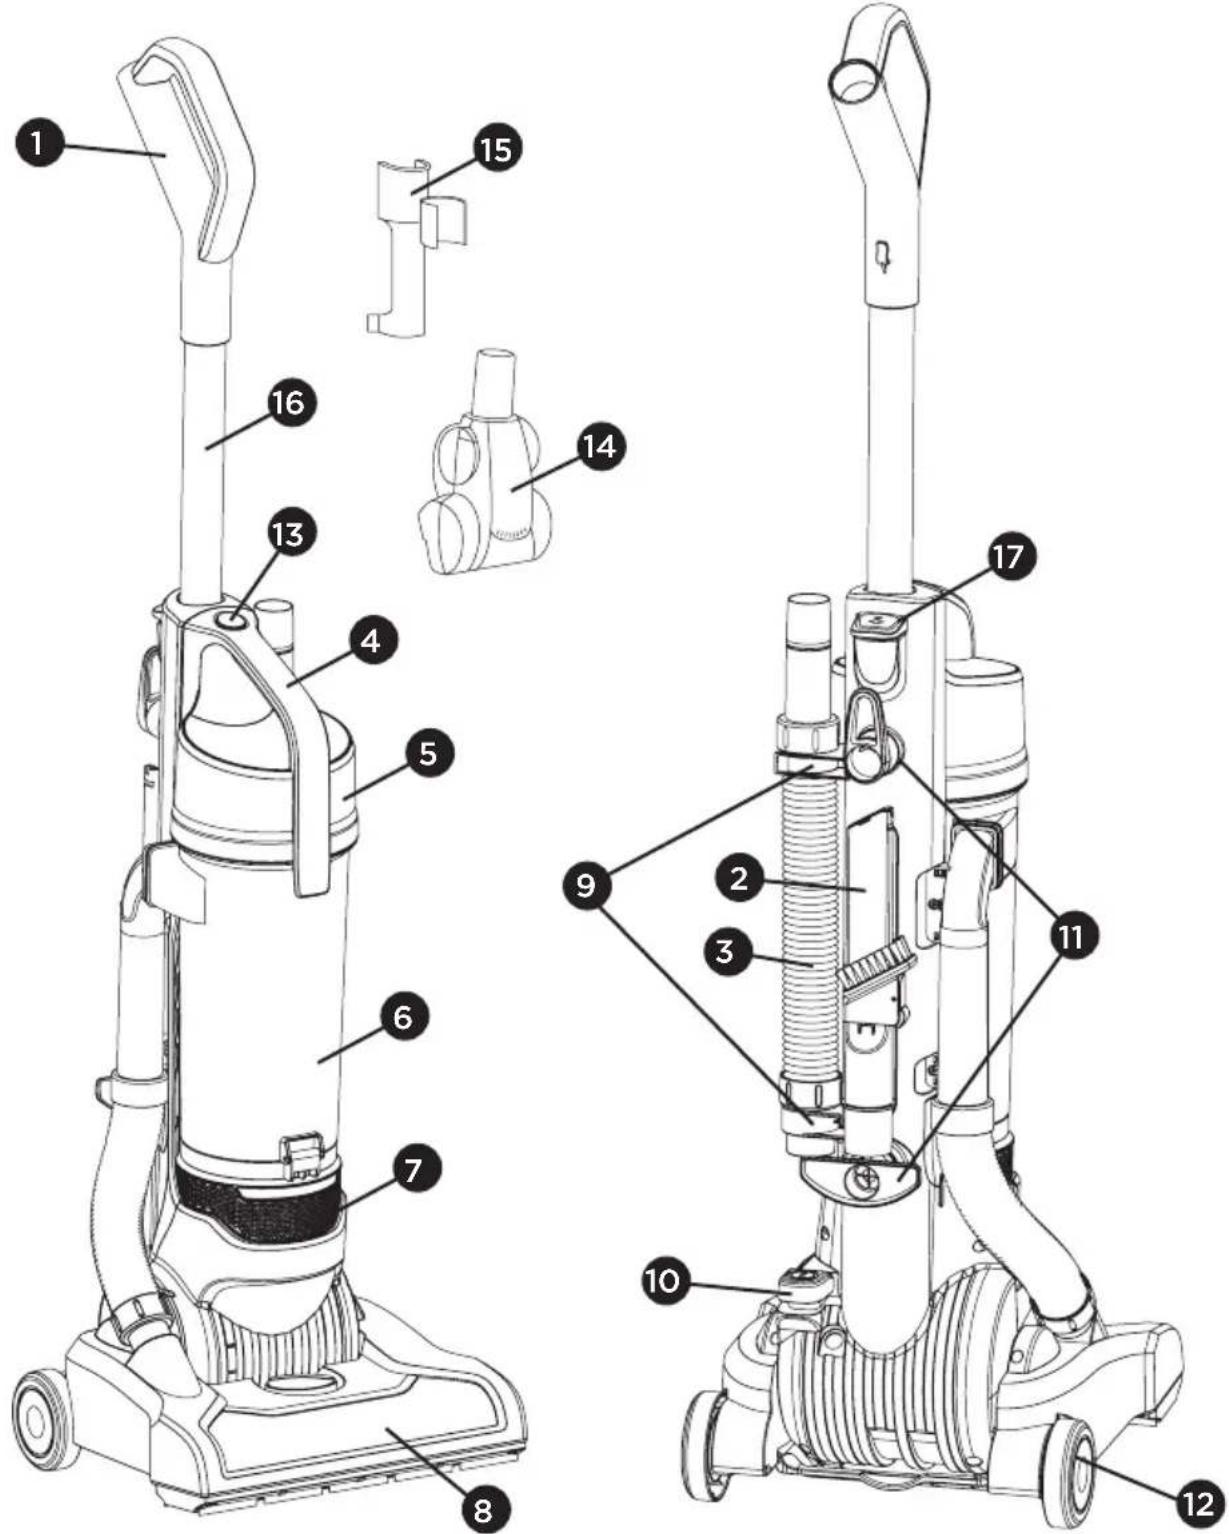
Vacuum Overview
(1) Handle
(2) Dual Tool - Crevice Tool and Upholstery Brush
(3) Extension Hose
(4) Carry Handle
(5) Dust Container Lid
(6) Dust Container
(7) Post-Filter Lid
(8) Vacuum Nozzle
(9) Hose Holder
(10) On/Off Foot Pedal
(11) Cord Hooks
(12) Vacuum Wheels
(13) Dust Canister Release Button
(14) Pet and Upholstery Tool
(15) Pet Tool Clip
(16) Handle Tube
(17) Handle Release Lever
How to Assemble the Vacuum
Make sure the vacuum is turned off and unplugged before assembling or disassembling.
- Find the handle. Press down on the handle release button.
- Slide the handle tube into the main body of the vacuum cleaner.
- Once handle tube is secure, ensure the handle release button is in upright position to lock in place.
- Place the crevice tool and upholstery brush into the tool holder.
- Gently attach pet tool clip to handle tube.
- Secure pet tool onto the pet tool clip.

How to Use the Vacuum
- Plug cord into an electrical outlet.
- Place your foot on the vacuum head and pull back the handle to tilt the vacuum back.
- Turn the vacuum ON by pressing the foot pedal located on the back left side of the vacuum. Turn the vacuum OFF by pressing the foot pedal again.
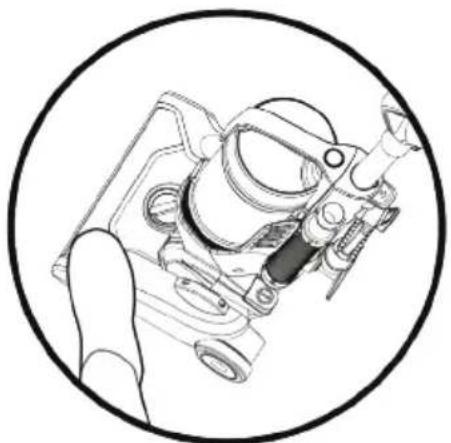
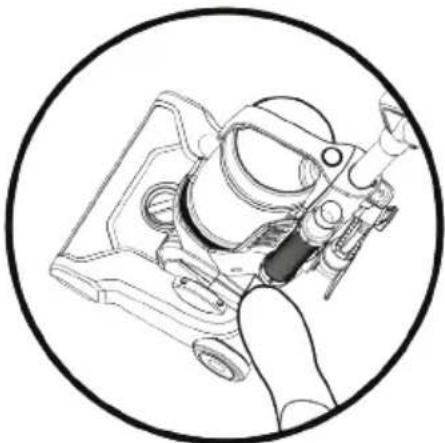
How to Adjust Brushroll Height
Adjust the height of the brushroll depending on the correct setting for your carpet and rugs. Turn the dial on the nozzle to select the appropriate height for flooring.
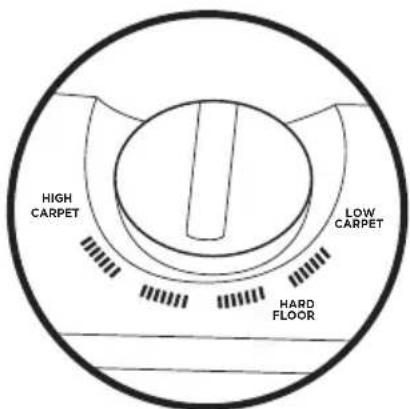
NOTE: Brushroll does not turn off. Please be mindful of vacuum placement on floors when using attachment cleaning. Please use care when vacuating delicate rugs and rugs with looped edges.
How to Clean with Attachments
This vacuum is equipped with onboard attachments for above floor and stair cleaning. All attachments are stored on the machine when not in use. Always turn vacuum off before changing cleaning configuration or switching attachments.
Using the Pet and Upholstery Tool
- Utilize the turbo for effortlessly eliminating pet hair from your sofa and furniture.
- To use the tool, attach to the inner side of the hose.
Using the Dual Tool - Crevice Tool and Dusting Brush
- Crevice tool may be used in tight spaces, corners, and along edges in such places as dresser drawers, upholstered furniture, and stairs.
- Dusting brush may be used for furniture, table tops, books, lamps, lighting fixtures, baseboards, and shutters.
-
To use the dusting brush, insert the crevice tool into the small brush forward until it clicks into place. Remove the hose and connect the tool to the end of the hose.
-
Take out the hose connector
- Install accessories brush on hose connector to clean stairs
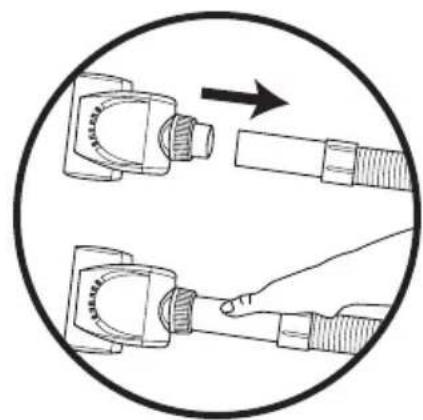
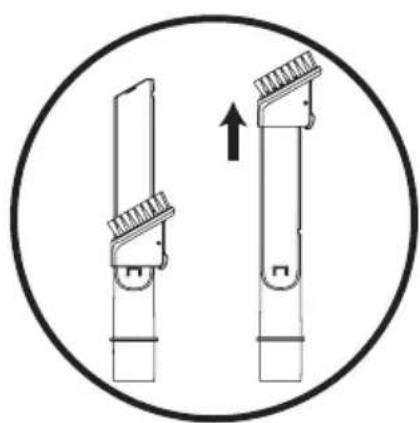
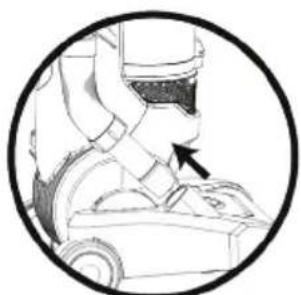
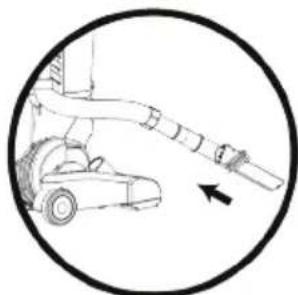
- Take off the hose.
- Press the handle release button to take out the handle.
- Connect the hose, handle and crevice tool to clean areas which are high or hard to touch.
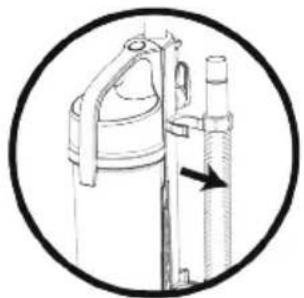
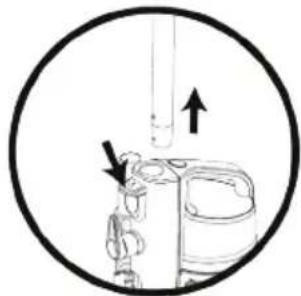
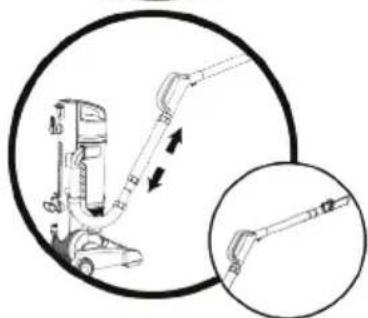
Caution: Extra care is needed when cleaning the stairs to avoid personal injury or damage, and to prevent the vacuum from falling. Always place vacuum at the bottom of stairs or on floor. Do not place vacuum on stairs or furniture, as it may result in injury or damage. When using tool, always ensure handle is in upright position.
Emptying Dust Container
Tip: Always empty the dust container before or after use. Never overfill the container. Remove dirt to avoid blocking the air flow through the vacuum cleaner.
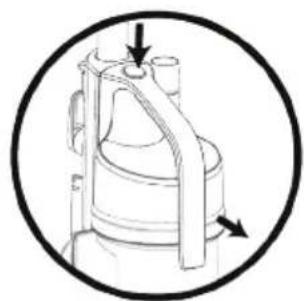
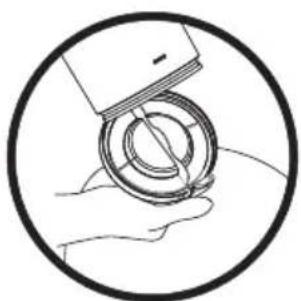
- Press the dust container release button to remove the dust container.
- Hold the dust container over a trash can. Pull the release clip to empty. Secure base before replacing on vacuum.
Vacuum Maintenance
This vacuum is simple to maintain and clean. To maintain the performance of your filters, they should be routinely washed and replaced.
- The HEPA post-filter and HEPA media electrostatic cotton filter should be replaced every 6-12 months.
- Wash filters on a monthly basis.
- Cyclonic filter may be removed from dust container. It should not need to be replaced but should be cleaned regularly.
- Do not put filters in a dishwasher, washing machine, tumble dryer, oven, or microwave, or place near an open flame.
- Remove dust and debris before rinsing filters in cool water.
- Filters must be completely dry before reinstalling in the vacuum. Allow filters to dry for at least 24 hours before reinstalling in the vacuum.
- If the surrounding humidity is high, please allow filters to air-dry for a longer period of time.
- Never operate the vacuum without the filters properly installed.
- Frequent use may require cleaning and/or replacing filters more often.
Cleaning Instructions
- Before cleaning, turn the vacuum off and unplug it from the electrical outlet.
- Do not use abrasive cleaning products on this appliance.
- Use a damp cloth for cleaning the unit body, avoid abrasive materials or solvents to prevent damage.
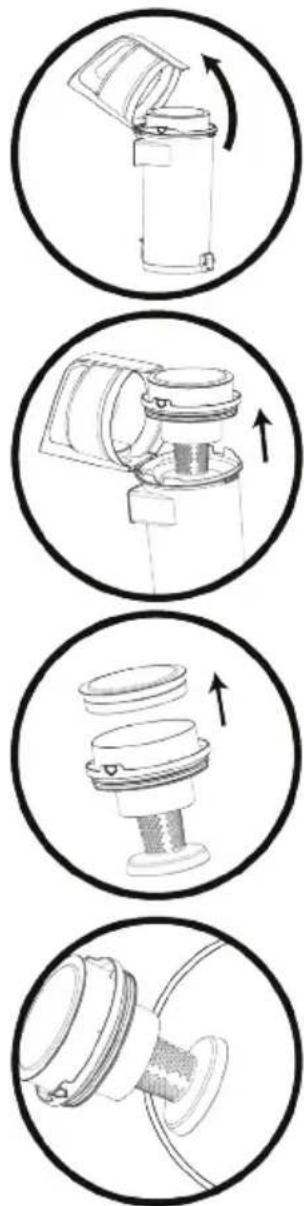
A. Open the dust container cover.
B. Turn the cyclonic filter clockwise to remove from the dust container.
C. Lift the pre-motor filter out of the cyclonic filter. Tap excess dirt from the cyclonic filter and rinse under cool tap. Leave the filter to dry for at least 24 hours.
D. Tap the cyclonic filter over a trash can to remove any dirt or debris. Use a soft brush to clean visible debris. Rinse with cool water. Allow to dry for at least 24 hours.
Cleaning the Post Motor Filter
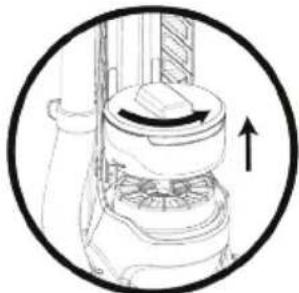
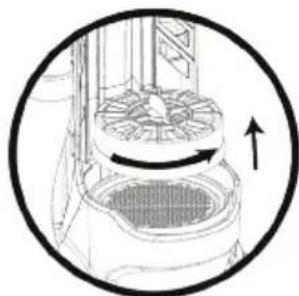
- Underneath the dust container is a post-motor filter.
- Lift to remove post motor filter.
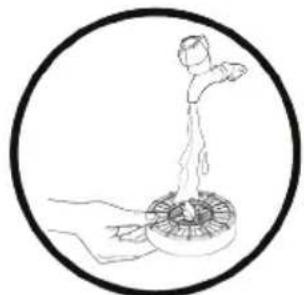
- Remove any dirt/debris by rinsing under water.
- Leave to dry for 24 hours or until fully dry before replacing back in vacuum cleaner.
IMPORTANT: Do not operate your vacuum without either the dirt container or filters in the right place.
Removing Debris from the Brushroll
Using a pair of scissors, remove any threads or hair caught around the brushroll.
Storage
- Always store the vacuum in a dry place.
- Never store the vacuum while it is still plugged in.
- Wind the cord around the cord storage hooks.
For Best Performance
- Keep machine and all accessories clean and in good operating condition.
- Replace the HEPA and electrostatic filter every 6-12 months.
- Always use genuine filters, as other products may result in poor cleaning performance. Filtration products are designed for maximum performance.
- Store machine carefully in a dry area.
- Regularly remove any hair or debris that get wrapped around brushroll.
- Replace brushroll annually.
- Do not operate without filters in place. Always use vacuum with completely dry filters.
- Never use vacuum to clean wet messes.
Thermal Motor Protection
This vacuum is equipped with a thermal protector designed to protect it from overheating due to restricted airflow (i.e. clogged hose). Should this situation occur, the thermal protector will automatically shut the motor off to avoid any potential damage.
How to Reset the Thermal Protector
- Unplug the vacuum.
- Allow the vacuum to cool at least 30 minutes.
- Check for blockages, empty the dust container and clean the filters.
- Plug the vacuum in and begin using.
If the vacuum fails to turn on, contact an Authorized Simplicity Service Center.
Troubleshooting
CAUTION: To reduce the risk of personal injury, unplug the vacuum cleaner before performing maintenance or troubleshooting checks.
| Problem Possible Solution | |
| The vacuum cleaner will not run | 1. Ensure it's properly plugged into the electrical outlet- Check for a secure connection. 2. Check for electricity in the outlet - Inspect the fuse or breaker. 3. Verify if the On/Off switch is turned on - Press the switch to the ‘On’ position. 4. If the motor thermostat has tripped, switch off and unplug the vacuum cleaner. Wait for one hour before turning it back on. 5. In case of a blown fuse or tripped breaker, reset the circuit breaker or replace the fuse. |
| Vacuum cleaner will not pick up/loss of suction | 1. Ensure the dust container is installed properly - Review the dust container replacement process. 2. Check if the dust container is full or blocked - Empty the dust container. 3. If there are clogged filters, remove, clean, and replace them. 4. For a blocked hose, remove it from the vacuum cleaner and check and clear any blockages. 5. If the crevice tool and small brush are not picking up, check and clear any blockages. |
| Dust escaping from vacuum cleaner | 1. If the dust container is full, empty it. 2. Ensure the dust container is installed correctly - Review the dust container replacement process. 3. If the hose is not installed correctly, review the installation. 4. Check if the filter is not installed completely - Remove, clean, and replace filters. |
| Brushroll will not rotate or is jammed | 1. Check the brushroll and clear any hair or debris. 2. May need to use scissors to cut debris loose. |
| Any other service should be performed by an Authorized Simplicity Vacuum Retailer. To locate your nearest Authorized Retailer, visit our website at www.SimplicityVac.com or call 888-974-6759. | |
Key Replacement Parts
- SFSVPET - Replacement Filter Set
SVPBELT - Replacement Belt
SVPBR - Replacement Brushroll
Warranty
What is Covered:
This warranty covers any defects in material and workmanship in your new vacuum and applies exclusively to the original purchaser.
How Long Coverage Lasts:
Visit Simplicityvac.com for warranty information.
What is Not Covered:
- Damage to the vacuum which occurs from neglect, abuse, alterations, accident, misuse or improper maintenance.
- Normal replacement items: disposable filters, belts and filters.
What Simplicity Will Do:
This warranty provides, at no cost to you, all labor and parts to keep this vacuum in correct operating condition during the warranted period.
How to Get Service:
Warranty service can only be obtained by presenting the vacuum to an Authorized Simplicity Service Center. A proof-of-purchase and product serial number will be required before service is rendered. To locate your nearest Simplicity Service Center, please call 888-974-6759 or visit www.SimplicityVac.com.
THIS WARRANTY IS EXCLUSIVE AND IN LIEU OF ANY AND ALL OTHER WARRANTYES WHEHER WRITTEN, ORAL, EXPRESSED OR IMPLIED, (INCLUDING ANY WARRANTY OF MERCHANTABILITY OR FITNESS FOR A PARTICULAR PURPOSE). THIS WARRANTY DISCLAIMS LIABILITY FOR INCIDENTAL OR CONSEQUENTIAL DAMAGES.
How State Law Applies:
This warranty gives you specific legal rights, and you may also have other rights which vary from state to state.
Owner's Warranty Information (keep this for your records...)
Store name
Store Address City State Zip
Telephone Date of purchase
Serial number Model number


Simplicityvac.com/register-warranty
For complete warranty information visit Simplicityvac.com/warranty-information

We want to hear from you!
Please let us know what you think of your new vacuum by leaving a product review on Simplicityvac.com.
Simplicity® VACUUMS
Que Hará Simplicity:
Simplicityvac.com/register-warranty
Para Obtener información completa sobre la garantía, visite Simplicityvac.com/warranty-information

iQueremos saber deasted!
SPÉCIFICATIONS DU PRODUIT
Que Hará Simplicity:
Simplicityvac.com/register-warranty
- Getting Started
- Care and Maintenance
- Customer Support
- IMPORTANT SAFETY INSTRUCTIONS
- READ ALL INSTRUCTIONS BEFORE USING THIS APPLIANCE. FOR HOUSEHOLD USE ONLY.
- IMPORTANT:
- WARNING:
- SAVE THESE INSTRUCTIONS
- Power Cord, 2-Wire Polarized Cord
- PRODUCT SPECIFICATIONS
- Vacuum Overview
- How to Assemble the Vacuum
- How to Use the Vacuum
- How to Adjust Brushroll Height
- How to Clean with Attachments
- Using the Pet and Upholstery Tool
- Using the Dual Tool - Crevice Tool and Dusting Brush
- Emptying Dust Container
- Vacuum Maintenance
- Cleaning Instructions
- Cleaning the Post Motor Filter
- Removing Debris from the Brushroll
- Storage
- For Best Performance
- Thermal Motor Protection
- How to Reset the Thermal Protector
- Troubleshooting
- Key Replacement Parts
- Warranty
- What is Covered:
- How Long Coverage Lasts:
- What is Not Covered:
- What Simplicity Will Do:
- How to Get Service:
- How State Law Applies:
- Owner's Warranty Information (keep this for your records...)
- We want to hear from you!
- Simplicity® VACUUMS
- Que Hará Simplicity:
- iQueremos saber deasted!
- SPÉCIFICATIONS DU PRODUIT
Brand : Simplicity
Model : SVPET
Category : Vacuum Cleaner