
TubeMeister 36 - Audio Amplifier HUGHES & KETTNER - Free user manual and instructions
Find the device manual for free TubeMeister 36 HUGHES & KETTNER in PDF.

| Product type | Tube guitar amplifier |
| Brand | Hughes & Kettner |
| Model | TubeMeister 36 |
| Dimensions (Head) | 446 x 171 x 152 mm |
| Weight (Head) | 7.7 kg |
| Dimensions (Combo) | 555 x 475 x 269 mm |
| Weight (Combo) | 19.4 kg |
| Preamp tubes | 3 x 12AX7 / ECC83 |
| Power tubes | 4 x EL84 |
| Output power | 36 W (adjustable from 36 W to 1 W and silent mode) |
| Maximum power consumption | 200 W |
| Mains voltage | ±10% (specific fuses depending on voltage) |
| Instrument input | 6.35 mm jack, unbalanced, 1 MΩ |
| RED BOX output | Balanced XLR, with speaker emulation |
| Effects loop | Send and Return 6.35 mm jacks |
| Reverb | Integrated digital reverb |
| MIDI control | Yes, 128 presets |
| Footswitch | Compatible with dual footswitches (FS-2, FSM-432) |
| POWER SOAK | Yes, progressive power reduction |
| TSC | Tube Safety Control (automatic tube monitoring) |
| Speaker (Combo) | Celestion Vintage 30 12" |
| Speaker output impedance | 8 to 16 Ω |
| Special features | 3 channels (Clean, Crunch, Lead), passive 3-band EQ |
| Cleaning | Dry cloth only |
| Protection class | I (grounded) |
| Ambient operating temperature | 0° to +35°C |
Frequently Asked Questions - TubeMeister 36 HUGHES & KETTNER
User questions about TubeMeister 36 HUGHES & KETTNER
0 question about this device. Answer the ones you know or ask your own.
Ask a new question about this device
Download the instructions for your Audio Amplifier in PDF format for free! Find your manual TubeMeister 36 - HUGHES & KETTNER and take your electronic device back in hand. On this page are published all the documents necessary for the use of your device. TubeMeister 36 by HUGHES & KETTNER.
USER MANUAL TubeMeister 36 HUGHES & KETTNER

Class 10

L'Enchel du Pout le

Fund by HBCdn
Torn Mccyny

from next bubble

Fulfe Bov

Sub Review

1. Reference

Title: Pernette

MIL Pernmark

Figure 1

Feng O'ouwefchi

Hillness

Bridging The

fwood
TubeMeister 36
Manual 1.2
Rock on Stage
Play at Home
Record at Night
Important Safety Instructions! Read before connecting!
Th is product has been built by the manufacturer in accordance with IEC 60065 and left the factory in safe working order. To maintain this condition and ensure non-risk operation, the user must follow the advice and warning comments found in the operating instructions. The unit conforms to Protection Class 1 (protectively earthed). If this product shall be used in vehicles, ships or aircraft or at altitudes exceeding 2000 m above sea level, take care of the relevant safety regulations which may exceed the IEC 60065 requirements.
WARNING: To prevent the risk of fi re and shock hazard, do not expose this appliance to moisture or rain. Do not open case – no user serviceable parts inside. Refer service to qualified service personnel.

Th is symbol, wherever it appears, alerts you to the presence of uninsulated dangerous voltage inside the enclosure – voltage that may be sufficient to constitute a risk of shock.

Th is symbol, wherever it appears, alerts you to the presence of externally accessible hazardous voltage. External wiring connected to any terminal marked with this symbol must be a “ready made cable” complying with the manufacturers recommendations, or must be a wiring installed by instructed persons only.

Th is symbol, wherever it appears, alerts you to important operating and maintenance instructions in the accompanying literature. Read the manual.

Th is symbol, wherever it appears, tells you: Take care! Hot surface! To prevent burns you must not touch.
- Read these instructions.
- Keep these instructions.
- Follow all warnings and instructions marked on the product and in this manual.
- Do not use this product near water. Do not place the product near water, baths, wash basins, kitchen sinks, wet areas, swimming pools or damp rooms.
- Do not place objects containing liquid on the product – vases, glasses, bottles etc.
- Clean only with dry cloth.
- Do not remove any covers or sections of the housing.
- The set operating voltage of the product must match the local mains supply voltage. If you are not sure of the type of power available consult your dealer or local power company.
- To reduce the risk of electrical shock, the grounding of this product must be maintained. Use only the power supply cord provided with this product, and maintain the function of the center (grounding) pin of the mains connection at any time. Do not defeat the safety purpose of the polarized or grounding-type plug.
- Protect the power cord from being walked on or pinched particularly at plugs, convenience receptacles, and the point where they exit from the device! Power supply cords should always be handled carefully. Periodically check cords for cuts or sign of stress, especially at the plug and the point where the cord exits the device.
- Never use a damaged power cord.
- Unplug this product during lightning storms or when unused for long periods of time.
- Th is product can be fully disconnected from mains only by pulling the mains plug at the unit or the wall socket. The product must be placed in such a way at any time, that disconnecting from mains is easily possible.
- Fuses: Replace with IEC127 (5x20mm) type and rated fuse for best performance only! It is prohibited to use "patched fuses" or to short the fuse-holder. Replacing any kind of fuses must only be carried out by qualified service personal.
- Refer all servicing to qualified service personnel. Servicing is required when the unit has been damaged in any way, such as:
- When the power cord or plug is damaged or frayed.
- If liquid has been spilled or objects have fallen into the product.
- If the product has been exposed to rain or moisture.
- If the product does not operate normally when the operating instructions are followed.
- If the product has been dropped or the cabinet has been damaged.
- Do not connect external speakers to this product with an impedance lower than the rated impedance given on the product or in this manual. Use only cables with sufficient cross section according to the local safety regulations.
- Keep away from direct sunlight.
- Do not install near heat sources such as radiators, heat registers, stoves or other devices that produce heat.
- Do not block any ventilation openings. Install in accordance with manufacturer's instructions. This product must not be placed in a built-in installation such as a rack unless proper ventilation is provided.
- Always allow a cold device to warm up to ambient temperature, when being moved into a room. Condensation can form inside it and damage the product, when being used without warming up.
- Do not place naked flame sources, such as lighted candles on the product.
- The device must be positioned at least 20 cm/8" away from walls with free air space in between, and there must be free air space of at least 50 cm / 20" immediately above the unit within which no object(s) may be placed or positioned.
- Use only with the cart, stand, tripod, bracket or table specified by the manufacturer or sold with the product. When a cart is used, use caution when moving the cart/product combination to avoid injury from tip-over.
- Use only accessories recommended by the manufacturer, this applies for all kind of accessories, for example protective covers, transport bags, stands, wall or ceiling mounting equipment. In case of attaching any kind of accessories to the product, always follow the instructions for use, provided by the manufacturer. Never use fixing points on the product other than specified by the manufacturer.
- 'Th is appliance is NOT suitable to be used by any person or persons (including children) with limited physical, sensorical or mental ability, or by persons with insufficient experience and/or knowledge to operate such an appliance. Children under 4 years of age must be kept away from this appliance at all times.
- Never push objects of any kind into this product through cabinet slots as they may touch dangerous voltage points or short out parts that could result in risk of fi re or electric shock.
- Th is product is capable of delivering sound pressure levels in excess of 90 dB, which may cause permanent hearing damage! Exposure to extremely high noise levels may cause a permanent hearing loss. Wear hearing protection if continuously exposed to such high levels.
• The manufacturer only guarantees the safety, reliability and efficiency of this product if:
- Assembly, extension, re-adjustment, modifications or repairs are carried out by the manufacturer or by persons authorized to do so.
- The electrical installation of the relevant area complies with the requirements of IEC (ANSI) specifications.
- The unit is used in accordance with the operating instructions.
- The grounding of the center pin of the mains plug is maintained to reduce the risk of shock.
Since the company's 1984 inception, Mr. Hughes and Herr Kettner have put their hearts and souls into an ambitious quest: to develop guitar amps with unsurpassed tone and supreme handling ease. Their mission: Technology of Tone. Their mantra: Make the most of all available technologies to afford discerning guitarists immediate access to inspiring sounds. They packed over a quarter of a century's worth of tube amp know-how into the ultra compact TubeMeister format. And the Technology of Tone inside each amp introduces a whole new chapter to the tale of tube-driven tone.
Rock on Stage – Play at Home – Record at Night
Things to Do Before Operating the Amp
- Please read these instructions carefully, particularly the notes on safety, before operating the amp.
- The manufacturer disclaims any liability or responsibility whatsoever for any damage or defect to this and other devices resulting from misuse.
- Before you plug this amp into a mains power outlet, make sure its POWER and STANDBY switches are off and that the voltage rating indicated on its rear panel matches your local mains current.
- A word of warning before you fire up your TUBEMEISTER 36: It's loud, and high volume levels can cause hearing damage.
Table of Contents
1 Connections and Control Features 10
2 Standard Setup/ Cable Connections 14
3 MIDI 14
4 Tube Safety Control (TSC) 16
5 Technical Specifications 18
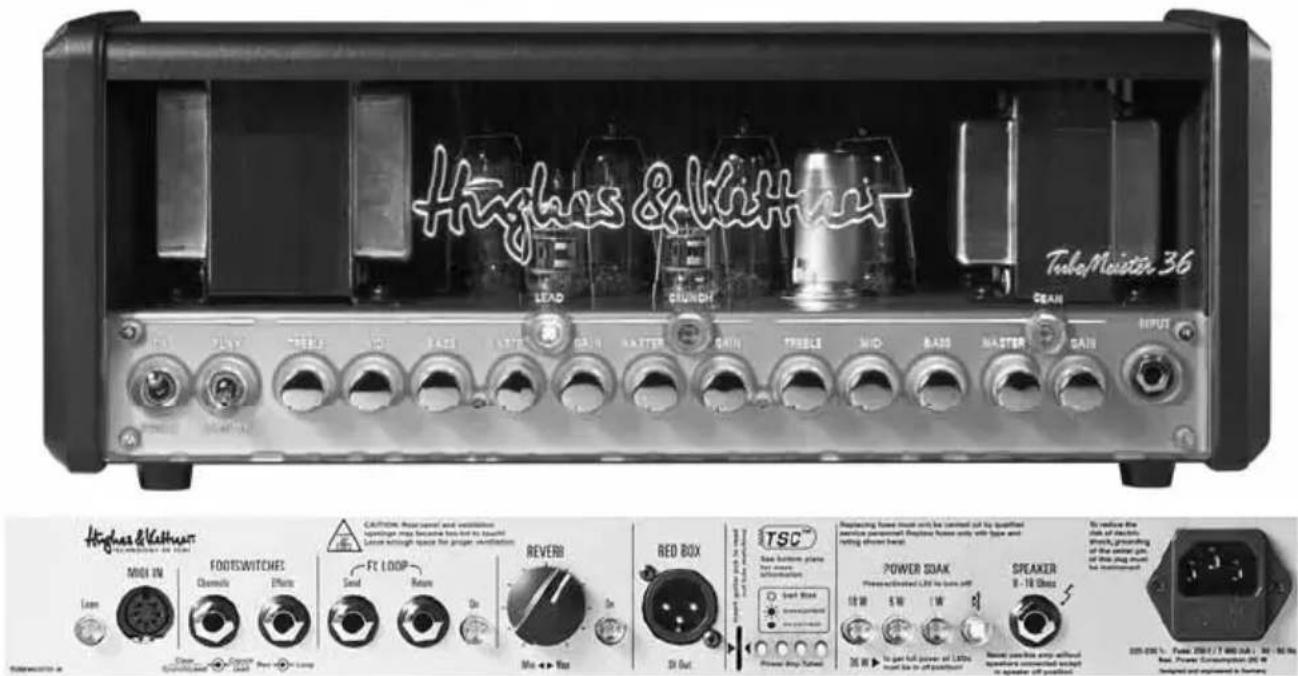
1 Connections and Control Features
The TubeMeister 36 features three channels with dedicated GAIN and MASTER controls. Think of GAIN and MASTER as the yin and yang of sound-shaping for all three channels. The best way to probe the channels' many sonic possibilities is to experiment. We recommend that you set the POWER SOAK to five-watt mode and all knobs to the 12 o'clock position. Then adjust GAIN/MASTER settings at will to get a taste of the very different flavors of preamp and power tube distortion. The further you back off the MASTER knob, the drier the amp's sound. The further you turn the knob up, the juicier the power tube distortion. All of TubeMeister 36's channels are very responsive to the input signal. You can conjure a remarkably diverse range of sounds simply by varying your choice of pickup and adjusting the guitar's volume knob.
NOTE: Be advised that you cannot mute the TubeMeister 36 by turning the MASTER knob all the way down (to the far left position). If you wish to play at very soft levels, we recommend that you attenuate the amp's overall output by selecting five-watt or one-watt mode (see POWER SOAK) rather than backing the MASTER volume way down.
To avoid very loud and unwelcome surprises, make a habit of backing the Volume knob of the guitar connected to the TUBEMEISTER all the way down before switching on the amp.
1.1 Front Panel
POWER/ON
Set this switch to ON to get the mains power flowing. The amp lights up and the tubes will begin to heat up.
PLAY/STANDBY Switch
Give the tubes about 30 seconds to get toasty; then you can flip the STANDBY switch to PLAY. The amp is now ready to operate. When taking a short break from playing, please use the STANDBY switch so the tubes remain at operating temperature. This protects them and ensures they last longer.
INPUT
Connect your guitar to this input using a shielded cord equipped with 6.3 mm (1/4") jack plugs.
CLEAN Button
Use it to activate the CLEAN channel. Its LED lights up blue when you do.
GAIN [CLEAN]
The GAIN knob determines the CLEAN channel's input sensitivity.
MASTER [CLEAN]
This knob adjusts the CLEAN channel's volume without affecting the other channels' levels.
BASS, MID, TREBLE [CLEAN]
This passive 3-band voicing section controls the CLEAN channel's low, midrange and high frequencies.
CRUNCH Button
Use it to activate the CRUNCH channel. Its LED lights up yellow when you do.
GAIN [CRUNCH]
This knob controls the amount of tube distortion in the CRUNCH channel.
MASTER [CRUNCH]
This knob adjusts the CRUNCH channel's volume without affecting the other channels' levels.
LEAD Button
Use it to activate the LEAD channel. Its LED lights up red when you do.
GAIN [LEAD]
This knob controls the amount of tube distortion in the LEAD channel.
MASTER [LEAD]
This knob adjusts the LEAD channel's volume.
BASS, MID, TREBLE [CRUNCH/LEAD]
This is a shared voicing section that controls both the CRUNCH and LEAD channels.
1.2 Rear Panel
MIDI IN and LEARN
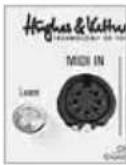
We devoted an entire chapter to MIDI
control. See section 3 to learn more about it.
FOOTSWITCHES
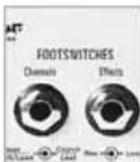
Both CHANNELS and EFFECTS
accept a two-way footswitch equipped with a standard stereo jack plug, for example the HUGHES & KETTNER FS-2.
The first switch on the two-way footswitch plugged into the CHANNELS port selects either CLEAN or the two overdrive channels; the second switch activates either CRUNCH or LEAD.
The first switch on the two-way footswitch plugged into the EFFECTS port switches REVERB on and off; the second switch enables and disables the FX loop.
Note: If a footswitch is connected to the CHANNELS jack plug, you can only activate channels using this footswitch. In this case, the channel select buttons on the front panel serve only to indicate the channels' status. However, you can continue switching channels via a connected MIDI board.
TIP: You can also connect a MIDI-enabled controller or foot-switchable board such as the HUGHES & KETTNER FSM-432 (see section 3). We urge you to do this. Then you can make the most of the Power Soak's potential and use it as a sound-shaping tool unlike any other you've ever experienced. With MIDI commands, you can switch entire setup – that is, combinations of different channel, power output, reverb and FX loop settings – at the touch of a button.
FX LOOP
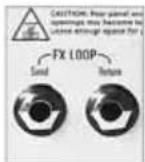
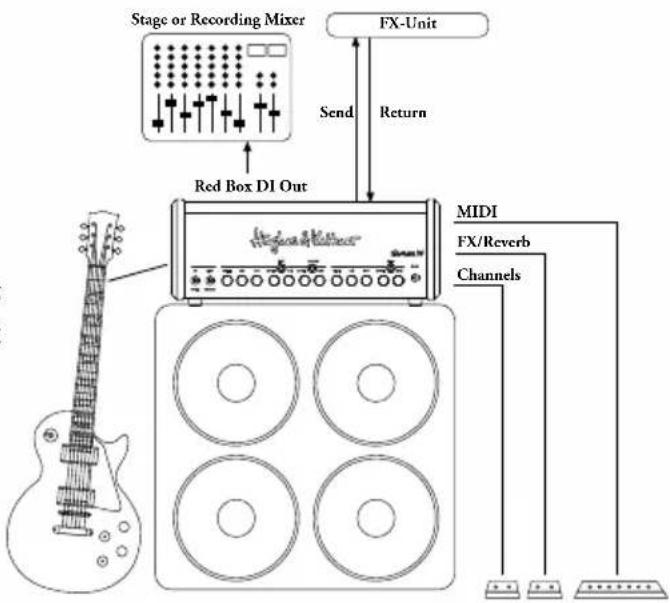
This serial loop lets you patch in effects devices: Connect the SEND jack to your effects processor's input and the RETURN jack to the processor's output. The ON button activates and deactivates the loop.
TIP: You can also use the SEND jack to tap the preamp signal, for example, to patch it to another power amp or a tuner. Conversely, you can use RETURN to feed signals into the TUBE MEISTER's power amp. In combination with the POWER SOAK and the RED BOX Recording Out, this gives you a powerful recording front end that offers very interesting re-amping and sound-shaping options for just about every conceivable signal.
If you're a stomp-box user, you may want to try the four-cord method: For devices that work best plugged into the front end of the amp, simply connect the guitar to the input of the first pedal in the chain and the last pedal's output to the amp's input. Now do the same for devices that work best in the FX loop: Connect the pedal's send to the amp's FX RETURN and the amp's FX SEND to the pedal's return. This lets you route chorused, phased and other modulated signals into the TubeMeister 36's preamp and time-based effects such as reverb and delay in after the preamp. If your multi effector features amp models, you can patch these straight to the TubeMeister 36's power amp via the FX loop.
HEADS UP: You can bypass the TubeMeister 36's preamp by routing amp models into the FX RETURN. However, when you switch channels its power amp is re-voiced to deliver the best tone for that channel. This means every channel sounds different even if you decide to use only the power amp! You probably want the amp model's sound and volume to remain consistent with your original programming. If so, you'll have to remember which channel you used for programming and select it when you activate the amp model. However, the better option is to program a MIDI command to do this for you.
REVERB
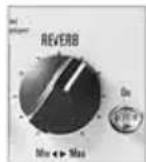
This knob adjusts the intensity of the vital reverb. We configured the reverb at the effect is more pronounced with the channel than with the overdriven channels. Ectton activates and deactivates the reverb can also switch it using a two-way r via MIDI (see the respective sections to
RED BOX
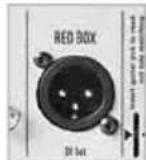
Invented by Hughes & Kettner, the
RED BOX has for years set the industry standard for analog guitar DI boxes with built-in speaker emulation. It converts the TubeMeister 36's speaker out signal, which is tapped post power amp and pre POWER SOAK, into a balanced, frequency-compensated signal that you can patch directly to a mixing console. This signal sounds very authentic when piped through a PA or studio monitors.
NOTE: Use a microphone cord to patch this signal to a mixing console. Make sure the mixing console's XLR input is set to line level. If the mixing console lacks XLR inputs or if these cannot be set to line level, you will need an XLR-to-6.3 mm-(1/4")-jack adapter readily available in music stores.
HEADS UP: The channels' MASTER settings and the selected POWER SOAK mode directly affect the signal level: Stepping up to 36 watts from 18 watts changes the RED BOX OUT level as it does the SPEAKER OUT level. Stepping down from 18 watts to 5 watts, 1 watt and Speaker Off (for silent recording) does not change the level! So you can step up from 18 watts to 36 watts on the fly (via
MIDI), for example, to boost the volume for leads when playing live. The level of the signal sent to the RED BOX OUT (and to the mixing console) will be bumped up accordingly. The signal level of the 18W, 5W, 1W and SPEAKER OFF modes remains the same for a very good reason: That way you can choose the right SPEAKER OUT level for the rehearsal room, home practicing and silent recording without having to adjust MASTER knob settings.
TSC
We devoted an entire chapter to the
TUBE SAFETY CONTROL. See section 4 to learn more about it.
POWER SOAK

Use these buttons to adjust the
TubeMeister 36's output power and set its basic volume level. This feature lets you enjoy the benefits of full-blown power amp saturation at low volume so you can play at home in your living room without alienating the neighbors. Its silent recording capability lets you capture genuine tube-driven tone via a mixing console without having to drive speakers. And if you want to rehearse in silence any time day or night, simply plug a set of headphones into the mixer.
None of the buttons in this section light up when the amp is in ‘normal’ operating mode (36 watts of output power). When you press the 18W button, TSC disables two tubes to reduce the output power by half to 18 watts. When you press the 5W and 1W buttons, some of the power is converted into heat to further reduce the output by 5 watts and 1 watt, respectively. In Speaker Off mode, all the power is converted into heat and the amp is muted.
The POWER SOAK is not just about managing volume; it's also about conjuring the right tone and response. For modern sounds that demand fast, tightly focused response with less power tube saturation, set the POWER SOAK to full power and turn the MASTER knob down. If you want classic rock sounds replete with spongier power tube saturation and creamier tone, drop the POWER SOAK down to a lower setting and crank the MASTER knob to give those power tubes a workout.
If you have connected a MIDI board, you can assign a separate power amp mode to each channel. This lets you do things like conjure classic rock tone by running the CRUNCH channel in a lower power mode with the MASTER cranked to saturate those power amps. Then you could operate the LEAD channel at full power and with a lower MASTER setting to coax more modern sounds out of the amp.
Note that if you choose to mute the amp, you do not need to connect a speaker to the TubeMeister 36's SPEAKER OUT. Designed to enable silent recording, this option provides the full signal to the RED BOX output. To protect the power amp, TubeMeister automatically engages this mute circuit as soon as the plug is pulled from the SPEAKER OUT port.
HEADS UP: TSC shuts down one pair of tubes to cut the power from 36 to 18 watts (see section 4), which is why two TLC LEDs always light up when the amp is in 18W, 5W, 1W and Speaker Off modes. TSC is simply indicating that two tubes are off, and not that it has detected a fault.
NOTE: If you select the POWER SOAK mode manually, this will affect all channels globally. The MIDI option (see chapter 3) is a different matter altogether: It lets you store the POWER SOAK mode locally for any given channel or even in a MIDI preset. This means you can switch the output power level on the fly simply by tapping your foot board. And that makes the POWER SOAK a sound-sculpting tool that you can use creatively on stage.
SPEAKER
Connect a speaker cabinet designed for guitar amps to this jack. Using a single speaker cord, you can connect any cabinet or combination of cabinets whose total impedance ranges between 8 Ω and 16 Ω. The formula below serves to calculate the overall impedance (R) of two cabinets with different impedances (R1 and R2)
For cabinets wired in series: R = R1 + R2
Example: If you connect two 8- cabinets, the overall impedance is 16 . However, very few modern cabinets are wired in series. Parallel circuits are far more common.
For cabinets wired in parallel:
$$ \mathrm{R} = (\mathrm{R1} \times \mathrm{R2}) / (\mathrm{R1} + \mathrm{R2}) $$
Here is an example with two 16- cabs:
$$ \mathrm{R} = (1 6 \times 1 6) / (1 6 + 1 6) $$
$$ \mathrm{R} = 2 5 6 / 3 2 $$
$$ \mathrm{R} = 8 $$
HEADS UP: On the Combo version, this jack is already occupied by the internal speaker. Feel free to disconnect this speaker from the SPEAKER OUT jack and connect another cabinet designed for guitar amps.
MAINS IN
Connect the factory-included power cord (MAINS LEAD) to this socket. The shaft holding the mains fuses is located next to this socket. Replacing blown fuses is a job to be carried out by fully qualified technicians only using exclusively the specified replacement fuses (see Technical Specifications).
2 Standard Setup/ Cable Connections
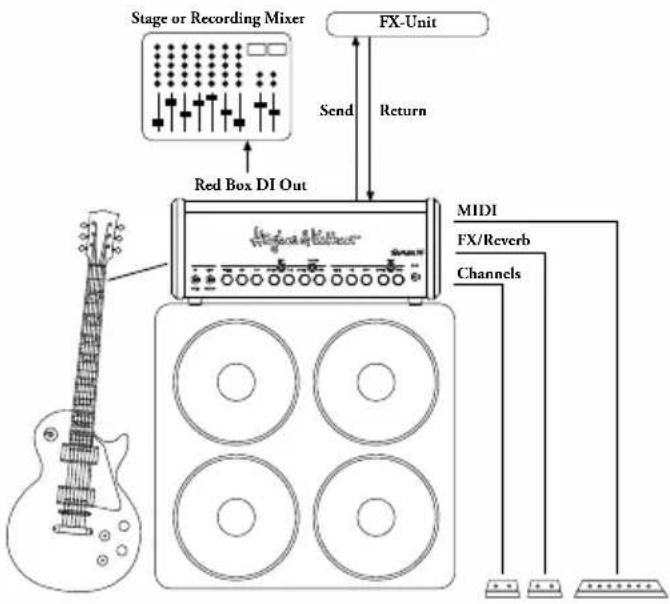
flowchart
graph TD
    A["Stage or Recording Mixer"] --> B["Red Box DI Out"]
    B --> C["FX-Unit"]
    C --> D["Send"]
    C --> E["Return"]
    D --> F["MIDI"]
    E --> F
    F --> G["FX/Reverb"]
    F --> H["Channels"]
    G --> I["Output"]
    H --> J["Output"]
3 MIDI
TubeMeister 36 is equipped with a 7-pin MIDI port. Two of the pins serve as a phantom power supply, providing 20 volts of direct current to power a device such as the Hughes & Kettner FSM 432 without requiring an additional wall-wart. A standard 5-pin connector does not tap this phantom power feed, so you can use a cable equipped with this type of plug to connect any standard MIDI board.
With TubeMeister 36's MIDI facility, command and control is an exercise in convenience with lots of intriguing switching and storage possibilities. Given a MIDI-enabled controller, foot board or multi-effector and a fistful of MIDI presets (see below), you can dip into the TubeMeister 36's deep sonic well and pull up any conceivable combination of the following functions at the tap of a toe:
One of the 3 channels CLEAN, LEAD, CRUNCH
+ FX-LOOP on/off
+ REVERB on/off
+ The full 36W or one of the POWER SOAK stages 18W, 5W, 1W or Speaker Off
3.1 Programming
Programming couldn't be any easier. If you want to save a configuration such as CRUNCH with BOOST, FX LOOP and 18W activated, simply activate this combination on TubeMeister 36. Arm the amp by briefly pressing the MIDI LEARN button (LEARN lights up), and then send the number of the program slot where you want to store this setup by pressing the appropriate switch on your MIDI board. The LEARN light extinguishes to indicate TubeMeister 36 has saved this configuration to one of the 128 internal program slots and assigned it to a preset on your foot board. To discontinue programming without saving settings, simply press the button again.
Now when TubeMeister 36 receives a program change message via the selected MIDI channel (more on this below), LEARN flashes briefly and TubeMeister 36 is configured accordingly.
TIP: This lets do some pretty exotic stuff on stage: You could use the same killer tone at 18 watts for your rhythm work and at 36 watts for leads, and switch between the two on the fly. Or you could assign a different power stage to each channel, say the full 36 watts to CLEAN, 5 watts to CRUNCH and 18 watts to LEAD.
3.2 Setting the MIDI Channel and Switching OMNI On/Off
Flip the PLAY/STANDBY switch to STANBY. Now press and hold the two ON buttons for FX LOOP and REVERB simultaneously. They will flash after about three seconds.
This assigns special programming functions to the following LEDs and buttons:

Now serves as a +1/up button. The factory default is MIDI channel 1.
18W
Now serves as a -1/down button.
LEARN [MIDI]
Switches OMNI on/off. LEARN lights up to indicate TubeMeister 36 is configured to receive incoming program changes via all MIDI channels (default). If the LED is not illuminated the amp receives messages via the selected channel only.
NOTE: OMNI enables reception on all channels. This option is a good choice if you're unsure which channel your foot board uses to send messages.
When configuring MIDI setups, the four POWER SOAK LEDs serve to indicate the MIDI channels. Consult the table below for the MIDI channel assignments. They are shown what in tech-speak is called binary code:
| MIDI-Channel | 18W 5W 1W | Speaker Off | ||
| 1 | ||||
| 2 | ||||
| 3 | ||||
| 4 | ||||
| 5 | ||||
| 6 | ||||
| 7 | ||||
| 8 | ||||
| 9 | ||||
| 10 | ||||
| 11 | ||||
| 12 | ||||
| 13 | ||||
| 14 | ||||
| 15 | ||||
| 16 | ||||
Press and hold the two ON buttons for FX LOOP and REVERB simultaneously for more than three seconds to save the settings and quit MIDI setup mode. The buttons will stop flashing to indicate the amp is back in normal operating mode.
3.3 Factory Settings and How to Restore Them (Factory Reset)
To reset the amp to the factory default settings, press and hold the REVERB ON and FX LOOP ON while powering up simultaneously until the MIDI LEARN button lights up. After you release the ON buttons, MIDI LEARN will flash once to confirm that the reset has been executed properly.
The factory defaults are:
- OMNI ON
- MIDI Channel 1
The factory default settings and assignments for sounds are:
| MIDI Program | Preamp Channel | Power Output | FX Loop REVERB | |
| 1 | C | l e | a | n |
| 2 Crunch 36 W OFF OFF | ||||
| 3 Lead 36 W OFF OFF | ||||
| 4 | C | l e | a | n |
| 5 | C | l e | a | n |
| 6 Crunch 18 W OFF OFF | ||||
| 7 Lead 18 W OFF OFF | ||||
| 8 | C | l e | a | n |
| 9 | C | l e | a | n |
| 10 | Crunch | 5 W | OFF | OFF |
| 11 | Lead | 5 W | OFF | OFF |
| 12 | Clean | 0 W | OFF OFF | |
| 13 | Clean | 1 W | OFF | ON |
| 14 | Crunch | 1 W | OFF | OFF |
| 15 | Lead | 1 W | OFF | OFF |
| 16 | Clean | 0 W | OFF | OFF |
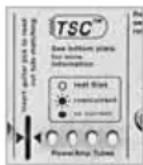
4 Tube Safety Control (TSC ^™ )
TSC ^™ adjusts bias to improve the amp's tonal and technical stability and extend power tubes' life. It does this automatically and continuously, so there is nothing for you to do but enjoy the convenience.
Swapping tubes is more easily, quickly, and safely done than with a conventional amp. This is a big help not only in case of a defect, but also when you want to compare different brands of replacement tubes.
CAUTION: Replacing tubes is a job for qualified professionals! TSC™ merely spares the technician the biasing effort.
What do the LEDs indicate?
Each LED is assigned to the power tube occupying that same position. Getting a read-out of tubes' operating status and bias points is easy using any standard guitar pick.
4.1 Automatic Status Indications:
3 6 W O F F O N
All LEDs Light Up And Stay On
All LEDs remain on for as long as the amp is in 0 standby mode. When you flip the STANDBY F F
1 switch to WPLAY, they will extinguish after about 30 seconds. If the LEDs remain illuminated, the most likely cause is a blown anode fuse that needs to be 0 Weplace by a technician. The anode fuse can trip if 5 W tube is already defective when the Amp is switched on, and TSC does not have enough time to measure idle current and shut the faulty tube down.
None of the LEDs Lights Up
The power tubes are operating normally.
One LED Lights Up Continuously
The tube assigned to this LED is not delivering enough current and has been shut down. If the LED does not extinguish after a few minutes, this tube must be replaced.
Two LEDs Light Up Continuously
This tells you one of two things: Either these tubes are not delivering enough current and has to be replaced (see the instructions for one illuminated LED), or the Power Soak is active. In the latter case, two tubes are switched off automatically and the two illuminated LEDs are indicating this.
One LED Flashes, Another Lights Up
Continuously
The tube assigned to this flashing LED is generating too much current. It has been shut down and has to be replaced. In this type of power amp, it takes a pair of tubes working together to produce the best sound. The defective tube's counterpart has been switched off so it doesn't degrade the other pair's tone. This tube's LED lights up continuously to indicate it has also been shut down, but there is no need to replace it. You can continue playing, though output is halved from 36 to 18 watts for as long as the LED remains illuminated. If this occurs in a conventional amp, its fuse usually trips and you can't operate it until you replace the tube and fuse.
4.2 Manual Read-Out
TSC ^™ checks tubes' bias points to let your determine if pairs match. This is easily done by inserting a pick into the appropriate slot while the amp is on (rather than in STANDBY mode). The LEDs will flash. How many times the LEDs flash matters, but what matters more is the difference in flash counts. TSC will ensure optimum sound if the difference is no greater than four flashes. If the difference in flash counts is greater than four, we recommend installing a matched set of tubes to improve the tone. This is strictly a matter of tone - technically speaking; the amp will continue to operate safely.
HEADS UP: The two inside tubes and the two outside are matched pairs. If just a single tube is swapped, ensure the replacement tube's rating matches that of its counterpart. If all tubes are replaced, ensure they all share the same ratings.
The table below shows Hughes & Kettner tube ratings and how flash counts translate to a rating. For example, if the TSC display flashes six times you need a tube with an S2 rating. The chart also tells you that its bias point is set to 13 volts. You can buy a replacement tube from your local dealer. The original Hughes & Kettner rating (S1-S7, 0-12) is shown on a sticker on the tube.
| Flashes Rating Bias [V] | ||
| 1 | S | 7 |
| 2 | S | 6 |
| 3 | S | 5 |
| 4 | S | 4 |
| 5 | S | 3 |
| 6 | S | 2 |
| 7 | S | 1 |
| 8 | 0 | 1 |
| 9 | 1 | 1 |
| 10 2 15.4 | ||
| 11 | 3 16 | |
| 12 | 4 | 16.6 |
| 13 | 5 17.2 | |
| 14 6 | 17.8 | |
| 15 | 7 | 18.4 |
| 16 8 19 | ||
| 17 9 19.6 | ||
| 18 | 10 | 20.2 |
| 19 | 11 | 20.8 |
| 20 12 | 21.4 | |
| 21 | * | 22 |
| 22 | * | 22.6 |
| 23 | * 23.2 | |
| 24 | * 23.8 | |
| 25 * 24.4 | ||
5 Technical Specifications
| TubeMeister 36 Head & Combo | |
| Preamp tubes: 3 x 12AX7 / ECC83 | |
| Power tubes: 4 x EL84 | |
| Power output: 36 watts | |
| Max. power consumption: 200 watts | |
| Mains voltage tolerance range: +-10% | |
| Ambient operating temperature range: 0° to +35°C | |
| Mains fuse, 100 volts: 250 V / T 2 A L | |
| Mains fuse, 120 volts: 250 V / T 1.6 A L | |
| Mains fuse, 220-230 volts: 250 V / T 800 mA L | |
| Mains fuse, 240 volts: 250 V / T 800 mA L | |
| Input jack: 6.3 mm (1/4"), unbalanced, 1 MΩ | |
| Send jack: 6.3 mm (1/4"), unbalanced, 250 Ω, max. + 6 dBV | |
| Return jack: 6.3 mm (1/4"), unbalanced, 45 kΩ, -3 dBV | |
| RED BOX Out: XLR, balanced, 1360 Ω, max +9 dBV | |
| Speaker Out: | 6.3 mm (1/4"), 8 to 16 Ω |
| Footswitch Channels: | 6.3 mm (1/4"), stereo, tip=Channel, ring=Boost |
| Footswitch Effects: | 6.3 mm (1/4"), stereo, tip=Reverb, ring=FX Loop |
| MIDI In | 7-pin, 20 V DC phantom power, 5-pin compatible |
| TubeMeister 36 Head | |
| Dimensions: | 446 x 171 x 152 mm |
| Weight: | 7.7 kg |
| TubeMeister 36 Combo | |
| Dimensions: 39 | 555 x 475 x 269 mm |
| Weight: | 19.4 kg |
| Speaker: | 12" Celestion Vintage 30 |
Technology of Tone
Rock on Stage – Play at Home – Record at Night

BASS, MID, TREBLE [CLEAN]
BASS, MID, TREBLE [CRUNCH/LEAD]
Rock on Stage – Play at Home – Record at Night
4 Tube Safety Control (TSC) 40

BASS, MID, TREBLE [CLEAN]
BASS, MID, TREBLE [CRUNCH/LEAD]
Rock on Stage – Play at Home – Record at Night

BASS, MID, TREBLE [CLEAN]
BASS, MID, TREBLE [CRUNCH/LEAD]
Per cabinet collegati in serie: R = R1 + R2.
| Programma MIDI | Canale preamp-lificatore | Potenza finale | FX-Loop | REVER |
| 1 Clean 36 Watt OFF ON | ||||
| 2 Crunch 36 Watt OFF OFF | ||||
| 3 Lead 36 Watt OFF OFF | ||||
| 4 Clean 0 Watt OFF OFF | ||||
| 5 Clean 18 Watt OFF ON | ||||
| 6 Crunch 18 Watt OFF OFF | ||||
| 7 Lead 18 Watt OFF OFF | ||||
| 8 Clean 0 Watt OFF OFF | ||||
| 9 Clean 5 Watt OFF ON | ||||
| 10 Crunch 5 Watt OFF OFF | ||||
| 11 | Lead | 5 Watt OFF OFF | ||
| 12 | Clean 0 | Watt OFF OFF | ||
| 13 | Clean 1 | Watt OFF ON | ||
| 14 Crunch 1 Watt OFF OFF | ||||
| 15 | Lead | 1 Watt OFF OFF | ||
| 16 | Clean 0 | Watt OFF OFF | ||
4 Il Tube-Safety-Control (TSC ^™ )
Rock on Stage – Play at Home – Record at Night
BASS, MID, TREBLE [CLEAN]
BASS, MID, TREBLE [CRUNCH/LEAD]
4 El control Tube-Safety (TSC™)
$$ R = (1 6 \times 1 6) / (1 6 + 1 6) $$
$$ R = 2 5 6 / 3 2 $$
$$ R = 8 $$
2 標準設定および配線
flowchart
graph TD
    A["Stage or Recording Mixer"] --> B["Red Box D1 Out"]
    B --> C["FX-Unit"]
    C --> D["Send"]
    C --> E["Return"]
    D --> F["MIDI"]
    E --> F
    F --> G["FX/Reverb"]
    F --> H["Channels"]
    G --> I["Output"]
    H --> J["Output"]
3 MIDI
Hughes & Kettner
Postfach 1509
66595 St. Wendel
Germany
Tel: +49 (0) 68 51 - 905 0
Fax: +49 (0) 68 51 - 905 103
International Inquiries:
Fax: +49 - 68 51 - 905 200
hkinternational@hughes-and-kettner.com
www.hughes-and-kettner.com

facebook.com/hughesandkettner
Copyright 08/2017 by Music & Sales GmbH.
Subject to change without notice.
