
Espressionata Evo - Coffee machine Klarstein - Free user manual and instructions
Find the device manual for free Espressionata Evo Klarstein in PDF.

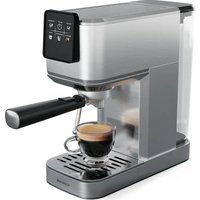
| Product type | Automatic coffee machine with steam wand |
| Brand | Klarstein |
| Model | Espressionata Evo |
| Article numbers | 10045425, 10045426 |
| Power supply | 220-240 V ~ 50/60 Hz |
| Power consumption | 1350 W |
| Pump pressure | 19 bar |
| Water tank capacity | 1.2 liter |
| Milk tank capacity | 0.5 liter |
| Main functions | Espresso, Cappuccino, Latte, Milk froth |
| Integrated pressure gauge | Yes |
| Cup warming area | Yes, on top |
| Included portafilters | Small (1 cup) and large (2 cups) |
| Measuring spoon | Yes, included |
| Swivel steam wand | Yes, with rotating head for milk froth |
| Milk circuit cleaning system | Automatic, with dedicated button |
| Descaling program | Automatic, button operated |
| Standby mode (energy saving) | Yes, after approximately 29 minutes of inactivity |
| Water shortage protection | Yes, automatic shut-off and alarm |
| Recommended regular maintenance | Descaling every 2-3 months |
| Safety | Automatic shut-off, overheat protection, use out of reach of children |
| Dimensions (approx.) | 35 x 25 x 30 cm (W x D x H) |
| Weight (approx.) | 5 kg |
Frequently Asked Questions - Espressionata Evo Klarstein
User questions about Espressionata Evo Klarstein
0 question about this device. Answer the ones you know or ask your own.
Ask a new question about this device
Download the instructions for your Coffee machine in PDF format for free! Find your manual Espressionata Evo - Klarstein and take your electronic device back in hand. On this page are published all the documents necessary for the use of your device. Espressionata Evo by Klarstein.
USER MANUAL Espressionata Evo Klarstein
ESPRESSIONATA EVO MILK
Espressomaschine
Espresso Maker
Machine à expresso
Máquina de expreso
area
| Category | Value | | -------- | ----- | | 1 | 100 | | 2 | 100 | | 3 | 100 | | 4 | 100 | | 5 | 100 | | 6 | 100 | | 7 | 100 | | 8 | 100 | | 9 | 100 | | 10 | 100 | | 11 | 100 | | 12 | 100 | | 13 | 100 | | 14 | 100 | | 15 | 100 | | 16 | 100 | | 17 | 100 | | 18 | 100 | | 19 | 100 | | 20 | 100 | | 21 | 100 | | 22 | 100 | | 23 | 100 | | 24 | 100 | | 25 | 100 | | 26 | 100 | | 27 | 100 | | 28 | 100 | | 29 | 100 | | 30 | 100 | | 31 | 100 | | 32 | 100 | | 33 | 100 | | 34 | 100 | | 35 | 100 | | 36 | 100 | | 37 | 100 | | 38 | 100 | | 39 | 100 | | 40 | 100 | | 41 | 100 | | 42 | 100 | | 43 | 100 | | 44 | 100 | | 45 | 100 | | 46 | 100 | | 47 | 100 | | 48 | 100 | | 49 | 100 | | 50 | 100 | | 51 | 100 | | 52 | 100 | | 53 | 100 | | 54 | 100 | | 55 | 100 | | 56 | 100 | | 57 | 100 | | 58 | 100 | | 59 | 100 | | 60 | 100 | | 61 | 100 | | 62 | 100 | | 63 | 100 | | 64 | 100 | | 65 | 100 | | 66 | 100 | | 67 | 100 | | 68 | 100 | | 69 | 100 | | 70 | 100 | | 71 | 100 | | 72 | 100 | | 73 | 100 | | 74 | 100 | | 75 | 100 | | 76 | 100 | | 77 | 100 | | 78 | 100 | | 79 | 100 | | 80 | 100 | | Note: The actual values are not provided in the code. I have used the label 'Value' as a placeholder for the value detection. You would need to run the code to get the actual values from the code list. Please note that the actual values would be the result of this example. You would need to run the code to get the actual values from the code list. You would need to run the code to get the actual values from the code list. You would need to run the code to get the actual values from the code list. You would need to run the code to get the actual values from the code list. You would need to run the code to get the actual values from the code list. You would need to run the code to get the actual values from the code list. You would need to run the code to get the actual values from you would need to run the code. You would need to run the code to get the actual values from you would need to run the code.INHALTSVERZEICHNIS
natural_image
Technical line drawings of three different types of industrial machines, showing front, side, and top views with no visible text or symbols.natural_image
Line drawing of a mechanical device with no visible text or symbolsnatural_image
Line drawing of a standard bread maker with control panel and handle (no text or symbols)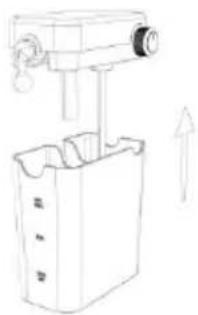
natural_image
Line drawing of a mechanical device with an upward arrow indicating motion or force (no text or symbols present)natural_image
Line drawings of three different kitchen utensils: a multi-tiered brush, a single-piston bath, and a standard microwave oven (no text or symbols present)natural_image
Symbol of a trash bin crossed with a diagonal line, no text or labels presentBerlin Brands Group UK Limited
PO Box 42
272 Kensington High Street
London, W8 6ND
United Kingdom
Dear customer,
Congratulations on your purchase. Please read the following instructions carefully and follow them to prevent potential damage. We accept no liability for damage caused by disregarding the instructions and improper use. Please scan the QR code to access the latest operating instructions and further information about the product.

CONTENTS
Safety Instructions 30
Device Overview 34
Operation 35
Cleaning and Care 43
Frequently Asked Questions 44
Troubleshooting 45
Coffee Variations 47
Disposal Considerations 50
Manufacturer & Importer (UK) 50
TECHNICAL DATA
| Article number 10045425, 10045426 | |
| Power supply 220-240 V ~ 50/60 Hz | |
| Power 1350 watts | |
| Water tank capacity 1.2 litres | |
| Milk tank capacity 0.5 litres | |
| Pressure 19 bar | |
SAFETY INSTRUCTIONS
- Read these operating instructions carefully to avoid hazards from physical damage, fire, electric shock, injury, and property damage.
- The device is only intended for the preparation of espresso coffee. Do not use the device for any purpose other than that for which it was intended.
- The device is not intended for commercial use, only for household and similar use. These include kitchens in offices, farms, hotels, motels and establishments offering bed & breakfast.
- Children from the age of 8 and physically, sensory and mentally impaired persons may only use the device if they have been familiarised by a responsible person with its functions and understand the safety precautions in place as well as any associated risks. Cleaning and maintenance shall not be performed by children unless they are older than 8 years and are supervised. Keep the device and the power cord out of the reach of children under 8 years of age. Children must not play with the device.
- Cleaning and user maintenance shall not be performed by children without supervision.
- Servicing is required when the device has been damaged in any way, such as when the power supply cord or plug is damaged, liquid has been spilled or objects have fallen into the device, the device has been exposed to rain or moisture, or does not operate
normally.
- To avoid fire and electric shock, do not immerse the power cord and plug in water or any other liquid. Do not damage, bend, or excessively stretch the power cord, or place heavy objects on the power cord.
- If the power cord is damaged, it must be replaced by the manufacturer, its service agent or a similarly qualified person to avoid a hazard.
- Use only the original accessories recommended by the manufacturer of this device to ensure proper functioning of the device.
- Before using the device, make sure that the water tank of the appliance is always filled with the required amount of water for the intended application to avoid damage to the appliance.
- Keep away from the hot steam coming out of the appliance. Only use the handles or levers attached to the appliance or its components when moving hot components of the device, such as the steam wand or portafilter.
- Do not immerse the device or the power cord in water or other liquids.
- Do not touch the plug of the device with wet or damp hands. Moisture from your hands can bead up on the plug and cause a dangerous electric shock if it comes in contact with the outlet.
- Supervise the device during operation.
- Keep the device and its components dry, clean and out of reach of unauthorised
persons.
- Supervise children while they are playing near the appliance to protect them from harm.
- Unplug the device from the mains outlet when it is being cleaned or is not in use.
- Do not clean the accessories until the device has cooled down.
- The espresso machine must not be placed in a cupboard during use.
- The filling opening must not be opened during use.
- Plug the espresso machine into a grounded outlet.
- Do not use the device at high temperatures, in strong magnetic fields or in a humid environment. Do not place the coffee maker on a hot surface, near a fire source or on top of other electrical equipment such as a refrigerator.
- Place the appliance in a dry area.
- Place the espresso machine on a flat table or tabletop, making sure the device is at least 5 cm away from objects and the back of the coffee maker is more than 20 cm from the wall. Do not hang the power cord on the edge of a table or counter.
- Make sure that the power cord does not touch any of the device's hot surfaces.
- Do not touch the metal surface of the device directly with your hand when operating the espresso machine. Please use the control knob and the handle.
- Do not touch hot parts of the device (such as high-pressure steam pipe, water outlet, etc.) while using the espresso machine. The surface of the heating element is subject to residual heat after use.
- Be careful not to scald yourself with splashing water or steam, or from improper use of the device.
- Do not move the espresso machine or turn off the power arbitrarily when the espresso machine is in operation.
- Clean and maintain the parts of the coffee machine regularly to ensure the quality of the coffee and the life of the espresso machine.
CAUTION
Risk of injury! Allow the appliance to cool completely before cleaning and before moving the appliance or any part of it. This will prevent burning on hot surfaces and injury from hot liquid.
DEVICE OVERVIEW
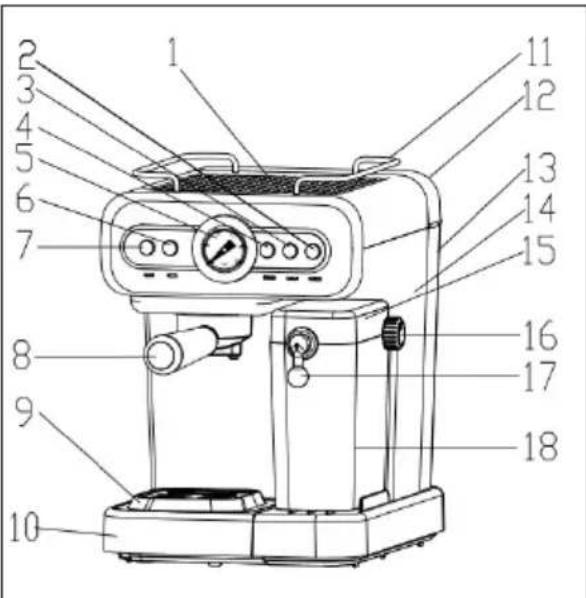 |  | ||
| 1 Warm cup area 12 Water tank cover | |||
| 2 “Latte” button 13 Water tank | |||
| 3 “Cappuccino” button (press and hold for milk foam) | 14 Machine body | ||
| 4 “Espresso” button 15 Milk tank cover | |||
| 5 Pressure gauge 16 Rotary knob for milk foam | |||
| 6 “Clean/Descale” button 17 Milk foam generator knob | |||
| 7 Power button 18 Milk tank | |||
| 8 Funnel holder 19 Coffee spoon | |||
| 9 Drip tray cover 20 | Small filter for 1 cup ground coffee | ||
| 10 Drip tray 21 | Large filter for 2 cups ground coffee | ||
| 11 Top cover decorative ring 22 Funnel holder | |||
OPERATION
Getting Started
• Take the espresso machine out of the packaging carton and check that the accessories are complete.
- Clean all detachable parts.
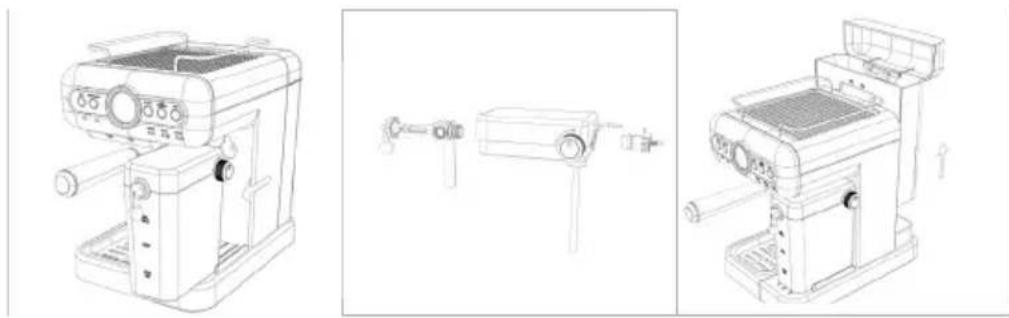
natural_image
Technical line drawings of three different types of industrial machines, showing front, side, and top views with no visible text or symbols.- Depending on the coffee preparation, clean the espresso machine 2-3 times with clear water. Make sure that there is no coffee powder in the device when cleaning the espresso machine.
Note: When it is used for the first time, the product may not produce water, causing it to enter a protected state. At this time, you can press the "Clean/Descale" button once to enter the cleaning mode of milk foam system. Then, the "Clean/Descale" button indicator light flashes for about 30 seconds after automatic stop.
Filling the water tank
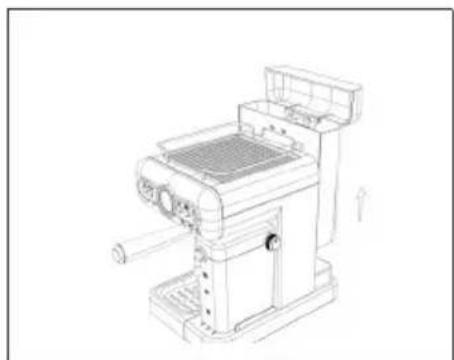
natural_image
Line drawing of a mechanical device with no visible text or symbols- Open the water tank lid and the take out the tank by pulling upwards.
- Fill the tank with fresh clean water and take care not to exceed the MAX level. Replace the tank, pressing lightly to open the valve located on the bottom of the tank.
- More simply, the tank can also be filled without removing it, pouring the water directly from a jug.
Note: It is normal for there to be water in the space under the tank. This should therefore be dried regularly with a clean sponge. Do not use the machine when there is no water in the tank. Add water timely when the water level is below the minimum level.
Pouring milk to the milk tank
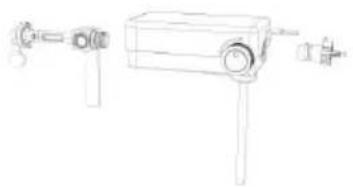
- Take out the milk tank in the direction shown in the figure below.
- Gently lift the milk tank cover to pour 3% whole milk at 8 C into the milk tank and close the milk tank cover to put the milk tank into the coffee machine. You will hear a "Di", indicating that the milk tank has been assembled in place.
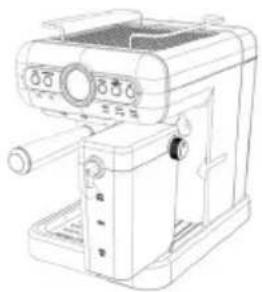
natural_image
Line drawing of a standard bread maker with control panel and stand (no text or symbols)
natural_image
Line drawing of a mechanical device with an upward arrow indicating motion or force (no text or symbols)Caution: The milk tank must be assembled in place. The milk tank will be pushed out due to too much internal pressure in the process of foaming if it is not assembled in place.
Choosing the right coffee cups
Before brewing, please choose the cup with the right size according to the following table.
| Function Button | Amount of espresso/fancy coffee (ml) | Size of the cup (ml) |
| Espresso small 30-50 80-100 | ||
| Espresso large 70-90 120-150 | ||
| Cappuccino small 50-120 200-250 | ||
| Cappuccino large 110-210 300-350 | ||
| Latte small 90-200 300-350 | ||
| Latte large 190-290 400-450 |
Preheating the espresso machine
Plug the power cord of coff ee machine into the socket. When all indicator lights turn on for 1 second and then turn off, the coff ee machine enters the standby state. Press the power switch once, the indicator light of the "On/Off" button remains on, and the espresso machine enters the self-test program to check whether the NTC is normal. If the NTC is normal, it starts to warm up, and the three indicator lights of "Espresso", "Froth/Cappuccino" and "Latte" begin to flash. When the temperature reaches the set point, the warm-up is over and all indicator lights remain on, signifying that the coff ee machine is ready to use.
Note: When the self-test program that checks the NTC is abnormal, the corresponding indicator lights will flash at the same time (see the protection rules for details) with the buzzer beeping for 5 seconds when the coffee machine cannot work. In this state, the button is invalid and the machine will automatically enter standby mode after 30S of alarm with all indicator lights going out.
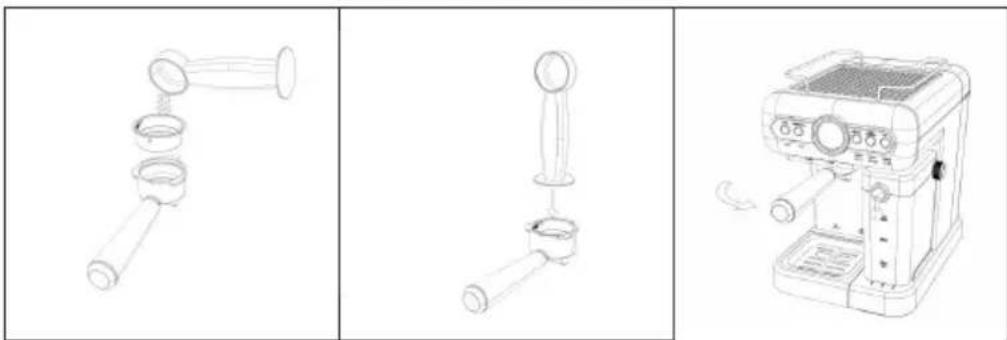
Making espresso
After the coff ee machine is preheated, put the required coff ee powder (7-8g for a small cup, approximately 14-15g for a large cup and pressing the powder with a force of 150 N into the fi Iter cup. Place the fi Iter cup containing tightly-pressed coff ee powder into the designated position of the funnel, and then rotate the funnel into the designated position of the coff ee machine. Press the "Espresso" button once, and wait for 5 seconds. Then, the indicator light of "Espresso" in small cup will fl ash, while the indicator lights of other coff ee functions will be half lit. At this time, the coff ee machine will start making a small cup of coff ee. Or press the "Espresso" button twice, and wait for 5 seconds. Then, the indicator light of "Espresso" in large cup will fl ash, while the indicator lights of other coff ee functions will be half lit. At this time, the coff ee machine will start making a large cup of coff ee. After the coff ee is made, the buzzer sounds once.
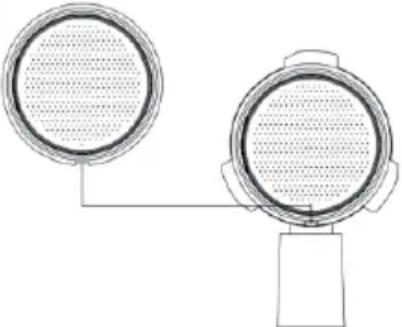 | 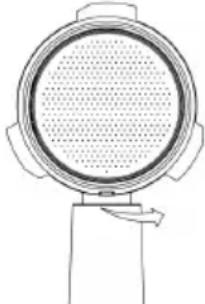 |
| Make sure that the small indentation on the small fi lter (20) or big fi lter(21) is located above the indentation on the funnel holder (22) when inserted. | Then turn the small fi lter (20) or big fi lter(21) slightly to ensure it cannot fall out. |
natural_image
Line drawings of three different kitchen utensils: a multi-tiered brush, a single-piston bath, and a standard microwave oven (no text or symbols present)- The coffee making time is about 25 seconds for a small cup and 38 seconds for a large cup. (The coffee machine has a flowmeter and the time will be slightly different every time)
- In the process of making coffee, you can stop the coffee by pressing the previously pressed coffee making button again.
Note: For preventing spillage, do not remove the funnel of the coffee machine while the machine is extracting coffee.
Setting coffee cup quantity
The acquiescent coffee cup quantity set by the machine at the factory is the standard cup quantity. If you need to change the coffee cup quantity, please follow the following steps:
- Place one or two cups below the coffee outlet.
-
Set the quantity of single-cup coffee. After the coffee machine is preheated, press the "Espresso" button once, and then continue to press the "Espresso" button for 3 seconds. Then, the indicator light of "Espresso" in small cup immediately changes to a flashing state, while the indicator lights of other coffee functions will be half lit. The coffee machine starts making coffee, and after 3 seconds, the buzzer "beeps" to enter the custom program. You must press and hold the "Espresso" button for more than 3 seconds before releasing it. When the coffee cup contains the required quantity of coffee, press the "Espresso" button to stop the coffee machine from making coffee, and the corresponding indicator light flashes three times to signify that the setting of coffee quantity is complete.
-
Set the quantity of double-cup coffee. After the coffee machine is preheated, press the "Espresso" button twice, and then continue to press and hold the "Espresso" button for 3 seconds. Then, the indicator light of "Espresso" in large cup immediately changes to a flashing state, while the indicator lights of other coffee functions turn off. The coffee machine starts making coffee, and after 3 seconds, the buzzer "beeps" to enter the custom program. You must press and hold the "Espresso" button for more than 3 seconds before releasing it. When the coffee cup contains the required quantity of coffee, press the "Espresso" button to stop the coffee machine from making coffee, and the corresponding indicator light flashes three times to signify that the
setting of coffee quantity is complete.
- The acquiescent set time of the machine is about 21 seconds if the coffee making time is set to less than 15 seconds. If the button is not pressed during making coffee, it will automatically stop after 75 seconds.
Factory default value (resetting)
This operation will return the set cup quantity to the factory default value. To restore the factory default value, please follow the following step:
After the coffee machine is preheated, press and hold the "Espresso" and "Froth/Cappuccino" buttons for 3 seconds, and all indicator lights will flash five times. At this time, the factory default settings of the machine have been restored.
Making Cappuccino
- Put the required coffee powder in the filter after the coffee machine preheating (7-8g for a small cup, 14-15g for large cup, and the pressing powder for 150N). After the coffee powder is compacted, the filter is needed to be put into the designated position of the funnel and screw the funnel into the designated position of the coffee machine.
- Put a cup of suitable size at the coffee outlet, rotate the milk foam generator knob to align the milk foam generator with the cup rim (the milk foam generator can have its length adjusted by rotating it counterclockwise to the specified position, pulling towards the cup rim, adjusting to the corresponding position, and then rotating it clockwise for fixing), and rotate the milk foam adjustment knob to the small milk foam position.
- Press the "Froth/Cappuccino" button once, and wait for 5 seconds. Then, the indicator light of Cappuccino in small cup will flash, while the indicator lights of other coffee functions will be half lit, and the coffee machine will start heating for a period of time (4-30 seconds). When it reaches the set temperature, the milk foam generator will produce the milk foam. After the milk foam is produced, the coffee will flow out of the funnel. After the coffee is made, the buzzer sounds once.
- Press the "Froth/Cappuccino" button twice, and wait for 5 seconds. Then, the indicator light of Cappuccino in large cup will flash, while the indicator lights of other coffee functions will be half lit, and the coffee machine will start heating for a period of time (4-30 seconds). When it reaches the set temperature, the milk foam generator will produce the milk foam. After the milk foam is produced, the coffee will flow out of the funnel. After the coffee is made, the buzzer sounds once.
- In the process of making fancy coffee, you can stop the coffee by pressing the button of making fancy coffee again.
Making Latte
-
Put the required coffee powder in the filter after the coffee machine preheating (7-8g for a small cup, 14-15g for large cup, and the pressing powder for 150N). After the coffee powder is compacted, the filter is needed to be put into the designated position of the funnel and screw the funnel into the designated position of the coffee machine.
-
Put a cup of suitable size at the coffee outlet, rotate the milk foam generator knob to align the milk foam generator with the cup rim (the milk foam generator can have its length adjusted by rotating it counterclockwise to the specified position, pulling towards the cup rim, adjusting to the corresponding position, and then rotating it clockwise for fixing), and rotate the milk foam adjustment knob to the small milk foam position.
-
Press the "Latte" button once, and wait for 5 seconds. Then, the indicator light of Latte in small cup will flash, while the indicator lights of other coffee functions will be half lit, and the coffee machine will start heating for a period of time (4-30 seconds). When it reaches the set temperature, the milk foam generator will produce the milk foam. After the milk foam is produced, the coffee will flow out of the funnel. After the coffee is made, the buzzer sounds once.
-
Press the "Latte" button twice, and wait for 5 seconds. Then, the indicator light of Latte in large cup will flash, while the indicator lights of other coffee functions will be half lit, and the coffee machine will start heating for a period of time (4-30 seconds). When it reaches the set temperature, the milk foam generator will produce the milk foam. After the milk foam is produced, the coffee will flow out of the funnel. After the coffee is made, the buzzer sounds once.
-
In the process of making fancy coffee, you can stop the coffee by pressing the button of making fancy coffee again.
Note: The cleaning function of the milk foam system must be used at least once to prevent the milk foam channel from being blocked after milk foam is finished.
Cleaning of milk foam system
- After the fancy coffee is made or the milk foam is produced, the indicator light of "Clean/Descale" button remains on to remind users to clean the milk foam system. Put a cup of suitable size (200 ml) at the coffee outlet, align the milk foam generator with the lip of the cup, rotate the milk foam adjustment knob to the large milk foam position, and press the "Clean/Descale" button once. Then, the coffee machine will enter the cleaning mode of milk foam system. At this time, the indicator light of "Clean/Descale" button will start to flash and automatically stop after about 30 seconds.
- Operating any function button is invalid during cleaning.

Warning: Danger of scalding
The milk foam generator produces a lot of hot water and steam during the cleaning process. Please add pure water to the milk tank when the function is activated.
Foaming milk
- Put a cup (200 ml) with a suitable size at the coffee outlet during foaming milk. Turn the knob of the milk foam generator to align the milk foam generator with the lip of the cup, and turn the adjustable knob of the milk foam generator to the appropriate position.
- Press and hold the "Froth/Cappuccino" button for more than 3 seconds. At this time, the indicator light of "Froth/Cappuccino" button starts to flash, with the buzzer "beeping" once, while the indicator lights of other coffee functions will be half lit, and the milk foam generator emits milk foam. When the desired amount is reached, you can press the "Froth/Cappuccino" button again to stop making milk foam.
- If there is no operation during making milk foam, it will automatically stop working after about 30 seconds. (The coffee machine has a flowmeter and the time will be slightly different every time)
Energy saving mode
- If there is no operation after the coffee machine finishes working, it will enter standby mode after about 29 minutes with all the indicator lights going out.
- If the coffee machine is in standby mode, the product will restore the preheating state by press any button.
Protection
- If the NTC fails (such as short circuit, open circuit, etc.) at any time, the machine must enter the protection state. If the NTC for measuring the coffee temperature fails, the indicator lights of "Espresso" in small cup and large cup will continue to flash. If the NTC for measuring the temperature of the milk foam fails, the indicator lights of "Froth/Cappuccino" in small cup and large cup, as well as the indicator lights of "Latte" in small cup and large cup will
continue to flash. The coffee machine beeps for 5 seconds, and any function buttons will be invalid in this state. After 30 seconds of alarm, the coffee machine automatically enters standby mode, and all indicator lights turn off.
- In the absence of water in the water tank, the coffee machine works for a period of time until it stops, and "Clean/Descale" ->"Espresso" ->"Froth/Cappuccino" ->"Latte" ->"Clean/Descale" is displayed in a cycle without any operation. After 15 seconds, the machine automatically enters standby mode. After the water tank is refilled, the coffee machine will be operated again.
Note: When the coffee machine is in a protection state for water shortage in the water tank, please make coffee after the water tank is refilled. If no milk foam or coffee flows out during this process, please stop making coffee immediately. You can try pressing the "Clean/Descale" button once to enter the cleaning mode of milk foam system.
- If the milk tank is not installed in place or its micro-switch is found short circuit or open circuit, the indicator lights of "Froth/Cappuccino" and "Latte" buttons will turn off.
Notes
- There is a need for a close guard during making coffee.
- Do not remove the funnel of the coffee machine while the machine is extracting coffee to prevent spillage.
- The lip of the milk foam generator cannot be placed on the surface of the milk to avoid being burnt, which will cause the milk to splash.
- The function of cleaning the milk foam system should be used in time and it is needed to clean the milk foam generator with a wet cloth to avoid the residual milk sticking to the milk foam generator after foaming.
- The function of cleaning the foam system must be used at least once after foaming.
Descaling
- After the machine is used for a period of time, the indicator light of "Clean/Descale" button will flash quickly, signifying that the machine needs to be descaled. (Default descaling: descale after 1000 times of coffee brewing)
- After the machine gives an alarm, users should add descaling solution to the water tank. The descaling solution to be poured should be diluted according to the instructions on the package (the ratio of water to descaling agent is about 4:1, or subject to the instruction for use. If no descaling agent is available, "citric acid" can be used instead, with the ratio of water to citric acid of about 100:3). Add 0.5L of water to the water tank, fill the milk tank with water, and put a container of suitable size below the outlet of the milk foam generator. After the machine is preheated, press and hold the "Clean/Descale" button for at least 3 seconds, and then the machine enters the descaling mode. The indicator light of "Clean/Descale" button starts to flash. The coffee machine circulates water from the milk foam generator and coffee outlet, and
automatically exits the descaling mode after about 5 minutes.
- In the descaling mode, you can press the "Clean/Descale" button to exit the descaling mode.
Note: Care should be taken to notice whether the water in the cup overflows. If the water in the cup is nearly full, pour out to avoid water overflowing from the cup.
CLEANING AND CARE
Note: Before carrying out any cleaning or maintenance work, switch off the device, pull out the mains plug and allow the device to cool down.
Cleaning after use
- Do not use any solvents or detergents to clean the espresso machine. Use a soft damp cloth
• Take out the drip tray, empty it and rinse it regularly. - Clean the water tank regularly.
- Turn the portafilter to the left to remove it with the filter screen from the device. Discard the coffee grounds, then clean the portafilter and filter screens with dish soap and a soft cloth. Then rinse out with clear water.
- Clean all detachable parts with clear water and dry them thoroughly.
Regular cleaning and maintenance
- To ensure the pure taste of coffee, perform descaling, cleaning and maintenance of the espresso machine every 2-3 months.
- Use a coffee machine descaler to descale the espresso machine (ratio of water to descaler is approximately 4:1; read and follow descaler instructions). If you don't have a descaling agent, you can use citric acid instead (the ratio of water and citric acid is about 100:3).
- When cleaning the espresso machine, make sure that there is no coffee powder in the espresso machine.
- Clean the water outlet and the steam pipe according to the steps given for cappuccino preparation (see “Cleaning after preparing milk froth”). Carry out the cleaning procedure described with clear water 3 times to ensure that the device is clean. Be sure to let the espresso machine rest for more than 3 minutes each time for repeated cleaning.
FREQUENTLY ASKED QUESTIONS
Which powder is the right one for the espresso machine?
The correct powder can be recognised by the shape of the powder after it has been squeezed in the sieve:
- If the powder is mushy, it's too fine.
- If the powder crumbles, it's too coarse.
- If the powder holds together tightly, then it's suitable.
What is the right amount of powder?
- If you want to prepare 1 cup of espresso, put a spoonful (approx. 7-8 g) of espresso powder in the small sieve.
- If you want to prepare 2 cups of espresso, put two scoops (approx. 14-15 g) of espresso powder into the large sieve.
What is the function of the small hook on the portafilter?
The hook prevents the filter screen from falling out of the portafilter when emptying the powder.
What is the function of the cup heating area?
By heating the coffee cup in this area, you can get a better coffee taste because the temperature difference when pouring the coffee into the coffee cup is smaller.
What is the function of the steam attachment on the steam pipe?
It ensures that the milk is swirled by the steam. This makes the milk foam firmer and finer.
Why can't the milk be frothed?
• Make sure to use cold milk.
- Do not froth the milk for too long. If it gets too hot, no milk froth can form.
What can you do if the bubbles in the milk froth are uneven in size?
Tap the milk cup to eliminate large bubbles. Then swirl the milk cup horizontally to fully mix the milk and milk froth.
What type of milk is suitable for frothing?
Low-fat milk froths easily, but the bubbles and froth are slightly larger and fluffy. Whole milk is more difficult to froth, but the milk foam is nice and thick.
TROUBLESHOOTING
| Problem Possible cause | Solution | |
| The coffee is spill out from the gap of the funnel. | There are sundries inside the seal ring. | Clean the sundries inside the seal ring. |
| The coffee powder is too fine. | Please replace it with the coffee powder which is relevantly coarse. | |
| The coffee powder has been pressed too tightly. | Please press the coffee power with strength of 33 pounds (about 15kg) | |
| The seal ring is being of aging. | Please contact the authorized service center. | |
| There is coffee powder at the top of filter cup. | Clean the top of filter cup before put into machine | |
| The coffee handle cannot be switched to the lock position. | The coffee powder amount has exceeded the max scale of the funnel. | Decrease the amount of the coffee powder. |
| The coffee powder hasn't been added and the handle could not be switched to the right place. | Please contact the authorized service centre. | |
| Cold coffee. The indicator | light is not on. Operation when | the indicator light is on. |
| Coffee machine boiler burns out. | Please contact the authorized service centre. | |
| The pump is too noisy | Without water in water tank Please | pour water into water tank |
| Mount the water tank in wrong way | Please mount water tank in right way | |
| Light coffee. Coffee powder | der is not pressed to be flat enough | Please press coffee powder to flat again |
| Not enough coffee powder Please | ase add coffee powder | |
| Coffee powder is too coarse Please | ase use dedicated Espresso coffee powder | |
| Coffee colour is too dark | The powder in the sieve was pressed too hard. | Don't press the powder so firmly next time. |
| Too much powder. Adjust the amount of powder (see: Frequently Asked Questions). | ||
| The sieve is dirty. Clean the sieve. | ||
| The powder is too fine. Use coarser powder. | ||
| The water outlet is clogged. Clean the water outlet. | ||
| Coffee is made normally, but the milk foam generator cannot produce milk. | The milk foam system is blocked | Add a proper amount of vinegar to the water tank and try to use the function of cleaning the milk foam system. |
| Milk has no foam after foaming. | Milk is not cold enough. Ice-cold milk | |
| The portafilter cannot be locked properly. | Too much powder. Adjust the amount of powder (see: Frequently Asked Questions). | |
| The holder is defective. Contact a specialist company. | ||
| "Clean/Descale"- >"Espresso"->"Froth/ Cappuccino"->"Latte"->"Clean/Descale" is displayed in a cycle | There is no water in the water tank. | Pour water int.o the water tank |
| The indicator light of "Clean/Descale" button will flash quickly | This descaling alarm reminds the user to descale the machine. | Descale according to the instructions. |
| Coffee machine does not produce coffee and milk for the first time. | The water pump is running out of water for a long time, resulting in inability to pump water, or the coffee is made when the water tank is empty | Press the "Clean/Descale" button once to enter the cleaning mode. of milk foam system |
COFFEE VARIATIONS
Preparation of premium coffee
All kinds of fancy espresso coffee are made on the basis of espresso. Adding milk can not only add a milky flavour to the coffee, it can also create a variety of flavours by adding milk, milk froth and cream in different proportions, which opens up a lot of possibilities. The following picture shows different coffee variations with different milk percentages:
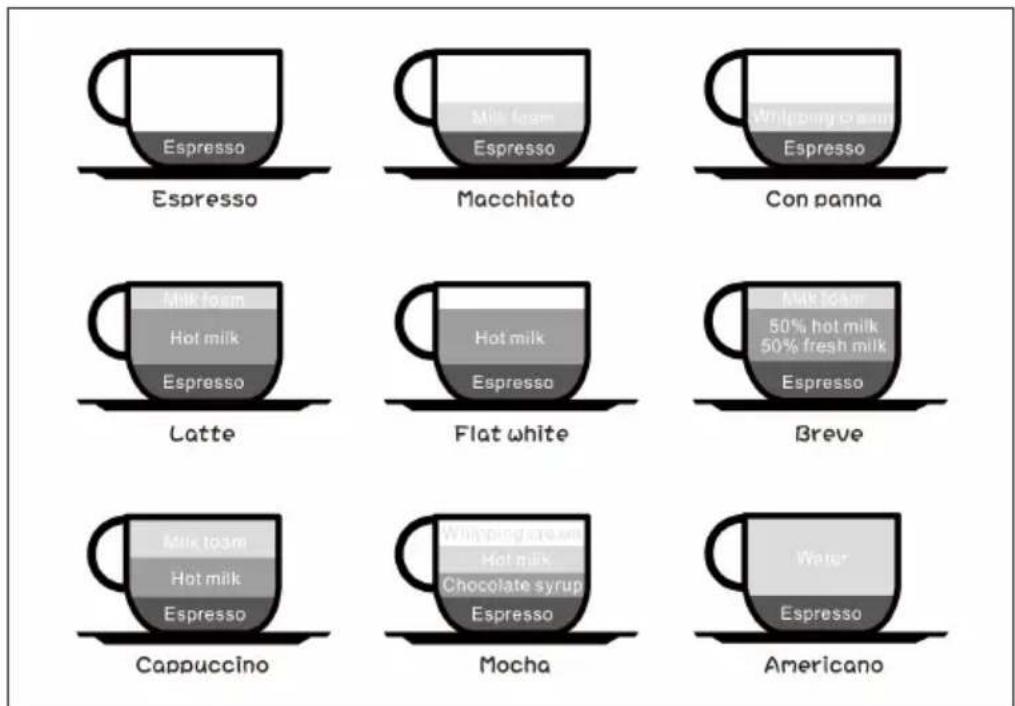
Espresso has a strong taste and can be called the original coffee. It retains its flavour when mixed with milk or other ingredients. Typical espresso preparation includes the following recipes:
Cappuccino
The preparation method for cappuccino is to heat milk in a milk cup to 66^ C with the steam wand of an espresso machine and create a dense layer of bubbles on the milk. Then pour the espresso into the cup and then the milk. The espresso, milk and milk froth each make up 1/3 of the cup. The result is a coffee creation where the top is white and the bottom is light brown. Cappuccino can be drunk with sugar, ground cinnamon or cocoa powder.
Caffè latte
The word "latte" means "milk". It consists of hot milk and espresso. Slowly pour a cup of hot milk and espresso into the coffee cup from both sides at a 6:1 ratio at the same time. (The traditional latte has only hot milk and no milk froth.)
Espresso macchiato
The word "macchiato" means "blotchy". To prepare it, all you have to do is add some milk froth to a cup of regular espresso. Only a small portion of the froth is poured onto the espresso, not much milk.
Latte macchiato
Latte macchiato is a type of coffee that is infused with hot milk. First prepare a cup with hot milk and milk froth and put it in a glass. Then pour in a cup of espresso. This gives the espresso a strong colour in the upper part and a light colour in the lower part. Pour the espresso over the rim of the cup into the glass. Due to the different flow speeds of the coffee, visually appealing design variations in the glass are visible from the outside.
Caffè mocha
Mocha coffee consists of espresso, hot milk with milk froth and chocolate sauce, each taking up 1/3 of the glass. You can slowly pour the chocolate sauce in from the rim of the cup, creating a waterfall-like formation.
Espresso con panna
With the conventional espresso con panna, some whipped cream is added to the espresso. There are now a variety of different brewing flavours that are very popular. A variety of syrups are available for flavouring, some made with wine, some made with honey and others made with soy milk.
Variety of coffee taste
Not only does the choice of coffee machine determine the taste of the coffee, the coffee aroma also varies depending on the type of coffee bean. Below is a possible flavour classification of different coffee beans:
| Sour taste Mocha, sour | coffee from Hawaii, Mexico, Guatemala, highland coffee from Costa Rica, Kilimanjaro, Colombia, Zimbabwe, El Salvador, the wet new beans of the western hemisphere. |
| Bitter taste All kinds of old beans from Java, Medellin, Bogota, Angola, Congo, Uganda. | |
| Sweet taste Colombia M | Mandheling, Venezuela's old bean, Blue Mountain, Kilimanjaro, Mocha, Guatemala, Mexico, Kenya, Santos, Haiti |
| Neutral taste Brazil, Salvador, lowland Costa Rica, Venezuela, Honduras, Cuba | |
| Acidic and mild taste Col | Colombia Mandheling, Mocha, Blue Mountain, Guatemala, Costa Rica |
Regardless of where the coffee bean is made, roasting, grinding, and brewing are important elements that can affect the flavour of the coffee. Make yourself a cup of coffee, enjoy the cosy and relaxing time, and experience the spicy and smooth aftertaste.
DISPOSAL CONSIDERATIONS

natural_image
Symbol of a trash bin crossed with a diagonal line, no text or numbers presentIf there is a legal regulation in your country regarding the disposal of electrical and electronic equipment, this symbol on the product or on the packaging indicates that this product must not be disposed of with household waste. Instead, it must be taken to a collection point for the recycling of electrical and electronic equipment. By disposing of this product in accordance with the regulations, you are protecting the environment and the health of those around you from negative consequences. For information on recycling and disposal of this product, contact your local government or household waste disposal service.
MANUFACTURER & IMPORTER (UK)
Manufacturer:
Chal-Tec GmbH, Wallstrasse 16, 10179 Berlin, Germany.
Importer for Great Britain:
Berlin Brands Group UK Limited
PO Box 42
272 Kensington High Street
London, W8 6ND
United Kingdom
Cher client, chère cliente,
SOMMAIRE
natural_image
Technical line drawings of three different types of industrial machines, showing front, side, and top views with no visible text or symbols.natural_image
Line drawing of a mechanical device with no visible text or symbolsnatural_image
Line drawing of a modern kitchen washing machine with control panel and handle (no text or symbols)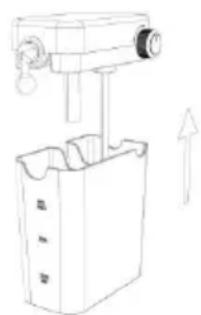
natural_image
Technical line drawing of a mechanical device with an upward arrow indicating motion (no text or symbols)natural_image
Line drawings of three kitchen utensils: a multi-tiered brush, a vertical rod with a handle, and a standard microwave oven (no text or symbols)natural_image
Symbol of a trash bin crossed with a diagonal line, no text or numbers presentBerlin Brands GOIup UK Ltd
PO Box 42
272 Kensington High Street
London, W8 6ND
United Kingdom
Gentile cliente,
INDICE
natural_image
Technical line drawings of three different types of kitchen appliances, showing front, side, and top views with no visible text or symbols.natural_image
Line drawing of a mechanical device with no visible text or symbolsnatural_image
Line drawing of a standard bread maker with control panel and stand (no text or symbols)
natural_image
Line drawing of a mechanical device with an upward arrow indicating motion or force (no text or symbols)natural_image
Line drawings of three different kitchen utensils: a multi-tiered brush, a single-piston bath, and a standard microwave oven (no text or symbols present)natural_image
Symbol of a trash bin crossed with a diagonal line, no text or labels presentPRODUTTORE E IMPORTATORE (UK)
Produttore:
Chal-Tec GmbH, Wallstraße 16, 10179 Berlino, Germania.
Berlin Brands Group UK Limited
PO Box 42
272 Kensington High Street
London, W8 6ND
United Kingdom
Estimado cliente:
ÍNDICE
natural_image
Technical line drawings of three different types of kitchen appliances, shown from top, side, and side views (no text or labels present)natural_image
Line drawing of a mechanical device with no visible text or symbolsnatural_image
Line drawing of a standard bread maker with control panel and stand (no text or symbols)
natural_image
Line drawing of a mechanical device with an upward arrow indicating motion or force (no text or symbols)natural_image
Line drawings of three kitchen utensils: a multi-tiered brush, a vertical rod with a handle, and a standard microwave oven (no text or symbols)natural_image
Symbol of a trash bin crossed with a diagonal line, no text or labels presentBerlin Brands Group UK Limited
PO Box 42
272 Kensington High Street
London, W8 6ND
Reino Unido

area
| Category | Value | | -------- | ----- | | 1 | 100 | | 2 | 100 | | 3 | 100 | | 4 | 100 | | 5 | 100 | | 6 | 100 | | 7 | 100 | | 8 | 100 | | 9 | 100 | | 10 | 100 | | 11 | 100 | | 12 | 100 | | 13 | 100 | | 14 | 100 | | 15 | 100 | | 16 | 100 | | 17 | 100 | | 18 | 100 | | 19 | 100 | | 20 | 100 | | 21 | 100 | | 22 | 100 | | 23 | 100 | | 24 | 100 | | 25 | 100 | | 26 | 100 | | 27 | 100 | | 28 | 100 | | 29 | 100 | | 30 | 100 | | 31 | 100 | | 32 | 100 | | 33 | 100 | | 34 | 100 | | 35 | 100 | | 36 | 100 | | 37 | 100 | | 38 | 100 | | 39 | 100 | | 40 | 100 | | 41 | 100 | | 42 | 100 | | 43 | 100 | | 44 | 100 | | 45 | 100 | | 46 | 100 | | 47 | 100 | | 48 | 100 | | 49 | 100 | | 50 | 100 | | 51 | 100 | | 52 | 100 | | 53 | 100 | | 54 | 100 | | 55 | 100 | | 56 | 100 | | 57 | 100 | | 58 | 100 | | 59 | 100 | | 60 | 100 | | 61 | 100 | | 62 | 100 | | 63 | 100 | | 64 | 100 | | 65 | 100 | | 66 | 100 | | 67 | 100 | | 68 | 100 | | 69 | 100 | | 70 | 100 | | 71 | 100 | | 72 | 100 | | 73 | 100 | | 74 | 100 | | 75 | 100 | | 76 | 100 | | 77 | 100 | | 78 | 100 | | 79 | 100 | | 80 | 100 | | Note: The actual values are not provided in the code. I have used the label 'Value' as a placeholder for the value detection. You would need to run the code to get the actual values from the code list. Please note that the actual values would be the result of this example. You would need to run the code to get the actual values from the code list. You would need to run the code to get the actual values from the code list. You would need to run the code to get the actual values from the code list. You would need to run the code to get the actual values from the code list. You would need to run the code to get the actual values from the code list. You would need to run the code to get the actual values from the code list. You would need to run the code to get the actual values from you would need to run the code.
KLARSTEIN
- ESPRESSIONATA EVO MILK
- INHALTSVERZEICHNIS
- Dear customer,
- CONTENTS
- SAFETY INSTRUCTIONS
- CAUTION
- DEVICE OVERVIEW
- OPERATION
- Getting Started
- Filling the water tank
- Pouring milk to the milk tank
- Choosing the right coffee cups
- Preheating the espresso machine
- Making espresso
- Setting coffee cup quantity
- Factory default value (resetting)
- Making Cappuccino
- Making Latte
- Cleaning of milk foam system
- Foaming milk
- Energy saving mode
- Protection
- Notes
- Descaling
- CLEANING AND CARE
- Cleaning after use
- Regular cleaning and maintenance
- FREQUENTLY ASKED QUESTIONS
- What is the right amount of powder?
- What is the function of the small hook on the portafilter?
- What is the function of the cup heating area?
- What is the function of the steam attachment on the steam pipe?
- Why can't the milk be frothed?
- What can you do if the bubbles in the milk froth are uneven in size?
- What type of milk is suitable for frothing?
- TROUBLESHOOTING
- COFFEE VARIATIONS
- Preparation of premium coffee
- Cappuccino
- Caffè latte
- Espresso macchiato
- Latte macchiato
- Caffè mocha
- Espresso con panna
- Variety of coffee taste
- DISPOSAL CONSIDERATIONS
- MANUFACTURER & IMPORTER (UK)
- Manufacturer:
- Importer for Great Britain:
- SOMMAIRE
- Gentile cliente,
- INDICE
- PRODUTTORE E IMPORTATORE (UK)
- Produttore:
- Estimado cliente:
- ÍNDICE
- KLARSTEIN
Brand : Klarstein
Model : Espressionata Evo
Category : Coffee machine