Powerflex X8 - Camera ROLLEI - Free user manual and instructions
Find the device manual for free Powerflex X8 ROLLEI in PDF.
User questions about Powerflex X8 ROLLEI
0 question about this device. Answer the ones you know or ask your own.
Ask a new question about this device
Download the instructions for your Camera in PDF format for free! Find your manual Powerflex X8 - ROLLEI and take your electronic device back in hand. On this page are published all the documents necessary for the use of your device. Powerflex X8 by ROLLEI.
USER MANUAL Powerflex X8 ROLLEI
Symbol Explanation 36
Safety Instructions 37
Battery Warning 37
What's in the Box 38
Product Overview 39
Installing the Battery 41
Charging the Camera 42
Inserting and Removing the microSD Card 42
Formatting the Memory Card 43
Camera Settings 45
Photo Mode 47
Viewing Photos 49
Video Mode 51
Viewing Videos 53
Focusing and Zooming 55
Flash 57
Mode Dial 58
Downloading Photos/Video to a Computer 60
Using the Camera as a Webcam 61
Connecting to a TV for Playback 62
Technical Specifications 63
Disposal 64
Spanish 66
French 98
Italian 130
Dutch 162
Czech 192
Slovak 223
Please read the user manual and safety instructions carefully before using the device for the first time.
Keep the user manual along with the device for future reference. If you pass the device on to a third party, this manual is part of the device and must be included.
Symbol Explanation
The following symbols are used in this manual, on the product, or on the packaging.

Products marked with this symbol comply with all applicable regulations of the European Economic Area.

Products marked with this symbol are operated with direct current.
Danger: This signal word indicates a hazard with a high level of risk that, if not avoided, will result in death or serious injury.
Warning: This signal word indicates a hazard with a medium level of risk that, if not avoided, could result in death or serious injury.
Caution: This signal word indicates a hazard with a low level of risk that, if not avoided, may result in minor or moderate injury.
Note: This signal word warns of possible property damage.
Safety Instructions
Dangers for children and individuals with reduced physical, sensory, or mental capabilities (e.g., partially disabled persons, elderly individuals with physical or mental limitations) or lack of experience and knowledge (e.g., older children).
- This product may be used by children aged 14 years and above. Cleaning and user maintenance must not be performed by children without supervision.
- The packaging material is not a toy. Do not allow children to play with the packaging film. They could become entangled while playing and suffocate
Supervise children to ensure they do not play with small parts (e.g., memory cards). If you suspect that a small part has been swallowed, seek medical attention immediately. - Store small parts in a place that is inaccessible to children and animals.
CAUTION! Risk of injury!
Improper handling of the product may lead to injuries.
- Immediately remove the battery and, if applicable, the charging cable if you notice unusual noises, odors, or smoke coming from the device.
NOTICE! Risk of property damage!
Improper handling of the product may cause damage.
- Never place the device on or near hot surfaces (e.g., stovetops) or open flames. Never expose the device to high temperatures (e.g., heaters).
- Do not fill the device with any liquids.
- Do not use a steam cleaner to clean the device.
- Do not continue using the device if any plastic or metal components have cracks, fractures, or deformations.
- Handle the device carefully. Impacts, drops, or shocks may damage the device.
Safety Instructions
- Remove the battery if you do not use the product for an extended period to prevent damage caused by a leaking battery.
- Do not modify the device.
- Never open the housing; leave repairs to qualified professionals. Contact a specialist workshop for this purpose. Liability and warranty claims are excluded in the case of self-performed repairs, improper connections, or incorrect operation.
- Do not operate the device if it has visible damage or defects.
- When not using the device, during cleaning, or in case of a malfunction, always turn off the device, remove the battery, and disconnect all connections.
- If the product experiences issues due to static discharge, turn it off and switch it back on after approximately 10 seconds.
Battery Warning
- Do not disassemble, strike, or puncture the battery, and ensure that it is not short-circuited. Do not expose the battery to high-temperature locations. Do not continue using the battery if it leaks or expands.
- Always charge using the designated system. There is a risk of explosion if the battery is replaced with an incorrect type.
- Keep the battery away from children.
- Batteries can explode if exposed to an open flame. Never throw batteries into fire.
- Follow local regulations for the disposal of used batteries.
- Before disposing of the device, remove the battery and dispose of it separately.
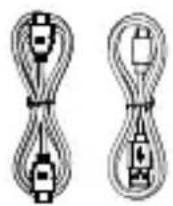
What's in the Box
- Powerflex X8 Dual Lens
Battery
-USB-C cable
-HDMI cable - USB-A to USB-C adapter
-USB-A to
micro-USB adapter
- USB-A to microSD adapter
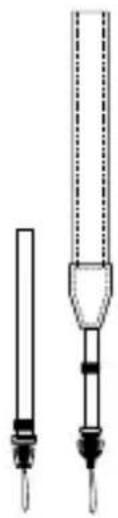
- Hand strap
- Carrying strap
- Cleaning cloth
- Storage bag
-User manual
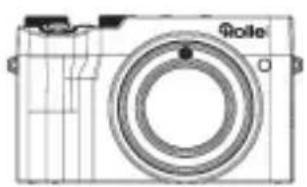

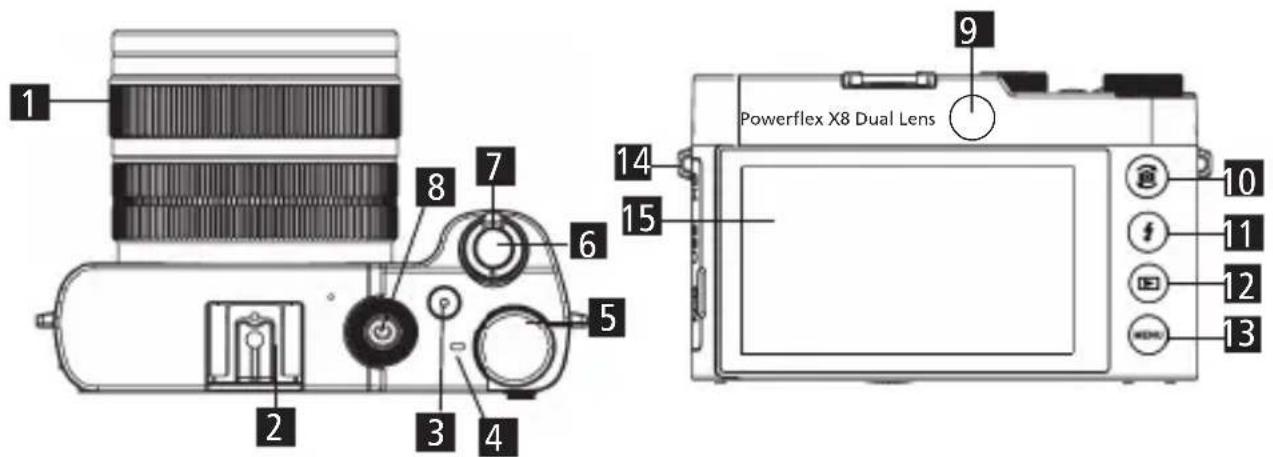
Product Overview
1 Focus / zoom ring Menu button
Hot shoe mount Strap mount
3 Video recording button Touchscre
4Indicator light Microphone
5 Mode dial
6Shutter button Speaker
7Zoom lever Flash
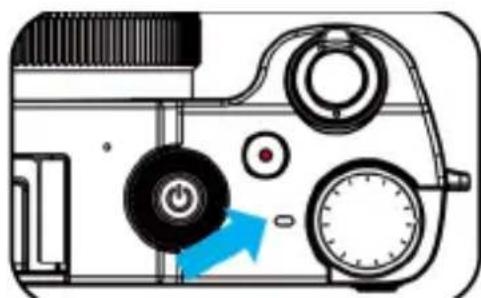
8Power button Main lens
Selfie lens
10 Camera switch / OK button USB-
11 Flash / up button Microphone collection
12Playback / down / screen display button
display
Section
17 Focus assist light
21 Mini-HDMI connection
connnection
24 Battery / microSD memory card compartment cover
25 1/4-inch connection
Installing the Battery
- Slide the battery compartment latch towards the "OPEN" direction and open the battery cover.
- Insert the battery as shown and push it in until it locks into place.
- To remove the battery: Push the battery lock lever in the direction shown, and the battery will pop out. Remove the battery, then close the battery cover.
Charging the Camera
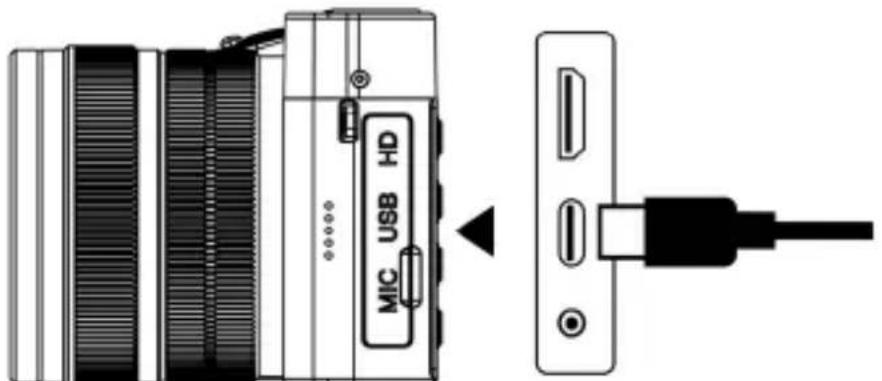
- After installing the battery, use a USB-C cable and a 5V charger to charge the camera.
- Indicator Light:
Red light steady on: Charging in progress.
Red light off: Charging completed.
Red light flashing: No battery installed.
Blue light flashing: Camera is recording video.
Blue light steady on: Camera is in standby mode.
Note: For first-time use, please fully charge the battery before using the camera.
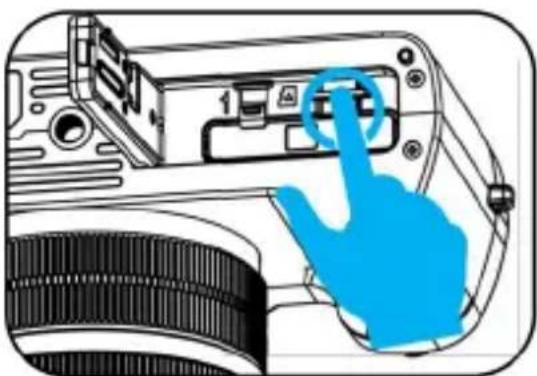
Inserting and Removing the Memory Card
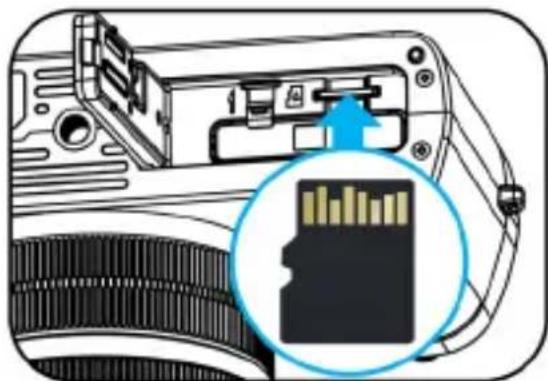
-
Open the battery cover. Insert the microSD memory card as shown in the diagram, and press it in until it locks into place.
-
To remove the memory card: Press the memory card gently, release it slowly, and it will pop out. Remove the card.
Inserting and Removing the Memory Card
Notes:
- Turn off the camera before inserting or removing the memory card.
- For new memory cards or those used in other devices, format them using this camera before use.
- Insert the memory card in the correct direction. Avoid using excessive force to prevent damage to the memory card or camera components.
- If the memory card cannot be inserted, check the orientation.
- The camera supports 4GB-64GB Micro SD cards and SDHC Class 6 or higher cards.
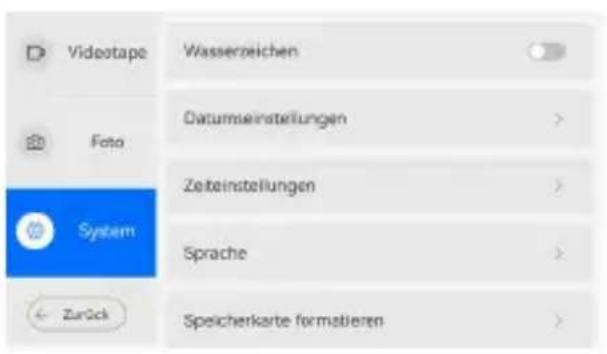
Formatting the Memory Card
Method 1 :
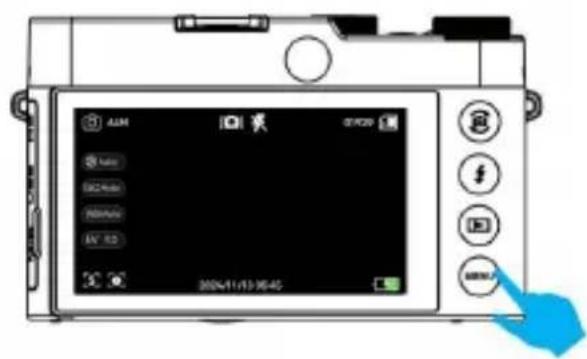
- Turn on the camera and press the Menu button to enter the settings menu.
- Press the Playback button (Down button) to select "System Settings" and press the OK button to enter the system settings menu.
- Use the Down button to find "Format Memory Card" and press the OK button to confirm formatting.
- Press the Menu button to exit the system settings menu, and press it again to exit the main settings menu.
44 Formatting the Memory Card
Method 2 :
- Turn on the camera and press the Menu button to enter the settings menu.
- Tap the "System Settings" icon in the lower-left corner of the screen.
- On the right side of the menu, swipe up or down to locate the "Format Memory Card" option.
- Tap "Format Memory Card" to confirm formatting.
- Tap the "Return" icon in the lower-left corner of the screen to exit the settings menu.
Notes:
- Do not accidentally select "Format Memory Card" while using the camera.
- Formatting is only necessary for first-time use or if there are compatibility issues.
- Regularly back up photos and videos to a computer.
- If you need to reformat the memory card, back up your data first, as formatting will erase all photos, videos, and other files.
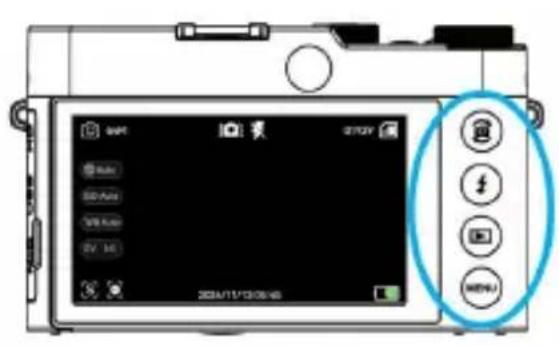
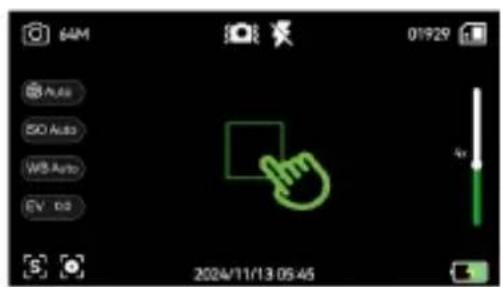
Camera Settings
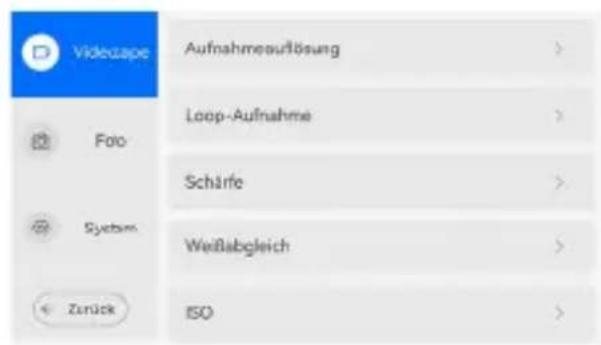
- After turning on the camera, press the Menu button during photo or video preview to enter the camera settings menu.
- On the left side of the screen, tap "Video Settings," "Photo Settings," or "System Settings." The corresponding submenu will appear on the right side of the screen.
- Swipe up or down on the submenu on the right side of the screen to locate the desired option, then tap it to confirm.
- Once the settings are completed, tap the "Return" icon in the lower-left corner of the screen to exit the settings menu.
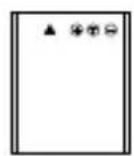
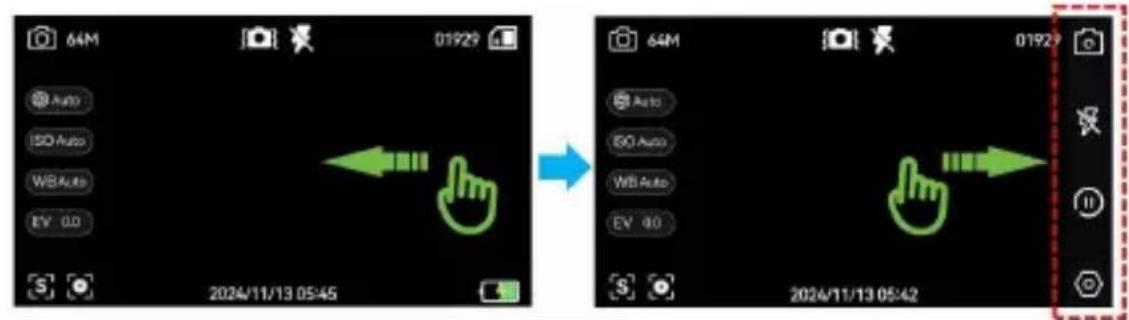
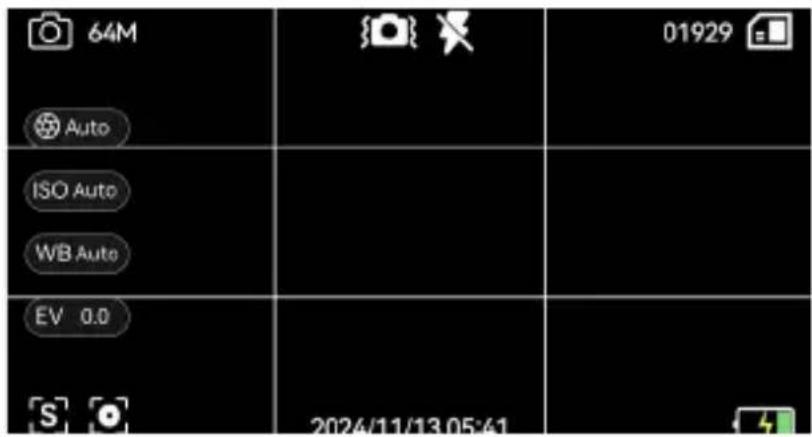
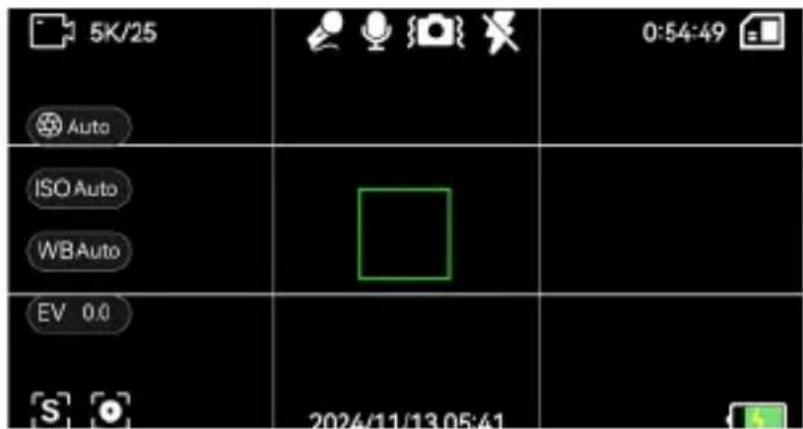
Screen Icons
During photo preview or video preview :
- Swipe left on the camera screen to display hidden icons on the right side of the screen. Swipe right to hide them again.
- Long press the Playback button to toggle between showing and hiding all screen icons.
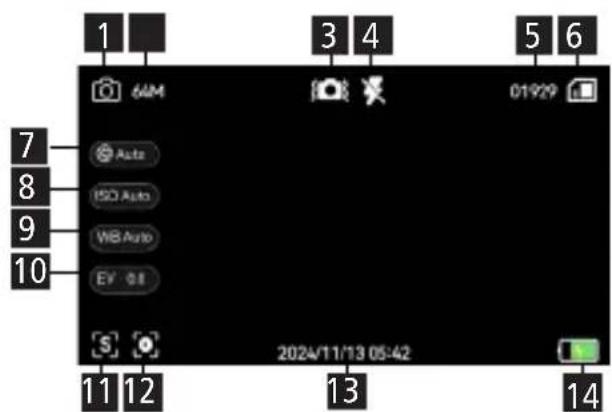
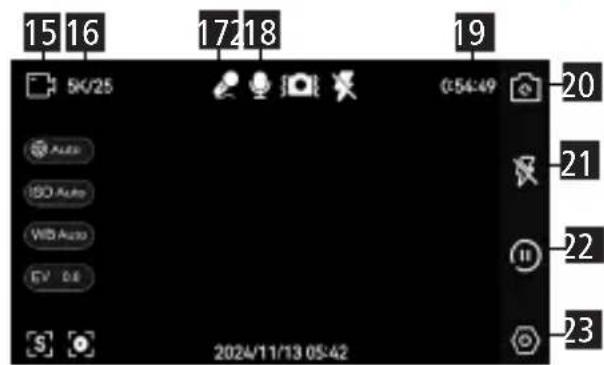
1 Photo mode Date and time waterark
2 Photo resolution Battery level
3Image stabilization Video mode
4 Flash mode Video resolution
5Remaining photo capacity External microphone
6 Memory card 18 Audio
7Shutter speed Remaining video reirding time
8ISO settings Switch to front came
9 White balance settings Flash settings
10 Exposure settings Playback mode
11 Focus settings Settings menu
12 Center focus
Photo Mode

-
Rotate the Mode Dial to select the desired photo mode (e.g., Standard Photo, Portrait, Landscape, Filter, Night).
-
Focusing and Taking Photos
Single Focus Photo

Half-press the shutter button to focus.
Fully press the shutter button to take a photo.
A. Press the Menu button select "System Settings" > "Focus Settings" > "Single Focus" > tap "Return" to return to the preview mode.
B. Adjust optical zoom using the Zoom Lever or the Zoom Ring on the lens.
C. Tap on the screen to select a custom focus area.
D. Half-press the Shutter Button until the focus box changes from white to green, indicating focus is complete. Fully press to capture the photo.
Photo Mode
→Manual Focus Photo
A. Select "System Settings" > "Focus Settings" > "Manual Focus" > tap "Return" to return to the preview mode.
B. Adjust optical zoom using the Zoom Lever.
C. Rotate the lens's Focus Ring to achieve focus.
D. Once focused, fully press the Shutter Button to take the photo.
Auto Focus Photo
A. Select "System Settings" > "Focus Settings" > "Auto Focus" > tap "Return" to return to the preview mode.
B. Adjust optical zoom using the Zoom Lever or Zoom Ring.
C. Tap a specific area on the screen to set the focus point. The camera will automatically focus, and the focus box will change from white to green. Fully press the Shutter Button to take the photo.
- During photo preview, long press the Playback Button to toggle hiding or displaying all icons on the screen.
- During photo preview, press the Menu Button _i = 1^n select "System Settings"> enable"Grid Lines"> tap "Return." A grid will appear on the screen for composition assistance.
Photo Mode
- Use two fingers to pinch on the screen during photo preview to zoom in or out.
- Press the Camera Switch Button to activate the front-facing camera. (Note: The selfie camera does not support zoom adjustments.)
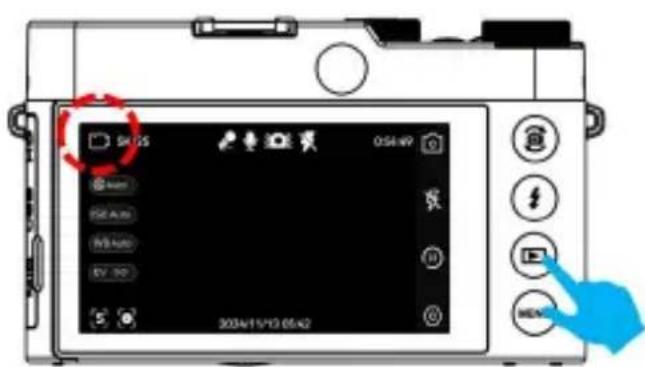
Viewing Photos
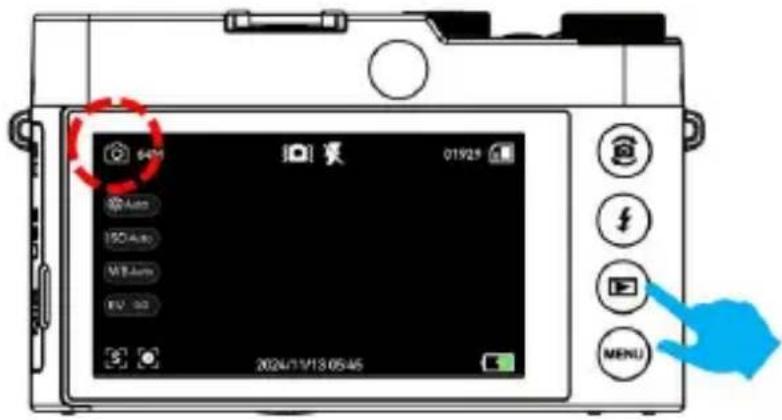
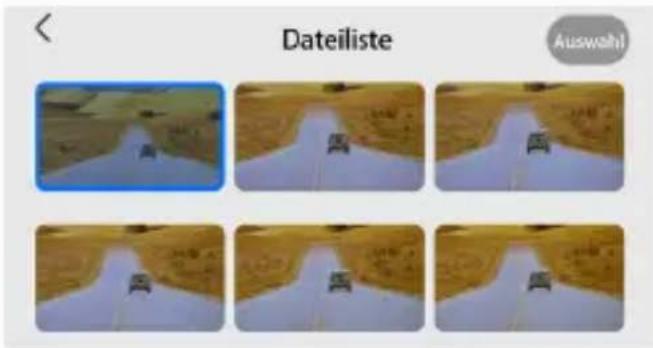
- In Photo Mode, press the Playback Button to enter playback mode.
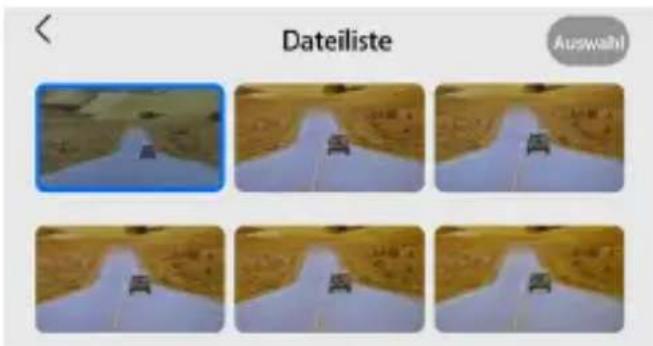
- Use the Up and Down Buttons to navigate through the photo list.
Press the OK Button or tap on a photo to open and view it.
- In the file list, tap the "Select" option in the top-right corner of the screen to delete photos.
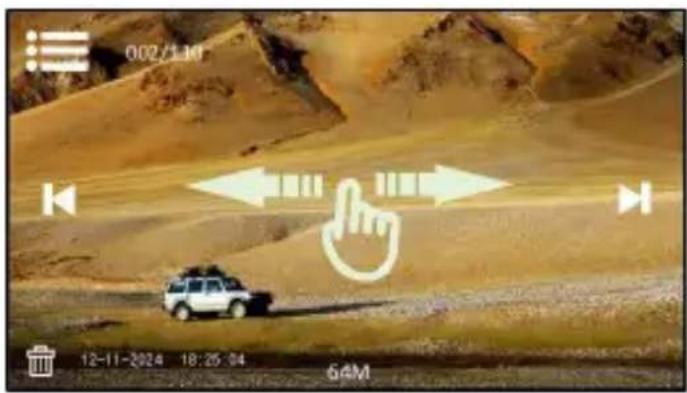
- After opening a photo, use the Up and Down Buttons (or swipe left or right on the screen) to view the previous or next photo.
- Once done viewing, press the Menu Button twice to exit playback mode.
Video Mode
- Rotate the Mode Dial to select the desired video recording mode (e.g., Standard Video, Slow Motion, Time-Lapse, Night).
- Focusing and Recording Videos
Single Focus Recording


Half-press the shutter button to focus
Press the video recording
A. Press the Menu Button "System Settings" > "Focus Settings" > "Single Focus" > tap "Return" to return to preview mode.
B. Adjust optical zoom using the Zoom Lever or Zoom Ring.
C. Tap on the screen to select a custom focus area.
D. Half-press the Shutter Button until the focus box changes from white to green. Then press the Video Recording Button to start recording.
E. Half-press the Shutter Button until the focus box changes from white to green. Then press the Video Recording Button to start recording.
Video Mode
→Manual Focus Recording
A. Select "System Settings" > "Focus Settings" > "Manual Focus" > tap "Return" to return to preview mode.
B. Adjust optical zoom using the Zoom Lever.
C. Rotate the lens's Focus Ring to achieve focus.
D. Press the Video Recording Button to start recording.
E. Press the Video Recording Button again to stop recording.
Auto Focus Recording
A. Select "System Settings" > "Focus Settings" > "Auto Focus" > tap "Return" to return to preview mode.
B. Adjust optical zoom using the Zoom Lever or Zoom Ring.
C. Tap a specific area on the screen to set the focus point. The camera will automatically focus, and the focus box will change from white to green. Press the Video Recording Button to start recording.
D. Press the Video Recording Button again to stop recording.
- During video preview, long press the Playback Button to toggle hiding or displaying all icons on the screen.
- During video preview, press the Menu Button select "System Settings" > enable "Grid Lines" > tap "Return." A grid will appear on the screen for composition assistance.
Video Mode
- Use two fingers to pinch on the screen during video preview to zoom in or out.
- Press the Camera Switch Button to activate the front-facing camera. (Note: The selfie camera does not support zoom adjustments.)
Viewing Videos
- In recording mode, press the playback button to enter playback mode.
-
Use the up button or down button in the file list to select a video, and press the OK button open it. (Or click on the video to view it.)
-
In the file list, click "Select" at the top right to delete videos.
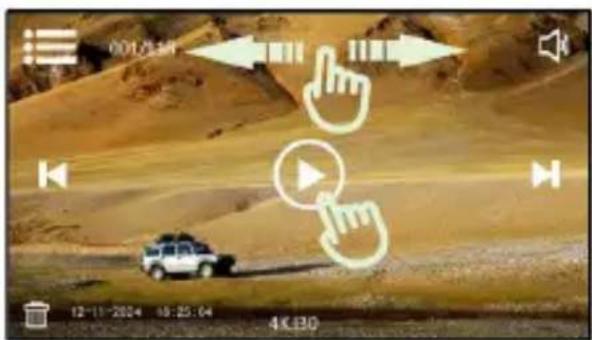
- To play or pause a video, press the OK button or tap the play icon in the center of the screen.
- You can select the previous or next video by using the up/down buttons or swiping left/right on the screen.
- Tap the volume icon in the top right corner of the screen to adjust the

video playback volume.
- During video playback, drag the progress bar at the bottom to fast-forward or rewind.
- After viewing the video, press the menu button twice to exit playback mode.
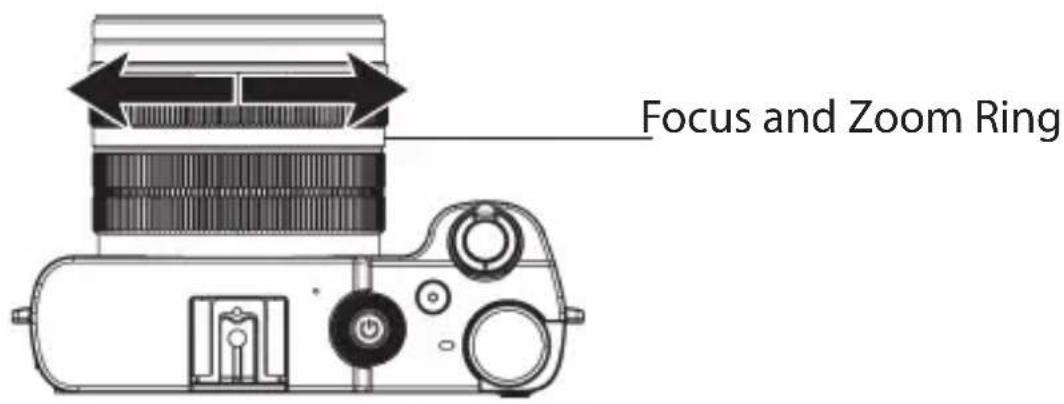
Focusing and Zooming
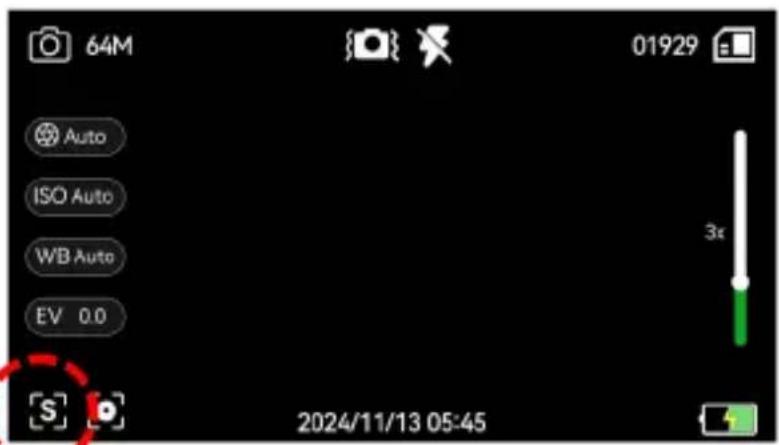
- Focus Settings
During photo or video preview, tap the focus icon S the bottom left corner of the screen to toggle between: [A] Auto Focus, [S] Single Focus, [M] Manual Focus
Focus settings
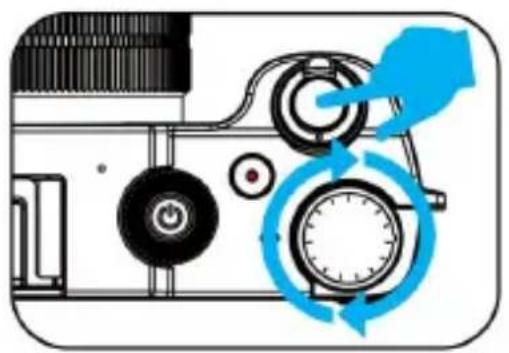
- Focus and Zoom Ring
A. In [M] Manual Focus mode, manually rotate the focus ring on the lens to adjust focus.
B. In [A] Auto Focus or [S] Single Focus modes, manually rotate the zoom ring on the lens to adjust zoom.
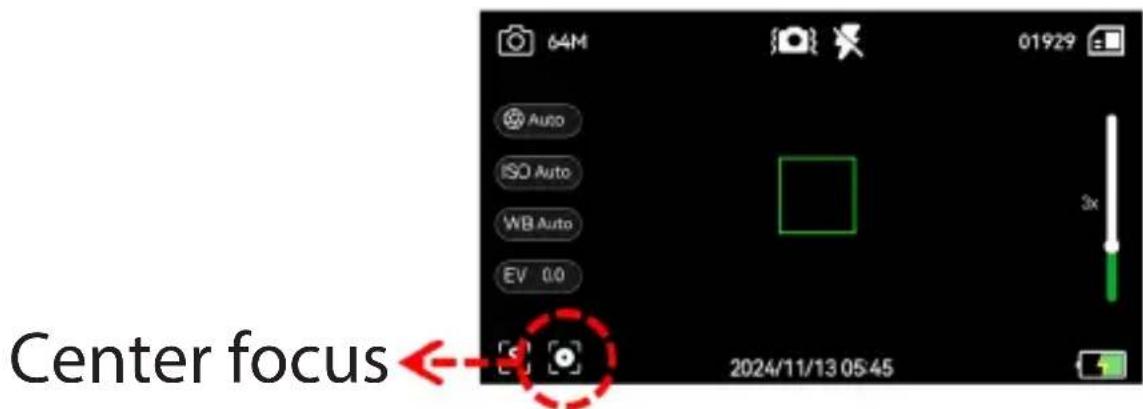
Focusing and Zooming
3. Center Focus
In [A] Auto Focus or [S] Single Focus modes, tap anywhere on the screen to set the focus box at that location. Then tap the center focus icon the bottom left to center the focus.
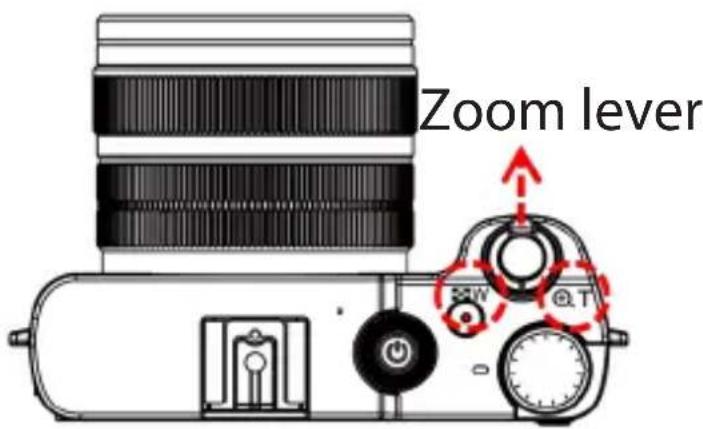
4. Zoom Lever
Use the zoom lever to adjust zoom in all focus modes. Push [W] to zoom out and [T] to zoom in.
Focusing and Zooming
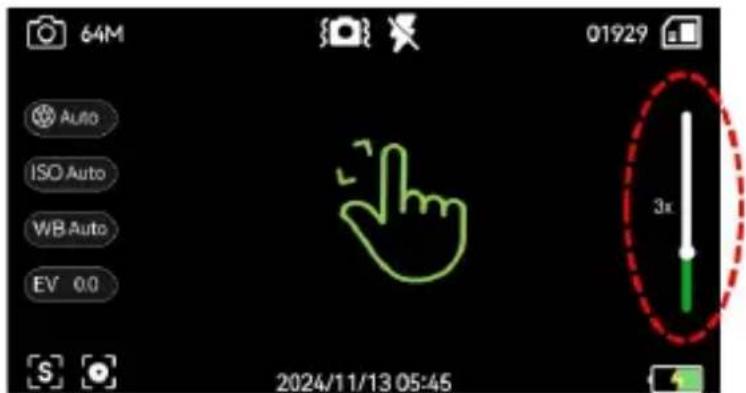
5. Pinch-to-Zoom
In [A] Auto Focus or [S] Single Focus modes, pinch or spread two fingers on the screen to zoom in or out.
Flash
- In Photo Mode or Video Recording Mode, press the Flash Button to activate the flash.
- Tap the flash icon on the screen to select the desired flash mode.
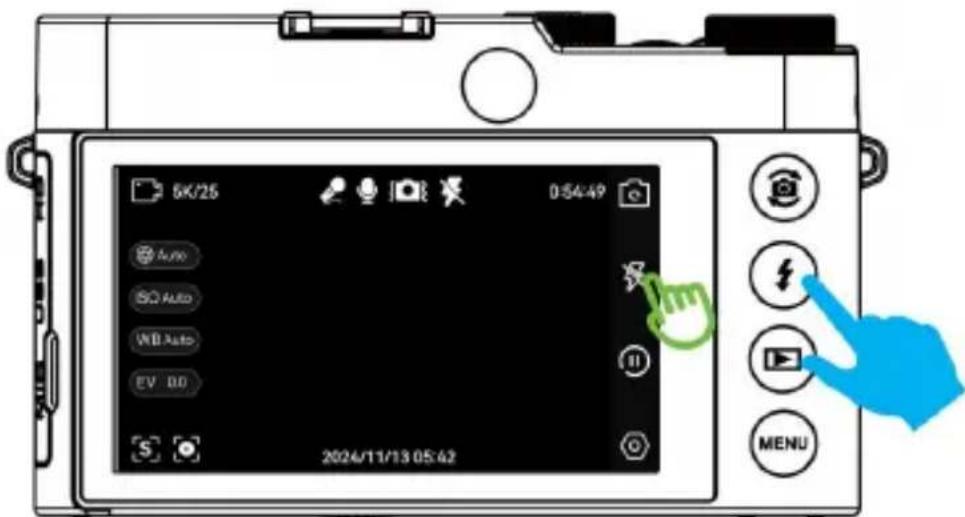
Flash
| Turn off flash | No flash is used when taking photos under any circumstances. |
| Forced flash | The built-in flash is always activated for flash photography, regardless of lighting conditions. |
| Auto flash | In low light conditions, the built-in flash automatically activates when taking photos. |
| Fill On | The LED light will remain on continuously. |
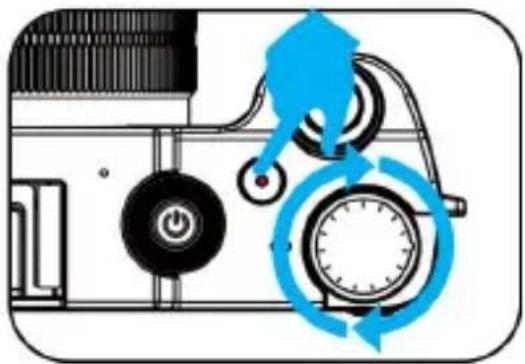
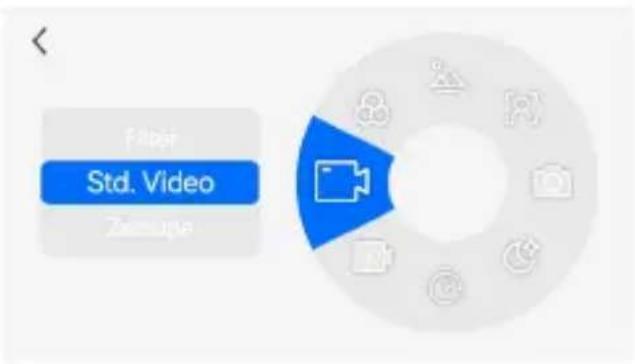
Mode Dial
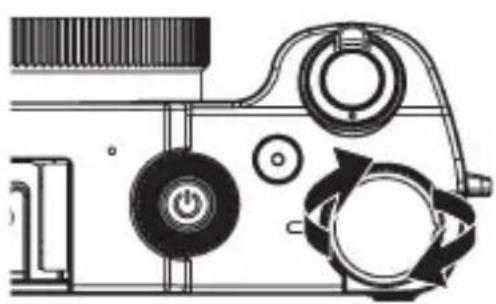
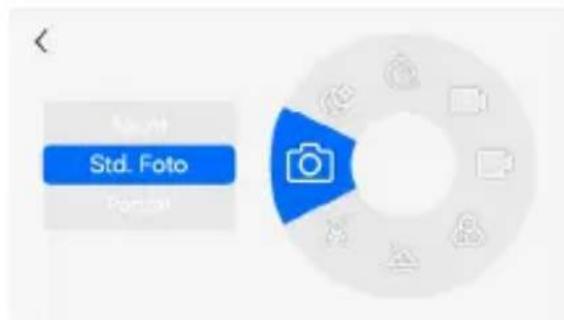
Rotate the Mode Dial to enter the mode selection screen. Then, rotate the dial (or swipe up and down on the screen, or tap icons on the right side of the screen) to switch to the desired mode.
Available Modes:
- Standard Photo Mode:
Press the Shutter Button to capture photos.
Mode Dial
- Portrait Mode:
Focuses on the subject's features to capture vivid portraits.
- Landscape Mode:
Captures wide landscapes with sharp focus and vibrant colors.
- Filter Mode:
Allows the use of various filters: Standard, Black & White, Sepia, Retro, Vivid, Warm Tone, Cool Tone, Red, Green, Blue.
- Standard Video Mode:
Press the Video Recording Button to start and stop video recording.
- Slow Motion Mode:
Records at a high frame rate to create slow-motion playback, ideal for capturing fast-moving objects or quick events with detail.
- Time-Lapse Mode:
Set an interval (1s/5s/10s/30s) before recording. The camera will record a compressed video by taking frames at the set intervals over a certain period. Press the Video Recording Button again to stop recording.
- Night Mode:
Enhances brightness and detail for photos or videos captured in low-light or nighttime environments using advanced night vision and color processing techniques.
Downloading Photos/Videos to a Computer

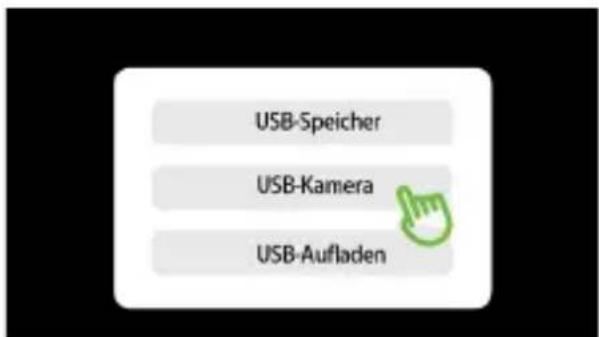
- Turn on the camera and use a USB-C cable to connect it to your computer.
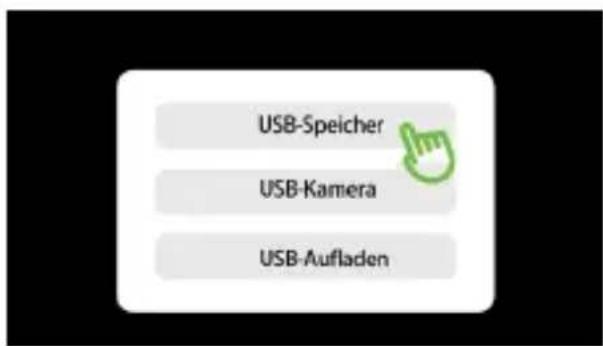

- Once connected, a dialog box will appear on the camera screen. Select "USB Storage" on the screen. Access the camera's folder on your computer and download
photos and videos.
- After completing the transfer, disconnect the USB cable. The camera will automatically exit USB storage mode.
Using the Camera as a Webcam
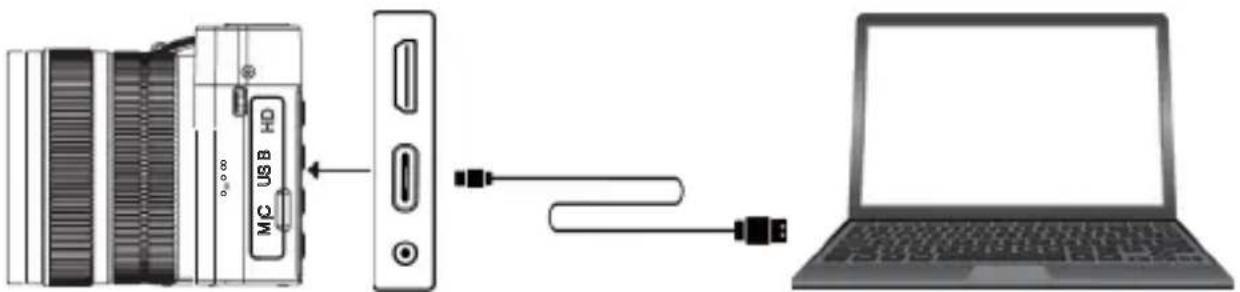
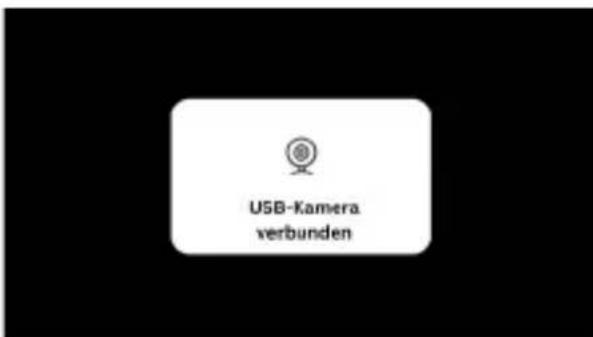
- Turn on the camera and use a USB-C cable to connect it to your computer.
-
Once connected, a dialog box will appear on the camera screen. Select "UVC" on the screen. The camera will now function as a webcam for your computer.
-
After using, disconnect the USB cable. The camera will automatically exit webcam mode.
Connecting to a TV for Playback

- Use an HDMI Cable to connect the camera to the TV. Turn on the camera.
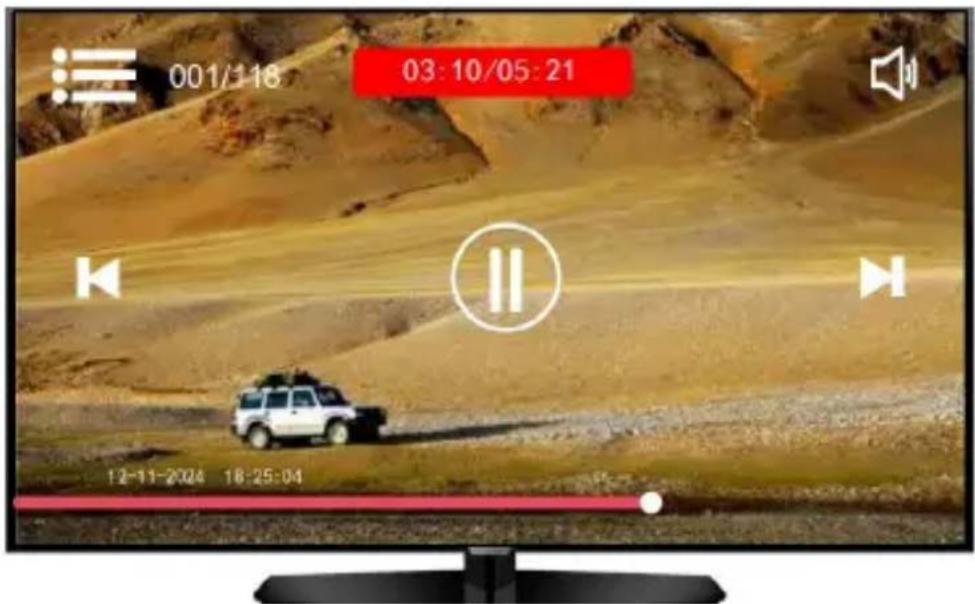
- After a successful connection, in Video Recording Mode, press the Playback Button to enter playback mode.
- Use the Up/Down Buttons to select the video you want to play. Press the OK Button (or tap the screen) to confirm and play the selected video.
- After viewing, disconnect the HDMI cable. The camera will automatically exit TV playback mode.
Technical Data
| Image Sensor | Main lens: 1/2.8" CMOS sensor | diagonal 6.43 mm (crop factor 6.73) Selfie lens: 1/3.06" CMOS sensor |
| Lens | Main lens: 8x optical zoom | 5.76 - 46.09 mm | 35 mm equivalent: 38 - 310 mm | F/1.8 - 2.6 Selfie lens: 3.37 mm | F/2.2 |
| Focus Range | Main lens: Wide angle: 0.2 - ∞ m | Tele: 0.4 - ∞ m Selfie lens: 0.5 - ∞ m |
| Chip | HisiliconH3519DV500 |
| Photo Resolution | 64 MP* (10720 x 6030), 48 MP* (9280 x 5220), 36 MP* (7952 x 4472), 24 MP* (6544 x 3680), 20 MP* (5888 x 3312), 16 MP* (5376 x 3024), 12 MP* (4608 x 2592), 8 MP (3840 x 2160) |
| Video Resolution | 5K* / 25 fps, 4K / 30 fps, 2.7K / 30 fps, 1080p / 60 fps, 1080p / 30 fps, 720p / 60 fps |
| Photo Modes | Standard photo, Portrait, Landscape, Filter, Night |
| Video Modes | Standard video, slow motion, time lapse, night |
| White Balance | 2500 - 6500 |
| Exposure Compensation | -2EV to +2EV in 0.5 steps |
| Metering | Center, Matrix, Spot |
| Flash | Yes |
| Self-Timer | 3 / 5 / 10 seconds |
| Display | |
| Memory | microSD memory cards of class 10 / U3 with up to 64 GB** |
| Data Format | Photo: JPG | Video:MP4 |
Technical Data
Video compression H.265
Connections USB-C connection, mini-HDMI connection, microphone connection, microSD memory card slot, 1/4-inch connection, hot shoe connection
Material Plastic, Aluminum, Glass
Power Supply Lithium polymer battery type NP-60 (3.8 V / 1,350 mAh / 5.13 Wh), input DC 5.0 V / 2.0 A
Dimensions ( L x W x H) | 12.6 x 8.4 x 7.3 cm | 383 g (without battery) Weight
What's in the Box Powerflex X8 Dual Lens, battery, USB-C cable, HDMI cable, USB-A to USB-C adapter, USB-A to micro-USB adapter, USB-A to microSD adapter, hand strap, carrying strap, cleaning cloth, storage bag, user manual
We reserve the right to make technical and visual modifications to the product as part of product improvements. *Interpolated.
**Not included.
Disposal


Dispose of the packaging separately according to material type. Use local collection facilities for paper, cardboard, and lightweight packaging (applicable in the European Union and other European countries with recycling systems for separated waste collection).
Devices marked with this symbol must not be disposed of with household waste! You are legally required to dispose of old devices separately from household waste. Information about collection points that accept old devices free of charge can be obtained from your municipal or city administration.
Disposal

Batteries and rechargeable batteries must not be disposed of with household waste! As a consumer, you are legally obligated to ensure that all batteries and rechargeable batteries, whether they contain hazardous substances* or not, are disposed of in an environmentally friendly manner. Batteries and rechargeable batteries are therefore marked with the adjacent symbol.
For more information, contact your retailer or return and collection points in your community.
*Labeled as follows: Cd = Cadmium, Hg = Mercury, Pb = Lead
Declaration of Conformity
Rollei GmbH & Co. KG hereby declares that this product, „Rollei Powerflex X8 Dual Lens,“ complies with the following directives:

2011/65/EU RoHS Directive 2014/30/EU EMC Directive
The full text of the EU Declaration of Conformity is available at the following website: www.rollei.com/egk/powerflexX8duallens Rollei GmbH & Co. KG In der Tarpen 42
22848 Norderstedt
Germany
www.rollei.com
- Mode Photo Standard:
Dimensions (L x I x H) | 12.6 x 8.4 x 7.3 cm | 383 g (without battery) Poids
Directive RoHS 2011/65/EU
Directive CEM 2014/30/EU
Half-press the shutter button to focus
Press the videorecording
A. Stlačte tlacidlo Menu > lyberte „Systémové nastavenia“ > „Nastavenia zaostrenia“ > „Jednorazové zaostrenie“ > tuknite na „Návrat“ pre námrat do režimu náhladu.
B. Upravte opticky zoom pomocou packy zoomu alebo prstenza zoomu.
C. Šuknite na obrazovku pre vyber vlastnej oblasti zaostrenia.
D. Stlache spust do polovice, kym sa ramicek zaostrenia nezmeni z bielej na zelenu. Potom stlache tlacidlo nahravania videa pre zachatie nahravania.
E. Stlache tlacidlo nahravania video znova pre zastavenie nahravania.