29341 - Model making Märklin - Free user manual and instructions
Find the device manual for free 29341 Märklin in PDF.

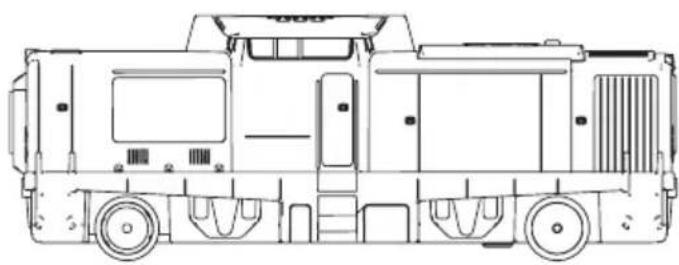
| Product type | H0 scale (1/87) electric miniature train |
| Scale | H0 (1/87) |
| Train power supply | Rechargeable built-in battery via included USB/Mini-USB cable |
| Charging time | Approximately 3 hours |
| Train battery life | Approximately 2 hours 30 minutes |
| Remote control power supply | 2 AAA/LR03 1.5 V batteries (included) |
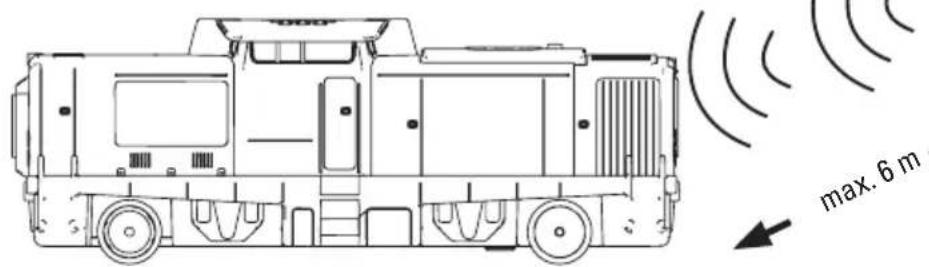
| Remote control range | Approximately 6 meters |
| Speeds | 3 forward and reverse speeds (slow, medium, fast) + stop |
| Sound functions | Construction site sounds, horn, construction vehicle |
| Lighting | Front headlight (switchable) |
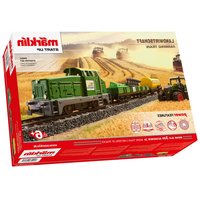
| Included items | 4-piece train, 12 R1 track pieces, 1 R2 track piece, 2 straight rails 188 mm, 4 straight rails 172 mm, 1 left switch, 1 buffer stop, 1 remote control, 1 USB/Mini-USB charging cable, 2 AAA batteries, 1 excavator shovel, 6 balls, 2 traction tires, instructions |
| Recommended age | From 3 years |
| Safety | The product contains magnets. Not suitable for children under 3 years. Sharp points and edges. Risk of electric shock if instructions are not followed. |
| Care and cleaning | Clean with a dry, smooth cloth. Check the axles (hair/dust). Recharge the battery at least every 6 months to prevent deep discharge. |
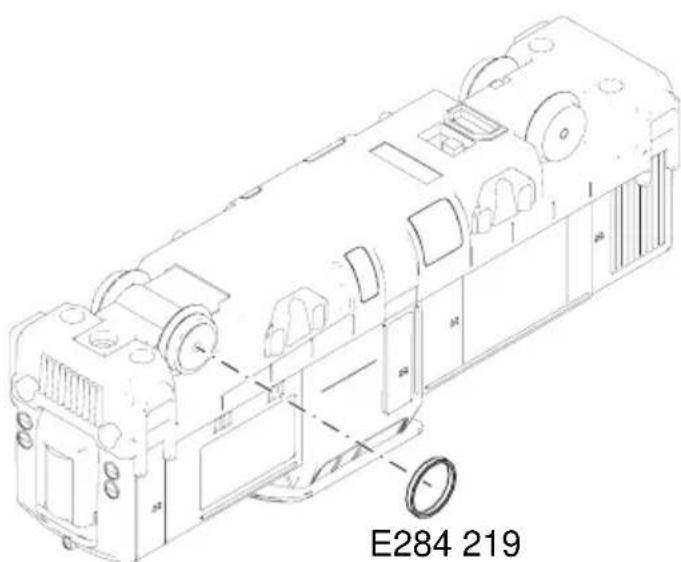
| Spare parts | Replacement traction tires ref. E284 219 |
| Warranty | Legal and contractual warranty as per the included certificate |
Frequently Asked Questions - 29341 Märklin
User questions about 29341 Märklin
0 question about this device. Answer the ones you know or ask your own.
Ask a new question about this device
Download the instructions for your Model making in PDF format for free! Find your manual 29341 - Märklin and take your electronic device back in hand. On this page are published all the documents necessary for the use of your device. 29341 by Märklin.
USER MANUAL 29341 Märklin
CHOKING HAZARD - Small parts.
Not for children under 3 yrs.
C E UK CA
- Using the Product as Intended 11
- Safety Notes 11
- Contents 11
- Technical Information 11
- Notes about Using this Model for the First Time 11
6.Preparations 11 - Track to build 13/35
- Running the Train for the First Time 14
- Information about Operating the Train 16
- Trouble Running the Train 17
- Cleaning and Maintenance 17
12.Disposing 18 - Symbols and Their Meaning 18
14.Warranty 18 - Complementary accessories 18
- Track and Turnouts 35
- Other Play Options 36
Carefully read through the operating instructions before using the model for the first time. The operating instructions come with the product and must therefore be kept as well as passed on when giving the product to a third party.
F
Sommaire: Page
73033 Goppingen Germany
Tel: +49 7161 608 222
1. Using the Product as Intended
This product is an H0 Gauge (1:87 scale) model train for children ages 3 and above. This battery-powered train can be operated on model railroad layouts equipped with Märklin C Track.
- The track included in this set are not suitable for use with a transformer / digital locomotive controller.
- This train may not be run on a rug or carpet.
- This train can be run on a smooth, clean base or floor, on the my world plastic track, or on H0 C-Track.
2. Safety Notes
- This product may only be used indoors.
- Do not expose the model to direct sunlight, extreme changes in temperature, or high humidity.
WARNING! Not suitable for children under 3
For U.S.A. only:

WARNING:
CHOKING HAZARD - Small parts.
Not for children under 3 yrs.
years. Sharp edges and points required for operation. Danger of choking due to detachable small parts that may
be swallowed. Misuse of the switched mode power pack can cause an electrical shock.
WARNING! Do not hold this product close to your face or in your hair when it is turned on.
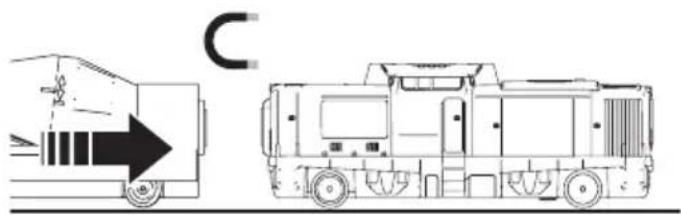
- WARNING! If one of the cars in the train becomes damaged, the damaged car may not be used any longer.
- WARNING! This product contains magnets in the couplings. Swallowing one or more of the magnets may be deadly under certain circumstances. Go to the emergency room of your local hospital immediately.
- Do not bend the USB charging cable included with this set. Check it regularly for damage to the cord, plug, enclosure and other parts, and in the event of such damage, they must not be used until the damage has been repaired.
- This toy may only be used with a switched mode power pack for toys and may only be connected to devices bearing the symbols or (Output: DC 5 V / USB 2A)
The power supply is not a toy.
- The LEDs in this item correspond to Laser Class 1 according to Standard EN 60825-1.
3. Contents
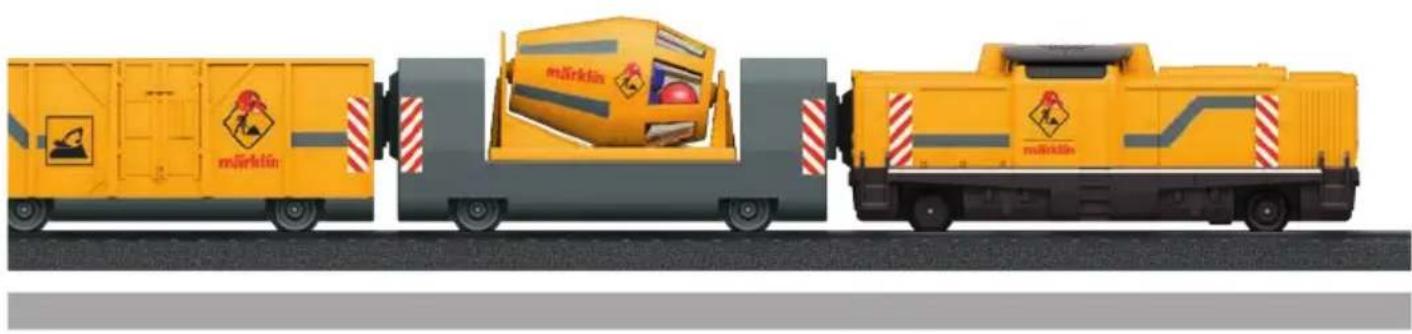
4-part train
12 sections curved track R1
1 sections curved track R2
2 sections straight track 188 mm
4 sections straight track 172 mm
1 turnout left
1 track end with a bumper
1 remote controller
1 Recharging cable (USB / mini USB)
2 type AAA/LR 03 1.5 volt batteries
1 Power shovel
6 Balls
2 Traction tire
Operating instructions

Operating instructions

Warranty card
Advertising sheet
4. Technical Information
Voltage supplied to the train: permanently built in rechargeable battery (can be recharged with the recharging cable included with the set)
Voltage supplied to the remote controller: 2 × 1.5 volts DC
- Battery type: 2 x 1.5 volts Micro, AAA, LR 03
H0 Gauge (1:87 scale)
5. Notes about Using this Model for the First Time
- Prepare the remote controller and the train according to Sections 6.2 and 6.3.
- If the train goes outside of the range of the remote controller (approximately 6 meters/20 feet) it will go further but cannot be controlled any more.
- A maximum of two trains can be used at the same time.
- You may have problems if another controller with the same frequency is operated in the range of the train.
6. Preparations
6.1 Notes about Handling Batteries:
Notes about Batteries and Rechargeable Batteries
- This toy contains a rechargeable battery in the train / in the locomotive that cannot be exchanged.
WARNING! The rechargeable battery in the train can only be recharged with the USB charging
cable included with the train when the train is turned off.
- Batteries should only be used and replaced by adults.
- Batteries that cannot be recharged must not be put into a recharger.
If rechargeable batteries are being used for the remote controller, they must be removed from the controller before recharging them! - Rechargeable batteries should be charged up only under the supervision of adults. Make sure that you pay attention to the instructions for operating the recharger you are using.
- Inequality of battery types, or new and used batteries can not be used together.
- Batteries with the correct polarity insert.
- Remove run down batteries from the remote controller.
- Contacts should not be shorted.
If you are not going to use the train for a longer time, remove the batteries from the remote controller. - Put on protective gloves to remove run down batteries. Then clean the battery holder and the contacts with a dry cloth.
- Batteries should not be handled by children. Children could put batteries in their mouth and swallow them. If a battery should be swallowed take your child immediately to a hospital emergency room.
See Section 12 about disposing of batteries.
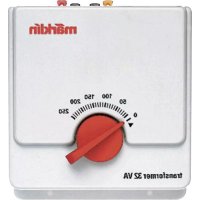
6.2 Remote Controller
Unscrew the battery holder and lift up the cover
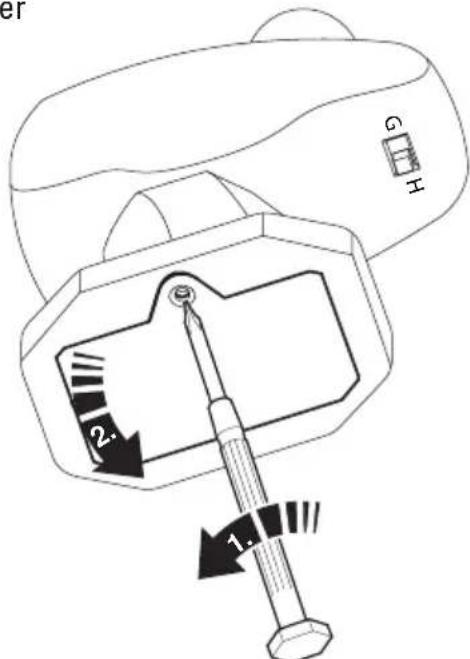
Insert two (2) type AAA/LR 03 batteries as shown in the drawing
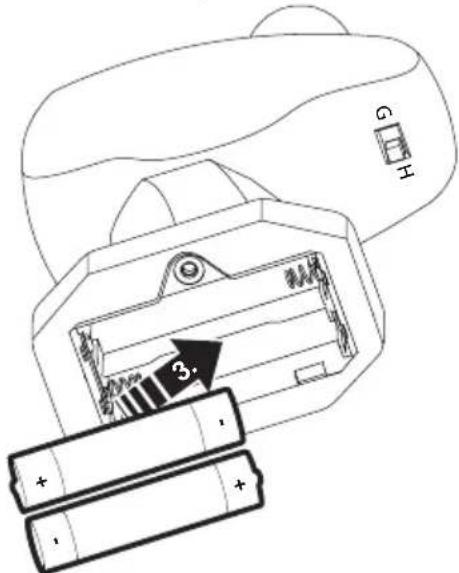
Install or change the batteries only in pairs according to the markings! Pay attention to the polarity!
Put the cover for the battery holder back in place. Screw the battery holder down into place.

6.3 Train
The built-in rechargeable battery must be charged up before operating the train for the first time!
Make sure the train is turned off before charging the battery.
Plug the mini USB plug on the recharging cable included with the train into the mini USB socket on the train.
The USB plug for the charging cable included with this set may only be connected to a charging device from Protection Class II (example: from a cell phone charger), which is provided with the following symbol:
The red light in the train will be on during the charging process.
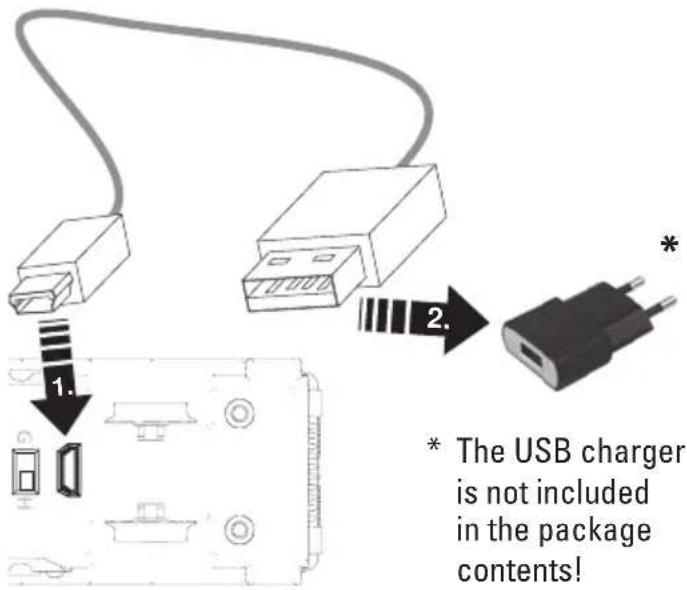
The charging time with the cable included with the train is approximately 3 hours.
The train is recharged when the red light in the train goes out.
After the rechargeable battery is fully charged, the charging cable must be removed from the train and the charging device.
The train can be run approximately 2.5 hours with a complete charge in the battery.
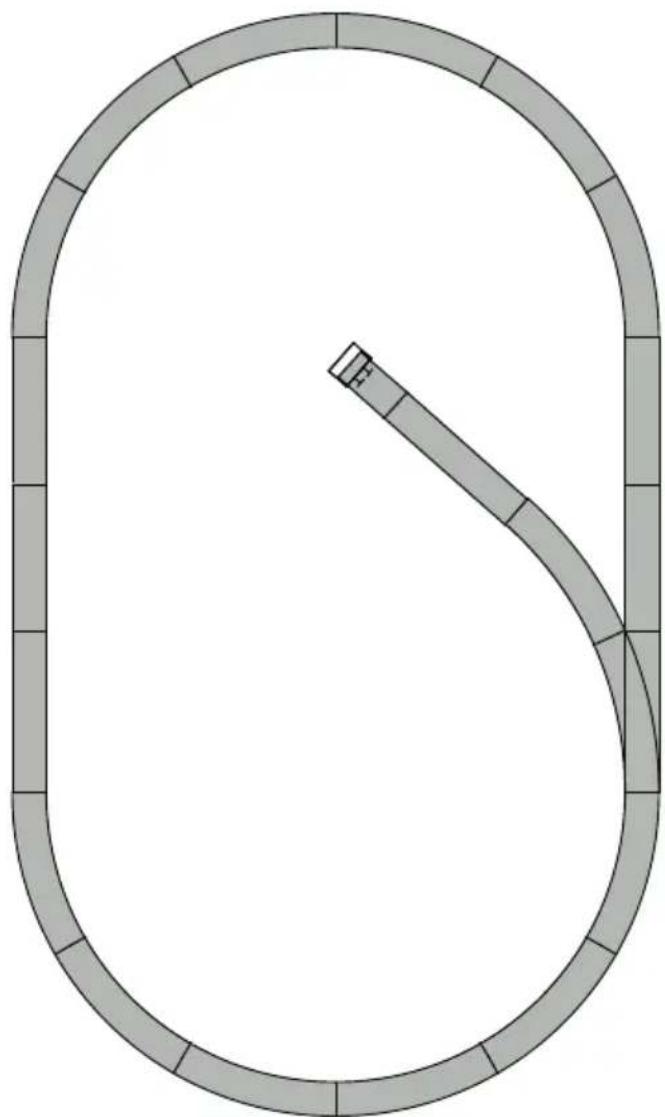
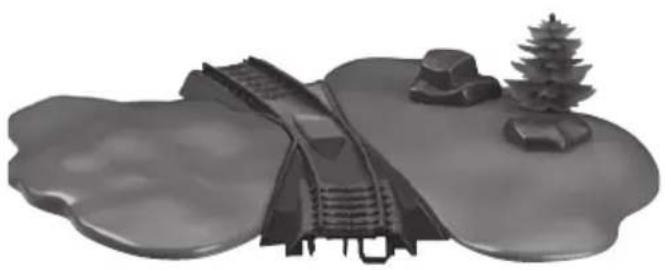
7. Track to build
Put together
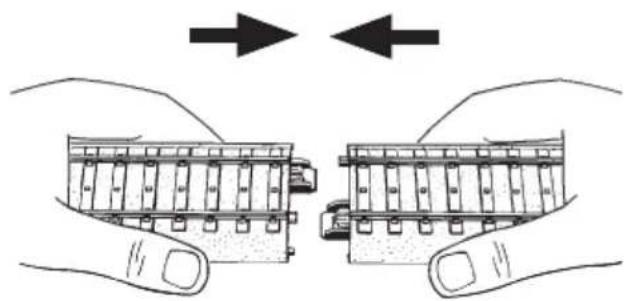
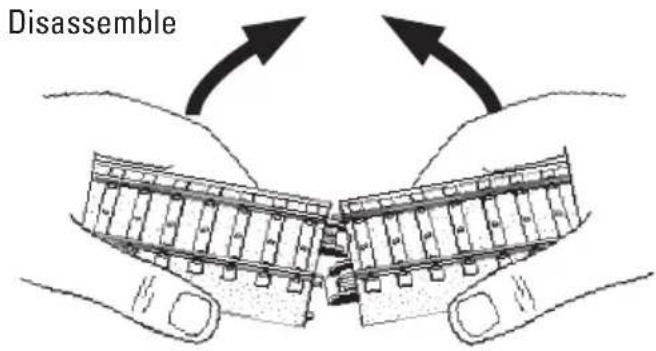
Ideas for setting up the track (see also Page 35):
8. Running the Train for the First Time
8.1 Preparing the Train / Turning the Train on
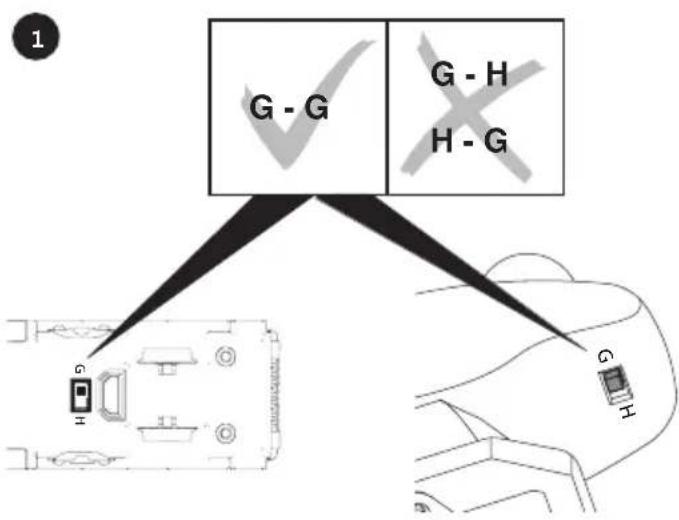
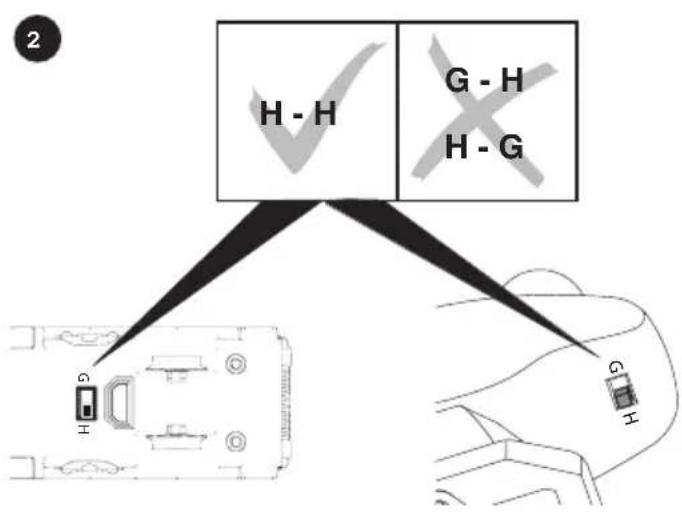
The switch settings on the train and on the remote controller must agree with each other.

Set the train on the track or on a smooth flat base.
The 72240 rerailer makes it easier to set locomotives and cars on the track. (Not included in package contents.)

Couple the cars together.

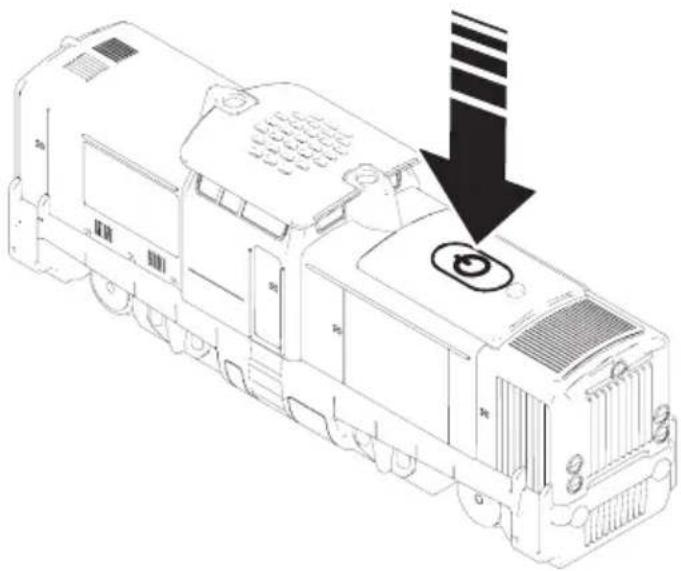
Turn the train on by pressing the button once.
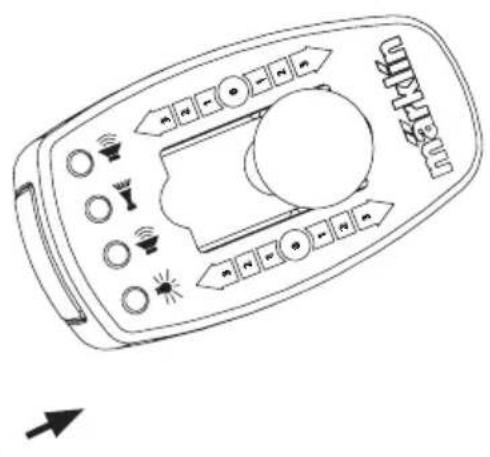
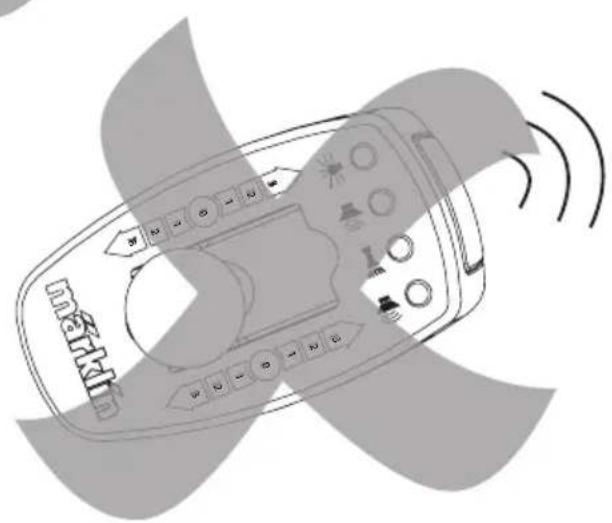
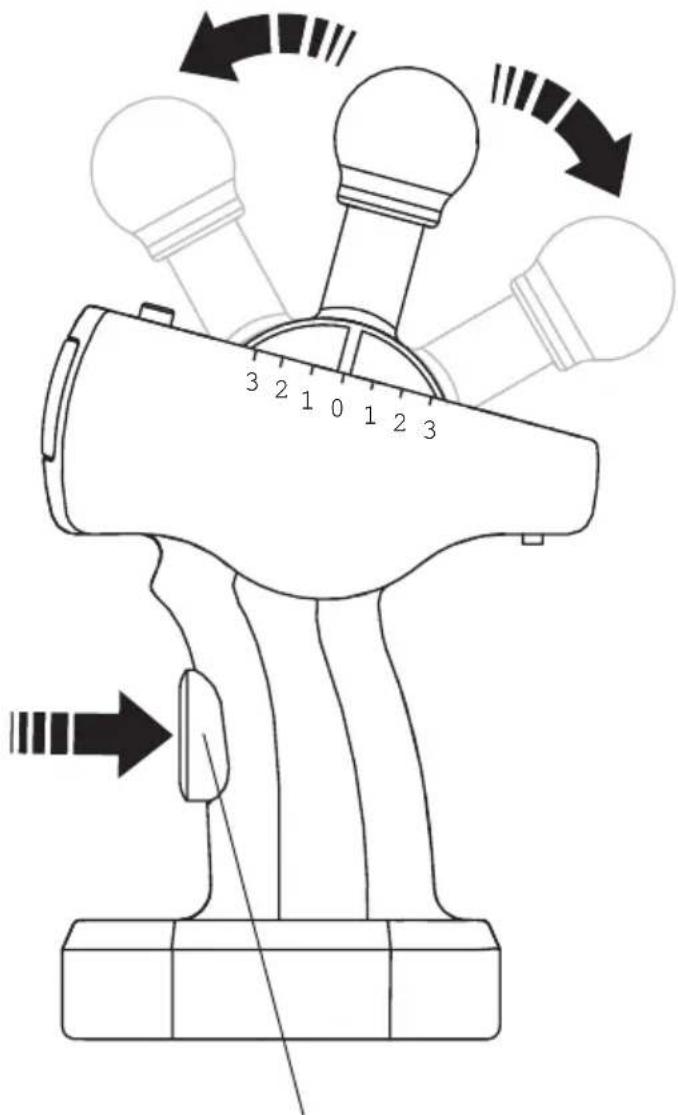
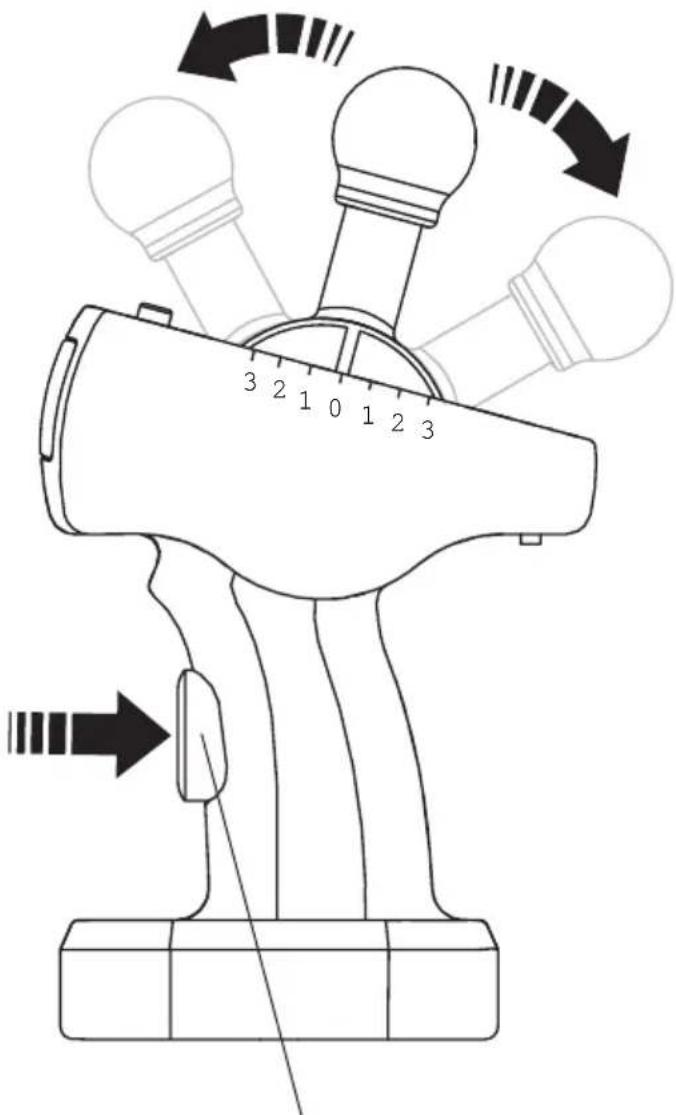
8.2 Operating the Remote Controller
Key functions
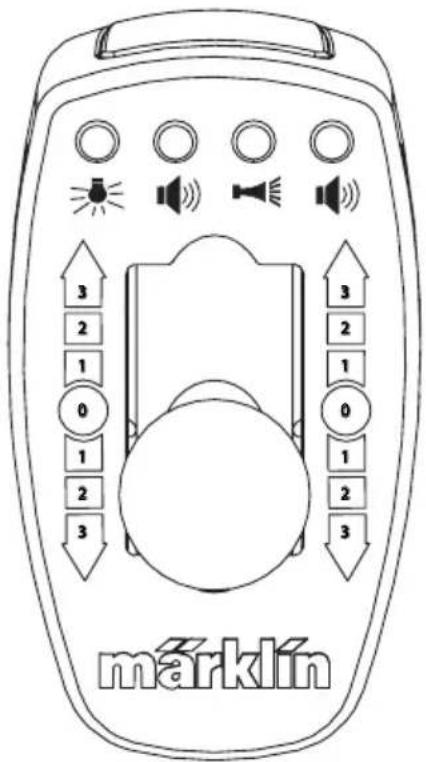
Controllable Functions
Headlights (Front)
Sound effect: Large construction site
Sound effect: Horn
Sound effect: Construction Vehicle
Important: Sound functions can only be activated in succession one after the other and not simultaneously. Another sound function cannot be activated until a sound function called up has completely finished.
Speed and Direction
0: stop position
1: slow
2: medium fast
3: fast
Forward stop Reverse (1/2/3) position (0) (1/2/3)
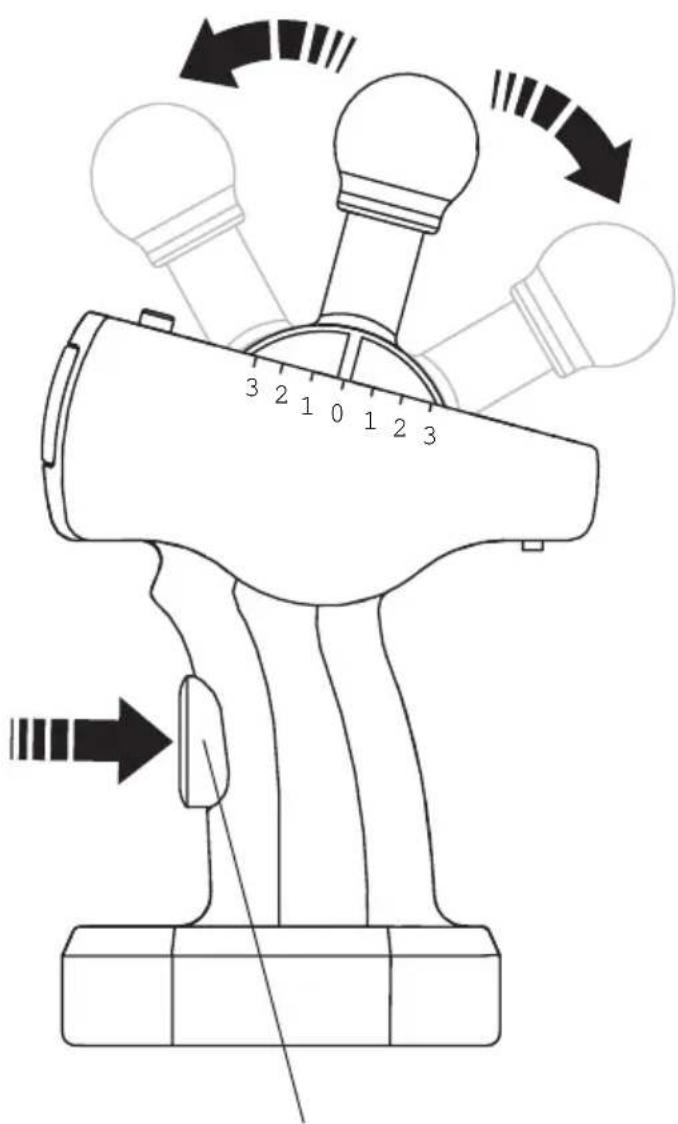
Train stop
9. Information about Operating the Train
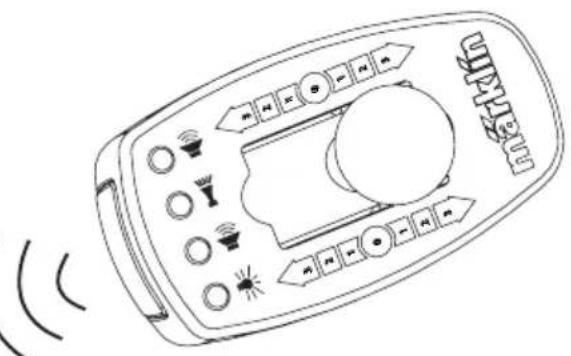
- When running the train, make sure that the remote controller is always pointed at the train.
If the train goes outside of the range of the remote controller (approximately 6 meters / 20 feet) it will go further but cannot be controlled any more. - After 5 minutes without a signal set at go by the remote control, the train remains stopped. It can be started again by any signal set at go. After 10 minutes without a signal set at go, the train shuts off. The train must first be turned on again at the controller in order for it to start again.
- No obstacle can be allowed between the train and the remote controller.
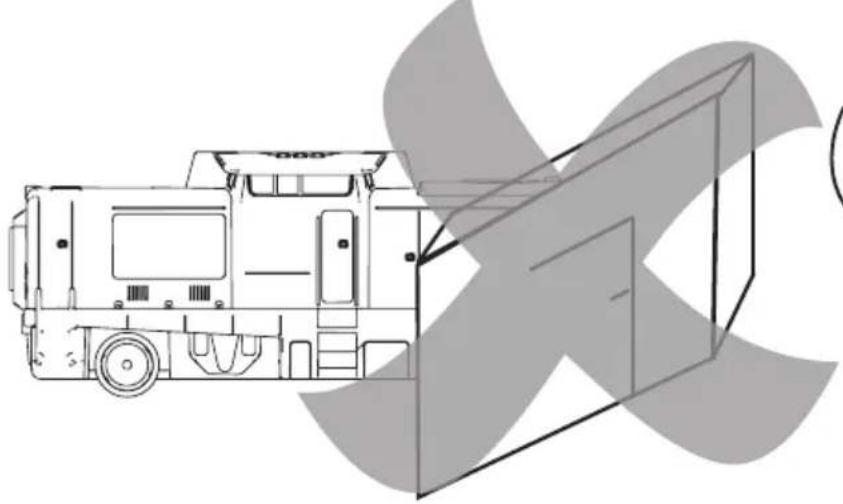
- Do not turn the remote controller away from the train.
9.1 Operating with 2 Trains
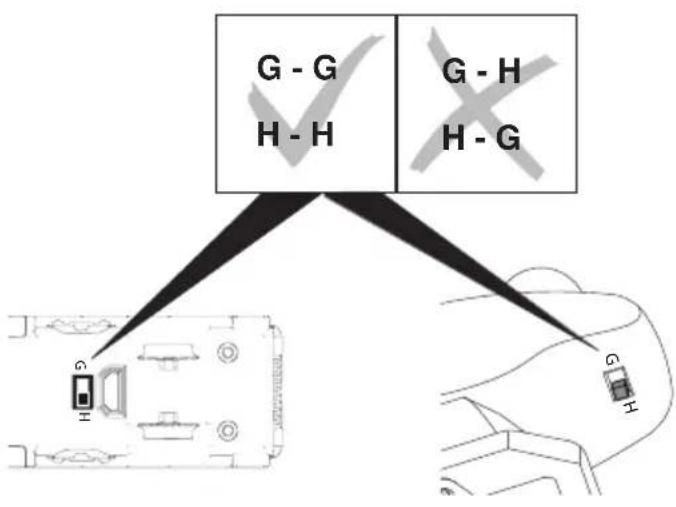
Two trains can be operated independently of each other on the same layout. To do this, you must set one train and remote controller to switch setting G-G (1) and the second train and remote controller to H-H (2). The switch settings for the train and remote controller must agree with each other!
10. Trouble Running the Train
- If the train does not run, check to make sure that the rechargeable battery for the train is charged up. If necessary, charge up the rechargeable battery for the train. If the rechargeable battery for the train is charged up and the train still does not react, check the batteries for the remote controller. If necessary, replace the batteries for the remote controller.
- If the train runs noticeably slower or comes to halt while you are playing with it, charge up the rechargeable battery. Pay attention to the automatic shutoff time! (See section 9)
- If the train is damaged, it may not be used anymore. If another car or powered car is damaged, take it out of the train and do not use it anymore.
- If the range of the remote controller decreases, then the batteries for the remote controller need to be replaced.
11. Cleaning and Maintenance
- Check to see if hair or dirt gets on the axles on the train and remove this hair or dirt from the axles with the help of a pair or tweezers so that the train runs correctly.
- The train can be wiped with a dry, lint-free cloth.
- Recharge the battery no later than 6 months after not being used in order to avoid deep discharge. Deep discharges damage the battery, reduce the performance, and shorten the possible running time for the unit.
- The traction tire on the powered axle can be replaced if necessary. The traction tire is available under item number E284 219.
12. Disposing (only EU)
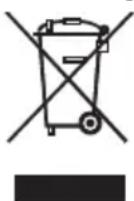
Notes on environmental protection:
Products marked with a trash container with a line through it may not be disposed of at the end of their useful life in the normal household trash. They must be taken to a
collection point for the recycling of electrical and electronic devices. There is a symbol on the product, the operating instructions, or the packaging to this effect. The materials in these items can be used again according to this marking. By reusing old devices, materially recycling, or recycling in some other form of old devices such as these you make an important contribution to the protection of our environment. Please ask your city, town, community, or county authorities for the location of the appropriate disposal site.
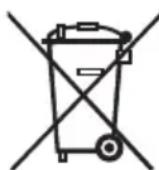
Batteries Do Not Belong in the HouseholdTrash! Every user in the EC area is legally obligated to turn in batteries at a collection point in his community or at a dealer. The
batteries are then disposed of appropriately in order to protect the environment. Batteries containing dangerous materials are marked with this symbol and with chemical symbols (Cd = Cadmium, Hg = Mercury, Pb = Lead).
Other information:
www.maerklin.com/en/imprint.html
13. Symbols and Their Meaning

indicates adherence to all basic safety and health
requirements.
(EU/UK)
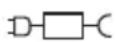
Separate supply unit
14. Warranty
The warranty card included with this product specifies the warranty conditions.
- Please contact your authorized Märklin dealer for repairs or contact:
U.S. only:
The USA subsidiary using the contact form at www_marklin.com.
GB only
15. Complementary accessories
The 72222 construction site station and the 44118 crane car are ideal add-ons for the "Construction Site Train" starter set.
Indications relatives aux piles et aux accus rechargeables
The different track sections and turnouts are identified on the back with a colored round sticker.
Additional setup possibilities such as with the 23300 extension set at https://www.maerklin.de/de/productte/my-world/einfach-starten
© by Gebr. Marklin & Cie. GmbH
márklin my world
E Instrucciones de empleo
Istruzioni di impiego
S Bruksanvisningen
DK Betjeningsvejledningen
Marcha
atrás (1/2/3)

Parada del tren
Marcia in avanti (1/2/3)
Marcia indietro (1/2/3)
Arresto del treno
Korsel fremad (1/2/3)
Stop-position (0)
Korsel bagud (1/2/3)
Standsninqaftoget
www.maerklin.com/en/imprint.html.
© by Gebr. Marklin & Cie. GmbH