
FMOD4053MLB1 - Oven BERTAZZONI - Free user manual and instructions
Find the device manual for free FMOD4053MLB1 BERTAZZONI in PDF.
| Product type | Built-in combination microwave oven |
| Brand | Bertazzoni |
| Model | FMOD4053MLB1 |
| Rated voltage | 230 V ~ 50 Hz |
| Microwave power (input) | 1650 W |
| Microwave power (output) | 900 W |
| Convection power | 1700 W |
| Grill power | 2200 W |
| Maximum power | 3000 W |
| Dimensions (W x H x D) | 595 x 454 x 568 mm |
| Cooking types | Microwave, convection, grill, microwave+convection, microwave+grill, pizza, automatic defrost (3 programs), 13 automatic programs |
| Special functions | Quick preheat, kitchen timer, child safety, programmed cooking |
| Included accessories | Grill rack, glass tray, enamel tray, side rails (left/right), ceramic clips (front/stop), screws and fixing plugs |
| Display and controls | Touch screen, touch keys, adjustment slider |
| Safety | Child safety, door lock, thermal cut-off, automatic stop when door opened |
| Cleaning and maintenance | Do not use steam cleaners or abrasives. Clean with warm soapy water. Do not use metal scrapers on the glass. |
| Repairability | Bertazzoni after-sales service; interventions reserved for a qualified technician |
| Warranty | Manufacturer's warranty (see conditions on Bertazzoni website) |
Frequently Asked Questions - FMOD4053MLB1 BERTAZZONI
User questions about FMOD4053MLB1 BERTAZZONI
0 question about this device. Answer the ones you know or ask your own.
Ask a new question about this device
Download the instructions for your Oven in PDF format for free! Find your manual FMOD4053MLB1 - BERTAZZONI and take your electronic device back in hand. On this page are published all the documents necessary for the use of your device. FMOD4053MLB1 by BERTAZZONI.
USER MANUAL FMOD4053MLB1 BERTAZZONI
| EN | INSTALLATION MANUAL USER AND MAINTENANCE MANUAL BUILT-IN COMBI MICROWAVE | 3 |
| IT | MANUALE D'INSTALLAZIONE MANUALE D'USO E MANUTENZIONE MICROONDE COMBI DA INCASSO | 37 |
| FR | MANUEL D'INSTALLATION MANUEL D'UTILISATION ET D'ENTRETIEN MICRO-ONDES ENCASTRÉ COMBINÉ | 73 |
| NL | INSTALLATIEHANDLEDING GEBRUKS- EN ONDERHOUDSHANDLEIDING INBOUW COMBI-MAGNETRON | 107 |
| SV | INSTALLATIONSHandboK BRUKS- OCH UNDERHÄLLSHANDBOK INBYGGD KOMBI-MIKROVÄGSUGN | 143 |
FROM THE DESK OF OUR PRESIDENT
Dear new owner of a Bertazzoni appliance,
I want to thank you for choosing one of our beautiful products for your home.
My family started manufacturing kitchen appliances in Italy in 1882, building a reputation for quality of engineering and passion for good food.
Today, our products stand out because of their unique blend of authentic Italian design and superior appliance technology. It is our mission to make products that function perfectly and bring joy to their owners.
By making beautiful products we respond to our customers' flair for good design. By making them versatile and easy-to-use, cooking with Bertazzoni becomes a real pleasure.
This manual will help you learn to use and care for your Bertazzoni appliance in the safest and most effective way, so that it can give you the highest satisfaction for years to come.
Enjoy!
Paolo Bertazzoni
President
fes
USER MANUAL VALIDITY
The following manual is valid only for FMOD4053MLB1 product code.
INTRODUCTION ANDWARNINGS 9
READING THE MANUAL 9
APPLIANCE IDENTIFICATION 9
GENERAL SAFETY INSTRUCTIONS 9
APPLIANCEWARNINGS 10
ENVIRONMENTAL PROTECTION 11
SAVING ENERGY 11
ENVIRONMENTALLY-FRIENDLY DISPOSAL 11
HEATING FOOD 12
INSTALLATION MANUAL 13
INSTALLING THE OVEN 13
FITTEDUNITS 13
INSTALLATION DIMENSIONS 14
BUILDING IN 15
ELECTRICAL CONNECTION 15
PARTS AND ACCESSORIES 16
INSTALLING THE CLIPS AND SIDE RAILS 17
INSTALLATION OF THE CERAMIC CLIPS AND SIDE RAILS 17
LEFT SIDE RAIL INSTALLATION [05] 18
RIGHT SIDE RAIL INSTALLATION [06] 19
USING THE APPLIANCE 20
TECHNICAL INFORMATION 20
CONTROL PANEL 20
TOUCH KEYS AND DISPLAY 20
FUNCTION AND SCREEN DISPLAY 21
PARAMETER ADJUSTMENT 22
COOLING FAN 22
OVEN ACCESSORIES 23
GRILL RACK 23
BAKING TRAY 23
BAKING TRAY-ENAMEL TRAY 23
BAKING TRAY-GLASS TRAY 24
BEFORE USING THE APPLIANCE 24
SETTING THE CLOCK 24
CLEANING THE ACCESSORIES 24
SETTING THE TYPE OF HEATING AND TEMPERATURE 25
OPENING THE OVEN DOOR DURING OPERATION 25
SETTING A PROGRAMME 28
CHANGING THE PROGRAMME 28
CANCELLING THE PROGRAMME 28
CHANGING THE COOKING TIME 28
COOKING MODES TABLE 29
DEFROSTING PROGRAMMES 30
PREPARING FOOD 30
OVENWARE 30
RESTING TIME 30
SETTING THE PRE-SET COOKING 30
THE PRE-SET TIME HAS ELAPSED 30
SPECIFICATIONS 30
SETTING THE TIME-SETTING OPTIONS 31
SETTING THE COOKING TIME 31
SETTING THE CLOCK 31
SETTING THE TIMER 31
CHILDPROOF LOCK 31
SWITCHING ON THE CHILDPROOF LOCK 31
CLEANING THE APPLIANCE 32
CLEANING AGENTS 32
TROUBLESHOOTING 34
MALFUNCTION TABLE 34
ACRYLAMIDE IN FOODSTUFFS 35
TIPS FOR KEEPING ACRYLAMIDE TO A MINIMUM WHEN PREPARING FOOD 35
WARRANTY AND SERVICE 36
READING THE MANUAL
These instructions are suitable for different types of appliances, so they may contain descriptions of functions which your appliance may not contain or support.
The images and illustrations in this document refer to various models and may differ slightly from the product purchased.
The manufacturer does not accept any responsibility for personal injury or damage to property arising from incorrect installation or misuse of the appliance.
The manufacturer reserves the right to modify the various models as required to comply with the technical regulations in force.
In the event of complaints, please contact the customer service.
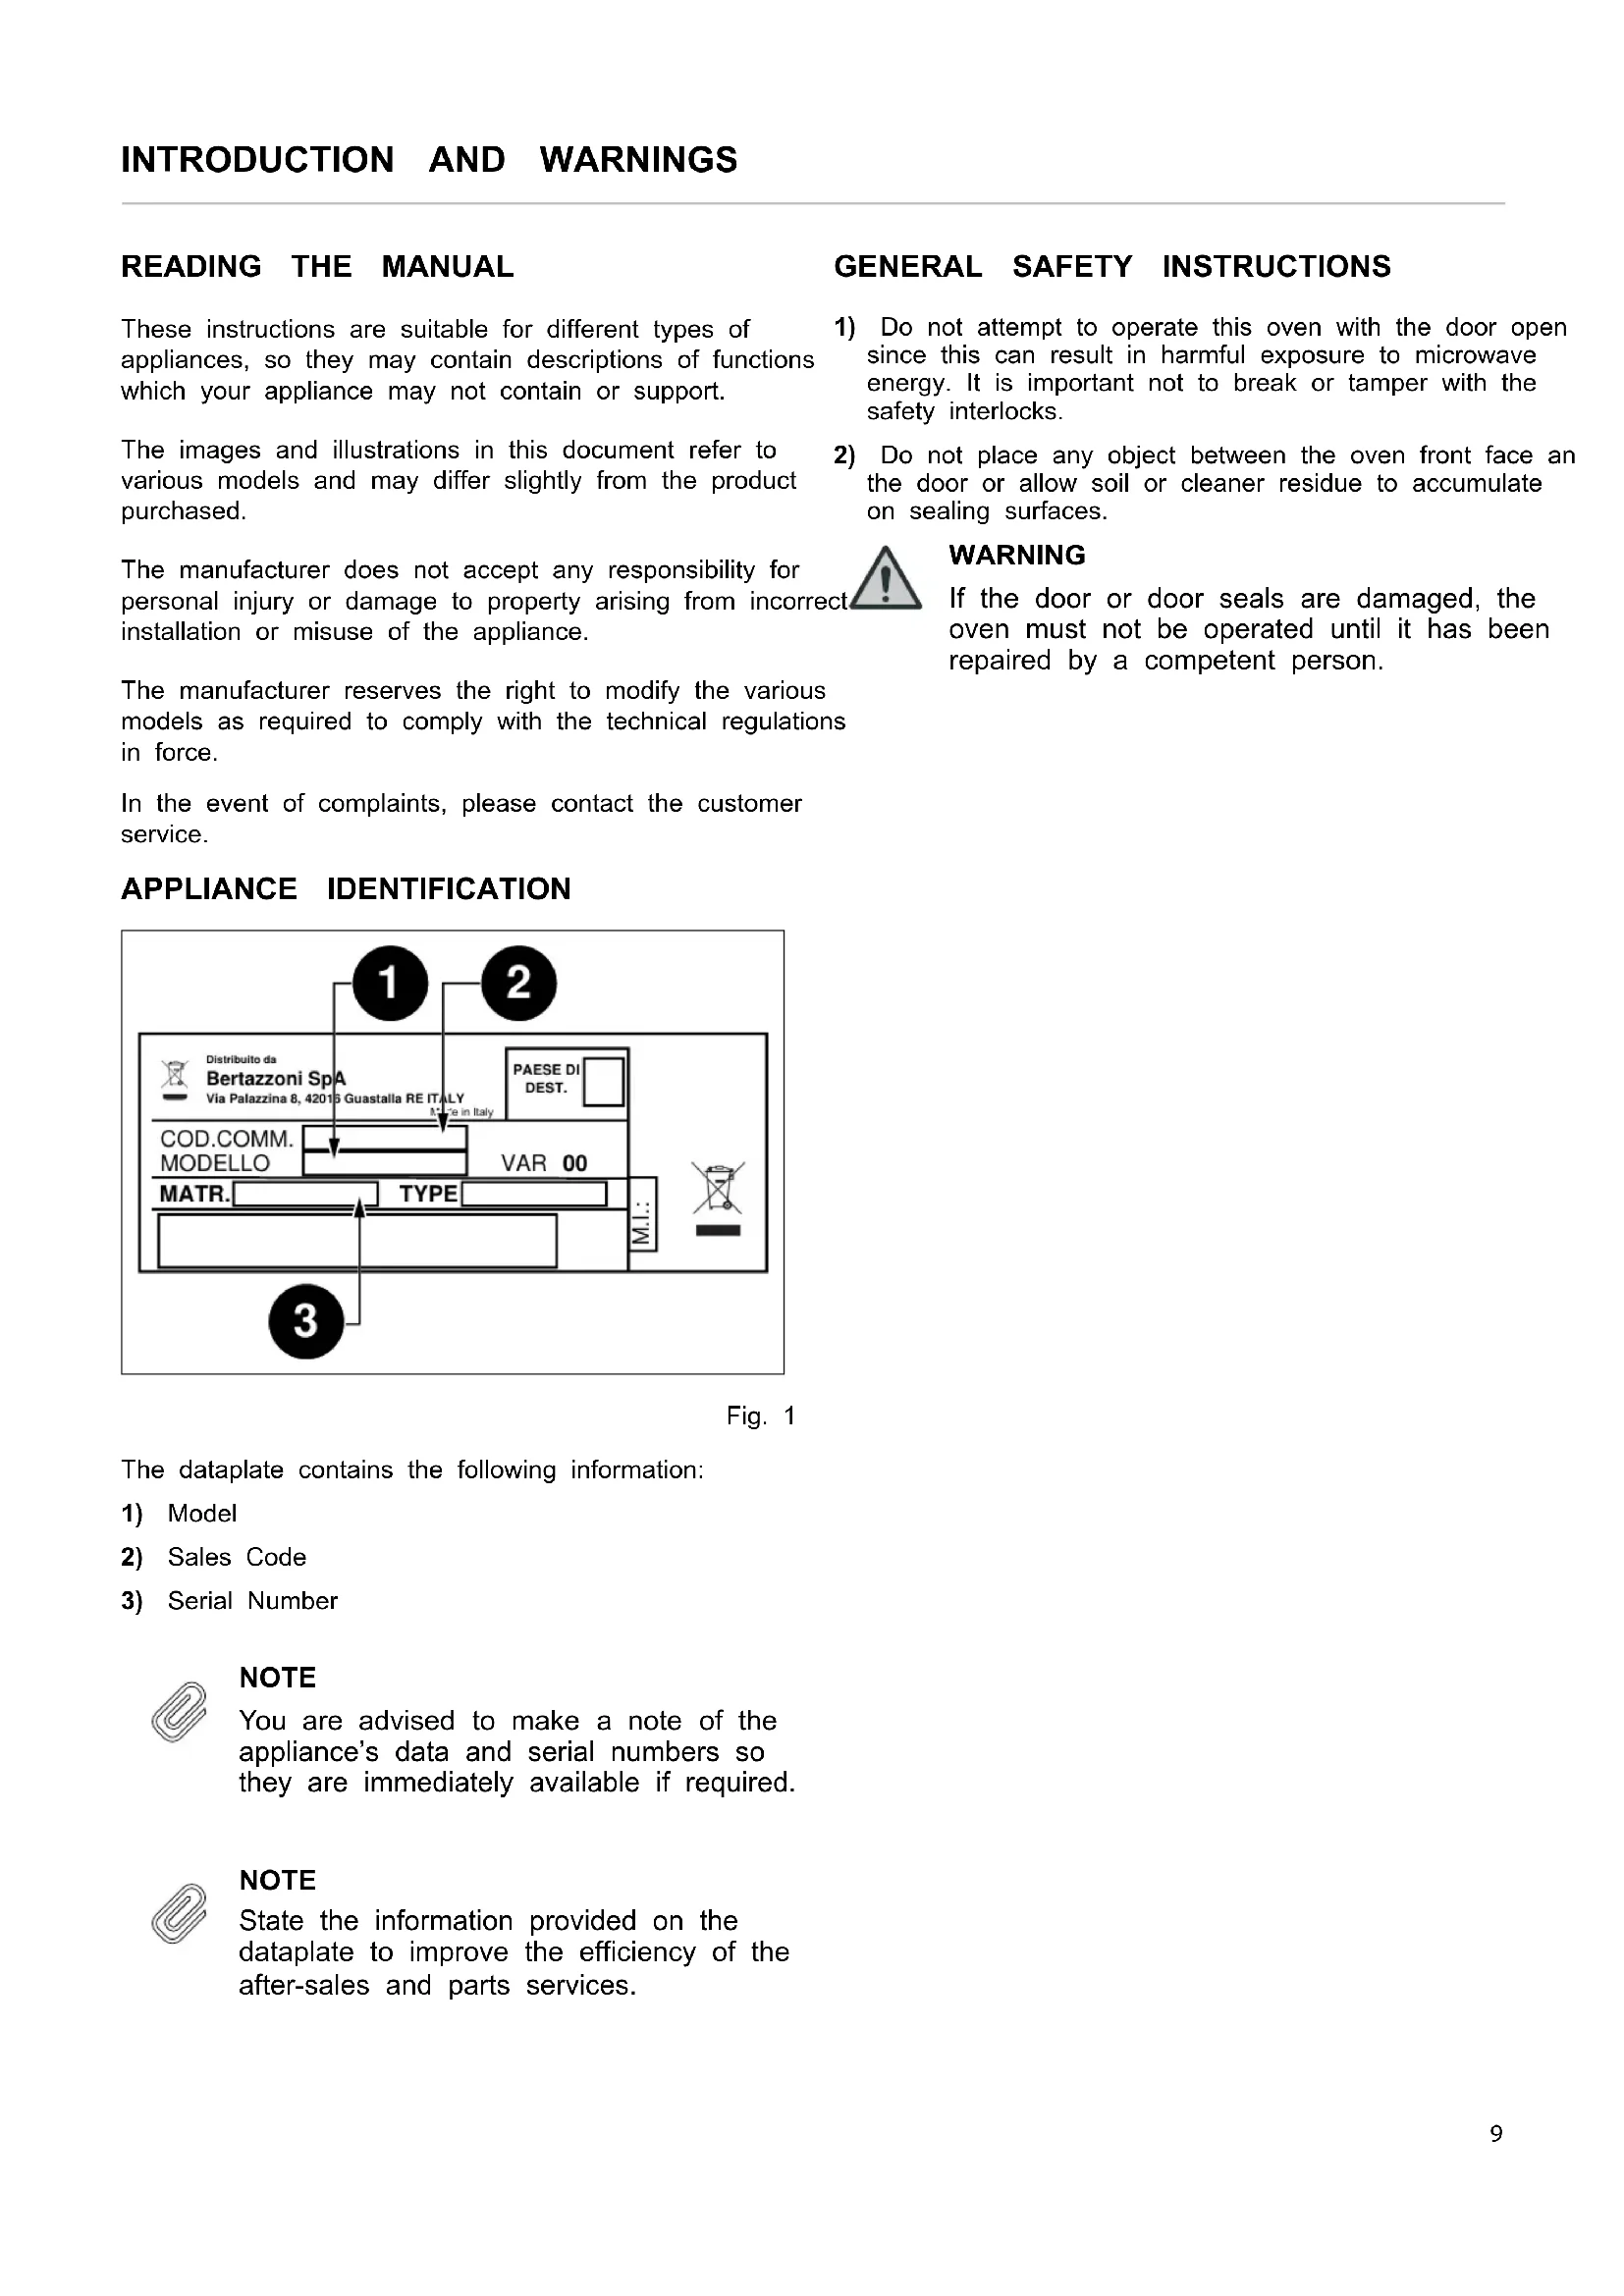
APPLIANCE IDENTIFICATION

Fig. 1
The dataplate contains the following information:
You are advised to make a note of the appliance's data and serial numbers so they are immediately available if required.

NOTE
State the information provided on the dataplate to improve the efficiency of the after-sales and parts services.
GENERAL SAFETY INSTRUCTIONS
1) Do not attempt to operate this oven with the door open since this can result in harmful exposure to microwave energy. It is important not to break or tamper with the safety interlocks.
2) Do not place any object between the oven front face and the door or allow soil or cleaner residue to accumulate on sealing surfaces.

WARNING
If the door or door seals are damaged, the oven must not be operated until it has been repaired by a competent person.
APPLIANCE WARNINGS
To reduce the risk of fire, electric shock, injury to persons exposure to excessive microwave oven energy when using your appliance, follow basic precautions, including the following:
- This appliance can be used by children aged from 8 years and above and persons with reduced physical, sensory or mental capabilities or lack of experience and knowledge, only if they have been given supervision or instruction concerning use of the appliance in a safe way and understand the hazards involved. Children shall not play with the appliance. Cleaning and user maintenance shall not be made by children unless they are older than 8 and supervised. Children less than 8 years of age shall be kept away unless continuously supervised.
- Keep the appliance and its cord out of reach of children less than 8 years.
- If the supply cord is damaged, it must be replaced by the manufacturer, its service agent or similarly qualified persons in order to avoid a hazard. (For appliance with type Y attachment)

WARNING
Ensure that the appliance is switched off before replacing the lamp to avoid the possibility of electric shock.

WARNING
It is hazardous for anyone other than a competent person to carry out any service or repair operation that involves the removal of a cover which gives protection against exposure to microwave energy.

WARNING
Liquids and other foods must not be heated in sealed containers since they are liable to explode.
- When heating food in plastic or paper containers, keep an eye on the oven due to the possibility of ignition.
- Only use utensils that are suitable for use in microwave ovens.
- If smoke is emitted, switch off or unplug the appliance and keep the door closed in order to stifle any flames.
- Microwave heating of beverages can result in delayed eruptive boiling, therefore care must be taken when handling the container.
- The contents of feeding bottles and baby food jars shall be stirred or shaken and the temperature checked before consumption, in order to avoid burns.
- Eggs in their shell and whole hard-boiled eggs should not be heated in microwave ovens since they may explode, even after microwave heating has ended.
-
The oven should be cleaned regularly and any food deposits removed.
-
Failure to maintain the oven in a clean condition could lead to deterioration of the surface that could adversely affect the life of the appliance and possibly result in a hazardous situation.
- Only use the temperature probe recommended for this oven. (for ovens provided with a facility to use a temperature-sensing probe.)
The microwave oven must be operated with the decorative door open. (for ovens with a decorative door.)
This appliance is intended to be used in household and similar applications such as:
1) staff kitchen areas in shops, offices and other working environments;
2) by clients in hotels, motels and other residential type environments;
3) farm houses;
4) bed and breakfast type environments.
The microwave oven is intended for heating food and beverages. Drying of food or clothing and heating of warming pads, slippers, sponges, damp cloth and similar may lead to risk of injury, ignition or fire.
Metallic containers for food and beverages are not allowed during microwave cooking.
- Care should be taken not to displace the turntable when removing containers from the appliance. (For fixed appliances and built-in appliances being used equal or higher than 900mm above the floor and having detachable turntables. But this is not applicable for appliances with horizontal bottom hinged door.)
- The microwave oven is intended to be used built-in.
Surface of a storage drawer can get hot.

WARNING
The appliance and its accessible parts become hot during use. Care should be taken to avoid touching heating elements. Children less than 8 years of age shall be kept away unless continuously supervised.
During use the appliance becomes hot. Care should be taken to avoid touching heating elements inside the oven.

WARNING
Accessible parts may become hot during use. Young children should be kept away.
The appliance must not be installed behind a decorative door in order to avoid overheating. (This is not applicable for appliances with decorative door.)

WARNING
When the appliance is operated in the combination mode, children should only use the oven under adult supervision due to the temperatures generated.
Creation of sparks: Metal e.g. a spoon in a glass must ENVIRONMENTAL PROTECTION be kept at least 2 cm from the oven walls and the inside of the door. Sparks could irreparably damage the glass. Here you can find tips on how to save energy when baking on the inside of the door. and roasting and how to dispose of your appliance properly.
Water in the hot cooking compartment: Never pour water into the hot cooking compartment. This will cause steam. SAVING ENERGY The temperature change can cause damage.
- Moist food: Do not store moist food in the closed cooking compartment for long periods. Do not use the appliance to store food. This can lead to corrosion.
- Use dark, black lacquered or enamelled baking tins.
Cooling the appliance: To cool the cooking compartment leave the door closed. Do not trap anything in the appliance door. Even if the door is only slightly ajar, the fronts of adjacent units may be damaged over time.
Heavily soiled seal: If the seal is very dirty, the appliance door will no longer close properly during operation. The fronts of adjacent units could be damaged. Always keep the seal clean.
- Operating the microwave without food: Operating the appliance without food in the cooking compartment may lead to overloading. Never switch on the appliance unless there is food in the cooking compartment. An exception to this rule is a short crockery test.
- Using the appliance door for standing on or placing objects on: Do not stand or place anything on the open appliance door. Do not place ovenware or accessories on the appliance door.
- Transporting the appliance: Do not carry or hold the appliance by the door handle. The door handle cannot support the weight of the appliance and could break.

This appliance complies with European Directive 2012/ 19/EC on Waste Electrical and Electronic Equipment (WEEE). The directive gives a framework for the collection and recycling of old appliances, which is valid across the EU.

NOTE
Microwave popcorn: Never set the microwave power too high. Use a power setting no higher than 600 watts. Always place the popcorn bag on a glass plate.
Liquid that has boiled over must not be allowed to run through the turntable drive into the interior of the appliance. Monitor the cooking process. Choose a shorter cooking time initially, and increase the cooking time as required.
- The oven should be cleaned regularly and any food deposits removed since they may explode, even after microwave heating has ended.
- Failure to maintain the oven in a clean condition could lead to deterioration of the surface that could adversely affect the life of the appliance and possibly result in a hazardous situation.
HEATING FOOD

WARNING
Risk of scalding!
There is a possibility of delayed boiling when a liquid is heated. This means that the liquid reaches boiling temperature without the usual steam bubbles rising to the surface. Even if the container only moves a little, the hot liquid can suddenly boil over and spatter. When heating liquids, always place a spoon in the container. This will prevent delayed boiling.

Fig. 2
INSTALLING THE OVEN
FITTED UNITS
- This appliance is only intended to be fully fitted in a kitchen.
- This appliance is not designed to be used as a tabletop appliance or inside a cupboard.
-
The fitted cabinet must not have a back wall behind the appliance.
A gap of at least 45mm must be maintained between the wall and the base or back panel of the unit above. -
The fitted cabinet must have a ventilation opening of 250~cm^2 on the front. To achieve this, cut back the base panel or fit a ventilation grille.
- Ventilation slots and intakes must not be covered.
- The safe operation of this appliance can only be guaranteed if it has been installed in accordance with these installation instructions.
- The fitter is liable for any damage resulting from the incorrect installation.
- The units into which the appliance is fitted must be heat-resistant up 90^ .
Installation height not less than 850~mm
INSTALLATION DIMENSIONS

NOTE
There should be gap above the oven.
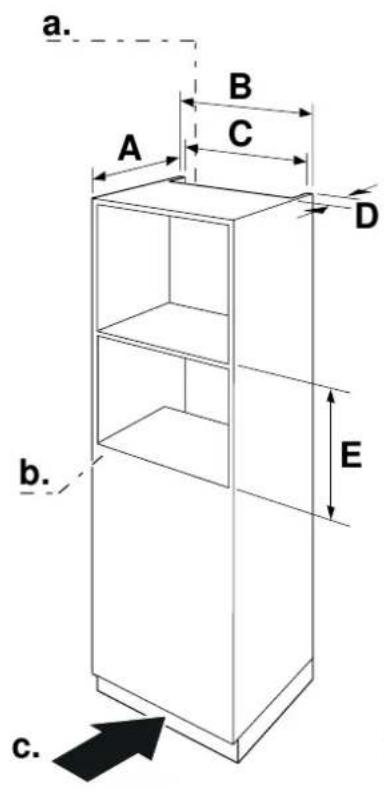
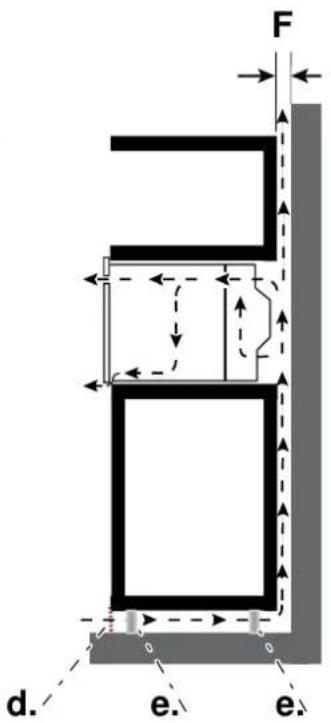
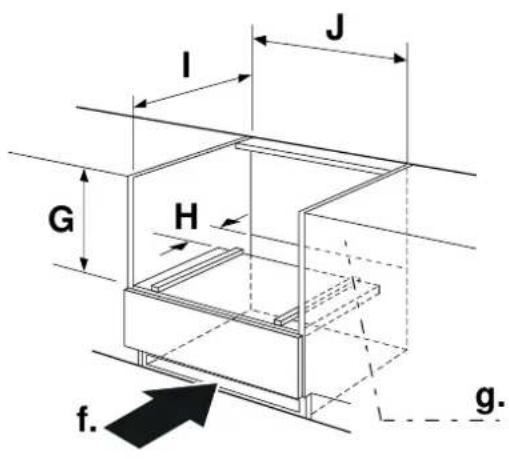
Fig. 3
A.min.550
F.min.6
B. 600
G.min.460-max.462
C.min.560-max.568
H. 50
D.min.45
I.min.550
E.min.450-max.452
J.min.560-max.568
a. Ventilation openings
d. Ventilation grid
behind, min. 250 cm
e. Curpboard feet
b. Back panels open
f. Ventilation in the base
c. Ventilation area in the base min. 250 cm
min. 250 cm
g. Back panels open
BUILDING IN
4) Do not kink the connecting cable.
5) Screw the appliance into place.
Do not hold or carry the appliance by the door handle. The door handle cannot hold the weight of the appliance and may break off.
1) Carefully push the microwave into the box, making sure that it is in the centre.
2) Open the door and fasten the microwave with the screws that were supplied.
3) Fully insert the appliance and centre it.

NOTE
The gap between the worktop and the appliance must not be closed by additional battens.

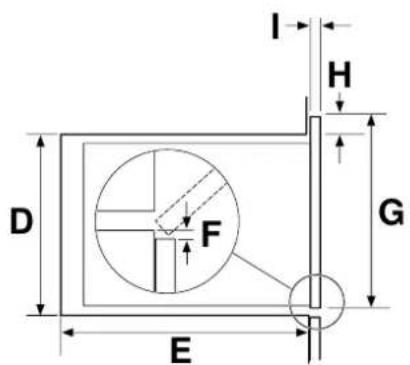

Fig. 4
A. 454
B. 595
C. 568
D. 450
E.min.550
F.min.10
G. 454
H. 4
I. 19 (20 for metal fascias)
ELECTRICAL CONNECTION
The appliance is fitted with a plug and must only be connected to a properly installed earthed socket. Only a qualified electrician who takes the appropriate regulations into account may install the socket or replace the connecting cable. If the plug is no longer accessible following installation, an all-pole isolating switch must be present on the installation side with a contact gap of at least 3mm . Contact protection must be ensured by the installation.
For fuse protection see instructions for use-technical data.
PARTS AND ACCESSORIES
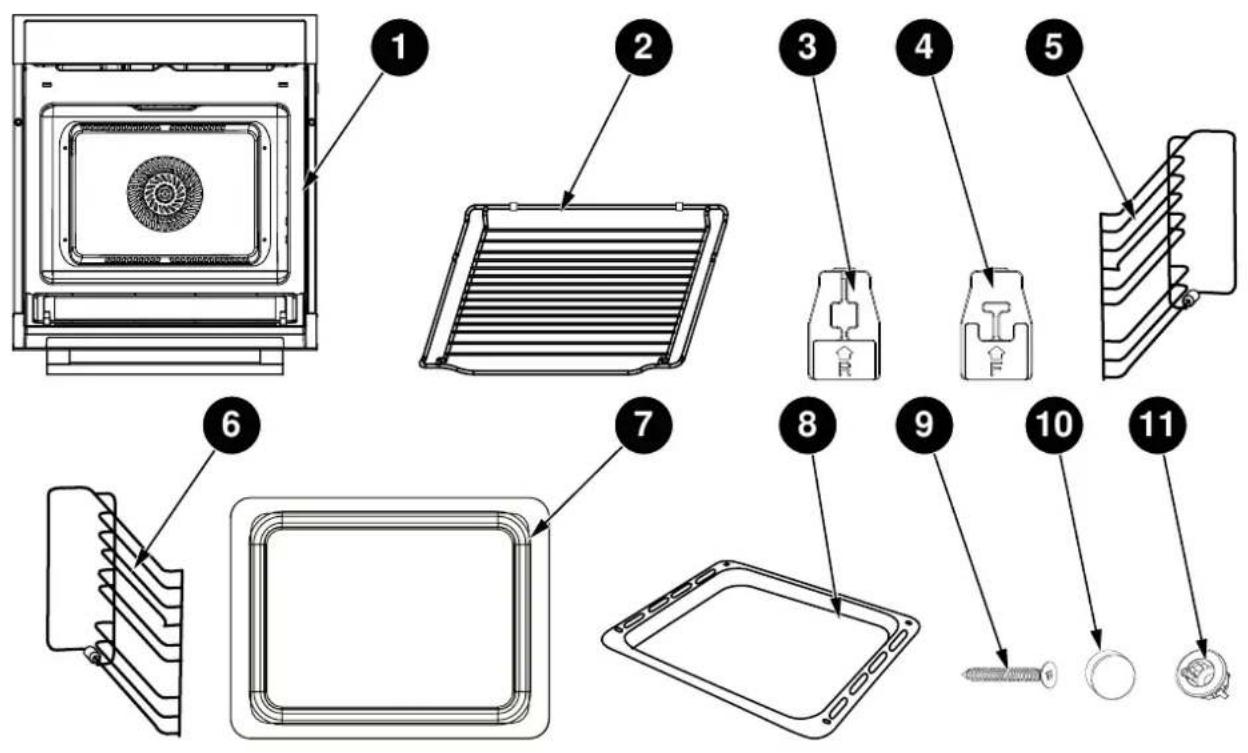
Fig. 5
| ITEM | QUANTITY | |
| 1 | Oven 1 | |
| 2 | Grill rack 1 | |
| 3 | Rear ceramic clip | 2 |
| 4 | Front ceramic clip | 2 |
| 5 | Left side rail 1 | |
| 6 | Right side rail | 1 |
| 7 | Glass tray | 1 |
| 8 | Enamel tray | 1 |
| 9 | Screw 2 | |
| 10 | Screw cap | 2 |
| 11 | Oven fixing bushing | 2 |
INSTALLING THE CLIPS AND SIDE RAILS
Once the oven has been lifted into place inside the appliance housing, locate the two holes in the casing of the oven and fix it into place using [09], [10] and [11].
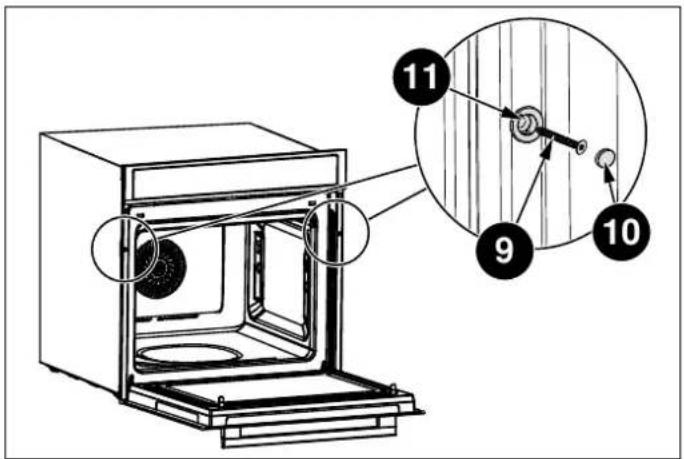

CAUTION
Do not over tighten the screws [09] to avoid damage to the oven or appliance housing - use a screwdriver only!
Fig. 6
INSTALLATION OF THE CERAMIC CLIPS AND SIDE RAILS
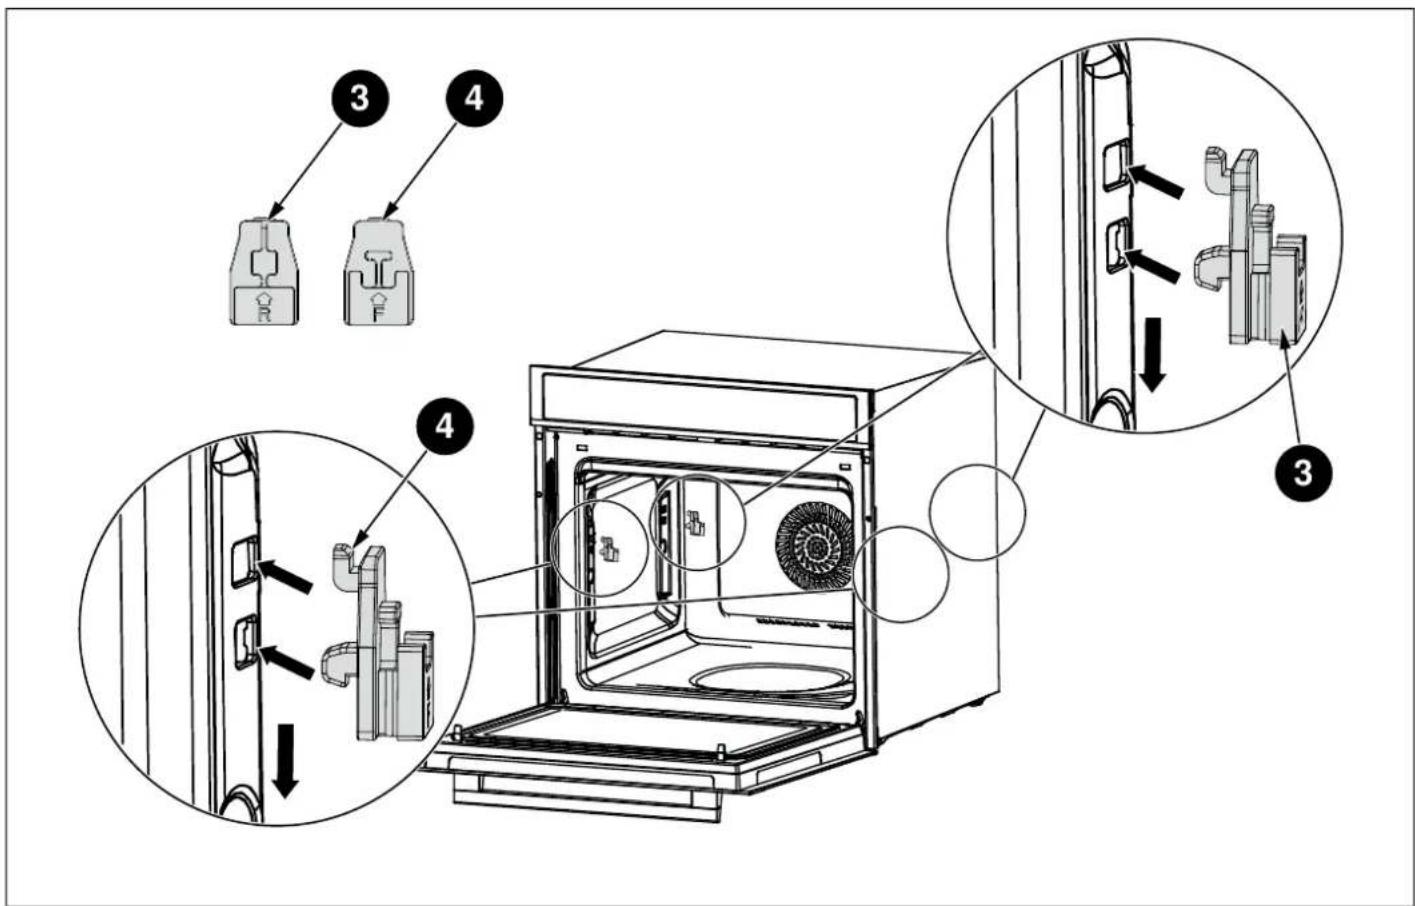
Fig. 7
LEFT SIDE RAIL INSTALLATION [05]
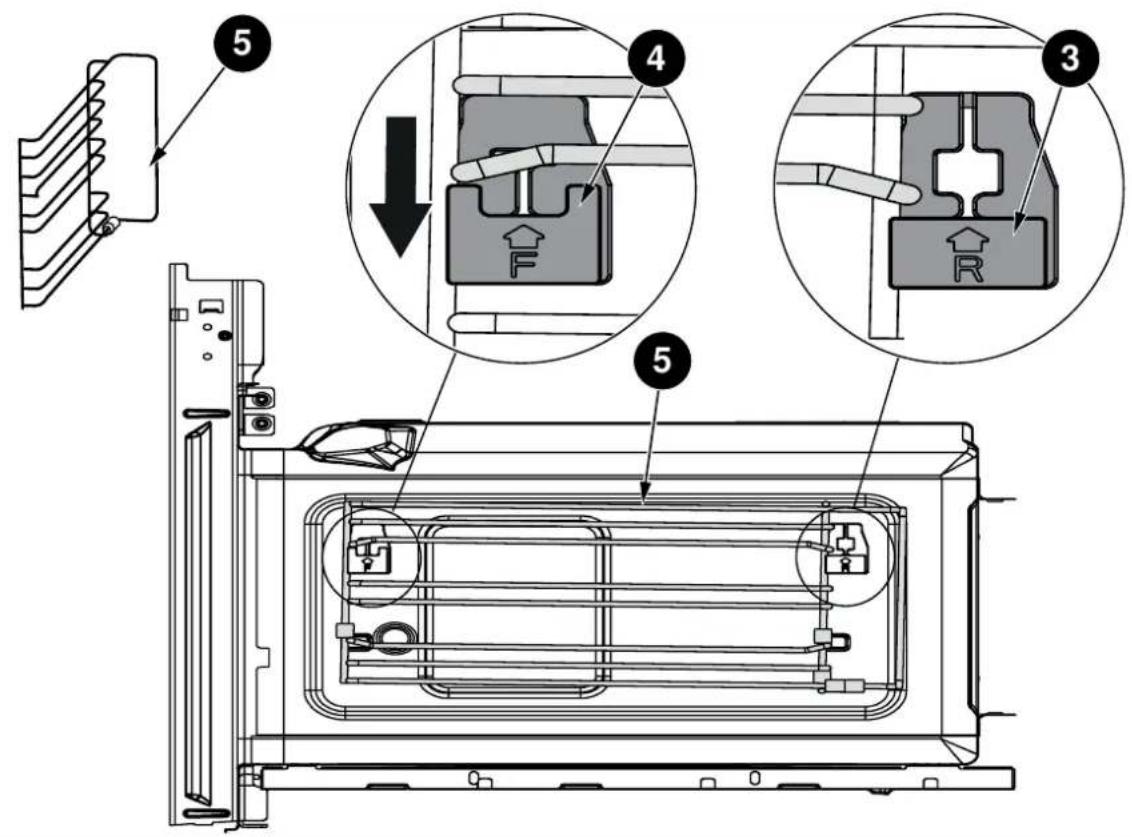
Fig. 8
RIGHT SIDE RAIL INSTALLATION [06]
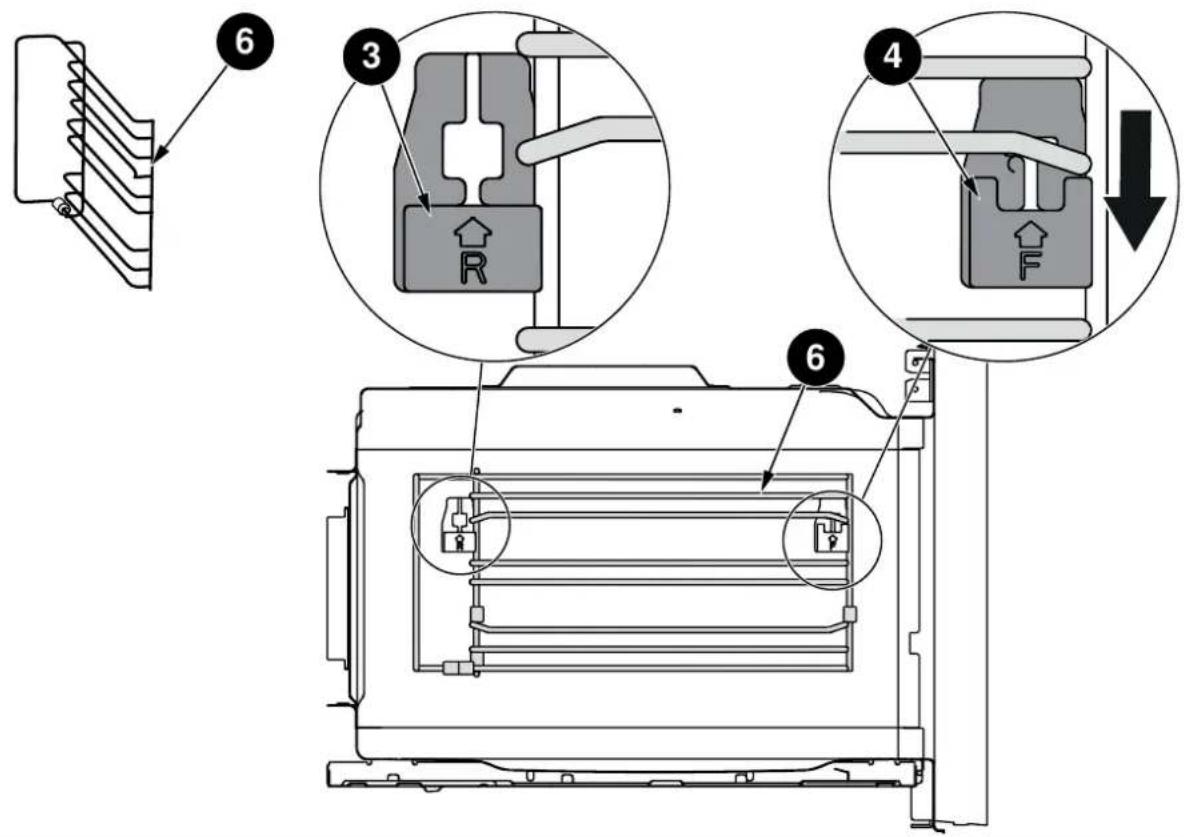
Fig. 9
Use this section to familiarise with your new appliance.
The control panel and the individual operating controls explained. You will find information on the cooking compartment and the accessories.
TECHNICAL INFORMATION
| TECHNICAL DATA | |
| Model | FMOD4053MLB1 |
| Rated Voltage 230 V~ 50 Hz | |
| Microwave Input 1650 W | |
| Microwave Output 900 W | |
| Convection | 1700 W |
| Grill | 2200 W |
| Maximum Power 3000 W | |
CONTROL PANEL
TOUCH KEYS AND DISPLAY
The touch keys are used to set the various additional functions. On the display, you can read the values that you have set.
| SYMBOL FUNCTION | |
| ○ | Cancel |
| ≈ | Microwave |
| ® | Kitchen Timer / Childproof Lock |
| × | Pre-set |
| XXX | Preheat |
| F | Function |
| - + | Parameter adjustment |
| —— | Slider control bar |
| A | Auto Menu |
| ◎ | Clock / Temperature |
| ® | Weight |
| △ | Light bulb |
| ▷II | Start / Pause |
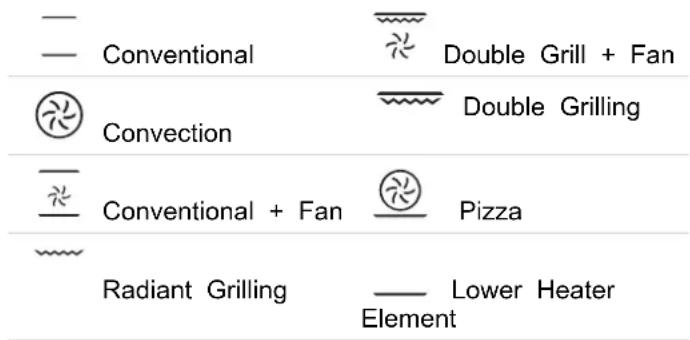
FUNCTION AND SCREEN DISPLAY
Use the function keys to set the type of cooking.
| FUNCTION USE | ||
| - | Conventional | The top and bottom elements work together to provide conventional cooking. The oven needs to be preheated to the required temperature: ideal for slow cooking dishes such as casseroles and stews. |
| Convection | For baking on several levels(e.g. baking trays of chocolate chip cookies). | |
| - | Conventional + Fan | Convenient and time savings, up to 4 dishes can be cooked simultaneously on different shelves without mixing of taste or smell. |
| - | Radiant Grilling | Best results can be obtained from using the top shelf for small items and lower shelves for larger items. |
| - | Double Grill + Fan | For gratin dishes and finishing roasted vegetables. |
| - | Double Grilling | The inside radiant elements and outside top element work simultaneously giving a rapid and even grilling heat, therefore effectively browning the top surface of the food. |
| - | Pizza | Pizza is perfectly cooked with extra heat from both bottom and sides of the oven, guaranteeing pizza bases are crispy. |
| - | Lower Heater Element | This is ideal for slow cooking dishes such as casseroles, stews. |
| - | Microwave | Defrost, reheat and cooking. |
| - + | MW + Convection | For reducing large portions' cooking time with browning finish. |
| - + | MW + Double Grill + Fan | This function is suitable where quick browning is required; will cook the ingredients down to the core. |
| - + | MW + Pizza | This function is suitable where quick under browning is required; will cook the ingredients down to the core. |
| * | Defrost | 3 defrosting programmes. |
| A | Auto-programs | 13 cooking programmes The type of heating and cooking time are set by weight. |
PARAMETER ADJUSTMENT
Use the adjusting keys to set the parameters.
| PARAMETER FUNCTION | |
| Auto menu | Select 13 automatic programmes.From P 01 to P 13. |
| Temperature | Select the temperature of cooking (°C). |
| — | |
| — | |
| 100-235 50-250 | |
| — | |
| 50-250 50-235 | |
| — | |
| 50-235 | |
| — | |
| 100-235 | |
| — | |
| 100-250 | |
| — | |
| 100-235 | |
| Weight | Set the weight of cooking. |
| Time | Set the time of cooking. |
| Microwave | Select microwave power.100W,300W, 500W, 700W and 900W |
COOLING FAN
Your appliance has a cooling fan. The cooling fan switches on during operation. The hot air escapes above the door.
The cooling fan continues to run for a certain time after operation.

CAUTION
Do not cover the ventilation slots. Otherwise, the appliance will overheat.

NOTE
The appliance remains cool during microwave operation. The cooling fan will still switch on. The fan may run on even when microwave operation has ended.

NOTE
Condensation may appear on the door window, interior walls and floor. This is normal and does not adversely affect microwave operation. Wipe away the condensation after cooking.
OVEN ACCESSORIES

NOTE
Type and quantity of accessories is subject to actual demand.
GRILL RACK

BAKING TRAY - ENAMEL TRAY
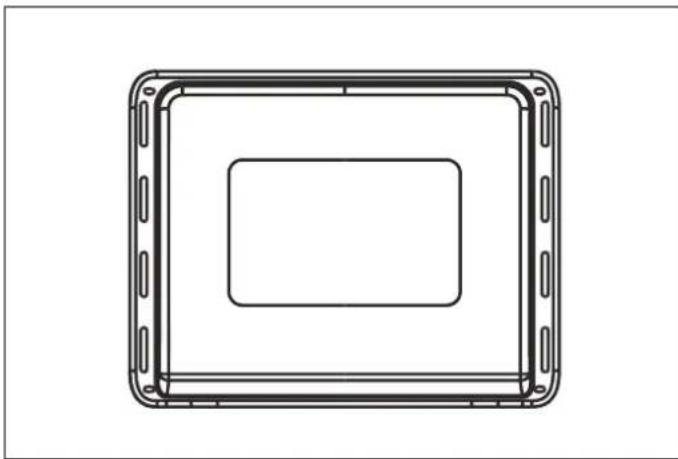
Fig. 12
The enamel baking tray is used for making cake, roll and roasting whole chicken.
For making cake roll and roasting whole chicken.
- When cooking with microwave function, the use of enamel tray is prohibited.
The grill rack is used for grilling, e.g. steaks, sausages and for toasting bread.
BAKING TRAY

Fig. 10

Fig. 11
NOTE
When cooking with microwave function, the use of enamel tray is prohibited. Use the glass baking tray.
For safety reasons, the baking tray should be placed on the side hanger instead of being placed directly on the bottom board of the cavity.
BAKING TRAY - GLASS TRAY

Fig. 13
- When cooking with microwave function, please use the glass tray.
- The Glass Baking Tray is used for catching liquids, such as water and grease when food is baked.
- In order to ensure the best cooking effect, the glass tray should be placed in the bottom of the side hanger, as shown in the figures below. The glass tray should be pushed along the lowest guide rails of the side hanger place.
BEFORE USING THE APPLIANCE
Here you will find everything you need to do before using your oven to prepare food for the first time. First read the section on Safety information.
SETTING THE CLOCK
1) In waiting state, touch key to enter clock setting mode.
2) "00:00" will display and the hour figures will flash.
3) Touch - or + or slide the to set the hour figures. The input time should be within 0-23.
4) Touch confirm, the minute figures will flash.
5) Touch - or + or slide the to set the minute figures. The input time should be within 0-59.
6) Touch to finish clock setting, " : " will flash.
The time is set. And the appliance will enter waiting state.
CLEANING THE ACCESSORIES
a Before you use the accessories for the first time, clean them thoroughly with hot soapy water and a soft dish cloth.
HEATING UP THE OVEN
To remove the new cooker smell, heat up the oven when it is empty and closed. One hour with Convection at 250^ is ideal. Ensure that no packaging remnants have been left in the cooking compartment.
1) In waiting state, touch F key once. and the default temperature will light in the screen.
2) Touch F key repeatedly till lights. The default temperature of convection will display.
3) Touch - or + or slide the to set the temperature to 250^ .
4) Touch to enter cooking time setting mode. "00:00" will flash.
5) Touch - or + or slide the —— to set the cooking time to 60 minutes.
6) Touch the key. The oven begins to heat up.
SETTING THE OVEN
There are various ways in which you can set your oven. With rapid preheating, your oven reaches the set. Here we will explain how you can select the desired type temperature particularly quickly.
heating and temperature or grill setting. You can also set the oven cooking time for your dish. Please refer to the section on SETTING THE TIME-SETTING OPTIONS.
SETTING THE TYPE OF HEATING AND TEMPERATURE
Example : Radiant Grilling at 200^ for 25 minutes.
1) In waiting state, touch key once. and the default temperature will light in the screen.
2) Touch key repeatedly till lights. The default temperature of radiant grilling will display.
3) Touch - or + or slide the to set the temperature to 200^ .
4) Touch enter cooking time setting mode. "00:00" will flash.
5) Touch - or + or slide the to set the cooking time to 25 minutes.
6) Touch the key. The oven begins to heat up.
OPENING THE OVEN DOOR DURING OPERATION
If the user will open the oven door during operation, the operation will be suspended. Once close the door, touch the key to continue the operation.
PAUSING OPERATION
Touch the key to pause operation. Then touch and key to continue operation.
CHANGING THE COOKING TIME
The user can change the cooking time at any time. Touch the key repeatedly till the cooking time flashes, and then touch - or + or slide the to set the cooking time.
CHANGING THE TEMPERATURE
This activity can be done at any time, touching - or + or slide the to set the temperature.
This can be done at any time. Touch the key to enter into the waiting state.
RAPID PRE-HEATING
Rapid Preheating is available for the following types of heating:
To ensure an oven cooking result, only put your food in the cooking compartment when the preheating phase is completed.
1) Setting the type of heating and temperature.
2) Touch the key. The symbol lights up in the display. The oven begins to heat up.
3) Once the preheating process is completed, the appliance sounds. The symbol in the display blinks, so put your dish in the oven.
CANCELLING RAPID PREHEATING
During setting the rapid preheating function, touch the key can cancel the function.
During rapid preheating, touch the can cancel the function.

NOTE
Only when you can hear alarm and preheating icon is blinking you can open the door and put food inside.
MICROWAVE SETTINGS
Microwaves are converted to heat in foodstuffs. The Do not microwave can be used only, i.e. on its own, or in The combination with a different type of heating. You will find rule. information about ovenware and how to set the microwave

NOTE
The step quantities for the adjustment time of the coding switch are as follow:
0-1 min: 5 seconds
1-3 min: 10 seconds
3-15 min: 30 seconds
15-60 min: 1 minute
Over 60 min: 5 minutes
SUITABLE OVENWARE
Suitable dishes are heat-resistant ovenware made of glass, glass ceramic, porcelain, ceramic or heat-resistant plastic. These materials allow microwaves to pass through. You can also use serving dishes. This saves you having to transfer food from one dish to another.
You should only use ovenware with decorative gold or silver trim if the manufacturer guarantees that they are suitable for use in microwaves.
UNsuitABLE OVENWARE
Metal ovenware is unsuitable. Metal does not allow microwaves to pass through. Food in covered metal containers will remain cold.

CAUTION
Creation of sparks: metal - e.g. a spoon in a glass - must be kept at least 2 cm from the oven walls and the inside of the door. Sparks could destroy the glass on the inside of the door.
OVENWARE TEST
Do not switch on the microwave unless there is food inside. The following ovenware test is the only exception to this
Perform the following test if you are unsure whether your ovenware is suitable for use in the microwave:
1) Heat the empty ovenware at maximum power for 12 to 1 minute.
2) Check the temperature occasionally during that time.
The ovenware should still be cold or warm to the touch.
The ovenware is unsuitable if it becomes hot or sparks are generated.
MICROWAVE POWER SETTINGS
Use the key to set the desired microwave power.
| 100 W | Defrosting sensitive/ delicate foods |
| Defrosting irregularly-shaped foods | |
| Softening ice cream | |
| Allowing dough to rise | |
| 300 W | Defrosting |
| Melting chocolate and butter | |
| 500 W | cooking rice, soup |
| 700 W | Reheating |
| cooking mushrooms, shell fish | |
| cooking dishes containing eggs and cheese | |
| 900 W | Boiling water, reheating |
| cooking chicken, fish, vegetables |

NOTE
When you touch a key, the selected power lights up.

NOTE
The microwave power can be set to 900 watts for a maximum of 30 minutes. With all other power settings a maximum cooking time of 1 hour 30 minutes is possible.
SETTING THE MICROWAVE
Example : Set microwave power to 300 W and cooking to 17 minutes.
1) In waiting state, touch ≈ key to enter microwave function. The default microwave power 900 W will appear, and the default cooking time will flash.
2) Touch - or + or slide the to set the cooking time to 17 minutes.
3) Touch the key . to activate the microwave power. Then touch - or + or slide the to set the microwave power to 300 W.
4) Touch the key.
Operation begins. The cooking time starts counting down the display.
When the cooking time has elapsed a signal sounds. The microwave operation has finished.
OPENING THE OVEN DOOR DURING OPERATION
Operation is suspended. After closing the door, touch the key. Operation continues.
CHANGING THE COOKING TIME
This can be done at any time. Touch - or + or slide the to set the cooking time.
CHANGING THE MICROWAVE POWER SETTING
This can be done at any time. Touch the key and then touch - or + or slide the to set the microwave power.
PAUSING OPERATION
- Touch the key briefly. The oven is paused. Touch the key again to continue operation.
This can be done at any time. Touch the into the waiting state.
key to
ents
Touch the key briefly. The oven is paused. Touch the key again to continue operation.
COMBI MICROWAVE
tirfleis involves simultaneous operation of the grill and the microwave. Using the microwave makes your dishes ready more quickly, but they are still nicely browned.
You can switch on all microwave power settings. Exception: 700 and 900 watts
Example: MW + Pizza function with 500 W and 190^ for 17 minutes.
1) In waiting state, touch ≈ key, and then touch F repeatedly to set MicroCombi mode. Stop touching
in when 和 and display in the screen. The default microwave power will display and the default temperature will flash.
2) Touch - or + or slide the to set the temperature to 190^ .
3) Touch the key to confirm the temperature. The default cooking time will flash, and touch - or + or slide the to set the cooking time to 17 minutes.
4) Touch the key. The default power will blink. Then touch - or + or slide the to set the microwave power to 500 W.
5) Touch the key. The oven begins to heat up.
Appliance operation begins. The cooking time starts counting down.
When the cooking time has elapsed a signal sounds. The microwave operation has finished.
OPENING THE OVEN DOOR DURING COOKING
If the user opens the oven door during the microwave activities, the operation will be suspended. After closing the door, touch the key briefly. The programme will then continue
PAUSING OPERATION
- Touch the key briefly. The oven is paused. Touch the key again to continue operation.
CHANGING THE COOKING TIME
This can be done at any time. Touch the key repeatedly till the cooking time flashes, and then touch - or + or slide the to set the cooking time.

NOTE
If you open the appliance door during cooking, the fan may continue to run.
CHANGING THE MICROWAVE POWER SETTING
This can be done at any time. Touch key and then touch - or + or slide the to set the microwave power.
CHANGING THE TEMPERATURE
This can be done at any time. Touch - or + or slide the to set the temperature.
This can be done at any time. Touch the key to enter into the waiting state.
AUTO MENU
The automatic programmes enable you to prepare food very easily. You select the programme and enter the weight of your food. The automatic programme makes the optimum setting. You can choose from 13 programmes.
Always place the food in the cold cooking compartment.
SETTING A PROGRAMME
1) In waiting state, touch the key twice to enter the Cooking modes menu function. The first programme number blinks in the screen.
2) Touch - or + or slide the to select the programme number.
3) Touch the key.
4) Touch - or + or slide the to set the weight, cooking time will shown.
5) Touch the key. The programme starts. You can see the cooking time is counting down.
6) When the programme has ended a signal sound. The oven stops heating.
CHANGING THE PROGRAMME
Once you have started the programme, it is not possible to change the programme number and the weight.
CANCELLING THE PROGRAMME
Touch the key to cancel operation.
CHANGING THE COOKING TIME
During the using of automatic programmes, the user can not change the cooking time
COOKING MODES TABLE
| PROGRAMME | NO. | ITEM | WEIGHT(G) | ACCESSORY LAYER AND ACCESSORY |
| P 01* | Fresh vegetables | 200 | ||
| 400 | 1st layer, glass tray | |||
| 600 | ||||
| P 02* | Potatoes peeled/cooked | 240 | ||
| 480 | 1st layer, glass tray | |||
| 720 | ||||
| P 03 | Baked potatoes | 450 | ||
| 1000 | 3rd layer, grill track | |||
| P 04 | Chicken pieces(frozen) | 450 | 3rd layer, grill track | |
| P 05* | Cake | 400 | ||
| 500 | 2nd layer, grill track | |||
| 600 | ||||
| P 06* | Apple pie | 2400 | 2nd layer, grill track | |
| P 07* | Quiche | 1000 | 3rd layer, grill track | |
| P 08** | Reheat soup | 200 | ||
| 400 | 1st layer, glass tray | |||
| 600 | ||||
| P 09** | Reheat plate | 250 | ||
| 350 | 1st layer, glass tray | |||
| P 10** | Reheat sauce/stew | 100 | ||
| 200 | 1st layer, glass tray | |||
| 300 | ||||
| P 11 | Frozen Pizza | 200 | ||
| 400 | 3rd layer, grill tray | |||
| 600 | ||||
| P 12* | Frozen oven chips | 300 | ||
| 400 | 3rd layer, enamel tray | |||
| 500 | ||||
| P 13 | Lasagna | 1600 | 3rd layer, grill track | |
| From the bottom to the top, the number of layers is from the first to the fourth. | ||||

NOTE
The programmes with a * are preheated. During preheating, the cooking time pauses and the preheating symbol is on. After preheating, you will hear an alarm and the preheating symbol will blink.

NOTE
The programmes with ** only use the microwave function.
DEFROSTING PROGRAMMES
You can use the 3 defrosting programmes to defrost meat. The appliance can be programmed to preset the cooking poultry and bread. end time and duration.
1) In waiting state, touch the key once to enter the Defrost function. The first programme number blinks in the screen.
2) Touch - or + or slide the to-select the programme number.
3) Touch the key.
4) Touch - or + or slide the to set the weight, cooking time will shown.
5) Touch the key. The programme starts. You can see the cooking time is counting down.
PREPARING FOOD
SETTING THE PRE-SET COOKING
The appliance can be programmed to preset the cooking time and end time and duration.
1) In waiting state, touch the key once to enter the Defrost function. The first programme number blinks in the screen.
2) Touch - or + or slide the to set the hour figures. The input time should be within 0-23.
3) Touch the to confirm, the minute figures will flash.
4) Touch - or + or slide the to set the figures. The input time should be within 0-59.
5) Touch the to finish the pre-set time setting.
6) Setting the type of heating and temperature.
7) Touch finish the setting.
Use food that has been frozen at -18^ and stored in THE PRE-SET TIME HAS ELAPSED portionsized quantities that are as thin as possible. Take the food to be defrosted out of all packaging and weigh an audible signal sounds. The oven starts cooking. It. You need to know the weight to set the programme.
Liquid will be produced when defrosting meat or poultry. Drain off this liquid when turning meat and poultry and under no circumstances use it for other purposes or allow it to come into contact with other foods.
SPECIFICATIONS
Before setting the pre-set cooking, the clock must has been set. Kitchen Timer can not be set after the pre-set cooking setting.
OVENWARE
- Place the food in a microwaveable shallow dish, e. g. glass plate, but do not cover.
- When defrosting chicken and chicken portions (d 01), an audible signal will sound on two occasions to indicate that the food should be turned.
RESTING TIME
The defrosted food should be left to stand for an additional 10 to 30 minutes until it reaches an even temperature. Large pieces of meat require a longer standing time than smaller pieces. Flat pieces of meat and items made from minced meat should be separated from each other before leaving to stand.
After this time, you can continue to prepare the food, even though thick pieces of meat may still be frozen in the middle. The giblets can be removed from poultry at this point.
| PROGRAMME NO. | DEFROST | WEIGHT RANGE IN | KG |
| d 01* | meat | 0.10 - 1.50 | |
| d 02* | poultry | 0.10 - 1.50 | |
| d 03* | fish | 0.10 - 1.80 |
- During defrosting, place the food on the glass tray.
- If you hear 3 beeps, turn the food over. Then touch start key to continue defrosting.
SETTING THE TIME-SETTING OPTIONS
Your oven has various time-setting options. You can use the key to call up the menu and switch between the individual functions. A time-setting option that has already been set can be changed directly with the parameter knc
SETTING THE COOKING TIME
The cooking time for your meal can be set on the oven. When the cooking time has elapsed, the oven switches itself off automatically. The cooking time cannot be accidentally exceeded.
The oven starts and the cooking time counts down in the The oven has a childproof lock to prevent children display. Once the cooking time has elapsed an audible switching it on accidentally.
SETTING THE CLOCK
If the user wants to set the clock please refer to paragraph BEFORE USING THE APPLIANCE. In case of changing the time, repeat the steps of setting the clock.
SETTING THE TIMER
You can use the timer as a kitchen timer. It runs independently of the oven. The timer has its own audible signal.
b) In waiting state, touch key to enter kitchen timer. "00:00min" will flash.
2) Touch - or + or slide the to set the timer time.
3) Touch key to start timer.
CHILDPROOF LOCK
The oven has a childproof lock to prevent children from switching it on accidentally.
The oven will not react to any settings. The timer and clock can also be set when the childproof lock has been switched on.
SWITCHING ON THE CHILDPROOF LOCK
In waiting state, touch and hold the seconds.
key for approx. 3
There will be a long beep and the symbol goes out in the display.
The childproof lock is deactivated.
In this section we will explain how you should care and clean your appliance correctly; in this case the appliance will remain in a good state.

WARNING
Risk of electric shock
Penetrating moisture may cause an electric shock. Do not use any high-pressure cleaners or steam cleaners.

WARNING
Risk of burns
Never clean the appliance immediately after switching off. Let the appliance cool down.

WARNING
Risk of serious damage to health
Microwave energy may escape if the cooking compartment door or the door seal is damaged. Never use the appliance if the cooking compartment door or the door seal is damaged. Contact the after-sales service.

CAUTION
The appliance shall not be cleaned with a steam cleaner.

CAUTION
Do not use harsh abrasive cleaners or sharp metal scrapers to clean the oven door glass since they can scratch the surface, which may result in shattering of the glass.

CAUTION
If the apparatus is not maintained in a good state of cleanliness, its surface could be degraded and affect the lifespan of the apparatus and lead to a dangerous situation.

NOTE
Slight differences in colour on the front of the appliance are caused by the use of different materials, such as glass, plastic and metal.

NOTE
Shadows on the door panel which look like streaks, are caused by reflections made by the oven light.

NOTE
Unpleasant odours, e.g. after fish has been prepared, can be removed very easily. Add a few drops of lemon juice to a cup of water. Place a spoon into the container as well, to prevent delayed boiling. Heat the water for 1 to 2 minutes at maximum microwave power.
CLEANING AGENTS
To ensure that the different surfaces are not damaged by using the wrong cleaning agent, observe the information in the table. Do not use:
sharp or abrasive cleaning agents,
metal or glass scrapers to clean the glass in the appliance door.
metal or glass scrapers to clean the door seal,
- hard scouring pads and sponges,
- cleaning agents with high concentrations of alcohol.
Wash new sponge cloths thoroughly before use.
Allow all surfaces to dry thoroughly before using the appliance again.
| AREA CLEANING AGENTS | |
| APPLIANCE FONT | Hot soapy water:Clean with a dish cloth and dry with a soft cloth. Do not use glass cleaners metal or glass scrapers for cleaning. |
| APPLIANCE FRONT WITH STAINLESS STEEL | Hot soapy water:Clean with a dish cloth and dry with a soft cloth. Remove flecks of limescale grease, starch and albumin (e.g. egg white) immediately. Corrosion can form under such residues. Special stainless steel cleaning agents can be obtained from the after-sales service or from specialist shops. Do not use glass cleaners or metal or glass scrapers for cleaning. |
| COOKING COMPARTMENT | Hot soapy water or a vinegar solution:Clean with a dish cloth and dry with a soft cloth.If the oven is very dirty, do not use oven spray or other aggressive oven cleaners or abrasive materials. Scouring pads, rough sponges and pan cleaners are also unsuitable. These items scratch the surface. Allow the interior surfaces to dry thoroughly. |
| RECESS IN COOKING COMPARTMENT | Damp cloth:Ensure that no water seeps through the turntable drive into the appliance interior. |
| WIRE RACKS | Hot soapy water:Clean using stainless steel cleaning agent or in the dishwasher. |
| DOOR PANELS | Glass cleaner:Clean with a dish cloth. Do not use a glass scraper. |
| SEAL | Hot soapy water:Clean with a dish cloth, do not scour. Do not use a metal or glass scraper for cleaning. |
Malfunctions often have simple explanations. Please refer to the malfunction table before calling the after-sales service.
If a meal does not turn out exactly as you wanted, refer to the Expert Cooking Guide section, where you will find plenty of cooking tips and tricks.

WARNING
Risk of electric shock
Incorrect repairs are dangerous. Repairs may only be carried out by one of our trained after-sales engineers.
MALFUNCTION TABLE
| PROBLEM POSSIBLE CAUSE REMEDY/INFORMATION | ||
| The appliance does not work. | Faulty circuit breaker. | Look in the fuse box and check that the circuit breaker for the appliance is in working order. |
| Plug not plugged in. Plug in the plug. | ||
| Power cut | Check whether the kitchen light works. | |
| The appliance does not work appears in the display panel. | Childproof lock is active. | Deactivate the childproof lock (see section: Childproof lock). |
| The microwave does not switch on. | Door not fully closed. | Check whether food residue or debris is trapped in the door. |
| It takes longer than before for the food to heat up in the microwave | The selected microwave power level is too low. | Select a higher power level. |
| A larger amount than usual has been Double the amount = almost double the cooking time. | ||
| The food was colder than usual. | Stir or turn the food during cooking. | |
| A particular operating mode or power level cannot be set. | The temperature, power level or combined setting is not possible for this operating mode. | Choose permitted settings. |
| E-01 appears in the display panel. | The thermal safety switch-off function has been activated. | Call the after-sales service. |
| E-04 appears in the display panel. | The thermal safety switch-off function has been activated. | Call the after-sales service. |
| E-17 appears in the display panel. | Rapid heating has failed. | Call the after-sales service. |
ACRYLAMIDE IN FOODSTUFFS
TIPS FOR KEEPING ACRYLAMIDE TO A MINIMUM WHEN PREPARED FOOD
Acrylamide is mainly produced in grain and potato products that are heated to high temperatures, such as potato crisps, chips, toast, bread rolls, bread, fine baked goods (biscuits, gingerbread, cookies).
General
- Keep cooking times to a minimum.
Cook meals until they are golden brown, but not too dark.
Large, thick pieces of food contain less acrylamide.
Baking biscuits Oven chips
Max. 200^ in Top/bottom heating or max. 180^ in 3D hot air or hot air mode.
Max. 190^ in Top/bottom heating or max. 170^ in 3D hot air or hot air mode.
- Egg white and egg yolk reduce the formation of acrylamide.
- Distribute thinly and evenly over the baking tray.
Cook at least 400g at once on a baking tray so that the chips do not dry out.

Bertazzoni is committed to providing the highest quality service to our customers. In the unlikely event that your product should have a manufacturing defect, please contact our service team at:
https://uk.bertazzoni.com/more/care-service
You will be requested to provide product information, proof of purchase, a photo of the silver data label and a description of the issue. Please have this information ready.
DALLA SCRIVANIA DEL PRESIDENTE
Gentile Cliente,
MANUEL D'INSTALLATION 83
INSTALLATION DU FOUR 83
UNITÉS ÉQUIPÉES 83
DIMENSIONS D'INSTALLATION 84
ENCASTREMENT 85
RACCORDEMENT ELECTRIQUE 85
ACCESSIONS DU FOUR 93
GRILLEPOUR GRILL 93
PLAQUE DE CUISSON 93
PLAQUE DE CUISSON - PLAQUE EN EMAIL 93
PLAQUE DE CUISSON - PLATEAU EN VERRE 94
AVANT UTILISATION DE L'APPAREIL 94
RéGLAGE DE L'HORLOGE 94
NETTOYAGE DES ACCESSOIRES 94
CHAUFFAGE DU FOUR 94
RÉGLAGE DU FOUR 95
RéGLAGE DU TYPE DE RECHAUFFEMENT ET DE LA TEMPERATURE 95
OUVERTURE DE LA PORTE DU FOUR PENDANT LE FONCTIONNEMENT 95
OPÉRATION EN PAUSE 95
MODIFICATION DU TEMPS DE CUISSON 95
CHANGEMENT DE TEMPERATURE 95
ANNULATION DE L'OPÉRATION 95
PRE-CHAUFFAGE RAPIDE 95
ANNULATION DU PRE-CHAUFFAGE RAPIDE 95
RéGLAGES DU MICRO-ONDES 96
USTENSILES ADAPTÉS 96
USTENSILES INADAPTÉS 96
TEST DU FOUR 96
RéGLAGES DE PUISSANCE DES MICRO-ONDES 97
RéGLAGE DU MICRO-ONDES 97
OUVERTURE DE LA PORTE DU FOUR PENDANT LE FONCTIONNEMENT 97
MODIFICATION DU TEMPS DE CUISSON 97
MODIFICATION DU RÉGLAGE DE LA PUISSANCE DU MICRO-ONDES 97
OPERATION EN PAUSE 97
ANNULATION DE L'OPÉRATION 97
MICRO-ONDES COMBINÉ 98
RéGLAGE DU FONCTIONNEMENT MICRO-ONDES COMBINÉ 98
OUVERTURE DE LA PORTE DU FOUR PENDANT LA CUISSON 98
OPERATION EN PAUSE 98
MODIFICATION DU TEMPS DE CUISSON 98
MODIFICATION DU RÉGLAGE DE LA PUISSANCE DU MICRO-ONDES 98
CHANGEMENT DE TEMPERATURE 98
ANNULATION DE L'OPÉRATION 98
98
CONFIGURATION D'UN PROGRAMME 98
CHANGEMENT DE PROGRAMME 98
ANNULATION DU PROGRAMME 98
MODIFICATION DU TEMPS DE CUISSON 98
TABLEAU DES MODES DE CUISSON 99
PROGRAMMES DE DÉCONGÉLATION 100
PREPARATION DE LA NOURRITURE 100
PLATS ALLANT AU FOUR 100
TEMPS DE REPOS 100
INSTALLATION DU FOUR
UNITÉS ÉQUIPÉES
DIMENSIONS D'INSTALLATION

NOTE
ANNULATION DU PROGRAMME
TABLEAU DE DYSFUNCTIONNEMENT
WAARSCHUWINGEN OVER HET APPARAAT 114
MILIEUBESCHERMING 116
ENERGIEBESPARING 116
MILIEUVRIENDELIJKE AFVOER ALS AFVAL 116
VERWARMING VAN VOEDSEL 116
INSTALLATIEHANDLEIDING 117
DE OVEN INSTALLEREN 117
GEPLAATSTE APPARATEN 117
INSTALLATIEMATEN 118
INBOUWEN 119
ACRYLAMIDE IN LEVENSMIDDELEN 140
TIPS OM ACRYLAMIDE TOT EEN MINIMUM TE BEPERKEN BIH HET BEREIDEN VAN VOEDSEL 140
GARANTIE EN SERVICE 141
DE HANDLEIDING LEZEN
WAARSCHUWINGEN OVER HET APPARAAT
GEPLAATSTE APPARATEN
HET PROGRAMMA ANNULEREN
ACRYLAMIDE IN LEVENSMIDDELEN
You will be requested to provide product information, proof of purchase, a photo of the silver data label and a description of the issue. Please have this information ready.
FRAN CHEFENS SKRIVBORD
INBYGGDA APPARATER 153
INSTALLATIONSMÄTT 154
INBYGGNAD 155
ELEKTRISK ANSLUTNING 155
RESERVDELAR OCH TILLBEHOR 156
ATT INSTALLERA KLÄMMORNA OCH GUIDESKENOR 157
ATT INSTALLERA KERAMIKKLÄMMORNA OCH GUIDESKENOR 157
INSTALLATION AV VANSTER GUIDESKENA [05] 158
INSTALLATION AV HÖGER GUIDESKENA [06] 159
ATT ANVÄNDA APPARATEN 160
TEKNISK INFORMATION 160
KONTROLLPANEL 160
TOUCHKNAPPAR OCH DISPLAY 160
FUNKTION OCH SKÄRMENS DISPLAY 161
JUSTERING AV PARAMETRAR 162
KYLFLAKT 162
UGNENS TILLBEHOR 163
GRILLGALLER 163
BAKPLAT 163
BAKPLAT-EMALJBRICKA 163
BAKPLAT-GLASBRICKA 163
INNAN APPARATEN ANVÄNDS 164
ATT STALLA IN KLOCKAN 164
ATT RENGÖRA TILLBEHÖREN 164
ATT VÄRMA UPP UGNEN 164
ATT STÄLLA IN UGNEN 164
INSTÄLLNING AV TYP AV UPPVÄRMNING OCH TEMPERATUR 164
ATT ÖPPNA UGNSLUCKAN UNDER TILLAGNING 164
ATT PAUSA PROGRAMMET 164
ATT ANDRA TILLAGNINGSTID 164
ATT ANDRA TEMPERATURE 164
ATT AVBRYTATILLAGNINGEN 164
SNABB FÖRVÄRMNING 165
ATT AVBRYA SNABBUPPVÄRMNING 165
MIKROVAGSINSTÄLLNINGAR 165
PASSANDE KOKKÄRL FÖR UGNEN 165
ICKE-PASSANDE KOKKÄRL FÖR UGNEN 165
TESTAVKOKKARLFORUGNEN 166
INSTÄLLNING AV MIKROVÄGSEFFEKT 166
ATT STALLA IN MIKROVAGSGUGNEN 167
ATT OPPNA UGNSLUCKAN UNDER TILLAGNING 167
ATT ANDRA TILLAGNINGSTID 167
ATT ANDRA INSTALLINGEN FOR MIKROVAGSEFFEKT 167
ATT PAUSA PROGRAMMET 167
ATTAVBRYTATILLAGNINGEN 167
KOMBI-MIKROVAGOR 167
INSTÄLLNING AV KOMBI-MIKROVÄGSTILLLAGNING 167
ATT OPPNA UGNSLUCKAN UNDER TILLAGNING 167
ATT PAUSA PROGRAMMET 167
ATT ANDRA TILLAGNINGSTID 167
ATT ANDRA INSTÄLLNINGEN FÜR MIKROVÄGSEFFEKT 168
ATT ANDRA TEMPERATURE 168
ATTAVBRYTATILLLAGNINGEN 168
AUTOMENY 168
ATT STÄLLA IN ETT PROGRAM 168
ATT BYTA PROGRAM 168
ATTAVBRYAETTPROGRAM 168
ATT ANDRA TILLAGNINGSTID 168
TABELL OVER TILLAGNINGSLÄGEN 169
UPPTININGSPROGM 170
ATT FÖRBEREDA MAT 170
KOKKARL FOR UGN 170
VILOTID 170
ATT STALLA IN FÖRINSTÄLLD TILLAGNING 170
DEN FÖRINSTÄLLDA TIDEN HAR FÖRFLUTIT 170
SPECIFICATIONER 170
ATT STÄLLA IN TIDSINSTÄLLNINGAR 171
ATT STALLA IN TILLAGNINGSTID 171
ATT STÄLLA IN KLOCKAN 171
ATT STALLA IN TIMERN 171
BARNLAS 171
ATT SLA PABARNLASET 171
ATT RENGÖRA APPARATEN 172
RENGORINGSMEDEL 172
FELSÖKNING 174
FELFUNKTIONSTABELL 174
AKRYLAMID I LIVSMEDEL 175
RAD FOR ATT HALLA AKRYLAMID P MINIMAL NIVA VID TILLAGNING 175
GARANTI OCH SERVICE 176
ATT LÄSA HANDBOKEN
INNAN APPARATEN ANVÄNDS
ATT PAUSA PROGRAMMET
ATT ANDRA TEMPERATURE
ATT PAUSA PROGRAMMET
ATT PAUSA PROGRAMMET
ATT ANDRA TEMPERATURE
https://SE.bertazzoni.com/more/care-service