
F45 CON XT - Oven BERTAZZONI - Free user manual and instructions
Find the device manual for free F45 CON XT BERTAZZONI in PDF.


| Product Type | Built-in Oven |
| Brand | Bertazzoni |
| Model | F45 CON XT |
| Dimensions (W x H x D) | 45 cm x 45 cm x 55 cm |
| Weight | 35 kg |
| Power Supply | 220-240 V, 50/60 Hz, 3.5 kW |
| Energy Consumption | 0.95 kWh (conventional cycle) |
| Energy Class | A+ |
| Oven Capacity | 65 liters |
| Number of Functions | 8 |
| Main Functions | Natural Convection, Fan-assisted, Grill, Ventilated Grill, Defrost, Pulsed Heat, Bottom Heat, Rotisserie |
| Cleaning | Pyrolytic (self-cleaning) |
| Child Safety | Key Lock |
| Cool Door | Yes, double glazing |
| Lighting | Halogen lamp |
| Included Accessories | Grid, drip tray, temperature probe |
| Repairability | Repairability index 8.2/10 |
| Spare Parts | Available for 10 years |
Frequently Asked Questions - F45 CON XT BERTAZZONI
User questions about F45 CON XT BERTAZZONI
0 question about this device. Answer the ones you know or ask your own.
Ask a new question about this device
Download the instructions for your Oven in PDF format for free! Find your manual F45 CON XT - BERTAZZONI and take your electronic device back in hand. On this page are published all the documents necessary for the use of your device. F45 CON XT by BERTAZZONI.
USER MANUAL F45 CON XT BERTAZZONI
Maintenance and Installation Manual Manual de Mantenimiento e Instalación Manuale di installazione e manutenzione Manual d'Entretien et Installation Instandhaltung Buch
F45 CONXT



Index
Before Using your Oven for the First Time Page 3
Ecological Packaging 3
Important Safety Instructions 4
Cooking Tables 5
Cleaning and Maintenance 9
Trouble Shooting 11
Technical Information 12
Installation 12
Before Using your Oven for the First Time
Carefully read this Instruction Manual to achieve the best results from your oven.
Due to the manufacturing process there may be residues of grease and other substances. To eliminate these, proceed as follows:
- Remove all the packaging material, including the protective plastic, if included.
- Select the or function at 200°C for one hour. To do so, consult the feature list provided with this manual.
- To cool the oven open the door to allow ventilation and odours to escape from inside.
• After cooling, clean the oven and the accessories.
During the first use, fumes and odours may occur and the kitchen should therefore be well ventilated.
Ecological Packaging
The packaging materials are completely recyclable and can be used again. Check with your local authority on the regulations for disposing of this material.
CAUTION
The symbol on the product or on its packaging indicates that this product may not be treated as household waste. Instead it shall be handed over to the applicable collection point for the recycling of electrical and electronic equipment. By ensuring this product is disposed of correctly, you will help prevent potential negative consequences for the environment and human health, wich could otherwise be caused by inappropriate waste handling of this product. Please contact your local city office, your household waste disposal service or the shop where you purchased the product
Important Safety Instructions
Electrical Safety
- All adjustments to or repair of the appliance, including replacement of the power lead, must be carried out by authorised Technical Assistance Service staff using original spare parts. Repairs or alterations carried out by persons other than Technical Assistance Service staff may result in the malfunctioning of or damage to the appliance, representing a risk to your personal safety.
- Disconnect your oven if it breaks down.
Safety for Children
- Do not allow children to approach the oven while it is in use, as high temperatures can be reached.
- Precautions must be taken to prevent children from playing with the appliance.
Oven Safety in Use
- The oven must not be operated with the door open.
- The manufacturer will not be held responsible if this oven is used for anything other than domestic purposes.
- Only use the oven when it is installed within kitchen units.
- Do not store oils, fats or inflammable materials inside the oven, as it could be dangerous if the oven is switched on.
- Do not lean or sit on the open door of the oven as it could damage the door and be dangerous for you.
- Do not cover the bottom of the oven with aluminium foil, as it could affect cooking and damage the interior enamelling of the oven.
- To use the oven, insert the tray or rack supplied onto the side guides inside the oven. The trays and racks are fitted with a system to facilitate partial extraction and make handling easier.
- Do not put containers or food on the floor of the oven. Always use the trays and grids.
- Do not spill water on the floor of the oven while it is working as this could damage the enamel.
- While using the oven, open the door as little as possible to reduce electricity consumption.
- Use protective gloves if you need to work inside the hot oven.
- In recipes with a high liquid content, it is normal for condensation to form on the oven door.
- Use of the appliance is not intended for persons (including children) whose physical, sensory or mental capabilities are reduced. This is also applicable to those who lack experience or knowledge, unless they are supervised, or have received instructions on how to use the appliance from a person in charge of their safety.
Cooking Tables
The Cooking Tables show examples of temperature ranges and approximate cooking times. The cooking mode depends on the model. For the best results we recommend the oven to be preheated with the function of ☐ The beheating time finishes when the heating pilot light switches off.
| STARTERS | Weight (Kg) | Tray Position | Cooking Mode | Temperat. (°C) | Time (min) | Receptacle |
| Baked rice | 1,0 | Lower | 180-200 25-30 | Shallow oven dish | ||
| 170-190 20-25 | ||||||
| Pasty | 1,2 | Intermediate | 170-190 | 45-50 | Tray | |
| 160-180 30-35 | ||||||
| Vegetable Pastry | 1,0 | Intermediate | 190-210 25-30 | Shallow dish | ||
| 180-200 | 25-30 | |||||
| Lower | 170-190 35-40 | |||||
| Vegetable Pie | 1,0 | Intermediate | 190-210 55-60 | Shallow dish | ||
| 170-190 45-50 | ||||||
| Baked potatoes | 1,0 | Lower | 180-200 55-60 | Tray | ||
| 180-200 40-45 | ||||||
| Pizza | 0,6 | Intermediate | 190-210 | 15-20 | Grid | |
| 170-190 | 10-15 | |||||
| Quiche | 0,8 | Intermediate | 180-200 | 40-45 | Quiche Mould | |
| 160-180 35-40 | ||||||
| 170-190 40-45 | ||||||
| Stuffed tomatoes | 0,8 | Intermediate | 170-190 10-12 | Tray | ||
| 160-180 | 10-12 | |||||
| Lasagne | 1,0 | Intermediate | 180-200 8-10 | Shallow dish | ||
| FISH | Weight (Kg) | Tray Position | Cooking Mode | Temperat. (°C) | Time (min) | Receptacle |
| Red Bream | 1,0 Intermediate | 180-200 25-30 | Tray | |||
| 170-190 20-25 | ||||||
| Salted Dorado | 1,0 Intermediate | 190-210 25-30 | Tray | |||
| 180-200 25-30 | ||||||
| Sole | 1,0 Intermediate | 170-190 15-20 | Tray | |||
| 160-180 10-15 | ||||||
| Sea-bass Tray | 1,0 Intermediate | 190-210 20-25 | ||||
| 180-200 10-15 | ||||||
| Hake Tray | 1,1 Intermediate | 190-210 25-30 | ||||
| 180-200 20-25 | ||||||
| Fish Pie Casserole dish | 1,1 Intermediate | 190-210 60-65 | ||||
| 190-210 60-65 | ||||||
| Salmon in greased paper | 1,0 Intermediate | 180-200 20-25 | Tray | |||
| 170-190 15-20 | ||||||
| Trout | 1,1 Intermediate | 190-210 20-25 | Tray | |||
| 180-200 15-20 | ||||||
| Fillet of Fish | 1,0 Higher | 170-190 15-20 | Grid | |||
| Sardines | 1,0 Higher | 180-200 10-15 | Grid | |||
| MEAT | Weight (Kg) | Tray Position | Cooking Mode | Temperat. (°C) | Time (min) | Receptacle |
| Suckling Pig | 1,4 Intermediate | 190-210 70-75 | Tray | |||
| 170-190 70-75 | ||||||
| Rabbit | 1,2 Intermediate | 180-200 55-60 | Tray | |||
| 170-190 45-50 | ||||||
| 170-190 30-35 | ||||||
| Lamb | 1,0 Intermediate 170- | 190-210 | 50-55 | Tray | ||
| 180-200 50-55 | ||||||
| Salted Pork Loin | 0,6 Intermediate | 170-190 35-40 | Tray | |||
| 170-190 40-45 | ||||||
| Chicken Tray | 1,2 Lower | 190-210 | 50-55 | |||
| 170-190 45-50 | ||||||
| Roast-beef | 0,6 Intermediate 180- | 190-210 30-35 | Tray | |||
| 190-210 30-35 | ||||||
| Fillet Steak Pastry | 1,0 Intermediate | 180-200 35-40 | Tray | |||
| 160-180 30-35 | ||||||
| Brochettes | 0,3 Higher | 180-200 10-12 | Grid | |||
| Sausages | 0,6 Higher | 190-210 10-15 | Grid | |||
| CAKES AND DESSERTS | Weight (kg) | Tray Position | Cooking Mode | Temperat. (°C) | Time (min) | Receptacle |
| Sponge Cake | 0,5 Intermediate | 170-190 Intermediate | 30-35 | 150-170 35-40 | Cake Mould | |
| 30-35 | ||||||
| 60 | 160-180 30-35 | |||||
| Swiss Roll | 0,5 Intermediate | 60 | 170-190 10-15 | Tray | ||
| 60 | 160-180 10-15 | |||||
| Flan | 0,8 Intermediate | 60 | 160-180 55-60 | Bread Mould | ||
| 60 | 150-170 50-55 | |||||
| Biscuits | 1,0 Intermediate | 60 | 160-180 20-25 | Tray | ||
| 60 | 150-170 20-25 | |||||
| Vol-au-vents | 0,3 Intermediate | 60 | 170-190 20-25 | Tray | ||
| 60 | 160-180 15-20 | |||||
| Cup Cakes | 0,7 Intermediate | 60 | 160-180 20-25 | Tray | ||
| 60 | 160-180 | 20-25 | ||||
| Baked Apples | 0,5 Intermediate | 60 | 180-200 30-35 | Tray | ||
| 60 | 170-190 | 20-25 | ||||
| Meringue | 0,35 Intermediate | 60 | 100-120 70-75 | Tray | ||
| 60 | 100-120 60-65 | |||||
| Baked bananas | 0,5 Intermediate | 60 | 180-200 20-25 | Casserole dish | ||
| 60 | 170-190 15-20 | |||||
| Plum-Cake | 0,6 Intermediate | 60 | 170-190 55-60 | Cake Mould | ||
| 60 | 160-180 50-55 | |||||
| Apple Pie | 0,8 | Intermediate | 60 | 170-190 45-50 | Tray | |
| 60 | 160-180 40-45 | |||||
| Cheesecake | 0,8 Intermediate | 60 | 180-200 40-45 | Cheesecake Mould | ||
| 60 | 170-190 40-45 | |||||
Cleaning and Maintenance
Caution
Before carrying out any work, the appliance must be disconnected from the mains electricity supply.
Cleaning the Inside of the Oven
- The inside of the oven should be cleaned to remove food and grease deposits, which can give off smoke or odours and cause stains to appear.
- With the oven cold and for enamelled surfaces (e.g. the floor of the oven) use a nylon brush or sponge with warm soapy water. If using special oven cleaning products, use only on enamelled surfaces and follow the manufacturer's instructions.
Caution
Do not clean the inside of your oven with a steam or pressurised water jet. Do not use either metallic scouring pads or any material that could scratch the enamel.
Use of the Fold-down Grill (Depending on Model)
To clean the upper part of the oven,
- Wait until the oven is cold.
- Turn the screw (A) and lower the grill element as far as possible.
- Clean the upper part of the oven and return the grill element to its original position.

natural_image
Close-up of a hand inserting a component into a device with a circular component and a labeled point A (no readable text or symbols)Cleaning the Oven Exterior and Accessories
Clean the outside of the oven and the accessories with warm soapy water or with a mild detergent.
Caution
Never use metallic scouring pads or commercial or scouring powders that could scratch the enamel. For stainless steel surfaces, proceed with care and only use sponges or cloths that cannot scratch them.
To clean the outside of the oven do not attempt to remove the controls, as for this, the oven has to be first removed from the kitchen unit
Cleaning the Oven Door
Do not use metal scouring pads, wire brushes or commercial or abrasive powders to clean the oven door. They may scratch the surface and cause the glass to break.
Depending on the oven model, you can remove the door to simplify its cleaning. To do so:
1 Open the oven door completely.
2 Insert the safety pins into the holes on the door's hinges.

natural_image
Mechanical assembly diagram showing a sliding mechanism with spring and housing (no text or labels)3 Hold the door at each side with both hands and close it until nearly shut.
4 Then lift the door and release the hinges from the front slots on the oven by pulling outwards.

Warning
Do not remove the safety pins at any time, as the hinge is taut and may cause injuries. Also, it might not be possible to assemble the door if these pins are not in place.
To assemble the door, hold it with both hands and insert the hinges in the appropriate slots at the front of the oven. Open the oven door slowly and completely.
Cleaning the Large Interior Glass Door
Do not use metal scouring pads, wire brushes or commercial or abrasive powders to clean the oven door. They may scratch the surface and cause the glass to break.
Dismantling / Assembly Instructions for the interior glass
1 Open the oven door.
2 Pull the glass upwards from the bottom (A).

natural_image
Illustration of a person using a tool to adjust or install a component, with an arrow and labeled point A pointing upward (no text or symbols beyond the label)3 The interior glass is now free. Remove it.
Warning
Be careful: the oven door closes when the interior glass is removed.
4 Clean the interior glass and the inside of the oven door.
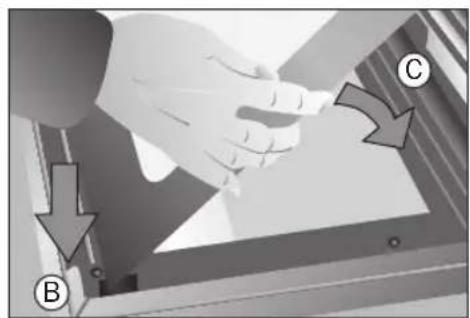
5 Then insert the supports on the interior glass into the grooves at the top of the door (B).
natural_image
Illustration of a hand holding a tool with arrows indicating motion or flow, labeled B and C (no text or symbols present)6 Lower the glass into the door (C).
7 The glass is fixed to the door by pressing the two lower supports (D) while pushing the glass into the door (E).

Changing the oven bulb
Caution
To change the bulb, first ensure that the oven is disconnected from the power supply.
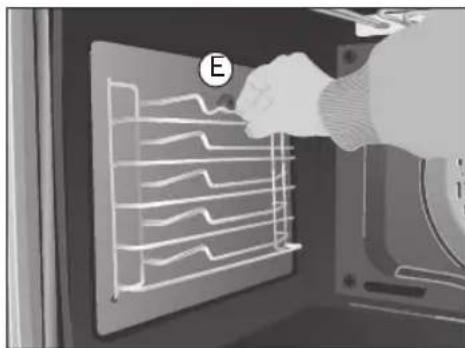
- Ease out the chrome supports, releasing them from the bolt (E).
natural_image
Interior view of an oven with a hand placing a rack into the top panel (no visible text or symbols)- Loosen the lens from the lampholder with the help of the appropriate tool.

natural_image
Hand holding a metallic switch with a circular button, no text or symbols visible- Exchange the bulb.
- Replace the lens, making sure it fits in the correct position without forcing it.

natural_image
Mechanical assembly diagram showing a rotating component with an arrow indicating rotation (no text or symbols present)The replacement bulb must be temperature resistant to 300 °C. These can be ordered from the Technical Service Department.
Trouble Shooting
The oven does not work
Check the connection to the electrical circuit.
Check the fuses and current limiter of your installation.
Ensure the clock is in the manual or programmed mode.
Check the position of the function and temperature selectors
The inside light of the oven does not work
Change the bulb.
Check its assembly in accordance with the instruction manual.
The heating indicator light does not work
Select a temperature.
Select a setting.
It should only light up while the oven is heating up to its set working temperature.
Smoke Is given off while the oven Is working
This is normal during its first use. Periodically clean the oven.
Reduce the amount of grease or oil added to the tray.
Do not use higher temperature settings than those in the cooking tables.
Expected cooking results are not achieved
Review the cooking tables to obtain guidance on the working of your oven.
NB
If, despite these recommendations, the problem continues, contact our Technical Assistance Service.
Technical Information
If the equipment does not work, please contact the Technical Service Department and advise them of the problem, indicating:
1 Serial number (S-No)
2 Appliance model. (Model)
You will find this information on the rating plate on the lower part of the oven when the door is opened.
CE The item that you have bought meets the European directives on electrical material safety (73/23/CEE) and electromagnetic compatibility (89/336/CEE).
Installation
This information is intended for the installer, as the person responsible for assembly and electrical connection. If you install the oven yourself, the manufacturer will not be held responsible for any possible damage.
Installation must only be performed by a fully qualified electrician who must ensure regulations laid down for installation are observed.
Before Installation. Comments
- To unpack the oven, pull the tab located on the lower part of the box.
-
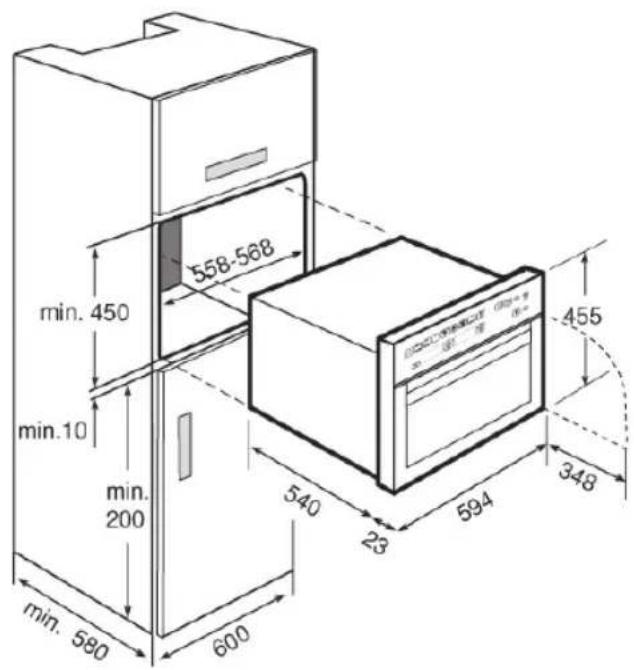
A niche is required in the kitchen unit as per the dimensions shown on the figure, providing a minimum depth of 580 mm. (See figure 1 describing oven fitting on the page 14).
-
To fit multifunction ovens in their locations, the back part of the unit corresponding to the shaded area of figure 1, must not have any projections (reinforcements, pipes, sockets, etc). (See the page 14).
- The adhesive used for the plastic covering of kitchen furniture must be able to withstand temperatures up to 85°C.
Electrical Connection. Legal Requirements
The installer must check that:
- The voltage and cycles of the mains supply correspond to that indicated on the rating plate.
- The electrical installation can stand the maximum power indicated on the rating plate.
- The connection diagram is shown in the following figure:

- The electrical connection has adequate earthing in accordance with regulations in force.
- The connection must be carried out with an omnipolar switch, of an adequate size for the current drawn. There must be a minimum aperture between contacts of 3 mm to enable disconnection in the case of emergency, cleaning or bulb exchange.
Under no circumstances must the earth wire pass through this switch.
- This switch may be replaced with a plug, which must always be accessible in normal working conditions.
After connecting the electricity, check that all the electrical parts of the oven are working.
This appliance must be installed by a licensed electrician in accordance with AS/NZS 3000 wiring rules and any local wiring rules, and a Certificate of Compliance issued upon completion. The main supply and interconnecting cables required for installation must be rated at a minimum 15A.
Installing the Oven
For all ovens and after carrying out the electrical connection,
1 Insert the oven in the kitchen unit, making sure the power lead is not trapped or in contact with hot parts of the oven.
2 Fix the oven to the unit by means of the 2 screws supplied via the holes that can be seen when the door is opened.
3 Check that the oven housing is not in contact with the sides of the unit and that there is at least 2 mm separating the neighbouring units.
Fig. 1
Índice
natural_image
Mechanical component diagram showing a lever mechanism with no visible text or symbolsAtención
natural_image
Illustration of hands using a tool to adjust or install a component, with an arrow and labeled point A pointing upward (no text or symbols beyond the label)natural_image
Illustration of a hand holding a tool with arrows indicating motion or force, labeled B and C (no text or symbols present)natural_image
Interior view of an oven with a hand adjusting the rack and panel (no visible text or symbols)natural_image
Hand holding a metallic tool inside a wall-mounted electrical switch (no text or symbols visible)natural_image
Mechanical assembly diagram showing a rotating component with a curved arrow indicating rotation (no text or symbols present)natural_image
Illustration of a hand pressing down on a car interior panel with no visible text or symbolsnatural_image
Mechanical component diagram showing a spring mechanism inside a housing (no text or symbols)Attenzione
natural_image
Person using a tool to interact with a device, no visible text or symbolsnatural_image
Illustration of a hand holding a tool with directional arrows indicating movement or flow (no text or symbols present)natural_image
Illustration of a hand placing a grid-like structure into an oven (no text or symbols visible)natural_image
Hand holding a metallic tool inside a wall-mounted electrical switch (no text or symbols visible)natural_image
Mechanical assembly diagram showing a rotating component with a curved arrow indicating rotation (no text or symbols present)natural_image
Close-up of a hand pressing down on a mechanical component with no visible text or symbolsnatural_image
Mechanical assembly diagram showing a spring-loaded component inserted into a bracket (no text or symbols visible)Attention
natural_image
Close-up of a person using a tool in a mechanical component, with an arrow and letter 'A' pointing to the tool (no readable text or symbols beyond basic diagram)natural_image
Mechanical assembly diagram showing a hand holding a tool with directional arrows labeled B and C (no text or symbols present)natural_image
Illustration of a hand placing a white rack into an oven with a label 'E' (no text or symbols on the diagram itself)natural_image
Hand holding a metallic switch inside a wall-mounted electrical outlet (no text or symbols visible)natural_image
Mechanical assembly diagram showing a rotating component with a curved arrow indicating rotation (no text or symbols present)natural_image
Close-up of a hand pressing down on a mechanical component with no visible text or symbolsnatural_image
Mechanical component diagram showing a sliding mechanism with motion arrows (no text or symbols)Achtung
natural_image
Illustration of a person using a tool to adjust or install a mechanical component, with no visible text or symbols.natural_image
Illustration of a hand holding a tool with directional arrows indicating movement or flow (no text or symbols present)Lampenwechsel
Achtung
natural_image
Interior view of an oven with a hand placing a tray into the oven (no visible text or symbols)natural_image
Hand holding a metallic switch with a circular component above, against a plain wall (no text or symbols visible)natural_image
Mechanical assembly diagram showing a rotating component with a curved arrow indicating rotation (no text or symbols present)- Index
- Before Using your Oven for the First Time
- Ecological Packaging
- CAUTION
- Important Safety Instructions
- Electrical Safety
- Safety for Children
- Oven Safety in Use
- Cooking Tables
- Cleaning and Maintenance
- Cleaning the Inside of the Oven
- Use of the Fold-down Grill (Depending on Model)
- Cleaning the Oven Exterior and Accessories
- Cleaning the Oven Door
- Warning
- Cleaning the Large Interior Glass Door
- Dismantling / Assembly Instructions for the interior glass
- Changing the oven bulb
- Trouble Shooting
- The oven does not work
- The inside light of the oven does not work
- The heating indicator light does not work
- Smoke Is given off while the oven Is working
- Expected cooking results are not achieved
- NB
- Technical Information
- Installation
- Before Installation. Comments
- Electrical Connection. Legal Requirements
- Installing the Oven
- Índice
- Atención
- Attenzione
- Attention
- Achtung
- Lampenwechsel
Brand : BERTAZZONI
Model : F45 CON XT
Category : Oven