
F60 PRO XA/12 - Oven BERTAZZONI - Free user manual and instructions
Find the device manual for free F60 PRO XA/12 BERTAZZONI in PDF.


| Product Type | Built-in Oven |
| Brand | Bertazzoni |
| Model | F60 PRO XA/12 |
| Dimensions (W x H x D) | 60 x 60 x 55 cm |
| Weight | 35 kg |
| Power Supply | Electric, 230 V / 50 Hz |
| Total Power | 3.5 kW |
| Capacity | 70 L |
| Number of Functions | 8 cooking functions: fan-assisted, natural convection, grill, etc. |
| Grill | Yes, with rotisserie |
| Cleaning | Pyrolytic |
| Door | Removable double glazing |
| Interior Lighting | Yes, halogen |
| Display | Digital touch screen |
| Thermostat | 50 - 250 °C |
| Timer | Programmable, up to 12 h |
| Child Safety | Control lock |
| Automatic Shut-off | Yes |
| Repairability Index | 7.8 / 10 |
| Material | Stainless steel |
Frequently Asked Questions - F60 PRO XA/12 BERTAZZONI
User questions about F60 PRO XA/12 BERTAZZONI
0 question about this device. Answer the ones you know or ask your own.
Ask a new question about this device
Download the instructions for your Oven in PDF format for free! Find your manual F60 PRO XA/12 - BERTAZZONI and take your electronic device back in hand. On this page are published all the documents necessary for the use of your device. F60 PRO XA/12 by BERTAZZONI.
USER MANUAL F60 PRO XA/12 BERTAZZONI
F60CONXA / F60PROXA
Specifiche tecniche
Feature List
natural_image
Line drawing of a standard open oven with a lid and front panel (no text or symbols)
BERTAZZONI SpA Via Palazzina 8 42016 Guastalla RE ITALY
WWW.BERTAZZONI.COM
FROM THE DESK OF THE PRESIDENT
Dear new owner of a Bertazzoni product,
Our company brings to homeowners around the world beautiful, high-performance kitchen appliances, which make their dreams come true.
We marry the finest Italian craftsmanship with technical precision using state-of-the-art manufacturing, which give our customers peace of mind.
Our brand elevates food – preparing it, sharing it, enjoying it – to a new dimension where taste, fun, and lifestyle - the values of our land - come together.
We have built this company with the unique passion and dedication of family entrepreneurship. Our fathers handed it to us. Our children will inherit it. It's in our minds, our hearts, our soul.
Since 1882 our name is on the products we build. We are proud – and at the same time humbled – by our heritage. This company is Bertazzoni. We are Bertazzoni. And we vow to continue building this great enterprise into the future.
DALLA SCRIVANIA DEL PRESIDENTE
F60CONXA / F60PROXA

4 Chrome Support + Telescopic Guides
5 Oven Grid
6 Cake Tray
7 Hinge
8 Door
9 Air Outlet for Cooling
10 Cabinet Mounting
11 Grill Screen
12 Smoke Outlet
13 Side light
14 Back Wall Panel
15 Fan
16 Large Inner Glass Door
Control Panel
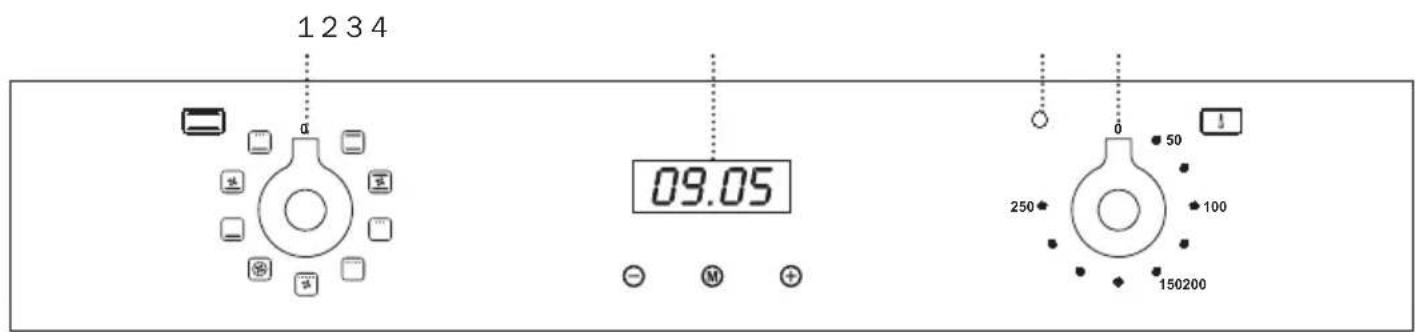
1 Function selector
2 Electronic clock
3 Heating indicator light. Indicates that the heat is going to the food and it goes out when the set temperature is reached.
4 Temperature selector
Oven Functions
0 Oven Switch-Off

Conventional
This function is for use when baking cakes where the heat should be even to give a spongy texture.

Conventional with Fan
Suitable for roasts and cakes. The fan spreads the heat evenly throughout the inside of the oven to reduce cooking time and temperature.

Grill
Toasting and browning. This function allows the surface to be cooked without affecting the inside of the food. Suitable for flat pieces such as steaks, ribs, fish and toasts.

MaxiGrill
For toasting larger surfaces than possible with the Grill function, in addition to greater toasting power for faster food browning.

MaxiGrill with Fan
For even roasting and simultaneous surface browning. Ideal for mixed grills. Perfect for bulky pieces such as poultry and game. The meat should be placed on the oven grid with the tray below to collect meat juices and fat.
Caution
The door must be closed during use with Grill, MaxiGrill or MaxiGrill with Fan.

Turbo
The fan spreads the heat coming from an element located at the back of the oven. As a result of the evenly distributed temperature, food can be cooked on two levels at the same time.
This function can also be used for defrosting food. Set temperature selector to 0

Lower Element
Heat only comes from beneath. Suitable for warming plates or letting dough rise.

Lower Element with Fan
This distributes the heat coming from the lower element. Ideal for pastries with jam or fruit fillings that only require heat from below. This function always requires pre-heating.

Grill and Lower Element
Ideal for roasts. This function can be used with any size joints of meat.
NB
The light remains on with any cooking function.
Setting the Electronic Clock
When you switch on the oven, you will notice that the word AUTO will flash on the display with 00:00. Press the + and - symbols until you hear a beep and see a dot flashing between the digits of the clock. Then set the clock time by pressing on the + or - symbols. You will hear a beep to confirm that the time has been set. The symbol will remain lit.
Should you wish to change the time, follow these instructions again.
Manual Operation
After setting the clock, the oven is ready for use. Select a cooking temperature and function by pressing and turning the oven controls.
To turn off the oven, set the controls to 0
Electronic Clock Functions
Timer Alarm: An audible signal is produced at the programmed time, even if the oven is not being used.
Cooking Time: This function allows you to programme cooking time length, after which the oven will turn off automatically.
Cooking Stop Time: This function allows you to programme the time for cooking to stop, after which the oven will turn off automatically.
Cooking Time and Cooking Stop Time: This function allows both cooking time length and the stop time to be programmed. The oven switches on automatically at the set time and operates for the cooking time it has been programmed for. It switches itself off automatically at the entered stop time.
Changing the Clock Alarm Tone
1 Press + and - at the same time. You will notice a dot light up between the + and - symbols on the clock display.
2 Press M and you will see "ton1" light up on the clock display.
3 The alarm tone can be changed by repeatedly pressing on the - symbol.
Programming the Timer Alarm
1 Press on M. The 🔔 symbol will flash on the clock display.
2 Select the length of time after which you want the alarm to sound by pressing on + or -.
3 The alarm will be confirmed by two consecutive beeps and the display will show the current time. The 🔒 symbol will remain lit.
4 At the programmed time, the alarm will sound and the 🔔 symbol will begin to flash.
5 Press on any symbol to turn off the alarm. The 🔔 symbol will continue to flash.
6 Keep pressing M until the function is switched off.
You can see how much time is left at any time by pressing M until the 🔔 symbol flashes. You can then change the selected time by pressing + or -. The beep you hear will confirm the new time has been set.
Programming Cooking Time
1 Press M until you hear a beep. Press M again and the word "dur" will appear on the clock display.
2 Select the cooking time by pressing + or -.
3 You will then hear a beep and the present time and the word "AUTO" will light up to show that the oven will switch off automatically.
4 Select a cooking function and temperature.
5 When the set cooking time is over, the oven will turn off and an alarm will sound.
6 Press any symbol to turn off the alarm. The oven will remain off and AUTO will continue to flash.
7 Keep pressing on M until you hear a beep to show the function is now off. Then set the controls to 0 to switch off the oven.
You can see how much time is left and change the remaining cooking time. Follow the previous instructions.
To cancel this function, just press + and - at the same time.
Programming the Cooking Stop Time
1 Press M until you hear a beep. Then press M until the word "End" appears on the clock display.
2 Select the cooking stop time by pressing + or -.
3 You will then hear a beep and the present time and the word "AUTO" will light up to show that the oven will switch off automatically.
4 Select a cooking function and temperature.
5 When it is the time for cooking to stop, the oven will switch off and an alarm will sound.
6 Press any symbol to turn of the alarm. The oven will remain off and AUTO will continue to flash.
7 Keep pressing on M until you hear a beep to show the function is now off. Then set the controls to 0b switch off the oven.
You can use this function even if you are cooking with the oven. If this is the case, follow all of the above instructions except No. 4.
You can see the stop cooking time at any time by following instruction No.1.
Programming Cooking Time and Cooking Stop Time
1 Press M until you hear a beep. If you press M again, the word "dur" will appear on the clock display.
2 Select the cooking time by pressing + or -.
3 A beep will then sound and the present time and AUTO will show.
4 Press M until you hear a beep. Then press M until the word "End" appears on the clock display.
5 Select the stop cooking time by pressing + or -.
6 A beep will then sound and the present time and AUTO will show.
7 Select a cooking function and temperature.
8 The oven will remain off with AUTO on the clock display. The oven is now programmed.
9 When it is the time for cooking to start, the oven will switch on and cooking will continue for the selected time. The symbols AUTO and 📋 will light up on the clock display.
10 When the programmed time is reach, the oven will switch itself off and an alarm will sound.
11 Press any symbol to stop the alarm. The oven will remain off and AUTO will continue to flash.
12 Press M until you hear a beep in order to switch off the function. Then set the controls to 0 to switch off the oven.
You can see the state of the timer at any time by following instructions 1 and 4.
If you wish to modify the timer setting, you must cancel the function by pressing + and - at the same time. Re-programme the oven by following the instructions given.
Caution
In the event of power failure, your electronic clock timer settings will be erased and 00:00 will flash on the display. Reset the clock and programme again.


.00: 00. Information Auto
- F60CONXA / F60PROXA
- FROM THE DESK OF THE PRESIDENT
- DALLA SCRIVANIA DEL PRESIDENTE
- Oven Functions
- Oven Switch-Off
- Conventional
- Conventional with Fan
- Grill
- MaxiGrill
- MaxiGrill with Fan
- Caution
- Turbo
- Lower Element
- Lower Element with Fan
- Grill and Lower Element
- NB
- Setting the Electronic Clock
- Manual Operation
- Electronic Clock Functions
- Changing the Clock Alarm Tone
- Programming the Timer Alarm
- Programming Cooking Time
- Programming the Cooking Stop Time
- Programming Cooking Time and Cooking Stop Time
Brand : BERTAZZONI
Model : F60 PRO XA/12
Category : Oven