USER MANUAL PHT600 SCHEPPACH
natural_image
Black-and-white photo of a manual hedge shaver tool with extended blade and meshing (no visible text or symbols)
PHT600
| DE | Benzin-HeckenschereOriginalbedienungsanleitung | 5 |
| GB | Petrol hedge trimmerTranslation of original instruction manual | 19 |
| FR | Taille-haies thermiqueTraduction des instructions d'origine | 31 |
| IT | Tosasiepi a benzinaLa traduzione dal manuale di istruzioni originale | 44 |

natural_image
Technical line drawing of a mechanical assembly with labeled component E (no text or symbols beyond label)
natural_image
Technical line drawing of a mechanical assembly with no visible text or symbols
natural_image
Line drawing of a mechanical tool with a long-handled chain, spooling cable, and a flat blade (no text or symbols)
Günzburger Straße 69
D-89335 Ichenhausen
Verehrter Kunde,
Gabelschlüssel Gr. 8 + 10 (20)
Bedienungsanleitung
Vibration (Hinterer Handgriff) A_hv = 3,8 m/s^2
Messunsicherheit K_hv = 1,5 m/s^2
Explanation of the symbols on the device
Symbols are used in this manual to draw your attention to potential hazards. The safety symbols and the accompanying explanations must be fully understood. The warnings themselves will not rectify a hazard and cannot replace proper accident prevention measures.
|  | Read the operating and safety instructions before start-up and follow them! |
|  | Warning! Disregard results in a risk of death or injury, or damage to the tool |
|  | Wearing safety shoes is recommended! |
|  | Use hearing protection and safety goggles! |
|  | Wear work gloves! |
|  | Attention: Risk of injury!Never have your hands near the blades. Never touch a blade when switching on or working with the device. |
|  | Protect the device from rain and do not leave outdoors in the rain! |
|  | The product complies with the applicable European directives. |
|  | Attention: flammable substances. Fire, naked flames and smoking prohibited! |
|  | Cold start lever (choke) |
|  | "Warm start and working" start lever (choke) |
|  | Attention! Keep bystanders away from the work area! |
|  | Attention! The exhaust pipe and other parts of the engine become very hot during operation, do not touch! |
|  | Guaranteed sound power level |
|  | Hedge trimmer cutting length 560 mm |
|  | Symbol for the "Petrol/oil mixing ratio" to be filled in on the tank cover. |
Table of contents: Page:
- Introduction......21
- Device description....21
- Scope of delivery....21
- Proper use....22
- Safety information 22
- Technical data 24
- Before commissioning....24
- Attachment and operation 25
- Working instructions....26
- Maintenance....27
- Storage and transport 29
- Disposal and recycling 29
- Troubleshooting....30
1. Introduction
Manufacturer:
Scheppach GmbH
Günzburger Straße 69
D-89335 Ichenhausen
Dear customer,
We hope your new tool brings you much enjoyment and success.
Note:
In accordance with the applicable product liability laws, the manufacturer of this device assumes no liability for damage to the device or caused by the device arising from:
- Improper handling,
- Failure to comply with the operating instructions.
- Repairs carried out by third parties, unauthorised specialists.
- Installing and replacing non-original spare parts,
• Application other than specified,
Please consider:
Read through the complete text in the operating manual before installing and commissioning the device.
The operating manual is intended to help the user to become familiar with the machine and take advantage of its application possibilities in accordance with the recommendations.
The operating manual includes important instructions for safe, proper and economic operation of the device, for avoiding danger, for minimising repair costs and downtimes, and for increasing the reliability and extending the service life of the device.
In addition to the safety instructions in this operating manual, you must also observe the regulations applicable to the operation of the device in your country.
Keep the operating manual package with the machine at all times and store it in a plastic cover to protect it from dirt and moisture. They must be read and carefully observed by all operating personnel before starting the work.
The device may only be used by personnel who have been trained to use it and who have been instructed with respect to the associated hazards. The required minimum age must be observed.
In addition to the safety instructions in this operating manual and the separate regulations of your country, the generally recognised technical rules relating to the operation of such machines must also be observed.
We accept no liability for accidents or damage that occur due to a failure to observe this manual and the safety instructions.
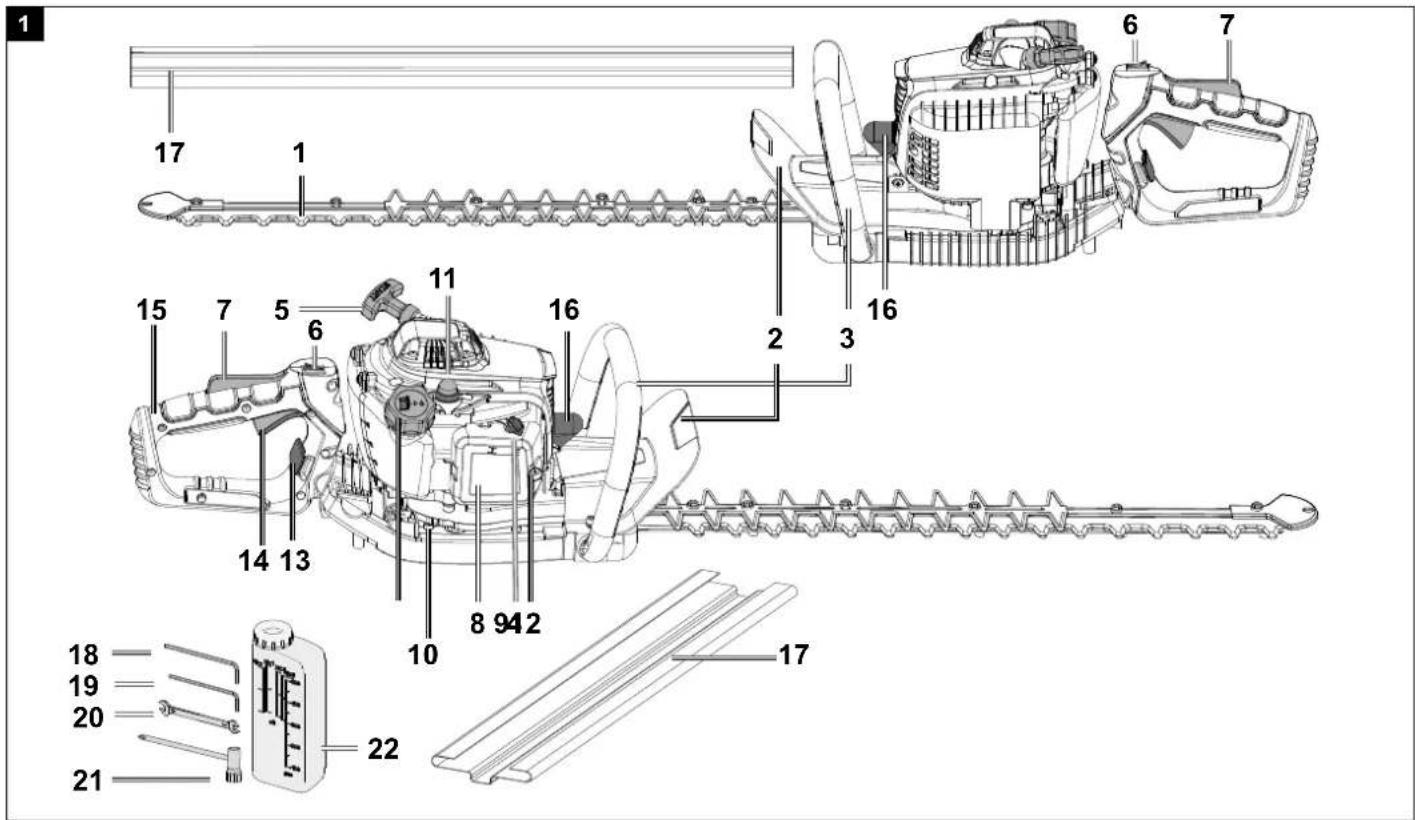
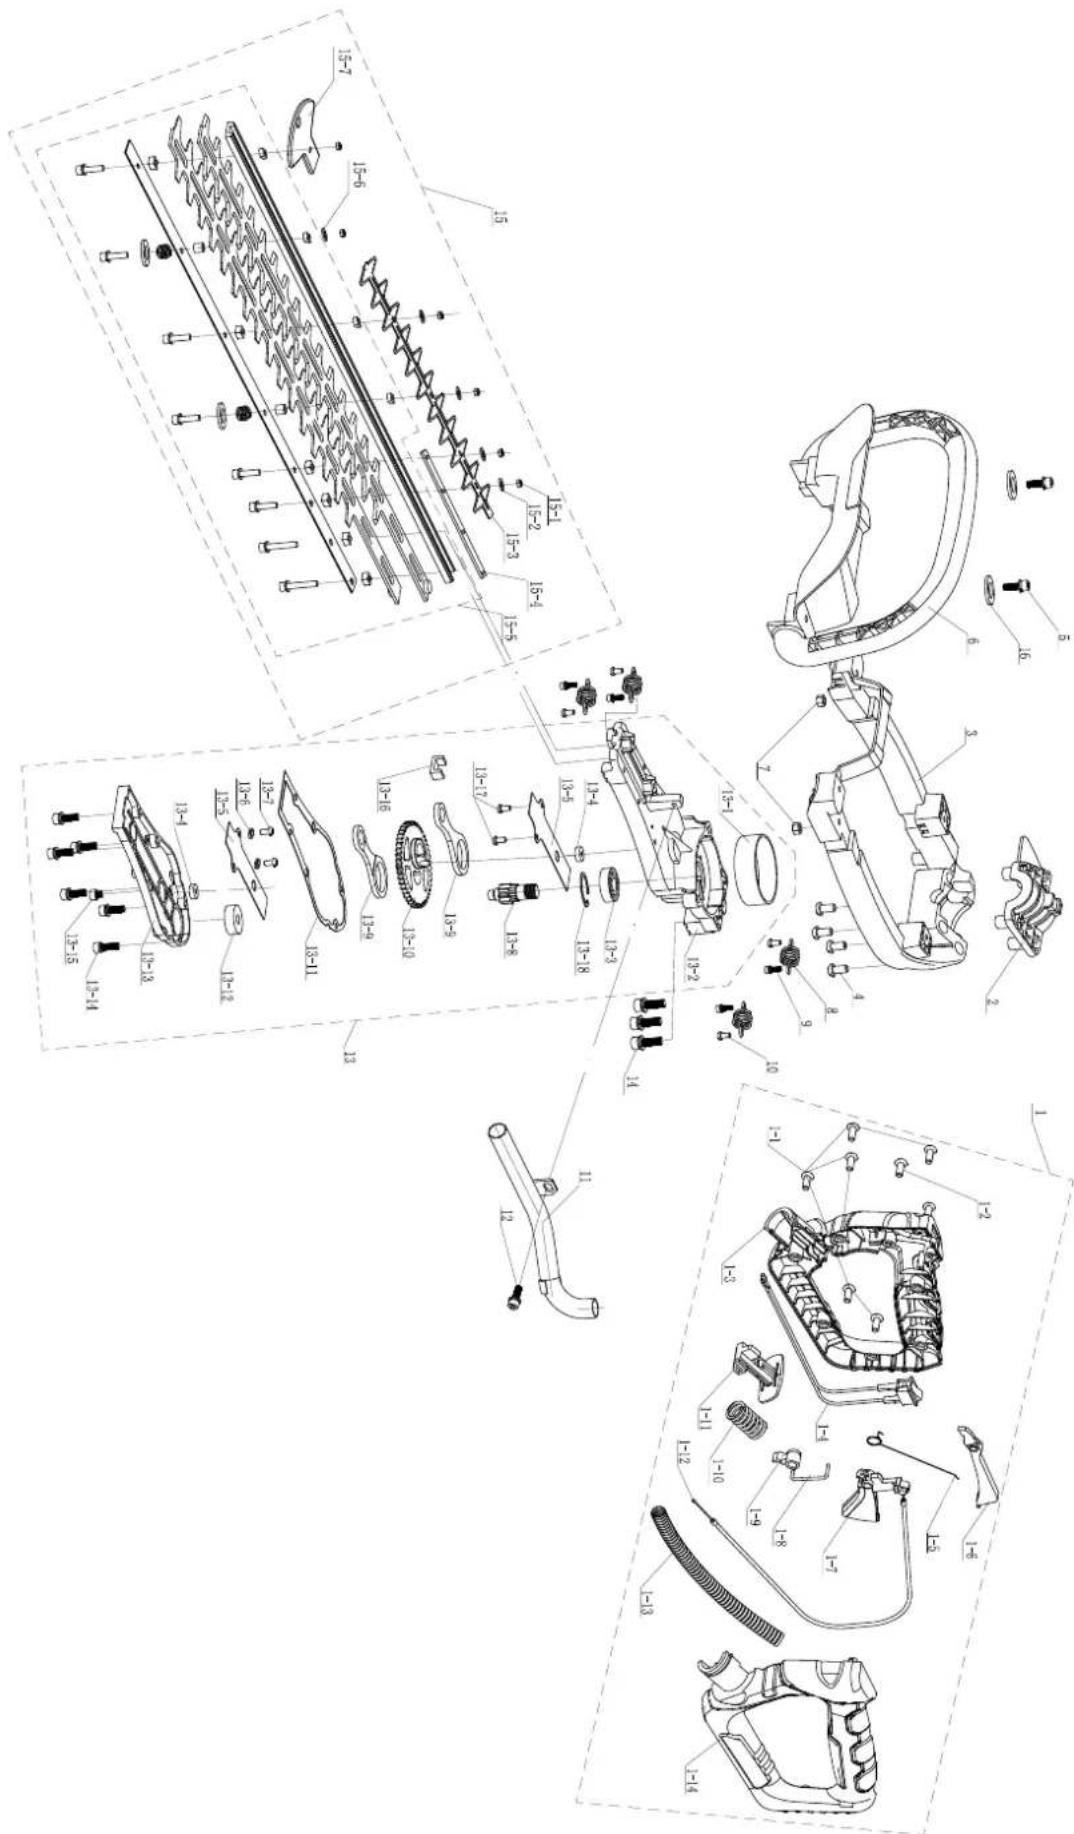
2. Device description (Fig. 1)
- Cutting blade
- Hand guard
- Front handle
- Start lever (choke)
- Starter cable
- On/off switch
- Throttle interlock
- Air filter cover
-
Wing screw
-
Gear grease screw
-
Fuel pump
-
Tank cover
-
Slider
-
Throttle
-
Rear handle
-
Spark plug connector
-
Blade guard
-
Allen key size 5
-
Allen key size 4
-
Open-ended spanner size 8+10
-
Spark plug wrench
-
Oil-petrol mixing bottle
3. Scope of delivery
Open the packaging and carefully remove the device from the packaging.
Remove the packaging material, as well as the packaging and transport safety devices (if present).
Check whether the scope of delivery is complete.
Check the device and accessory parts for transport damage. In the event of complaints the carrier must be informed immediately. Later claims will not be recognised.
If possible, keep the packaging until the expiry of the warranty period.
- Familiarise yourself with the product by means of the operating instructions before using for the first time.
- With accessories as well as wearing parts and replacement parts use only original parts. Spare parts can be obtained from your -specialist dealer.
- When ordering please provide our article number as well as type and year of manufacture for your equipment.
Attention!
The device and the packaging material are not children's toys! Do not let children play with plastic bags, films or small parts! There is a danger of choking or suffocating!
Petrol hedge trimmer
Blade guard (17)
Spark plug wrench (21)
Oil-petrol mixing bottle (22)
Allen key size 5 (18)
Allen key size 4 (19)
Open-ended spanner size 8 + 10 (20)
Operating manual
4. Proper use
The machine complies with the applicable EC machinery directive.
Before starting any work, all protective and safety devices must be in place.
These hedge trimmers are intended to cut soft, newly grown hedge material. It is not suitable for the cutting of branches, solid wood or other cutting material.
The machine has been designed to be operated by one person.
The operator is responsible for third parties in the area of operations.
Observe all safety information and danger notices on the machine.
Ensure that all of the safety information and danger notices on the machine are complete and in legible condition.
Only use the machine when in a technically faultless condition, appropriately and in compliance with the operating manual and with full knowledge of safety and hazards!
In particular, rectify malfunctions that could impair safety immediately (or commission rectification works accordingly)!
The manufacturer's safety, operating and maintenance specifications as well as the dimensions given in the technical data must be observed.
Relevant accident prevention regulations and other generally recognized safety and technical rules must also be observed.
The machine may only be used, maintained or repaired by trained persons who are familiar with it and have been informed of the dangers. Any liability of the manufacturer for damages resulting from arbitrary changes to the machine is excluded.
The machine is intended for use only with original accessories and original tools from the manufacturer.
Any use beyond this is improper use. The manufacturer is not responsible for the resultant damages, the user bears this risk alone.
The hedge trimmer may only be used for cutting hedges, bushes and shrubs. Any other use not specified in these usage instructions may damage the trimmer or cause severe injuries to the user and is therefore explicitly prohibited from the list of possible uses.
The machine must not be used for commercial, technical or industrial applications.
If you are not sure whether working conditions are safe or unsafe, do not work with the machine.
WARNING! For your own safety, please thoroughly read this manual and the general safety instructions before turning the machine on. If you give the machine to third parties, always include these instructions.
Please observe that our equipment was not designed with the intention of use for commercial or industrial purposes. We assume no guarantee if the equipment is used in commercial or industrial applications, or for equivalent work.
Safe work
Read and observe the following instructions and the safety instructions valid in the respective country before commissioning these products in order to protect yourself and others from possible injuries.
Always store these safety instructions (operating manual) together with the hedge trimmer.
The hedge trimmer may only be operated by persons with sufficient experience.
Only give or lend the hedge trimmer to persons who are familiar with the hedge trimmer and its handling. Always provide the operating manual.
Repairs to the device must be done by the manufacturer or companies named by them.
First-time users
Anyone working with the hedge trimmer for the first time must receive practical instruction in the use of the hedge trimmer and the personnel protective equipment from an experienced operator.
- Remain attentive. Pay attention to what you are doing. Remain sensible when working. Do not use the device while tired or under the influence of drugs, alcohol or medication. A moment of in-attention while operating power tools may result in serious personal injury.
- Familiarise yourself with the device with the help of the operating manual before use. Inadequately informed operators can endanger themselves and others through improper use.
- Do not use the device for purposes for which it is not intended (see "Proper use").
- Avoid abnormal posture. Make sure that you have secure footing and always maintain your balance. This is especially true when using a stepladder or ladder.
-
Wear suitable work clothing:
-
Do not wear loose clothing or jewellery, which can become entangled in moving parts
- Wear gloves and non-slip footwear
-
Wear a hair net if you have long hair
-
Wear personal protective equipment:
- Hearing protection
- Safety goggles or face protection
- Work gloves
- Safety shoes
- Safety helmet approved in situations where head injuries are to be expected.
- We recommend wearing leg protection and a safety jacket.
- Keep the work area orderly! Disorder can lead to accidents.
• Take environmental influences into account:
- Do not expose the hedge trimmer to rain.
- Do not use the hedge trimmer in a damp or wet environment.
- Reschedule work in the event of adverse weather (rain, snow, ice, wind), increased risk of accidents!
- Ensure good lighting.
- Do not use the hedge trimmer in the vicinity of combustible fluids or gases.
- Familiarise yourself with your environment and pay attention to possible hazards that you may not hear due to the noise from the motor.
- Never leave the hedge trimmer running unattended.
- When taking a break, the hedge trimmer must be set down in such a way that no one is endangered. Secure the hedge trimmer from unauthorised access.
- Persons under the age of 18 may not operate the device.
- Keep other persons away.
- The user is responsible for all accidents and hazards that occur to other people and their property.
- The operator is responsible for third parties in the area of operations.
- Keep away from children.
- Do not allow other persons, especially children, to touch the tool or the motor. Keep them away from your work area.
- Do not use blunt, cracked or damaged cutting devices.
- Only start cutting when the cutting device is running.
- Do not overload the machine! They work better and more safely in the specified output range.
- Only operate the device with the protective devices fully and correctly attached and do not change anything on the machine that could affect safety.
- Do not modify the device or parts of the device.
-
Do not use any cutting device which does not correspond to the characteristics specified in this user manual. The use of other tools and other accessories may result in a danger of injury.
-
Switch the machine off and remove the spark plug connector from the spark plug:
- In the event the hedge trimmer makes contact with soil, stones, nails or other foreign objects, check whether the device is damaged.
- Repair work
- Maintenance and cleaning work
- Rectification of faults (this also includes blocking of the cutting device)
- Transport and storage
- Leaving the hedge trimmer (even with brief interruptions)
• Take care of your hedge trimmer:
- Keep tools sharp and clean in order to be able to work better and more safely.
- Keep the handle dry and free of oil and grease.
- Follow the maintenance instructions.
- Check the machine for potential damage:
- Protective devices must be carefully inspected to ensure that they are fault-free and function as intended prior to continued use of the machine.
- Check whether the moving parts function faultlessly and do not jam or whether parts are damaged. All parts must be correctly mounted and all conditions must be fulfilled to ensure fault-free operation of the hedge trimmer.
- Damaged protective devices and parts must be repaired properly or replaced by a recognised specialist workshop unless otherwise specified in the usage instructions.
-
Damaged or illegible safety stickers must be replaced.
-
Do not leave a tool key inserted! Before switching on, always make sure that keys and adjusting tools are removed.
- Store unused devices in a dry, locked place and out of reach of children.
- Do not carry out any repairs on the machine unless you are trained to do so. Do not carry out any repairs to the machine other than those described in the "Maintenance" chapter, contact the manufacturer or the responsible customer service directly.
Repairs to the other parts of the machine must be done by the manufacturer or their customer service centre.
Only use original spare parts. The use of other spare parts and accessories may result in accidents for the user. The manufacturer is not responsible for damage resulting from this.
Safe use of fuels
Fuels and fuel vapours are flammable and can cause severe damage to the skin or when inhaled. Caution is therefore advised when using fuel and ensure good ventilation.
- Switch off the motor and allow the device to cool before refuelling the hedge trimmer.
- Do not smoke and avoid naked flames when refuelling.
- Wear gloves when refuelling.
- Do not refuel in enclosed spaces (risk of explosion).
- Ensure that you do not spill fuel or oil. Clean the hedge trimmer immediately if you spill fuel or oil. Change your clothes immediately if you spill fuel or oil on them.
• Make sure that no fuel gets into the soil.
- Carefully seal the tank plug immediately after refuelling and ensure that it does not become loose during operation.
- Ensure that the tank cover and fuel lines are tight. If the event of leaks, the device must not be operated.
- Only transport and store fuels in approved and labelled containers.
- Keep children away from fuels.
- Do not transport and store fuels in the vicinity of flammable or easily flammable substances as well as sparks or naked flames.
- Move at least three meters away from the refueling area before starting the device.
- To reduce the risk of fire, keep the motor and silencer free of cutting waste, leaves and lubricants!
Residual risks
Even when used as intended, there may still be residual risks due to the design determined by the intended use, despite compliance with all relevant safety regulations. Residual risks can be minimised if the "Safety Instructions" and the "Intended Use" together with the operating manual as a whole are observed. Consideration and caution lower the risk of personal injuries and damage.
- Injury due to ejected parts.
- Breakage and ejection of blade pieces.
- Danger of carbon monoxide poisoning when using the device in enclosed or poorly ventilated spaces.
- Danger of burning if hot components are touched.
- Impairment of hearing in the event of prolonged work without hearing protection.
Furthermore, despite all precautions having been met, some non-obvious residual risks may still remain.
6. Technical data
| Type of engine | 2-stroke engine - air-cooled |
| Displacement 22.5 cm | 3 |
| Motor power 0.65 kW | |
| Idle speed n_0 | 3000 ± 300 min^-1 |
| Max. motor speed 10500 min | -1 |
| Tank contents 0.26 l | |
| Mixture ratio (fuel/two-stroke oil) | 40:1 |
| Cutting length 560 mm | |
| Max. cutting thickness 27 mm | |
| Dimensions L x W x H 1100 x 245 x 200 mm | |
| Blade length 600 mm | |
| Weight 5.0 kg | |
Technical changes reserved!
Information about noise level measured in accordance with applicable standards:
Sound pressure L_pA = 99.5 dB(A)
Sound power L_WA = 105.5 dB(A)
Measurement uncertainty K_pA = 3 dB(A)
Wear hearing protection.
Excessive noise can result in a loss of hearing.
Vibration (front handle) A_hv = 3.3 m/s^2
Vibration (rear handle) A_hv = 3.8 m/s^2
Measurement uncertainty K_hv = 1.5 m/s^2
7. Before commissioning
The hedge trimmer is not filled with the fuel mixture when delivered.
Fill the hedge trimmer as described under "Refueling".
Refuelling
- The device is operated with a mixture of normal petrol (unleaded) and two-stroke motor oil.
Pay extra attention when handling petrol.
Smoking and naked flames are not permitted (risk of explosion).
Petrol:
Octane rating of at least 91 ROZ, unleaded
- Do not fill with leaded, diesel or other non-permissible fuels.
- Do not use petrol with an octane rating of less than 91 ROZ. This can result in severe damage to the motor due to increased motor temperatures.
- If working continuously in the high speed range, petrol with a higher octane rating should be used.
- The use of unleaded petrol is recommended for environmental reasons.
Two-stroke motor oil:
In accordance to the specification JASO FC or ISO EGD
Do not use
- four-stroke oil or two-stroke for water-cooled outboard motors.
- a premixture from petrol stations.
The mixture
Mixing ratio 40:1
Petrol two-stroke motor oil 2.5% (40:1)
1 litre 0.025 litres
2 litres 0.05 litres
5 litres 0.125 litres
10 litres 0.25 litres
- Ensure that the oil quantity measurements are precise as with low amounts of fuel a slight deviation in the oil quantity can have strong effects on the mixing ratio.
- Do not change the mixing ratio as this increases combustion residues, increases fuel consumption and reduces performance, or damages the motor.
Mix the petrol and oil in a clean container approved and labelled for petrol. Use a fuel container with overfill protection.
- First, fill with half of the petrol required for the mixture.
- Then fill with the entire amount of oil.
- Shake the fuel mixture.
- Fill with the rest of the petrol.
Fuels only have a limited shelf life as they age. Expired fuels and fuel mixtures can result in start problems. Therefore only mix as much fuel as required for one months use. Only store fuels in approved and labelled containers. Store the fuel container in a dry and safe place.
Make sure that the fuel container cannot be reached by children when stored.
Attention! Before commissioning, find out how to take the device out of operation in an emergency!
Refuelling the hedge trimmer
- Switch off the engine and allow it to cool!
- Wear safety gloves!
- Avoid skin and eye contact!
-
Always observe, "Safe use of fuel".
-
Only refuel the hedge trimmer outdoors or in sufficiently ventilated rooms.
- Clean the area surrounding the filling area. Impurities in the tank lead to operational faults.
-
Before refuelling, shake the container with the fuel mixture.
-
Carefully open the tank plug (12) so that any possible overpressure can be relieved.
- Carefully fill the petrol mixture up to the lower edge of the filler neck.
- Close the tank plug again. Ensure that the tank cap is tightly sealed.
- Clean the tank cap and the surroundings.
- Check the tank and fuel lines for leaks.
- Press the fuel pump (11) if necessary.
- Move at least three meters away from the refueling area before starting the engine.
8. Attachment and operation
You may not put the device into operation before this operating manual is read, have observed all the specified notes and the device is fully and properly assembled!
- Ensure that the On/Off switch (6), the throttle interlock (7), and the throttle (14) are functioning properly.
- You may only start the hedge trimmer when it is fully assembled.
- Support the hedge trimmer when starting it and hold it firmly. Ensure that the cutting device is free.
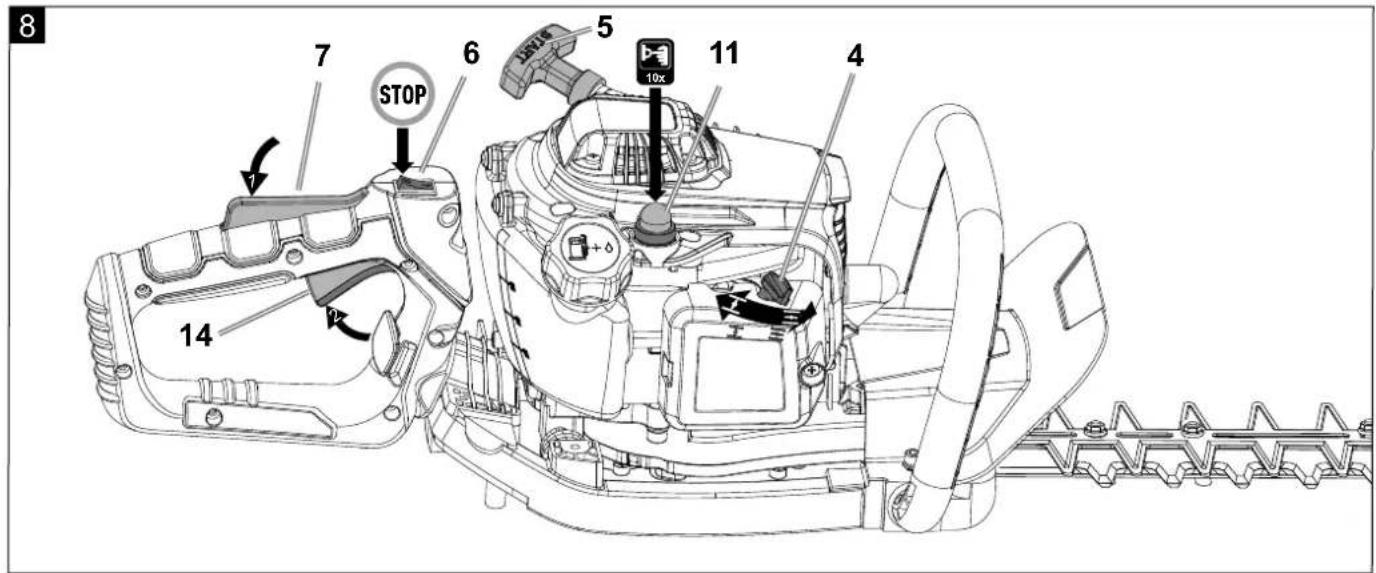
To start the hedge trimmer:
- Keep your distance from flammable materials.
- Take up a firm stance.
- Place the hedge trimmer carefully on the floor, point the cutting device away from the body.
- Place the right toe in the rear handle.
- Grip the front hand guard with the left hand.
Starting the motor when cold
- ATTENTION: The switch (6) is an auto-return switch and always returns to the "ON" starting position after release.
- Carefully press the fuel pump (11) several times until fuel gets into the pump.
- Push the start lever (choke) (4) to “Cold start”.
- Now pull the starter cable on the starter handle (5) out slowly up until there is resistance.
- Now pull the start pull cord (5) and the engine should start. If the engine does not start, repeat the process. As long as the cold start lever (choke) (4) is pulled out (N), the engine will run for only a short time and then stop.)
- As soon as the motor has stopped, actuate the throttle interlock (7) and the throttle (14) together. The cold start (choke) lever (4) will automatically spring back to the "warm start" operating position.
- Now pull the start pull cord (5) again and the motor should start.
Stopping the motor
- Release the throttle (14).
- Switch the on/off switch (6) to the off "0" position.
ATTENTION: The switch (6) is an auto-return switch and always returns to the "ON" starting position after release.
Starting the motor when warm
- Switch the on/off switch (6) to the on "I" position.
- Push the start lever (choke) (4) to “Warm start and working”.
- Now pull the starter cable on the starter handle (5) until the motor starts up.
Throttle interlock:
- Hold the hedge trimmer by the rear handle (15) and press the throttle interlock (7).
- Use the other hand to grab the front handle (3).
- Press the throttle (14).
- The cutting device starts running.
If the throttle is released, the cutting device stops and the motor idles.
If the cutting device is running despite the throttle not be pressed, the idle speed must be lowered. (See "Maintenance")
Settings on the hedge trimmer
Adjusting the rear handle (15)
The rear handle can be adjusted in 3 working positions in order to guide the hedge trimmer easier.
- While adjusting, the throttle (14) cannot be actuated.
- Use the left hand to hold the hedge trimmer tight by the front handle (3).
- Press the slider (13) and turn the handle into the required position.
- Release the slider (13). Ensure that the unlocking device re-engages and the handle is affixed securely.
9. Working instructions
Before commissioning and regularly while working with the hedge trimmer, carry out the following checks:
- Is the hedge trimmer fully and properly assembled? Ensure that all nuts and screws are tightened.
- Screws of the cutting device: See maintenance
- Is the hedge trimmer in a good and safe condition?
- Are all safety functions working?
• Is the fuel tank filled?
- Is the cutting device undamaged and sharpened?
-
Are the motor and silencer free of deposits, leaves or escaping lubricant?
-
Is the handle clean and dry, free of oil, grease and resin?
• Is the workplace free of trip hazards?
- Are you wearing the required protective equipment?
- Have you read and understood all the safety instructions?
- Is the throttle easy to access and functional?
• Is the On/Off switch functional?
- Does the cutting device always remain still when idling?
If the cutting device moves when idling, the idle speed must be reduced (see "Setting the idle speed").
- Make sure that the transmission is sufficiently lubricated (see "Maintenance").
General behaviour when working with the hedge trimmer
- Do not work alone. Someone should be within reach for emergencies.
- Keep children, persons and animals away from your work area (at least 15 m).
- Do not work on snow, ice or other slippery surfaces, risk of slipping.
- Do not work when the light conditions are insufficient (e.g. fog, rain, driving snow or twilight).
- Shoo animals away from the hedge before cutting so they are not injured.
- Make sure that you have a safe and tidy workplace. Remove objects which could be ejected from the work area.
- Avoid abnormal posture. Keep your balance at all times. Do not work with your upper body bent over.
- Only operate the hedge trimmer with firm footing.
- Switch the hedge trimmer off when changing location.
- Keep hands and feet away from the cutting device if it is moving.
- Hold the hedge trimmer so that no exhaust gases can be breathed in. Do not work in enclosed spaces.
- Do not use the hedge trimmer to lift or shovel away pieces of wood or other objects.
- Make sure to remove any foreign objects from the hedges (e.g. wire), since it may damage the cutting device of the hedge trimmer.
- Always hold the hedge trimmer tightly with both hands, left hand on the front handle and the right hand on the rear handle. Never work with only one hand.
- If the throttle is released, the cutting device continues to run for a short time (freewheel effect).
- Start cutting with the cutting device running.
- Never touch the cutting device with your hands during operation.
- Never work
- with your arms stretched
- in hard to reach places
- leaning too far forward
- Never work with the hedge trimmer above shoulder height.
- Never touch wire fences or the floor with the running cutting device.
- Switch the motor off and pull out the spark plug
- If there are any noticeable changes in the behaviour of the device
- To eliminate jammed material to be cut
- To check the cutting device if you hit any stones, nails, or other hard objects with it.
- To eliminate faults
- With breaks in work
- Before leaving the hedge trimmer
- Do not place the hedge trimmer which is hot directly onto dry grass or other flammable objects.
- Before starting work, make sure that:
- There are no other persons or animals in the work area.
- An obstacle free path to the rear is available for you.
- The floor is free from all foreign bodies, brushwood and branches.
- You have firm footing.
If people with blood circulation disorders are exposed to vibrations too often, damage to the nervous system or blood vessels can occur.
You can reduce the vibrations:
- With strong, warm work gloves.
- Shortening the work time (take several long breaks).
See a doctor if your fingers swell up, you feel unwell or your fingers go numb.
Working with the hedge trimmer
Hold the hedge trimmer at a safe distance away from your body with two hands.
- The maximal diameter to cut depends on the wood's type, age, moisture and hardness.
- Therefore cut very thick branches using branch shears to your desired length before trimming the hedge.
- Thanks to the its double-sided cutting unit, the hedge trimmer can be moved forward and backward or from one side to the other swinging it back and forth.
- Cut the sides of the hedges first and then the top edge.
- Cut the hedges from bottom to the top.
- Cut the hedges in trapezium shape. This prevents the lower hedge area from becoming bare due to insufficient light.
- Stretch a guide over the complete length of the hedge when you want to shorten the upper edge of the hedge evenly.
- Trim in several passes if you have to cut down a large portion of the hedge.
The right time to cut:
- Leaf hedge: June and October
• Conifer hedge: April and August
- Fast growing hedge: around every 6 weeks from May
Pay attention to nesting birds in the hedge. Delay the hedge cut or leave this area out if this is the case.
Always observe all safety instructions.
10. Maintenance
Before any maintenance and cleaning work
- Shut off engine
- Wait until the cutting device is at a standstill
- Remove the spark plug connector (except for idling adjustments)
Do not carry out maintenance work in the vicinity of naked flames. Risk of fire!
Further maintenance and cleaning work, as described in this chapter, may only be carried out by customer service.
Safety devices removed for maintenance and cleaning must always be properly reattached and checked.
Only use original parts. Other parts may cause unforeseeable damage and injuries.
Wear gloves in order to prevent potential injuries. In order to ensure reliable use of the hedge trimmer for a long time, carry out the following maintenance work on a regular basis.
Check the hedge trimmer for obvious defects such as
- loose fastenings
- worn or damaged components
- bent, broken or damaged cutting device
- Tank plug and fuel lines for leaks
Check the hedge trimmer after every use
- Wear, especially sliding clearance of the cutting device.
- covers or protective devices correctly mounted and intact.
Necessary repairs or maintenance work is carried out before using the hedge trimmer.
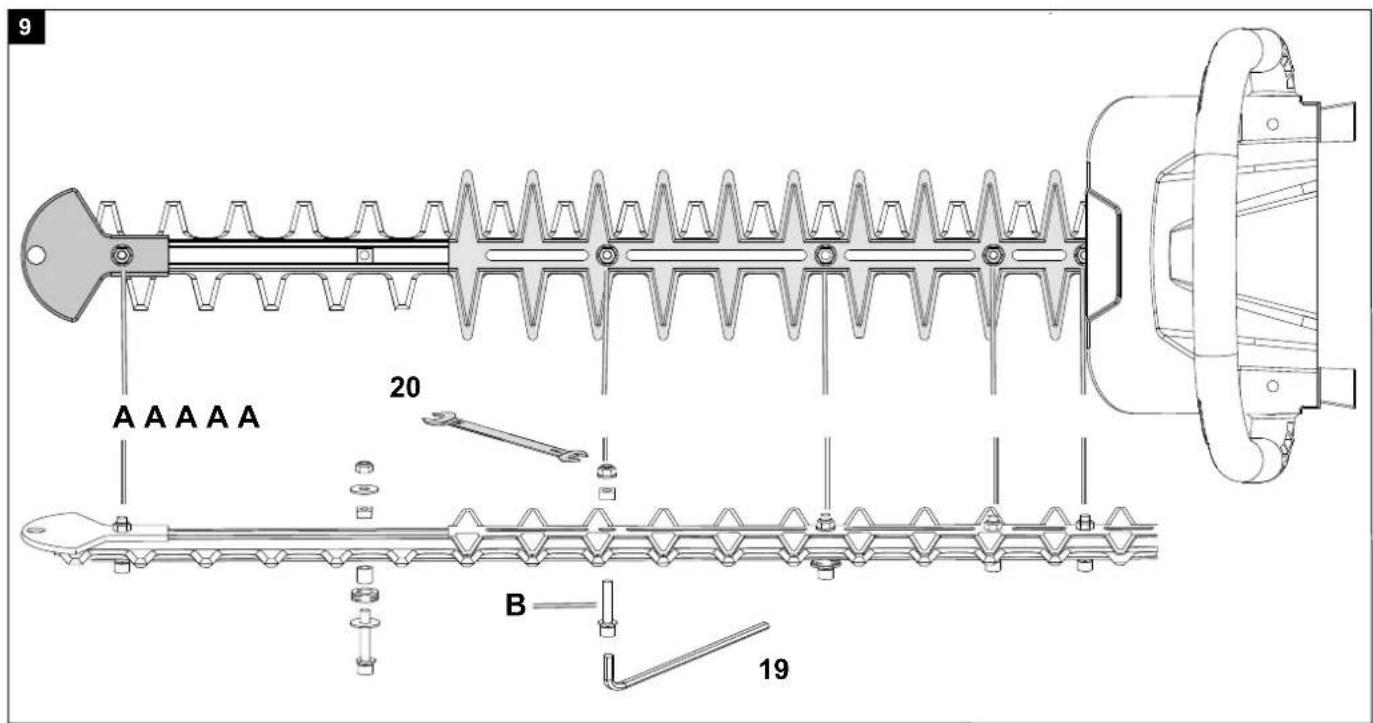
Adjusting the cutting device (Fig. 9)
Readjust the sliding clearance if material to be cut is jammed between the cutters or the play has increased due to normal wear of the cutting device after prolonged use.
In order to achieve good cutting results, the sliding clearance between the cutting edges and the blade must be adjusted correctly.
Proceed as follows:
- Loosen the nuts (A) on the top of the cutting device.
- Tighten the screws (B) on the bottom slightly (loosen them slightly beforehand if necessary).
- Turn the screw back by a quarter to a half turn anti-clockwise.
- Hold the screw with the screwdriver and tighten the nuts tight.
The sliding clearance is adjusted correctly when the washer beneath the screw head can be moved back and forth a little by hand.
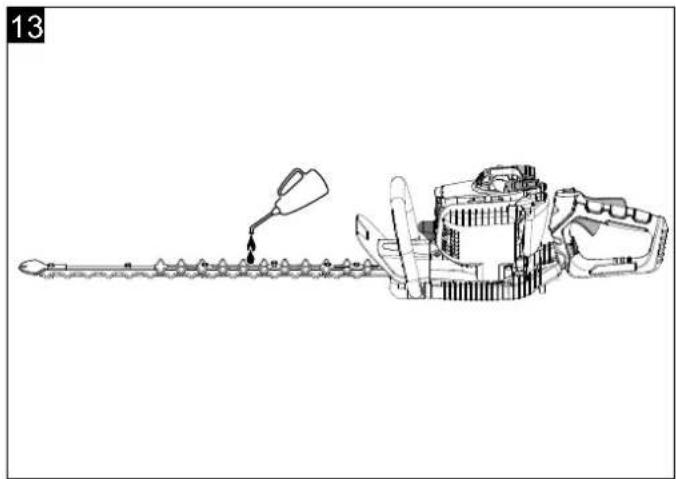
- Lubricate the cutting device using environmentally friendly lubricating oil.
Not enough sliding clearance results in strong heat development and thus damage to the device.
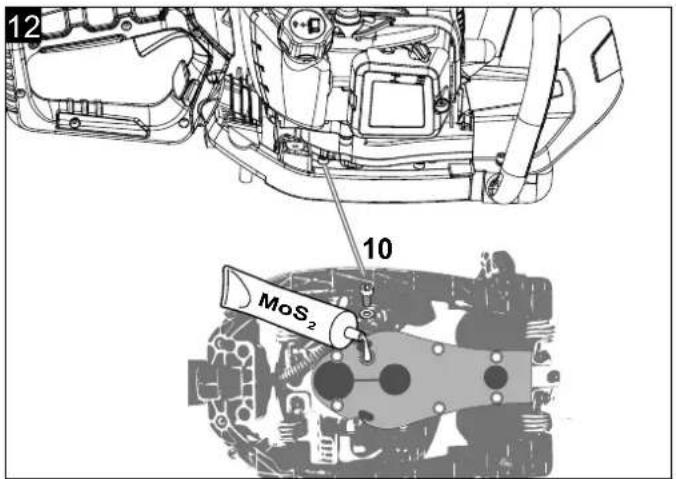
Lubricate transmission
Lubricate the transmission every 20 operating hours.
- Apply the grease gun to the grease nipple (10).
- Squeeze some grease into it.
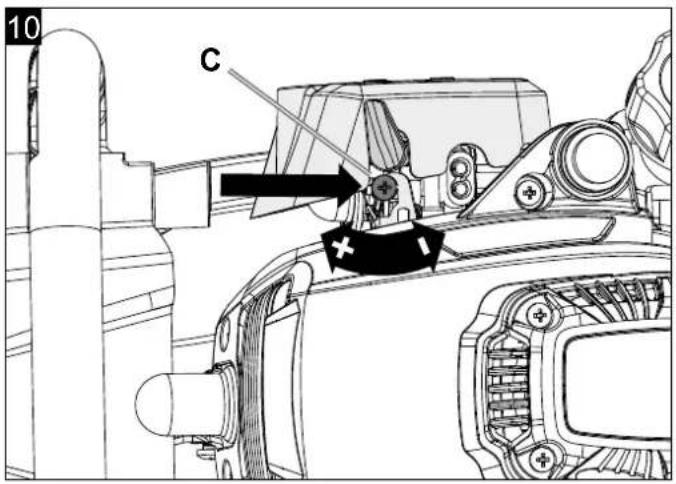
Adjusting the idle speed (Fig. 10)
If the cutting device continues to run when idle, the idle speed must be corrected.
-
Let the motor warm up for 3-5 minutes (no high motor speeds!).
-
Turn the set screw (C):
Clockwise
- Idle speed increases (+)
Counter clockwise
- Idle speed decreases (-)
Contact the manufacturer if the cutting device still continues to run with the motor at idle.
Do not work with the hedge trimmer again under any circumstances!
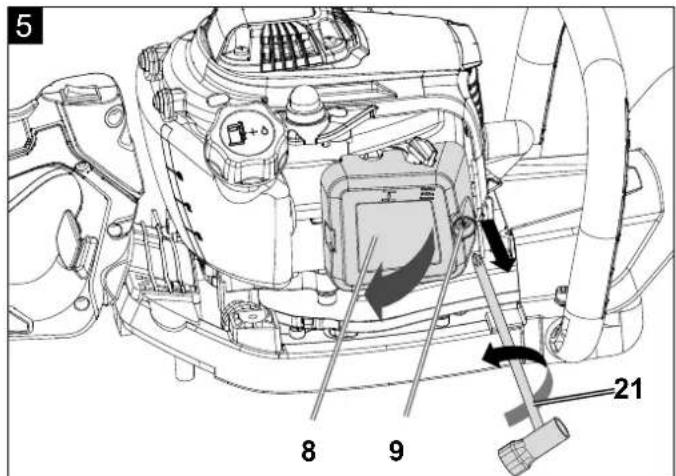
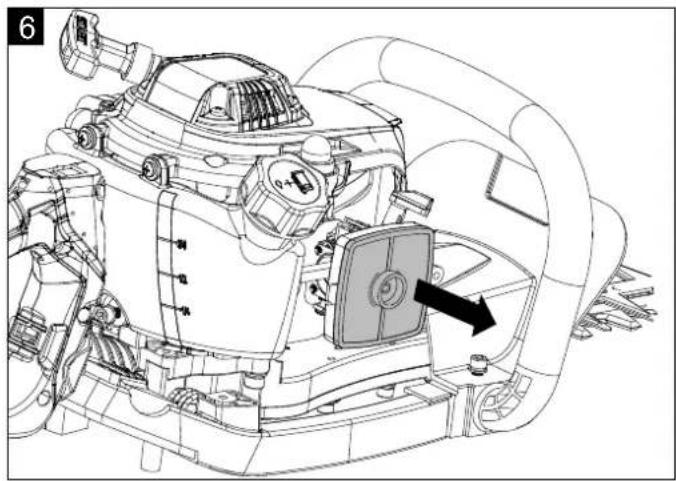
Cleaning or replacing the air filter (Fig. 6)
Clean the air filter of dust and dirt regularly to avoid
- starting difficulties,
- performance losses,
- too much fuel consumption.
Clean the air filter approx. every 8 operating hours, more often in particularly dusty conditions.
- Set the start lever (choke) (4) to "Cold start" so that no particles of dirt get into the carburettor.
- Remove the air filter cover (8).
- Remove the air filter (D) from the foam.
- Wash the air filter in lukewarm soapy water. Do not blow out the particles of dirt, there is a danger of eye injuries!
- Clean the inside of the air filter with a brush.
- Allow the air filter to dry and reinsert it again.
- Attach the air filter cover again.
Replace the air filter regularly.
Damaged air filters must be replaced immediately.
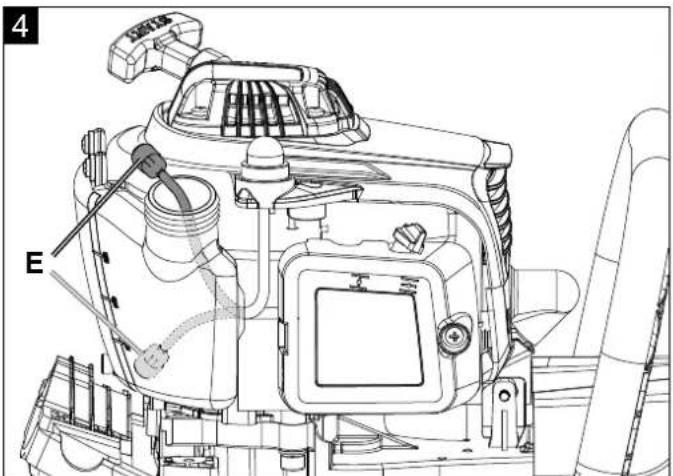
Clean or replace the fuel filter
Check the fuel filter (E) if necessary. A contaminated fuel filter hinders the fuel supply.
Open the tank cover (12) and pull the fuel filter through the opening using a wire hook.
• Light contamination
- Remove the fuel filter from the fuel line and clean the filter in cleaning solvent
• Heavy contamination
- Replace the fuel filter
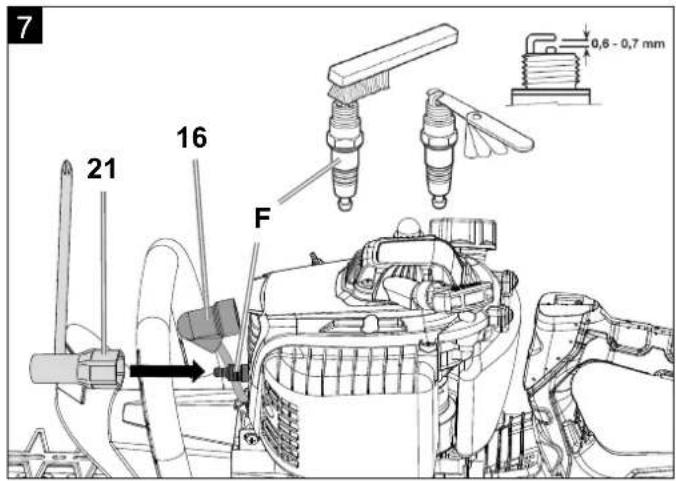
Clean or replace the spark plug
(Fig. 2/7)
Do not touch the spark plug (F) or the spark plug connector (16) while the motor is running. High voltage! Danger of burning if motor is hot. Wear safety gloves!
Check the spark plug and the gap of the electrodes regularly.
Proceed as follows:
- Remove the spark plug connector from the spark plug.
- Unscrew the spark plug with the supplied spark plug wrench.
The electrode gap must be 0.6 to 0.7 mm.
Clean the spark plug if it is contaminated.
Replace the spark plug:
- Once a month in the event of regularly use
- If the insulating body is damaged
- In the event of heavy electrode erosion
- In the event of heavily contaminated or oily electrodes
Checking the ignition spark (Fig. 2, 7)
- Remove the spark plug connector from the spark plug.
- Unscrew the spark plug with the supplied spark plug wrench.
- Unscrew the spark plug.
- Insert the spark plug connector firmly.
- Push the spark plug against the motor housing using insulated tongs (not in the vicinity of the plug hole).
- Slide the on/off switch to the on "I" position.
- Pull the start cable firmly by the starter handle. A spark must be visible between the electrodes when functioning properly.
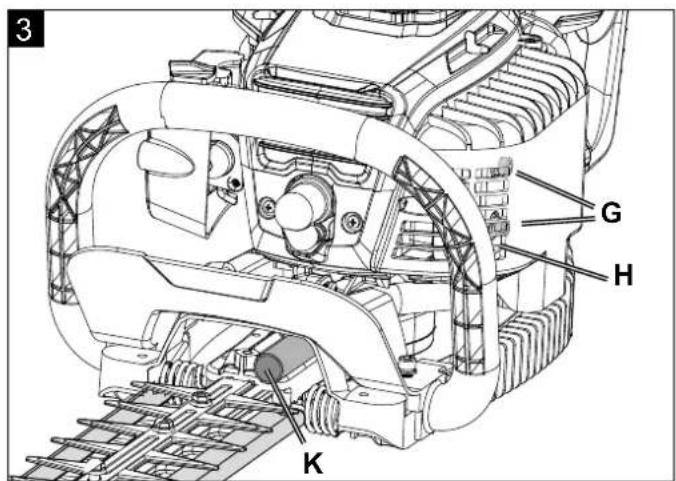
Silencer / outlet opening (Fig. 3)
Do not retighten the silencer screws if the motor is still hot.
- Regularly check whether the screws (G) of the silencer (H) have come loose or not. If they are loose, tighten them hand-tight.
- Clean the outlet opening (K) regularly.
Care
Clean the hedge trimmer carefully after each use so that it keeps functioning properly.
Wear protective gloves when cleaning the cutting device!
- Clean the housing with a soft brush or a dry cloth. Water, cleaning agents and polish must not be used.
- Ensure that the ventilation slots for cooling the motor are free (danger of overheating).
- Clean the cutting device regularly with a brush or a cloth.
- Never clean the cutting device with water
- Danger of corrosion!
- Clean and oil all moving parts regularly.
- Never use grease!
- Use environmentally friendly oil.
Maintenance plan
Activity - Maintenance interval
Adjusting the cutting device - as required
Adjusting the idle speed - as required
Tightening the silencer screws - as required
Cleaning / replacing the fuel filter - as required
Cleaning / replacing the air filter, every 8 operating hours (more often in dusty conditions)
Lubricating the transmission, every 20 operating hours, at least once a year
With this product, it is necessary to note that the following parts are subject to natural or usage-related wear, or that the following parts are required as consumables.
Wearing parts*: Cutting blade, spark plug, air filter, fuel filter
* may not be included in the scope of supply!
Spare parts and accessories can be obtained from our service centre. To do this, scan the QR code on the cover page.
11. Storage and transport
Storage
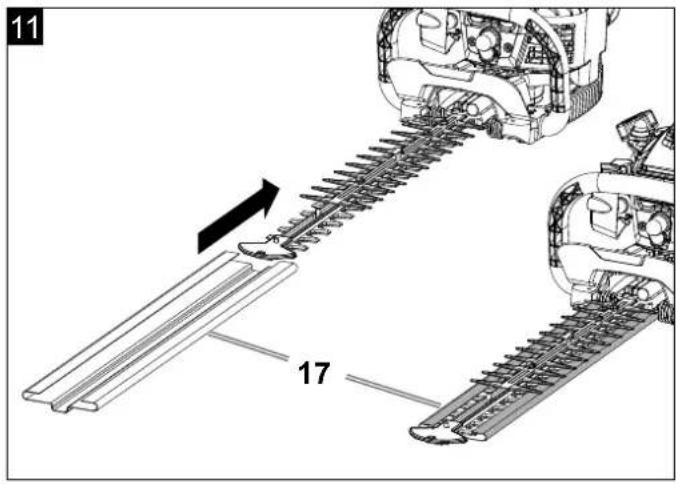
Store unused devices with the blade guard pushed on in a dry, locked place and out of reach of children.
Before long-term storage, observe the following in order to increase the service life of the hedge trim-mer and ensure smooth operation:
- Carry out a thorough cleaning.
- Treat all moving parts with environmentally friendly oil.
- Do not use grease.
- Slide the blade guard onto the cutting device.
- Remove the spark plug connector.
• Empty the fuel tank completely.
- Dispose of the remaining fuel properly (environmentally friendly).
- Run the carburettor empty.
Transport
To transport the device, switch the motor off, wait until the cutting device has come to a standstill and attach the blade guard.
Carry the device by the front handle. Hold the cutting device backwards and keep the hot silencer away from your body.
Only transport the device in the boot of the car or a separate transport surface.
Secure the hedge trimmer against tipping, damage and from fuel leaking.
12. Disposal and recycling

plastics. Take defective components to special waste disposal sites. Check with your specialist dealer or municipal administration!
13. Troubleshooting
| Fault Possible cause Remedy |
| Hedge trimmer does not run • No fuel• Fault in the fuel line• Fuel filter clogged• Spark plug is defective• Carburettor defective• Internal fault | • Check the fuel quantity• Check the fuel line for kinks or damage• Clean or replace the fuel filter.• Replace spark plug• Contact the manufacturer or the responsible customer service point• Contact the manufacturer or the responsible customer service point | |
| Hedge trimmer cuts with interruptions | • Internal fault• On/off switch defective | • Contact the manufacturer or the responsible customer service point• Contact the manufacturer or the responsible customer service point |
| Motor runs, cutting device remains stationary | • Cutting device blocked• Internal fault• Clutch defective | • Remove object• Contact the manufacturer or the responsible customer service point• Contact the manufacturer or the responsible customer service point |
| Cutting device gets hot • No lubrication → friction• Not enough sliding clearance• Cutting device is blunt | • Oiling the cutting device• Adjust the sliding clearance• Have the cutting device sharpened | |
Günzburger Straße 69
D-89335 Ichenhausen
Cher client,
Günzburger Straße 69
89335 Ichenhausen, Germania
Egregio cliente,
Standard references:
EN ISO 10517:2019; EN ISO 14982:2009
This declaration of conformity is issued under the sole responsibility of the manufacturer.
Apparent defects must be notified within 8 days from the receipt of the goods. Otherwise, the buyeris rights of claim due to such defects are invalidated. We guarantee for our machines in case of proper treatment for the time of the statutory warranty period from delivery in such a way that we replace any machine part free of charge which provably becomes unusable due to faulty material
or defects of fabrication within such period of time. With respect to parts not manufactured by us we only warrant insofar as we are entitled to warranty claims against the upstream suppliers. The costs for the installation of the new parts shall be borne by the buyer. The cancellation of sale or the reduction of purchase price as well as any other claims for damages shall be excluded.
Garantie FR