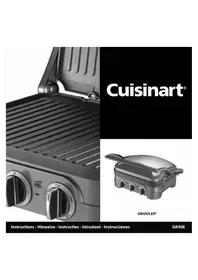
Griddler Elite GR47E - Grill plate CUISINART - Free user manual and instructions
Find the device manual for free Griddler Elite GR47E CUISINART in PDF.
User questions about Griddler Elite GR47E CUISINART
0 question about this device. Answer the ones you know or ask your own.
Ask a new question about this device
Download the instructions for your Grill plate in PDF format for free! Find your manual Griddler Elite GR47E - CUISINART and take your electronic device back in hand. On this page are published all the documents necessary for the use of your device. Griddler Elite GR47E by CUISINART.
USER MANUAL Griddler Elite GR47E CUISINART
natural_image
Modern stainless steel grater with a flat-screen menu and side grates (no visible text or symbols)GRIDDLE ELITE®
GR47E
Q162a
Cuisinart®

natural_image
Line drawings of three different household accessories: open suitcase, pairless eyeglasses, and flatboard (no text or symbols)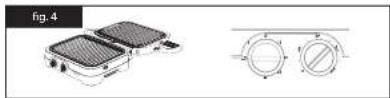
SOMMAIRE
B. INSTALLING THE COOKING PLATES .....11
C. USAGE INSTRUCTIONS ..... 11
D. USE 11
E. DR/P TRAY 12
- Advice from the chefs ..... 12
-
Cooking and storage ..... 10
-
Cleaning and storage 12
- Questions and answers 13
International Guarantee 04
INHALT
- CAUTION: Very hot surface. The temperature of accessible surfaces may be high when the appliance is in use. Do not touch the appliance when in use. Use oven mitts or protective gloves. Allow the unit to cool before storing.
- The grill should not be used with an external timer or with a separate remote control system.
- If the supply cord is damaged, it must be replaced by the manufacturer, its service agent or similarly qualified persons in order to avoid a hazard.
- This appliance can be used by children aged from 8 years and above and persons with reduced physical, sensory or mental capabilities or lack of experience and knowledge if they have been given supervision or instruction concerning use of the appliance in a safe way and understand the hazards involved. Children shall not play with the appliance. Cleaning and user maintenance shall not be made by children unless they are older than 8 and supervised.
- Keep the appliance and its cord out of reach of children less than 8 years.
- The appliance is intended for domestic use only and is not intended to be used in applications such as: staff kitchen areas in shops, offices, and other working environments; farm houses; by customers in hotels, motels, and other residential type environments; bed and breakfast type establishments.
-
The cleaning/scraping tool, the juice-collection tray and the plates can be washed in hot soapy water or in the dishwasher.
-
Do not place the appliance on or near a hot appliance. Do not use on heat sensitive surfaces or near inflammable materials.
- Do not put anything on the appliance when it is on.
- Leave enough space between the appliance and the walls or furniture (at least 10 cm). Do not place the appliance below wall-mounted kitchen elements.
- Do not let cord hang over the edge of the work surface and do not let it touch hot surfaces.
- Do not immerse in water or any other liquid.
- Always unplug the appliance after use and before cleaning. Never leave the appliance unattended when plugged in. Pull on the plug to unplug, never on the cord.
- Do not use the appliance if it has fallen or if it appears damaged.
- Stop using the machine immediately if the cord is damaged.
- Do not try to repair the appliance yourself.
- Using any accessories not recommended or sold by Cuisinart® may cause a fire, electrocution and risk of injury.
- Use this appliance for cooking only and follow the instructions in this manual.
- Do not use outdoors.

WARNING: The polyethylene bags over the product or its packaging may be dangerous. Keep these bags out of the reach of babies and children.
Never use them in cribs, children's beds, pushchairs or playpens. The thin film may cling to the nose and mouth and prevent breathing. A bag is not a toy.

WEEE - END-OF-LIFE ELECTRICAL AND ELECTRONIC EQUIPMENTS
In everybody's interest and to actively participate in
protecting the environment and human health:
- Do not discard your products with your unsorted household wastes.
- The WEEE (wastes of electrical and electronic equipments) must be collected separately.
- Use the return and collection systems dedicated to the WEEE available in your area. In this way, some materials can be recycled, re-used or recovered.
- By ensuring this product is disposed of properly, you will help prevent potential negative consequences for the environment and human health due to possible content of hazardous substances.
For more detailed information about the disposal of this product, please contact your local household waste disposal service.
2. INTRODUCTION
Congratulations on your purchase!
For over 30 years, Cuisinart ^® has been developing a full range of kitchen appliances that lets both passionate amateurs and great chefs express their creativity to the fullest. Every product combines sturdiness, innovation, performance and ergonomics. Made with professional materials like brushed stainless steel, our products will easily fit into any kitchen thanks to their simple and elegant design.
3. PRODUCT CHARACTERISTICS
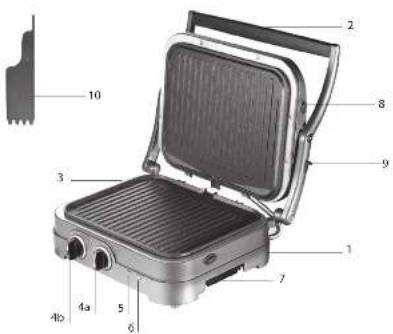
- Hard-wearing phenolic body
- Heat-insulated press handle
- Non-stick grill plates
- Adjustment buttons:
4.a. Button 0/1 and temperature setting
4.b. Timer - Red indicator light: appliance powered up and pre-heating
- Green indicator light: appliance ready for use
- Drip tray
- Button to lock/unlock the plates
9. Hinge release to open grill to flat position
10. Special grill spatula
4. USE
A. BEFORE USING FOR THE FIRST TIME
Before using for the first time, wipe the body of the appliance thoroughly, the lid and the controls with a damp cloth. Wash the plates, the drip tray and the scraping tool in hot soapy water or in the dishwasher. Refer to the section "Cleaning and Storage" for more information.
B. INSTALLING THE COOKING PLATES
- Place the appliance on a clean, flat and dry surface. The control panel should be facing you.
- Grill cooking plate: a ribbed surface which is perfect for grilling steaks, hamburgers, chicken or vegetables. Also suitable for making paninis.
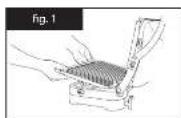
- Insert each plate into the small metal notches located at the back of the base of the appliance (fig.1) Then press gently down on the cooking plate so as to ensure that it has been correctly secured in place.
- To remove the plates, press the release button for the plates located on the side of the appliance. Then pull the plates towards you (fig.2).
C. USAGE INSTRUCTIONS
Thanks to its exclusive floating hinge, the grill lets you cook your food in the closed or in the open, flat position, this way doubling the available heating surface. Before you start to cook, select the configuration that is best adapted to your recipe.
IMPORTANT: Preheating lasts for 7 minutes. Grill preheating is complete when the green indicator light turns on.
IMPORTANT: Always attach the plates before you pre-heat the appliance.
D. USE
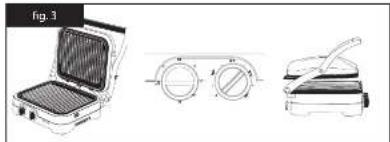
GRILL/PANINI POSITION (fig.3)
- Position the cooking plates.
- Switch on the appliance and select the desired temperature by turning the button on the right in a clockwise direction. The green light will switch on indicating that the appliance is preheated.
- When the green light turns on, indicating that the appliance has reached temperature, arrange the food on the lower plate and then close the lid. The distance between the plates will adjust automatically to the thickness of the food.
- Use the timer (left-hand button) to select cooking time.
WARNING: The timer does not have an automatic shut off device for the appliance.
BARBECUE POSITION (fig.4)
- Insert the cooking plates then open the cooking surface to the flat position by pulling the button located on the right of the handle.
- Switch on the appliance and adjust the temperature by turning the button on the right in a clockwise direction.
- When the green light switches on, arrange the food on the plates.
- Use the timer (left-hand button) to select cooking time.
WARNING: The timer does not have an automatic shut off device for the appliance.
E. DRIP TRAY
At the bottom of the appliance there is a slot for the drip tray. Fats and juices from cooking the foods flow over the plates and are collected in the drip tray.
- Slide the tray into position or to remove.
- Wait for the appliance to cool before emptying the tray.
• The drip tray can be washed in the dishwasher.
CAUTION: Every time before using, check that no grease has accumulated in the drip tray. Always remove excess grease to prevent fire and serious injury or material damage.

The fat collected is not fit for consumption.
5. ADVICE FROM THE CHEFS
- To preserve the non-stick nature of the cooking plates, do not allow them to heat up too long without food on them and do not wash the plates with abrasives.
- Use wooden or heat-resistant plastic utensils to turn food over and avoid scratching the surface.
- Cut your food into equal size pieces to ensure even cooking.
- With practice, you will become familiar with cooking times and the necessary adjustment to cook the food to your taste.
- Prepare spice- or condiment-based marinades for meats or fish, grilled food will be tasty and food cooked on the barbecue more tender.
- If you have grilled fish and shellfish on the plates, rub the plates with a cloth soaked in lemon juice. This will prevent the characteristic odour from remaining for the next dish.
6. CLEANING AND STORAGE
- After use, turn the knob to "O" and unplug the appliance. Allow to cool completely (at least a 1/2 hour) before cleaning.
- Use the spatula to remove any food residue that remains on the cooking plates.
• Empty the grease tray. - Remove the plates from the unit by pressing the release buttons.
- The cleaning/scraping tool, the drip tray and the plates can be washed in hot soapy water or in the dishwasher.
- Do not use metal objects like knives and forks, or abrasive sponges or products that could damage the coating.
-
Use a damp cloth and a little soft detergent to clean the body of the appliance, the lid and the handle. Never use abrasive sponges or products.
-
Regularly cleaning the appliance prevents build-up. The grill will then continue to be easy to clean and will perform at the same high level.
- Before storing your grill, put the plates and the drip tray back in position, close the lid then wind the cable around the hooks intended for this purpose.
7. QUESTIONS/ANSWERS
| WHAT DO I DO IF: ANSWER | |
| Smoke appears when I use the appliance for the first time? | It is normal for the appliance to release smoke when you use it for the first time. Remember to wipe it with a damp cloth before turning it on. |
| The appliance turns itself off? Make sure that the | temperature control button is not turned to the off position and that the appliance is properly plugged in. It is also possible that the appliance has overheated. Unplug the appliance and allow it to cool for at least 15 minutes. Turn it on again following the usual procedure and restart your cooking. |
| The food is not fully cooked? Make sure that the | appliance is properly plugged in and that the selected temperature is appropriate for the foods. |
| Grilled food is not cooked, cooking is difficult? Make sure that the selected temperature is appropriate for the foods. | |
| Different kinds of food need to be cooked? Use the grill in the open position (barbecue position) and cook each food on a different plate to prevent the flavours from mixing. | |
| A little cooking liquid has leaked onto the body of the appliance? | Wait until the appliance has cooled completely then wipe with a hot damp cloth. Do not immerse the base of the appliance in water. |
| It releases a great deal of smoke during cooking? | Avoid using too much grease when cooking. Grease will add to the release of smoke. Use a brush to grease dry food. |
WEEE- ELEKTRO-UND ELEKTRONIK-ALTGERÄTE
MODALITÀ GRILL/PANINI (fig.3)
7. PERGUNTAS E RESPOSTAS
ENGLISH: CUISINART guarantees easier contact with its customer services in every country. For details of the customer services in your area, call:
- Please keep this warranty card with your original proof of purchase.
Cuisinart offers you a 3-year warranty. We offer a standard exchange of the appliance (identical or equivalent) during this period. To benefit from the warranty, the original proof of purchase (sales ticket or receipt) must be attached to this warranty slip along with your full contact details. The warranty does not cover damage resulting from misuse, falls, dismantling, or repair by unauthorized persons. This guarantee in no way affects your rights under statutory law.
DEUTSCH: GARANTIE
| Version no.GR47E IB-18_442C | |
| Size: 140mm(W)X210mm(H) | |
| Material: 157gsm gloss artpaper for Cover | |
| Coating: waterbase varnishing on for whole book | |
| Color (Front): 1C+1C | |
| (Back): 1C+1C(black) | |
| Date: 08/21/19 Co-ordinator: Astor You/Scias Liu | |
| XieFaXing Des cription: E GR47E IB-18_442C OPERATOR:Song | |
| XieFaXing Code: E GR47E IB-18_442C |

natural_image
Color palette grid with grayscale squares and a solid brown bar at the bottom (no text or symbols)