
PIXMA E304 - Printer CANON - Free user manual and instructions
Find the device manual for free PIXMA E304 CANON in PDF.
| Brand | Canon |
| Model | PIXMA E304 |
| Product type | Multifunction inkjet printer (print, copy) |
| Print technology | Inkjet (FINE cartridges) |
| Maximum print resolution | 4800 x 1200 dpi |
| Ink cartridges | FINE color cartridge (PG-543?) and black cartridge (CL-544?) – refer to manual |
| Supported paper sizes | A4, Letter, 10x15 cm photo paper |
| Paper tray capacity | 60 sheets of plain paper |
| Connectivity | Wi-Fi 802.11 b/g/n, direct connection (no router) |
| Wireless functions | Print and copy via smartphone (Canon PRINT app) |
| Power supply | 100-240 V AC, 50/60 Hz |
| Power consumption | Approx. 10 W (printing), 0.6 W (standby) |
| Dimensions (W x D x H) | Approx. 426 x 145 x 306 mm |
| Weight | Approx. 3.9 kg |
| Noise level | Approx. 44 dB (silent printing) |
| Compatible operating systems | Windows (7, 8.1, 10), macOS, Chrome OS |
| Maintenance and cleaning | Print head cleaning via Canon software |
| Safety | Refer to the Safety and Important Information section of the manual |
| Spare parts and repairability | Replacement ink cartridges, power cord |
| General information | Manual available in multiple languages on notice-facile.com |
Frequently Asked Questions - PIXMA E304 CANON
User questions about PIXMA E304 CANON
0 question about this device. Answer the ones you know or ask your own.
Ask a new question about this device
Download the instructions for your Printer in PDF format for free! Find your manual PIXMA E304 - CANON and take your electronic device back in hand. On this page are published all the documents necessary for the use of your device. PIXMA E304 by CANON.
USER MANUAL PIXMA E304 CANON
Read Safety and Important Information (addendum) first.
Installing the Printer page 1
Installation de l'imprimante page 1
Connecting with Computer and Smartphone/Tablet . page 4
JaK TpImaTn npInTeP DoBikOe BiJeO
Kako držati pisač Videozapiš objasnjenjima
aaii
4y


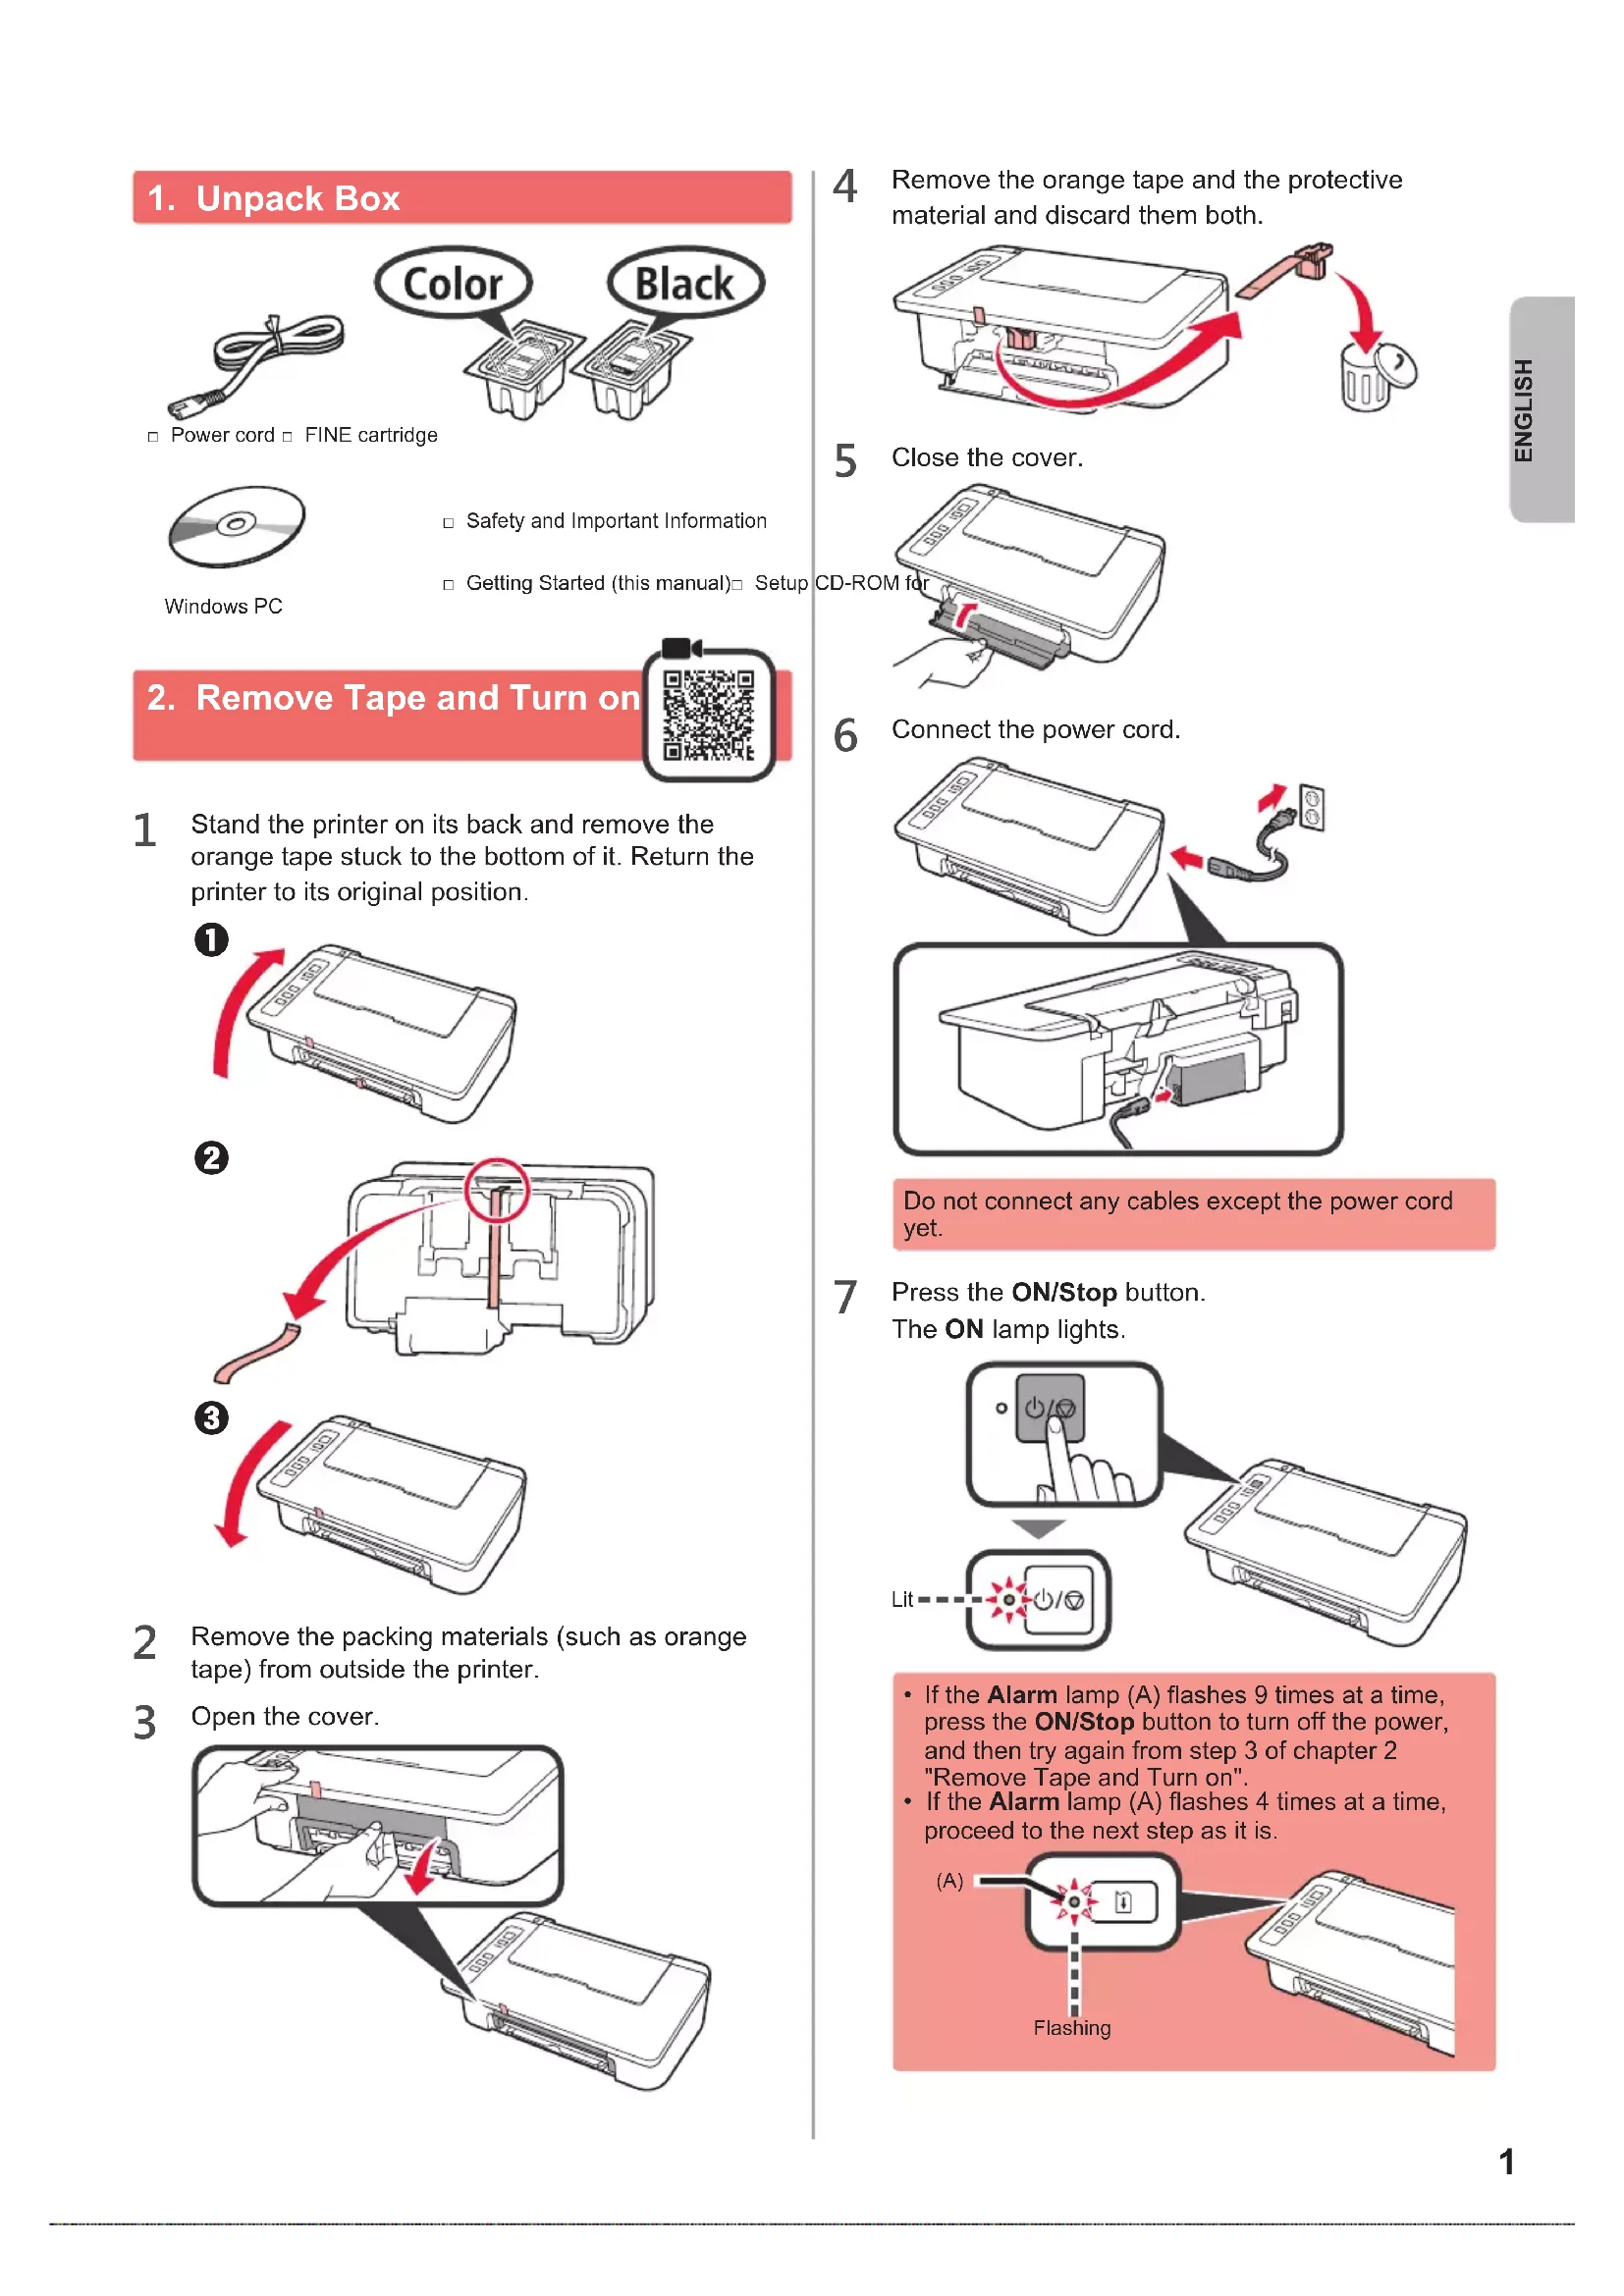
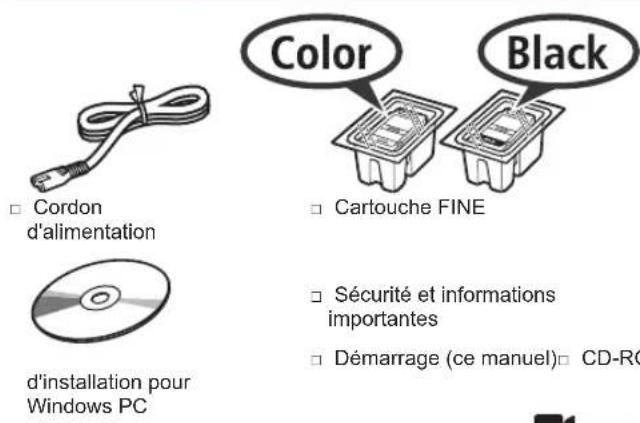
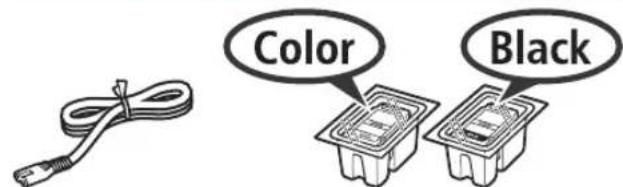
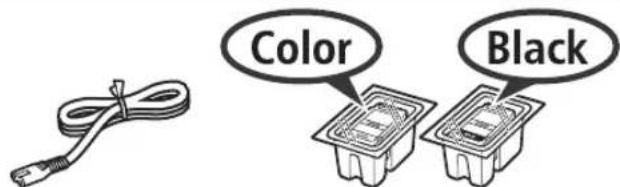
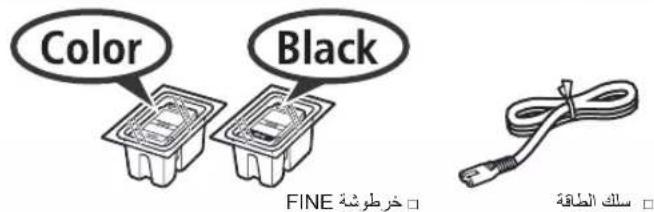
1. Unpack Box
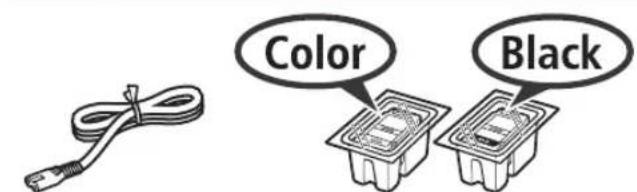
Power cord FINE cartridge

Windows PC
Safety and Important Information
Getting Started (this manual) Setup
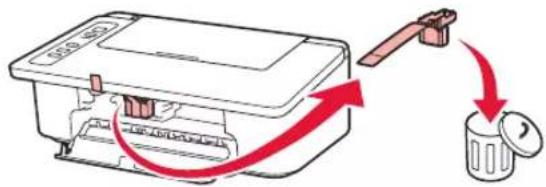
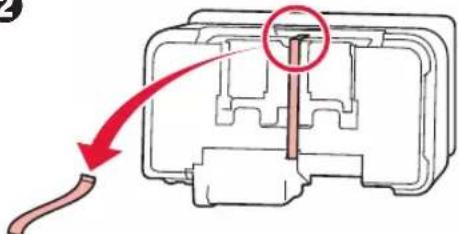
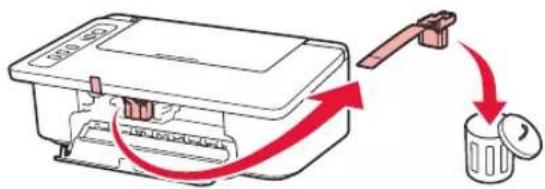
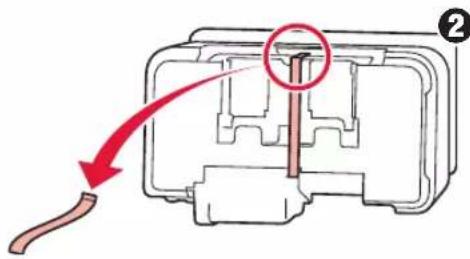
4 Remove the orange tape and the protective material and discard them both.
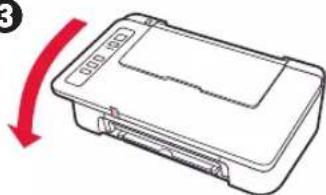
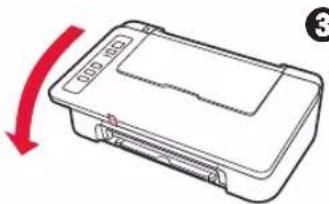
5 Close the cover.
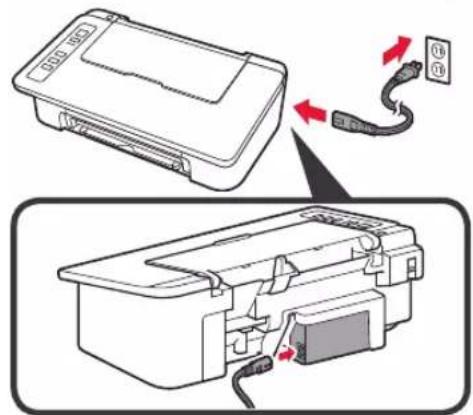
6 Connect the power cord.
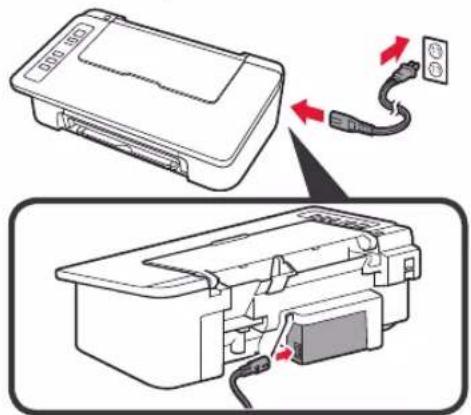
Do not connect any cables except the power cord yet.
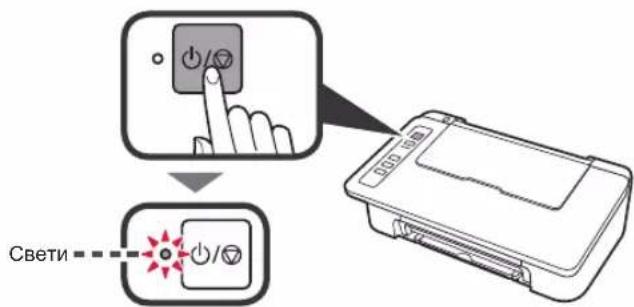
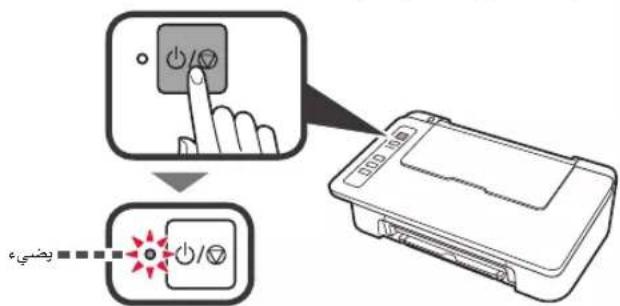
7 Press the ON/Stop button. The ON lamp lights.
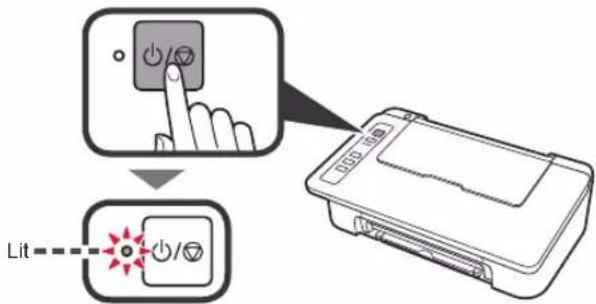
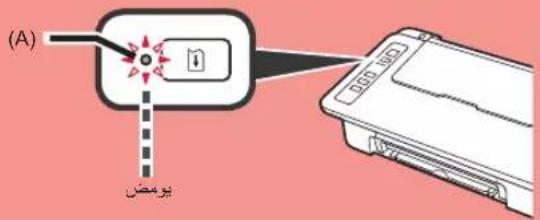
- If the Alarm lamp (A) flashes 9 times at a time, press the ON/Stop button to turn off the power, and then try again from step 3 of chapter 2 "Remove Tape and Turn on".
If the Alarm lamp (A) flashes 4 times at a time, proceed to the next step as it is.

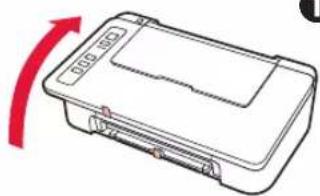
2. Remove Tape and Turn on

1 Stand the printer on its back and remove the orange tape stuck to the bottom of it. Return the printer to its original position.
1
2
3
2 Remove the packing materials (such as orange tape) from outside the printer.
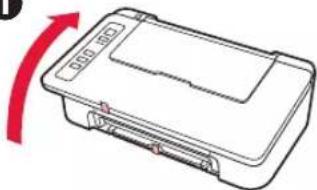
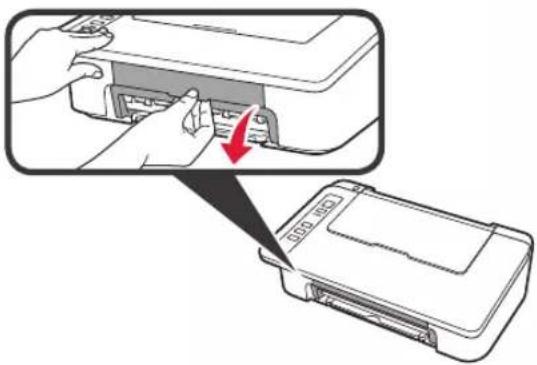
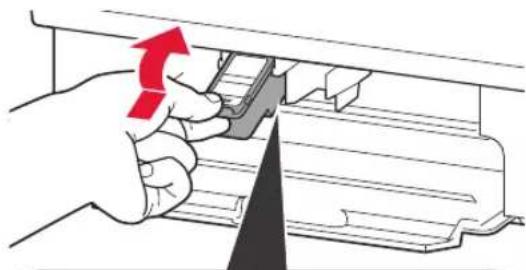
3 Open the cover.
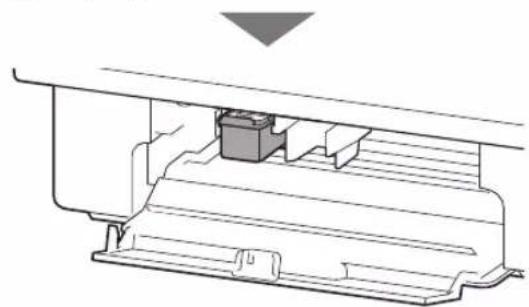
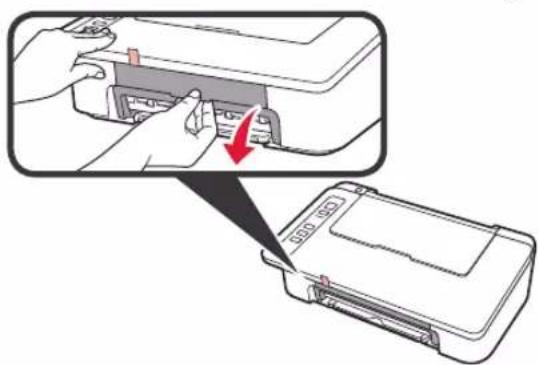
3. Install Inks

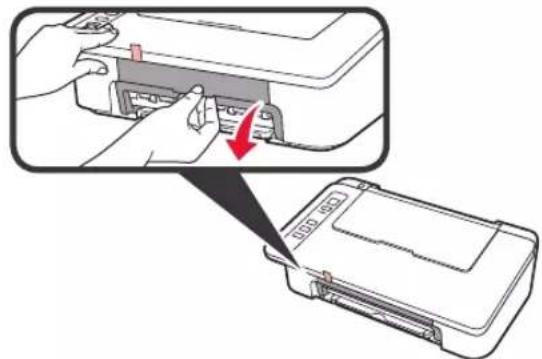
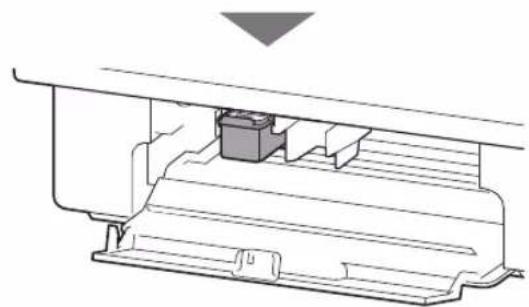
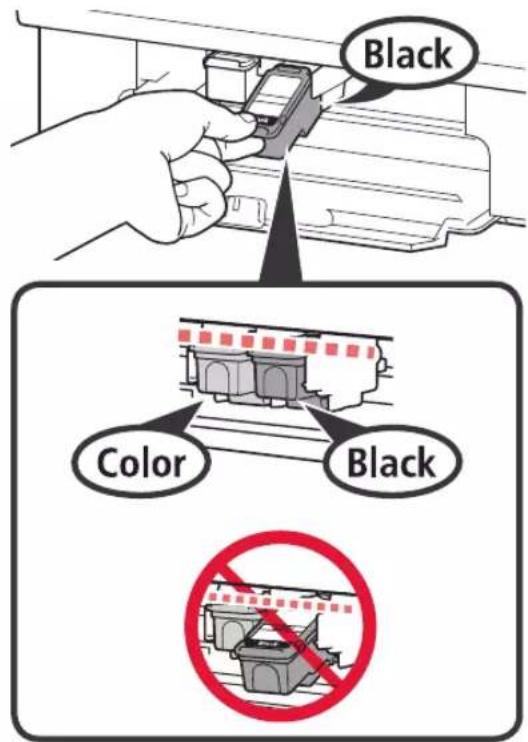
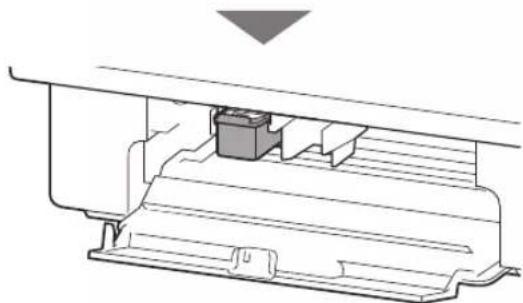
1 Open the cover.
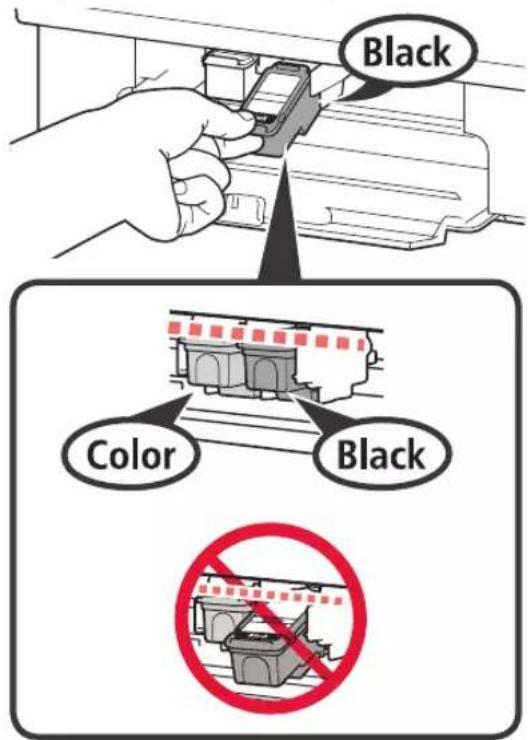
2 Take out the Color FINE cartridge from the package.
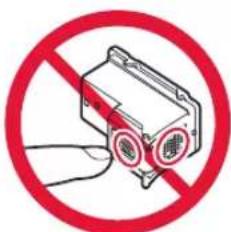
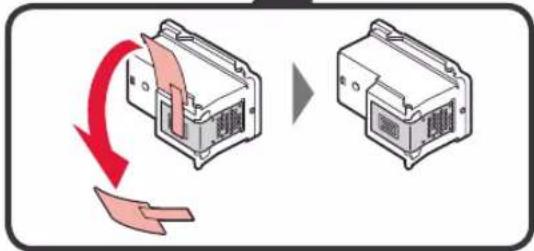
Remove the protective tape.
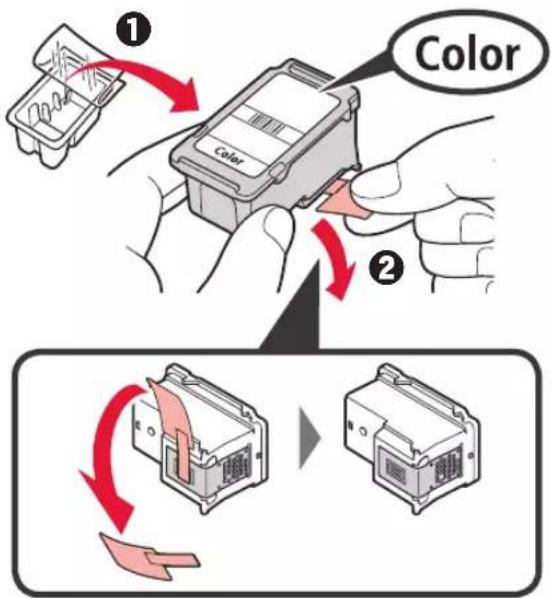

Do not touch.
Be careful of ink on the protective tape.
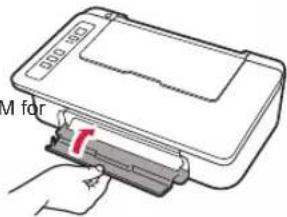
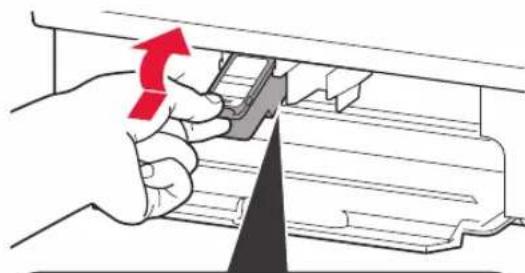
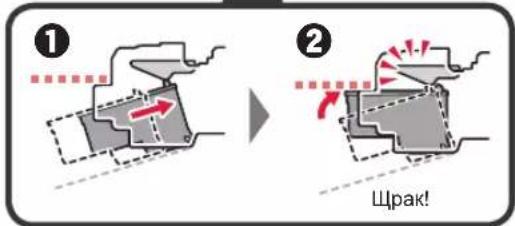
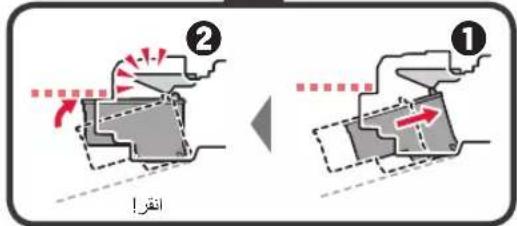
3 ① Insert the Color FINE cartridge into the FINE cartridge holder on the left at a slight upward angle.
Push the FINE cartridge in and up firmly until it snaps into place.
Make sure that the FINE cartridge is installed horizontally.

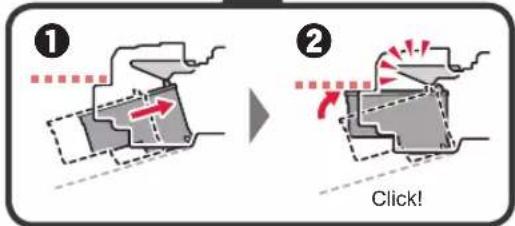

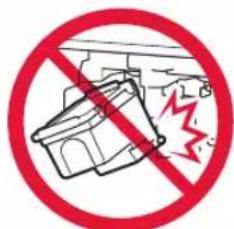
Do not bump it against the surrounding parts.
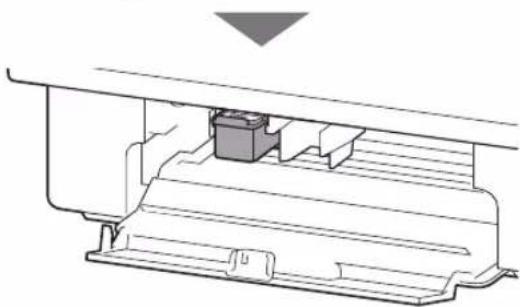
4 Repeat steps 2 to 4 and install the Black FINE cartridge as well, on the right.

5 Close the cover.
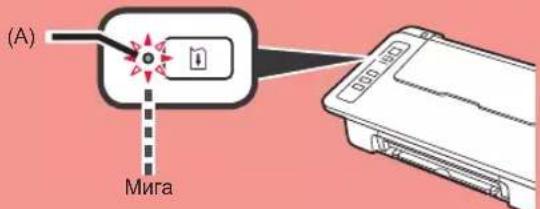
If the Alarm lamp flashes 4 times at a time, go back to step 3 of chapter 3 "Install Inks" and check whether the FINE cartridges for Color and Black are installed correctly.
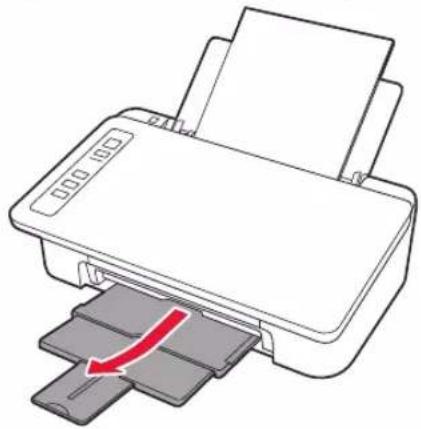
4. Load Paper

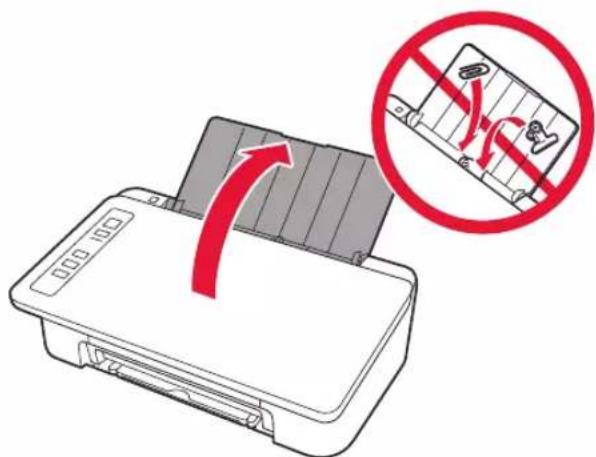
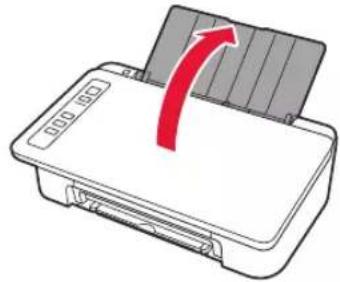
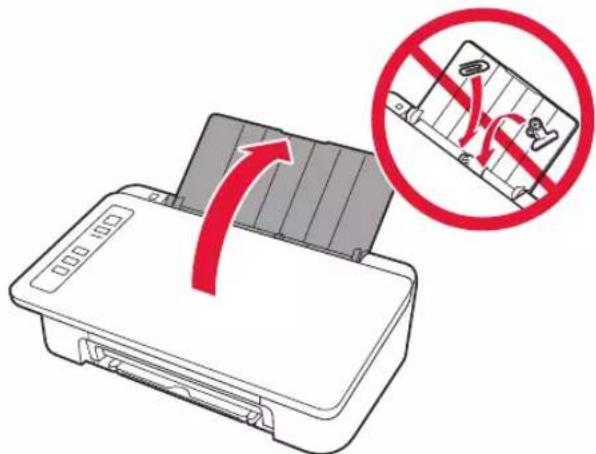
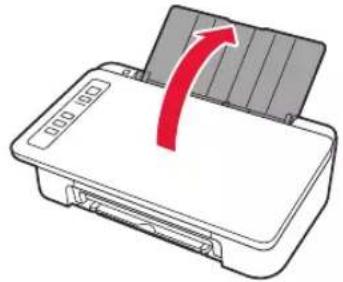
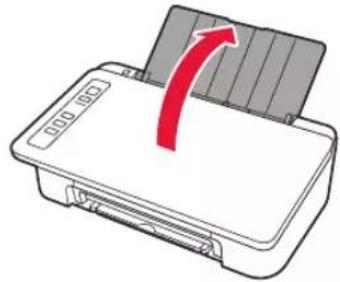
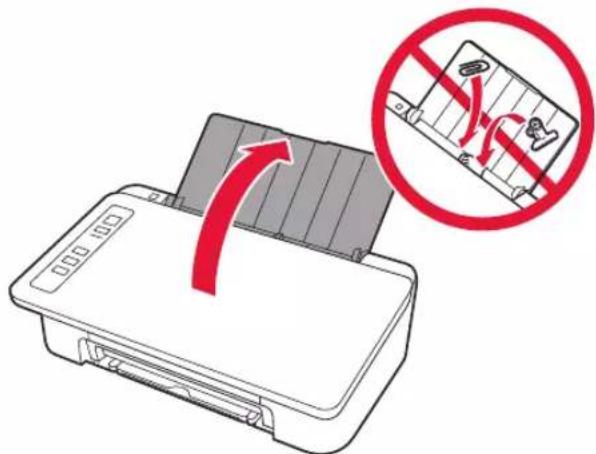
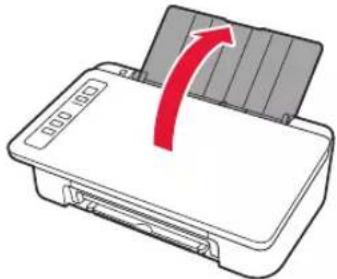
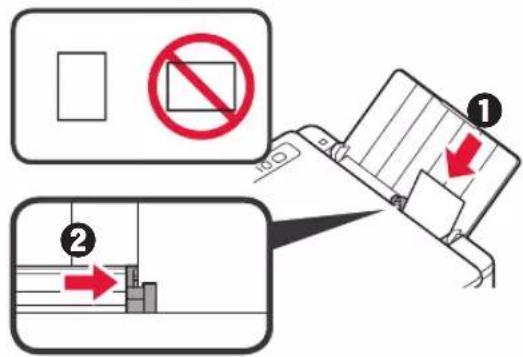
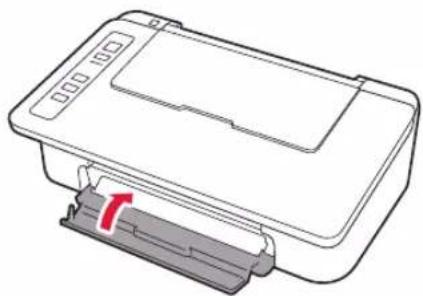
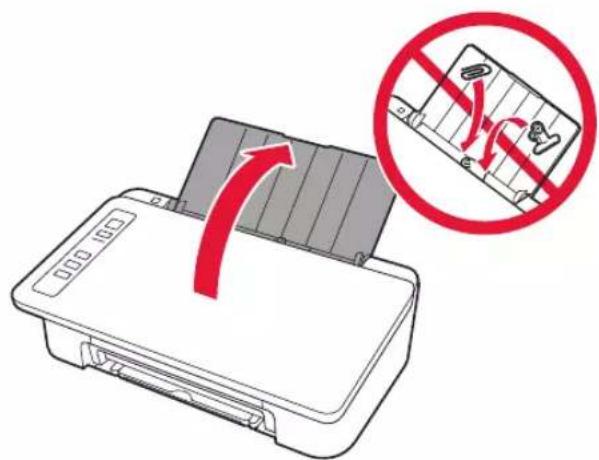
1 Open the paper support.
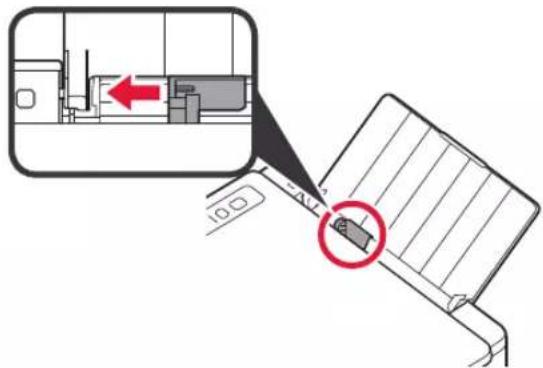
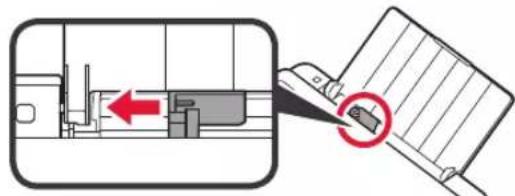
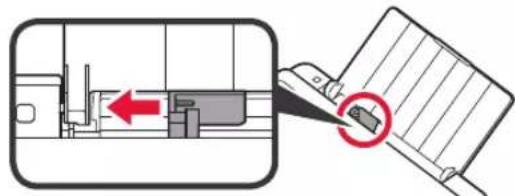
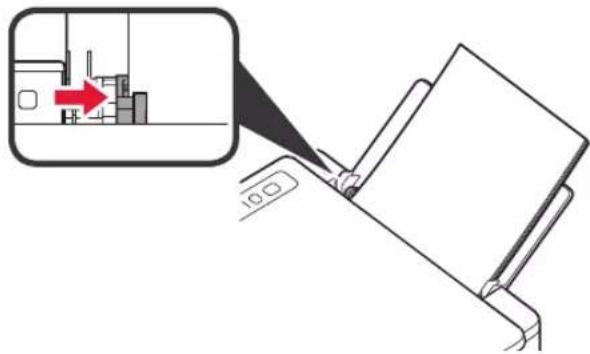
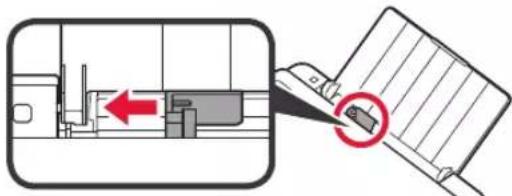
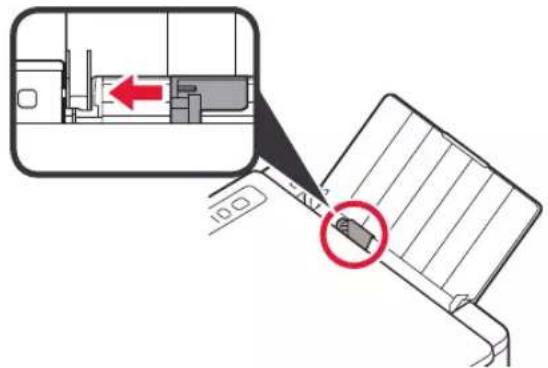
2 Slide the paper guide to the left.
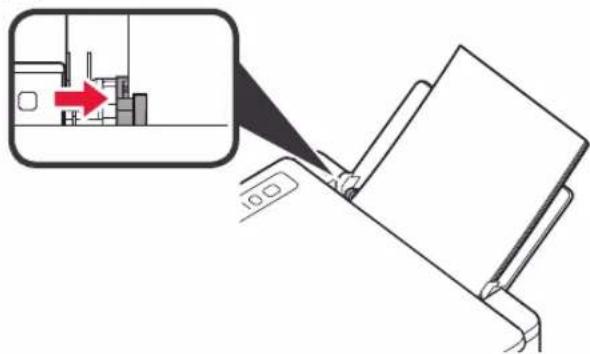
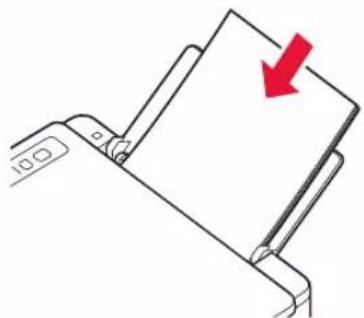
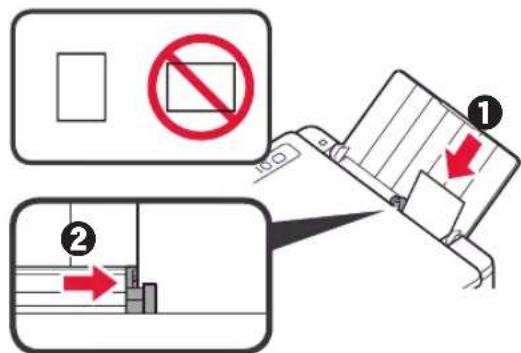
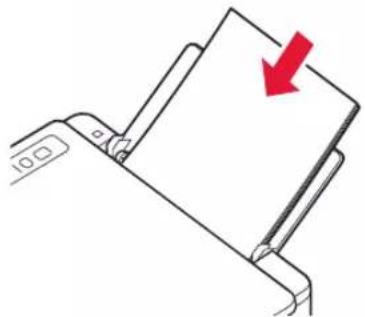
3 Load plain LTR or A4 size paper against the right edge with the print side facing up.

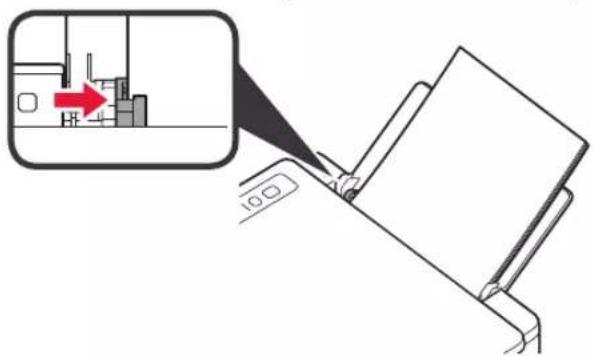
4 Slide the paper guide to align it with the side of the paper stack.
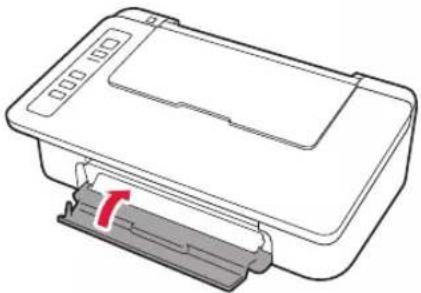
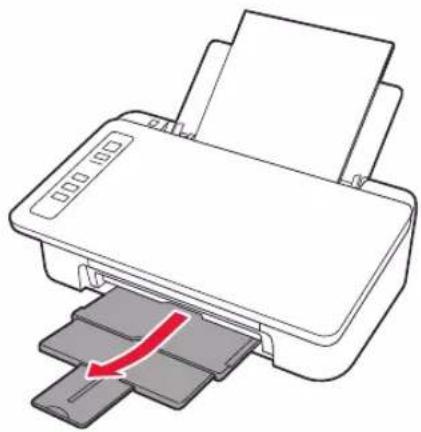
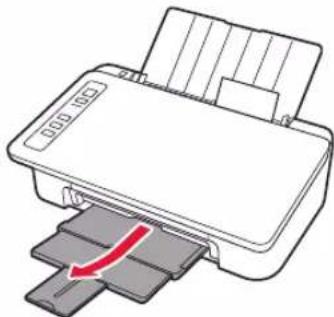
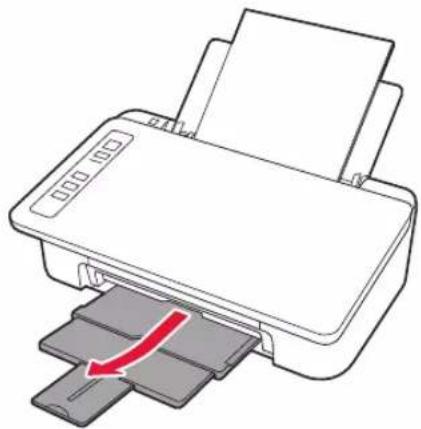
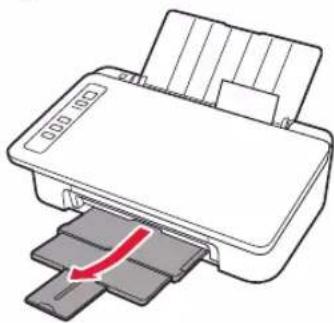
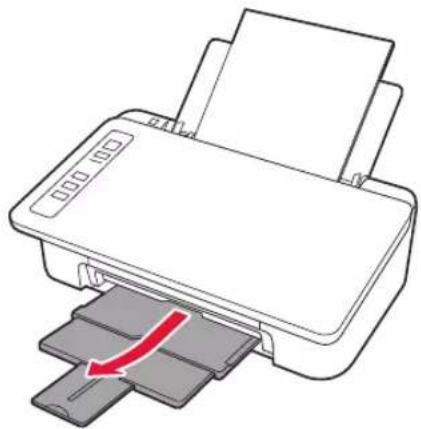
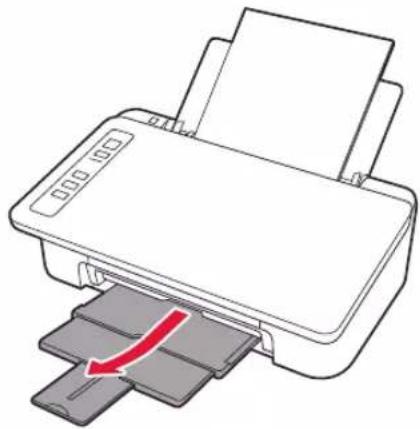
5 Pull out the paper output tray and output tray extension.
5. Preparing for Connection
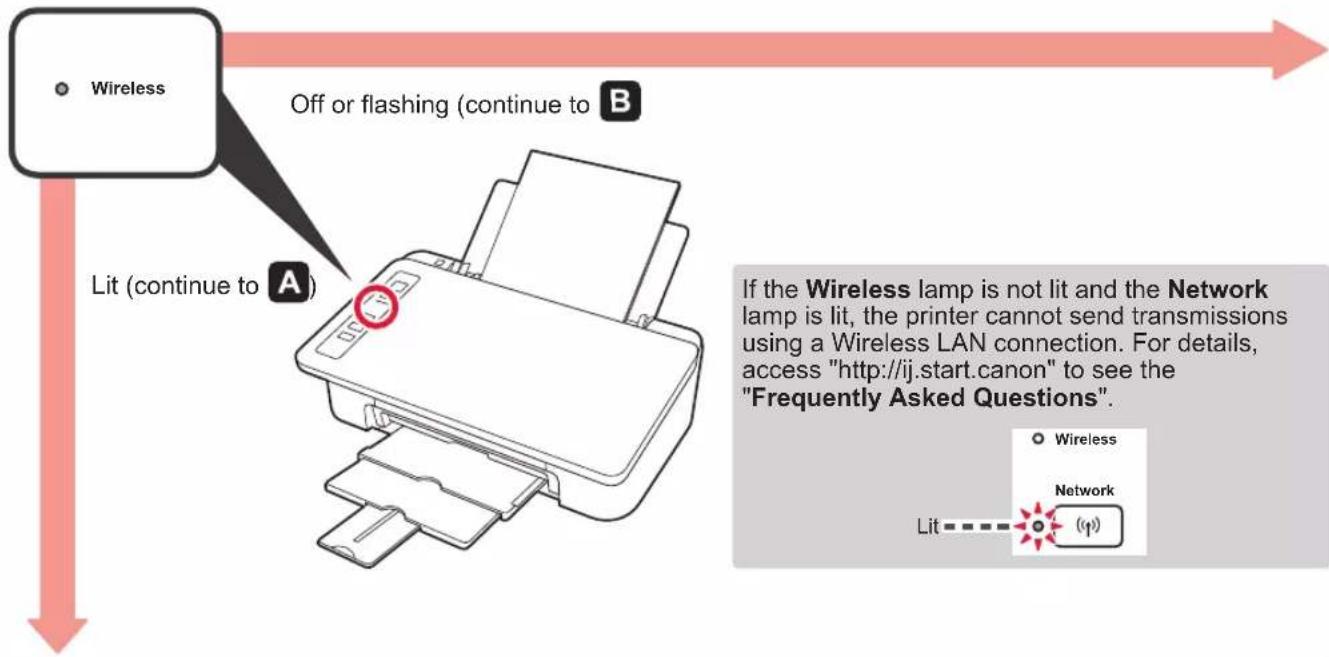
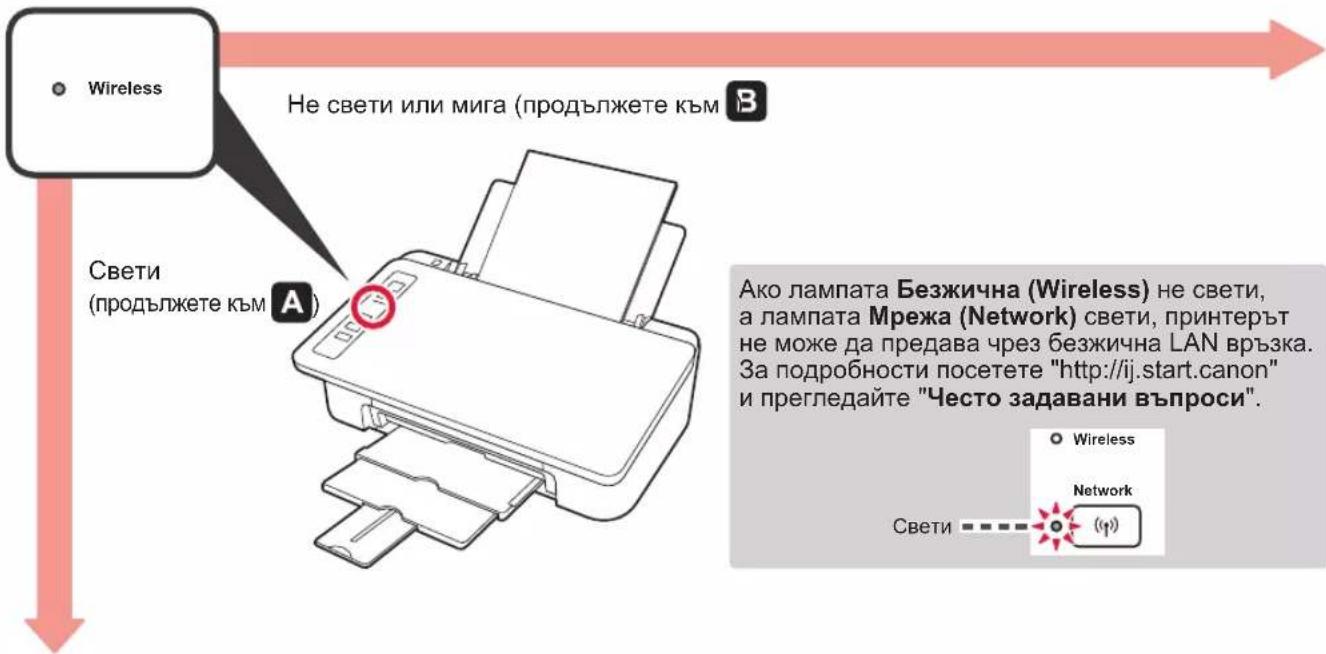
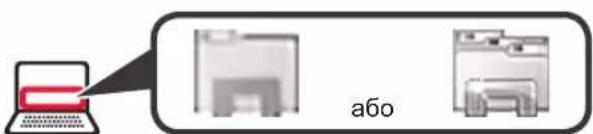
From here on, the procedure differs depending on the device used to connect to the printer.
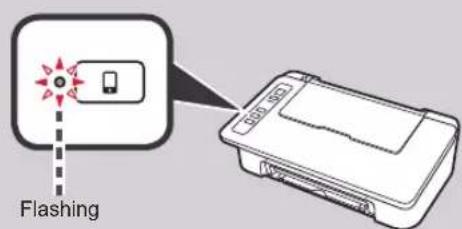
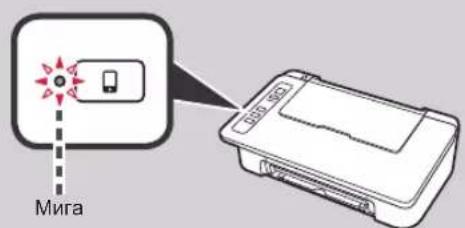
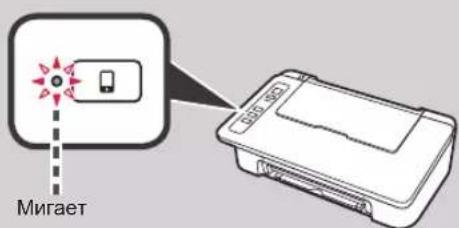
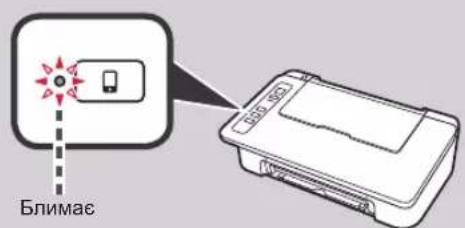
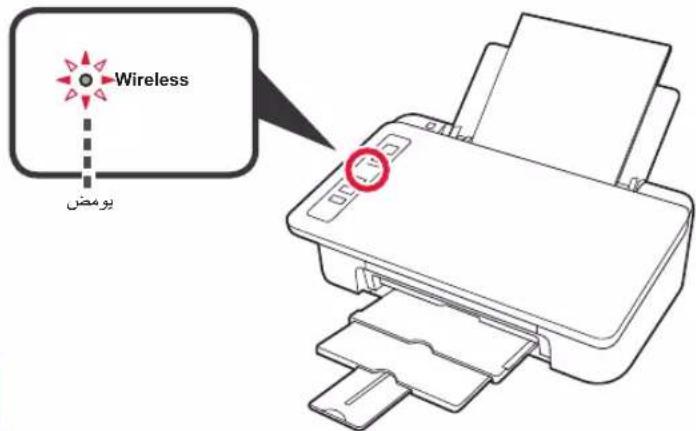
First, after checking that the Wireless lamp is flashing 2 times at a time, proceed to the following operations. In the following description, smartphones and tablet devices are collectively described as smartphone.
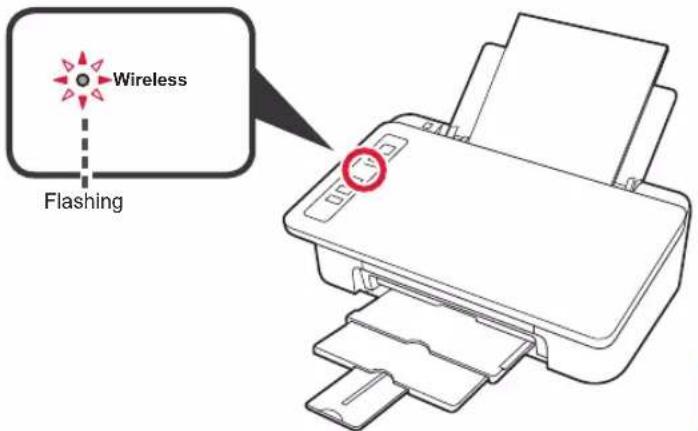
When the Wireless lamp does not flash, try again from chapter 2 "Remove Tape and Turn on".
- To use the printer by connecting only to a computer or both to a computer and smartphone

"6-A. Connecting to Computer"
- To use the printer by connecting only to a smartphone

"6-B. Connecting to Smartphone" on page 6
6-A. Connecting to Computer
You need a connection setup for each computer. Proceed with the setup from step 1 for each computer.
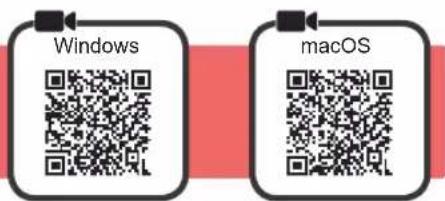
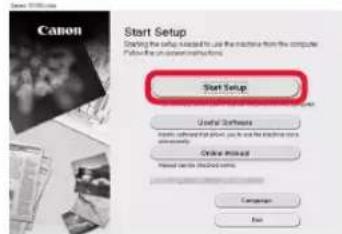
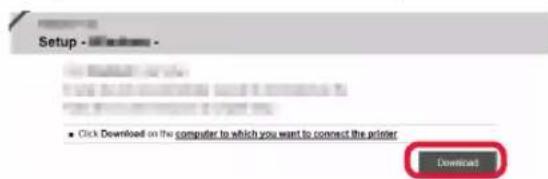
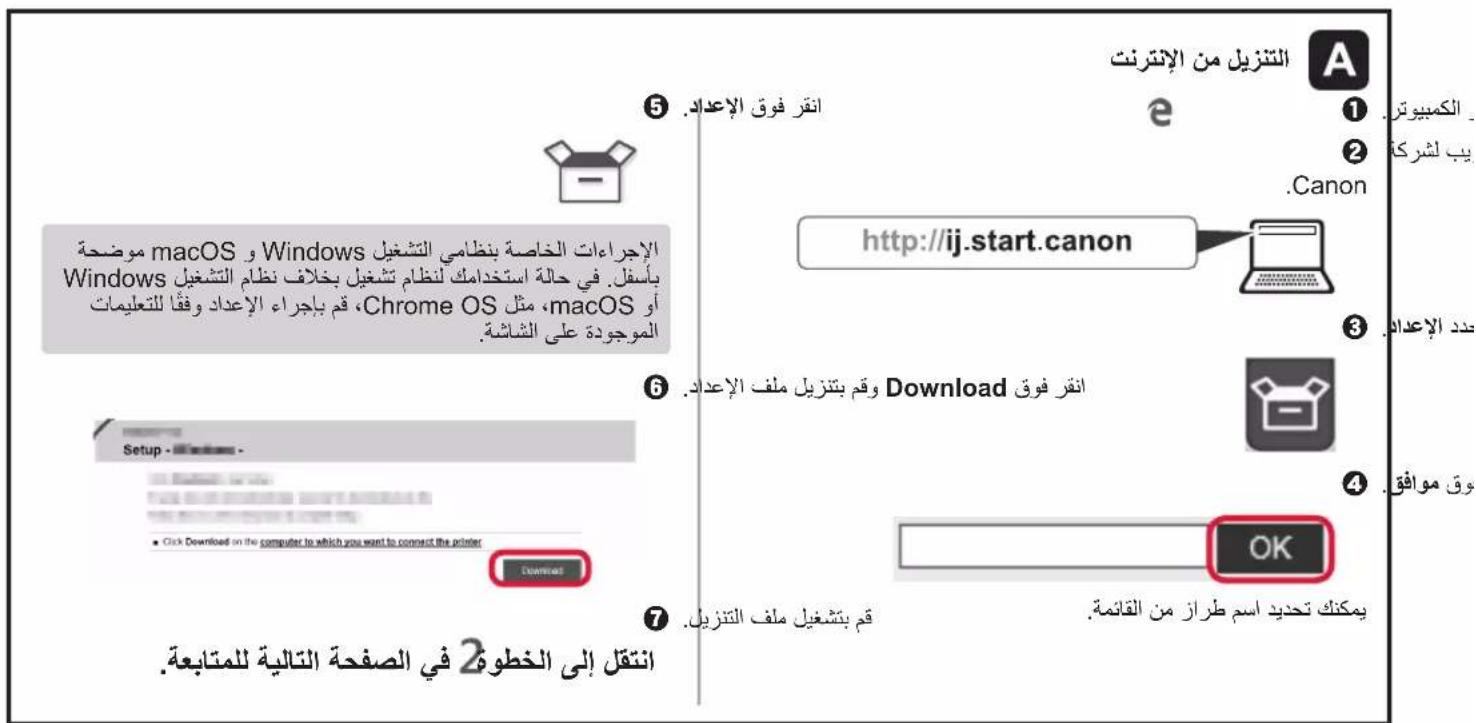
1 Start the setup file for either method A method B

Downloading from the Internet
Open a web browser (etc.) on your computer.
Input the following URL and access the Canon website.

3 Select Set Up.

4 Input the model name of your printer and click OK.

You can select a model name from the list.
Click Setup.

The procedures for Windows and macOS are shown below. If you are using a computer with an OS other than Windows or macOS, such as a Chrome OS, do the setup according to the on-screen instructions.
Click Download and download the setup file.
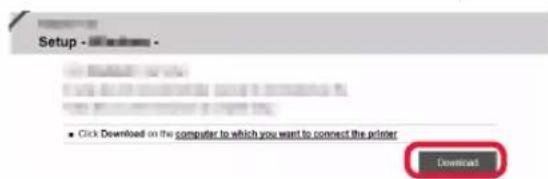
Execute the downloaded file.
Proceed to step 2 on the next page to continue.

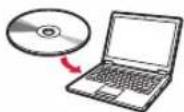
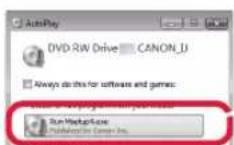
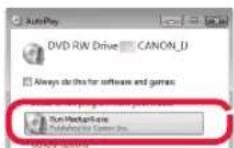
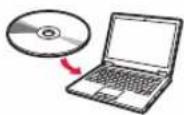
Using Setup CD-ROM (Windows Only)
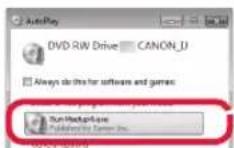
1 Load the Setup CD-ROM in your computer.
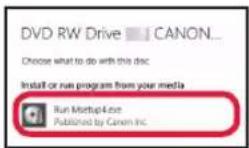
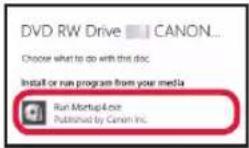
When using Windows 10 or Windows 8.1:
When the following message appears on the right side of your computer screen, click it.

If the following screen appears, click Run Msetup4.exe.
If the User Account Control dialog box appears, click Yes.
When This Message Does Not Appear (or Has Disappeared)
- Click File Explorer on the taskbar.

- Click This PC on the left side of the opened window.
- Double-click the CD-ROM icon on the right side of the window. If the contents of the CD-ROM appear, double-click Msetup4.exe.
- Proceed to step 4.
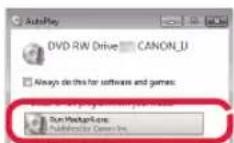
When using Windows 7:
When the AutoPlay screen appears, click Run Msetup4.exe.
If the User Account Control dialog box appears, click Continue.
When Play Screen Does Not Appear
- Click Computer from the start menu.
- Double-click the CD-ROM icon on the right side of the opened window. If the contents of the CD-ROM appear, double-click Msetup4.exe.
Proceed to step 2 to continue.
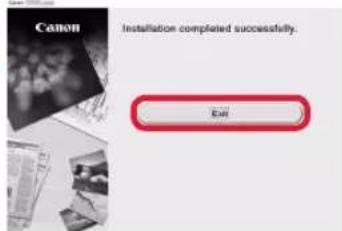
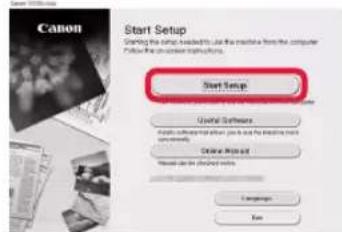
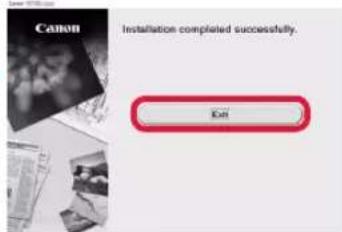
2 Click Start Setup.
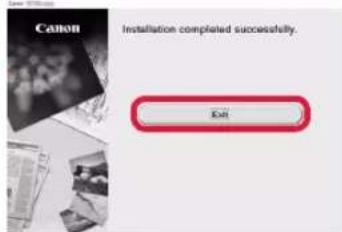
If the following screen appears, click Exit.


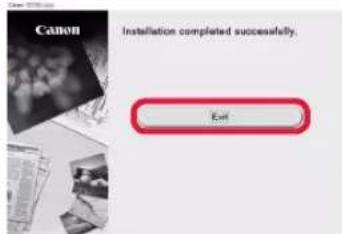
Follow the on-screen instructions to proceed with the setup.
The connection with your computer is now complete. You can print from your computer.
6-B. Connecting to Smartphone

You need a connection setup for each smartphone. Proceed with the setup from step 1 for each smartphone.
Preparation
- Turn on Wi-Fi on your smartphone.
- If you have a wireless router, connect your smartphone to the wireless router you want to connect to the printer.
- For operations, refer to manuals of your smartphone and the wireless router or contact those manufacturers.
1 Install the application software Canon PRINT Inkjet/SELPHY in your smartphone.
iOS : Search "Canon PRINT" in App Store.
Android:Search"Canon PRINT"in Google Play.
Or access the Canon website by scanning the QR code.

- You may not connect your smartphone to the Internet wirelessly during connecting the printer to the smartphone directly. In that case, you may be charged depending on the contract with your service provider.
- Up to 5 devices can be connected to the printer via wireless LAN connection directly.
2 Check the Wireless lamp, and then proceed to A. B

iOS
Android
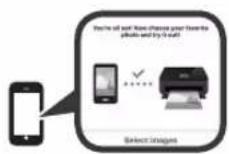
1 Tap the installed application software.
Follow the on-screen instructions to register the printer.
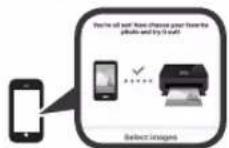
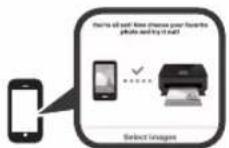
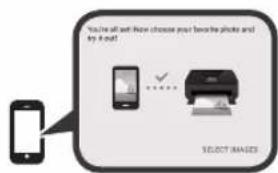
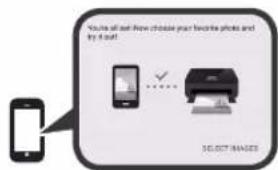
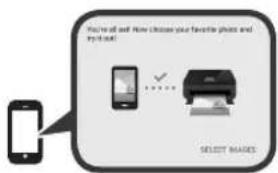
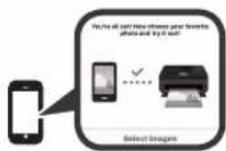
Make sure that the following screen appears.
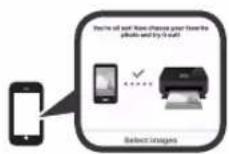
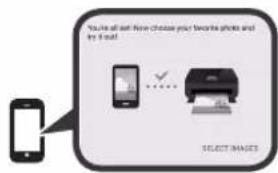
The connection with your smartphone is now complete. You can print from your smartphone.
To print photos, load photo paper. Proceed to "Loading Photo Paper" on page 8.

Procedures below vary depending on iOS or Android. Select your operating system and proceed to its procedure.
iOS
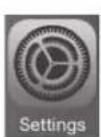
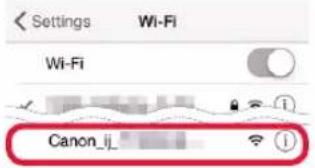
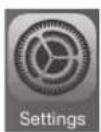
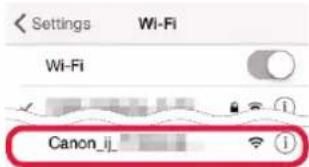
Tap Settings on your smartphone's home screen, and tap Canon_ij_XXXX in the Wi-Fi settings.


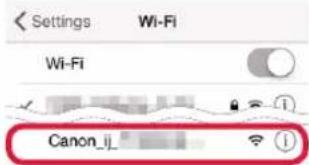
If Canon_ij_XXXX does not appear on the list, see "Troubleshooting" below to operate the printer, and then repeat step ①.
Tap the installed application software.
Follow the on-screen instructions to register the printer.
Follow the on-screen instructions to proceed with the setup.
If you select Auto Select Conn. Method (recommended) on the connection method selecting screen, the appropriate connection method is selected automatically depending on your environment.
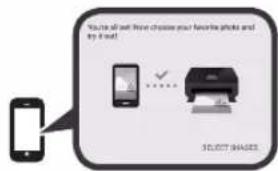
4 Make sure that the following screen appears.

The connection with your smartphone is now complete. You can print from your smartphone.
To print photos, load photo paper. Proceed to "Loading Photo Paper" on page 8.
Android
Tap the installed application software.
Follow the on-screen instructions to register the printer.
If a message saying "Printer is not registered. Perform printer setup?" does not appear, see "Troubleshooting" below to operate the printer, and then wait for a while until the message appears.
Follow the on-screen instructions to proceed with the setup.
The appropriate connection method is selected depending on your environment.
3 Make sure that the following screen appears.

Troubleshooting
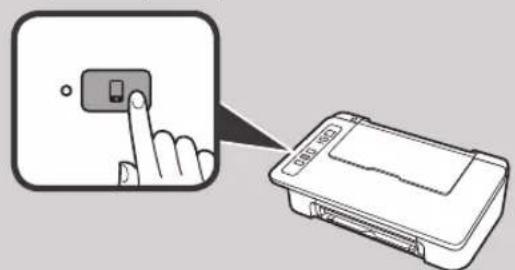
Printer is not found from your smartphone.
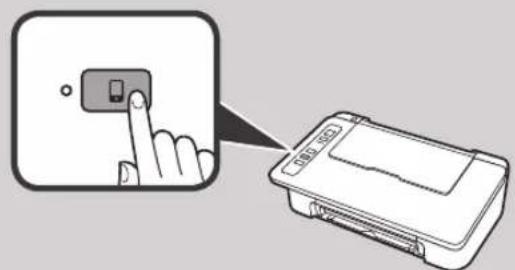
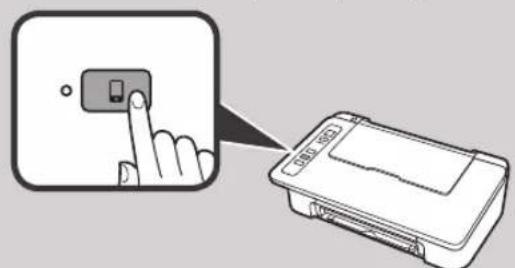
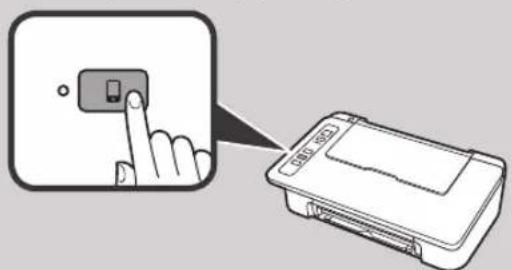
Press and hold the Direct button on the printer for about 2 seconds until the Direct lamp starts to flash.

2 Return to the operation of your smartphone.
Loading Photo Paper
1 Open the paper support.
2 Slide the paper guide to the left.
3 1 Load photo paper against the right edge with the print side facing up.
Slide the paper guide to align it with the side of the paper stack.

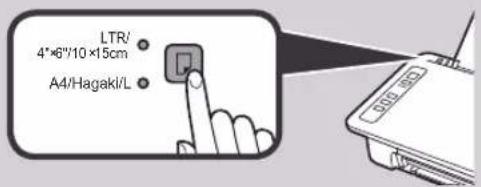
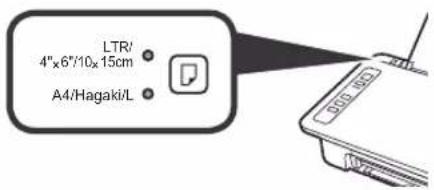
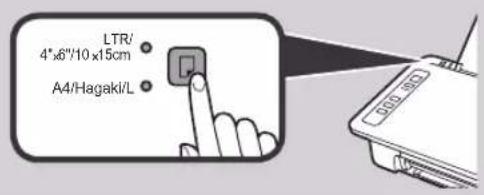
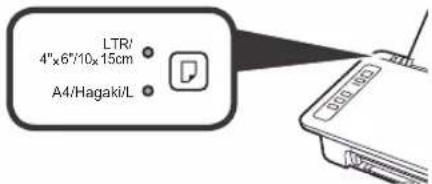
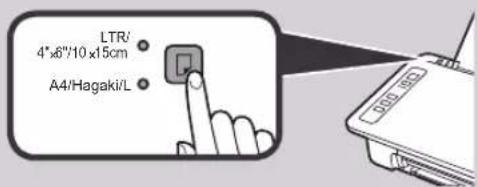
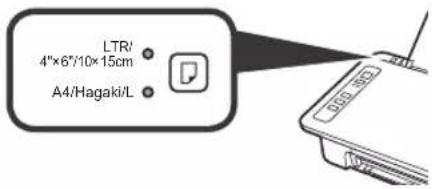
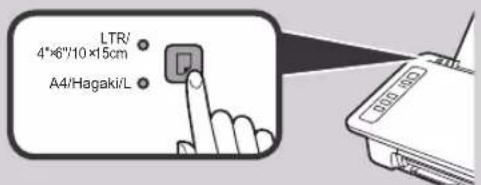
4 Confirm that the Paper lamp that is lit matches the paper size that is loaded.

If the Paper lamp that lights does not match the paper size, press the Paper Select button.
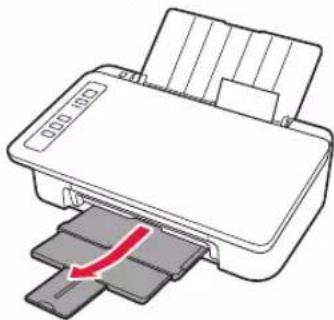
5 Pull out the paper output tray and output tray extension.
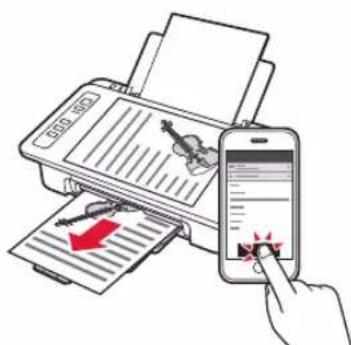
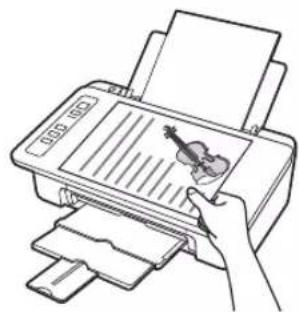
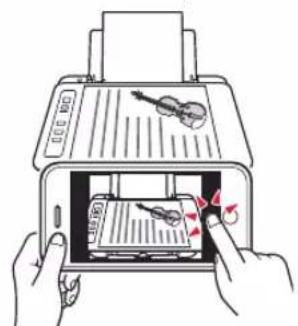
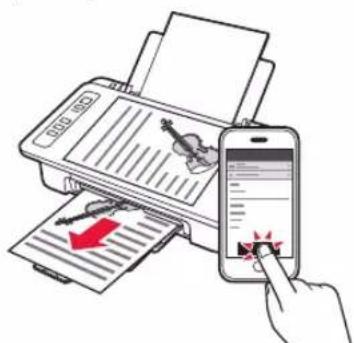
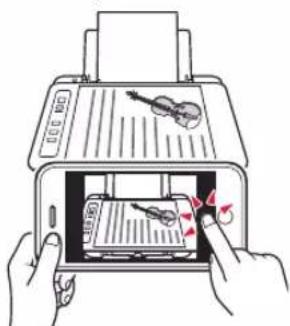
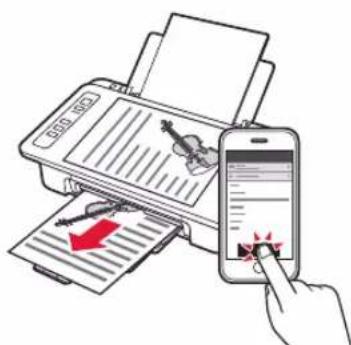
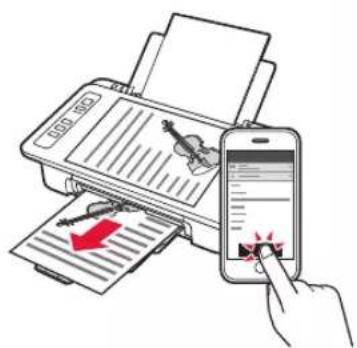
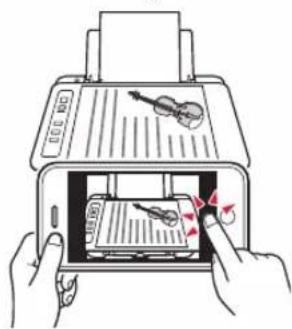
Smartphone Copy
You can copy documents by using the Canon PRINT Inkjet/SELPHY application software for smartphones. To install the application, refer to step 1 on page 6. For the operation procedure, refer to the Online Manual.

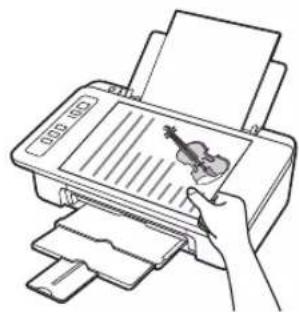
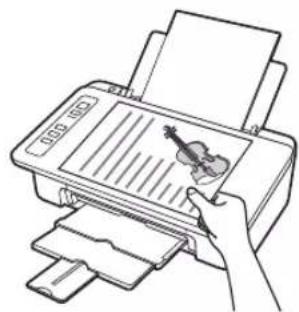
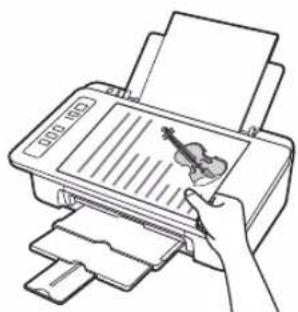
1 Load the document on the printer.
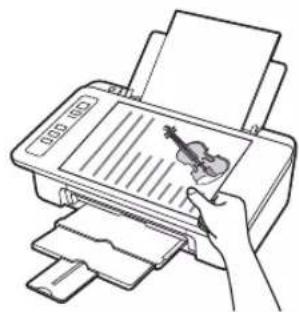
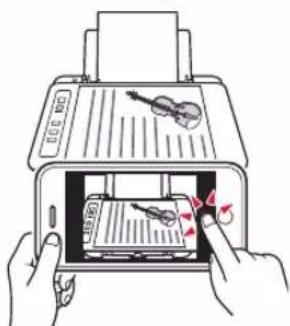
2 Take a photo of the document by using Canon PRINT Inkjet/ SELPHY.

3 Send the image data to the printer and print it.
1. Déballage
6-A. Conectarea la computer
- Pouru a utilizes imprimanta prin conectarea doar la un smartphone

6-B. Conectarea la un smartphone" la pagina 6
6-A. Conectarea la computer
Dacă aparec ecranul AutoPlay, faceti clipe Executare Msetup4.exe (Run Msetup4.exe).
7 HaTnchTe 6yToHa BKnIOuBaHe/CTon (ON/Stop). JAmnata BKnIOuBaHe (ON) cBETba.
Ako lamnata Anapma (Alarm) A) Mira no 9 nbTn nopei, HATNCHEte 6yToHa BKnIOUbaHe/CTon ON/Stop), 3a da n3KJIIOHTe 3axpaHbAHeTO, n CneI TOBa OINTaIte OTHOBO OT CTbNka 3 B pa3den 2 "OTcPaHbBaHe Ha IeneHKATA N BKNIOUbaHe".
Ako lamnata Anapma (Alarm) A) mra no 4 nbtnoDpei, npemHete KbM cneBaauata CTbNka.
3. NocTabaHHe Ha MaCTnJaTa

1 Otbopete kanaka.

2 13BaTe TeBcTaKaTe TaFINE oT onaKOBkata.
OTcTaHete npeDna3HaTa JeneHka.

HeDOKOCBaIte.
BHHMaaIte 3a MaCTnIO npeIpa3HaTaNenEHa.
3 ① NocTaBete uBeTHata Kaceta FINE B DbpxkaHa KaCeta FINE ot IaBata CtpaHa noJneK bTbI HaRope.
HaTncheteKaceTaFINEcHnHOHaBbTpE HArope,DOkATOupaKHeHaMCTO.
YBepete ce, ye kacetata FINE e noctabeHa XOpu3OHTaHIO.
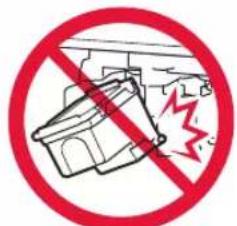
He ydpnTe B yactnte hao
4 NOBTOpeTe CTbKN OTo 2 Do 4 nNoCTaBeTe CbUo UePhata Kaceta FINE OTJrACHO.
5 3atbopete kanaka.

Ako lamnata Anapma (Alarm) Mra 4 nTn nope, ce Bbphete Ha cTbIka 3 B pa3den 3 "NocTabaHHe Ha MaCTnIata" n npOBepe TaI NcBtHaTa u cepHO6Jnata Kaceta FINCA NOCTABEHn npabuHNO.
4. 3apekdahe ha xaptnia

1 OToBopTe noDIOKkata 3a xapTna.
2 Ipb3HeTe B0daa 3a XapTna HajBO.

3 3apeTe o6nKHOBeHa xapTna c pa3mep LTR nnA4 do Decnna Kpa n CbC cTpaHata 3a neat Harope.
4Пьзhte Вада 3a xapTna,3a da ro nodpabHnTe cbc ctpaHaTa Ha TOnyeto xapTna.

5 ⅢaBpnaTe HABbH N3XoDHaTa TaBa 3a XapTnN yDbJIkeHHeTo Ha N3XoDHaTa TaBa.
- UpaKHeTe BbpyΦaHIOB MeHnJxbp (File Explorer) BJeHTaTa Ha 3aJaUHTe.

- UpaKHeTe Bbpxy To3n KomnToBp (This PC) B JraBaTa CtpaHa Ha OTBOpEHn npO3opeu.
- UpaKHeTe DByKpaTHO Bbpxy NkoHaTa Ha KOMNaKTdNcKa B DaChata CtpaHa Ha npo3OpEuA. Ako Ce NokaKe CbDbpKaHneTo Ha KOMNaKTdNcKa, UpaKHeTe DByKpaTHO Bbpxy Msetup4.exe.
4.ПремнenteКьмСтбнka
Ako n3non3Bate Windows 7:
2 Korato ce nokajke ekpaHbT ABtOMaTuH No3nBHeHne (AutoPlay), upaKHeTe Bpxy N3nBJIHH Msetup4.exe (Run Msetup4.exe)
Ako ce nokaxe dnaIorOBnT npo3opeu YnpaBHeHne Ha Notpe6nteKn akayHTn (User Account Control), ppaKHeTe Bbpxy PpOdbJnx (Continue).
Ako He ce nokaxe ekpaHbT ABTomatuHOnn3nBnHeHne (AutoPlay)
- LpakHeTe Bbpxy KomnOtp (Computer) OT CTapTOBATO MeHO.
- ⅡpaKHeTe DByKpaTHO Bbpxy IKOHaTa Ha KOMNaKTmB DcHATA CtpaHa HA OTBOpEHnI np03opeu, Ako Ce NOKaKe CbDbpXaHneTo Ha KOMNaKTmCKa, ⅡpaKHeTe DByKpaTHO Bbpxy Msetup4.exe.
IpeMHHeTe KbM cTbNka 23a da npOdbJnxHTe.
2 ⅢpaKHeTe Bbpy CtapTnpaH eHa hacTpoKa (Start Setup).
Ako ce nokaxe cneHnT ekpaH, npakheTe Bpxy N3xoD (Exit).

CneBaIte HNCTpyKuHNTe
HaekpaHa,3a
Da npOdbJnxHTe
c NaCTpOJaKaTa.
Cbbp3BaHeTo c KOMNIOBbpa e 3aBbpoeHo. Beue moKeTe da neyataTe ot KOMNIOBbpa.
6-B. Cbbp3BaHe cbc cmapTphO
Tp6Ba Da Hactponte Bpb3ka 3a BCEKN CmapTfoH. 3anoHHeTe C hactpoKATAOTCTbNka 13a BCEKN CmapTfoH.
IoproTOBka
BknqueteWi-FiHa cmapToHa.
CbpxTe cMapToHa c 6e3xuHn pyTep, aKO mATE TaKB, C KOITo NcKaTe Da CbbpxTe npHTepa.
* 3a onepaunTe BnKTe pkoBODCTBaTHa cMaprfoha n 6e3kunHpyTe npnn Ce Cbpxte TcTexHnTe npon3BODnten.
1 HcTanpaTne npnoKnna coTyepe Canon PRINT Inkjet/SELPHY B cMaprfoHa.
iOS : Iotbpcete "Canon PRINT" B App Store.
Android: Notepad "Canon PRINT" B Google Play.
IIN noceteye6 caTHa Canon, KaTo cKaHnape QR kOJa.

- He moxe da Cbpxte 6e3xuHc mCapTfoh Kb m HHTepHET NO Bpeme Ha dIpeKTHo CbP3BaHe Ha npHTEpa Cbc cmapToHa. B To3n cIyau MoKe da 6bDeTe TAKCyBaHN B 3aBNCIMOCt OT DOROBOPa BN C DoCTaBUnKa Ha ycnyr.
* Do 5 yctpoiCTBa Moar Da 6bDaT CbBp3aHn DnpeKTHO C npHTEpa Ype3 6e3KnUHa LAN Bpb3ka.
2 PpOBepTe Iamnata Be3KnuHa (Wireless) n cIeT OBa npemHeTe KbM A nn B.

iOS
Android
1 DOKOCHETe HnCTaJIpaHnI npNJIOKeH coΦTyep.
CleDbaiTe HNCTpyKunTe Ha ekpaHa, 3a da pernctpnpate npntepa.
3 Ybepete ce, ye ce noka3Ba cneHnT ekpaH.
Cbbp3BaHeTo cbc cMapTfoHa e 3aBbpuheNo. Beue moKeTe da neuTaTe OT cMapTfoHa.
3a da nehaTaTe cHMMK, 3apeTe foTOxapTna. IpoIbIkeTe KbM "3apeKaHa He foTOxapTna" Ha cTpaHnca 8.

IpoceDypnTe no-dony ce pa3nuaBAT B 3aBncmocT ot iOS nn Android. N36peTe Baata onepauonHna cnTeMa n npOdbJkTe KbM npOeDpypTa 3a Heer.
iOS
1 DOKOCHETe HAcTPOIN (Settings) Ha HaayanHna EKpaHcMapToHa HOKOCHETe Canon_ijXXXX B HAcTPOINTE 3a Wi-Fi.

Ako Canon_ii_XXXX He ce NOKa3Ba B CINcBka, BnKTe "OTcpanraBaHe HEn3npabHocTH" NO-DOy, 3a Da IN3BbPwNTe onepaunC npInTepa, n CneD TOBA NOBTOpe CTbnKa1.
2 DoKoCHeI INCTaJIINpaHnI npNIOKeH coΦTyep.

CneBaIte HNCTpyKunTe Ha ekpaHa, 3a da pernctpupaTe npHTepa.
CneBaTe INCTpyKcHnTE Ha ekpaHa, 3a Da npOdbJnxTe c HactpOikKaTa.
Ako n36epete Auto Select Conn. Method (recommended) Ha ekpaHa 3a n36op Ha MeToD Ha CBbp3BaHe, CbOTBeTHnT MeToD Ha CBbp3BaHe Ce n36upa ABTOMaTHUHO 3aBNCUMoCT OT cpeDaTa BN.
4 Ybepete ce, ye ce noka3Ba cneHnT ekpaH.
Cbbp3BaHeto cbc cMapToHa e 3aBbpueHo. Beye moxete da neyataTe ot cMapToHa.
3a da neyatate cHmKn, 3apeTe foTOxapTna. IpoBbIke Te KbM "3apeKdaHe Ha foTOxapTna" Ha cTpaHnla 8.
Android
1 DOKOCHETe HCTaIIpaHnI npNIIOXKeH coΦTyep.
CneBaanTe HNCTpyKunTe Ha ekpaHa, 3a da pernctpnpate npHTepa.
Ako He ce nokaxe cbo6eHne "Printer is not registered. Perform printer setup?", BnKTe "OTcpanraBaHe Ha HEn3npaBHOCTn" NO-DOJy, 3a Da I3BbPwNTe OepaCn C npHTepa, IN CneI TOBa I3yakaTe MaNko, DOKaTO ce NOKaxe cbo6eHneTo.
CneBaTe HNCTpyKcHnTe Ha ekpaHa, 3a Da npoDbJnxTe C hAcTPOKaTa.
IOnxOJaIaT MeToH Na CBbp3BaHe ce n36npaB 3aBNCIMoCT OT BaWata CpeHa.
3 YbepeTe ce,Ye ce NOKa3Ba CneHnT ekpaH.

OTcTpahBaHe Ha Hen3npaBHOCTN
PnHTepbT He e OTKpNT OT cMaprfoHa.
HaTnucHeTe 3aApbXte 6yToHa DnpeKTHo (Direct) Ha npHtepa 3a Okono 2 cekyHn, dokato namnata DnpeKTHo (Direct) 3anoHHe Ha Mna.

BbPheTe Ce KbM N3BbPbBaHeTo Ha onepaun Cbc cMaprfoHa.
3apeKdaHe Ha φoToxapTnA
1 OToBopTe noIIOxKata 3a xapTna.
2 Ⅱb3Hete Boaaya 3a XapTna HJIABO.

3 ① 3apeTe foToxapTna Do deChnKpaCbC cTpaHaTa 3a neyat Harope.
Tb3HeTe B0daa 3a xapTna, 3a da ro npabHnTe Cbc CtpaHaTa Ha TonyeTo xapTna.

4 YBepTe ce, Ye nAmnata XapTna (Paper), KOrTo CBETn, CbOTBeTCTBa Ha pa3Mepa Ha xapTnra, KOrTO e 3apeDeHa.
Ako naMaNaTa 3a XapTna (Paper), KOrTO CBeTu, He CbOTBcTCTBa Ha pa3Mepa Ha xapTnTa, HATNCHeTe 6yToHa N36Op Ha xapTna (Paper Select).
5 ⅢdIbpaIte HABbH I3XoHaTa TaBa 3a XapTnA yDbJxKeHHeTo Ha I3XoHaTa TaBa.

Smartphone Copy
Mokte da konipate dokymeHTn c nomoTa ha npnoxHna coptyeep Canon PRINT Inkjet/SELPHY 3a cmapTfoHN. 3a da nHCTanpate npnoxHeHneTo, BxKTe CTbNka 1 Ha cTpaHnca 6. 3a pa60thata npoeDpya BxKTe OHnaih pBkoBOdCTBO.

1 3apeTe DOKyMeHt a B npInTepa.
2 HanpaBeTe cHIMka Ha DokyMeHTa c NOMOuTa Ha Canon PRINT Inkjet/SELPHY.
3 ⅢnpaTeTe n3o6paXeHneTo KbM npnHTepa I ro OTneYataIte.
1. Kutuyu Açma
Guc kablosu FINE kartusu

Kurulum CD-ROM'u
He yapnTe NM no OKpykaIOUIM DeTaNm.
4 NOBTOPNE DeIcTBn 2-4 n TaKIM JKe o6pa3oM yCTaHOBnTe YepHbI KApTpIxK FINE cnpBa.

5 3akpoTe KpbuKy.

Ecnn HndkaTop ABapnHbI cnHaJ (Alarm) Mrraet 4 pa3a noDpyd, BepHntecb K lary 3 rnaBbl 3 «YctaHOBA qEPHN» n npOBepbTe, npABINbHO Jn ycTaHOBJIeHbI cBeTHO h CEHPbIK KapTpNDK FinE.
4. 3arpy3ka 6ymarn

1 OtkpoIte ynp dny bymar.

2 CdbnHbTe HanpaBnaIouyIO 6ymarN BJeBO.

3 3arpy3nte o6bHnyo 6yumary foopmata LTR nnn A4 npOTnB npaBoro kpar nueBOI cToPOHOB BBepx.

4 IpeBnBHe HappaIIOyIO 6ymarN DO COBMeueHnco CTONKo 6ymarN.

5 N3BNEKInTe NOToK npEma 6ymaru IN DOONHHTeNbHbI NOToK npEma 6ymaru.
Ecnn 3kpan ATo3anyck (AutoPlay) He noBnreTc
- HaxmTe KombIopE (Computer) B MeHIO «IyncK».
2.Двждь�цeнкнite 3HAcOK KOMnakT-DnCKa B npabOu yactn OTkpblTOrO OKHa. Korda oTo6pa3ntcra CoepKHMoe KOMnakT-DnCKa, DBaJDbI ZeENKHTe paIn Msetup4.exe.
Ipeennte K 2yto6bl npoJnxTb.
2 ⅢeπKNHTe Hauatb hactpoiky (Start Setup).
Pn noBneHn CneDyIOeO 3KpaHa HaxMNTe BbIXoD (Exit).

CneyuTe HnCTpyKuYMaHa 3KpaHe, YTo6bl npOdoJnxHbHaCtpoNky.
IopKnIOueHHe K KomNbIOTepy BblOnHeHO. Tenepb MoXHo neYaTaTb C KomNbIOTepa.
2 PpOBepBte HndnKaTOp BecnpoB. (Wireless), a 3aTeM npeynIte K JeIeCTBnIO A nnB


iOS
Android
1KochHTecb yctaHOBJeHHoro npNJIOKeHna.
CJeDyIe HNCTpyKzmaH Ha 3KpaHe, YTO6bI BbINOHNITb peNCTpaunIO npHTepa.
3 y6eintecb, YTO OTo6paKaTcY kza3aHHb HnKe 3KpHaN.
IopKIOUeHne K cMapTfoHy BbINoJIHeHo. Tenepb MoXHO neyataTb co cMapTfoHa.
Uto6bI HaneuataTb foToTpaΦn, 3aRpy3nte foTo6yMaY. IpeeiDITe B paAen «3arpy3ka foTo6yMaN» Ha cTp.8.

PpoeIpybI,OnncaHhbIe Hxke,3aBucrT OT onepauonHnoCnCTEmbl (iOS nn Android). Bb6epnte cboIO onepauonHnyo CnCTEmy N BbINONHTe nHCTpyKuN K Hei.
iOS
1 KCHNTecb nyHKta HacrpoKn (Settings) Ha CTapTOBOM 3KpaHe CmapToHa, a 3aTeM KCHNTecb NyHKta Canon_ij_XXXX Ha 3KpaHe HAcrpoKn Wi-Fi.

EcnnyHKTa Canon_ijXXXX Het B cnicke, BbINOHNHTe DeiCTBnC pInHTepOM, yKa3aHHbIe B pa3deJe «YcTpaHHeHHeNoJADOK》BHN3y,a 3aTeM NOBTOPIte DeiCTBnE1.
Kochntecb yctaHOBJeHHoro npJIOKeHn.
CneDyIte HNCTpyKUmaH Ha 3kpaHe, YTO6bI BbINONHHtB pernctpaunIO npHTepa.
CneyuTe HNCTpyKuMaH 3kpaHe, TTo6bI npoDOnXnTb HaCTpoNky.
Ecnn Bb6paTb ABTom. Bb6op MeToa noKnHou. (pekomeh.) (Auto Select Conn.Method (recommended)) Ha 3KpaHe Bb6opa MeToa noKnHoueHn, COOTBeCTBryUoi MeToa noKnHoueHn 6yDet Bb6paH ABtOMaTHueckn B 3aBNCIMOCr OT BaWeI cTeBOc PcEbl.
4 Y6eDInTeCb, YTO OTo6paKaTcY kA3aHHb HnKe 3KpAH.

Android
Kochntecb yctaHOBJeHHoro npINOxKeHnA.
CneIyTe HNCTpyKzmaH Ha 3KpaHe, YTO6bI BblONHHTb perncTpaunIO npHTepa.
Ecnn coo6ueHne «PnHTep He 3aperuuctpnpoban. BbINOHNtB hactpoKy npHTepa? (Printer is not registered. Perform printer setup?)» He NOBUNOCB, BblONHTE INCHpykUIN no pa6Ote C pnpHTepom B pa3dene «UcTpaHeHne HEnoJaOK> BHN3y, a 3aTeM NIOOXNTe HEMHOrO, Noka COo6ueHne He NOBNTCA.
CneyuTe HNCTpyKzmaH Ha 3kpaHe, YTo6bI npoDoJnxTb HAcTpoiKy.
Bb6op noDxOJaIero MeToa noKnIOueHn 3aBnCT OT nCNoB3yEmo Cpebl.
3 y6eNTecb, yTO OTo6paKaetcra yka3aHHbH HnKe 3KpaH.
IopKnHoyHe K cMapToHy BbINOnHeHO. Tenepb MoXHo neyataTb co cMapToHa. Uto6bl HaneuataTb foToRaΦn, 3aRpy3nte foTo6umary. IpeenDITE B pa3dE «3arpy3ka foTo6ymar» Ha cTp.8

YcTpaHHe HenoJaOk
PnHTep He o6hApyKeH co cMaprfoHa.
Haxmte u yepknae Ta Ha npntpe KhoNky Ppmaoe (Direct) npmepe 2 cekyHdbI, noka He hauhet MraTb HndkaTop Ppmaoe (Direct).

BepHITecb K BbIOnHeHIO DeIcTBn Ha cMapTfoHe.
3arpy3ka foTo6ymarn
1 OTkpoTe ynop dIa 6yMaHn.
2 CdbnHbTe HappaNIOyIO 6ymarBJeBO.
3 3arpy3nte foTo6yMaI npOTnB npaBOKpaJNueBOI CTOpOHOBepx.
2IpeBnHbTe HnpaBnIouyO bymann Do coBmeueHnco cTOnkO bymann.

4 Y6eIITecb, yTO ropAun HnDnKaTOp Bymara (Paper) coBnaaet c pa3mepom 3arpykeHHoH 6ymarn.
Ecnr ropuHnHdkaTOp Bymara(Paper) He coBnaJaET c pa3MepOM bymaru, HAKMITE KhoNky Bb6op bymaru (Paper Select).
5 ⅠЗВЕКИTe JOTOK npeMa 6ymaHn IdoONHITeIbHbI JOTOK npeMa 6ymaHn.
KoHpoBaTb co cMaprfoHa (Smartphone Copy)
KoHpOBaTb DOkymeHTb MoXHO B npIIOxHeHn Canon PRINT Inkjet/SELPHY dЯ cMaprTOHOB. IyCTaHOBKn npIIOxHeHn CM. WAr 1 Ha cTpaHnCe 6. Iy nOlyuHn INΦopMaun O npOceDype CM. OhnaH-pyKOBOdCTBO.

1 NomeCTnTe DOKyMeHT Ha npHTeP.
2 Cdaenate potoTpaqno DOkymeHTa c nOMoIbHO yHKm Canon PRINT Inkjet/SELPHY.
3 OTnpaBbTe DaHHbIe n3o6paXeHnHa npHTep n HaneyataaTe erO.

1. Po3naKOBka kopo6kn
HypKunBneHHa KaptnkFINE

1 BiKpnTe nIoppy Inapepy.
2 Nocyhte HapmHK dna panepy niBopyu.

3 3aBaHTaxTe 3BnuaHn nnip fOpMaTy LTR a6o A4 no npabomy kpaO cTopoHO dIpyky Doropu.

4 NocyHbTe HnnpMnK dIa nanepy, uo6 BnpiBHTn Ioro 3i CTopoHOIO CTocy nanepy.
5 BntTnHtB nOTOK BnBeHeHH naepy Ta noDobKyBaU BnBiHOrO nOTka.
Ha3By mojedi moXHa Bn6paTn 3i cnNcKy.
5 HatnchItb HactpoOBaHHa.

Dani onucaH npoueDpyn DnA Windows i macOS. RaIO Bu Bn BnKOpncToByeTe OC, BiMInHy BiD Windows i macOS, k-OT Chrome OS, DotpmyItecb IHCTpykui, kki 3'ABNtMMyTbcra Ha ekpaHi.
KnauiHt 3aBaHTaxnTn 3aBaHTaxkTe paai BCTaHOBneHHA.
3anyctitb 3aBaHTaxeHn faaiI.
IpeenidtBdoKpOky 2HaHacTynHi ctopinci,06 npoDobkntn.

BukopncTaHHa KomnakT-Dncka 3 nporpamOIO BCTaHOBneHHa (TilbKn DnJa Windows)
1 BCTaBTe KOMnAeT-Dnck i3 nporpaMO BoTaHOBHeHH B KOMnIOTeP.
Windows 10 a6o Windows 8.1
KoNnB npaBi yactHHe kpaHa KOMn'IoTepa 3'BAuTBcR ue NOBIOMJeHHra, KlaUHITb NOrO.

3 RaKUo 3'ABNTbCA TaKn ekpaH,HaTNCHTb KONKY 3anyctntu Msetup4.exe (Run Msetup4.exe).
4 RaKIO 3'ABNTbcA dianorOBe BIKHO Cnyx6a 3axncty KopncTyBauiB (User Account Control), Knauchitb TaK (Yes).
Kaio ce nobidomnene He 3'YBnOcra (a6o 3nKIO
- Knauchitb Повднк (File Explorer) Ha naheJI 3aBdaHb.
- KnaHtB nyHK TcN PK (This PC) JIbOpuy y BIKHi, 0o BIDKpNIocr.
3.ДычкauнгсiktorpamyKOMnakT-DnCKa npabopyuyBikhi. Koln BiOobpa3ntbcra BMCT KOMnakT-DnCKa,Дыч knaHtbpaimMsetup4.exe.
4.ПершдьdoКроку 4
Dnra Windows 7
KoNn 3'raBntbCRe ekpan ABTObiTbOpeHHa (AutoPlay), knaHHTb 3anyctNTn Msetup4.exe (Run Msetup4.exe).
3 RaKIO 3'ABNTbCra DIAIOROBe BIKHO CnyX6a 3axncty KopncTyBauiB (User Account Control), Knauchitb PpOdoBxNtU (Continue).
Kkoekpan AToBtBopeHHA(AutoPlay) He 3'RnTbC
- KnaHtB Komn'otep (Computer) y rONOBHOMy MeHO.
2.ДычканчпнiktorpamyKOMnakT-DnCKa npabopyy y BiKHi, lo BIDKPneTBcR. KoIN BiIObopa3ntbcR BMCT KOMnAKT-DnCKa,Дыч knaHITb faJN Msetup4.exe.
Ipeenidtbdo kpoky 2o6 npoobxntn.
2 Bn6epitb nyHKT 3anyck HactpoOBaHHa (Start Setup).
KHONKy Buxi (Exit).


Uo6 npoOBxHn HAcTpoOBaHH, DOTpMMyTeCb IHCTpyKui, KI 3'ABJNTMBybCnHa ekpaHI.
Плкюеваяdo komn'tepa BctahOBneHo.Tenep moxha pykyBaTu 3 Hboro.
JaIO NOIOMJENHRA "Printer is not registered. Perform printer setup?» He 3'ABNTbcra, npouHTaTe po3dIn «UcyHeHH HEnOlaOK» HnKYe, BnKoHaTe OncaHi B HbOMy DII Ha npHTEpi Ta 3aKeaIte, DOKI CE NOIOMJENHRA He 3'ABNTbcra.
Ioo npoOBXHTn HactpoOBaHH,
DopmyTecb IHctpyKcii, Aki 3'ABnTmMyTbcra
Ha ekpani.
HaJexHn cnoci6 niiKIOueHH Bn6npaetbca 3aJexHo Bi CEpeoBua.
Mac o6oB'3KOBO 3'ABNTnC HabeHn HxKHe ekpaH.

YcyHeHHH HenoJaOK
He Bdaetbca 3HaHTn npHtep 3i cMapToHy.
HaTnCHiB i yTpmyTe KhoNky Be3nocep (Direct) Ha npHTepi 6n3bko 2 cekyH,doKHe noUHe 6nMaTH iHdkaTop Be3nocep (Direct).

10ouHiB 3HOBy KopnCTyBaTncr CMapToHOM.
3aBaHTaxeHHaΦoTOnanepy
1 BiikpnTe nIbnopy dna nanepy.
2 NocyhbTe HaprrMnK dna nanepy niBopyu.
3 3aBaHTaxTe foToanip no npabomy kpaO CTOpHOIO DnIpyKy DoropN.
10cyhTe HnnpMnK dIy nanepy, 06 BnpiBnTn Ioro 3i CTopoHOc CTocy nanepy.
4 IpeekoHaTeC, 0i HdkaTOp Panip (Paper), knn Cbitntbcra, BiNobidae po3mipy 3abaHTaxeHoro nanepy.
Kuio iHnkaTop Nanip (Paper), kN CBITbCra, He BiIOBiae po3mipy nanepy, HATNCHTb KHONKY Bn6ip nanepy (Paper Select).
5 BnTnHtB NOTOK BnBeHeHH naepy Ta nOobKyBaU BnBiHoro Notka.
Smartphone Copy
3a Donomoro nporpamn Canon PRINT Inkjet/SELPHY dIra cMapTfoHIB MOXHa KOnIOBaTHN DOKyMeHTN. 06B BCTaHOBHTN ii, noCHITb 3 KPOky 1 Ha cTOpIHci 6. 06 Di3HaTnCRA, JIK HeO KopNCyBAtncA, nB. OHJaHOBn Noci6Hnk.

1 POKnaiTb DOKyMeHT Ha npInTeP.
2 CpoToRaPcyIte DOKyMeHT 3a donomoro nporpamn Canon PRINT Inkjet/SELPHY.
3 BiinpaBTe daHi 3o6paXeHHHa npHTep i HApkyuTe Noro.
a_i = 70%
a
2
Smartphone Copy

I 1
aill 1sall lj
3
Canon PRINT .Inkjet/SELPHY
2
aill jll
1
Printer is not registered." alw j 1
y
Canon ij XXXX 1
0
3
Aeae aee aee aee ae eae aee aee
3.
4
Aillll lllllllllllllllllllllllllllllllllllllllllllllllllllllllllllllllllllllllllllllllllllllllllllllllllllllllll
i 1
(Weileess) Juaaal jy 2
a 100000000000000000000000000000000000000000000
"JyJ 6-A"

6-wwll"5S1 6-B"

6-A
( xt^2 + x) = - 4
jss 1 s jzal y aae g. jss jss uai ai z!
B
1
J 1
2
aA4 LTR 50
3
a
4
1
5
FINE 42
4
5
4 4 (Alarm) 3 3 3 3 3 3 3 3 3 3 3 3 3 3 3 3 3 3 3 3 3 3 3 3 3 3 3 3 3 3 3 3 3 3 3 3 3 3 3 3 3 3 3 3 3 3 3 3 3 3 0

4
② x^2 + 5x - 6 = 12
1
FINE
FINE
FINE 1
10125 10125

3
C. 1,2,3
1

FINE
02
a
2


aill llll llll llll llll llll
aai 1

e1
aalal
aallll 1
.(ON/Stop) (ON)
9 9 (A) (Alarm) 11 11 11 11 11 11 11 11 11 11 11 11 11 11 11 11 11 11 11 11 11 11 11 11 11 11 11 11 11 11 11 11 11 11
4
4.1

adaii iaiy jaiiy

J 2
yI yI yI yI yI yI yI yI yI yI yI yI yI yI yI yI yI yI yI yI yI yI yI yI yI yI yI yI yI
0
2 3

From Web site
Prek splenetega mesta
Oу Ye6caɪta
CBe6-caTa
Putem web-stranice
PnPiOMoUyIaMbkaHa pa6ooyem cTone
3a donomoroio npnka ha po6oohmy ctoJI
Putem prečaca na radnoj povrsini
iikai jai


From Web site
Prek splenetega mesta
Oуевсайта
CBe6-caTa
Putem web-stranice