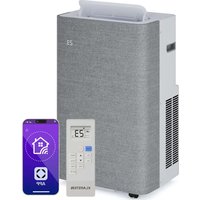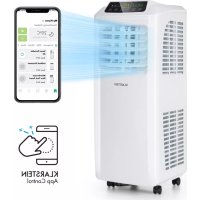
Pure Blizzard Smart - Air Conditioning Klarstein - Free user manual and instructions
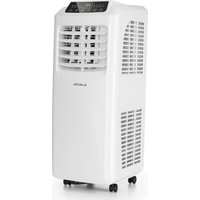
Find the device manual for free Pure Blizzard Smart Klarstein in PDF.


| Brand | Klarstein |
| Model | Pure Blizzard Smart |
| Product type | Portable air conditioner |
| Cooling capacity | 7,000 BTU (2.1 kW) or 9,000 BTU (2.6 kW) depending on model |
| Power supply | 220-240 V ~ 50-60 Hz |
| Ambient temperature range | 10-35 °C |
| Adjustable temperature | 16-30 °C |
| Refrigerant | R290 (flammable) |
| Sound power | 65 dB(A) |
| Energy class | A |
| Power consumption | 0.8 kWh/h (7,000 BTU) or 1.0 kWh/h (9,000 BTU) |
| Wi-Fi | 802.11 b/g/n, 2.4 GHz |
| Operating modes | Air conditioning, Dehumidification, Ventilation |
| Timer | 1-24 hours |
| Sleep function | Yes |
| Smartphone control | Yes (Klarstein app) |
| Water tank | Manual drainage or fixed evacuation possible |
| Filters | Evaporator filter, condenser filter, fine filter |
| Maintenance | Clean filters every 2 weeks |
| Safety | Anti-freeze protection, overflow protection, delayed compressor start |
| Package contents | Main unit, remote control, air duct, sealing frame, C-bracket, accessories |
Frequently Asked Questions - Pure Blizzard Smart Klarstein
User questions about Pure Blizzard Smart Klarstein
0 question about this device. Answer the ones you know or ask your own.
Ask a new question about this device
Download the instructions for your Air Conditioning in PDF format for free! Find your manual Pure Blizzard Smart - Klarstein and take your electronic device back in hand. On this page are published all the documents necessary for the use of your device. Pure Blizzard Smart by Klarstein.
USER MANUAL Pure Blizzard Smart Klarstein
PURE BLIZZARD SMART 7K|9K
Klimaanlage
Air Conditioner
Aire acondicionado
Climatiseur
text_image
QR code image containing encoded data, no visible human-readable textINHALTSVERZEICHNIS
natural_image
Diagram showing two window frame configurations with directional arrows indicating movement or force (no text or symbols)natural_image
Line drawing of an air conditioner unit with a hose, mounted on a wall near a door (no text or symbols)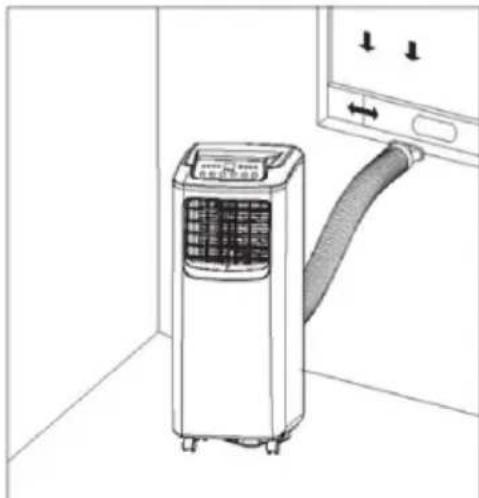
natural_image
Line drawing of an air conditioner unit with attached hose and control panel (no text or symbols)natural_image
Simple line drawing of a circular container with a grid pattern inside (no text or symbols)Member of Berlin Brands Group
Handwerkerstr. 11
15366 Dahlwitz-Hoppegarten
Deutschland
natural_image
Symbol of a trash bin crossed with a diagonal line, no text or numbers presentBerlin Brands Group UK Ltd
PO Box 1145
Oxford, OX1 9UW
United Kingdom
Congratulations on purchasing this equipment. Please read this manual carefully and take care of the following hints to avoid damages. Any failure caused by ignoring the items and cautions mentioned in the instruction manual is not covered by our warranty and any liability. Scan the QR code to get access to the latest user manual and other information about the product.

text_image
QR code image containing encoded data, no visible human-readable textCONTENT
Notes on Refrigerant R290 32
Safety Instructions 33
Product Overview 35
Control Panel and Remote Control 36
Installation 37
How to Install the Window Seal 40
Use and Operation 41
Protection Functions 42
Device Control by Smartphone 43
Water Tank and Continuous Drainage 45
Cleaning and Care 47
Troubleshooting 49
Disposal Considerations 51
Declaration of Conformity 51
Product Data Sheet 52
Product Data Sheet 54
TECHNICAL DATA
| Item number 10035805, 10035806 10035807, 10035808 | ||
| Cooling capacity 7.000 BTU | 9.000 BTU | |
| Power supply 220-240V ~ 50-60 Hz | ||
| Operating temperature 10-35 °C | ||
| Setting temperature 16-30 °C | ||
| WiFi standard | 802.11 b/g/n | |
| WiFi frequency | 2,4 GHz | |
| WiFi radio-frequency power (max.) | 20 dBm | |
NOTES ON REFRIGERANT R290
Warnings
- The air conditioning system must be kept and transported upright. Otherwise, irreparable compressor damage may occur. Leave the unit for at least 24 hours before putting it into operation.
- Switch off the device and disconnect it from the power supply before cleaning.
- Make sure that the product creates a steady stream of air. Ensure the air inlets and outlets are not blocked.
• To prevent leaks, operate this unit on a horizontal surface. - Any person performing work on a refrigerant circuit should have a current certificate from an industry-accredited assessment body. This ensures competence for the safe handling of refrigerants according to an industry-recognised assessment specification.
- If the device stops working, dispose of it properly.
- Store the device in a well-ventilated place when not in use.
- Store the device so that it is not damaged.
- Repairs may only be carried out by the manufacturer or an authorised specialist company.
- The cables connected to the device may contain potential ignition sources.
- Do not damage any components of the refrigerant circuit. Escaping refrigerant may not be noticed because it is odourless.
- Maintenance and repairs must be carried out under the supervision of specialists in the use of fl ammable refrigerants.
Information for rooms with refrigerant pipes
- Limit the piping to a minimum.
- Be careful not to damage the piping.
- Appliances with fl ammable refrigerants may only be installed in a well-ventilated room.
• Comply with national gas regulations. - All mechanical connections must be freely accessible for maintenance purposes.
CAUTION
Risk of fi re! This device contains the fl ammable refrigerant R290. If the refrigerant escapes and is exposed to an external ignition source, there is a risk of fi re.
SAFETY INSTRUCTIONS
Special notes
- Only use agents recommended by the manufacturer for defrosting or cleaning.
- Never store the appliance in a room in which there are permanent sources of ignition (e.g. open flames, a switched on gas appliance or a switched on electric heater).
- Do not puncture or burn the appliance.
• Note that coolant may be odourless.
Note: Only use the unit in rooms larger than X m ^2 (see table):
| Model X ( m^2 ) | |
| 5000 BTU/h, 7000 BTU/h, 8000 BTU/h 10 m^2 | |
| 9000 BTU/h, 10000 BTU/h, 10500 BTU/h 13 m^2 | |
| 12000 BTU/h, 14000 BTU/h, 16000 BTU/h,18000 BTU/h 1 | 8 m^2 |
General safety instructions
• The device is only suitable for indoor use.
- Do not use the product if it needs to be repaired or if it has not been installed properly.
- Do not use the product in the following areas:
- near heat sources,
- in areas where oil can splash,
- in areas exposed to direct sunlight,
- in areas where splash water can occur,
-
near bathtubs, in washrooms, near showers or swimming pools.
-
Never insert your fingers or other objects into the ventilation openings. In particular, warn children of the dangers this may cause.
- Ensure that the unit is held vertically during transport and storage so that the compressor is correctly positioned.
• Always turn off the appliance before cleaning and unplug it from the wall outlet. - Switch off the appliance before moving it and unplug it from the wall outlet. Move the appliance slowly and carefully.
• To avoid the risk of fire, do not cover the unit.
- All fan connections must comply with local electrical safety regulations. If necessary, refer to these regulations.
- Supervise children so that they do not play with the unit.
- If the power cord is damaged, it must be replaced by the manufacturer, customer service or a similarly qualified person to avoid danger.
- This equipment may be used by children over the age of 8 and by persons (including children) with limited physical, sensory or mental capabilities and/or lack of experience and knowledge, provided they have been instructed in the use of this equipment by a person responsible for their safety and understand the hazards associated with the use of this equipment. Cleaning and maintenance of the appliance may only be carried out by children under supervision.
- The appliance must be installed in accordance with national wiring regulations.
• Type and voltage of fuses: T, 250 V AC, 2 A or higher.
- Contact customer service for cleaning and maintenance.
- Do not pull the power cord, deform or modify it, or immerse it in water. Incorrect handling of the power cord may result in damage to the equipment and/or electric shock.
• National gas regulations must be observed.
- Do not block the ventilation openings.
- Do not operate the appliance solely by inserting or removing the power plug, as this may result in electric shock or fire due to heat.
- Immediately unplug the appliance from the wall outlet if it emits strange noises, odours or smoke.
Instructions for Handling Damage
- In case of damage to the device, contact the manufacturer, customer service or a similarly qualified person.
- If damage occurs, turn off the power, unplug the power cord, and contact the manufacturer, the service representative, or a similarly qualified person.
• The power cord must be securely earthed. - If the power cord is damaged, turn off the power to avoid danger and unplug the power cord from the wall outlet. The power cord must be replaced by the manufacturer, customer service or a similarly qualified person.

WARNING
Risk of injury! Repairs to the coolant circuit may only be carried out by trained specialist personnel. Never attempt to repair the unit yourself!
PRODUCT OVERVIEW
| 1 | Control panel | 15 | Lower air duct bottom |
| 2 | Horizontal louvre | 16 | Wire-winding post |
| 3 | Vertical louvre | 17 | Drain cap |
| 4 | Air outlet frame | 18 | Evaporator filter mesh |
| 5 | Vertical louvre connecting lever | 19 | Evaporator filter frame |
| 6 | Caster | 20 | Radiating fine mesh |
| 7 | Top cap | 21 | Condenser filter mesh |
| 8 | Horizontal louvre connecting lever | 22 | Condenser filter frame |
| 9 | Main vertical louvre | 23 | Base plate |
| 10 | Front shell | 24 | Remote control |
| 11 | Handle position (right side: remote control storage area) | 25 | Exhaust hose short connector |
| 12 | Back shell | 26 | Heat exhaust hose |
| 13 | C-shaped buckle of the heat exhaust hose snap | 27 | Sealing board assembly |
| 14 | Power cord | 28 | Circular connector |
CONTROL PANEL AND REMOTE CONTROL
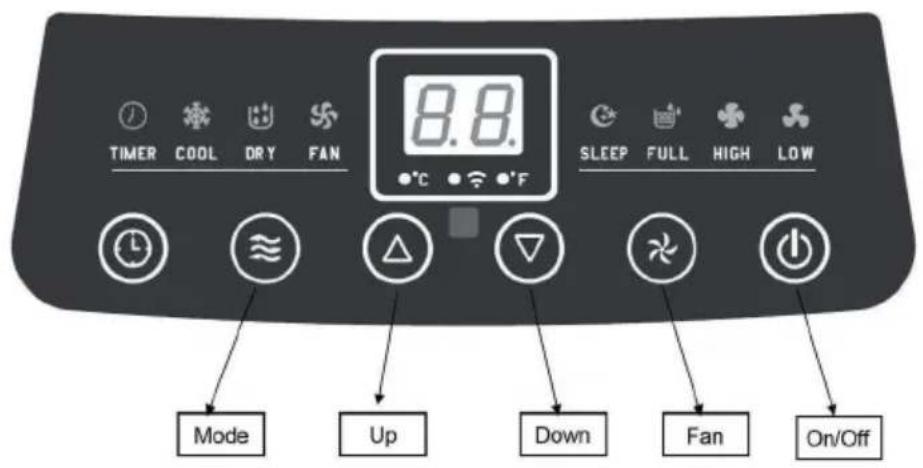
text_image
TIMER COOL DRY FAN 8.8. SLEEP FULL HIGH LOW Mode Up Down Fan On/OffControl Panel and Key Functions
| Power Press the key to start the unit, and press this key again to turn unit off. |
| Mode Set the Cooling, Dehumidifying and Fan Mode when unit is working. |
| Fan speed Change fan speed low - high. Not available in dehumidifying mode. |
| Timer To switch the unit on/off automatically. |
| Up/Down Increase/decrease room temperature by 1 °C. Change from °C to °F by pressing these two keys at the same time. |
Remote Control and Key Functions
| Power Press the key to start the unit, and press this key again to turn unit off. |
| Timer To switch the unit on/off automatically. |
| High/Low Change between high fan speed and low fan speed. |
| Up/Down Increase/decrease room temperature by 1 °C. |
| Cool Set this unit to operate in the cooling mode. |
| Fan set this unit to operate in the air supply mode. |
| Dry Set this unit to operate in the dry mode. |
| Sleep Set this unit to operate in sleeping mode. |
INSTALLATION
Important Hints on Installation
- Leave this mobile air-conditioner in an upright position for at least 2 hours before first use.
- This air-conditioner may be moved indoor conveniently; leave the air-conditioner in an upright position while moving it.
• The air-conditioner shall be placed on a flat ground surface. - Do not install or operate this air-conditioner in a bathroom or other wet environments.
Installation of the C shape buckle of the heat exhaust hose and unit
• Take out the C shape buckle of the heat exhaust hose and remove the plastic bag.
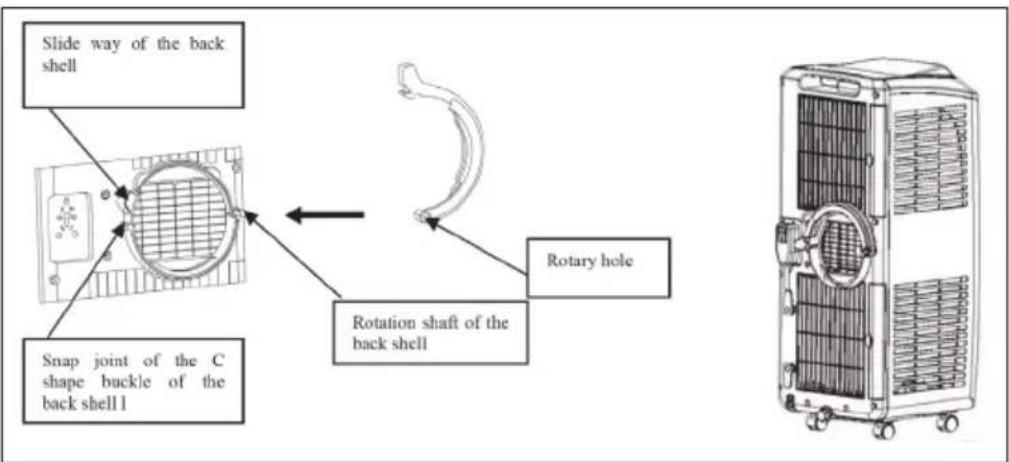
- Point the rotary hole at the end of the heat exhaust hose snap toward the rotation shaft of the back shell and slide it onto the back shell in accordance with the snap joint direction of the rotation shaft on the back shell (see picture). When the end snap joint at the end of the rotation shaft of the back shell sticks out of the snap, it means that the heat exhaust hose snap has been slid into place.
- Rotate the C shape buckle counterclockwise to clip the snap joint of the C shape buckle of the back shell successfully through the guide of the slide way of the back shell (see picture).
text_image
Slide way of the back shell Snap joint of the C shape buckle of the back shell Rotation shaft of the back shell Rotary holeInstallation of the heat exhaust hose assembly and unit
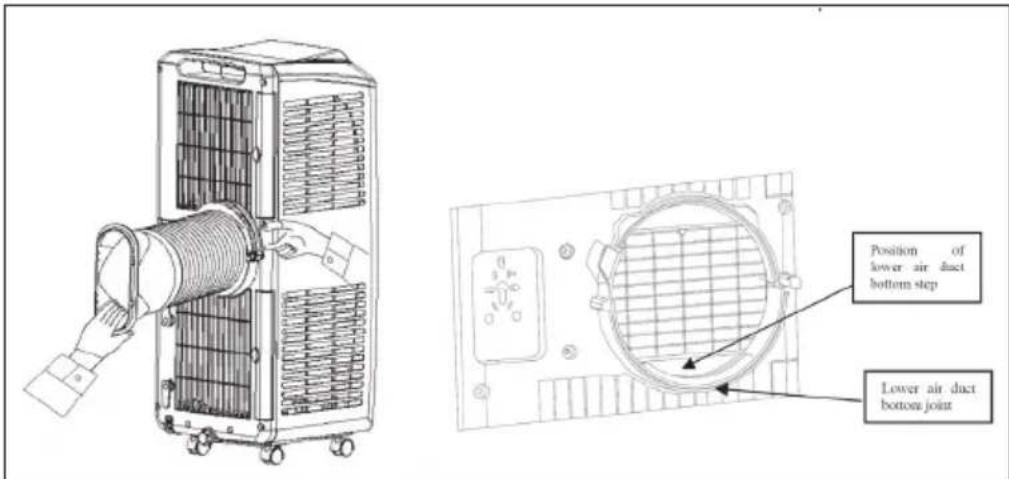
- Pull the end of the heat exhaust hose apart by several turns. - Hold the end handle of the C shape buckle with the left hand and the heat exhaust hose short connector with the right hand, put one end of the heat exhaust hose that is pulled apart onto the snap of the lower air duct bottom, press the C shape buckle with the left hand by force so that the C shape buckle of the heat exhaust hose clips the snap joint of the back shell. The end of the heat exhaust hose must reach one step inside the bottom of the lower air duct (see picture).
- The few turns at the end of the heat exhaust hose must be snapped in the snap of the lower air duct bottom. The C shape buckle that clips the heat exhaust hose must clip the back shell and heat exhaust hose firmly. Hold the unit with one hand and the heat exhaust hose short connector with another hand; or both people cooperate with one person holding the unit and the other person pulling the heat exhaust hose to prolong the heat exhaust hose gently.
text_image
Position of lower air duct bottom step Lower air duct bottom jointInstallation of the window sealing board assembly
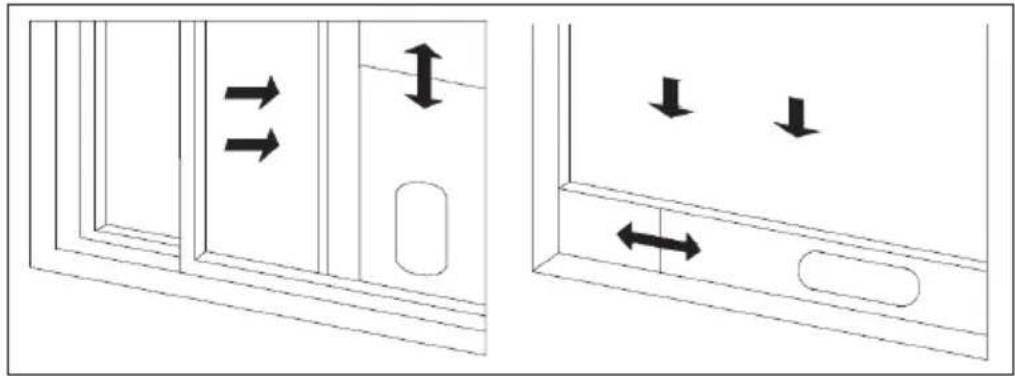
Half open the window and mount the window sealing board assembly onto the window, either vertically or horizontally (see picture). Pull apart the parts of the assembly, adjust the distance of assembly pulled apart so that the two ends of the assembly come into contact with the frame, and fasten the parts of the assembly with screws.
natural_image
Diagram showing two window frame configurations with directional arrows indicating movement or force (no text or symbols)Installation of the unit
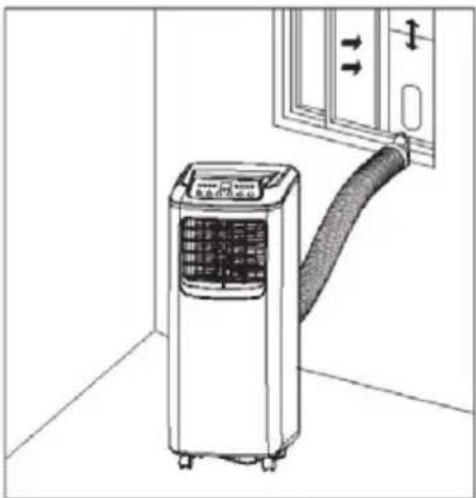
Move the machine with the heat exhaust hose assembly installed before the window and keep the unit at least 50 cm away from the walls or other objects. Snap the flat end of the heat exhaust hose short connector into the elliptical hole of the window sealing board assembly (see picture below).
Note: The flat end of the exhaust hose short connector must be snapped into place. The heat exhaust hose may not be bent and shall be free from significant (greater than 45°) flexure. The exhaust hose is 280-1500 mm long and this length is determined based on the specification of the air-conditioner. Do not use prolonged hose or replace with other different hoses as this may affect the functions of the air-conditioner. The exhaust must be smooth and the air-conditioner may overheat if the exhaust is obstructed.
natural_image
Line drawing of an air conditioner unit with a hose, placed near a door (no text or symbols visible)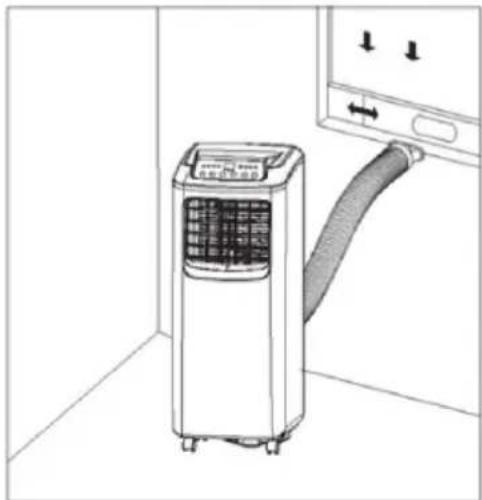
natural_image
Line drawing of a small air conditioner unit with a hose, next to a control panel (no text or symbols visible)HOW TO INSTALL THE WINDOW SEAL
Installing the window sealing is easy. You can attach it to a tilted window or to a laterally opened window. Our demonstration is performed on a laterally opened window. It is especially suitable for low positions of the exhaust pipe.
The velcro tape must be attached on three sides. Leave out the side with the window being connected to the frame. Clean the frame and dry it first, so that the tape sticks.
| 123 | ||
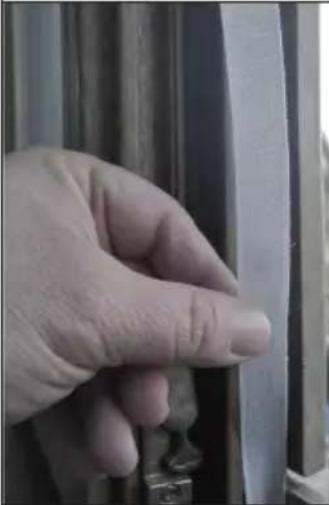 | 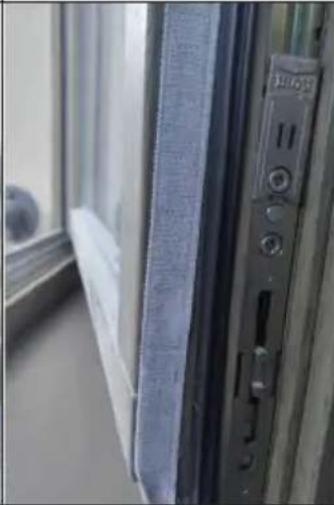 | 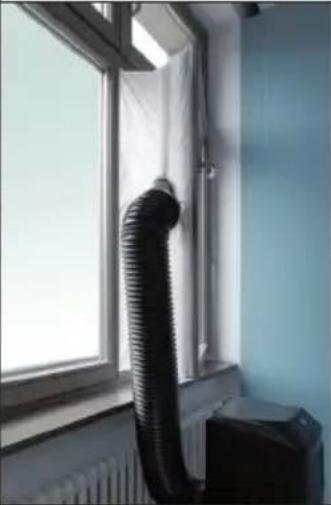 |
| Attach the velcro tape on the left, on the top and on the bottom of the window frame.We recommend that you cut the tape into strips for each window side first. | Now attach the velcro tape to the inner window sides. | Stick the window sealing to the velcro strips on the window frame first (starting with the top), then on the velcro strips on the window.Push the exhaust air tube of the air conditioner through the hole, which can be adjusted in height and size. |
USE AND OPERATION
Sleep Mode
After two hours of operation, the set temperature automatically increases by 1 °C . After another 2 hours of operation, the set temperature increases again by 1 °C . The temperature then remains the same and the fan runs at low speed.
Cooling Mode
If the room surrounding temperature is higher than the setting temperature, the cooling is starting. If the room surrounding temperature is higher than the setting temperature, the compressor stops and only the fan motor remains working at the set fan speed.
Dry Mode
In the dry mode, if the ambient temperature ≥17 ^ , the compressor will start. Then, the unit is controlled in the following manner: when the ambient temperature ≤15 ^ , the compressor shuts down. When the ambient temperature rises to be ≥17 ^ , the compressor starts again. The start/stop of the compressor meets the requirement for 3-minute protection time.
Fan Mode
Under the fan mode, fans runs on both high speed or low speed. Temperature setting is in vain, unit just displays environment temperature between 10-35 °C.
Temperature Setting
The up button and down button may be used to change the set value of the temperature.
Timer Setting
- Press the Timer button to enter timed shutdown. Upon shutdown, press this button to enter timed start. In the meanwhile, the timer indicator illuminates. Press the Timer button to enter timed start/timed shutdown. Adjust the up or down button to set the timing time. The time will cycle in the order of 1 to 24 to 1. The adjustment time of the timing function is relative time.
- After timed start is set, once the timed start time is reached, the unit will start. In the meanwhile, the timer indicator will extinguish and the ambient temperature is displayed.
-
After timed shutdown is set, once the timed shutdown time is reached, the unit will shut down. In the meanwhile, the timer indicator will extinguish and the ambient temperature is displayed.
-
ON/OFF operations caused by the button or remote control will clear all timing settings.
- Once the timing is determined, if the timer button is pressed once, it is possible to query the remaining timed start/shutdown time. If the timer button is pressed twice continuously within 5s, it is possible to cancel timing.
PROTECTION FUNCTIONS
Anti-freeze protection function
If the compressors operates continuously for more than 10 minutes and the pipe temperature is less than 2 °C continuously for 20 seconds, the compressor and water spraying motor turn off. LED displays E4 and the unit initiates the anti-frost protection function and the buttons are inactive (except the OFF button). Once the pipe temperature exceeds 8 °C, the protection is relieved, the original status is restored and the unit meets the requirements for 3-minute delay protection of the compressor.
Full water protection function
When the water in the water tray exceeds the alarm level, the unit will alarm automatically and the full water indicator illuminates. In this case, you need to drain the condensate in the unit; otherwise, the unit will shut down automatically after the buzzer gives off 5 beeps. The unit will be restored to the previous operating status automatically once the water is fully drained.
Delay protection function of the compressor
This unit offers restart protection for the compressor. Except that the compressor may start immediately when the unit is energized for the first time, there is 3-minute delay start protection after the compressor is shut down.
DEVICE CONTROL BY SMARTPHONE
If you integrate the device into your home WiFi, you can conveniently operate it via the associated Klarstein app. The app not only allows you to remotely control the device via your smartphone, but also gives you access to recipes and additional information.
Follow these steps to connect your smartphone to your Klarstein device:
1 Download the Klarstein app first by scanning the QR code with your smartphone (see below), or download it directly from App Store or Google Play.
2 Make sure your smartphone is connected to the same WiFi network that your Klarstein device is to be connected to.
3 Open the Klarstein app.
4 Sign in to your account. If you do not have an account, sign up in the Klarstein app.
5 Follow the instructions from the app.
App Download
Use the scan function of your smartphone to scan the QR code and save the app on your smartphone.
Note: The app provides further information on how to use the app and help on how to connect to your device as soon as you open it for the first time.
| iOS Android | |
 |  |
Troubleshooting connection problems
If your Klarstein device cannot be found in the WLAN, check the following:
• Is the device plugged in?
• Is the WiFi feature of my phone enabled?
- Is the WiFi function of the Klarstein device activated? (Follow the instructions in the app)
- Has the WLAN password been entered correctly?
- Are the router, Klarstein device and smartphone in the immediate vicinity during the connection attempt? (Ideally no more than 5 m apart)
- If you have deactivated the 2.4 GHz band in the settings of your wireless router, activate it in your router settings.
Note: For further help, follow the instructions in the app when setting up the connection.
WATER TANK AND CONTINUOUS DRAINAGE
Empty water tank manually
Once the unit shuts down upon full water, turn off the power of the unit and then unplug the power plug. Move the unit carefully to avoid spillage of water in the water tray at the bottom of the unit
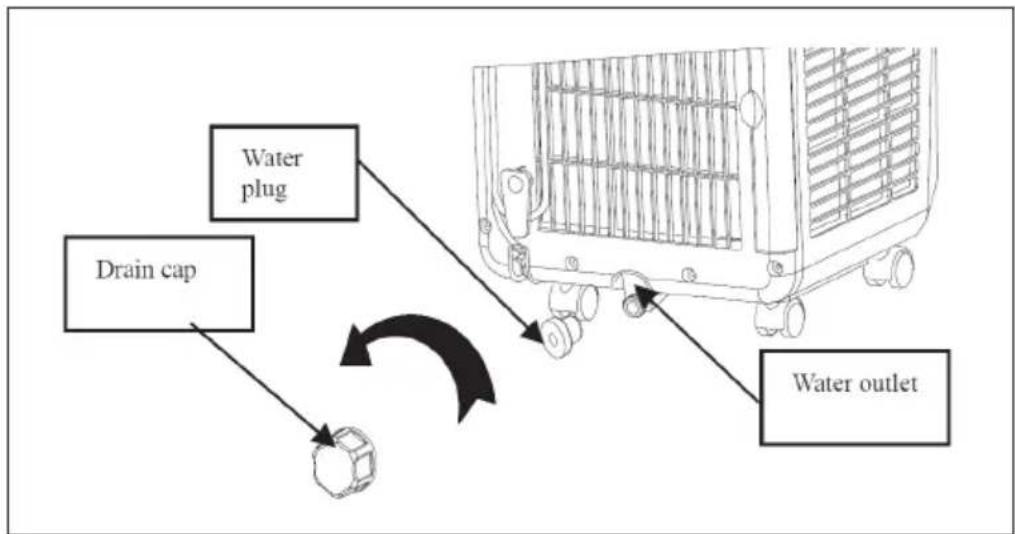
- Put the vessel that holds water below the water outlet at the back of the unit.
- Screw off the drain cap, unplug the water plug and water will flow into the vessel that holds water automatically. If the vessel that holds water can not hold all water in the unit, before the vessel that holds water is full of water, block the water outlet with the water plug as soon as possible to prevent the water from flowing onto the ground or carpet.
flowchart
graph TD
    A["Drain cap"] --> B["Water plug"]
    B --> C["Water outlet"]
    C --> D["Return to drain cap"]
Note: Protect the drain cap and water plug properly. Tilt the unit slightly backward when draining. Turn on the unit only after the water plug and drain cap are installed properly; otherwise, the condensate of the unit will flow onto the ground or carpet.
Continuous Drainage
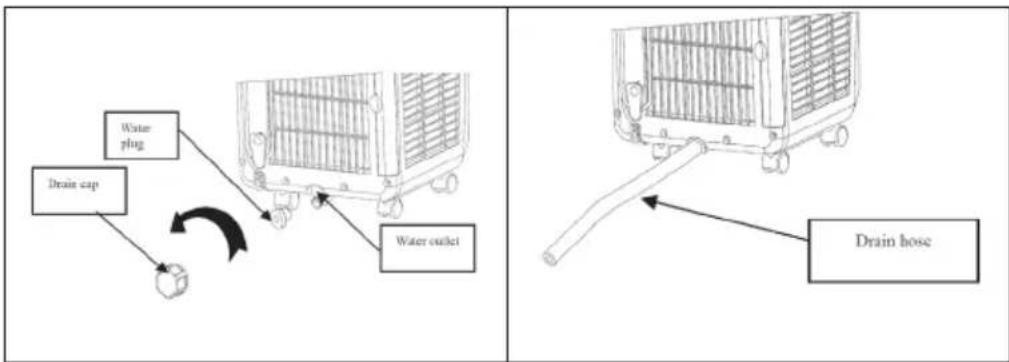
Screw off the water cap in the direction shown by the arrow and unplug the water plug. Insert the OD 13 mm PVC drain hose 8-10 mm into the water outlet and connect the drain hose to a sink.
flowchart
graph TD
    A["Water plug"] --> B["Drain cap"]
    B --> C["Water outlet"]
    D["Drain hose"] --> E["Water outlet"]
    style A fill:#f9f,stroke:#333
    style B fill:#ccf,stroke:#333
    style C fill:#cfc,stroke:#333
    style D fill:#fcc,stroke:#333
    style E fill:#cff,stroke:#333
Important Hints on Continuous Drainage
- When operating in the heating mode, adopt continuous drain; otherwise, the unit may shut down due to full water.
- Put the drain hose in an inaccessible place at a height not above the water outlet and keep the drain hose free from flexure.
- When continuous drain is adopted, keep the drain cap and water plug properly.
CLEANING AND CARE
Clean the surface of the unit with wet soft cloth. Do not use chemical solvents such as alcohol and gasoline; otherwise, the surface of the air-conditioner may be damaged and even the whole unit may be damaged.
Cleaning of the filter frame and filter mesh
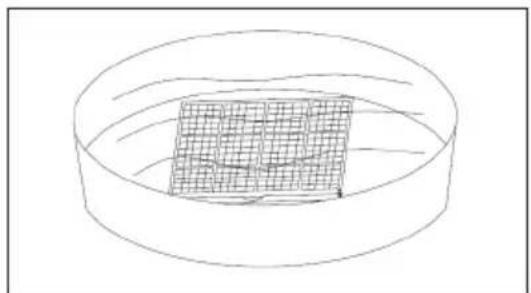
Clean the filter mesh once every two weeks. If the filter frame and filter mesh are clogged with dust, the function of the air-conditioner may decrease
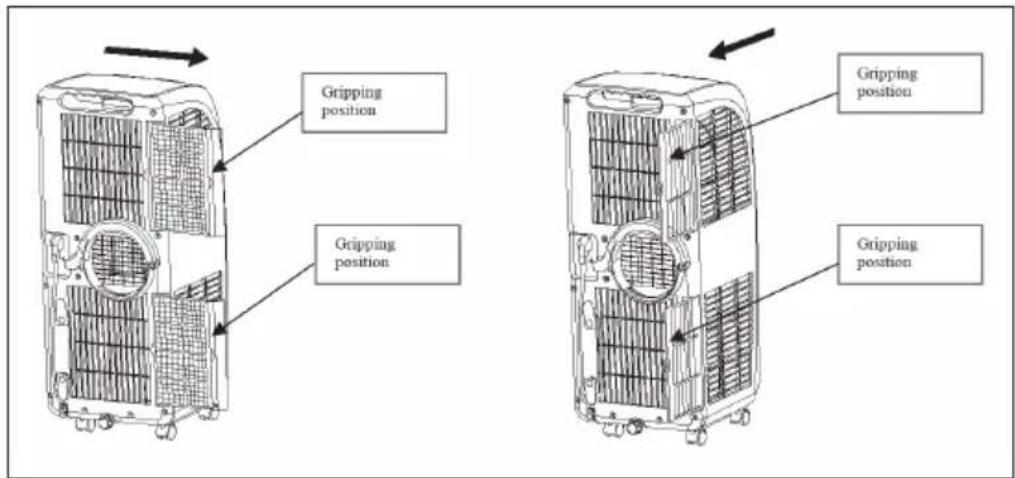
- Grip the gripping position of the evaporator filter frame and the condenser filter frame and take out the filter frame gently in the direction shown by the arrow.
- Grip the gripping position of the evaporator filter mesh and condenser filter mesh and take out the filter mesh gently in the direction shown by the arrow.
text_image
Gripping position Gripping position Gripping position Gripping position- Clean the frames and filters in warm water (not warmer than 40 °C) with a little neutral cleaner. Let the parts dry in the shade. Take care not to damage the filter fabric. After the parts have dried, replace the filters in the frames.
- Make sure that the filters are in the frames before pushing the frames back into the unit. Then carefully push the frames back into the unit.
natural_image
Simple line drawing of a container with a grid pattern inside (no text or symbols)Cleaning of the handle position and remote control storage area
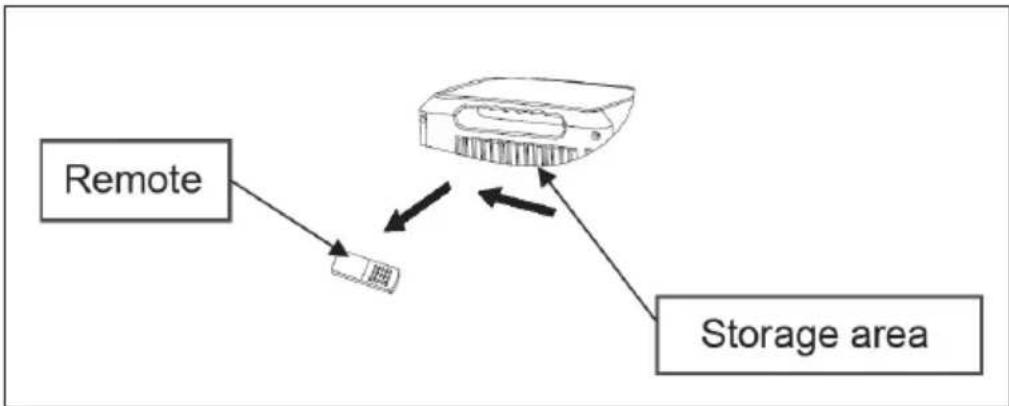
Take the remote control out of the storage area in the direction shown by the arrow. Clean the handle position and remote control storage area of this unit with wringed wet soft cloth. Do not drip water into the unit. If the remote control needs to be put back into the remote control storage area, put it back into the storage area in the reverse direction of removal.
flowchart
graph TD
    A["Remote"] --> B["Device"]
    B --> C["Storage area"]
    style A fill:#f9f,stroke:#333
    style B fill:#ccf,stroke:#333
    style C fill:#cfc,stroke:#333
Moving and storing equipment
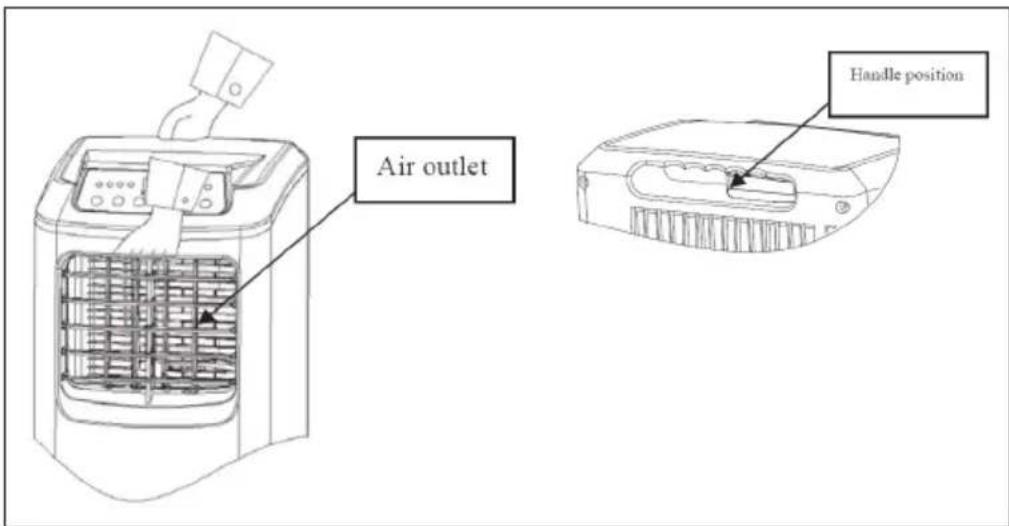
To handle or move the unit, hold the top of the air outlet of the front shell with one hand and the handle position at the top of the back shell with another hand, and leave the unit in upright position.
text_image
Air outlet Handle positionNote: Do not hold the horizontal louvre by hand. Leave the unit in the upright position when handling or moving it. If the remote control is in the position of the handle, take out the remote control.
End of Season Storage
- Screw off the drain cap, unplug the water plug and drain the water in the water tray to another vessel that holds water. The tilt angle of the unit shall not be greater than 30 degrees.
- Start the unit, turn the mode to the low fan speed state of the air supply mode, keep this state for half a day and dry the interior of the unit to prevent mold.
- Turn off the unit, unplug the power plug, wrap the power cord around the wire-winding post, insert the plug into the universal jack at the back shell of the unit; install the water plug and drain cap.
- Remove the heat exhaust hose assembly and keep it properly.
- Pack the air-conditioner properly with soft plastic bag, put the unit in a dry place & take appropriate dust-proof measures, and keep the unit out of the reach of children.
• Take out the batteries of the remote control and keep it properly.
TROUBLESHOOTING
| Problem Cause Remedy | ||
| The air-conditioner does not work | No power. Connect the unit | to a live socket and turn it on. |
| Full water indicator illuminates. | Drain the water stored in the unit. | |
| Ambient temperature too low? | It is recommended that this unit be operated at 10-35 °C. | |
| The room temperature is lower than the set temperature in the cooling mode. | Change the set temperature. | |
| Bad cooling or heating effects | There is direct sunlight. Draw | the curtain on. |
| The doors and windows are open, the room is crowded or there are other heat sources in the cooling mode. | Close the door and window and add new air-conditioners. | |
| Bad cooling/heating effects | Filter mesh very dirty. Clean | or replace the filter mesh. |
| Air inlet or air outlet clogged. | Remove the obstruction. | |
| Large noise. Air-conditioner | not put on a flat surface. | Put the air-conditioner in a flat and firm place (may reduce noise). |
| The compressor does not work. | Initiation of overheat protection. | Wait 3 minutes until the temperature decreases and then turn on the unit. |
| The remote control does not work. | Too long a distance. Wait 3 | minutes until the temperature decreases and then turn on the unit. |
| The remote control does not point toward the receiving head of the remote control. | Bring the remote control close to the air-conditioner and ensure that the remote control points toward the receiving head of the remote control. | |
| The batteries have no electricity. | Replace the batteries. | |
| Display E1. Pipe temperature | sensor failure. | Check the pipe temperature sensor and related circuits. |
| Display E2. Room temperature | sensor failure. | Check the room temperature sensor and related circuits. |
| Display E4. Anti-freeze protection. | Restore the functions | automatically once defrozen. |
| Full water indicator illuminates | The water in the baseplate of the unit reaches the full water level. | Drain the water in the baseplate. |
DISPOSAL CONSIDERATIONS
natural_image
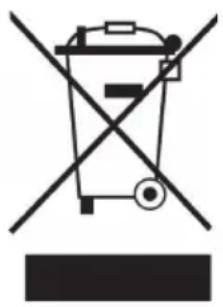
Symbol of a trash bin crossed with a diagonal line, no text or numbers presentIf there is a legal regulation for the disposal of electrical and electronic devices in your country, this symbol on the product or on the packaging indicates that this product must not be disposed of with household waste. Instead, it must be taken to a collection point for the recycling of electrical and electronic equipment. By disposing of it in accordance with the rules, you are protecting the environment and the health of your fellow human beings from negative consequences. For information about the recycling and disposal of this product, please contact your local authority or your household waste disposal service.
This product contains batteries. If there is a legal regulation for the disposal of batteries in your country, the batteries must not be disposed of with household waste. Find out about local regulations for disposing of batteries. By disposing of them in accordance with the rules, you are protecting the environment and the health of your fellow human beings from negative consequences.
DECLARATION OF CONFORMITY
CE UK CA
Manufacturer:
Chal-Tec GmbH, Wallstrasse 16, 10179 Berlin, Germany.
Importer for Great Britain:
Berlin Brands Group UK Ltd
PO Box 1145
Oxford, OX1 9UW
United Kingdom
Hereby, Chal-Tec GmbH declares that the radio equipment type Pure Blizzard Smart is in compliance with Directive 2014/53/EU. The full text of the EU declaration of conformity is available at the following internet address: use.berlin/10035805
For Great Britain: Hereby, Chal-Tec GmbH declares that the radio equipment type Pure Blizzard Smart is in compliance with the relevant statutory requirements. The full text of the declaration of conformity is available at the following internet address: use. berlin/10035805
PRODUCT DATA SHEET
Information according to regulation (EU) No. 626/2011
Supplier's trademark:
Klarstein
Supplier's model identifier:
10035805, 10035806
Inside sound power levels at standard rating conditions on cooling mode in dB:
65 dB
Refrigerant (R290) leakage contributes to climate change. Refrigerant with lower global warming potential (GWP) would contribute less to global warming than a refrigerant with higher GWP, if leaked to the atmosphere. This appliance contains a refrigerant fluid with a GWP equal to 3. This means that if 1kg of this refrigerant fluid would be leaked to the atmosphere, the impact on global warming would be 3 times higher than 1kg of CO_2 , over a period of 100 years. Never try to interfere with the refrigerant circuit yourself or disassemble the product yourself and always ask a professional.
Energy efficiency ratio ( EER_rated ): 2,6
Energy efficiency class:
A
Energy consumption 0,8 kWh per 60 minutes, based on standard test results. Actual energy consumption will depend on how the appliance is used and where it is located.
Cooling capacity P_rated in kW:
2,1 kW
Information according to regulation (EU) No. 206/2012
| Model identifier(s) 10035805, 10035806 | |||
| Description Symbol Value Unit | |||
| Rated capacity for cooling P | rated for cooling | 2,1 kW | |
| Rated capacity for heating P | rated for heating | kW | |
| Rated power input for cooling P | EER | 0,8 kW | |
| Rated power input for heating P | COP | -kW | |
| Rated Energy efficiency ratio EERd 2,6 - | |||
| Rated Coefficient of performance COPd -- | |||
| Power consumption in thermostat-off mode | P_TO | - | W |
| Power consumption in standby mode | P_SB | 0,8 W | |
| Electricity consumption of single/double duct appliances (indicate for cooling and heating separately) | DD: Q_DD SD: Q_SD | 0,8 DD: kWh/aSD: kWh/h | |
| Sound power level | L_WA | 65 | dB(A) |
| Global warming potential | GWP | 3 | kgCO _2 eq. |
| Contact details for obtaining more information | Chal-Tec GmbH, Wallstraße 16, 10179 Berlin, Germany. | ||
PRODUCT DATA SHEET
Information according to regulation (EU) No. 626/2011
Supplier's trademark:
Klarstein
Supplier's model identifier:
10035807, 10035808
Inside sound power levels at standard rating conditions on cooling mode in dB:
65 dB
Refrigerant (R290) leakage contributes to climate change. Refrigerant with lower global warming potential (GWP) would contribute less to global warming than a refrigerant with higher GWP, if leaked to the atmosphere. This appliance contains a refrigerant fluid with a GWP equal to 3. This means that if 1kg of this refrigerant fluid would be leaked to the atmosphere, the impact on global warming would be 3 times higher than 1kg of CO_2 , over a period of 100 years. Never try to interfere with the refrigerant circuit yourself or disassemble the product yourself and always ask a professional.
Energy efficiency ratio ( EER_rated ): 2,6
Energy efficiency class:
A
Energy consumption 1,0 kWh per 60 minutes, based on standard test results. Actual energy consumption will depend on how the appliance is used and where it is located.
Cooling capacity P_rated in kW:
2,6 kW
Information according to regulation (EU) No. 206/2012
| Model identifier(s) 10035807, 10035808 | |||
| Description Symbol Value Unit | |||
| Rated capacity for cooling P | rated for cooling | 2,6 kW | |
| Rated capacity for heating P | rated for heating | kW | |
| Rated power input for cooling P | EER | 1,0 kW | |
| Rated power input for heating P | COP | -kW | |
| Rated Energy efficiency ratio EERd 2,6 - | |||
| Rated Coefficient of performance | COPd | -- | |
| Power consumption in thermostat-off mode | P_TO | - | W |
| Power consumption in standby mode | P_SB | 0,6 W | |
| Electricity consumption of single/double duct appliances (indicate for cooling and heating separately) | DD: Q_DD SD: Q_SD | 1,0 DD: kWh/aSD: kWh/h | |
| Sound power level | L_WA | 65 | dB(A) |
| Global warming potential | GWP | 3 | kgCO _2 eq. |
| Contact details for obtaining more information | Chal-Tec GmbH, Wallstraße 16, 10179 Berlin, Germany. | ||
Estimado cliente:
text_image
QR code image containing encoded data, no visible human-readable textÍNDICE DE CONTENIDOS
natural_image
Diagram showing two window frame structures with directional arrows indicating movement or force (no text or symbols)natural_image
Line drawing of an air conditioner unit with a hose, mounted on a wall near a door (no text or symbols)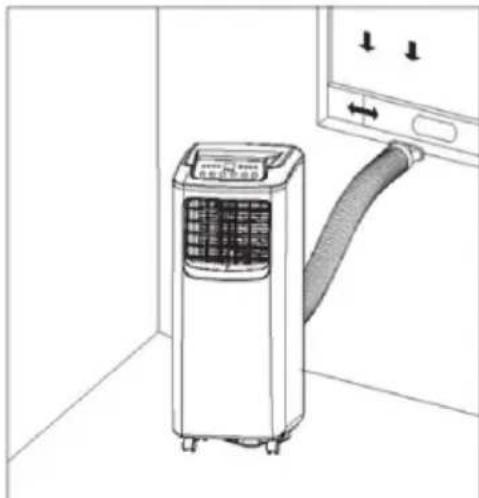
natural_image
Line drawing of an air conditioner unit with attached hose and control panel (no text or symbols)CÓMO MONTAR LA JUNTA
natural_image
Simple line drawing of a circular container with a grid pattern inside (no text or symbols)natural_image
Symbol of a trash bin crossed with a diagonal line, no text or numbers presentBerlin Brands Group UK Ltd
PO Box 1145
Oxford, OX1 9UW
United Kingdom
text_image
QR code image containing encoded data, no visible human-readable textSOMMAIRE
natural_image
Diagram showing two window frame structures with directional arrows indicating movement or force (no text or symbols)natural_image
Line drawing of an air conditioner unit with a hose, placed inside a room near a door (no text or symbols)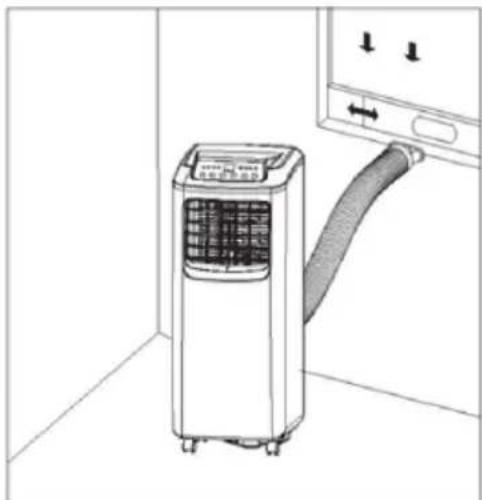
natural_image
Line drawing of an air conditioner unit with a hose and control panel, no text or symbols presentINSTALLATION DU JOINT
natural_image
Simple line drawing of a container with a grid pattern inside (no text or symbols)natural_image
Symbol of a trash bin crossed with a diagonal line, no text or numbers presentDÉCLARATION DE CONFORMITÉ

text_image
CE UK CAFabricant :
Chal-Tec GmbH, Wallstraße 16, 10179 Berlin, Allemagne.
Berlin Brands Group UK Ltd
PO Box 1145
Oxford, OX1 9UW
United Kingdom
FICHE DE DONNÉES PRODUIT
FICHE DE DONNÉES PRODUIT
text_image
QR code image containing encoded data, no visible human-readable textINDICE
natural_image
Diagram showing two window frame configurations with directional arrows indicating movement or force (no text or symbols)natural_image
Line drawing of an air conditioner unit with a hose, mounted on a wall near a door (no text or symbols)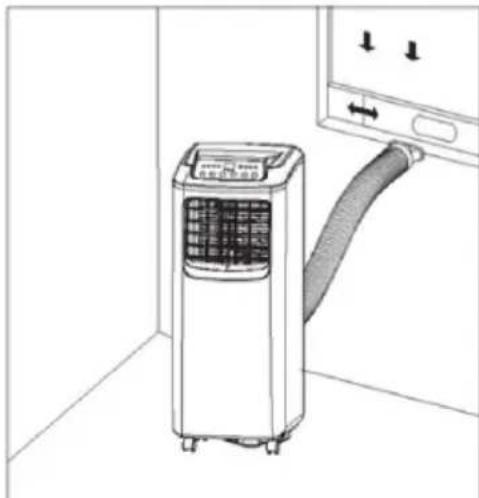
natural_image
Line drawing of an air conditioner unit with attached hose and control panel (no text or symbols)INSTALLARE LA GUARNIZIONE
natural_image
Simple line drawing of a circular container with a grid pattern inside (no text or symbols)natural_image
Symbol of a trash bin crossed with a diagonal line, no text or numbers presentBerlin Brands Group UK Ltd
PO Box 1145
Oxford, OX1 9UW
United Kingdom