
electribe - DJ Equipment KORG - Free user manual and instructions
Find the device manual for free electribe KORG in PDF.
| Product Type | Music production station / Sampler (electribe sampler model) |
| Brand | Korg |
| Model | electribe / electribe sampler |
| Category | DJ Equipment |
| Dimensions (L × D × H) | 339 × 189 × 45 mm |
| Weight | 1.6 kg |
| Power Supply | DC 9 V power adapter (included) or 6 AA batteries (alkaline or Ni-MH) |
| Battery Life | Approximately 5 hours (Ni-MH batteries, power saving mode active) |
| Power Consumption | 500 mA max. |
| Main Features | 16 parts, 250 patterns, step sequencer, touch pad, Gate Arpeggiator, insert and master effects, Motion Seq, sampling (sampler), MIDI/Sync synchronization |
| Polyphony | 24 voices max. for an entire pattern, up to 4 voices per part |
| Storage | SD/SDHC memory card (512 MB to 32 GB, not compatible with SDXC) |
| Connectivity | Audio outputs L/R (6.35 mm), audio input (stereo minijack), sync In/Out (3.5 mm), MIDI In/Out, USB, headphone (3.5 mm) |
| Display | LCD screen, adjustable contrast |
| Operating Temperature | 0 to 40 °C (without condensation) |
| Care and Cleaning | Clean with a clean, dry cloth. Do not use benzene, thinner, or flammable products. |
| Safety | Avoid exposure to sunlight, heat, moisture, dust, vibrations, and magnetic fields. Do not spill liquid. Do not insert metal objects. |
| Included Accessories | User manual, power adapter, MIDI conversion cable × 2 |
| General Information | Manufactured by Korg Corporation. All product names are trademarks of their respective owners. |
Frequently Asked Questions - electribe KORG
User questions about electribe KORG
0 question about this device. Answer the ones you know or ask your own.
Ask a new question about this device
Download the instructions for your DJ Equipment in PDF format for free! Find your manual electribe - KORG and take your electronic device back in hand. On this page are published all the documents necessary for the use of your device. electribe by KORG.
USER MANUAL electribe KORG
Using the unit in the following locations can result in a malfunction.
- In direct sunlight
- Locations of extreme temperature or humidity
- Excessively dusty or dirty locations
- Locations of excessive vibration
- Close to magnetic fields
Power supply
Please connect the designated AC adapter to an AC outlet of the correct voltage. Do not connect it to an AC outlet of voltage other than that for which your unit is intended.
Interference with other electrical devices
Radios and televisions placed nearby may experience reception interference. Operate this unit at a suitable distance from radios and televisions.
Handling
To avoid breakage, do not apply excessive force to the switches or controls.
Care
If the exterior becomes dirty, wipe it with a clean, dry cloth. Do not use liquid cleaners such as benzene or thinner, or cleaning compounds or flammable polishes.
Keep this manual
After reading this manual, please keep it for later reference.
Keeping foreign matter out of your equipment
Never set any container with liquid in it near this equipment. If liquid gets into the equipment, it could cause a breakdown, fire, or electrical shock.
Be careful not to let metal objects get into the equipment. If something does slip into the equipment, unplug the AC adapter from the wall outlet. Then contact your nearest Korg dealer or the store where the equipment was purchased.
THE FCC REGULATION WARNING (for USA)
NOTE: This equipment has been tested and found to comply with the limits for a Class B digital device, pursuant to Part 15 of the FCC Rules. These limits are designed to provide reasonable protection against harmful interference in a residential installation. This equipment generates, uses, and can radiate radio frequency energy and, if not installed and used in accordance with the instructions, may cause harmful interference to radio communications. However, there is no guarantee that interference will not occur in a particular installation. If this equipment does cause harmful interference to radio or television reception, which can be determined by turning the equipment off and on, the user is encouraged to try to correct the interference by one or more of the following measures:
- Reorient or relocate the receiving antenna.
- Increase the separation between the equipment and receiver.
- Connect the equipment into an outlet on a circuit different from that to which the receiver is connected.
- Consult the dealer or an experienced radio/TV technician for help.
If items such as cables are included with this equipment, you must use those included items.
Unauthorized changes or modification to this system can void the user's authority to operate this equipment.
DECLARATION OF CONFORMITY (for USA)
Responsible Party: KORG USA INC.
Address: 316 SOUTH SERVICE ROAD, MELVILLE, NY
Telephone: 1-631-390-6500
Equipment Type : Music Production Station
Model:electribe2,electribe2s
This device complies with Part 15 of FCC Rules. Operation is subject to the following two conditions:
(1) This device may not cause harmful interference, and (2) this device must accept any interference received, including interference that may cause undesired operation.
Notice regarding disposal (for EU)

When this "crossed-out wheeled bin" symbol is displayed on the product, owner's manual, battery, or battery package, it signifies that when you wish to dispose of this product, manual, package or battery you must do so in an ap

proved manner. Do not discard this product, manual, package or battery along with ordinary household waste.
Disposing in the correct manner will prevent harm to human health and potential damage to the environment. Since the correct method of disposal will depend on the applicable laws and regulations in your locality, please contact your local administrative body for details. If the battery contains heavy metals in excess of the regulated amount, a chemical symbol is displayed below the "crossed-out wheeled bin" symbol on the battery or battery package.
Regarding data
Unexpected malfunctions caused by inappropriate operation can cause the contents of memory to be lost. Please save important data to other media for safekeeping. Korg Corporation accepts no responsibility for any damages resulting from loss of data.
Regarding copyright
The use of copyrighted material for any purpose other than permitted uses such as personal or home enjoyment, constitutes copyright infringement, and may incur penalties including damages and restitution. The rights of the copyright holder also apply to recordings of, or derivative works produced using copyrighted material, meaning that reuse or distribution of such material is also a violation of copyright law. Korg Incorporated accepts no responsibility for any damages or penalties you may incur due to any copyright violation you may commit. If you have any questions regarding your rights to use copyrighted material, please consult a specialist in copyright law.
- All product names and company names are the trademarks or registered trademarks of their respective owners.
electribe
MUSIC PRODUCTION STATION
electribe sampler
MUSIC PRODUCTION STATION
Table of Contents
Introduction. 4
- Section names.. 4
- Connection 7
- Connecting power supply.. 7
- Insert and remove memory card 8
Making sounds 8
- To turn power on/off 8
- Basic operation 8
3.To playback a pattern 8 - Selecting a part.. 9
Playing music 10
- Playing music with the trigger pad 10
- Playing music with the touch pad. 10
- Using the gate arpeggiator.. 10
- Using master effects.. 11
- Playing with pattern set 11
- Setting the BPM (tempo) 11
- Adding variation to sound by a knob. 11
Record playing 12
- Real time recording 12
2.Stepedit. 12 - Record knob and button movements (motion sequence). 12
- Saving a pattern 12
Editing a pattern 13
- Muting a part 13
- Erasing a part 13
- Copying a part 13
- Changing pattern setting 13
Other setting. 14
1.Setting metronome. 14
2.Setting type of battery 14
3. Adjusting LCD contrast 14
4. Prolonging battery life 14
5. Setting auto power off 14
6. Setting global MIDI channel 14
7. Playing by synchronizing with external device 14
8. Using memory card 14
9. Using the Event Recorder 15
10. Formatting user data.. 15
electribe sampler features 16
- New functions of the electribe sampler.. 16
- Changes to specific controller functions 16
Recording & Editing Samples.....16
- Sampling 16
- Resampling 17
- Editing a sample 17
- Importing/exporting samples 17
Appendix 18
1.Troubleshooting 18
2. Error message 19
Specifications. 19
Introduction
Thank you for purchasing the Korg electribe/electribe sampler Music Production Station.
In order to take full advantage of your new instrument, please read this instruction manual carefully and use the product as directed. You should also keep the instruction manual for future reference.
The electribe/electribe sampler is a production station for dance music that is capable of creating original music. Using the knobs and the touch pad on the main unit enables you to edit sounds to easily create rhythm and phrase patterns with a single unit. Basic operation for the electribe sampler is the same as for the electribe.
For additional explanations that apply to the electribe sampler, refer to "electribe sampler features" ( p. 16) and "Recording & Editing Samples" ( p. 16).
TIP Illustrations in this manual show the electrbc.
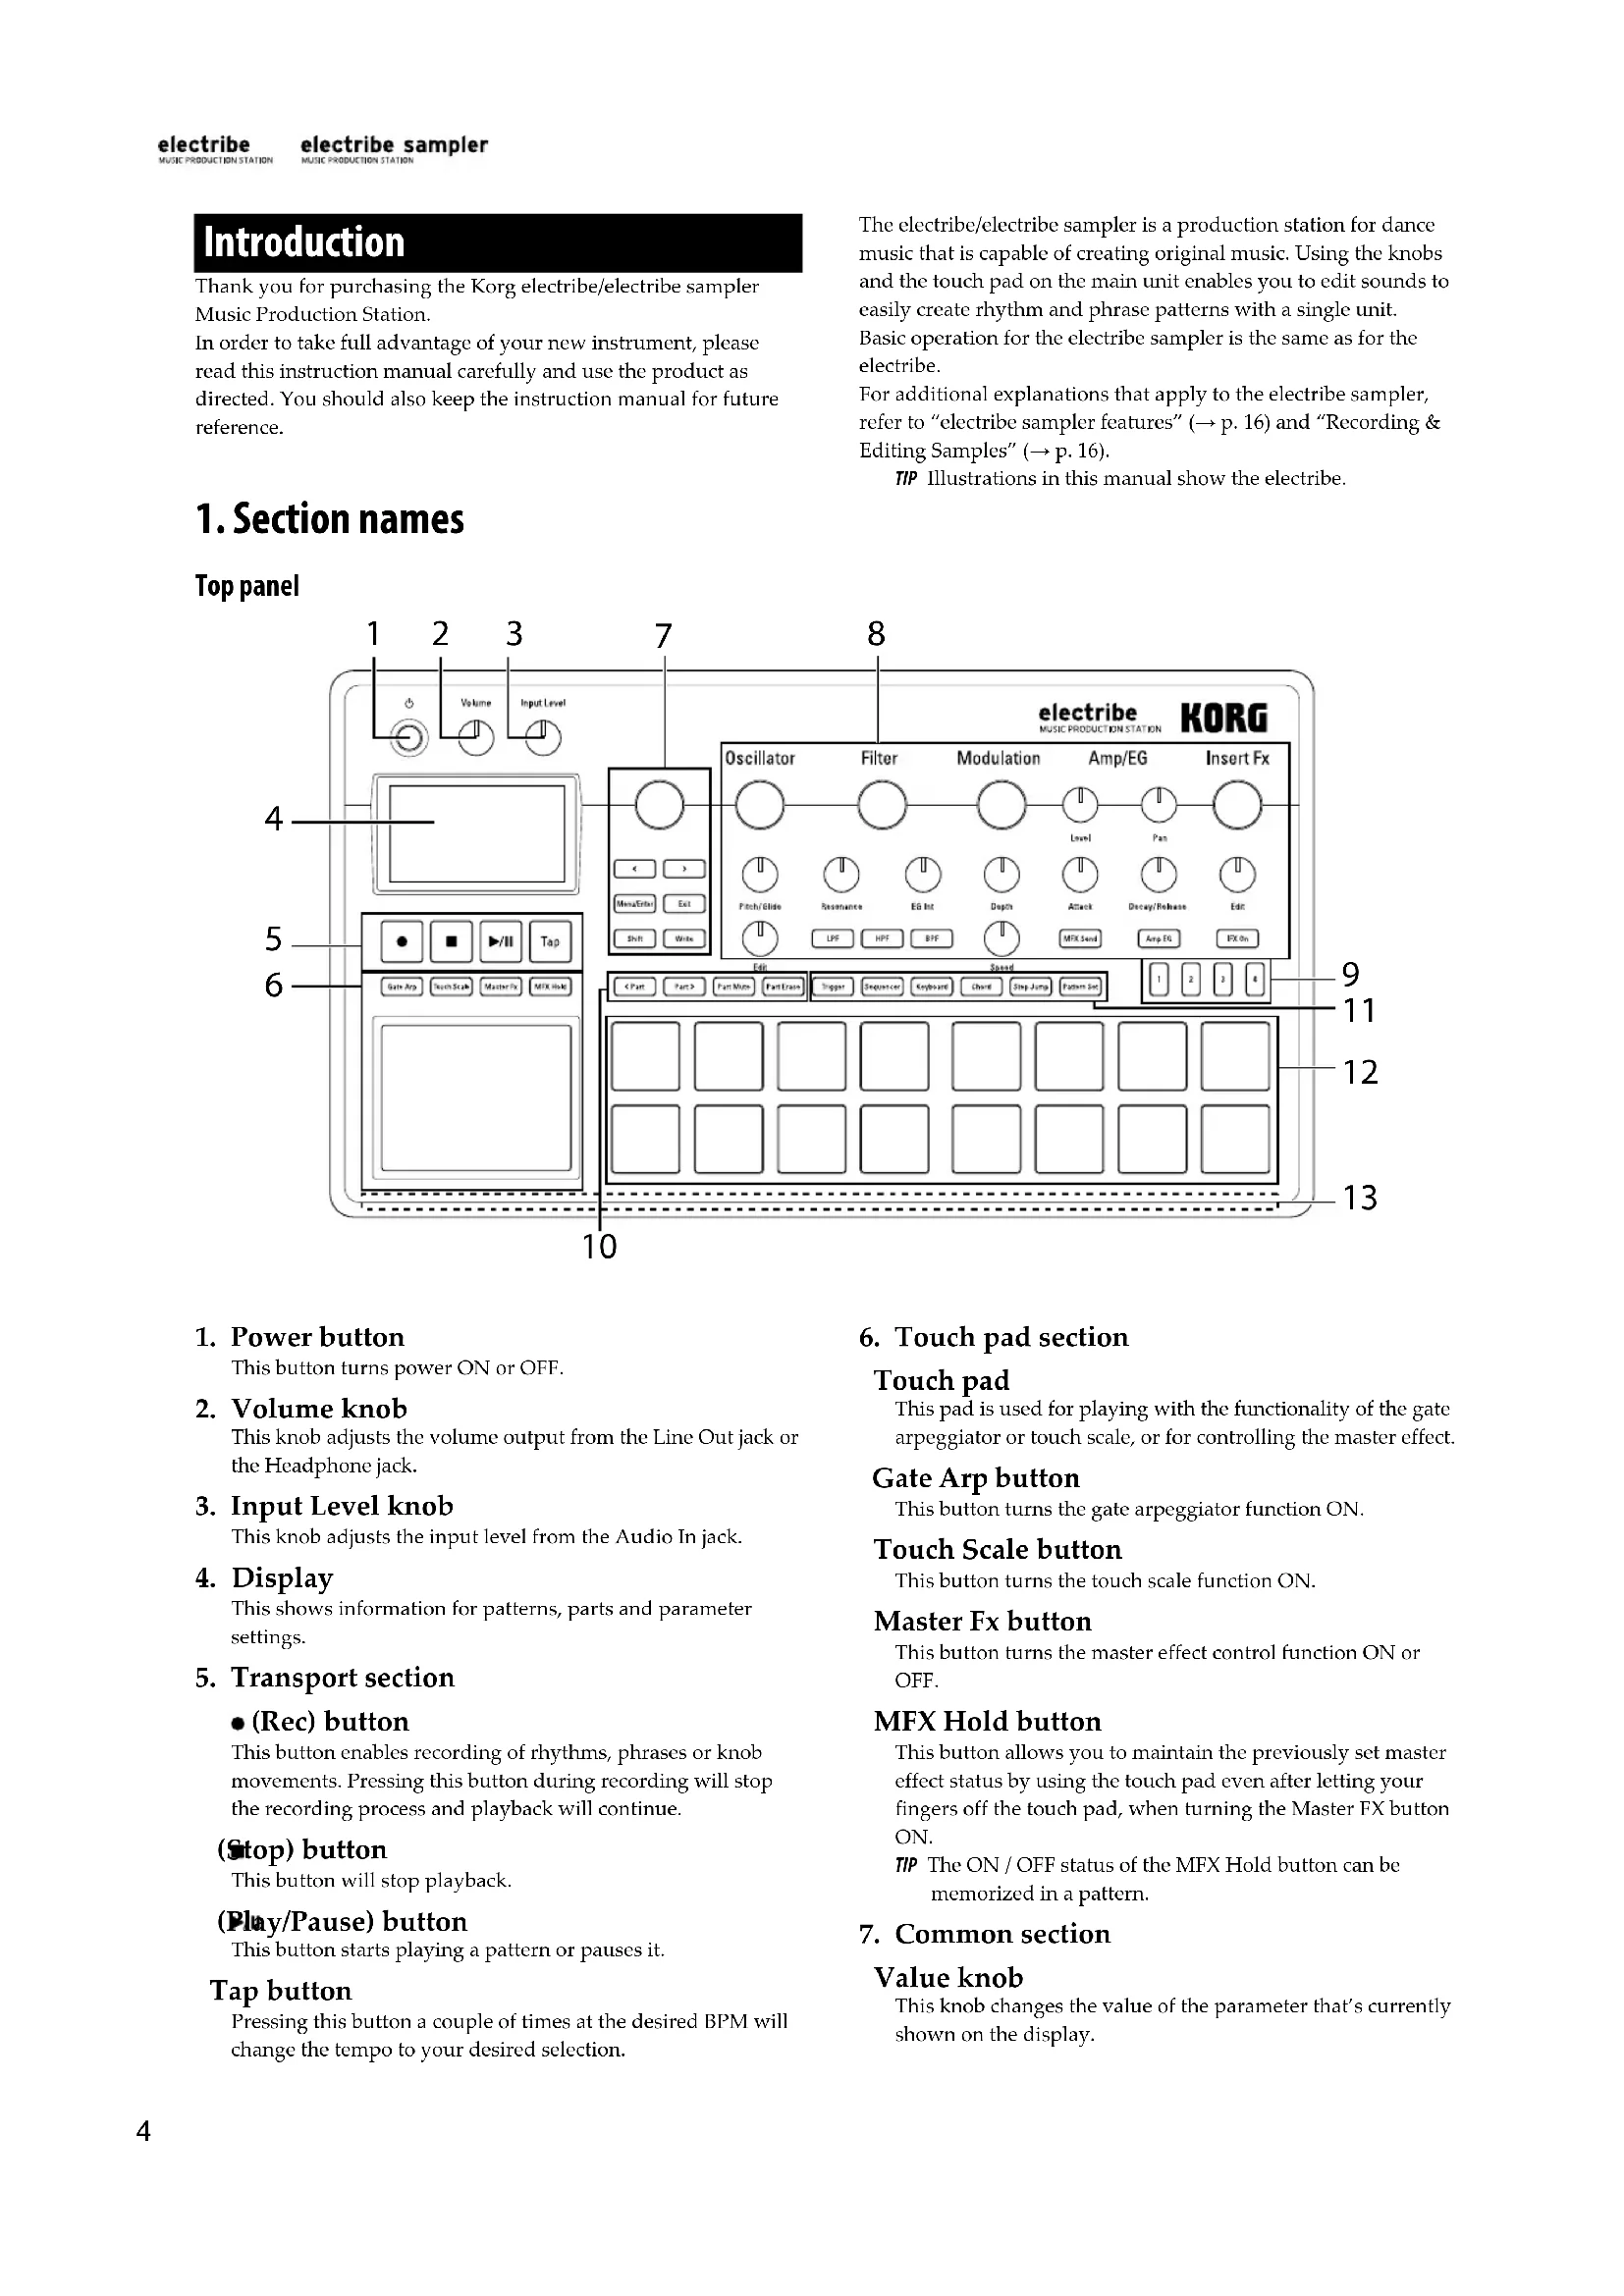
1. Section names
Top panel

1. Power button
This button turns power ON or OFF.
2. Volume knob
This knob adjusts the volume output from the Line Out jack or the Headphone jack.
3. Input Level knob
This knob adjusts the input level from the Audio In jack.
4. Display
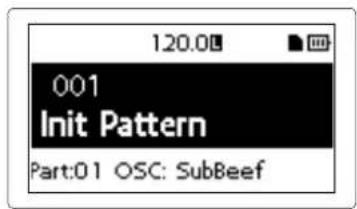
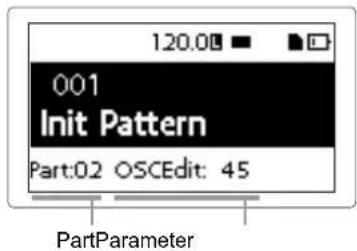
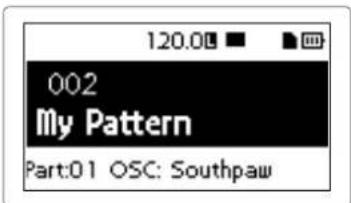
This shows information for patterns, parts and parameter settings.
5. Transport section
- (Rec) button
This button enables recording of rhythms, phrases or knob movements. Pressing this button during recording will stop the recording process and playback will continue.
(Stop) button
This button will stop playback.
(Play/Pause) button
This button starts playing a pattern or pauses it.
Tap button
Pressing this button a couple of times at the desired BPM will change the tempo to your desired selection.
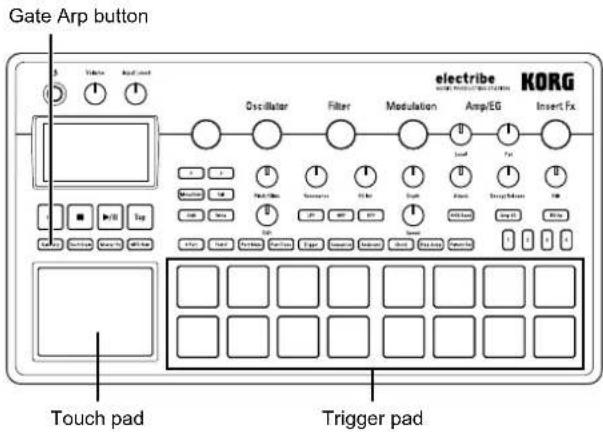
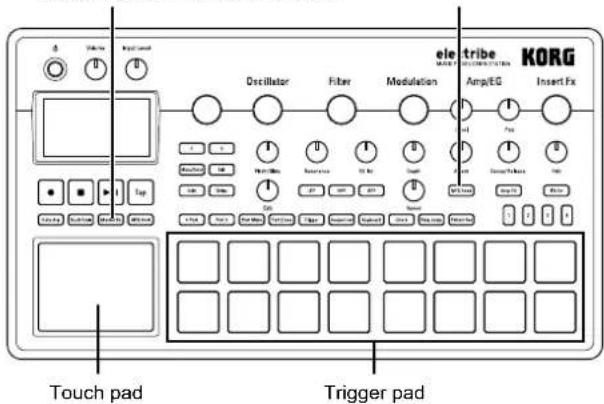
6. Touch pad section
Touch pad
This pad is used for playing with the functionality of the gate arpeggiator or touch scale, or for controlling the master effect.
Gate Arp button
This button turns the gate arpeggiator function ON.
Touch Scale button
This button turns the touch scale function ON.
MasterFxbutton
This button turns the master effect control function ON or OFF.
MFX Hold button
This button allows you to maintain the previously set master effect status by using the touch pad even after letting your fingers off the touch pad, when turning the Master FX button ON.
Tip The ON/OFF status of the MFX Hold button can be memorized in a pattern.
7. Common section
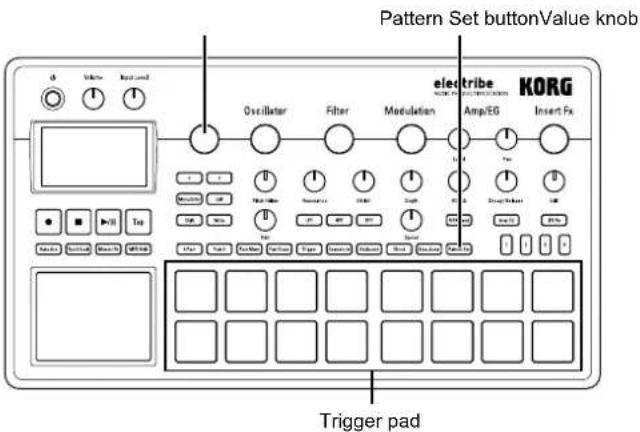
Value knob
This knob changes the value of the parameter that's currently shown on the display.
<,> (cursor) buttons
These buttons are used to select the parameter that you want to edit.
Menu/Enter button
This button is used to select parameters such as pattern, part, global or utility, or it can also be used to confirm changes in parameter settings.
Exit button
Pressing this button a couple of times enables you to return from the edit screen to the pattern selection screen.
Shift button
This button executes various functions when pressed in tandem with another button or a knob.
Shift button + < (cursor): Cancels the most recent operation (undo function)
Shift button + Write button: Patterns can be named and saved.
Shift button + Value knob: Either large or small value changes can be made
TIP Large or small value changes depend on the selected parameter.
Write button
This button is used to save pattern and global data to the electribe/electribe sampler. Data is saved when you press the Write button on the Global parameters page. The pattern data will also be saved in other pages as well.
8. Edit section
Here is where can edit parameters for each part.
Oscillator (electribe sampler: Sample)
This is where you can select or adjust the sound tone of the waveforms, such as: sawtooth, square, noise or PCM.
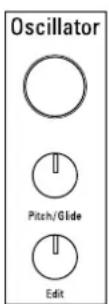
Oscillator knob (electribe sampler: Sample knob)
This knob selects the waveform.
Pitch/Glide knob
This knob adjusts the pitch (sound tone). You can adjust the transition to smoothly change pitch between two tones (Glide) for synth sounds by turning the knob while you press and hold down the Shift button.
Edit knob
This knob adjusts style of the sound. The effect varies depending on type of waveform that's being used.
Filter
The filter is used for adjusting the sound tone (color of the sound) by eliminating or enhancing frequency components of the oscillator.
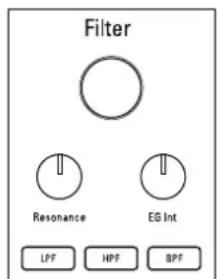
Filter knob
This knob adjusts the cut-off frequency.
Resonance knob
This knob adjusts the resonance of the filter.
EG Int knob
This knob adjusts the volume of the temporal change of the cut-off frequency for the filter by the envelope generator (EG) that is set in the Amp/EG section.
LPF button
This button enables the low-pass filter.
Pressing the button repeatedly allows you to change type of the filter.
HPF button
This button enables the high-pass filter.
Pressing the button repeatedly allows you to change type of the filter.
BPF button
This button enables the band-pass filter.
Pressing the button repeatedly allows you to change type of the filter.
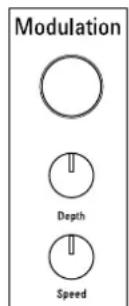
Modulation
This is used to make temporal change to the sound tone by LFO or EG.
Modulation knob
This knob adjusts type of modulation.
Depth knob
This knob adjusts the effect intensity of the modulation.
Speed knob
This knob adjusts the speed of the modulation.
Amp/EG
You make setting of the amplifier that adjusts volume and location of sound, and of the envelope generator (EG) and the master effect send that apply temporal change.
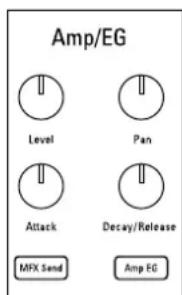
Level knob
This knob adjusts the volume of a part.
Pan knob
This knob adjusts the location of a part.
Attack knob
This knob adjusts the attack speed of a sound.
Decay/Release knob
This knob adjusts the amount of time it will take for a sound to decay.
MFX Send button
This button allows you to select whether the output of a part is sent to the master effect or not. It switches between ON (lit) and OFF (dark) each time the button is pressed.
Amp EG button
This button allows you to enable the envelope of the amplifier. It switches between ON (lit) and OFF (dark) each time the button is pressed. Sound volume changes in accordance with the EG that you select by setting the Attack and Decay/Release knobs when it is ON. The setting does not follow the EG (organ envelope fixed) when it is OFF.
Insert Fx
The Insert Fx section is used for adding various sound effects, such as distortion or surge to your sound.
Insert Fx knob
This knob is used to select the type of insert effect.
Edit knob
This knob is where you can adjust the effect intensity of the insert effect. The effect varies depending on the type of effect that's selected.
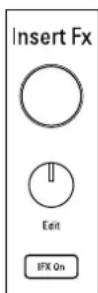
IFX On button
This button allows you to select whether you the insert effect
is enabled or not. It switches between ON (lit) and OFF (dark) each time the button is pressed.
9. Step button
This button displays the location of a sequence or octave along with the current function of the trigger pad. Pressing this button allows you to change the location or octave of the sequence being edited.
10. Part edit section
buttons
This button selects a part to use. The display illustrates the part that's currently selected.
Part Mute button
Pressing a trigger pad while this button is ON (lit) mutes the corresponding part. The trigger pad turns OFF (dark) at this moment and the Part Mute button turns OFF. Pressing the trigger pad for the selected part that is dark will turn off the mute function (lit).
Part Erase button
While you press and hold the trigger pad after pressing the Part Erase button during playing, you can eliminate the sound of the selected part.
11. Pad mode section
Here is where you can select the function of the trigger pad.
Trigger button
Tapping on a trigger pad while this button is ON (lit) plays the corresponding part. You can set how it plays back by editing the TRIGGER MODE parameter.
Sequencer button
The trigger pad is used in step input mode while this button is ON (lit).
Keyboard button
The trigger pad can be played as a keyboard while this button is ON (lit). You can set the key or scale per pattern.
Chord button
The trigger pad can be used as a code pad while this button is ON (lit). You can set the variation or the key or scale of the code per pattern.
Step Jump button
Pressing any of the buttons ranging from step 1 to 16 during sequencer play back while this button is ON (lit) enables you to jump to that step instantly. Pressing multiple buttons will play back the steps being pressed in sequence.
Pattern Set button
Pressing a trigger pad while this button is ON (lit) switches the pattern to the one registered in the respective trigger pad. Pressing a trigger pad while you press and hold down this button enables you to assign the pattern that's currently selected to the trigger pad.
12. Triggerpad
The trigger pad is used for playing in accordance with the setting of the pad mode section.
13. LED
The LED on the rear of the unit is illuminated in accordance with the playing pattern.
2. Connection
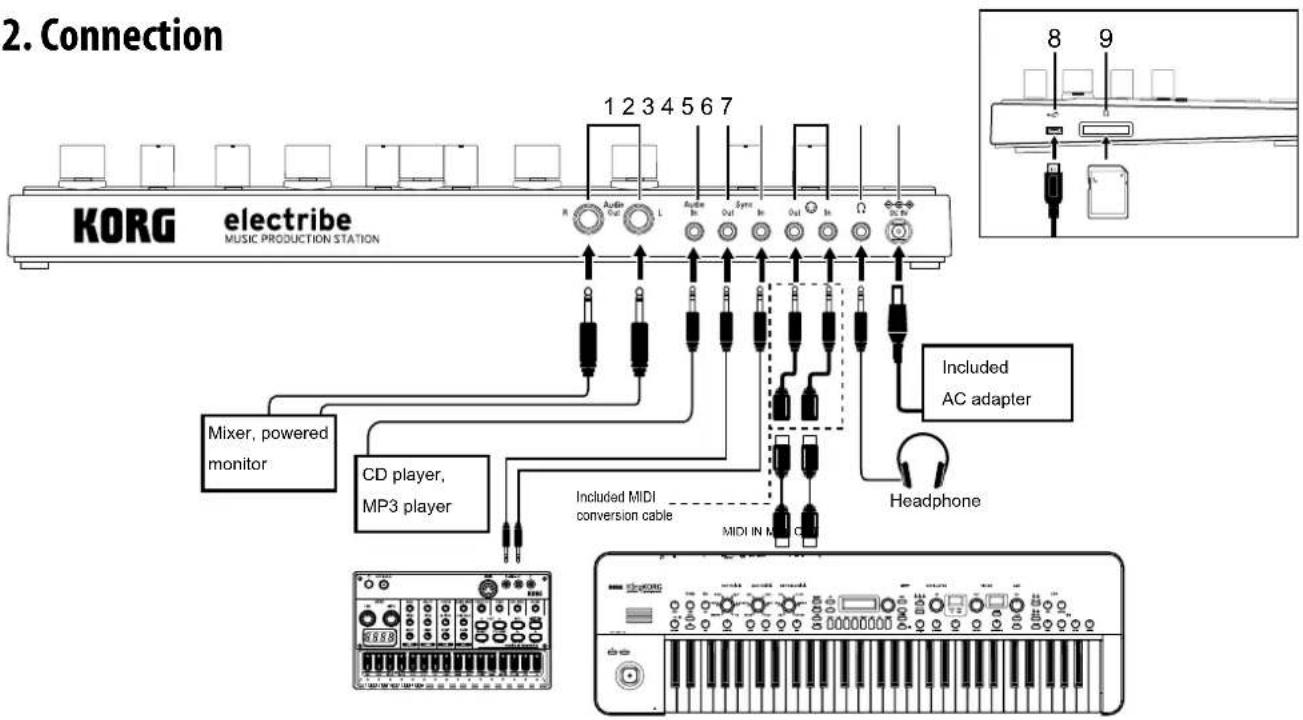
You must connect all devices with the power turned off. Failure to observe this precaution may cause malfunctions or damage to your speaker system.
TIP When you connect the unit to your Windows computer for the first time, the driver included in the OS will be installed automatically.
The standard USB-MIDI driver included in the Windows OS will not allow the electribe/electribe sampler to be used by two or more applications simultaneously. To allow the electribe/electribe sampler to be used by two or more applications simultaneously, you need to install the KORG USB-MIDI driver. Please download the KORG USB-MIDI driver from the Korg website, and install it following the instructions in the supplied document.
1. Audio Out L/R jack
The audio output of the electribe/electribe sampler is sent from these jacks. Connecting a cable to the Left Audio Out jack only without connecting a cable to the Right Audio Out jack will mix the stereo output sound into monaural.
TIP While the output signal is sent in mono, the jack supports both mono and stereo 1/4" cable connections.
2. Audio In jack
This jack is where the audio output from other audio sources are input into the electribe/electribe sampler.
Inputted sounds can be mixed by turning the AUDIO IN THRU function ON in the global menu.
3. Sync Out jack
A 5V pulse is outputted from this jack every 15 ms, for every eighth note or sixteenth note.
This jack is used for synchronizing with the KORG volca series products or other analog sequencers to this system.
TIP The pulse polarity and cycle are set in the global menu.
4. Sync In jack
When you set "Auto" or "Ext. Sync" in the clock mode in the Global menu and you connect a pulse output from the sync output or audio output from an analog device, the internal step clock will be disabled in order to advance the step in accordance with the input pulse.
Tip The settings for enabling/disabling SYNC IN, as well as for the cycle and polarity of the pulse detected are in the global menu. Refer to the "Parameter Guide" for additional details on this procedure.
5. MIDI IN/OUT jack
You can connect the system to a MIDI device by using included conversion cable.
6. Headphone jack
This jack is where headphones are to be connected.
7. DC 9V jack
This is where the included AC adapter is connected.
8. USB jack
This jack is used to connect the electribe/electribe sampler to a computer.
9. Memory card slot
This slot is where a memory card can be inserted. You can use a memory card to save (write) or load (read) playback or data. ( p.14)
3. Connecting power supply
Using battery
Open the battery case cover located on the back side of the unit to insert six AA batteries, paying careful attention to observe the correct polarity orientation of the batteries.
Compatible batteries
AA alkaline batteries or nickel metal hydride batteries are approved for use in this product.
Tip You can select the type of battery in use by referring to the BATTERY TYPE page in the global menu in order for the electribe/electribe sampler to accurately detect and display the amount of remaining charge.
Displaying remaining battery charge
The display shows the battery indicator "on) which indicates remaining charge of the batteries. When the display shows the deplete battery icon, "con) it's indicating that there is almost no remaining battery charge and it's time to replace the batteries.
When there has been no user input for a while, the elec tribe/electribe sampler will enter the power save mode while using batteries in order to reduce battery consumption. You can disable the power save mode by adjusting the setting in the "Power Save Mode" page in Global mode. ( p.14:4 Prolonging battery life)
If the power supply is connected, make sure to turn the electribe/electribe sampler off before replacing the batteries.
Remove unusable battery immediately. It's also wise to remove the batteries if you're not planning on using the electribe/electribe sampler for an extended period of time, to eliminate the risk of battery leakage.
Using AC adapter
Connect the included AC adapter to the DC 9V jack of the system and then connect the adapter to power outlet.
Make sure to use included AC adapter only. Using an AC adapter other than the included one may cause unexpected malfunctions.
4. Insert and remove memory card
You can use a memory card to save (write) or load (read) a song for playback or to read data.
Never insert or remove the memory card with the system power turned ON. You may lose data on the system or in the memory card, or alternatively, you may damage the memory card.
To insert card
- Check that all display and LEDs are turned off and the power supply is off.
- Insert the memory card until you hear a clicking sound.
Insert the memory card all the way to the back of the slot securely, paying attention to the orientation of the card. Never force the card into the slot.
To remove card
- Check that all display and LEDs are turned off and the power supply is off.
- Push the memory card in until you hear a clicking sound, and then release your finger to remove the memory card. Remove the card once it pops out to the front of the slot.
Memory cards that are usable in this system
Memory cards usable in this system are: SD cards ranging in sizes from: 512MByte to 2GByte, and SDHC cards of 32GByte or less.
TIP This system does not support SDXC cards.
Handling memory card
Thoroughly read the operation manual that came with your memory card.
Tip No memory card is included in this system. Please purchase it separately to take advantage of this feature.
Making sounds
1. To turn power on/off
You can turn power on by pressing the power button until the display shows the start-up screen.
Starting-up this system, the display will show the pattern selection screen.
You can turn the power off by pressing the power button until the display shuts off and becomes dark.
Do not touch any button or touch pad during power up.
Auto power off function
The electribe/electribe sampler is equipped with the auto power off function. The auto power off function will turn off the power automatically when there has been no user input for about 4 hours.
Tip You can disable this function by adjusting the settings found on the "AUTO POWER OFF" section in the Global menu. ( p.14:5) Setting auto power off
2. Basic operation
To use the screen
Press the < button or the > button on the pattern selection screen to confirm the setting of the currently selected part.
Pressing the Menu/Enter button on the pattern selection screen will allow you to enter the edit menu.
Press the < or > button to select the parameter you want to adjust. You can set the parameter value by using the Value knob.
Pressing the Exit button a couple of times enables you to return from the edit menu to the pattern selection screen.
Tip Refer to the "Parameter Guide" for additional details.
3. To playback a pattern
A pattern is a combination of phrases consisting 16 parts that is created to be a segment of a larger performance.
This system is capable of creating and storing up to 250 patterns. A single pattern consists of 16 parts and a master effect.
Selecting a pattern
- Display the pattern selection screen.
- Use the Value knob to select a pattern.
Pressing the Exit button a couple of times while another screen is displayed will display the pattern selection screen.
TIP You can change the pattern during playback as well.
Playing back a pattern
- Pressing the Play/Pause button will play back the pattern that's currently selected.
- The pattern will start to play back from its beginning. It will play through until its end, and then return to the beginning to repeat playback.
- Pressing the Stop button stops playback.
4. Selecting a part
What is a part?
A part is a minimum unit used to create a pattern. Parts are comprised of sound tones and rhythms or phrases, as well as the ON/OFF status for effects and motion sequences in addition to other elements.
You can process sound tones per part and record rhythms, phrase patterns, motion sequences and insert effect status as well as other parts.
Confirming sound of a part
- Press the Trigger button to illuminate the button.
- Pressing the trigger pad makes sound by selecting the part and enables you to confirm the sound tone.
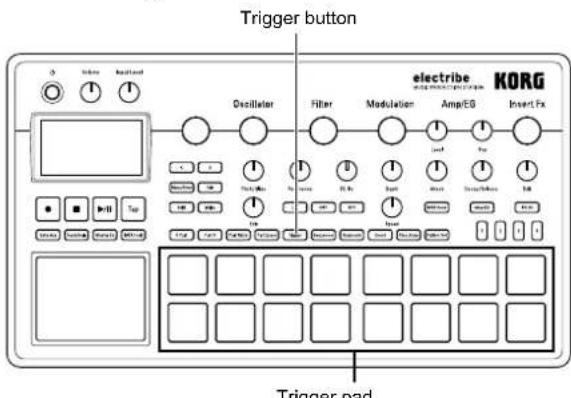
Select the part you want to use
Use the
The trigger pad of the selected part is illuminated in blue.
You can change sound tone of the selected part by using the knob in the edit section.

Playing music
1. Playing music with the trigger pad
Tapping on the trigger pad will make sound.
You can enjoy using your electribe in different ways by changing the pad mode.
Using the trigger pad as a keyboard
- Press the Keyboard button.
- Use the

2. Playing music with the touch pad.
- Press the Touch Scale button to illuminate the button.
- You can play by rubbing or tapping (hit lightly) the touch pad with your fingers.
Touch Scale button
- Play with the trigger pad.
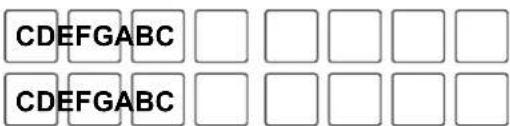
Where, Key = C , Scale = Ionian

Tip You can choose the type of sound by using the Key and Scale function in the edit menu. Pressing more than 2 pads simultaneously will make different sounds depending on the settings in the Voice Assign section.
- You can change the sound range by using the step button. Pressing step button 1 once decreases range for 1 octave and pressing step button 4 once increases it for 1 octave.
Position of illuminated step button indicates range.
Rubbing or pressing surface of the touch pad with a sharp object could damage the pad. Make sure to only use your finger tip to avoid damage to your electribe.
TIP Sounds can be set using the KEY and SCALE functions in the edit menu. Operable sound range can be set using the TOUCH SCALE RANGE function in the global menu.
TIP Sound range can be modified using the step button after turning the Keyboard button ON.
TIP Sound tone may not change depending on the setting of selected part.
3. Using the gate arpeggiator.
Automatically play the sound of selected part along with set tempo or rhythm. You can change the length for a single sound using the gate time parameter.
Playing chords with the trigger pad
- Press the Chord button.
- Play with the trigger pad.
TIP Select the part where the VOICE ASSIGN function in the edit menu is set to Poly 1 or to Poly 2.
Tip You can change the chord variations by using the CHORD SET feature in the edit menu.
- Press the Gate Arp button to illuminate the button.
- Press the Trigger button and press and hold down the trigger pad of the part to play to use the touch pad.
Or, you can use the touch pad while selecting the pitch with the trigger pad after pressing the Keyboard or Chord button.
- Sounds can be modified by using the touch pad.
X axis: Alters the gate speed.
Y axis: Alters the length of sound.

Tip You can change pattern of the gate arpeggiator in the GATE ARP page in the edit menu.
4. Using master effects
- Press the Master Fx button.
- Select the part where you want to apply the master effect, and then press the MFX Send button to turn it ON.
- Touching the touch pad will apply the effect. TIP Select the master effect type in the MFX TYPE page of the edit menu when you want to change effect types.
There may be some noise depending on position where you touch the touch pad.
Master Fx button MFX Send button
5. Playing with pattern set
What is a pattern set?
A pattern set is a function used to register a pattern to the trigger pad to enable easy pattern switching. You can switch desired patterns one after another during playback.
Registering a pattern to a trigger pad
- Press the Pattern Set button to illuminate the button.
- Press a Step button from 1 to 4 to select a group to register.
- Select a pattern to register by using the Value knob.
- Press a trigger pad to register while you press and hold the Pattern Set button.
Playing with a pattern set
- Press the Pattern Set button to illuminate the button.
- Press the Step button (1 to 4) to select the group where the desired pattern is registered.
- Pressing a trigger pad will play back the pattern which is registered to that respective trigger pad.
6. Setting the BPM (tempo)
You can select the tempo for the pattern or gate arpeggiator.
Setting BPM
Pressing the Tap button fat the approximate tempo you want will set the BPM value at the interval that you tap it. You can also set the tempo manually by using the Value knob once the BPM parameter is selected from the edit menu.
7. Adding variation to sound by a knob
You can alter the sound by using the knob to change the Filter or Oscillator Edit parameters of the edit section. Refer to the "Parameter Guide" for details of each knob.
Depending on the settings, there may be some noise or audio dropouts in your signal.
Record playing
1. Real time recording
Your performances can be recorded in real time when you're using the trigger pad or the touch pad. You also can record with the metronome. ( p.14)
Recording along with a pattern
You can record any phrase that pops up in your mind while you're playing, without having to stop playback.
- Start playing back a pattern.
- Select a part to record.
- Press the Rec button to start recording with the button illuminated.
- Play with the trigger pad and other functions. Recording will continue while the pattern rep
- Press the Rec button again to stop recording (button becomes dark). Press the Play/Pause button to stop playback as well.
Delete unnecessary sounds during a performance
While you press and hold the trigger pad after pressing the Part Erase button during playing, you can eliminate the sound of the selected part.
2.Stepedit
- Select a part to record.
- Press the Sequencer button to illuminate the button.
- Press the step button to select the recording length. You can check the length by looking at the number of red LEDs.
- A pattern of selected part is indicated by illumination of the trigger pad. Note switches between ON (lit) and OFF (dark) each time the trigger pad is pressed.
Tip The note number that is input by pressing the trigger pad is C4 (60) in the default setting. Turning ON again after turning OFF the step that has been already input turns ON with the original note.
You can also record patterns during playback by pressing Play/Pause button.
Tip You can select Step Edit on the edit menu to enable detailed editing per each step. Refer to the "Parameter Guide" for detail.
3. Record knob and button movements (motion sequence)
You can record knob and button motion for each part and effect (motion sequence).
What is a motion sequence?
A motion sequence is a function which records changes to a sound from the use of knobs and buttons to play it back.
The followings are knobs and buttons that can be recorded/ played back as a motion sequence.
- OSC Edit, Pitch
Filter Cutoff, Resonance, EG Int
Modulation Speed, Depth - Amp/EG Level, Pan, Attack, Decay/Release
IFX Edit, IFX ON, MFX Send - Master Fx On, Master Fx X, Master Fx Y
Additional motion sequence recording
- Select a part where you want to add a motion sequence.
- Select MOTION SEQ from the edit menu to select a part to be edited, and set the motion sequence to Smooth or Trigger Hold.
Smooth: Smoothly records knob motion.
Trigger Hold: Reads and memorizes knob information at the sounding timing.
- Press the Rec button to illuminate the button, and then press Play/Pause button.
- You can move the knob to alter the sound while a pattern is playing back. The Rec button will blink while a motion sequence is recorded.
Once you pass a single cycle of the pattern once recording has started, the motion sequence will automatically stop the recording process and switch to playback of the recorded motion sequence. You will need to press the Rec button again to continue recording.
Deleting a motion sequence
Select CLEAR MOTION from the PART UTILITY in the edit menu and execute it.
Deleting a motion sequence of the Master Fx only
Select CLEAR MFX MOTION from the edit menu and execute the command.
4. Saving a pattern
Make sure to save (write) the created pattern data.
Selecting other patterns without saving will revert the pattern you were editing to its original state. Make sure to save your data when you want to keep edited contents.
Overwriting a pattern
- Press the Write button.
- Select the save location by using the Value knob.
- Press the Write button.
The display shows "Working..." and the write process will begin. The Write button is illuminated while the save process is taking place and the button becomes dark upon completion.

Never turn the power off while saving data as this may cause unexpected malfunctions. (while Write button is illuminated.)
Saving with a different pattern name (copying pattern)
- Press the Write button while you press and hold down the Shift button.
The display shows "enter NAME."
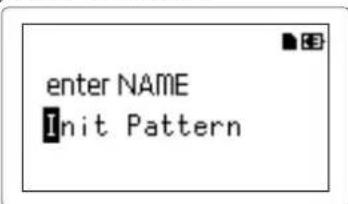
- Change the name of the pattern you want to save. You can move the cursor on the display left and right using the < button or the > button and determine the character you want to change. Turn the Value knob to change the selected character and confirm it with Menu/Enter button.
- Select a pattern number to save your data by using the Value knob.
- Press the Write button after you complete the process of changing the pattern name. Pressing the Write button starts the save process. The Write button is illuminated while the save process is taking place and the button becomes dark when upon completion. TIP Press the Exit button to cancel the save process. TIP The Pattern number where the edited pattern will be saved is selected after you complete the save process.
Editing a pattern
1. Muting a part
- Press the Part Mute button to illuminate the button.
- Press the part of the trigger pad that you want to mute to turn it off.
- Press the trigger pad that is dark to illuminate it when you release the mute.
2. Erasing a part
- Press the Part Erase button to illuminate the button.
- During playback, press the trigger pad of the part which you want to erase. While holding the trigger pad, note information of the selected part will be erased.
Tip To erase all sequence information of the currently selected part, select CLEAR SEQUENCE from PART UTILITY in the edit menu and execute it.
Tip Execute the Clear Motion command in the edit menu to erase the motion sequence.
3. Copying a part
- Select COPY PART from PART UTILITY in the edit menu.
- Select the pattern that includes the part you want to copy, and press the Menu/Enter button.
- Press the trigger pad corresponding to the copy source part.
- Press the trigger pad corresponding to the copy destination part.
4. Changing pattern setting
The following list introduces main setting related to patterns in the edit menu.
Refer to the "Parameter Guide" for each setting.
SWING: Adds shuffling or hopping feelings by shifting sound timing.
BEAT: Sets beat (rhythm) of a pattern.
LENGTH: Changes length of a pattern. You can set it to length from 1 to 4.
PATTERN LEVEL: Adjusts sound volume of the entire pattern.
KEY: Sets pitch for scale reference.
SCALE: Sets scale for playing with the trigger pad or the touch pad by turning the Keyboard button ON.
GROOVE TYPE and GROOVE DEPTH: Adds playing methods of typical musical instruments and / or a groove which could reproduce a feeling of the song to metronomic part sequence data.
CHAIN REPEAT, CHAIN TO: After playing back the selected pattern, select the number of times to play back the same pattern, and select the pattern to play back next. This will play multiple patterns back as if they were a song.
Other setting
You can set each global parameter, such as the settings for the metronome, or you can execute utility functions, such as formatting a memory card.
TIP Please refer to the "Parameter Guide" for additional details.
How to display each setting menu
- Pressing Menu/Enter button on the pattern selection screen enters the edit menu.
- Pressing the < button or the > button to show "GLOBAL PARAMETER" on display and then pressing Menu/Enter button enables you to enter the global menu.
Pressing Menu/Enter button after showing "DATA UTILITY" enables you to enter the DATA utility menu. Pressing Menu/Enter button after showing "PART UTILITY" enables you to enter the part utility menu. - Press the Write button after you complete each setting to save the setting.
Turning power off without saving resumes to original without saving the setting. Make sure to execute saving when you want to keep the contents that you set.
1. Setting metronome
You can set the parameters for the metronome function. Using the metronome is convenient when creating a pattern using the real time recording function.
The metronome creates a sound in quarter tempo intervals.
- Select the METRONOME from the Global menu.
- Rotate the Value knob to adjust the settings. When it's on, the metronome will always make sound during both playing back and recording. Setting the metronome to Rec 0, Rec 1, Rec 2 allows it to run only during recording. Setting the metronome to Off disables the metronome.
2. Setting type of battery
Set in accordance with type of batteries in use.
- Select BATTERY TYPE from the global menu.
- Rotate Value knob to make setting. Set to "Ni-MH" to use nickel metal hydride batteries. Set to "Alkali" to use alkaline batteries.
3. Adjusting LCD contrast
You can adjust brightness of the display.
- Select LCD CONTRAST from the global menu.
- Rotate Value knob to make setting.
4. Prolonging battery life
You can set enabling or disabling the power save mode. Using this system with battery power enters the power save mode to dim back light of the display and LEDs.
- Select POWER SAVE MODE from the global menu.
- Rotate Value knob to make setting. You can disable the power save mode by setting it to "Disable."
You can enable the power save mode all the time by setting it to "Enable."
You can enable it during using battery and disable it during using the AC adapter by setting it to "Auto." Default setting is in "Auto."
5. Setting auto power off
The auto power off function is a function to turn power off automatically when you leave it without any operation for about continuing 4 hours. You can set enabling or disabling this function.
- Select AUTO POWER OFF from the global menu.
- Rotate Value knob to make setting. Set it to "Off" to disable the auto power off function. Set it to "4 hours" to enable the auto power off function. Default setting is in "4 hours."
6. Setting global MIDI channel
You can set the global MIDI channel.
- Select MIDI GLOBAL CH. from the global menu.
- Rotate Value knob to make setting.
7. Playing by synchronizing with external device
This system can be set for synchronization with MIDI or Sync signals.
- Select CLOCK MODE from the global menu.
- Rotate the Value knob to set signals to be used as the master.
Internal: Sets this system as the master.
Auto: Sets an external device as the master, when the device is connected. In a regular setting, this system is set as the master.
Ext.USB, Ext.MIDI and ExtSync: Sets signals from devices connected to each jack as the master.
8. Using memory card
You can save the status of each setting to a memory card. You can reinstall saved data by loading it.
Formatting
You need to format your memory card using the electribe/electribe sampler in order to use a memory card.
You will lose all contents of a memory card when formatting it.
Never turn off the power or remove the memory card during this procedure.
- Select the CARD FORMAT option from the DATA utility menu.
- Press the Menu/Enter button. Upon completion of the format procedure, the display will indicate OK.
Saving to a memory card
- Select the EXPORT PATTERN option from the DATA utility menu.
- Press the Menu/Enter button.
Loading from a memory card
- Select the IMPORT PATTERN option from the DATA utility menu.
- Select the pattern data to be loaded with the Value knob. Select a file from the folder by using the Value knob and enter the folder by pressing the Menu/Enter button. To exit the folder, select the "Upper Folder" with the Value knob and press the Menu/Enter button to go back up one level.
- Press the Menu/Enter button to confirm.
Writing to a WAV file.
You can write patterns or a pattern set to a memory card.
Exporting a pattern to a WAV file
- Select the EXPORT AUDIO option from the DATA utility menu.
- Select the format (WAV file only, or Ableton Live Set) to write.
- Pressing the Menu/Enter button will export current pattern.
Exporting a pattern set to a WAV file
- Select the EXPORT P. SET AUDIO option from the DATA utility menu.
- Select the format (WAV file only, or Ableton Live Set) to write.
- Set a range of patterns recorded as pattern sets from 1 to 64 to be written as a file.
TIP A longer time may be required if a wide range of pattern sets is set to be written.
- Pressing the Menu/Enter button exports patterns recorded as pattern sets in a WAV file format.
9. Using the Event Recorder
This is a function to record performances by using several patterns or operating the knob or the trigger pad, etc. in the middle of performance.
Recording
- Select the EVENT REC/PLAY option from the edit menu and press the Menu/Enter button.
- Pressing the Menu/Enter button again sets the Event Recorder to recording standby status.
- Press the Play/Pause button to start recording.
- Press the Exit button several times to return to the pattern selection screen and perform by playing back patterns.
This screen is displayed during operation of the event recorder.
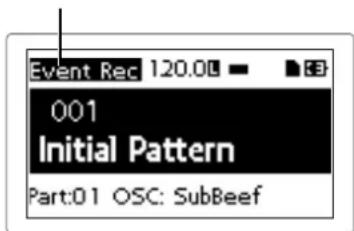
This records information, such as operation of the knob or the trigger pad together with the pattern under playback to add sounds or change the tempo, etc. In addition, you may perform with changing patterns.
- Press the Stop button after ending performance.
- The (name of) saved file will be displayed.
- Press the Exit button to end recording.
TIP If the Event Recorder does not have a memory card, it will display "No Card" and will not be usable.
TIP No information recorded on the Event Recorder will affect the data recorded on a pattern. Also, it cannot save data on a pattern.
Playing back
- Select the EVENT REC/PLAY option from the edit menu and press the Menu/Enter button.
- Select EVENT PLAYER by pressing the < button or the > button and press the Menu/Enter button.
- Select the file name you wish to play by using the Value knob
and the Menu/Enter button.
- Playback the selected file by pressing the Play/Pause button.
- Press the Stop button to stop playback and return to the beginning of the played-back file.
- Press the Exit button to end the Event Player.
This function is not usable when the Event Recorder is recording.
TIP During playback, other operations are not allowed.
10. Formatting user data
Formatting erases all patterns that you have created and resumes default status.
You should backup all important data before formatting to prevent loss of important data.
- Select the Factory Reset option from the DATA utility menu.
- Pressing the Menu/Enter button begins the format process.
Never turn off the power during formatting.
electribe sampler features
Sampling functionality has been added to the electribe's functions. The electribe sampler also provides the same analog modeling sound engines as the electribe.
You can use up to 499 user samples with a total length of approximately 270 seconds when calculated as monaural. Numerous preset samples of drums, drum/phrase loops, and hits are provided.
1. New functions of the electribe sampler
The electribe sampler adds powerful new features, and changes the function of certain electribe controls.
Sampling function
The electribe sampler provides two methods of sampling:
- Sampling from an external audio source via the Audio In jack.
- Resampling the entire output of your electribe sampler performance.
Sample editing
Sample editing allows you to edit the start and end points of a sample, as well as the "slicing" of audio samples. These same types of sample editing can also be used to edit the preset samples.
Stereo sample playback
Stereo samples—whether created on the electribe sampler or loaded from a memory card—can be assigned to a part and played as part of your performance.
2. Changes to specific controller functions
"Oscillator" on panel is displayed as "Sample"
The Oscillator in the edit section is displayed as "Sample" on this unit.
Sample Edit knob (Edit Section)
If a sample has been selected as the Oscillator, this knob can be used to adjust the playback start point and to change the playback direction.
Amp/EG Decay/Release knob
If a sample has been selected as the Oscillator, this knob can be used to adjust the Gate Time-if the Amp EG is off. If this knob is set to a value of 127, the sample plays to its end regardless of the sample length.
TIP If the sample's LOOP START POINT (Sample 5/10 page) is specified, or if the OSC TYPE (oscillator type) is the Analog or Audio In category, operation is the same as if the electribe's Amp EG is off.
Filter LPF/HPF/BPF buttons
The following filters can be individually activated, or turned off.
- electribe LPF ON or OFF
- electribe HPF ON or OFF
- electribe BPF ON or OFF
Recording & Editing Samples
1. Sampling
Recording an external sound source via the Audio Input jack.
Preparing to sample
- Connect the output of the instrument, sound source, or audio device that you wish to sample to the Audio In jack of the electribe sampler. This Audio Input uses a stereo mini-jack, and can accept either a stereo or mono mini-plug.
- Set the Audio In thru setting to On (Global page 14/17), and play back some sound from your audio device.
- Adjust the output level of your external device (or adjust the electribe sampler's Input Level knob) so that the peak icon (CLIP) does not light when the connected device's output level is at its maximum.
Setting the sampling mode
- Hold down the Shift button and press the Rec button. The Rec button and the Play/Pause button will now blink. If you decide to cancel before you start sampling, press the Exit button now.
- Choose the sampling mode (the display indicates "Sampling mode"). Turn the Value knob to specify either stereo sampling "Stereo" or monaural sampling "Mono."
- Press the > button to select the sampling source. Turn the Value knob to specify "Audio In."
- Press the button to see the available sampling time. TIP The available sampling time is based on mono sampling. For stereo sampling, the available sampling time is equal to half of the value shown in the display.
Sampling procedure:
-
When you're ready to begin sampling, press the Play/Pause button to start sampling. The Rec button and the Play/Pause button will remain lit.
-
Press the Stop button to stop sampling. The Rec button and the Play/Pause button will go dark. TIP If you exceed the available recording time, sampling will end automatically.
-
After sampling, the display will show "New Sample," indicating that a new sample has been recorded. Press the Play/Pause button to hear the newly recorded sample. You can save the newly recorded sample as a user sample by pressing the Write button. If you decide not to save the newly recorded sample, press the Exit button.
Even if you press the Write button to save the user sample, it will be erased when you turn off the power. If you want to keep the user samples, use the DATA utility menu command EXPORT ALL SAMPLE or EXPORT SAMPLE to write the sample data to a memory card before you turn off the power.
If you sample the Audio Input, the sample itself is recorded at the optimal volume, but the output volume during playback is perceptually lower than the volume you heard while sampling. This is by design, to minimize the distortion that might occur when playing that sample in Pattern. By setting the play level to +12dB (Sample page 9/10) you can also play back the sample at approximately the volume you heard during recording.
Assigning the sample to a part
The recorded sample is added to the Oscillator selections as a user sample.
Select a part, and then edit the Sample setting to select the sample that you want to use.
TIP Stereo samples play in stereo if assigned to an odd-numbered part, and play as Mono Mix if assigned to an even-numbered part.
Tip If you created a pattern with a user sample assigned to a part, use EXPORT ALL SAMPLE to write all sample data to a card before you turn off the power.
2. Resampling
Recording the playback of an electribe sampler part, pattern, or performance
electribe sampler can record the sound of its own playback to create a new sample; this is called "resampling."
Select the resampling mode
- Select the pattern that you want to resample.
- Hold down the Shift button and press the Rec button. The Rec button will remain lit, and the Play/Pause button will blink. If you decide to cancel before you start sampling, press the Exit button now.
- Choose the sampling mode (the display indicates "Sampling mode"). Turn the Value knob to specify either stereo sampling "Stereo" or monaural sampling "Mono."
- Press the > button to select the sampling source. Turn the Value knob to specify "Resampling."
- Press the > button to see the available sampling time.
Resampling procedure
- There are two ways to resample:
- Resample the pattern playback. Press the Play/Pause button to start resampling. The Rec button and the Play/Pause button will be lit.
- Resample the sound of a specific part. Resampling starts when you strike any trigger pad or touch pad.
- Press the Stop button to stop resampling. The Rec button and the Play/Pause button will go dark.
TIP If you exceed the available recording time, sampling will end automatically.
- After resampling, the display shows "New Sample," indicating that a new sample has been recorded.
Press the Play/Pause button to hear the sample that you just resampled. You can save the newly resampled sample as a user sample by pressing the Write button. If you decide not to save the newly resampled sample, press the Exit button.
TIP When you resample, the playback volume of the sample is raised so that the output volume of the playback is not perceptually diminished. However since this decreases the headroom margin, distortion may occur in some cases. If this occurs, you can set the play level to "Normal" (Sample page 9/10); the playback volume will be lower than during recording, but the headroom margin will be maintained.
Even if you press the Write button to save the user sample, it will be erased when you turn off the power. If you want to keep the user samples, use the DATA utility menu command EXPORT ALL SAMPLE or EXPORT SAMPLE to
write the sample data to a memory card before you turn off the power.
3. Editing a sample
Once a sample has been recorded, it can be edited using the electribe sampler's internal controls.
- Press the Menu/Enter button in the common section to open the edit screen.
- Use the < or > buttons to select SAMPLE EDIT, and press the Menu/Enter button once again.
- Use the Value knob to select the sample that you want to edit (using the sample number).
-
Use the < or > buttons to access the following sample editing functions. For details on each editing function, refer to the "Parameter Guide."
-
RENAME: Edits the name of the sample.
- START POINT: Specifies the playback start point.
- END POINT: Specifies the playback end point.
- LOOP START POINT: Specifies the loop start point. The sample playback is looped from the point you specify here until the END POINT.
- SAMPLE TUNE: Adjusts the pitch of the sample.
- Time Slice: Divides the sample by beats.
- CLEAR SLICE: Cancels the result of the TIME SLICE (divide sample) operation.
- PLAY LEVEL: Changes the playback level of the sample. For a resampled sample, this is automatically set to +12dB in order to reproduce the volume at which it was recorded.
- DELETE SAMPLE: Deletes a sample.
Tip To increase the available sampling time, delete unwanted preset samples to free up more sampling area, and execute EXPORT ALL SAMPLE while in this state; then load this data when restarting. It will no longer be possible to select the deleted preset sample numbers with the Sample knob.
Tip You can preview-play the sample by striking a trigger pad or by using the touch pad assigned to Touch Scale.
Tip When editing a sample, the Filter, Modulation, Amp/EG, and Insert FX sections are unavailable.
Tip When editing a sample, Voice Assign is set to Mono 2.
- When you have finished editing, press the Write button to save your changes.
Even if you press the Write button to save your edited content, the user samples are erased when you turn off the power. If you want to keep the user samples, use the DATA utility menu command EXPORT ALL SAMPLE or EXPORT SAMPLE to write the sample data to a memory card before you turn off the power.
4. Importing/exporting samples
WAV files saved on a memory card can be imported into the electribe sampler as samples. Samples can also be saved by writing them to a memory card. From the DATA utility menu, choose the desired command and execute it.
- Import SAMPLE: Loads a sample from the memory card.
- Export SAMPLE: Writes a sample to the memory card.
- Export ALL SAMPLE: Writes all samples saved in the electribe sampler to the memory card as "all sample data." The "all sample data" written to the memory card will automatically be loaded the next time the electribe sampler starts, returning it to the state prior to power-off.
"All sample data" on the memory card is automatically loaded at start-up. Since all samples saved in the electribe sampler will be overwritten, take care not to inadvertently
change the samples, for example if you swapped memory cards.
- Export ALL PATTERN: Writes all patterns to the memory card.
- Import ALL PATTERN: Loads all patterns that were written to the memory card by EXPORT ALL PATTERN. All patterns will be overwritten.
Appendix
1. Troubleshooting
The display won't turn on.
Have you securely connected the AC adapter?
Have you connected the AC adapter to the power outlet?
Do you have enough battery charge?
There is no sound!
Have you correctly connected the amplifier, mixer or headphones to the jack?
Have you turned the power on for the amplifier or mixer and set them correctly?
Have you set the Volume knob of the electribe/electribe sampler to an appropriate level?
Playback won't stop!
A Pattern keeps playing back, repeating the selected pattern. Press the Stop button after playback ends.
The sounds / motion sequence actions have changed from what I created during editing!
Have you completed the write operation after editing?
After you have edited, write the data to memory before switching the pattern in each mode or before you turn off the power.
I can't control MID!
Have you correctly connected the MIDI cable?
If you play this system from an external device:
Have you correctly set the MIDI channel in global mode? ( p.14)
If you play an external device from this system:
Have you set the same MIDI channel for the receiving device and for this system?
I don't hear anything when I'm playing on the trigger pad.
Have you saved the part after editing? ( p.12)
Have you turned the Keyboard button ON?
Have you disabled the motion sequence? ( p.12)
I can't seem to use my memory card.
Have you formatted the memory card only in your electribe?
You need to re-format any memory card that has been formatted by a computer or digital camera with this system before it can use it. ( p.14)
Have you correctly inserted the memory card?
Remove and insert the memory card again. ( p,8)
Is the card size supported by this system?
This system supports SD cards from 512MB to 2GB, and SDHC cards of 32GB or less.
2. Error message
Pressing the Exit button will close the message window.
Card Error
Memory card is damaged.
Make a backup of all files in the memory card.
Make a backup of all data in your memory card to a computer, etc. and then format the memory card with this system. Upon completion, you can replace all of your data to the newly formatted memory card.
Protected
Data protection is turned ON when you save data to a memory card.
If the write protect switch on the memory card is locked, unlock it.
Card Full
The memory card does not have sufficient available space.
Delete file(s) on the memory card to secure clear sufficient space and then write or save your data again.
Event Over
The number of events exceeds the maximum number of events that can be recorded.
File Error
File can't be read/write correctly.
Memory Full
This system does not have sufficient memory capacity when you load data from a memory card or copy data to this system.
Erase unnecessary data to increase the amount of available space.
Motion Seq Full
Motion sequence cannot be recorded.
The electribe/electribe sampler can support up to 24 motion sequence patterns. Erase any unnecessary motions and try to add your motion sequence again.
Specifications
The maximum number of sounds (entire pattern):
MAX. 24 voices (The number of simultaneous sounds in entire pattern depends on the type of Oscillator, Filter or Insert Fx
The maximum number of sound (per part):
MAX, 4 voices
Connectors: Audio Out L jack (mono 1/4" phone jack),
Audio Out R jack (mono 1 / 4'' phone jack), Audio In jack (Stereo 1 / 8'' mini phone jack), Headphone jack (Sterco 1 / 8'' mini phone jack), Sync In jack, Sync Out jack, MIDI OUT jack, MIDI IN jack, USB connector (micro USB B type)
Power supply: AC adapter (DC 9V),
Six AA batteries (alkaline or nickel-metal hydride batteries)
Battery life: approximately five hours (Power Saving:
ON, with nickel-metal hydride batteries)
Current consumption: 500mA or less
Dimensions (W x D x H): 13.35" x 7.44" x 1.77" / 339 x 189 x 45 mm
Weight: 3.53~lbs / 1.6~kg
Operating temperature: 0 + 40^ (non-condensing)
Included items: Owner's manual, AC adapter, MIDI
conversion cable x 2
- Specifications and appearance are subject to change without notice for improvement.
Précautions
Emplacement
Bouton (lecture/pause)
Oscillator (electribe sampler: Sample)
Commande Pitch/Glide
Commande Decay/Release
- OSC Edit, Pitch
Filter Cutoff, Resonance, EG Int
Modulation Speed, Depth - Amp/EG Level, Pan, Attack, Decay/Release
- IFX Edit, IFX ON, MFX Send
- Master Fx On, Master Fx X, Master Fx Y
Commande Sample Edit (section Edit)
Commande Amp/EG Decay/Release
Prises: Audio Out L (prise jack mono de 6,35mm),
Audio Out R (prise jack mono de 6,35mm),
Audio In (prise minijack stereo de 3,5mm)
Prise casque (prise minijack stereo de
3,5mm), Sync In, Sync Out, MIDI OUT,
MIDI IN, port USB (de type micro USB B)
Ossillator (electribe sampler: Sample)
- OSC Edit, Pitch
Filter Cutoff, Resonance, EG Int
Modulation Speed, Depth - Amp/EG Level, Pan, Attack, Decay/Release
IFX Edit, IFX ON, MFX Send - Master Fx On, Master Fx X, Master Fx Y
SUGERENCIÀ Alternatively, you can also use the command to create a new translation.
Donde, Key = C, Scale = Ionian
- OSC Edit, Pitch
Filter Cutoff, Resonance, EG Int
Modulation Speed, Depth - Amp/EG Level, Pan, Attack, Decay/Release
- IFX Edit, IFX ON, MFX Send
- Master Fx On, Master Fx X, Master Fx Y
Mando Amp/EG Decay/Release
Oscillator (electribe sampler: Sample)
Oscillator 旋钮 (electribe sampler:
Sample 旋钮)
可使用该旋钮选择波形。
Pitch/Glide 旋钮
- OSC Edit, Pitch
Filter Cutoff, Resonance, EG Int
Modulation Speed, Depth - Amp/EG Level, Pan, Attack, Decay/Release
- IFX Edit, IFX ON, MFX Send
- Master Fx On, Master Fx X, Master Fx Y
附加运动序列录制
electribsampler提供两个采样方式:
Amp/EG Decay/Release 旋钮
electribe sampler 105
Oscillator (electribe sampler : Sample)
Oscillator (electribe sampler:Sample
波形为选扱亻。
Pitch/Glide Np
Mé ju le-son's vip-bu lao
Amp/EG
Eddiht·-Sckshon's Sample Edit
sulplufoi1e-1i#i#i#i#i#i#i#i#i#i#i#i#i#i#i#i#i#i#i#i#i#i#i#i#i#i#i#i#i#i#i#i#i#i#i#i#i#i#i#i#i#i#i#i#i#
Amp/EG.Decay/Release N
``
它的不值127 1设定的或不的長之開我
FFAILJFJL<FJFJFJFJFJFJFJFJFJFJFJFJFJFJFJFJFJFJFJFJFJFJFJFJFJFJFJFJFJFJFJFJFJFJFJFJFJFJFJFJFJ
Memory Full
| Function... | Transmitted Received Remarks | |||
| Basic Channel | Default | 1-16 | 1-16 | Memorized |
| Change | 1-16 | 1-16 | ||
| Mode | Default | X | 3 | |
| Messages | X | X | ||
| Altered | ********** | X | ||
| Note Number | True Voice | 0-127 | 0-127 | |
| ********** | 0-108 | |||
| Velocity | Note On | O 9n, V=1-127 | O 9n, V=1-127 | *4 |
| Note Off | X 8n, V=64 | X | *4 | |
| After Touch | Key's | X | X | |
| Channel | X | X | ||
| Pitch Bend | X | X | ||
| Control Change | 0,32 | O | O | Bank Select (MSB, LSB) *5 |
| 7 | O | O | Level *4 | |
| 10 | O | O | Pan *4 | |
| 71 | O | O | Resonance *4 | |
| 72, 73 | O | O | EG Delay/Release, EG Attack *4 | |
| 74 | O | O | Cutoff *4 | |
| 80, 81, 82 | O | O | Oscillator Pitch, Oscillator Glide, Oscillator Edit *4 | |
| 83 | O | O | Filter EG Int *4 | |
| 85, 86 | O | O | Modulation Depth, Modulation Speed *4 | |
| 87 | O | O | Insert Fx Edit *4 | |
| 102, 103 | O | O | TouchPad X, TouchPad Y *1,*4 | |
| 104 | O | O | IFX On *4 | |
| 105 | O | O | MFX Send *4 | |
| 106 | O | O | TouchPad On/Off *1,*4 | |
| Program Change | True Number | O 0-127 | O 0-127 | *5 |
| ********** | 0-127 | *5 | ||
| System Exclusive | O | O | *2 | |
| System Common | Song Position | X | X | |
| Song Select | X | X | ||
| Tune Request | X | X | ||
| System Real Time | Clock | O | O | *3 |
| Commands | O | O | ||
| Aux Measages | Local On/Off | X | X | |
| All Notes Off | X | O 123-127 | ||
| Active Sense | O | O | ||
| System Reset | X | X | ||
| Notes *1: Available to transmit / receive by the Master FX button depending on setting. *2: In addition to Korg exclusive messages, also supports inquiry messages and master volume. *3: Transmit only, no receiving, when the CLOCK MODE of the Global mode is Int / Ext.Sync . Vice versa when it is Ext.MIDI / Ext.USB. *4: Received if Global mode MIDI RECEIVE FILTER is Off, and transmitted if MIDI SEND FILTER is Off. *5: Received if Global mode MIDI RECEIVE FILTER is Off or Short, and transmitted if MIDI SEND FILTER is Off or Short. | ||||
保证規定(必すお読み<ださい)
This warranty is valid only in Japan.
This Product is only suitable for sale in Japan. Properly qualified service is not available for this product if purchased elsewhere. Any unauthorised modification or removal of original serial number will disqualify this product from warranty protection.
客樣相談

0570-666-569
This product has been manufactured according to strict specifications and voltage requirements that are applicable in the country in which it is intended that this product should be used. If you have purchased this product via the internet, through mail order, and/or via a telephone sale, you must verify that this product is intended to be used in the country in which you reside.
WARNING: Use of this product in any country other than that for which it is intended could be dangerous and could invalidate the manufacturer's or distributor's warranty. Please also retain your receipt as proof of purchase otherwise your product may be disqualified from the manufacturer's or distributor's warranty.