USER MANUAL BT100 AKAI
EZ Vinyl/Tape Converter
User Guide
English (2-13)
Benutzerhandbuch
Deutsch (50-61)
Guía del usuario
Espanol (14-25)
User Guide (English)
Introduction
Welcome to EZ Vinyl/Tape Converter—the easiest way to transfer your recordings to your computer. This software lets you burn your recordings to CD or to transfer them to a portable digital media device. We hope that you enjoy using this product as much as we enjoyed designing it for you!
Installation
- Open the EZ Vinyl/Tape Converter installer file: .exe (Windows®) or .pkg (Mac® OS X®).
- Follow the on-screen instructions to install EZ Vinyl/Tape Converter.
- Once the installation has successfully completed, click the Finish or Close button to quit.
Transferring Music to Your Computer
Once you have installed the software, you can start recording. Open EZ Vinyl/Tape Converter by going to Start > All Programs > EZ Vinyl Tape Converter (Windows) or your Applications menu (Mac OS X).
Step 1
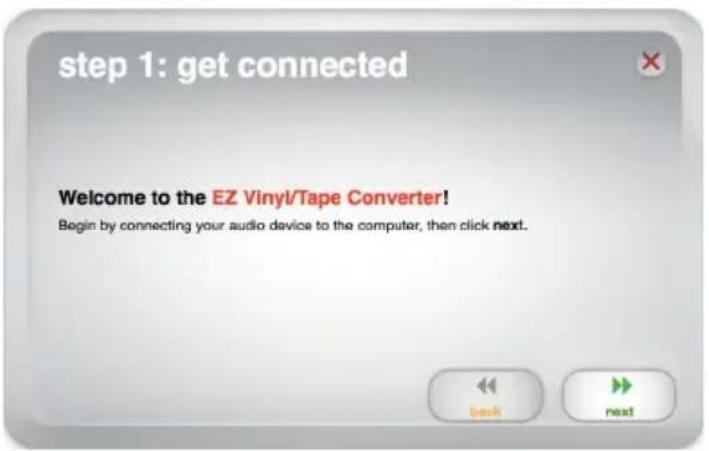
Once you start the software, you will see the screen shown on the right.
Connect a USB cable from the USB device to an available USB port on your computer. (This is the only audio connection you need to make to convert your vinyl or tapes using this software.)
Once the USB device is connected, click Next.
Note: If you are prompted to select your playback device (Turntable or Tape Player), check the appropriate box and click Next. If you selected Tape Player, you will be prompted to select the tape format, Normal or Chrome. (Normal tapes are the most common, including store-bought tapes and home recording tapes.)
Note: If you see a message that the software is unable to recognize your USB device, disconnect all other USB audio devices (USB speakers, USB audio interfaces, webcams, etc.) from your computer, then click Next again. Please note that EZ Vinyl/Tape Converter can be used only with products that included the EZ Vinyl/Tape Converter software; it does not support other hardware.
Step 2
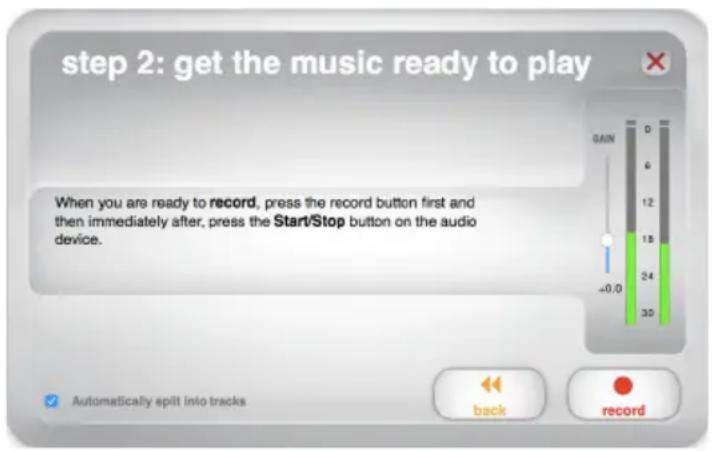
Locate the beginning of the section you would like to record. We recommend checking your levels before you begin recording.
If your USB device is equipped with a "gain" control, adjust it appropriately. You can also adjust the gain slider in the software next to the volume level meter (the loudest part of the song should reach the orange part of the meter).
The software will split tracks automatically when it detects silence in the music. For best results, make sure your volume levels reach the orange part of the software's volume meter during the loudest parts of the song. If your volume level is too low, EZ Vinyl/Tape Converter may have trouble detecting the difference between sound and silence. To split the tracks manually, uncheck the box labeled Automatically split into tracks. (This is recommended for typical popular music but may produce varied results when used with other genres like classical music, spoken word, etc.)
When you are ready to start recording, click Record and immediately play your music (press "play," place the needle over the record, etc.).
Step 3
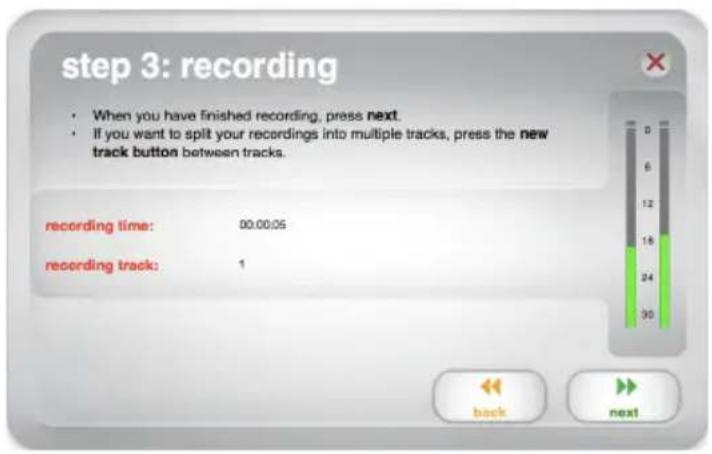
You are now recording. You should be hearing the audio from the device through your computer's speakers and seeing the audio meters move. If you cannot hear your music, make sure your computer's volume is not muted. (If you still cannot hear your music, see the Troubleshooting section of this manual.)
If you chose to manually split your recording into tracks, you will see a New Track button. You can use this button to mark the beginning of a new track.
When you have finished recording, click Next to proceed to the next step.
Step 4
Important: Windows users and Mac OS X users will see different windows for this step, as shown below.
Windows
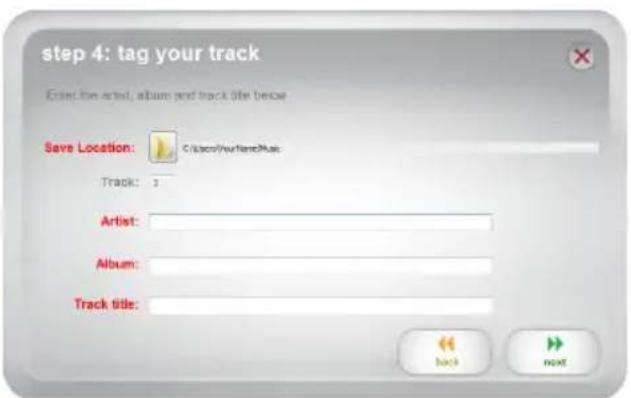
Once you have finished recording, please enter the Save Location by clicking the folder icon and selecting where you want the software to save your converted files. Also enter Artist, Album and Track titles by clicking and typing into the corresponding fields. (The Track title will be the name of the converted file. The Album and Artist names will be the names of the folders it is saved in.)
Note: If you have recorded more than 10 tracks, you can access the information for Tracks 11-20 by clicking Next.
When you are finished labeling your recording, click Next.
Mac OS X
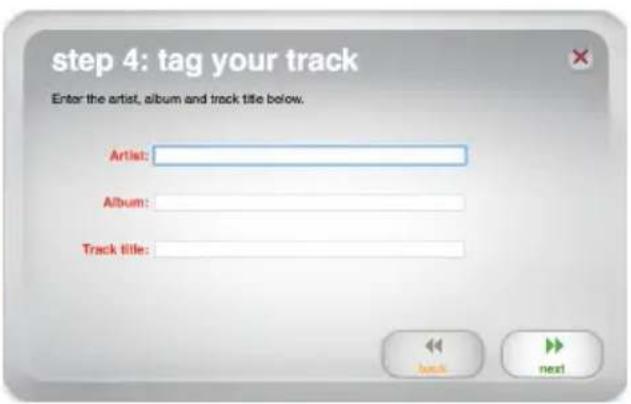
Once you have finished recording, please enter the Artist, Album and Track titles by clicking and typing into the corresponding fields. (The Track title will be the name of the converted file. The Album and Artist names will be the names of the folders it is saved in.)
Note: If you have recorded more than 10 tracks, you can access the information for Tracks 11-20 by clicking Next.
When you are finished labeling your recording, click Next.
Step 5
Important: Windows users and Mac OS X users will see different windows for this step, as shown below.
Windows
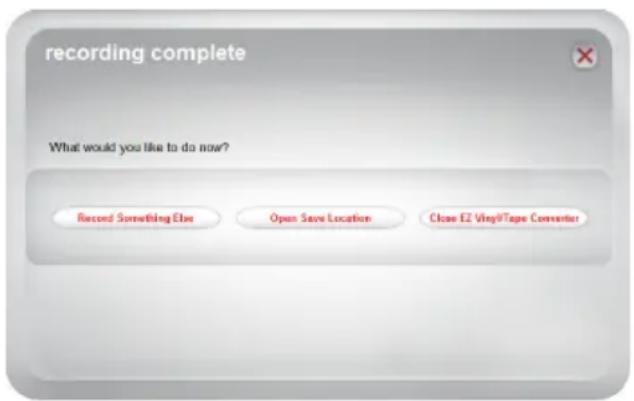
Once the software has saved your recording, you will see the screen on the right.
Click Record Something Else if you would like to record again.
Click Open Save Location to open the folder where your recordings are saved.
Click Close EZ Vinyl/Tape Converter or the X in the upper right corner if you do not wish to record more.
Mac OS X
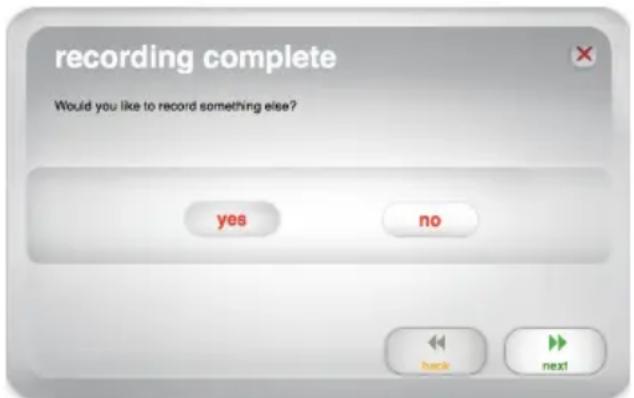
The software will now export your recording to iTunes. Please allow the exporting process to complete. Once the software has exported your recordings to iTunes, you will see the screen on the right.
Choose Yes if you would like to record again. Choose No if you do not wish to record more.
When you have made your selection, click Next to record again or exit the application.
You will now be able to access your recordings through your iTunes library. Switch over to your iTunes window (iTunes will open automatically once your tracks have been exported.) Click on the Music library tab on the left and navigate to the Artist, Album, and Track titles which you entered for your recording.
Important: This section is intended for Windows users because the Windows version of EZ Vinyl/Tape Converter saves files as WAVs. The Mac OS X version saves files as any format supported by iTunes (MP3, AAC, WAV, and more).
EZ Vinyl/Tape Converter saves your files as WAVs (.wav), which you can play with virtually any audio playback software but—because they are 10 times larger than MP3s—they may be too large to use on smartphones, to upload to a website, etc. You can convert WAVs to other file formats by using iTunes, Windows Media Player, or other free applications available online.
To convert your files using iTunes:
- If you do not have iTunes, download and install it from apple.com/ iTunes.
- Open iTunes on your computer.
- In the menu bar, click Edit and select Preferences.
- In the Preferences window's General tab, click the Import Settings button.
- Click the Import Using drop-down menu and select the format you want to convert to. (We recommend converting to MP3 since it is supported almost universally by audio playback applications, websites, etc. If you use mostly iTunes or other Apple software or devices, we recommend converting to AAC (.m4a), which has a slightly better sound quality than MP3.)
- Click OK to close the Import Settings window, and then click OK to close the Preferences window.
- Locate your WAV files, and then click and drag them over the Library category of the sidebar in iTunes. The files will be added into your iTunes library.
- In your iTunes library, select the files you want to convert, right-click them, and select Create Version (the format you selected in Step 5). iTunes will create an additional version of those files in your desired format.
Note: Your iTunes library will now show both an entry for each file format. To save hard drive space, you can delete those files from your iTunes library, if you wish.
For more information on using iTunes, see the iTunes Help menu.
Troubleshooting
| Problem Cause Solution | |
| I am not hearing any audio when I am recording and I do not see the audio meters moving. | USB device not powered. If your device has a power button, make sure that the USB device is powered on. | Make sure the USB device is connected to a working USB port on your computer. If already connected, try reconnecting the device and restarting the software. |
| USB device not connected to the computer. |
| Bad USB cable or bad USB port. | Try using a different USB cable. Also, try connecting the USB device to a different USB port on your computer. |
| I am experiencing poor sound quality. | Cartridge connection is not secure. | If using a USB turntable, cartridge must be securely connected to the tonearm whenever you are using the turntable. |
| Vinyl record is dirty or scratched. | If transferring vinyl, try dusting off and gently wiping the surface of the record before playing it. |
| Other software applications are interfering with EZ Vinyl/Tape Converter. | Close all applications, restart the computer, and only run EZ Vinyl/Tape Converter while recording. |
| Stylus may be worn. | Turntables only: If your stylus is over a year old or has been used extensively, it may be broken or worn. Visit the webpage for your product to purchase another stylus. |
| The music is playing and I see the audio meters moving but I am not hearing any audio. or I cannot hear my recordings once I have transferred them and try to play them on my computer. or While the USB device is connected, I cannot listen to any music from my computer. | Computer audio output not set correctly.
Make sure that your computer's soundcard is selected as your playback device. Windows XP: Click Start Menu > Control Panel (or Settings > Control Panel in Classic View) > Sound and Audio Devices. Click the Audio tab and under Sound playback, select your computer's soundcard as the default device. Windows Vista: Click Start Menu > Control Panel (or Settings > Control Panel in Classic View) > Hardware and Sound > Sound. Click the Playback tab and select your computer's soundcard as the default device. Windows 7: Click Start Menu > Control Panel > Sound. Click the Playback tab and select your computer's soundcard as the default device. Windows 8: Press the Windows key to open the Start page, start typing Control Panel, and then select Control Panel from the search results. Click Hardware and Sound, and then click Sound. Click the Playback tab and select your computer's soundcard as the default device. Mac OS X: Click the upper-left "apple" icon then click System Preferences > Sound. Click the Output tab. From the menu, select Internal Speakers if you are using the computer's internal speakers or select Headphones if you are using speakers or headphones attached to the computer's 1/8" headphone output. |
| Problem Cause Solution | |
| The music is playing and I see the audio meters moving but I am not hearing any audio. | Computer speakers are muted. | Turn up the volume on your computer speakers. |
| Computer speakers are not connected. | If using external speakers, make sure that they are connected to your computer's soundcard. |
| On Windows Vista and Windows 7, my recordings are mono instead of stereo. | Recording input properties not set to "stereo". | You may need to manually specify "stereo" for the recording input. Go to Start > Control Panel > Sound (in Classic View). Then, click on the Recording tab and highlight the Microphone input (USB Audio Codec). Click on Properties to bring up the input settings. Next, click on the Advanced tab and select 2 channel, 16 bit, 44100 Hz (CD quality) in the Default Format pull-down menu. Lastly, click Apply to accept the settings. |
| On my Mac, after recording a file, it appears as EZACT Temp in iTunes and does not play. | iTunes settings need to be adjusted. | In iTunes, click the iTunes menu in the upper-left and click Preferences. Click the General tab then the Import Settings button and set Import Using to MP3 Encoder. Then click the Playback tab and uncheck Sound Check, Sound Enhancer, and Crossfade Songs. Close the window when finished. |
| The recording sounds loud and distorted | The gain level is too high. | If your USB device is equipped with a “gain” control, adjust it appropriately. You can also adjust the gain slider in the software next to the volume level meter (the loudest part of the song should reach the orange part of the meter). Most computer operating systems provide a recording input level slider, which you can adjust: Windows XP: (not available) Windows Vista: Click Start Menu > Control Panel (or Settings > Control Panel in Classic View) > Hardware and Sound > Sound. Click the Recording tab and select USB Audio Codec as the default device. Click Properties. In the new window, click the Levels tab and adjust the Microphone slider appropriately. We recommend setting the level at 4. Windows 7: Click Start Menu > Control Panel > Sound. Click the Recording tab and select USB Audio Codec as the default device. Click Properties. In the new window, click the Levels tab and adjust the Microphone slider appropriately. We recommend setting the level at 4. Mac OS X: Click the upper-left “apple” icon then click System Preferences > Sound. Click the Input tab. From the menu, select your USB recording device and adjust the Input Volume slider appropriately. |
| The recording is barely audible. | The gain level is too low. |
| Problem Cause Solution | | |
| The sound from my USB device's audio outputs is distorted or full of static. | Line/phono-level switch may not be set properly. | Turntables only: If your USB device has a line/phono switch on its rear panel, make sure it is set to the appropriate level for the inputs to which it is connected ("line" or "phono"). If your USB device does not have this switch, please see the Quickstart Guide that came with the product to determine whether it is line- or phono-level.
Note: You do not need to connect your USB device to a speaker system, receiver, etc. for EZ Vinyl/Tape Converter to convert your music. You only need to connect it to your computer (using a USB cable). |
| In Windows 7 and Windows 8, the text in the EZ Vinyl/Tape Converter window is mis-aligned and the X button in the upper right corner has a white box around it. | Your Display settings are not set to 100%. | Open Windows's Control Panel, select Appearance and Personalization, and select Display. Change the magnification to 100% and click Apply. After that, sign out of your computer and sign back in. |
EZ Vinyl/Tape Converter is a trademark of inMusic Brands, Inc., registered in the U.S. and other countries.
Apple, iTunes, Mac, and OS X are registered trademarks of Apple Inc., registered in the U.S. and other countries.
Windows, Windows XP, Windows Vista, Windows 7, and Windows 8 are registered trademarks of Microsoft Corporation in the United States and other countries.
All other product names, company names, trademarks, or trade names are those of their respective owners.