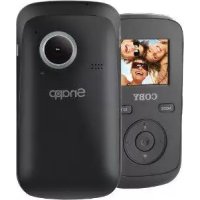
CAM5000 - Camcorder COBY - Free user manual and instructions
Find the device manual for free CAM5000 COBY in PDF.
| Product Type | Digital Camcorder |
| Brand | Coby |
| Model | CAM5000 |
| Dimensions (L x H x D) | 11.9 x 5.8 x 2.3 cm |
| Weight | Approx. 85 g (without battery) |
| Power Supply | Rechargeable lithium-ion battery (included) |
| Display | 2" bright TFT color LCD screen |
| Video Resolution | HD 720p (1280 x 720), VGA (640 x 480), QVGA (320 x 240) |
| Photo Resolution | Up to 12M (4032 x 3024) by interpolation |
| Digital Zoom | 4x |
| Internal Memory | 128 MB (built-in) |
| External Memory | SD/SDHC card up to 16 GB |
| Connectivity | USB 2.0 Hi-Speed, HDMI, AV (TV output) |
| Additional Functions | Webcam, compensation lamp, white balance, self-timer, date/time stamp |
| Included Software | CD with webcam driver and ArcSoft MediaImpression |
| Compatible TV Systems | PAL / NTSC |
| Care and Cleaning | Clean with a damp cloth; do not use liquid or aerosol cleaners |
| Safety | Do not open the casing; avoid moisture; comply with FCC instructions |
| Spare parts and repairability | Contact Coby customer service or a qualified technician |
| General Information | Made in China; brand Coby Electronics Corporation |
Frequently Asked Questions - CAM5000 COBY
User questions about CAM5000 COBY
0 question about this device. Answer the ones you know or ask your own.
Ask a new question about this device
Download the instructions for your Camcorder in PDF format for free! Find your manual CAM5000 - COBY and take your electronic device back in hand. On this page are published all the documents necessary for the use of your device. CAM5000 by COBY.
USER MANUAL CAM5000 COBY
natural_image
Black and white photo of a cooby HD smartphone with a digital display (no visible text or symbols on the device body)CAM5000
EN
Snapp™ HD Digital Video Camera Instruction Manual ......Page 2
ES
Snapp™ Videocámara Digital de HD
Manual de la instrucción......Pagina 48
FR
Snapp™ Caméscope Numérique HD
Manuel d'instruction ......Page 94
Table of Contents
PaCKagE CoNtENtS ....4
FEatuRES ....5
CamCoRDER at a glaNCE ......6
Display Overview 8
Video Mode 8
Playback Mode 12
gEttiNg StaRtED 13
Battery....13
Installing the Battery 13
Battery Indicator 14
Charging the Battery 14
Turning the Video Camera On/Off 14
Using a Memory Card 15
ViDEo moDE 16
Recording a Video Clip 16
Additional Features 16
Zoom....16
Compensating Lamp 16
White Balance 16
Movie Size ....17
PHoto moDE....18
Taking a Photo.... 18
Additional Features 18
Zoom....18
White Balance 18
Image Size 19
PlaybaCK moDE 20
Playback of Image Files....20
Playback of Video Files 21
Managing Files 21
tV PlaybaCK 22
Standard TV Playback 22
HDTV Playback 24
SEtuP oPtioNS 25
Video Mode Setup 25
Photo Mode Setup 26
Playback Mode Setup 26
General Setup 27
File tRaNSFER & aDDitioNaI FEatuRES ...... 29
USB Mode....29
Webcam Mode 30
Working Mode ....30
Charge Mode 31
Transferring Files 31
uPloaDiNg ViDEoS to youtubE™ 32
about tHE SoFtWaRE CD ....33
Web Camera Driver 34
ArcSoft MediaImpression™ 36
User Manual 36
tRoubleSHootiNg 37
SPECiFiCatioNS 40
SaFEty NotiCES 42
Package Contents
Thank you for your purchase of the Coby SNAPP CAM5000 HD Digital Video Camera. Please read this manual before operating your video camera, and keep it for future reference.
This package contains:
SNAPP CAM5000 unit ★
AV cable ★
USB cable ★
Installation CD ★
Lithium-ion battery ★
Hand strap ★
HDMI cable ★
Carrying pouch ★
If any of the above items are missing, please contact the dealer from whom you purchased this product.
Features
Brilliant 2" TFT LCD full color display ★
Captures video in 720p HD resolution ★
128MB built-in Flash memory ★
Integrated software for easy video editing and uploads ^†
Advanced features including multiple film modes, ♦ digital zoom (4x), and low-light LED
Hi-speed USB 2.0 port for fast file transfers ★
Integrated SD/SDHC card slot for memory expansion up to 16GB
Rechargeable lithium-ion battery ✦
Connects easily to your computer for use as a webcam ^
† Function available in Windows only.
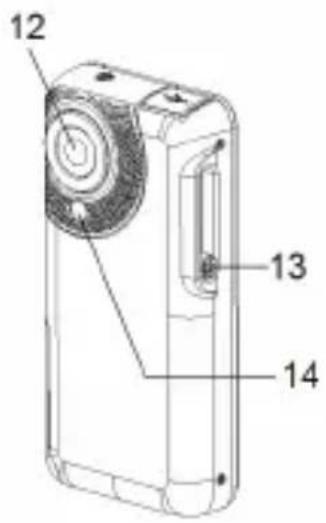
Camcorder at a Glance
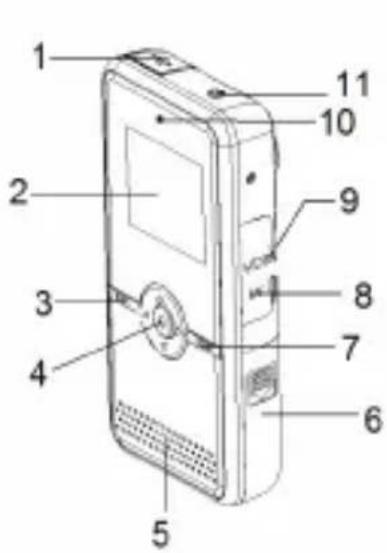
| 1 USB cover Hides the | USB connector. |
| 2 LCD screen Viewfinder display. | |
| 3 MODE Switch the function mode. | |
| 4 |  Up Up |
 Down Down | |
 Left Left | |
 Right Right | |
 Record Record | |
| 5 Speaker Audio output during video review. | |
| 6 Battery/SD card | Load SD or SDHC memory cards to increase the camcorder's storage capacity. The CAM5000 supports up to 16GB capacity cards. |
| 7 MENU Access the setup menu to adjust camcorder options. | |
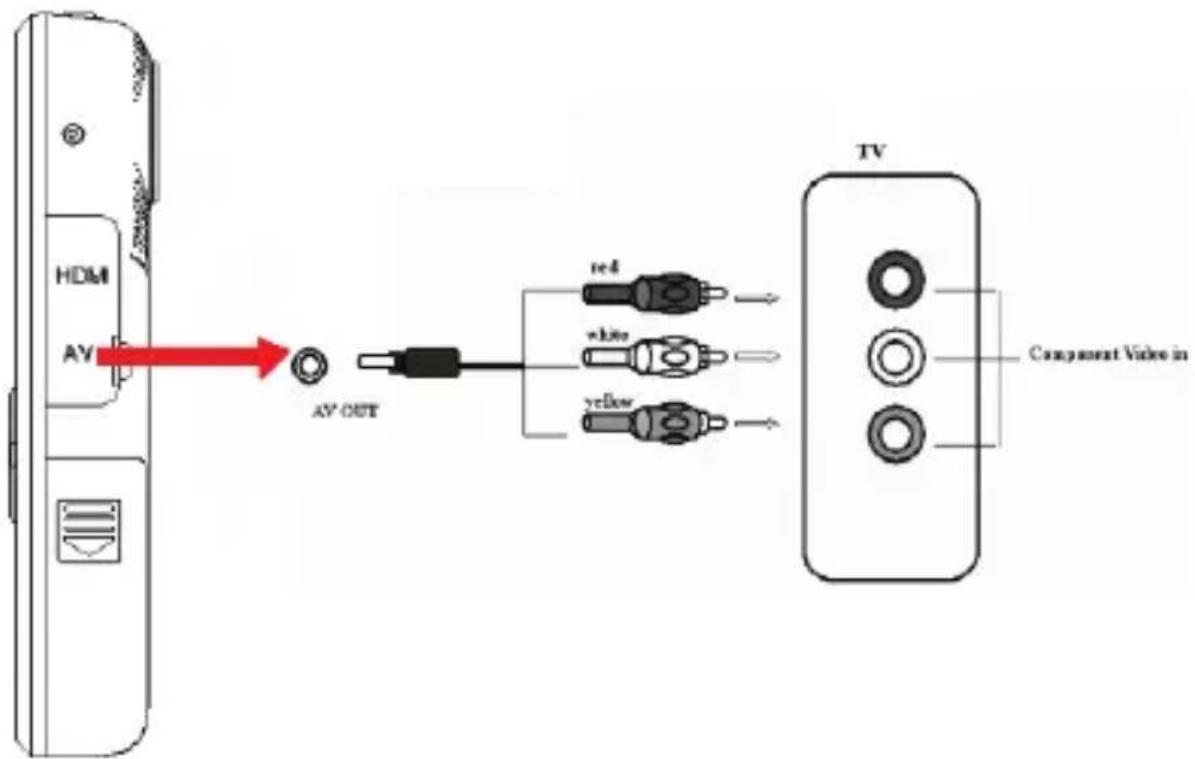
| 8 AV | output jack Connect the AV cable to this jack to display video on a TV. |
| 9 HDMI | jack Connect an HDMI cable to this jack to display video on an HDTV. |
| 10 Battery charge indicator | Indicates battery charging status. |
| 11 |  Power: press and hold to turn on; press to turn off. Power: press and hold to turn on; press to turn off. |
| 12 Lens Point the lens towards the subject you want to capture. | |
| 13 USB switch Extend/retract the USB connector. | |
| 14 Compensating lamp | Activate to improve picture quality in low light situations. |
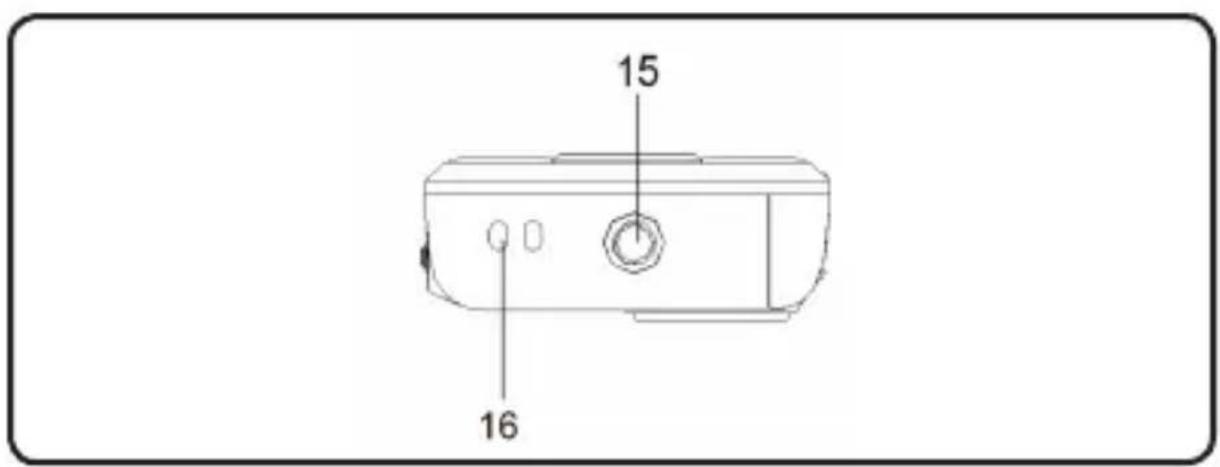
| 15 Tripod socket |
| 16 Strap mount |
Display Overview
Video Mode
English
![AWB VGA + 1.0x [30:30]](/content/2026/03/518840/images/2c8344cb0bbe5b07e15c23f7fdaecec90991e84d90b171cef0b4938a887b496d.jpg)
| Video Mode icon |  |
| Battery Level Indictor | |
| Full |  |
| Half |  |
| Low | 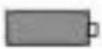 |
| Empty |  |
| Memory card icon |  |
| White Balance Indicator | |
| Auto AWB | |
| Sunny |  |
| Cloudy |  |
| Flourescent |  |
| Tungsten | [x035] |
| Resolution Indicator | |
| 320 x 240 QVGA | |
| 640 x 480 VGA | |
| 1280 x 720 HD | |
| Digital zoom indicator | [x08A] |
| Duration of recording [30:30] | |
Photo Mode
![AWB 8M + 1.0x [1270]](/content/2026/03/518840/images/024748f26797c7924297cfe620936e7f23eda27ceccde1748fabf1f22e0cc657.jpg)
| Photo Mode icon |  |
| Battery Level Indictor | |
| Full |  |
| Half | 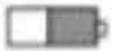 |
| Low | 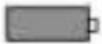 |
| Empty |  |
| Memory card icon |  |
| White Balance Indicator | |
| Auto AWB | |
| Sunny | |
| Cloudy | |
| Flourescent | |
| Tungsten | [kW70] |
| Resolution Indicator | |
| 4032 x 3024 12M | |
| 3400 x2550 8M | |
| 2592 x 1944 5M | |
| 1600 x 1200 2M | |
| Digital zoom indicator |  |
| Photos remaining [1270] | |
Playback Mode
![Thumbnails OK: ✓ [12/12]](/content/2026/03/518840/images/9516bfbb80df45f610e181b5cca476d41d6ec608e740063d35a65535209158ed.jpg)
| Playback Mode icon |  |
| Battery Level Indictor | |
| Full |  |
| Half |  |
| Low |  |
| Empty |  |
| Memory card icon |  |
| Sequence of current file / Total number of files | [12/12] |
Getting Started
Battery
A rechargeable lithium battery is used in this video camera.
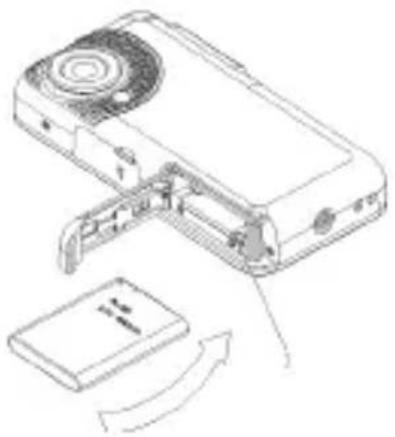
Installing the Battery
Slide the battery cover in the 1. direction indicated by the arrow.
Press the battery holder aside 2. and insert the attached battery with the positive (+) and negative (-) poles matching the directions indicated on the battery compartment.
natural_image
Line drawing of a device with an open lid and internal components, showing a curved arrow indicating rotation (no text or symbols present)Close the battery cover.3.

The batteries used in this device may present a fire or chemical burn if mistreated. Do not disassemble, incinerate, or heat the batteries.
Use only the size and type of batteries specified.
Do not mix old with new batteries, or mix different types of batteries.
Do not charge batteries that are not intended to be recharged. Follow the battery manufacturer's directions.
Do not install the batteries with their polarities reversed; this may damage the unit.
If the unit will not be used for a long time, remove the batteries to prevent damage or injury from possible leakage.
Battery Indicator
Your video camera's LCD monitor displays 3 different battery conditions. Please refer to the table below for more information.
Charging the Battery
Your video camera will charge when connected to a PC via the supplied USB cable or directly through the USB plug. To begin charging:
Power OFF the video camera; connect the video 1. camera to the PC via the USB cable.
Charging has begun when the charge indicator light 2. turns red. The charge indicator light turns off when charging is completed.
When charging is complete, disconnect the video 3. camera.
Turning the Video Camera On/Off
To turn on your video camera, press the ON/OFF button. Press again to turn off the video camera.
Using a Memory Card
To maximize your video camera's recording time, you may wish to use a memory card. Your video camera supports SD/SDHC card formats. To insert a memory card:
Open the battery/SD compartment door.1.
Insert the SD card with the frontispiece of the card 2. facing toward the LCD screen.
Close the battery door.3.

To remove a memory card, gently press on the edge of the card to release it. Gently pull the card out and close the battery cover.
To avoid damage and loss of data, always power off the video camera before inserting or removing a memory card.
Do not touch the connection terminals on the backside of the card.
Be sure that your memory card is unlocked before inserting it into the video camera.
Video Mode
Recording a Video Clip
Power ON the video camera.
Press the MODE button to select Video Mode. 1.
Press 2. to begin recording.
Press 3 again to stop the video recording.
Additional Features
Zoom
Press the ▲ to zoom in/out.
Compensating Lamp
In low light situations, press during recording to turn on the compensating lamp. Press it again to turn off the lamp.
White Balance
Depending on the lighting conditions, you may wish to adjust the video camera's white balance setting before you begin filming. Press to change the white balance. Options include: Auto, Sunny, Cloudy, Fluorescent, and Tungsten.
Movie Size
To maximize your video camera's available memory, you may wish to record video at a lower resolution. Press change the movie size. Options include: HD (1280 x 720), VGA (640 x 480), and QVGA (320 x 240).

For more information on Video Mode setup options, please see the Setup Options section of this manual.
Photo Mode
Taking a Photo
You can use your video camera to capture still shots. To take photos:
Power ON the video camera.1.
Press the MODE button to select Photo Mode. 2.
Press 3. to take a picture.

DO NOT attempt to remove the memory card or battery when the video camera is saving images. Doing so may cause data corruption.
Additional Features
Zoom
Press ▲ to zoom in/out.
White Balance
Depending on the lighting conditions, you may wish to adjust the video camera's white balance setting before you begin taking pictures. Press to change the white balance. Options include: Auto, Sunny, Cloudy, Fluorescent, and Tungsten.
Image Size
To maximize your video camera's available memory, you may wish to take photos at a lower resolution. Press to change the image size. Options include: 1600x1200 (2M), 2592x1944 (5M), 3400x2550 (8M by interpolation), and 4032x3024 (12M by interpolation).

For more information on Photo Mode setup options, please see the Setup Options section of this manual.
Playback Mode
NOTE:
If there are no files, the [no file] icon will be displayed on the LCD screen.

Power on the video camera and press the MODE button to select Playback Mode. Your recorded files will be displayed as thumbnails.
Use the ◀ and ▶ buttons to select your desired file.
Playback of Image Files
Image files are denoted by the Photo icon in the top lefthand corner of the thumbnail image.
To view a selected image in full screen, press 1.
Press 2▲ to zoom in on the image. Press to zoom out.
If you wish to view other sections of the ☆ zoomed-in image, press ⚙ to lock the zoom setting. You may then use the directional keypad to pan up, down, or across the image.
Press 🙏 again to unlock the zoom setting.
NOTE: If you wish to view your images in thumbnail mode, press ▼. Press 🔒 to return to full screen view.
Playback of Video Files
Video files are denoted by the Video icon in the top lefthand corner of the thumbnail image.
Press 📋 to access the desired video file. Press it again to begin playback.
During playback, press 2. to pause. Press it again to continue.
Press 3. to rewind through your video clip; press to fast-forward.
Press 4▲ or ▼o adjust the playback volume.
Managing Files
To delete files from the video camera:
Use the directional keypad to select "Delete One" or 2. "Delete All".
Press 3. to confirm.

Selecting Delete All will cause all files to be erased from the video camera.
TV Playback
Standard TV Playback
Connect your video camera to a television to view files or record new ones on a larger screen.
Power off the video camera and connect it to your 1. television using the AV-cable.
Power on the television and switch to AV-mode.2.
Power on the video camera and place it in the 3. desired mode.
Select Video Mode if you want to use your television 4. to preview content as you record it.
Select Playback Mode if you want to review the video 5. and/or image files you have already taken.
In Video Mode:
Use the video camera controls to record video as you 1. normally would. Your television screen will function as the video camera's LCD display.
In Playback Mode:
Press 1. or ▶ to select your desired file.
Press 2. to play the selected video file on your television.
During playback, press 3. to pause. Press it again to resume playback.
Press 4. to rewind your video clip. Press fast-forward.
Press 5▲ or ▼ to adjust the volume.

When the video camera is connected to a television, the LCD screen will automatically turn off.
Connecting to a television will not charge the video camera's battery; your video camera will continue to operate on battery power.
If the image is not displayed correctly in the center of the screen, you may need to adjust your television settings. Please refer to your television's user manual for help.
HDTV Playback
Your video camera is capable of playback at HD (720p) resolution on a compatible HDTV. To view your video files in HD:
Power off the video camera. 1.
Use the HDMI cable to connect the HDMI output jack 2. on your video camera to your HDTV's HDMI input.
Power on your HDTV and select HDMI mode.3.
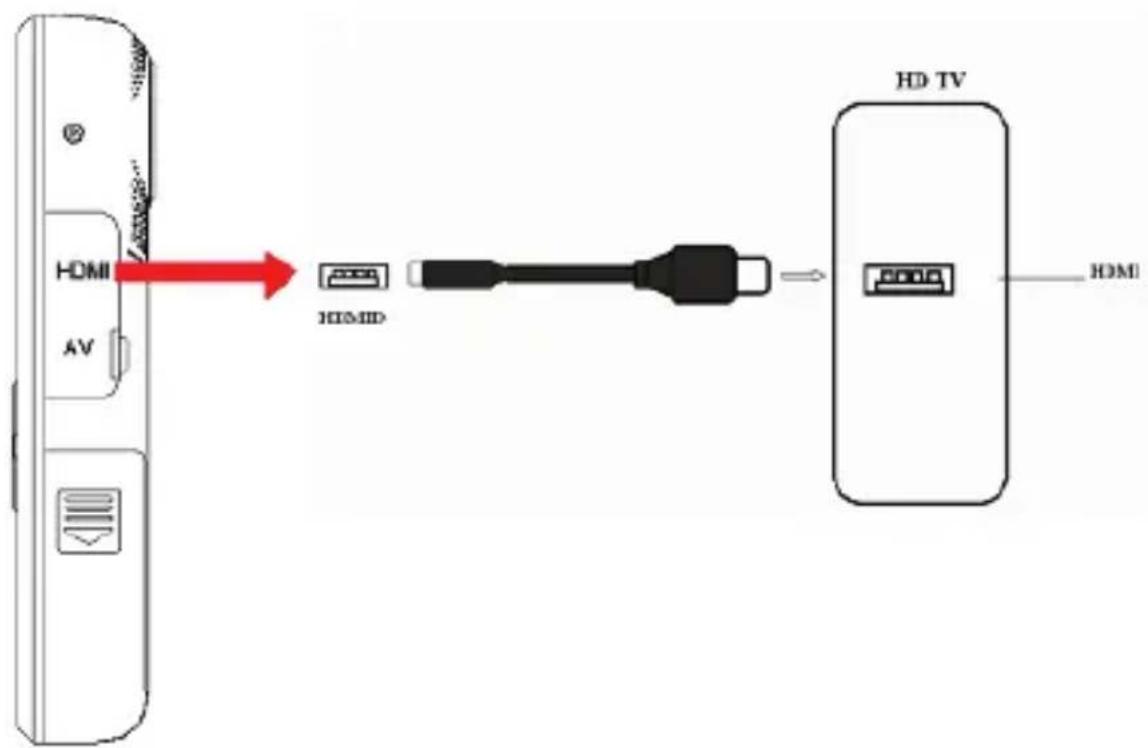
Once all connections are made and your television is turned on, power on the video camera. It will automatically enter Playback Mode. HDTV Playback controls are the same as the Standard TV controls.

The MODE button does not function when your camera is connected to a television via the HDMI cable. [this is only correct for HDMI connection]
Setup Options
Your video camera offers additional setup options in Video, Photo, and Playback modes, as well as a general setup menu for the camera.
Access the Setup menu in each mode by pressing the MENU button.

Use the directional keypad to navigate the setup ✦ menus.
Press ⬇ to enter a menu or select a setting.
To return to the previous menu without changing the setting selection, press the MENU button.
Please see the tables below for more information on setup options in individual modes.
Video Mode Setup
Enter the Video Mode Setup menu to adjust movie size or change filming options.
| Feature Description Hotkey | ||
| Movie Size | Record video at a lower resolution in order to maximize the video camera's available memory. |  |
| White Balance | Adjust the white balance to accommodate different lighting conditions. |  |
| EV Setup Adjust the exposure to accommodate different lighting conditions. | -- | |
Photo Mode Setup
Enter the Photo Mode Setup menu to adjust image size, set the self-timer, or change photo settings.
| Feature Description Hotkey | ||
| Quality Setup | Adjust the image quality. Finer quality images will use more memory. | -- |
| Image Size Take photos at a lower resolution to maximize the video camera's available memory. | ||
| White Balance | Adjust the white balance to accommodate different lighting conditions. | |
| EV Setup Adjust the exposure to accommodate different lighting conditions. | -- | |
| Self Timer Set the video camera's self-timer. -- | ||
| Stamp Display a date and time stamp on your photos.NotE: The video camera's internal date and time should be set using the General Setup menu before enabling the Stamp feature. | -- | |
Playback Mode Setup
Enter the Playback Mode Setup menu to delete files. Select "Delete One" to delete the selected file, or "Delete All" to erase all files from the video camera.
General Setup
You can access the video camera's general setup menu from any operating mode. Press the MENU button, then use the directional keypad to select the Setup icon [image].
| Feature Description | |
| Auto Off Set the camera to automatically turn off when not in use for a designated time period. This feature helps to maximize the video camera's battery life. | |
| Beep Set the sound effect for the video camera's controls. | |
| Brightness Set the display brightness. | |
| Display Setup | PAL / NTSC |
Format Format the video camera.CAUTION: Selecting YES will delete all data from your video camera. | |
| Date / Time Set the video camera's internal date and time.Press◀/▶to toggle between the fields for hour: minute and day: month: year.Press▲to change the values in these fields. | |
| Flicker Adjust the video camera's frequency depending upon your location.NOTE: US setting is 60Hz. | |
| Default Setup | Restore your video camera to its factory default settings.CAUTION: Selecting YES will delete all custom settings from your video camera. |
| Language Set the display language. | |
| Version View software information for the video camera. | |
File Transfer & Additional Features
Connect your video camera directly to your computer's USB port to transfer files, use the webcam feature, or continue shooting video and photos without draining the battery. (You may also connect the video camera using the supplied USB extension cable.)
Make sure the video camera is powered on before connecting.
Use the directional keypad and the ● button to select the desired mode:
USB Mode
Download files to your computer.

natural_image
Red glossy circular icon with a folder symbol and the letters 'USB' (no additional text or symbols)Webcam Mode
Use the video camera as a computer webcam. (Driver installation required.)
The webcam feature is available in Windows only.

To use the webcam, select the Webcam Mode icon, then:
Double-click the "My Computer" icon on your 1. Windows desktop.
Double-click the camera icon.2.
The CAM5000 is now ready for use as a web camera.
Working Mode
Use the video camera to shoot video, take photos, or play back files without draining the battery.

Charge Mode
Select this mode to charge the video camera's battery. The video camera will automatically power off when Charge Mode is selected.

Transferring Files
To transfer files from the video camera to your computer:
Connect the video camera to your computer's USB • port and select USB mode.
Your computer will automatically recognize the video • camera as an external drive. Follow the prompts on your computer screen to view files on the camera.
If no prompts appear, you may also access files on the video camera by opening My Computer and clicking on the External Drive to which the video camera is connected.
Copy and paste files from the camera to any folder • on your computer using basic Ctrl+C / Ctrl+V commands.
Uploading Videos to YouTube™
Share your videos with family, friends, or the world with the YouTube web service. The CAM5000 comes with the Arscoft Upload to YouTube application that makes sharing your videos easy and convenient.
The Upload to YouTube application is installed on the camcorder and will start automatically when you connect it to a computer.

To upload videos to YouTube, you must have a valid YouTube account. To sign up for a free account, please visit http://www.youtube.com.
To use the Upload to Youtube application, Microsoft Windows Vista, 2000, or XP Service Pack 2 is required.
Provide your YouTube username and password ✦ credentials. You will have the option to save these credentials; once saved, you will not have to enter them again.
Click the folder to add a video file to your collection. ★
Click on a video to select it for uploading. ★
Describe the video you are uploading (Title, ✦ Description, Video Category, and Tags are required).
Preview the selected video. ★
Click the Upload button to upload the selected video ✦ to YouTube.
About the Software CD
The bundled CD contains the drivers and software that come with video camera.

To use the included software, Microsoft Windows Vista, 2000, or XP Service Pack 2 is required.
Insert the CD into your CD-ROM drive. The autorun menu will appear.
Click on one of the following to launch the installation routine.
Install Driver: Installs software to use the CAM5000 as a web camera.
ArcSoft MediaImpression™: Installs software to edit video and pictures.
User Manual: Read the CAM5000 user manual.

If the autorun menu does not appear automatically, double-click the CD-ROM icon in [My Computer] or [Windows Explorer], then double-click the file named [autorun.exe] to start the program.
Web Camera Driver
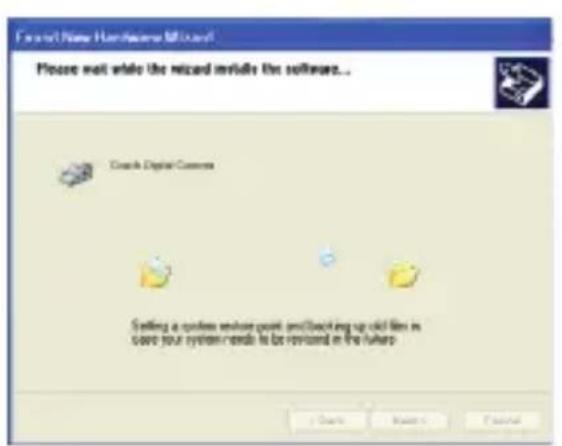
To use the CAM5000 as a web camera with your PC, you must first install the driver from the CD. After the CD driver has been installed:
Connect the camera to the computer with 1. the USB cable. Turn on the camcorder and select the Webcam Mode icon.

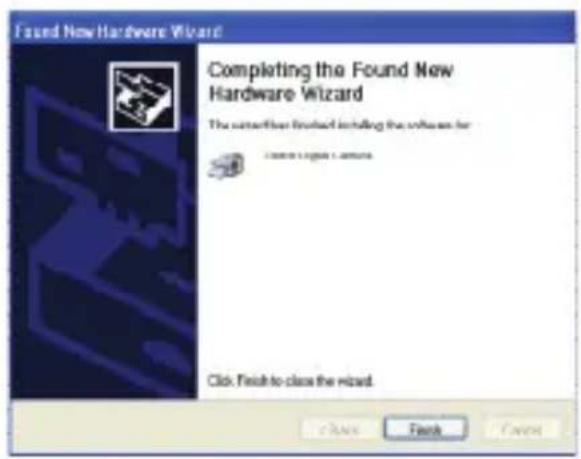
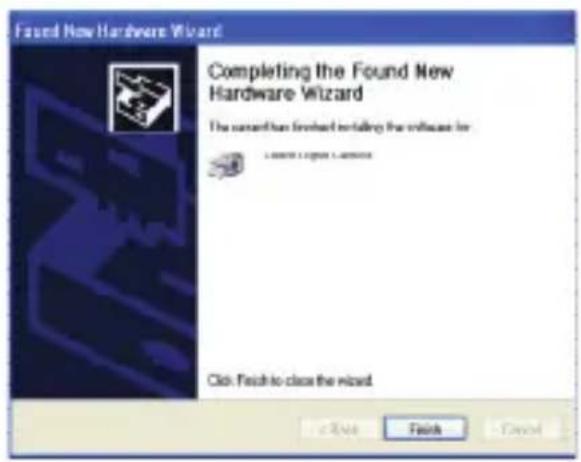
The "Found New Hardware Wizard" will launch.2.
Select "Install the software automatically" and then 3. follow the instructions to finish installation.
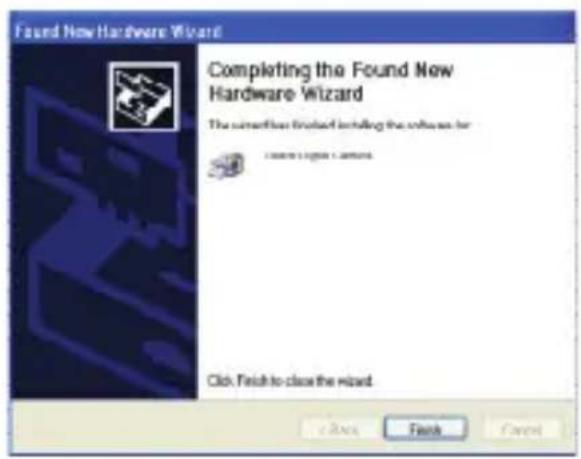

The “Found New Hardware Wizard” will launch again. 4. Follow the instructions again to finish installation.
The CAM5000 is now ready for use as a web camera.
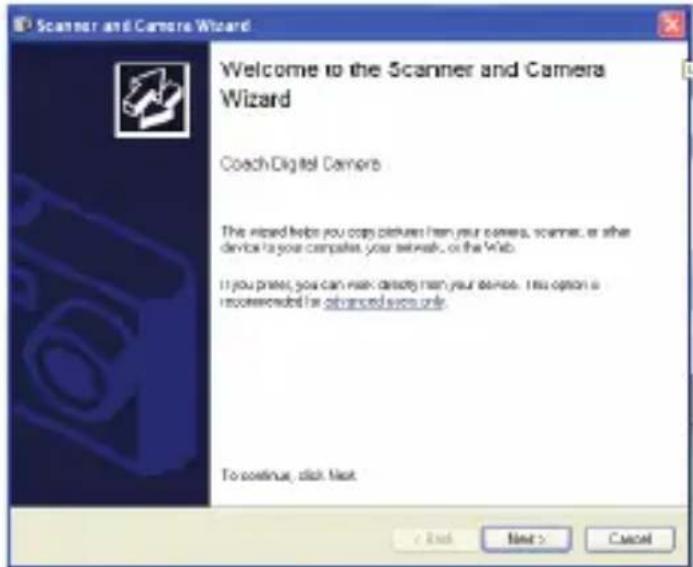
Note:
If the Hardware Installation screen appears, click ★ "Continue Anyway".
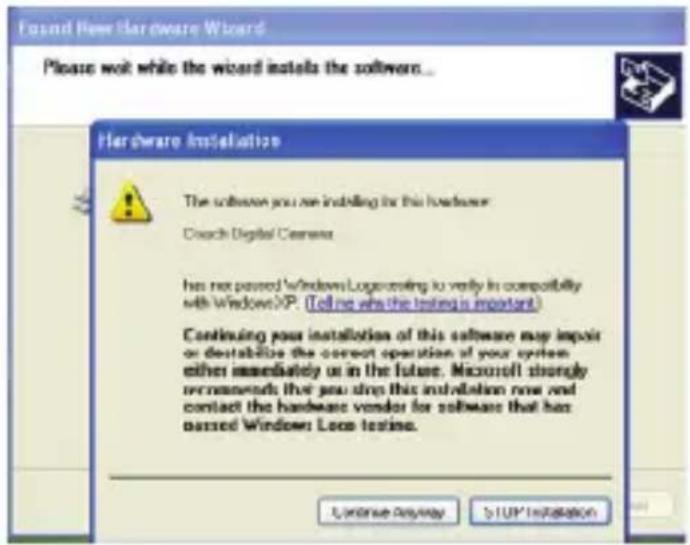
If the "Scanner and Camera Wizard" screen appears, click "Cancel".
ArcSoft MedialImpression™
To get acquainted with the MedialImpression software, please refer to the help file included with the application (click on the “?” symbol in the top right corner of the application screen, or press “F1” on your keyboard).
User Manual
To read the user manual, you may need to download and install the free Adobe Acrobat reader from the Adobe website at www.adobe.com.
Troubleshooting
If you have a problem with this device, please read the troubleshooting guide below and check our website at www.cobyusa.com for Frequently Asked Questions (FAQs) and firmware updates. If these resources do not resolve the problem, please contact Technical Support.
Address
COBY Electronics Technical Support
56-65 Rust Street
Maspeth, NY 11378
techsupport@cobyusa.com
Web
www.cobyusa.com
Phone
800-727-3592: Weekdays 8:30AM–9:00PM EST
Saturdays 9:00AM–5:30PM EST
718-416-3197: Weekdays 8:00AM-5:30PM EST
Camera does not power on.
Check that the battery has been inserted correctly. ✦
Check that the battery is adequately charged. If the ^★ battery status indicator shows low or no charge, recharge the video camera by connecting it to your computer's USB port.
The camera does not take pictures/video.
The camera's memory or memory card may be full.
Delete several files and try again.
An incompatible memory card may be inserted. ★ Check that the memory card is in a compatible format.
If the memory card has not been formatted, use the camera's Format function to clear data from the memory card.
Image is blurry or out of focus.
Blurry images or video may result when the camera ✦ is not held steady during recording. Hold the camera steady and try again.
Memory card images are not displayed on the LCD screen.
This camera will only display JPG images that have ★ filenames in the following format: CLIP####.jpg or PICT####.jpg. If you have inserted a memory card containing images in another format or filename structure, they will not display. Check the format of the images on your memory card.
Recorded images are not saved in memory.
Images will not save if the camera is turned off before data has finished processing. Be sure to allow adequate time for the image to save completely before turning off the video camera.
I cannot access the pictures on my camera or memory card from my computer.
Ensure that the camera has been placed in USB • mode when connected to your computer. For more information, see the Transferring Files section of this manual.
Specifications
| Sensor 5 Mega Pixel CMOS; | 8M & 12M by interpolation |
| Display 2.0” TFT Color LCD Display | |
| Focus Range 5ft ~ infinity | |
| Aperture F3.1, Fixed Focus | |
| Shutter Electronic Shutter: 1/2 ~ 1/1800 sec. | |
| File Format Sill Image: JPEG | (EXIF 2.2 compatible) |
| Video: MP4 with Audio (WAV) | |
| Resolution Still Image: 1600x1200 (2M) / 2592x1944 (5M) 3400x2550 (8M) / 4032x3024 (12M) | |
| Exposure Control Auto | |
| White Balance Auto / Daylight / Tungsten / Fluorescent / Cloudy | |
| Self Timer 5 sec / 10 sec | |
| Storage Internal 128MB | |
| Storage External SD / SDHC | |
| TV System | PAL / NTSC |
| Power Supply Lithium Battery | |
| Operating Temperature 0°C | up to 40°C |
| Storage Temperature -20°C | up to +60°C |
| Microphone Built-in | |
| Speaker Built-in | |
| Dimension Camera Body: 4.7" x 2.28" x 0.91" | |
| Weight Camera Body w/o battery: approx. 3 ounces | |

Specifications are subject to change without notice.
Safety Notices

natural_image
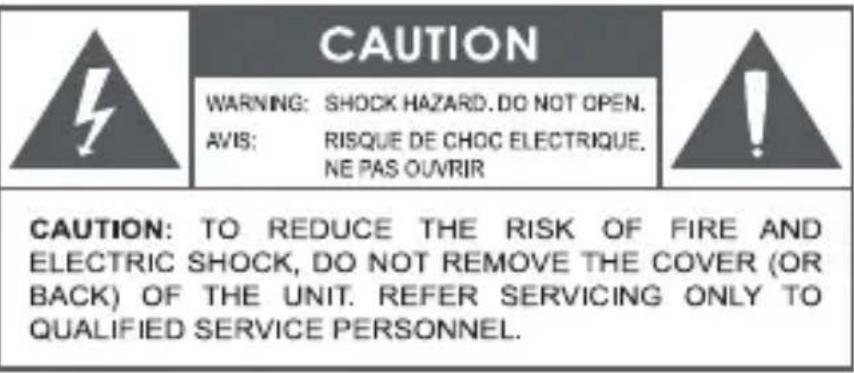
Warning symbol with lightning bolt inside a triangle (no text or numbers)The lightning flash with arrowhead symbol within an equilateral triangle is intended to alert the user to the presence of uninsulated “dangerous voltage” within the product’s enclosure that may be of sufficient magnitude to constitute a risk of electric shock.

natural_image
Warning symbol: gray triangle with white exclamation mark (no text or numbers)The exclamation point within an equilateral triangle is intended to alert the user to the presence of important operation and servicing instructions in the literature accompanying the appliance.
For Customer Use:
Enter below the serial number that is located on the rear of the unit. Retain this information for future reference.
Model No.
Serial No.
WARNING: To prevent fire or shock hazard, do not expose this device to rain or moisture. Dangerous high voltage is present inside the enclosure. Do not open the cabinet.
Note: If the product suddenly has no response or powers off, an electrostatic discharge may be the cause. In this circumstance, please follow the procedures below for recovery:
Remove the batteries and wait for 30 seconds.
Replace the batteries and turn the unit on again.

For recycling or disposal information about this product, please contact your local authorities or the Electronics Industries Alliance: www.eiae.org.
FCC Statement:
This device complies with Part 15 of the FCC Rules. Operation is subject to the following two conditions:
(1) This device may not cause harmful interference, and
(2) This device must accept any interference received, including interference that may cause undesired operation.
Note: This equipment has been tested and found to comply with the limits for Class B digital devices, pursuant to Part 15 of the FCC rules. These limits are designed to provide reasonable protection against harmful interference in a residential installation. This equipment generates, uses and can radiate radio frequency energy and, if not installed and used in accordance with the instructions, may cause harmful interference to radio communications. However, there is no guarantee that interference will not occur in a particular installation. If this equipment does cause harmful interference to radio or television reception, which can be determined by turning the equipment off and on, the user is encouraged to try to correct the interference by one or more of the following measures:
Reorient or relocate the receiving antenna.
Increase the separation between the equipment and receiver.
Connect the equipment into an outlet on a circuit different from that to which the receiver is connected.
Consult the dealer or an experienced radio/TV technician for help•
Use of shielded cable is required to comply with Class B limits in Subpart B of Part 15 of the FCC rules.
Do not make any changes or modifications to the equipment unless otherwise specified in the manual. If such changes or modifications should be made, you could be required to stop operation of the equipment.
Important Safety Instructions
Read Instructions: All the safety and operating instructions should 1. be read before the product is operated.
Retain Instructions: The safety and operating instructions should 2. be retained for future reference.
Heed Warnings: All warnings on the product and in the operating 3. instructions should be adhered to.
Follow Instructions: All operating and usage instructions should be 4. followed.
Cleaning: Unplug this product from the wall outlet before cleaning. 5. Do not use liquid cleaners or aerosol cleaners. Use a damp cloth for cleaning.
Attachments: Use only attachments recommended by the manufac-6. turer. Use of other attachments may be hazardous.
Water and Moisture: Do not use this product near water (e.g., near 7. a bath tub, washbowl, kitchen sink, laundry tub, in wet basements, or near a swimming pool and the like).
- Ventilation: Slots and openings in the cabinet are provided for ventilation to ensure reliable operation of the product and to protect it from overheating. These openings should never be blocked by placing the product on a bed, sofa, rug, or other similar surface. This product should not be placed in a built-in installation such as a bookcase or rack unless proper ventilation is provided or the manufacturer instructions have been adhered to.
Power Sources: This product should be operated only from the type 9. of power source indicated on the rating label. If you are not sure of the type of power supply to your home, consult your product dealer or local power company. For products intended to operate from battery power or other sources, refer to the operating instructions.
- Overloading: Do not overload wall outlets, extension cords, or integral convenience receptacles as this can result in a risk of fire or electric shock.
Object and Liquid Entry: Never push objects of any kind into this 11. product through openings as they may touch dangerous voltage points or shout-out parts that could result in a fire or electric shock. Never spill liquid of any kind on the product.
- Servicing: Do not attempt to service this product yourself as opening or removing covers may expose you to dangerous voltage or other hazards. Refer all servicing to qualified service personnel.
Damage Requiring Service: Unplug this product from the wall outlet 13. and refer servicing to qualified service personnel under the following conditions: a) when the power-supply or plug is damaged; b) if liquid has been spilled or if objects have fallen into the product; c) if the product has been exposed to rain or water; d) if the product does not operate normally by following the operating instructions. Adjust only those controls that are covered by the operating instructions as improper adjustment of other controls may result in damage and will often require extensive work by a qualified technician to restore the product to its normal operation; e) if the product has been dropped or damaged in any way; f) when the product exhibits a distinct change in performance—this indicates a need for service.
Replacement Parts: When replacement parts are required, be sure 14. that your service technician has used replacement parts specified by the manufacturer or have the same characteristics as the original part. Unauthorized substitutions may result in fire, electric shock, or other hazards.
Safety Check: Upon completion of any service or repairs to this 15. product, ask the service technician to perform safety checks to ensure that the product is in proper operating condition.
Heat: The product should be situated away from heat sources such as radiators, heat registers, stoves, or other products (including amplifiers) that produce heat.
natural_image
Line drawing of a device with a scroll wheel and a separate flat panel, showing internal components and an arrow indicating rotation (no text or symbols)Modo USB
The "Found New Hardware Wizard" will launch again. 4. Follow the instructions again to finish installation.
ArcSoft MedialImpression™
techsupport@cobyusa.com
Web
www.cobyusa.com
teléfono
800-727-3592: De Lun-Vie, 8:30-21:00 EST
Sab, 9:00–17:30 EST
718-416-3197: De Lun–Vie de, 8:00–17:30 EST
natural_image
Warning symbol of a lightning bolt inside a triangle (no text or numbers)natural_image
Warning symbol: gray triangle with exclamation mark (no text or numbers)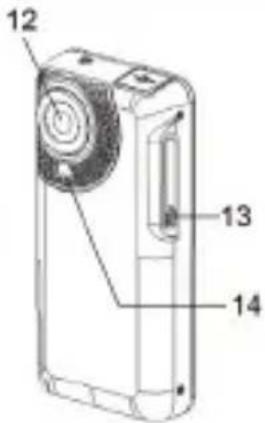
natural_image
Line drawing of a device with a circular top and internal components, showing a close-up of its base panel (no text or symbols)Mode USB
ArcSoft MedialImpression™
Coby Electronics : Support Technique
56-65 Rust Street
Maspeth, NY 11378
Courriel
techsupport@cobyusa.com
Internet
www.cobyusa.com
Téléphone
800-727-3592: Lun-Ven, 8:30-21:00 EST
Sam, 9:00–17:30 EST
718-416-3197: Lun-Ven, 8:00-17:30 EST
natural_image
Warning symbol of a lightning bolt inside a triangle (no text or numbers)natural_image
Warning symbol: gray triangle with exclamation mark (no text or numbers)Coby Electronics Corporation
1991 Marcus Ave, Suite 301
Lake Success, NY 11042
www.cobyusa.com
www.ecoby.com
IB v1.01
Coby is a registered trademark of Coby Electronics Corporation. Printed in China.