
Snapp - Camcorder COBY - Free user manual and instructions
Find the device manual for free Snapp COBY in PDF.

| Product type | Digital camcorder |
| Brand | COBY |
| Model | Snapp |
| Dimensions (L x W x H) | 11.68 x 5.69 x 1.78 cm |
| Power supply | 4 AAA batteries 1.5 V |
| Screen | 1.5-inch (3.8 cm) color LCD |
| Internal memory | 32 MB |
| Removable storage | SD/SDHC card up to 8 GB (not included) |
| Sensor resolution | 1.3 MP (1280 x 960) |
| Video resolution | VGA (640 x 480) at 30 fps |
| Video format | AVI (Motion JPEG codec) |
| Photo format | JPEG |
| Digital zoom | 4x |
| Connectivity | USB 2.0 Hi-Speed, composite/mono AV output 3.5 mm |
| Main functions | Video recording, photo, webcam, YouTube upload |
| Care and cleaning | Clean with a damp cloth; do not use liquid or aerosol products |
| Safety | Do not open the casing; use only the specified batteries; do not expose to moisture |
| Box contents | Camcorder, USB cable, AV cable, 4 AAA batteries, wrist strap, user manual, carrying case |
| Operating temperature | 0°C to 40°C |
| Storage temperature | -20°C to 60°C |
| Repairability | Do not attempt to repair yourself; call a qualified technician |
Frequently Asked Questions - Snapp COBY
User questions about Snapp COBY
0 question about this device. Answer the ones you know or ask your own.
Ask a new question about this device
Download the instructions for your Camcorder in PDF format for free! Find your manual Snapp - COBY and take your electronic device back in hand. On this page are published all the documents necessary for the use of your device. Snapp by COBY.
USER MANUAL Snapp COBY
natural_image
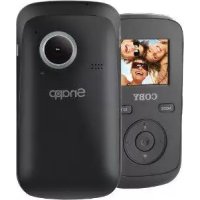
Black COBY mobile phone with a digital display showing three smiling people (no readable text or symbols on device body)CAM3000
EN
Snapp™ Digital Camcorder Instruction Manual ......Page 2
ES
Snapp™ Grabadora de Video Digital
Manual de la instrucción......Pagina 30
FR
Snapp™ Caméscope Numérique
Manuel d'utilisation ......Page 60
Table of Contents
PaCKaGE CoNtENtS 4
FEatuRES ....5
GEttiNG StaRtED 6
Camcorder at a Glance 6
Left View ....7
Front View ....7
Right View ....7
Rear View 9
Installing Batteries 10
Installing a Memory Card (optional) 11
Turning the Camcorder On/Off ....11
Resetting the Camcorder 11
FuNCtioN MoDES ......12
Changing Function Modes.... 12
Recording Video....12
Taking a Picture 13
Reviewing Your Recordings 14
tRANSFERRiNG RECoRDINGS to a CoMPutER ......15
Connecting to a Computer 16
uPloaDiNG ViDEoS to YoutubE™ 17
about thE SoFtwaRE CD ....18
Web Camera Driver 19
ArcSoft MediaImpression™ 19
User Manual 20
ViEwiNG ViDEoS & PiCtuRES oN a tV ......21
SaFEtY NotiCES 22
tRoubleShootiNG 27
SPECFiCatioNS 29
Package Contents
Please make sure that the items shown below are included in the package. Should an item be missing, please contact the local retailer from which you purchased this product.
Snapp™ CAM3000 digital camcorder1.
USB cable2.
AV cable3.
4 x "AAA" batteries4.
Hand strap5.
Instruction manual6.
Carrying case7.
Features
Brilliant 1.5" TFT LCD full color display ★
32 MB built-in Flash memory ★
Software CD for easy video editing/uploading ★ included
Advanced features including still capture, digital ★ zoom (4x), and low-light LED
Hi-speed USB 2.0 port for fast file transfers ★
Integrated SD/SDHC card slot for memory expansion ★ up to 8GB
Connects easily to your computer for use as a web- ★ cam (driver included; installation required)
Record over 2 hours of video (with SD card)* ★
*2 hours of film recording based on use with 4GB SDHC card. SDHC card not included. Actual film time may vary.
Getting Started
Camcorder at a Glance
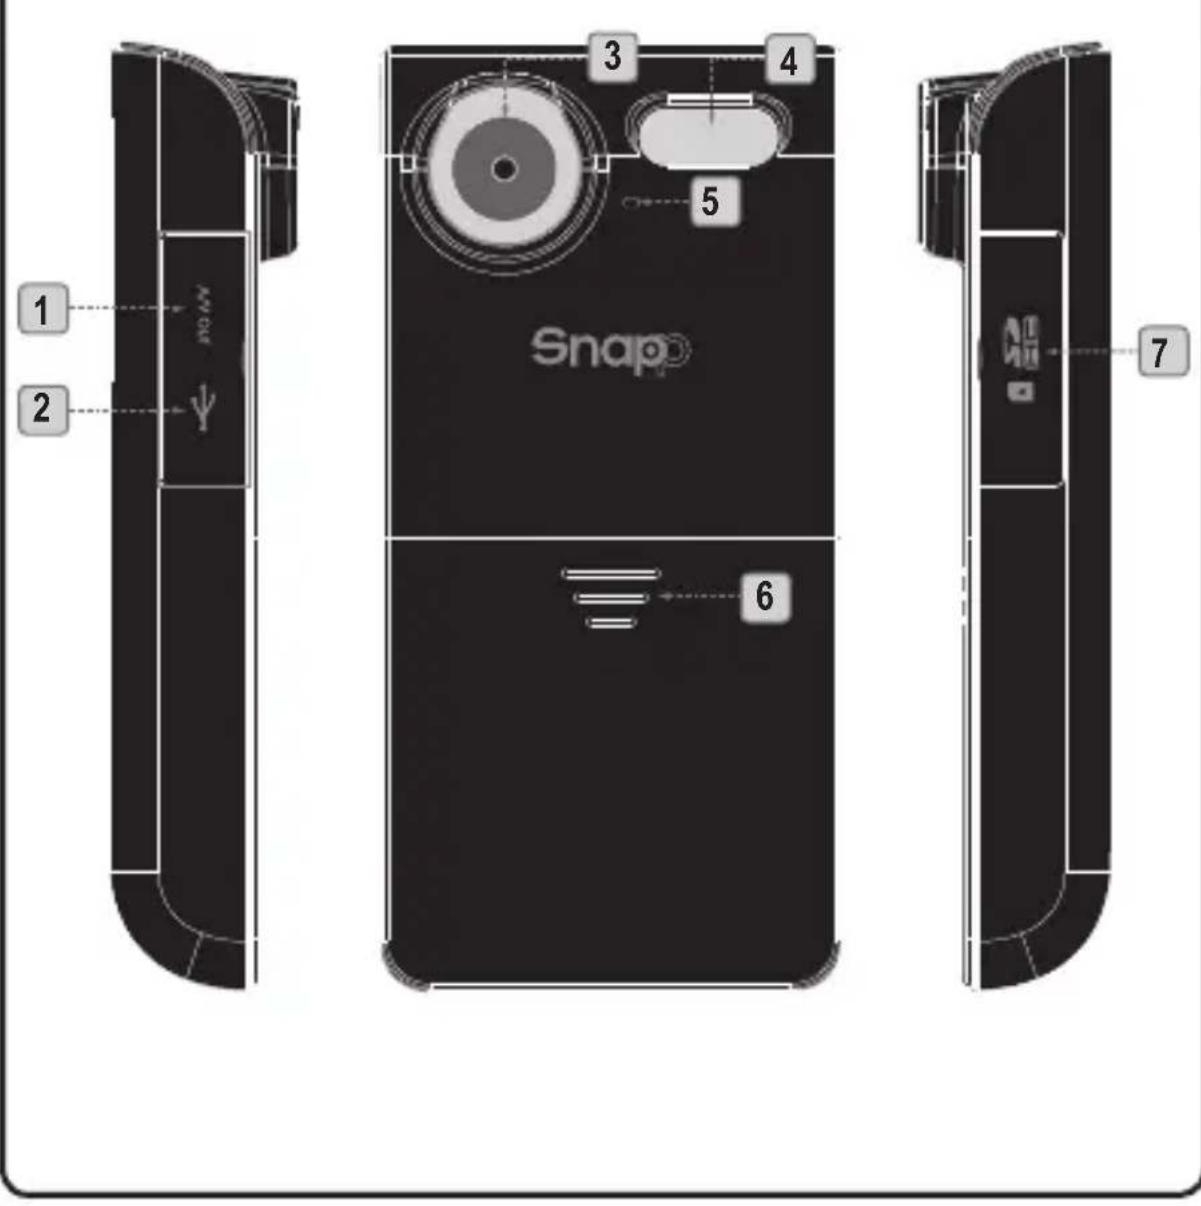
| Left View | ||
| 1 AV Out | Connect the AV cable to this jack to display video on a TV. | |
| 2 USB | Connect the USB cable to this port to transfer files to a computer. | |
| Front View | ||
| 3 Lens | Point the lens towards the subject you want to capture. | |
| 4 Flash | Improves picture quality in low-light situations. | |
| 5 Microphone | Captures audio during video recording. | |
| 6 | Battery | Slide the cover down to install or replace batteries. |
| Right View | ||
| 7 Card Slot | Load SD or SDHC memory cards to increase the camcorder's storage capacity. The CAM3000 supports up to 8GB capacity cards. | |
| Rear View | ||
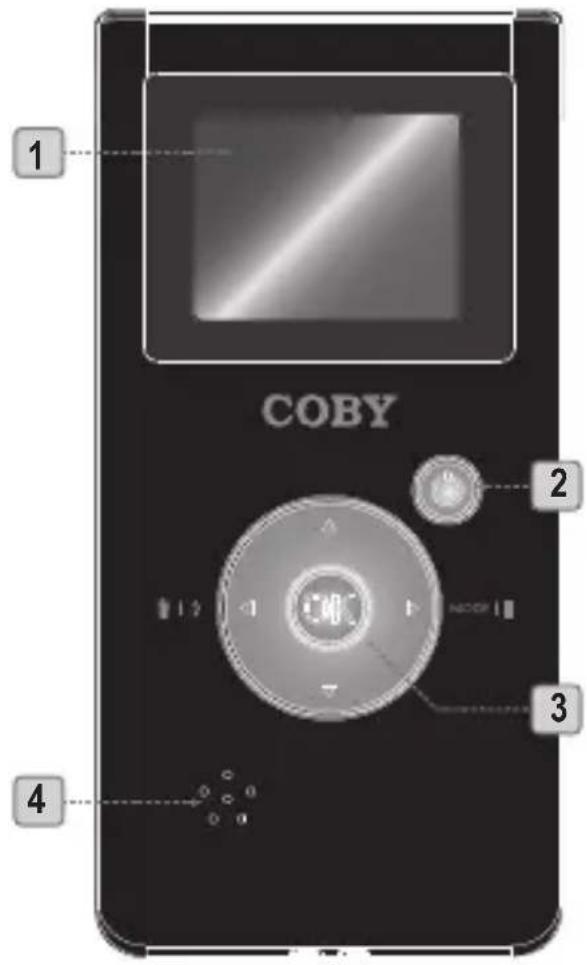
| 1 | LCD screen Viewfinder display. | |
| 2 |  | Power: press and hold to turn on;press to turn off. |
| 3 [Video, Photo]: Zoom in. | ||
| 4 Speaker Audio output during video review. | ||
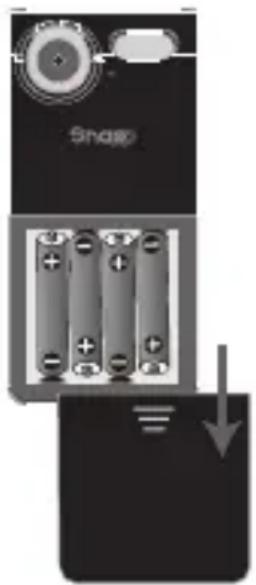
Installing Batteries
The CAM3000 requires 4 x "AAA" 1.5V batteries.
Slide the battery cover in the direction of 1. the arrow to access the battery compartment.
Load the four batteries, taking care to 2. position the positive and negative ends as shown.
Replace the battery cover.3.
natural_image
Diagram of a device showing battery pack and cable connections (no text or symbols)
The batteries used in this device may present a fire or chemical burn if mistreated. Do not disassemble, incinerate, or heat the batteries.
Use only the size and type of batteries specified.
Do not mix old with new batteries, or mix different types of batteries.
Do not charge batteries that are not intended to be recharged. Follow the battery manufacturer's directions.
Do not install the batteries with their polarities reversed; this may damage the unit.
If the unit will not be used for a long time, remove the batteries to prevent damage or injury from possible leakage.
Installing a Memory Card (optional)
Install an optional SD or SDHC memory card for increased recording capacity. The CAM3000 accepts memory card capacities of up to 8GB.
Locate the indentation of the 1. card door.
Use the indentation to flip the 2. card door down.
Load the card as shown. Make sure 3. the card clicks into place.
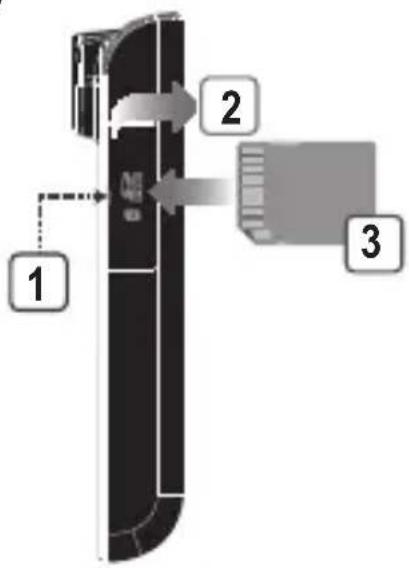


To remove a memory card, press down on the installed card; it will spring out of the slot.
Turning the Camcorder On/Off
To turn the unit on, press and hold 🔊.
To turn the unit off, press 🔒.
Resetting the Camcorder
Reset the unit if it should freeze and not respond or otherwise malfunction.
Remove the batteries and wait 30 seconds. 1.
Replace the batteries and then turn on the unit.2.
Function Modes
The CAM3000 has 3 function modes.
| Mode Icon Function | ||
| Video Make video recordings. | ||
| Photo Take pictures. | ||
| Review | Review video and picture files on the camcorder. | |
Changing Function Modes
To change function modes, press .▶
Recording Video
To enter Video mode, press until the icon appears in the top-left corner of the LCD.
Point the lens at the subject you wish to capture.
Press OK to start recording (the time counter in the top-right corner of the LCD will start). Press again to stop and save the video.
When you are recording a video:
Press ▶ to pause/resume recording.
Press ▲ to increase the digital magnification.
Press ▼ to decrease the digital magnification
Press 🔍 to toggle the low-light assist lamp.

The low-light assist lamp may help to increase video quality in dark environments. For best results, subjects should be well lit.
Using the low-light assist lamp will decrease battery life.
Taking a Picture
To enter Photo, press until the icon appears in the top-left corner of the LCD.
Point the lens at the subject you wish to capture.
Press OK to take a picture (the shutter will sound, and the counter in the top-right corner of the LCD will decrease by one).
When you are taking a picture:
Press ▲ to increase the digital magnification.
Press ▼ to decrease the digital magnification
Press 🔍 to toggle the low-light assist lamp.

The low-light assist lamp may help to increase picture quality in dark environments. For best results, subjects should be well lit.
Using the low-light assist lamp will decrease battery life.
Reviewing Your Recordings
To enter Review mode, press ▶ until the icon appears in the top-left corner of the LCD.
Press ▲ or ▼ to browse through your recordings.
Video recordings will have a 🎨 icon in the bottom-left corner of the LCD. Press 📣 to play the video.
Press ▶ to delete a recording.
Transferring Recordings to a Computer
Connect the CAM3000 to a computer with the provided USB cable to:
Transfer files from your camcorder ★
Perform basic file management functions. ★
The USB 2.0 Hi-Speed connection makes it easy to transfer recordings quickly from the camcorder to your computer. Simply use the camcorder as you would a removable storage drive using basic operating system commands.
If you need further assistance with transferring files, please refer to your operating system's instruction manual or on-screen help.

Do not disconnect or otherwise interrupt the cam-corder during transmission—this could damage or corrupt the camcorder’s rmware or your les. If the camcorder is accidentally disconnected and is not working properly, reset the camcorder.
Connecting to a Computer
The camcorder must be on to connect to a computer.
After the camcorder has been turned on, connect it to your computer's USB port with the supplied USB cable. Upon connection:
Your computer will automatically recognize the player as a Removable Disk drive. Two icons representing the camcorder will appear on your computer (either "My Computer" or "Finder").
Double-click the first icon to access the cam- ☆ corder's built-in memory.
Double-click the second icon to access the ☆ camcorder's memory card slot. You will need to install an optional memory card in order to use this drive.
It may take your computer several minutes to recognize and set up the device the first time it is connected depending on your hardware configuration.

When disconnecting the camcorder from your computer, follow the instructions provided by the operating system. Failure to do so could damage the camcorder or the recorded files stored on the camcorder.
Uploading Videos to YouTube™
Share your videos with family, friends, or the world with the YouTube web service. The CAM3000 comes with the Arscoft Upload to YouTube application that makes sharing your videos easy and convenient.
The Upload to YouTube application is installed on the camcorder and will start automatically when you connect it to a computer.

To upload videos to YouTube, you must have a valid YouTube account. To sign up for a free account, please visit http://www.youtube.com.
To use the Upload to Youtube application, Microsoft Windows Vista, 2000, or XP Service Pack 2 is required.
Provide your YouTube username and password ✦ credentials. You will have the option to save these credentials; once saved, you will not have to enter them again.
Click the folder to add a video file to your collection. ★
Click on a video to select it for uploading. ★
Describe the video you are uploading (Title, ✦ Description, Video Category, and Tags are required).
Preview the selected video. ★
Click the Upload button to upload the selected video ✦ to YouTube.
About the Software CD
The bundled CD contains the drivers and software that come with video camera.

To use the included software, Microsoft Windows Vista, 2000, or XP Service Pack 2 is required.
Insert the CD into your CD-ROM drive. The autorun menu will appear.

Click on one of the following to launch the installation routine.
Install Driver: Installs software to use the CAM3000 as a web camera.
ArcSoft MediaImpression™: Installs software to edit video and pictures.
User Manual: Read the CAM3000 user manual.

If the autorun menu does not appear automatically, double-click the CD-ROM icon in [My Computer] or [Windows Explorer], then double-click the file named [autorun.exe] to start the program.
Web Camera Driver
To use the CAM3000 as a web camera with your PC, you must first install the driver from the CD. After the driver has been installed:
Connect the camera to the computer with the 1. USB cable. Turn on the camcorder and wait for the computer to complete the USB connection.
Start the "Amcap" web camera driver application 2. (Start Menu > SPCA1528 PC Driver > Amcap).
The first time you start Amcap, you will need to select "Preview" from the Options menu (see diagram).
To change the video image size, select "Video Capture Pin" from the Options menu.
ArcSoft MediaImpression™
To get acquainted with the MedialImpression software, please refer to the help file included with the application (click on the “?” symbol in the top right corner of the application screen, or press “F1” on your keyboard).
User Manual
To read the user manual, you may need to download and install the free Adobe Acrobat reader from the Adobe website at www.adobe.com.
Viewing Videos & Pictures on a TV
Use the included AV cable to connect the CAM3000 to a TV in order to share videos and pictures with your friends and family!

To use this feature, the TV or display must have a RCA composite video and audio input jacks (usually yellow and red/white, respectively).
Use the included AV cable to connect the CAM3000 ✦ to the TV's composite video and audio input jacks.
Turn on the CAM3000. ★
Set the TV to the appropriate source input mode ★ (there is usually a button on the TV or remote labeled "Source," "Input," or "TV/AV" that you must press.
When the TV has been set to the correct input mode, you will see the CAM3000 display on the TV screen.
Use the CAM3000 controls as you normally would. ★
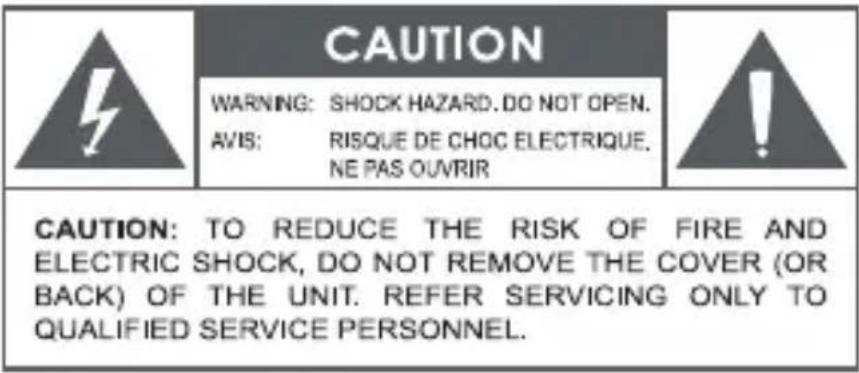
Safety Notices

natural_image
Warning symbol of a lightning bolt inside a triangle (no text or numbers)The lightning flash with arrowhead symbol within an equilateral triangle is intended to alert the user to the presence of uninsulated "dangerous voltage" within the product's enclosure that may be of sufficient magnitude to constitute a risk of electric shock.

natural_image
Warning symbol: black triangle with white exclamation mark (no text or numbers)The exclamation point within an equilateral triangle is intended to alert the user to the presence of important operation and servicing instructions in the literature accompanying the appliance.
For Customer Use:
Enter below the serial number that is located on the rear of the unit. Retain this information for future reference.
Model No.
Serial No.
waRNiNG: To prevent fire or shock hazard, do not expose this device to rain or moisture. Dangerous high voltage is present inside the enclosure. Do not open the cabinet.
Note: If the product suddenly has no response or powers off, an electrostatic discharge may be the cause. In this circumstance, please follow the procedures below for recovery:
Remove the batteries and wait for 30 seconds.
Replace the batteries and turn the unit on again.

For recycling or disposal information about this product, please contact your local authorities or the Electronics Industries Alliance: www.eiae.org.
FCC Statement:
This device complies with Part 15 of the FCC Rules. Operation is subject to the following two conditions:
(1) This device may not cause harmful interference, and
(2) This device must accept any interference received, including interference that may cause undesired operation.
Note: This equipment has been tested and found to comply with the limits for Class B digital devices, pursuant to Part 15 of the FCC rules. These limits are designed to provide reasonable protection against harmful interference in a residential installation. This equipment generates, uses and can radiate radio frequency energy and, if not installed and used in accordance with the instructions, may cause harmful interference to radio communications. However, there is no guarantee that interference will not occur in a particular installation. If this equipment does cause harmful interference to radio or television reception, which can be determined by turning the equipment off and on, the user is encouraged to try to correct the interference by one or more of the following measures:
Reorient or relocate the receiving antenna.
Increase the separation between the equipment and receiver.
Connect the equipment into an outlet on a circuit different from that to which the receiver is connected.
Consult the dealer or an experienced radio/TV technician for help•
Use of shielded cable is required to comply with Class B limits in Subpart B of Part 15 of the FCC rules.
Do not make any changes or modifications to the equipment unless otherwise specified in the manual. If such changes or modifications should be made, you could be required to stop operation of the equipment.
Important Safety Instructions
Read Instructions: All the safety and operating instructions should be 1. read before the product is operated.
Retain Instructions: The safety and operating instructions should be 2. retained for future reference.
Heed Warnings: All warnings on the product and in the operating instructions should be adhered to.
Follow Instructions: All operating and usage instructions should be 4. followed.
Cleaning: Unplug this product from the wall outlet before cleaning. Do 5. not use liquid cleaners or aerosol cleaners. Use a damp cloth for cleaning.
Attachments: Use only attachments recommended by the manufac-6. turer. Use of other attachments may be hazardous.
Water and Moisture: Do not use this product near water (e.g., near a 7. bath tub, washbowl, kitchen sink, laundry tub, in wet basements, or near a swimming pool and the like).
Ventilation: Slots and openings in the cabinet are provided for venti-8. lation to ensure reliable operation of the product and to protect it from overheating. These openings should never be blocked by placing the product on a bed, sofa, rug, or other similar surface. This product should not be placed in a built-in installation such as a bookcase or rack unless proper ventilation is provided or the manufacturer instructions have been adhered to.
Power Sources: This product should be operated only from the type 9. of power source indicated on the rating label. If you are not sure of the type of power supply to your home, consult your product dealer or local power company. For products intended to operate from battery power or other sources, refer to the operating instructions.
Overloading: Do not overload wall outlets, extension cords, or integral 10. convenience receptacles as this can result in a risk of fire or electric shock.
Object and Liquid Entry: Never push objects of any kind into this 11. product through openings as they may touch dangerous voltage points or shout-out parts that could result in a fire or electric shock.
Never spill liquid of any kind on the product.
Servicing: Do not attempt to service this product yourself as opening 12. or removing covers may expose you to dangerous voltage or other hazards. Refer all servicing to qualified service personnel.
Damage Requiring Service: Unplug this product from the wall outlet and 13. refer servicing to qualified service personnel under the following conditions: a) when the power-supply or plug is damaged; b) if liquid has been spilled or if objects have fallen into the product; c) if the product has been exposed to rain or water; d) if the product does not operate normally by following the operating instructions. Adjust only those controls that are covered by the operating instructions as improper adjustment of other controls may result in damage and will often require extensive work by a qualified technician to restore the product to its normal operation; e) if the product has been dropped or damaged in any way; f) when the product exhibits a distinct change in performance—this indicates a need for service.
Replacement Parts: When replacement parts are required, be sure 14. that your service technician has used replacement parts specified by the manufacturer or have the same characteristics as the original part. Unauthorized substitutions may result in fire, electric shock, or other hazards.
Safety Check: Upon completion of any service or repairs to this prod-15. uct, ask the service technician to perform safety checks to ensure that the product is in proper operating condition.
Heat: The product should be situated away from heat sources such as radiators, heat registers, stoves, or other products (including amplifiers) that produce heat.
Troubleshooting
If you have a problem with this device, please read the troubleshooting guide below and check our website at www.cobyusa.com for Frequently Asked Questions (FAQs) and firmware updates. If these resources do not resolve the problem, please contact Technical Support.
Address COBY Electronics Technical Support
56-65 Rust Street
Maspeth, NY 11378
Email techsupport@cobyusa.com
Web www.cobyusa.com
Phone 800-727-3592: Weekdays 8:30AM–9:00PM EST
Saturdays 9:00AM–5:30PM EST
718-416-3197: Weekdays 8:00AM–5:30PM EST
The player does not turn on.
The batteries may have been improperly installed. ✦ Please make sure that the positive and negative ends of the batteries match the markings in the battery compartment.
The batteries may have run out of power. Please ✦ replace the batteries.
The camcorder will not record.
The memory may be full. Please transfer or delete ✦ existing recordings, or install a new memory card.
Images are blurry or out of focus.
The camera may be moving of shaking when the ★ picture or video was recorded. Try steadying the camcorder.
There may not be enough light to capture a steady ✦ image. Try turning on more lights, or use the low-light assist lamp.
Picture is not displayed on the LCD during review.
If you are using a memory card from another camera, the image format may not be supported. The CAM3000 supports PICT-format images only.
Recording was not saved to memory.
The camcorder may have turned off before the recording was written and saved to memory. This may have happened if the battery level is low. If the "battery low" indicator appears on the LCD, replace the batteries immediately.
The player has malfunctioned.
If the product suddenly has no response or powers off, an electrostatic discharge may be the cause. If this happens, please follow the steps below for recovery:
Remove the batteries and wait for 30 seconds. ✦
Replace the batteries and turn the unit on again. ✦
Specifications
| Display Type 1.5" Color LCD | |
| Image Sensor 1.3MP CMOS | (1280 x 960) |
| Video Resolution VGA (640 x 480) @ 30fps | |
| Video Format AVI File (Motion JPEG codec) | |
| Photo Format JPEG | |
| Memory 32MB Flash | |
| Removable Memory Support | SD/SDHC (up to 8GB) |
| Zoom 4x Digital | |
| Focus Range 150cm ~ infinity | |
| Aperture F3.0, Fixed Focus | |
| Shutter Electronic Shutter: | 1/1,024 ~ 1/2sec. |
| Sensitivity Auto | |
| White balance Auto | |
| Ambient Temperature | Operating: 0°C to 40°CStorage: -20 to 60°C |
| USB Connection | USB 2.0 Hi-Speed |
| AV Output | 3.5mm composite video/mono audio |
| Power | 4 x 1.5V "AAA" batteries |
| Unit Dimensions | 4.60" x 2.24" x 0.70" (LWH) |
Design, specifications and manual are subject to change without notice.
natural_image
Diagram of a device showing battery pack and charging cable with a 'Snap' label, no readable text or symbols beyond the label.
natural_image
Warning symbol of a lightning bolt inside a triangle (no text or numbers)natural_image
Warning symbol: black triangle with white exclamation mark (no text or numbers)techsupport@cobyusa.com
web
www.cobyusa.com
teléfono
800-727-3592: De Lun–Vie, 8:30–21:00 EST
Sab, 9:00–17:30 EST
718-416-3197: De Lun–Vie de, 8:00–17:30 EST
natural_image
Diagram of a device showing battery arrangement and a downward arrow, no readable text or symbols present.natural_image
Warning symbol of a lightning bolt inside a triangle (no text or numbers)natural_image
Warning symbol: black triangle with white exclamation mark (no text or numbers)Coby Electronics : Support Technique
56-65 Rust Street
Maspeth, NY 11378
Courriel
techsupport@cobyusa.com
Internet
www.cobyusa.com
Téléphone
800-727-3592: Lun-Ven, 8:30-21:00 EST
Sam, 9:00–17:30 EST
718-416-3197: Lun-Ven, 8:00-17:30 EST
Coby Electronics Corporation
1991 Marcus Ave, Suite 301
Lake Success, NY 11042
www.cobyusa.com
www.ecoby.com
IB v2.01
Coby is a registered trademark of Coby Electronics Corporation. Printed in China.


- Table of Contents
- PaCKaGE CoNtENtS 4
- FEatuRES ....5
- GEttiNG StaRtED 6
- FuNCtioN MoDES ......12
- tRANSFERRiNG RECoRDINGS to a CoMPutER ......15
- uPloaDiNG ViDEoS to YoutubE™ 17
- about thE SoFtwaRE CD ....18
- Package Contents
- Features
- Getting Started
- Camcorder at a Glance
- Installing Batteries
- Installing a Memory Card (optional)
- Turning the Camcorder On/Off
- Resetting the Camcorder
- Function Modes
- Changing Function Modes
- Recording Video
- Taking a Picture
- Reviewing Your Recordings
- Transferring Recordings to a Computer
- Connecting to a Computer
- The camcorder must be on to connect to a computer.
- Uploading Videos to YouTube™
- About the Software CD
- Web Camera Driver
- ArcSoft MediaImpression™
- User Manual
- Viewing Videos & Pictures on a TV
- Safety Notices
- For Customer Use:
- FCC Statement:
- Important Safety Instructions
- Troubleshooting
- The player does not turn on.
- The camcorder will not record.
- Images are blurry or out of focus.
- Picture is not displayed on the LCD during review.
- Recording was not saved to memory.
- The player has malfunctioned.
- Specifications
- web
- teléfono
- Courriel
- Internet
- Téléphone
- Coby Electronics Corporation
Brand : COBY
Model : Snapp
Category : Camcorder