
PIE895B15E - Cooker BOSCH - Free user manual and instructions
Find the device manual for free PIE895B15E BOSCH in PDF.
User questions about PIE895B15E BOSCH
0 question about this device. Answer the ones you know or ask your own.
Ask a new question about this device
Download the instructions for your Cooker in PDF format for free! Find your manual PIE895B15E - BOSCH and take your electronic device back in hand. On this page are published all the documents necessary for the use of your device. PIE895B15E by BOSCH.
USER MANUAL PIE895B15E BOSCH
m = 311

24

25
26
m = 311
28
29
30
32
34
m = 311
36
m = 311
38
40

m = 311
42
13/14
44

46

47

48
49
es
After unpacking all parts, check for any damage in transit and completeness of the delivery.
Fig. 1
QR code for the installation video
This is were you will find the QR code for the installation video.
Fig. 2
Appliance dimensions
You will find the dimensions of the appliance here
Fig. 3
Installation dimensions for flat duct bends
This is where you can find an overview of the installation dimensions for the flat duct bends.
Side view:
Fig. 4
Fig. 5
Fig. 6
Front view:
Fig. 7
Installation variants
This is where you can find an overview of the different installation variants.
Odour filter and adapter for circulating-air mode:
Fig. 8
Odour filter, diffuser and seal for circulating-air mode:
Fig. 9
Acoustics filter and seal for air extraction mode:
Fig. 10
Note: Channels suitable for installation can be obtained from customer service, our website or from specialist retailers.
Safety clearances
Comply with the safety clearances for the appliance. Clearances to the overflow container:
Fig. 11
Position of the overflow container:
→Fig.12
The performance is optimal at a clearance of 50mm between the unit back panel and the wall. The performance is reduced at a smaller clearance.
Fig. 18
Observe the safety clearances for the worktop cutout.
Do not place any objects in the drawer which exceed the maximum height of the drawer. The objects may come into contact with the base of the appliance and thus disrupt the functions.
Fig. 14

General information
- Read this instruction manual carefully.
Only a licensed expert may connect the appliance. - Switch off the power supply before carrying out any work.
- Never use this appliance in boats or in vehicles.
- Follow the worktop manufacturer's recommendations.
Safe installation
Follow these safety instructions when installing the appliance.
The appliance can only be used safely if it is correctly installed according to the safety instructions.
The installer is responsible for ensuring that the appliance works perfectly at its installation location.
WARNING - Danger: Magnetism!
The appliance contains permanent magnets. They may affect electronic implants, e.g. pacemakers or insulin pumps.
- Persons with electronic implants must stand at least 10cm away from the appliance.
WARNING - Risk of poisoning!
Risk of poisoning from flue gases being drawn back in. Room-air-dependent heat-producing appliances (e.g. gas, oil, wood or coal-operated heaters, continuous flow heaters or water heaters) obtain combustion air from the room in which they are installed and discharge the exhaust gases into the open through an exhaust gas system (e.g. a chimney).
With the extractor hood switched on, air is extracted from the kitchen and the adjacent rooms. Without an adequate supply of air, the air pressure falls below atmospheric pressure. Toxic gases from the flue or the extraction shaft are sucked back into the living space.


Always ensure adequate fresh air in the room if the appliance is being operated in exhaust air mode at the same time as a room-air-dependent heat-producing appliance is being operated.
It is only possible to safely operate the appliance if the pressure in the room in which the heating appliance is installed does not drop more than 4 Pa (0.04 mbar) below atmospheric pressure. This can be achieved whenever the air needed for combustion is able to enter through openings that cannot be sealed, for example in doors, windows incoming/exhaust air wall boxes or by other technical means. An incoming/exhaust air wall box alone does not ensure compliance with the limit.
In any case, consult your responsible chimney sweep. They are able to assess the house's entire ventilation setup and will suggest the suitable ventilation measures to you.
Unrestricted operation is possible if the appliance is operated exclusively in circulating-air mode.
WARNING - Risk of fire!
Grease deposits in the grease filter may catch fire.
- Never work with naked flames close to the appliance (e.g. flambeing).
- Do not install the appliance near a heat-producing appliance for solid fuel (e.g. wood or coal) unless a closed, non-removable cover is available. There must be no flying sparks.
WARNING - Risk of injury!
Changes to the electrical or mechanical assembly are dangerous and may lead to malfunctions.
- Do not make any changes to the electrical or mechanical assembly.
Parts that are accessible during installation may have sharp edges and may lead to cutting injuries.
Wear protective gloves
The appliance is heavy.
To move the appliance, two people are required.
- Use only suitable tools and equipment.
WARNING - Risk of suffocation!
Children may put packaging material over their heads or wrap themselves up in it and suffocate.
- Keep packaging material away from children.
Do not let children play with packaging material.
WARNING - Risk of poisoning!
Risk of poisoning from flue gases being drawn back in.
- Do not emit the exhaust air into a smoke or exhaust gas flue that is in operation.
- Do not emit the exhaust air into a shaft that is used to ventilate installation rooms for heat-producing appliances.
If the exhaust air is to be conveyed into a smoke or exhaust gas flue, you must obtain the consent of the heating engineer responsible.
Risk of poisoning from flue gases being drawn back in.
If an extractor hood with an open-flued heat production source is installed, the power supply for the extractor hood must be provided with a suitable safety switch.
Information about the electrical connection
In order to safely connect the appliance to the electrical system, follow these instructions.
WARNING - Risk of electric shock!
It must always be possible to disconnect the appliance from the electricity supply. The appliance must only be connected to a mains socket that has been installed correctly.
An all-pole isolating switch must be integrated into the permanent electrical installation in accordance with the conditions of overvoltage category III and in accordance with the installation regulations.
The permanent electrical installation must only be wired by a professional electrician. We recommend installing a residual-current circuit breaker (RCCB) in the appliance's power supply circuit.
- Do not kink or trap the connection cable, and keep it away from sharp edges.
- Route the connection cable in such a way that it does not touch the hot casing.
Use only the connection cable that is supplied with the appliance or is provided by technical after-sales service.
This appliance complies with the EC interference suppression regulations.
The appliance corresponds to protection class 1. You should therefore only use the appliance with a protective earth connection.
The manufacturer shall assume no liability for malfunctions or damage resulting from incorrect electrical wiring.
Preparing the electrical connection
Requirement: Only after-sales service staff who have been trained accordingly may carry out work on the inside of the appliance or replace the power cord.
- Observe the information about the electrical connection.
An incorrect installation, an improper installation or connection invalidates the warranty.
- If a longer mains power cable is required, contact the after-sales service. Connecting cables up to 2.20m are available.
- On appliances without a preinstalled cable, insert the power cable into the mains socket.
Opening the mains socket
- Use a screwdriver to lift the cover of the mains outlet.
$$ \rightarrow \text {F i g .} 1 5 $$
Preparing the mains socket
- Undo the screw. Fig. 16
- Use a screwdriver to lift the hose clamp.
$$ \rightarrow \text {F i g .} \quad 1 7 $$
- Undo the hose clamp.
$$ \rightarrow \text {F i g .} 1 8 $$
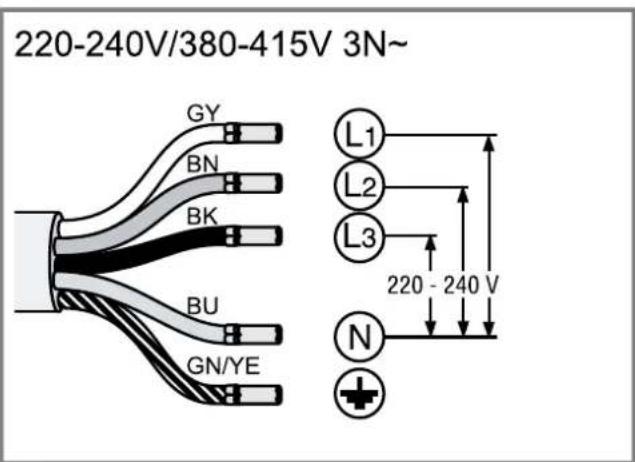
Connecting the cable to the mains socket
- For 3N connect the cable to the mains socket in accordance with the following figure.
$$ \rightarrow \text {F i g .} \quad 1 9 $$
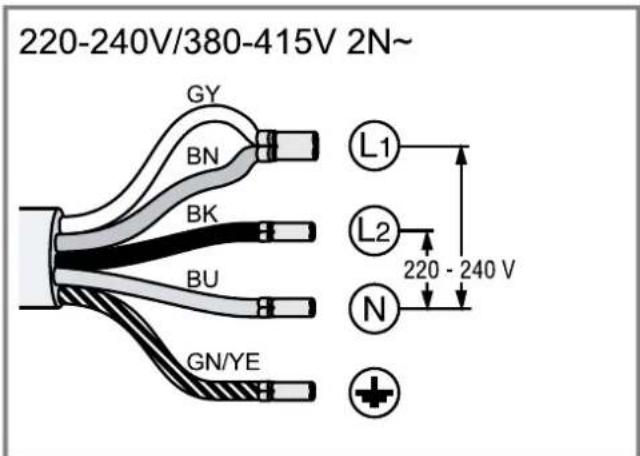
- For 2N connect the cable to the mains socket in accordance with the following figure.
$$ \rightarrow \text {F i g .} 2 0 $$
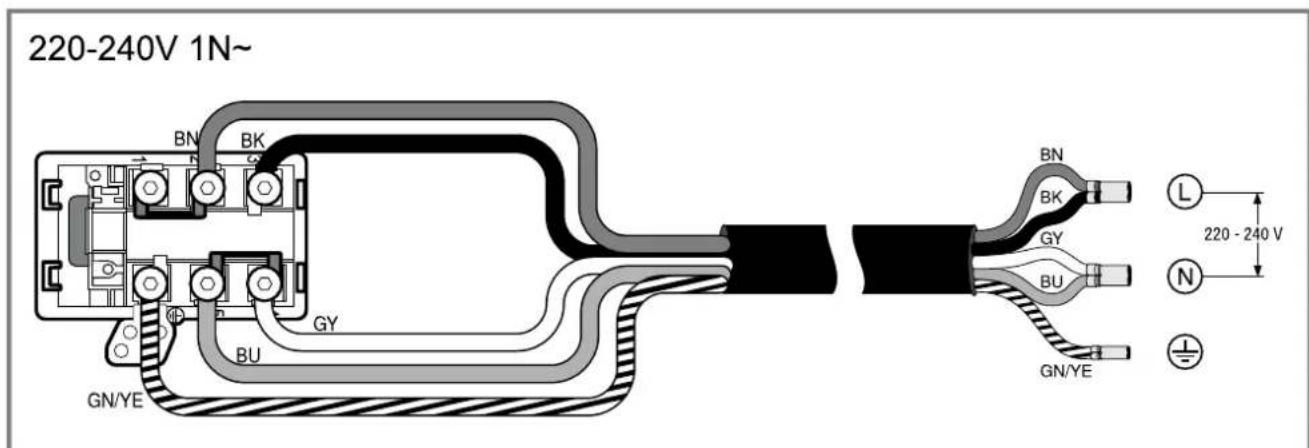
- For 1 N, connect the cable to the mains socket in accordance with the following figure.
$$ \rightarrow \text {F i g .} 2 1 $$
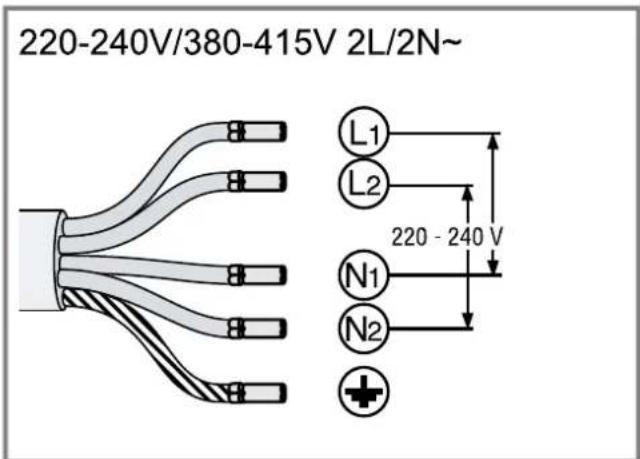
- For 2L / 2N connect the cable to the mains socket in accordance with the following figure.
$$ \rightarrow \text {F i g .} 2 2 $$
- Note the colours of the cables.
$$ \begin{array}{l} - B N: \text {B r o w n} \ - \mathrm {B U}: \text {B l u e} \ - G N / Y E: \text {Y e l o w a n d g r e e} \ - B K: \text {B l a c k} \ - G Y: \text {G r e y} \ \end{array} $$
- If required, install the enclosed copper bridges in accordance with the connection diagram.
- Connect the cables and then tighten the screws of the mains socket.
- For a 1N^ or 2L/2N connection in accordance with the connection diagram, 1 corresponds to the fan motor.
- For a 2N^ / 3N^ connection, phase L1 (grey) corresponds to the fan motor.
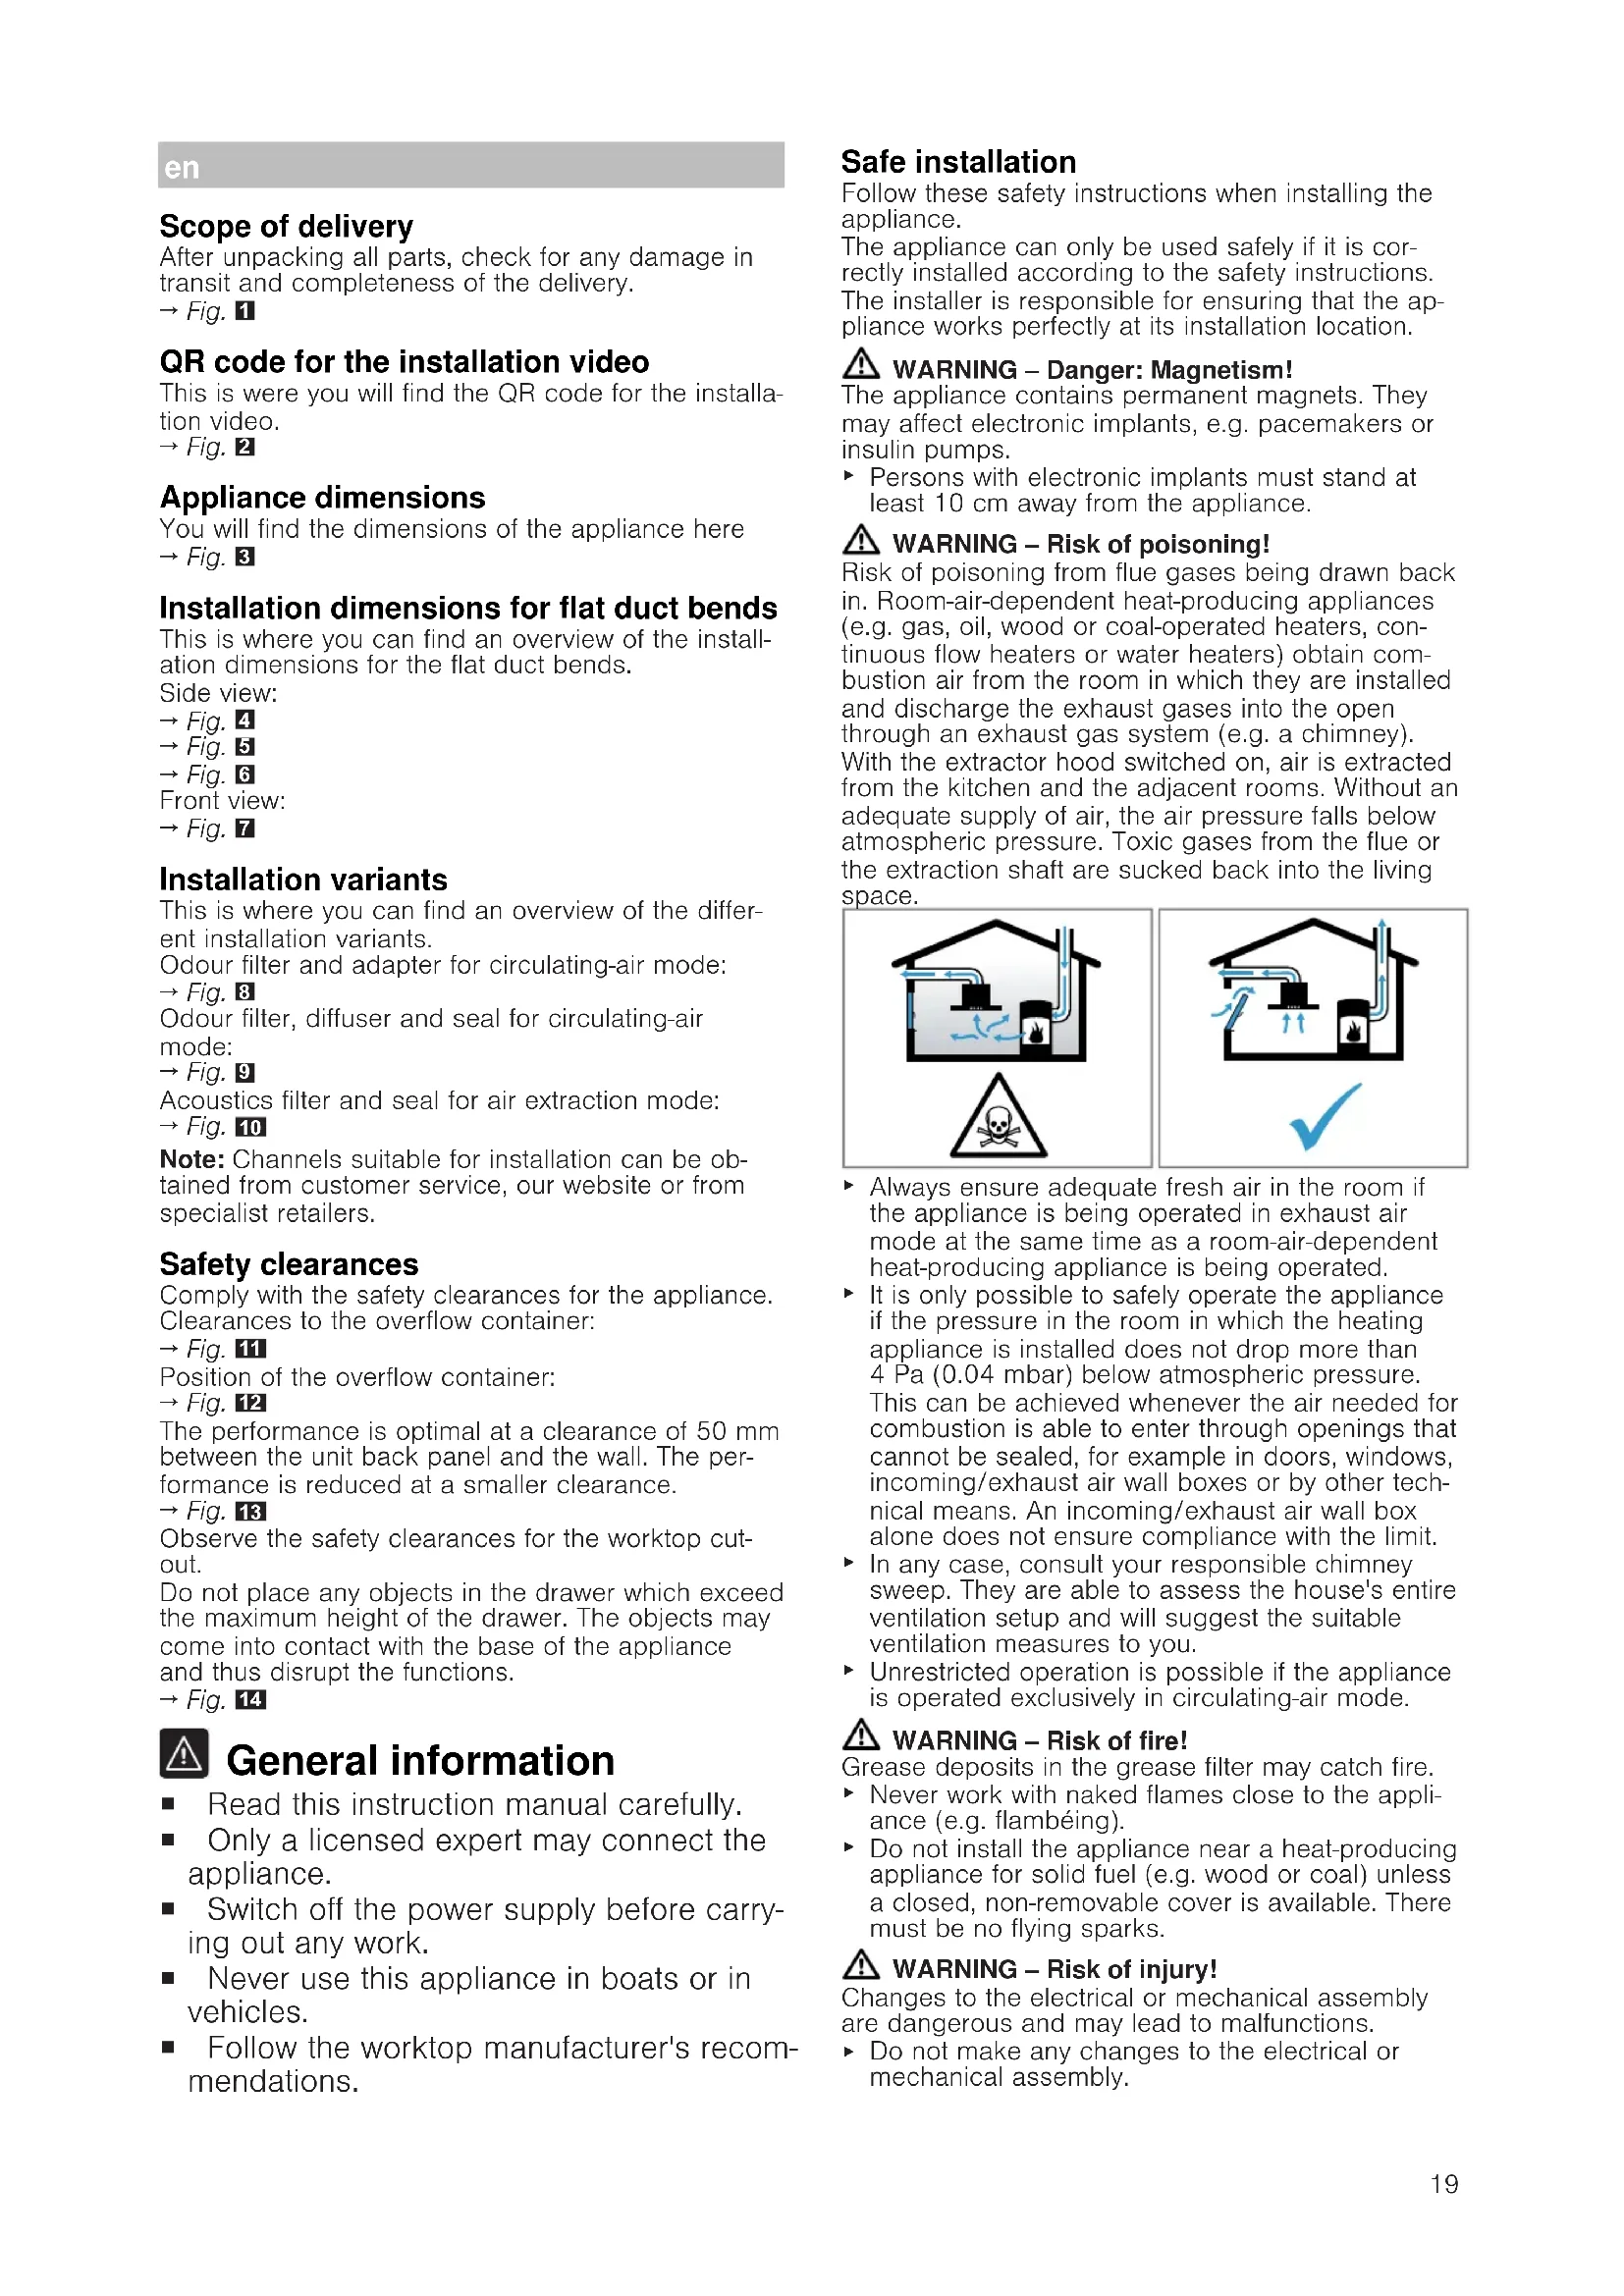
Secure the cable in the mains socket
- Use the hose clamp to secure the power cord.
- Tighten the screw at the correct position.
$$ \begin{array}{l} - \text {D o n o t u s e a c o r d l e s s s c r e w d r i v e r}. \ \rightarrow \text {F i g .} 2 3 \ \end{array} $$
- To facilitate closing the mains socket, arrange the cables in the central area of the mains socket.
- Close the cover of the mains socket.
Instructions for the exhaust air pipe
The appliance manufacturer does not provide any
warranty for faults attributable to the pipeline.
Use a short, straight exhaust air pipe with as large a pipe diameter as possible.
- Long, rough exhaust air pipes, many pipe bends or small pipe diameters reduce the suction power and increase the fan noise.
Use an exhaust pipe that is made of non-combustible material.
To prevent condensate from returning, fit the exhaust pipe with a 1^ gradient from the appliance.
Flat ducts
Use flat ducts with an inner cross-section that corresponds to the diameter of the round pipes:
Diameter of 150mm corresponds to approx. 177~cm^2
Use sealing strips for different pipe diameters.
- Do not use any flat ducts with sharp bends.
Round pipes
Round pipes with an inner diameter of 150~mm
Instructions for the air extraction mode
For air extraction mode, a one-way flap should be installed.
Notes
If a one-way flap is not included with the appliance, one can be ordered from a specialist retailer.
If the exhaust air is conveyed through the external wall, a telescopic duct should be used.
Checking the units
- Check whether the fitted unit is level and has sufficient load-bearing capacity.
The maximum weight of the appliance is approx. 25kg
The worktop into which you are fitting the appliance must be able to withstand loads of approx. 60kg
- Ensure that the stability of the fitted unit is also guaranteed following cut-out work.
-
Use suitable substructures to ensure the load-bearing capacity and the stability, particularly in the case of thin worktops.
-
Take the appliance weight, including additional load, into consideration.
-
Use heat-resistant and moisture-resistant reinforcement material.
-
Ensure that the fitted unit is heat-resistant up to 90^ .
- Do not support any other appliances, e.g. ovens, refrigerators, dishwashers or washing machines.
- Only check that the appliance is level once it has been installed in the installation opening.
Preparing the units
Requirement: The fitted units must be heat-resistant up to 90^
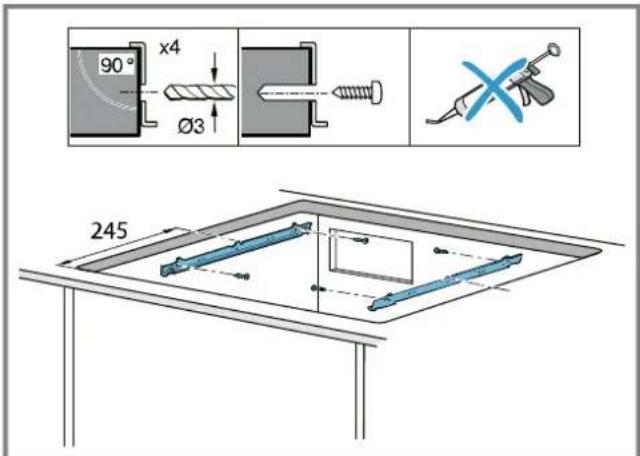
- Mark the unit cut-out in accordance with the installation diagram.
$$ \rightarrow \text {F i g .} 1 4 $$
- Drill four holes with a diameter of 6mm
$$ \rightarrow \text {F i g .} \quad 2 4 $$
- Ensure that the angle of the cut surface to the worktop is 90^ .
$$ \rightarrow F i g. \quad 2 4 $$
Observing the minimum clearances when installing above a drawer
- When removing the overflow container on integrated appliances, take the minimum clearances into consideration.
$$ \rightarrow F i g. \quad 1 1 1 $$
- Observe the position of the overflow container.
$$ \rightarrow F i g. 1 2 $$
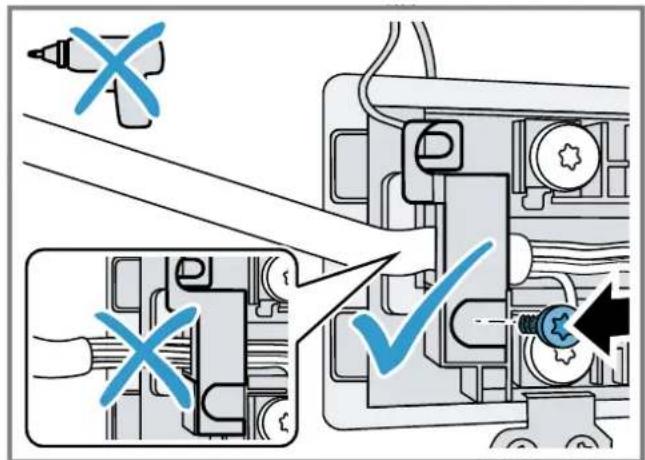
Preparing the unit for circulating-air mode with the adapter
- Observe the relevant dimensions when combining with the adapter for the cut-out in the back wall. Fig. 25
- Use the template to create the cut-out in the back wall.
-
In circulating-air mode, establish an air outlet in the unit's plinth.
-
Provide a minimum air outlet cross-section of approx. 440~cm^2
-
To keep the draught and noise low, ensure that the outlet opening in the base panel is as large as possible.
-
To guarantee that the appliance works correctly, ventilate the hob appropriately via an air outlet with a minimum cross-section of 200~cm^2 in the base unit.
- After making the cut-outs, remove any shavings.
- Seal the cut surfaces so that they are heat-resistant and waterproof.
$$ \rightarrow \text {F i g .} 2 4 $$
Preparing the unit for circulating-air mode with a circulating-air duct
- If required, remove the unit's back wall.
- Observe the relevant dimensions when combining with the flat duct elbow for the cut-out in the back wall.
$$ \rightarrow \text {F i g .} 2 6 $$
-
In circulating-air mode, establish an air outlet in the unit's plinth.
-
Provide a minimum air outlet cross-section of approx. 440~cm^2
-
To keep the draught and noise low, ensure that the outlet opening in the base panel is as large as possible.
-
To guarantee that the appliance works correctly, ventilate the hob appropriately via an air outlet with a minimum cross-section of 200~cm^2 in the base unit.
-
After making the cut-outs, remove any shavings.
- Seal the cut surfaces so that they are heat-resistant and waterproof.
$$ \rightarrow \text {F i g .} 2 4 $$
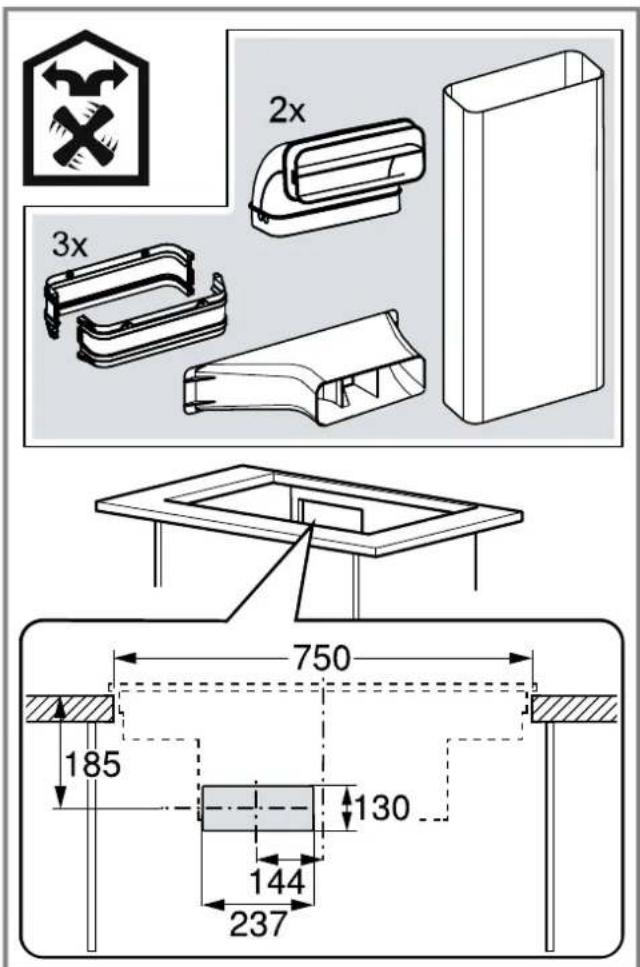
Preparing the unit for air extraction mode
- If required, remove the unit's back wall.
- Observe the relevant dimensions when combining with a flat duct elbow for the cut-out in the back wall.
$$ \rightarrow \text {F i g .} 2 7 $$
- After making the cut-outs, remove any shavings.
- Seal the cut surfaces so that they are heat-resistant and waterproof.
$$ \rightarrow \text {F i g .} 2 4 $$
Installing the support rails
Install the support rails in the unit.
$$ \rightarrow \text {F i g .} 2 8 $$
- Glue the support rails to the stone worktop. For stone worktops, use a heat-resistant adhesive suitable for gluing metal and stone.
- Do not use silicone for sealing.
Installing the appliance
WARNING - Risk of injury!
Parts that are accessible during installation may have sharp edges and may lead to cutting injuries.
Wear protective gloves
The appliance is heavy.
To move the appliance, two people are required.
- Use only suitable tools and equipment.
Install the appliance for air extraction mode
Page 22, circulating-air mode Page 22 or circulating-air mode with circulating-air duct Page 22.
Note: The appliance is only intended for flush installation.
Installing the appliance for circulating-air mode with adapter
Note: When installing directly on a non-insulated outer wall ( ≥ 0.5W / m^2C) we recommend a configuration with circulating-air duct.
- For the circulating-air mode, use the adapter and the odour filter.
- Ensure that the clearance between the appliance and the rear panel of the unit is between 10 and 80~mm
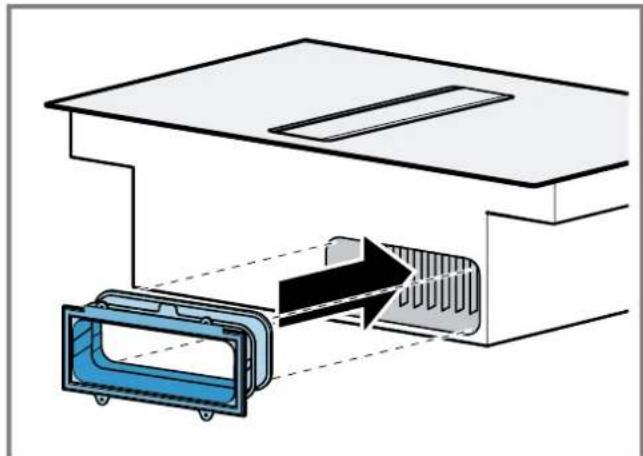
Attaching the adapter
- Clean and degrease the adhesive surface around the cut-out in the unit's back panel.
- Insert the adapter into the outlet opening on the rear of the hob.
Fig. 29
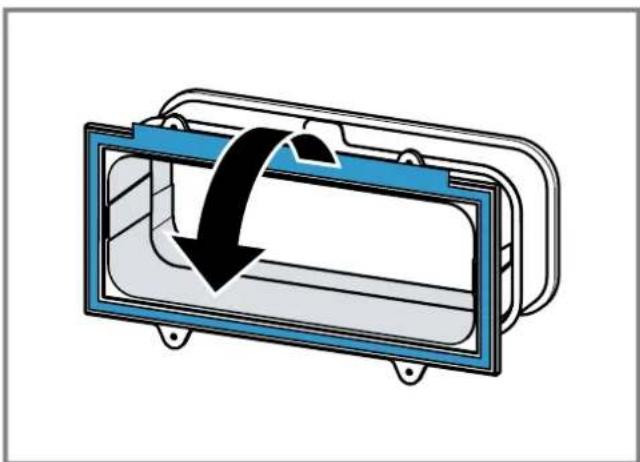
- Remove the adhesive tape's protective film from the adapter.
→Fig. 30
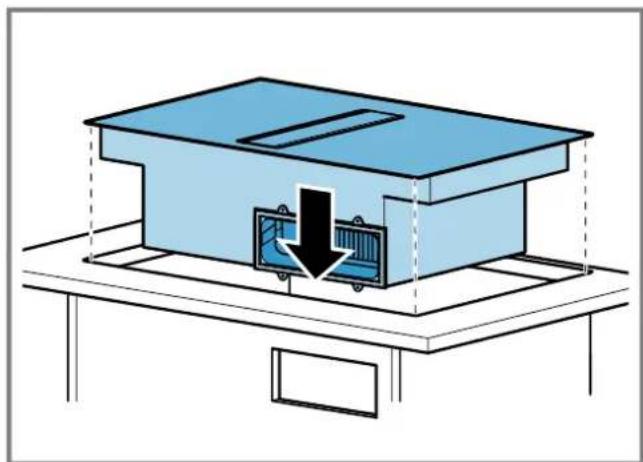
Inserting the appliance into the worktop cut-out
- Ensure that the connection cable is connected to the appliance.
- Carefully insert the appliance into the worktop cutout.
Fig. 31
Securing the adapter
-
Hold the adapter at the central holder and use the side holders to slide it towards the unit's back panel in the base unit, then affix it.
Fig. 32 -
If required, also use screws to secure it.
→Fig. 33
Installing the appliance for air recirculation mode with circulating-air duct
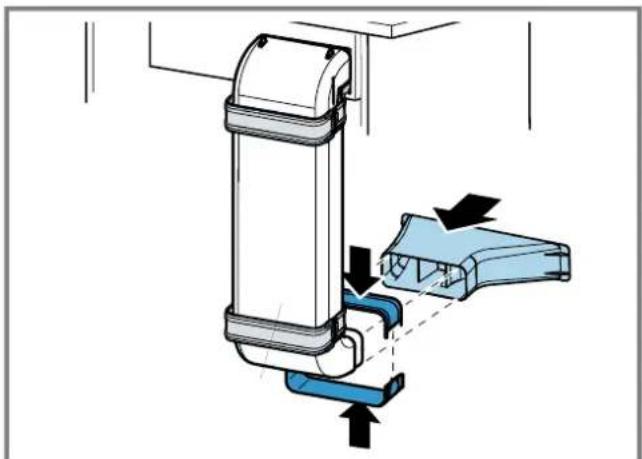
- For circulating-air mode, use the seal, the circulating-air duct, the diffuser and the odour filter.
- Observe the dimensions for the different flat duct bends. Page 19
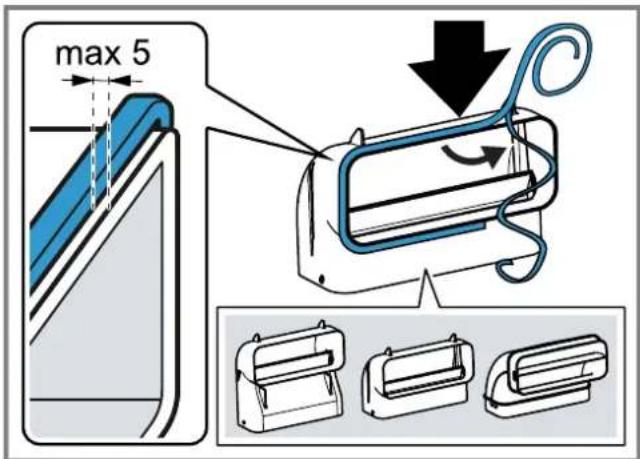
Securing the seal
- Secure the seal on the flat duct elbow at a maximum of 5mm from the edge.
Fig. 34
Inserting the flat duct elbow
- Insert the flat duct elbow into the outlet opening on the rear of the appliance.
Fig. 35
Inserting the appliance into the worktop cut-out
- Ensure that the connection cable is connected to the appliance.
- Carefully insert the appliance into the worktop cutout.
Fig. 36
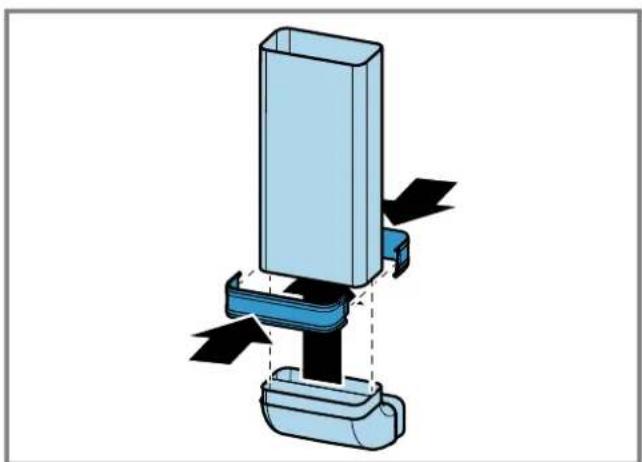
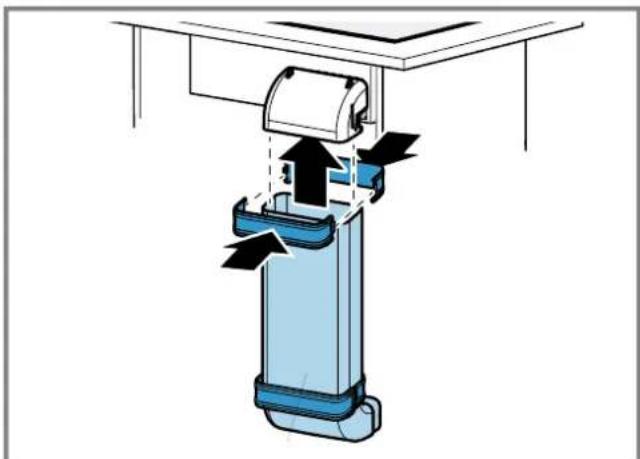
Establishing the pipework between the appliance and the diffuser
-
Connect the components of the circulating-air duct to each other.
Fig. 37 -
Connect the circulating-air duct to the flat duct elbow on the rear of the hob.
Fig. 38 - Connect the diffuser to the circulating-air duct.
Fig. 39
Install the appliance for air extraction mode
- For air extraction mode, use the seal and the acoustics filters.
- Observe the instructions for the exhaust air pipe. Page 20
Securing the seal
- Secure the seal on the flat duct elbow at a maximum of 5mm from the edge.
Fig. 34
Establishing the piping
- Insert the flat duct elbow into the outlet opening on the rear of the appliance.
Fig. 35 - If required, install additional piping elements.
Inserting the appliance into the worktop cut-out
- Ensure that the connection cable is connected to the appliance.
- Carefully insert the appliance into the worktop cutout.
Fig. 36
Connecting the exhaust air pipe
- Secure the exhaust air pipe to the flat duct bend.
- Establish the connection to the exhaust air opening.
- Seal the joints appropriately.
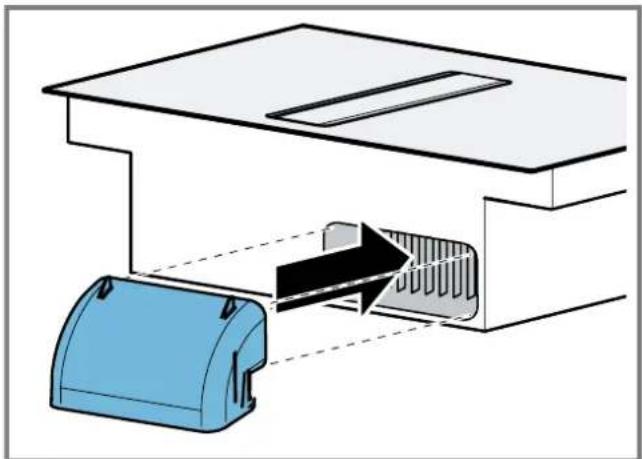
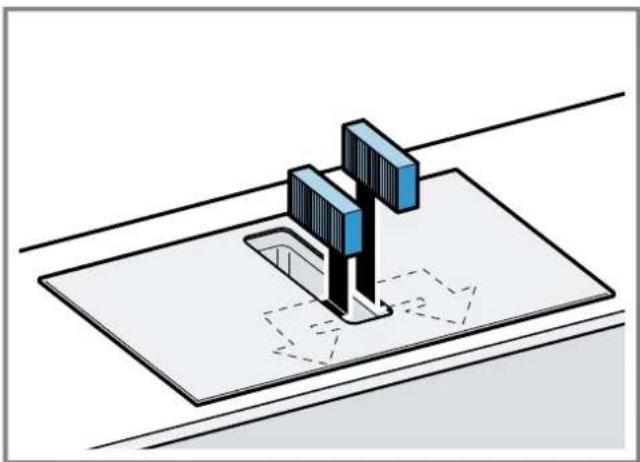
Inserting filters
Note: For circulating-air mode, insert the odour filters.
For air extraction mode, insert the acoustics filters.
- Observe the filters' air flow direction.
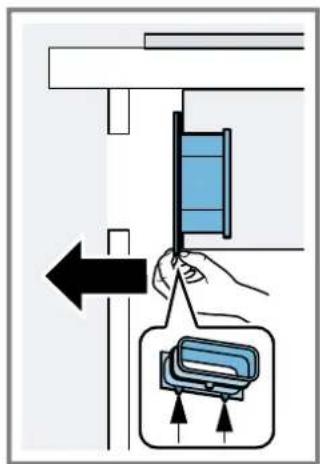
- Insert two of the filters into the left and right of the appliance, and slide them forwards.
Fig. 40
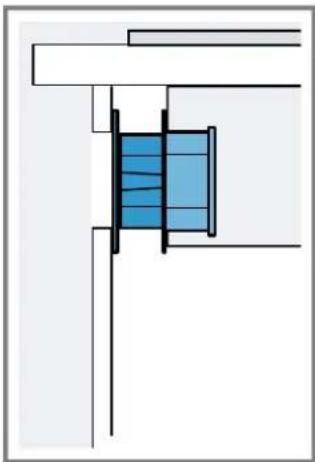
- Insert the other filters into the left and right of the appliance.
Fig. 41
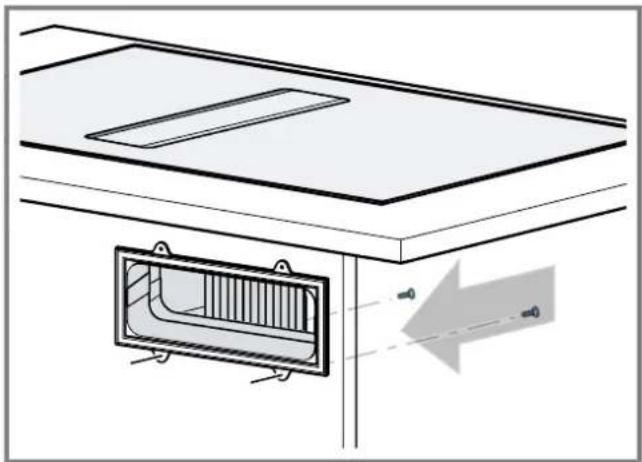
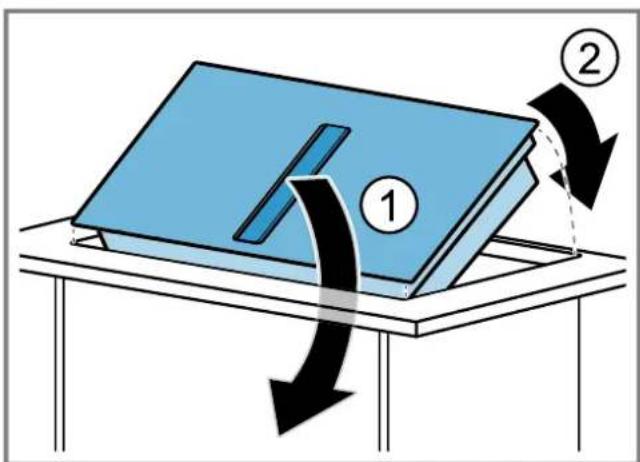
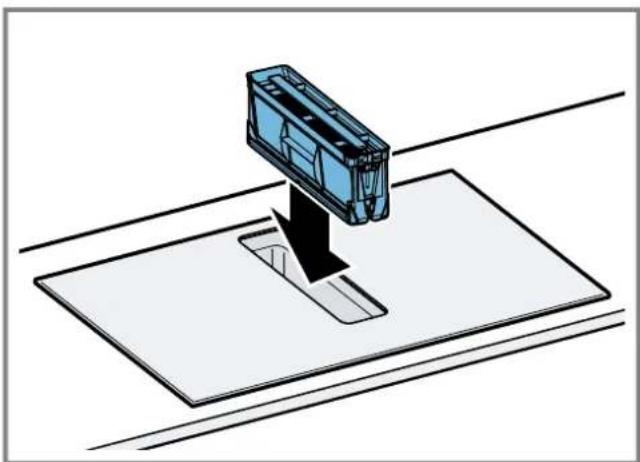
Inserting grease filters
Insert the grease filter.
→Fig.42
Establishing the connection to the power supply
- Observe the connection data on the rating plate.
- For 3N connect the cable to the mains socket in accordance with the figure.
Fig. 43
- For 2 N, connect the cable to the mains socket in accordance with the figure.
→Fig. 44 - For 1 N, connect the cable to the mains socket in accordance with the figure.
Fig. 45 - For 2L / 2N connect the cable to the mains socket in accordance with the figure.
Fig. 46
-
Note the colours of the cables.
-
BN: Brown
- BU: Blue
- GN/YE: Yellow and green
- BK: Black
-
GY: Grey
-
If required, arrange the supplied wire end ferrules differently depending on the type of connection.
- To connect two cables, if required, use a wire end ferrule.
Shorten the wires.
- Remove the insulation.
Checking the function
-
Switch on the appliance.
-
If 408 Eos1s up the appliance is not connected correctly. "Checking and correcting the electrical connection", Page 23
- If no faults appear in the appliance's display, use the operating instructions to check that the ventilation is working.
Checking and correcting the electrical connection
- Disconnect the appliance from the power supply.
- Check whether the connection to the appliance (fig. 4) and the building-side connection (fig. 8) correspond to the connection diagram in these installation instructions.
"Preparing the electrical connection", Page 20
"Establishing the connection to the power supply", Page 22
- For 3 N ,observe the following figure.
Fig. 47 - For 2N observe the following figure.
Fig. 48 - For 1 N, observe the following figure.
Fig. 49
Switching the display for air extraction mode
- If required for the air extraction mode and the air recirculation mode, change the display of the electronic control in the basic settings.
- Observe the basic settings section in the instruction manual.
Removing the appliance
ATTENTION!
Tools may damage the appliance frame.
Do not perish the appliance from above.
1. Disconnect the appliance from the power supply.
2. Remove the exhaust air duct or undo the circulating-air connections.
3. Remove the silicone joint.
4. Push out the appliance from below.
fr
ADVARSEL - Fare for forgiving!
ADVARSEL - Brandfare!
Fedtaflejringer i fedtfiltret kan blive antaendt.
ADVARSEL - Fare for forgiving!
Fastgoring at taeling
Monteringsmal for flat rorbend
Her finner du en oversikt over monteringsmalene for flate rorbend.
Sett fra sider:
Fig. 4
Fig. 5
Fig. 6
Sett forra:
Fig. 7
Installajsonsvarianter
ADVARSEL-Fare for forgiving!
ADVARSEL-Fare for forgiving!
Montere holdeskinner
Sette inn flatt rorbend
- Sett det flate rorbendet inn i utlops på baksiden av apparatet.
Fig. 35
TonoBttn Tou npooaoyea
3ndecb npuBeH o63Op BINOB pa3nHbIX BapnaHTOB yCTaHOBKN.
OTIOXKeHnI Xnpa B KInpoynabNIBaOuIeM FnIbTpE MoYrT BCnblxHyTb.
Hikorda He pa6oTaTc cOTKpbItbIM pIaMeHem pAOM c np6opom (HaNPmep, PAm6npoBaHne).
PpH6Op MOKHO yCTaHaBnBaTb B6n3n HcToHHKa dna CxNraHn TBepDOro TOnnBa (HAnpMep, pOba nn yroIb), ecn npedyCMOTpeHa uehha HecbEMHa 3a- uTHa naHe. He donKHO 6bITb pa3netaOuNXCnckp.
NPEyPEXKDEHNE-OnachocTb TpaBMnpoBaHHa!
H3meHeHne MexaHuecko Hn 3JeKtpueeCKo KOHcTpkyu MoKeT CTaTb HCTOCHKOM ONaCHOCTN IN PpNBecTN K BblxOdy np6opa n3 cTpor.
H3meHeHmexaHueeCKo HnN 3neKtpueeCKo KOHCTpykUnn 3anpeUeHO.
TeaH,OTKpbItbIe npH MOHTaKe,MOYT 6bITb OCTpbIMN npNBecTu K Nope3aM.
HcnoIb3OBaHHe 3aunTHbIX nepuATOK
Pnp6op TaKjIbI.
- Ina ero nepemeeHH noTpe6yOTc2 yeNoBeKa.
HcnoB3yTeToIbKOIOxOaUneBCNOMoTaJIbHbIe cpeCTBa.
A NPEyIpeJxDEHNE -OnachocTb ydysb!
TeMOry3aBepHyTbCByyNaKOBOUHbMaTePnA1NnHa-DeTberoce6eHa roNoBvN3aOxHyTbCra.
He npdnyckaTe deTe K ynaKoBOvHomy MaTePnany.
He no3BOJIaTe DeTAM HrpaTb C yNaKOBOUHbIM MaTePnaJOM.
A INPEyIpeXJEHNE -OnacHocTb OTPaBJeHnA!
BTRHytbe 6bpaTHOB NOMEeHne OtpaOToBUNHe ra3bl MoryT CTaT npuHNO OtpaBHeHn.
BbITAAHH BO3DyH He DOnJKe H BbIXOaNTb uepe3 DbIMOByTOpy6y nn BO3DyXoBOd npn nx 3KcNnyataun.
ДЯ OTBODA BbITaHHORO BO3dYxa He CneDyET NcNoIb30BaTb BEHTKaHaN, CnykaUIM DnA BeHTnlaUIN NOMeUeHIN, B KOTOpbIX yCTaHOBJHe IcTOuHNK INaMeHIn.
PnNoKIOUeHIN BbITAKKN K HeHCNOb3yEmomy DbIMoxOy, Heo6xOIMO NOLyHTb pa3peWHeH B CneuaJIb-HOH INCTaHUN, OTBeuAOSe 3a 3KcNpyaTuH IO YNCTKY Tpy6.
BTRHYtIe 6bpaTHOB NOMEUHNE OTPa6oTaBUNHe ra3bl MOryT CTaTBnPHHOOTpABJIeHH.
Pn yctaHOBe BbITAAKKN B NOMEeHnAX, Tne PnncytCTByeT NCTOCHN KIIaMeHN C NOBODOM BO3dyXa N3 NOMeHHN, CNCTema NOdau NITaHNA BbITAAKKN DOJHKHa 6bItbOBOpydoBaHa FyHKnne aBapnHoro OTKIOUeHN.
Yka3aHnno no noKnIooHnK 3JIeKTpocetN
Дябз�ансогиpoKJIQUeHnI np6opaK 3NeKTPocetN co6IoJaTe daHHbIe INCTpyKcun.
PNEyPExEHHe-Onachocb npaHexn 3JIekTpueckm TOKOM!
CneNyet OeocneHb BO3MOxHOCb OTKnHoueHn PnpOpaOT 3NeKtpocetN B IIOBOMoMeHT. 3TO T np6Op MOxHO nOJ KIIuOaTb K cETN TObKO Upe3 PpaBnIbHO yCTaHOBHeHHyO paCnpdeIeNTeBHyO Kopo6Ky.
B Ctaunohapno 3neKtpnpoBoDke Heo6xOIMo PpeyCMOTpeb CnueaJIbHb BbIKIIOUaTeNb Dnpa3MbKaHnBCex NIOIOCOB cOrnaCHO yCNOBnM KaTEROpn NepeHaipnKeHH III n cOrnaCHO yCNOBnM MOHTaKa.
IoiKJIIOUeHHe cTaUNoHApHOrO 3eKTPoo6OpyOBoaHHa IOnJHKHO pON3BOODTBCa TOnbKO KBaINHnIPoBaHHbIM 3eKTPnKOM.Mb peKOMeHdyEM yCTaHOBt b yCTpoNCTBO 3aunTHoro OTKnIOUeHHa (Y3O) B 3eKTPnuecko nen ChA6KeHHn np6OpOB.
IpocneDnte, YTo6bI cTeBOi Ka6JIb He 6bln 3aKaT, He nepeRn6anCn HaxOuNcB DaaII NT OCTpbIX KpOMOK.
IpoKnaIbIaIte ceTeBOI Ka6eIb TaK, YTO6bI OH He Ka- canIHarpeTOrO Kopnyca npnbopa.
IcnoB3yIe ToJIbKO ceTeBOH Ka6JIb, BXOJaUIM B KOMnJIeKT NoCTaBKn Ipi6opa HIN NoCTaBJIReMbI cepBNCHOH cIyKbOi.
3TOT npH6op COOTBeCTByeT Tpe6oBaHnM npaBn EC no NOdaBHeHHo paHOnomex.
Pn6op COOTBETCTByeT KAnccy 3aunIb1, NoTOMy OH DoJIKeH 3KcIIpyATnpOBaTBCr TOJbKO C 3a3EmJIIOUIM npoBODOM.
IpoH3BOIDTeHbHeHecETOTBETCTBeHHOCTHaHEncnPaBHOCTHINIBO3MOKHBIE NOBpeKJdeHn,KOtOpbE MOrYT 6bITbCB3aHbIC HeCOOTBeTCTByIOUIM 3JIeKTpueckm MOHTaXOM.
IoproTOBka K 3JeKtponoKnIOuOeHnIO
Tpe6oBaHne:Pa60TaB C BHyTpEHHMn YactrMn np6op a nn pOn3BODntb 3aMeHy CeTeBOrO Ka6eNl MOyr TOnbKO npoeDiune ObyeHne CneuaNCTbl cepBnCHOH cnyK6bl.
- Co6IIOJaIte yka3aHnno NO NOkNIOUeHnIO K 3JeKTPocetn. B clyaae HeKOppeKTHoCbOpKn, HeCOOTBeTCTByOuSei yctahOBKn HIN NOkNIOUeHnR rapaHTnHa npbOp nepe-CTaET DeNcTBoBaTb.
- EcIn Bam Tpe6yetc 60one nnHHb CteBOB Ka6enb, 6paTnTeCb B cepBuChyU cnJx6y. B HauHnn HMeOTc Ka6enn DnHHOI Do 2,20 M.
- Pn yctaHOBKe npnbopOB 6e3 npdeBapntelbHO cMOHTnpoBaHHoro Ka6eJr Heo6xOAnMo npOBecTH ceTeBOI Ka6eJb K pacnpedeJIteHbHOKopo6Ke.
OTKpbBaHne pacnpedeHtEnbHOn Kopo6Kn
- PpHIOJHMNITE KpbIuKy paCnpedeJInteJIbHOJ KOPO6Kn C NOMOUIO OTBepTK.
$$ \rightarrow P u c. \quad 1 5 $$
PnoIroTOBa paCnppeJeHnteHbHO Kopo6Kn
$$ \rightarrow P u c. \quad 1 6 $$
$$ \rightarrow P u c. 1 7 $$
$$ \rightarrow P u c. \quad 1 8 $$
1.Ocna6bTe BnHT.
2ПинпднIMITEаЖИСсnomoьюOTBepTKH.
3. Ocna6bTe 3aHmM.
PoiKluoyehne Ka6eJRA paCnppeIHTeJIb-HoKopo6Ke
1.ПоДКЛЮЧИТЕКLEММУ3Nka6eЯKpacnpeДeNTeHOB Kopo6Ke,кakpoKa3aHoHa cneIyHOUcem pucyHKe. →Pnc.19
2 IoikIIOUHTe KIeMMy 2 N Ka6eNk pacnPpeJeITeNbHOKopo6Ke, KaK noka3aHo Ha cNeyHOSeM pncyHKe. Pnc.20
3.ПоДКЛЮЧИТЕКLEММу1NkaБЯнКpacпepeДENTeNBOH Kopo6Ke,ΚΑΚΝΟΚАHAcneуHUsE M pucyHKe. →Pc.21
4.ПОДКЛIOHHTe KIeMMMy 2L/2N Ka6eJI KpacpeJeITeNBHOI Kopo6Ke, KaK nOKa3aHo Ha cJeDyIOUeM pncyHKe.→PnC.22
5.YuHTbBaIe TcBETKaBeJe.
-BN:KOpHHeBbI
-BU:CNHNI
- GN/YE: JkIeIbI N 3eJIeHbI
-BK:üepHbI
-GY:cepb
- Пи Heo6xOAnMoCTn yctaHOBHTe NoCTaBJIReMbIe B KOMNKeKTe MeIbIe NpeMbyKn COrIaCHO CXeMe NOI-KJIOUChEHN.
7.ПоДКЛIOHHTe Ka6eJIa,а 3aTeM 3aTAHHTe BnHTbHa paCnppeJInTeIbHOI Kopo6Ke. - Cornacno cxeme noikkyehn noikkyeHHIO 1 N\~nn2 L/2N cooTBeTcByet pha3a 1 neKtpoDnRaTeHn BENTIaTopa.
9.ПОДКИЮЧЕНIO 2N-/3N-COOTBETCTByeT Φa3a L1 (cepbi) 3NEKTKPODIBRATeIe BENTIJIrTopa.
PekomeHdyembI BHyTppeHHn DnaMeTp Kpyrblx Tpy6 150 MM.
YkaHnIpeKnMaOTbOaBO3yXa
BpeKIMe OToBa BO3yxa DOJIKA 6bITb yCTaHOBJeHa 3acNoHka 06paTHoTJrN.
Приимechanicals
Ecn 3acOnHka o6paTHOH Tn H E BXOHT B KOMPJIeKT NOCTaBKn np6opa, eM MoHNO pno6peCTn B CneuaJIN3HPOBaHHOM MaarHe.
EcnBbTAJHKHO B03dyX OTBOHTCaYepe3 HApyKHyO CTeHy, CNeDyeT HCNOJIb3OBaTb TeteCKONUeCKN BeHTINRAuOHnBu KaHaJI, npoxOJaUNB CTHe.
PpOBepKa Me6eHn
-
Y6eHITecb, yTO Me6eNb IINB BCTpaNBaHnY yCTaHOBNeHa pOBHo n CnOcObHa BbIepKaTb HArpy3Ky. MakcImaJIbHbI BEc np6opa coCTaBnaET npm. 25 Kr. CToJeUHnua, B KOTOpyIO BCTpaNBaETC np6Op, DOnJKHb BblEepKuBaTb HArpy3Ky npm. 60 Kr.
2.ПослЕБынOLинEHЯВьpe3a npOBepbTe yCTOnHBOcTb Me6eIДЯ BCTpaNBAHЯ.
3.Obecneyte HeCyUIO CnOCo6HOCTb yCTOuINBOCTb, OcObeHHO ToHKnx CToneuHnU, C NOMOUsIIOxOJusNX Onophix KOHCTpyKuN. -
YuHTbIbAaTe BeC np6opaa, BkHouaJ DOONHnTeJIbHyO HApTy3Ky.
-
IcnoJIb3yIte JapOpnpOHyB N BnaOroCToKm MaTepn-an.
-
Y6eIITecb, yTO Me6eIb IINB BCTpaBHa CnOCo6Ha Bbl-epKHBaTb TemnepaTy pO 90 °C.
5.He BCTpaBaNte DyXOBbIe Wkafo, XOJOnNtBnHKn, NocyDOMoeuHbIe MaunHbI, CTnpaJIbHbIe MaunHbI IN DpyryTOxHNky NO np6opom. - PpokoHTpOIpnyTe ToHocTh paCnOJKeHH np6opa B rOpH3OHaJIbHOI pIOCKOCTn IocNe erO yCTaHOBKn B MOHTaHHb II pOeM.
Poirotobka Me6eJH
Tpe6oBaHHe:Me6eBnIINBCTpaINBaHnI DOnJHnBaIepKnBaTbTeMnepatypDo90°C.
- Pa3MeTbTe Bblpe3 B Me6eIN B COOTBeTCTBHN CO CXeMOYyCTaHOBKN. P_NC 14
2.Порсевергпerte.YetbipeOTBepCTHЯДиAmEtPOM6MM. →Pc.24 - YrOJ MeKJy NOBepxHOCTbHcpe3a H CToneUHNuei DonJIKeH COCTaBnTb 90°. →Pnc.24
Pn yCTaHOBKe HaI BbIDBHXHbIM AUSHKOM BblepXHBaIe MHHMaJIbHbIe OTCTyNbl.
1.ПиСHTIN EMKOCTNДЯ CINBA NIMHHeJ KIDKOCTNHa yCTaHOBNEHOM npIbope co6NJaTe MHHMaJIbHbIe OTCTybl. P_NC 11
2.YuHTbBaIte paacnoIOXeHHe EMKoCTn IJIra CInBa IINiHeJ KNDKoCTn.
→PUC.12
IodrotobKa Me6eN K yctaHOBKe np6opa dna cnpkylaun BO3dyxa c aanTepom
- Пи КOMБИНРОВАнС садпгоручтбайтcoOTBETCTBNE pa3МЕРOB BbIpe3aВЗдн CTeHKe.
→PUC.25
- CdenaiTe Bbipe3 B 3aAnHei CTeHKe, noJIb3yrcb WAs6No-HOM.
3.YcTaHOBnTe BO3DyHbI KlaNaH B LOKone DnpeKIma CnpKyJUuN BO3DyXa.
MHHMaJIbHOe NOpEpeHoe CeeyHne BO3dyuHoro KlaNaHa DoJHKHO 6bTb npIM.440 cm².
BbInyckHoe OTBepCTne B OOKOE DOJIKHO 6bITb DocTaTOUHO 60JIbWHM, YTO6bl ObecneHTb TAY Hn3Kn ypoBeHb Wyma.
- TTo6bI npH6Op FyHKUHOHPOBaI npaBnIbHo, o6ecneYbTe npHTOK Bo3Dyxa K BapOuHoi NaHei Ne Upe3 OTBepCTne DnBbIXoDa Bo3Dyxa C MINHMajlbHbIM NOnpeueHbIM ce-ueHem 200cM² B HnKHeM WkaFy.
- NocJe BbIOnHeHH BByPe3a ydaJIte OINIKN.
- 3aRepeMeTHN3HpyTe CTbIKIe TepMOCTOKNIM N BDOHOENPOHnuaeMbIM TepMeTNIKOM.
→PNC.24
IodrotobKa Me6eJN K yctaHOBKe np6opa JnIzIkpKylraun BO3dyxa C zIrpKylraunOH HbIM KaHaJOM
1.ПиНeoБхОДМОСТСCHIMMITE3aHIOCTeHKyMe6eNII.
2.ПиКOM6HINHPOBaHN CПLOCKIM KaHaIOM yuHTbIaTe COOTBETCTBNE pa3MePoB BbIpe3a B 3aJHeI CTeHKe.
→PUC.26
3.YCTaHOBnTe BO3DyUHbI KlaNaH B 0OKone DInpeKHMa CHPKUYUHBO3DyXa.
MHHMaIbHoe NOpepueHoe CeeyHne BO3dyuHoro KlaNaHa DoJHKHO 6bTb npHM.440 cm2.
BbIyckHoe OTBepCTHe B 0KoJIe DOJIHKHO 6bITb IOCTaTOUHO 6OJIbIM, YTO6bl ObecneHTb TBy Hn3Kn ypoBeHb Wyma.
-
TTo6bI np60op fYHKUHOHPOBaI npaBnIbHo, o6ecneBte npHTOK Bo3dyxa K BapOHH NaHeN Yepe3 OTBepCTne IINBbIXOa Bo3dyxa C MINHMajlbHbIM NonepeuHbIM ce-ueHem 200cM² B HnKHeM WkaFy.
-
NocJe BbInonHeHH BBype3a ydaJIte OINIKM.
- 3aRepMetn3npyIe CTbIKN TePMoCTOnKIM N BOHOHePNOHnIaEMbIM RepeMeTNIkOM.
→PNC.24
IodrotOBKa Me6eHn IJIy yCTaHOBKn peKHaMa OTbOda BO3dyXa
- Pn Heo6xOaHMOCTn CHIMITE 3aDHIO CTeHKy Me6en.
2.ПиКOM6HINHPOBAHNcПLOCKIMKaHaONm yuHTbIaTe COOTBETCTBnE pa3MepOB BbIpe3a B 3aJHeNCTeHKe.
Pnc.27
- Nocne BbIOnHeHnB Bipe3a ydaJIte OINIKN.
- 3aRepeMTeH3npyIe CTbIKN TePMOCTOKNIM N BOHOHeNPO-HNuzaeMbIM TepMeTNIKOM.
→PNC.24
YctaHOBka ONOpHbIX NlaHOK
YcTaHOBnTe OOnpHbIe NnAHN BMe6eJIb.
- PpHKneTe onOpHbIe NlaHKn K KaMeHHoI CToneUHnue. Ppi paBoTe C KaMeHHbIMN CToneUHnUaMn IcNoJIb3yI Te TepMOCTOuKn KNe, NOxOuRn DnA CKNeBaNHr MeTAnJa n KaMHJ.
Длгпрнкневаньн HeIb3Я ИСПОЛБ3OBaTb CINIKOHOBbIRePMeTHK.
→Puc.28
MOHTaH npn6opa
A NPEUYPEXKDEHNE -Onachoctb TpaBMnpoBaHHa!
JETAHIN,OTKpbItbIe npn MOHTaKe,MOYT 6bITb OCTpbIMN npNBecTN K NOpe3aM.
HcnoIb3OBaHHe 3aunTHbIX nepuTOK Pnp6Op TReKJIb.
- Iya ero nepemeeHHN noTpebOHTc2 yeNoBeKa.
HcnoJIb3yIteToJIbKOIOxOJaIeBCNOMOraTeJIbHbIe cpeCTBa.
YctaHOBtpe np6Op nla pa60bI B peKHMe OTbOa BO3- dyxa CtpaHnua 76,peKHMe cNpKyJnHn BO3dyxa CtpaHnua 76 nIu peKHMe cNpKyJnHn BO3dyxa C npKyJnHnOHbIM KaHaON CtpaHnua 76.
3aMetKa:ДaHHbI npH6Op npEHa3HaueH NCKHouHTeJIbHO ⅡI BCTpaNBAHn 3aNoDnIO.
YcTaHOBka npH6opa dIpa peKIma cIrpKyIa- CUNB03dyxa c aIaNTepoM
3ametka: Pn yctaHOBe HENOCpeCTBeHHo Ha HeH3OJIPOBaHHyIO BHeUHIO CTeHy ( ≥ 0,5BT / M^2 °C) MbI peKOMeHdyem KOHnIpyauuio C uNpKyIaUNOHbIM KaHaONOM.
- IcnoIb3yIte aIaIeTp n fIbTp dIra ydaIeHn 3anaxOB peKIMe cIrpKyIaIu BO3dyxa.
2 Y6eIntecb, yTO pacCToHnHe MeKdy npN6Opom n 3aHne CTehKoM Me6eNi CoCTaBnE rT 10 do 80 MM.
YcTaHOBKa aanTepa
- OuHCTHTe N o6e3KHPbTe NOBepxHOCTb PnPKJEnBaHHa BOKpyr Bblpe3a B 3aDHei CTehKe Me6eHN.
2.YcTaHOBInTe aAnTep B BBInyCKHoe OTBepCTne B 3aDHeu qactn BapouHoN paHeiN.
→PUC.29
- CHIMMTE 3aunTHyO pIeHky caanTepa.
→PUC.30
YctaHOBka npH6opa B Bbipe3 B CToJeUHHue
- Y6eIITecb, yTO ceTeBoi Ka6eBIO IOKIIIOueH K npIbOpy.
2 AkkypaTHO yCTaHOBITE np6Op B BbIpe3 CToJeWHnUbl.
→PUC.31
Фнкациаадпетера
- YdepKINBa CpeHn DepKaTeIb aadTepa, CdbNbTe ero 60koBbIMn DepKaTeIaMn K 3aDHe cTeHKe B HxHHeM uKafty n npKnKeIte.
→Pnc.32
2.Пи Heo6xOIMOCTH DoONHITeIbHO 3aФHKcpyTe aDanTep BnHTamN.
→PUC.33
YcTaHOBbA npH6opa IJIpa6Otbl B peHXMe UnpKyJIaUHN BO3dUxacnKpyJIaUHOHHbIM KaHaJOM
- NcnoIb3yIte yIIOTHIeIb, cIpyKyIaIIOHHbI KaHAn, dIΦ- cy3Op I nnIbTp IIN ydaIeHn 3anaxOB B peKImpe- cnIPKyJIaIuN BO3dyxa.
- YUHTbIbaaTe pa3MepbI pa3JIuHbIX IIOCKHX BO3dYXOBoDob. CtpaHnua 72
ФИКСАЦИУПЛOTHHTeJIЯ
3aKpeNTe yNIOHTHeBa NIOCKOM KaHane He daIbWe 5 MM OT Kpa.
Puc.34
YcTaHOBKa IIOCKORO KaHaJa
YcTaHOBnTe NIOCKn KaHaJI B BbInyCKHoe OTBepCTne Ha 3aDHei CTeHKe npI6opa.
→PUC.35
YctaHOBbI npH6opa B Bblpe3 B CToJeHHne
- Y6eIntecb, yTO ceTeBO KabeBIO NOKIOUOeH K npN60py.
2.AKKypaTHO yCTaHOBNTe np6Op B Bbipe3 cToJIeUHnUbl. P. 36
YcTaHOBbCa ChcTeMbI Tpy6 MeHdI npH6Opom HnΦΦy3OpOM
- CoeHHnTe KOMHOENTbI UINPKyNAUHNOHORO KaHAna MeKdy co6oB.
→PUC.37 - PoiCoeDHHnte UINPKyIaIOOHbI KaHcI c NIOCKM BO3- DYXOBODOM B 3aDHeN YaCTn BapOuHOI NaHEnI.
→Pnc.38
3.ПодсоeДинHTe ДИФуЗОК UцИрКУЛЯЦИОНHOMу KaHaNoIy.
→Pnc.39
YcTaHOBka npH6opa Ira pa6oTbI B peKHe MTBOda BO3dyxa
- B peKnme OTbOa Bo3dyxa nCNoIb3yIe yNIOTHInTeIb IyMOnOrIooiaoUne ΦIbTpbl.
2 Co6nIouaIte yka3aHn no paBoTe B peKHe M e OTbOa BO3- dyxa. CtpaHua 74
ФИКСАЦИУПЛOTHHTЕЯ
3aKpeNTe yIIOTHHTeJIb Ha IIOCKOM KaHaJIe He DaJIbUe 5 MM OT KpaJ.
→PNC.34
YctaHOBKa CnCTembl Tpy6
- YctaHOBNTe PIOCKN KaHaN B BbInyCKHoe OTBepCTne Ha 3aJHeN CTehKe np6opa.
→PUC.35
2.Пи Heo6xOAnMoCTn MOHTnpyIte DoNoHHTeIbHbIe 3neMeHTbI ChCTeMbI Tpy6.
YcTaHOBbKa npH6opa B BBipe3 B CToJeUHHue
- Y6eIntecb, yTo cTeBoi KaebIb nOdknIOUeyH K npHbOpy.
2 AkkypaTHO ycTaHOBnTE np6Op B Bbipe3 cToJeuHnU.
→PUC.36
POncoeHHeHne BbITaHHoTpy6bl
- 3aKpeIe BbITaXHyIO Tpy6y Ha KoneHe IIOCKoro BO3DyXOBoJa.
- BbINOJIHInTe coeDINHeHne C BbITaXKbIM OTBepCTnEM.
- 3aRepeMeTn3HpyTe MeCTa CoeINHeHH COOTBeTcTByIO-
YctaHOBkaΦHbTPOB
3aMeTka:BpeKHeMepKpyLauuynycTaHOBHTeΦnIbTpbl, norgloaioune 3anax.
BpeKnme oTbOda Bo3dyxa ycTaHOBnTe wymOnorNoaIOuLneΦHbTpbl.
- 06paTHe BnMaHne Ha HAnpaBHeHne Bo3DyUHoro NotoKa ΦNtBPOB.
2 BCTaBbTe B npH6Op DBA FnIbTpA CneBa N CnpaBa N CdBnHbTe IN Bnpei.
Puc. 40
- BcTaBbTe B npH6Op dpyrHe DBa fNtPbI cneBa n cnpaBA.
→PUC.41
YcTaHObKa HnpoyNaBnBaHOuIeroΦHbTp a
YcTaHOBnTe KInpoynaBnBaIounIΦnIbTp.
→PUC.42
3neKtpnuecKoe nOdkIIOUeHHe
- YuHTbIaIe npaMeTpbl NODKJIIOUeHnHa TINOBO Ta-6JIuKe.
2.ПоДКЛЮЧИТЕКЛEMМУ3Nka6eЯKpacpepeHITeHOBIOKOPO6Ke,KaK NOKa3aHOHa pncyHke.
→PUC.43
3.ПоДКЛЮЧИТЕКLEММУ2NKa6EЯнKpacnpedeHNTeHOBKopo6Ke,ΚΑΚΝΟΚA3aHOHa pncyHke.
→PUC.44
4.ПодклочиКлему1NkaбянКpacpeДentьhoeKopo6ke,кakпokа3aHoHa pncyHke.
P_MC 45
5.ПОДКЛIOЧИТЕКLEММу2L/2Nka6eЯKpacnpedentelHoHKOPO6Ke,KaKnOKa3aHOHaPcCyHKe.
→PnC.46
- YUHTbIbaIte UBeT KaBeneJ.
-BN:KOpuHHeBbI
-BU:cHn
- GN/YE: JkEeTbI n 3eHbI
-BK: yephbl
-GY:cepbii
- B 3aBnCmOCTn OT Tnna NOkNIOUeHn, npn Heo6xoMnOCTn paCNOJXHTe Ka6eNBhIe 3aKIMbI, NOCTaBJIReMbIe B KOMnJIeKTe, No-pa3HOMy.
-
Pn Heo6xOaHmocTn HcNoIb3yIe Ka6eIbHbIe 3aXHMbl Dnra coeDInHeHH DaBy X Ka6enei.
-
YkopoTnte Knnb Ka6enei.
-
YdaIaIte H3OJIaIciHIO.
PpOBepka pa6oTbI
- BkHIOHTe npH6Op.
- Ecn 3aropaetc4yEop nKIO-yeH HeKoppeKTHO.
"PpOBeRka H OToJaKa IOnKnIOUeHnK 3NeKeTPOCeTn", CtpaHnua 77
- EcIn Ha DnCnnee np6opae He noBnHeTcHnDnKaun OuHbok, npoBepe TaBoTy BeHTnlaun, CneDyR pyKOBOCTBy NO EKcNpyataun.
PpOBeRka N OToJaKa NOpKJIHOueHnK 3JneK- TpocetN
- OToeDInHHe npHbOp oT cEtN.
- Y6eIntecb, yTO NOdkJIOUeHHe Ha npInbope (pnc. 4) n noDKJIIOUeHHe Ha cTeHe (pnc. 8) COOTBeTcByIOT CXEMe NOdKJIIOUeHnB INHCTpyKuIN N O MOHTaKy.
"PoiDrotOBKa K 3neKtpoNpOKnIHOueHnIO", CtpaHnca 74
"3neKtpnueeCKoNE noKnIoueHHe", CtpaHua 76
3.ДЯ3NOBpaTNTeBHIMaHHeHaCneIyUOuINpncyHOK. P_NC 47
4.ДЯ2NobpaTneBHIMaHHeHaCneIyUOuINpncyHOK. →Pnc.48
5.ДЯ1N O6paTHe BHMaHHe Ha cneIyUoIuI pncyHok. →Pnc.49
IpepeHacTpoKa HnHnKaaun Ha peKHM OTBOda BO3dyxa
- Пи НeoбхоДИМОСТ ИпЕнэсТpointe COOTBETCTBYIOUIM OБразOM 3лЕКТронhoeупалеHne B6a3OBbIX yCTaHOK Kax ДЯ ржима OTBOda BO3dYxa.
- CM. rnaBy «Ba30BbIe yCTaHOBKN» B pykoBoIDCTBe no 3Kc-nlyatauN.
Демонтан пнобopa
BHIMAHNE!
PnHcNoJIb3OBAHm HNCTpyMeHTOB MOKHO NOBpeIb paMy np6opa.
He n3BVeKeKaIe npn6Op cbepxy.
1. OToeDHHte npn6p ot 3neKtpocetH.
2. CHIMTE BbITXHON KaHAN INN OcIa6Be coeINHeHne INR CUPKyJIaUN BO3Dyxa.
3. Pa3peKbTe CNJIKHOHBbl WOB.
4.ИЗБЛЕКИТЕпибов,БВΙΤΟЛКΗΥΒΕΟСΗΝΥ.