
RoboVac 15C - Robot vacuum eufy - Free user manual and instructions
Find the device manual for free RoboVac 15C eufy in PDF.
| Product Type | Robot Vacuum |
| Brand | eufy |
| Model | RoboVac 15C |
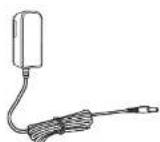
| Power Supply | AC adapter 19 V, 0.6 A (included) |
| Battery | Rechargeable Li-ion 14.4 V, 2600 mAh |
| Maximum Runtime | 100 minutes |
| Charging Time | 300 to 360 minutes (5 to 6 hours) |
| Dust Collector Capacity | 0.6 L |
| Suction Power | BoostIQ™: automatic power adjustment (Standard, Boost, Max) |
| Cleaning Modes | Automatic, Edge, Spot, Quick, Manual (remote control) |
| Connectivity | Wi-Fi 2.4 GHz, eufyHome app (iOS 8.0+/Android 4.4+) |
| Voice Assistant | Compatible with Amazon Alexa and Google Assistant |
| Remote Control | Yes (with 2 AAA batteries) |
| Sensors | Drop sensors (avoids stairs), front bumper |
| Filter Maintenance | High-performance filter and foam filter: washable with water (except HP), air dry |
| Spare Parts Included | Side brushes (x4), extra high-performance filter, extra foam filter |
| Brushes | Cylindrical brush and side brushes |
| Customer Service | Email: support@eufylife.com, hotline: +1 (800) 988 793 (US) |
| Warranty | Not specified in the manual (see website) |
Frequently Asked Questions - RoboVac 15C eufy
User questions about RoboVac 15C eufy
0 question about this device. Answer the ones you know or ask your own.
Ask a new question about this device
Download the instructions for your Robot vacuum in PDF format for free! Find your manual RoboVac 15C - eufy and take your electronic device back in hand. On this page are published all the documents necessary for the use of your device. RoboVac 15C by eufy.
USER MANUAL RoboVac 15C eufy
For FAQs and more information, please visit: www.eufylife.com

Owner's Manual
RoboVac 15C (T2120)
T2120 S1005001244 V02
Bedierungsanleitung | Manual del proprietario
Manuel d'utilisation | Guadadl Utilizzo | Handle ding
| English | 01 |
| Deutsch | 31 |
| Espanol | 63 |
| Français | 95 |
| Italiano | 127 |
| Nederlands | 157 |
English
Table of Contents
02 Important Safety Instructions
05 About Your RoboVac
What's in the Box
RoboVac Anatomy
LED Indication
09 Using Your RoboVac
Important Tips Before Use
Preparation
Charge Your RoboVac
Use Your RoboVac with the EuroHome App
Start/Stop Cleaning
Select a Cleaning Mode
Use Your RoboVac with Amazon Alexa/
the Google Assistant
20 Cleaning and Maintenance
Clean the Dust Collector and Filters
Clean the Rolling Brush
Clean the Side Brushes
Replace the Side Brushes
Clean the Sensors and Charging Pins
Clean the Swivel Wheel
25 Troubleshooting
Wi-Fi Connection
29 Specifications
29 Customer Service
Thank you for purchasing RubioVac 15C. Read all instructions before using this product, and keep it properly for future reference.
English
Important Safety Instructions
To reduce the risk of injury or damage, read these safety instructions carefully and keep them at hand when setting up, using, and maintaining this device.

WARNING SYMBOLS USED
This is the safety alert symbol. This symbol alerts you to potential hazards that could result in property damage and/or serious bodily harm or death.
This device can be used by children aged from 8 years and above and persons with reduced physical, sensory or mental capabilities or lack of experience and knowledge if they have been given supervision or instruction concerning use of this device in a safe way and understand the hazards involved.
Children should be supervised to ensure they do not play with this device.
- Cleaning and maintenance shall not be performed by children without adult supervision.
This device is only to be used with the power supply unit provided.
- For the purposes of recharging the battery, only use the detachable power supply unit provided with this device.
The battery must be removed from this device before this device is disposed of. To remove the battery from this device, first remove the screws on the bottom, then remove the main PCB and unscrew the battery cover using a screwdriver. Remove the battery by disconnecting the quick connector.
- The used battery should be placed in a sealed plastic bag and disposed of safely according to local environmental regulations.
0203
English
- The external flexible cable or cord of the power supply unit cannot be replaced; if the cord is damaged, the power supply unit shall be disposed of.
This device is for indoor use only.
This device is not a toy. Do not sit or stand on this device. Small children and pets should be supervised when this device is operating. - Store and operate this device in room temperature environments only.
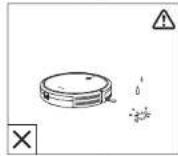
Clean with a cloth dampened with water only. - Do not use this device to pick up anything that is burning or smoking.
- Do not use this device to pick up spills of bleach, paint, chemicals, or anything wet.
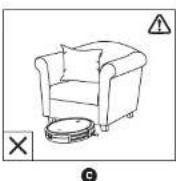
Before using this device, pick up objects like clothing and loose paper. Lift up cords for blinds or curtains, and move power cords and fragile objects out of the way. If this device passes over a power cord and drags it, an object could be pulled off a table or shelf.
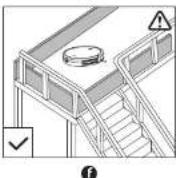
If the room to be cleaned has a balcony, a physical barrier should be used to prevent access to the balcony and to ensure safe operation.
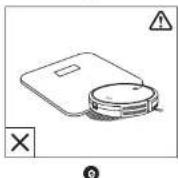
Do not place anything on top of this device. - Be aware that this device moves around on its own. Take care when walking in the area where this device is operating to avoid stepping on it.
- Do not operate this device in areas with exposed electrical outlets on the floor.
- Do not expose the electronics of this device, its battery, or the integrated Charging Base. There are no user-serviceable parts inside.
EnglishEng
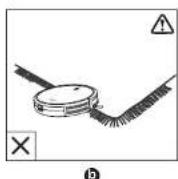
- Do not use this device on an unfinished, unsealed, waxed or rough floor. It may result in damage to the floor and this device. Use only on hard floor surfaces or low-pile carpet.
This device has been designed to be used on floors without scratching them. We still recommend that you test this device on a small area of the room to be cleaned to ensure no scratches are made before cleaning the whole room.
Notice

This symbol on the device or its packaging indicates: Do not dispose of electrical appliances as unsorted municipal waste; use separate collection facilities. Contact your local authority for information regarding the collection systems available. If electrical appliances are disposed of in landfills or dumps, hazardous substances can leak into the groundwater and get into the food chain, damaging your health and well-being. When replacing old appliances with new ones, the retailer is legally obliged to take back your old appliance for disposal at least free of charge.
Declaration of Conformity
This product complies with the radio interference requirements of the European Community. Hereby, Arker Innovations Limited declares that the radio equipment type 2120 is in compliance with Directive 2014/53/EU. The full text of the EU declaration of conformity is available at the following internal address: https://www.euyllife.com/
Maximum output power: <20 dBm
Frequency band: 2.4G band (2.400G/- 7.4835GHz)
Trademark Notice
Amazon, Echo, Alexa and all related logos are trademarks of Amazon.com, Inc. or its affiliates.
Apple and the Apple logo are trademarks of Apple Inc., registered in the U.S. and other countries. App Store is a service mark of Apple Inc., registered in the U.S. and other countries.
Google Play and the Google Play logo are trademarks of Google Inc. Google Home is a trademark of Google Inc.
0405
About Your RoboVac
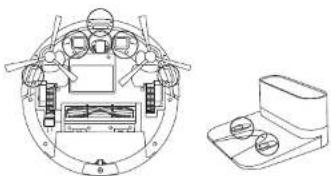
What's in the Box
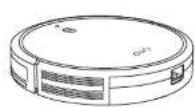
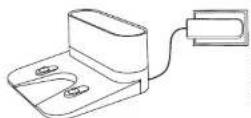
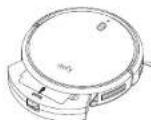
RoboVac 15C
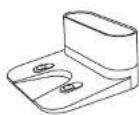
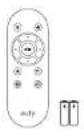
Charging Base Remote Control (AAA Battery x2)


Power Adapter Cleaning Tool Side Brushes (x4)


Additional Foam Filter
Cable Ties (x5)
Additional High-Performance Filter

Owner's Manual & Other Documents
EnglishEng
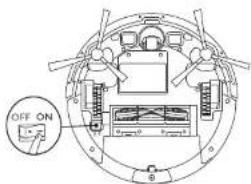
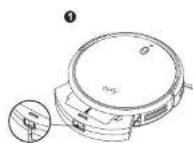
RoboVac Anatomy
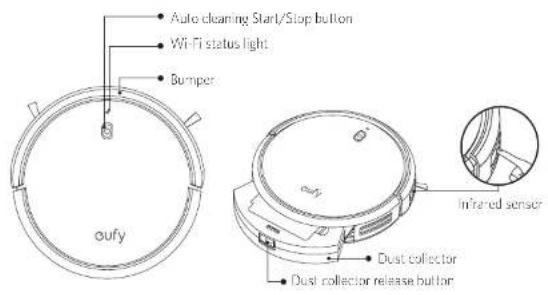
Top & Side
Bottom
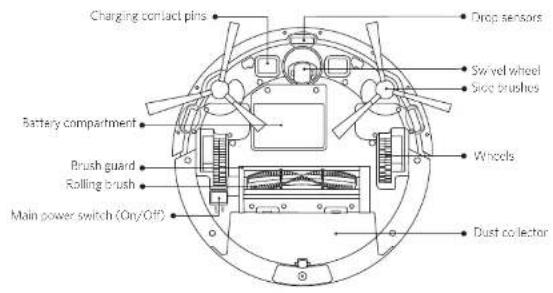
Dust Collector

Suction Inlet
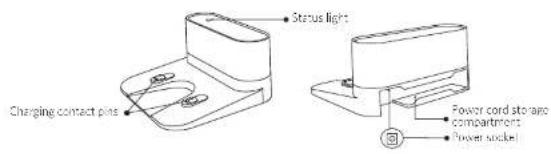
Charging Base
0607
EnglishEng
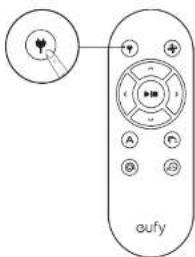
Remote Control
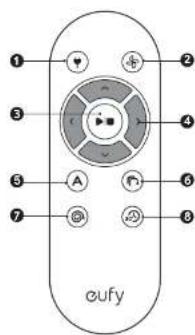
Return RoboVactoCharging Base
Adjust suction power level in Auto and Quick Clearing modes
3 Start Auto cleaning / Sloo cleaning
Control cleaning direction manually
5 Star Auto cleaning
6 Start Edge cleaning
7 Start Spot cleaning
Start:Quickcleaning

Inston 2 AAA batteries before using the remote control for the first time. Make sure the positive and negative ends are facing the correct polarity direction as marked in the battery compartment!
LED Indication
You can see the status of RoboVac from the LED indicators.
| (Power Status Light) | Status |
| Breaking orange Charging | |
| Solid blue Standby / Clearing / Fully charged | |
| Solid orange Low power and returning to Charging Base | |
| Off | • RoboVac is off • To conserve power, the light automatically turns off when RoboVac is not docked to the Charging Base and has been inactive for 1 minute. |
| Hashing / Solid red + Beeping | RoboVac has an error. Refer to the "Troubleshooting>Error Tone" section in this manual for solutions. |
| (Wi-Fi Status Light) | Status |
| Slowly flashing blue waiting for connection: | |
| Rapidly flashing blue Connecti ng with your wireless router | |
| Solid blue Connected to your reless router | |
Using Your RoboVac
Important Tips Before Use
Remove power cords and small objects from the floor that may entangle RabeVac. You can use the suppliant cable ties to organize your wires and power cords.
Fold tasseled edges of area rugs underneath to prevent tanging RoboVac. Avoid clean ng very carc-colored high-olde rugs or rugs thicker than 10 in/26 mm as they may cause RoboVac to malfunction.
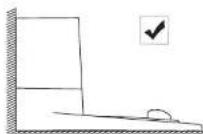
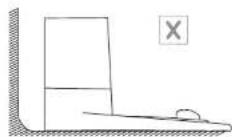
Kuen RoboVac away from spaces lower than 2.87in / 73mm to prevent RoboVac from getting stuck. If necessary, place a physical barrier to block off the problem areas.
6 Keep RoboVac away from wet areas.
RobVac may imb on top of objects less than 0.63 in/16 mm in Height. Remove those objects if possible.
EnglishEng
1 Antidrop sensors prevent RoboVoc from tumbling down stairs and steep drops. They may work less effective if dirty or used on reflective/very dark-colored floors.

Place physical barriers in front of fireplaces and areas that may cause damage to RoboVac if entered.
Preparation

Instal the side brushes before use.


Turn on the main power switch on the bottom of RoboVac.

Remove the sticker next to the power switch, and the foam blocks beside the bumper before use.
10 11
Place the Charging Base on a hard, level surface and against a wall.
Remove objects within 3 ft/1 m of the left and right side and within 6 ft/2 m of the front of the Charging Base
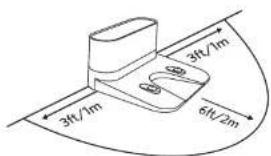
5 Connect the round connector of the adapter into the power socket on the Charging Base and the other end into a wall outlet.
- When the Charging Base connects to AC power, the LED indicator on the Charging Base is SOLDER WHITE.
- Install the Changing Bone in a location that has a hard surface easily access. It is recommended to place the Changing Bone against the wall and on a hard surface rather than those or caps.
- Always keep the Changing Bone plugged in, scheme RobVac will not automatically return to it.
Charge Your RoboVac
RoboVac has a pre-installed rechargeable battery that has to be fully charged before use.
RoboVac returns to the Charging Base at the end of a cleaning cycle or when its battery is running low.
EnglishEng
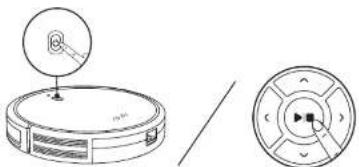
Method 1: Attach RoboVac to the Charging Base by aligning its charging pins with the charging pins on the base.
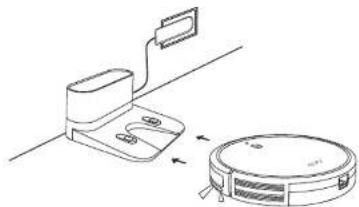
Method 2: Press on the remote control to return RoboVac to the Charging Base.

Turn off the main power switch if RoboVac will not be used for a long period of time. To preserve the battery's lifespan, recharge at least once every 6 months.
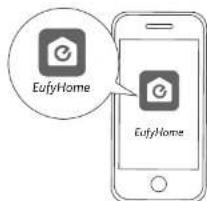
Use Your RoboVac with the EufyHome App
To enjoy all available features, it is recommended to control your RoboVac via the EutyHome app.
Before you start, make sure that:
- Your smartphone or tablet is connected to a Wi-Fi network.
- Your smartphone or tablet is running iOS 8.0 (or above) or Android 4.4 (or above).
The 2.4GHz band wireless signal is enabled on your wireless router
The Wi-Fi status light on RoboVac is slowly flashing blue.
RoboVac is attached to the Charging Base to ensure it has enough power during setup.

Download on the
App Store

GETITON
Google Play
- Download the EarlyHome app from the App Store (iOS devices) or Google Play (Android devices).
2 Open the app and create a user account.
3 Tap the "+" icon in the top right corner to add RoboVac to your EutyHome account -
Follow the instructions in the app to set up the Wi-Fi connection.
-
After connecting successfully, you can control RoboVac via the app
- Wth the app, you can select a cleaning mode, set the time, schedule a cleaning view
the system status, receive notifications and access additional features
Wi-Fi Status Light
| Slowly flashing blue waiting for connection |
| Rapidly flashing blue connecting with your wireless router |
| Solid blue Connected to your wireless router |

If you have any problems during the Wi-Fi setup process, refer to the Troubleshooting
Wi-Fi connection section in this manual
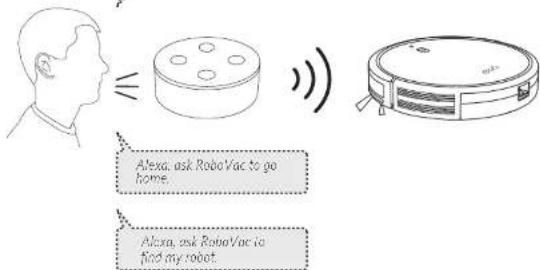
- If Ropov gets stuck in any space, top Find My Robot in the app to find the machine
This function is available in the app only.
Reset the Wi-Fi Connection
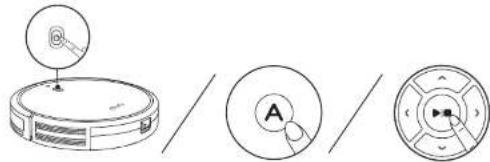
Press and hold On RoboVac for 10 seconds to reset the Wi-Fi connection if necessary.
- You will hear a beep when the Wi-Fi connection has been reset and the Wi-Fi status light will slowly flash blue. Now you can follow the Wi-Fi instructions in the EufyHome app to set up the Wi-Fi connection.
EnglishEng
Schedule Cleaning
With the EufyHome app, you can schedule RoboVac to start cleaning at a particular time.

You can set the time and customize the c cleaning schedules from Sunday to Saturday on the EarlyHome app. This function is available in the app only.
Start/Stop Cleaning

Make sure the main power switch on the bottom of Rappovac is turned on before use.
You can also start or stop cleaning via the Eutomy epe.
- Press On RoboVac or An emote control to start cleaning in Auto Mode.
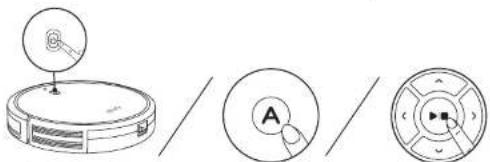
- Press on RoboVac or remote control to stop cleaning
Select a Cleaning Mode

You can also select a cloning mode via the EuflyHome app.
1. Auto cleaning
RoboVac optimizes its cleaning path by selecting different cleaning modes automatically until cleaning is complete. This is the most commonly used cleaning mode.
14 15
Press On RoboVacor Anemole control to start cleaning in Auto Mode.

RonoVac will return to the Charging Base automatically when the battery level becomes low or when RonoVac initiates charging.
- By default, RoboVac starts in Auto cleaning mode when it is turned on.
BoostIQTM Feature
When the BoostIQTM feature is enabled, RoboVac will automatically increase this suction power if it detects stronger power is needed to ensure the best boost. BoostIQTM is ideal for cleaning chigger carpets and hard-to-sweep messes, which will reduce the total cleaning time, but increase the noise level. If the vacuuming noise caused by RoboIQ™ disturbs you, you can disable this feature. This feature only works in Auto and Quick cleaning mode.
In Auto or Quick cleaning mode, press the remote control repeatedly to adjust the suction power level.
The corresponding icon is displayed on the remote control
| Suction Power Level Beeps | |
| Standard power | ● |
| Boost QTM (Default, automatically switches between Slandard and Enhanced power) | ●● |
| Maximum power | ●●● |

When RobotVac solution is chosen in Auto or Quick mode this next time, it will clear according to the suction power level you previously selected.
EnglishEng
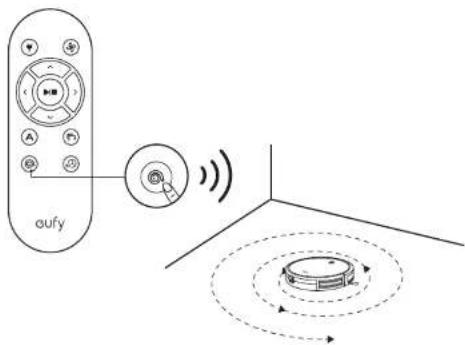
2. Spot cleaning
RoboVac intensively cleans a specific area in a spiral pattern, useful if there is a concentrated area of cust or debris. In Spot mode, RoboVac will stop cleaning after 2 minutes.
Press on the remote control to start cleaning in Spot Mode.
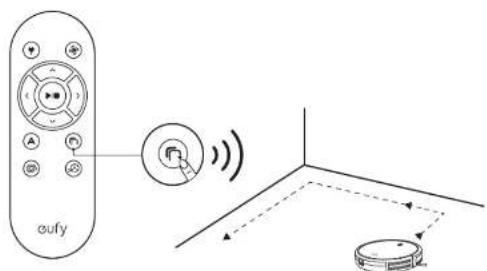
3. Edge cleaning
RoboVac reduces its speed when it closes a wall and then follows the wall to ensure the edge is cleaned thoroughly. In Edge mode, RoboVac will clean for 20 minutes and return to the Charging Base.
Press on the remote control to start cleaning in Edge Mode.
16 17
4. Quick cleaning
RoboVac will automatically stop cleaning after 30 minutes and return to the Charging Base in this mode. Any small room or area needs to be cleaned, it is recommended to select this mode to save time and power.
Press the remote control to start quick cleaning mode

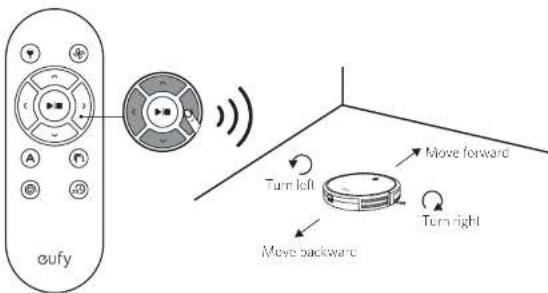
5. Manual cleaning
You can direct RoboVac to clean a particular area by using the directional buttons on the remote control.
EnglishEng
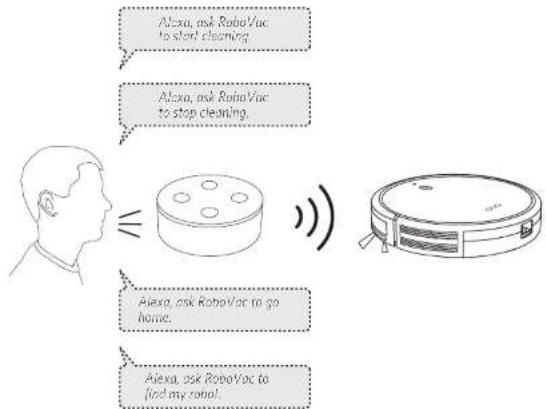
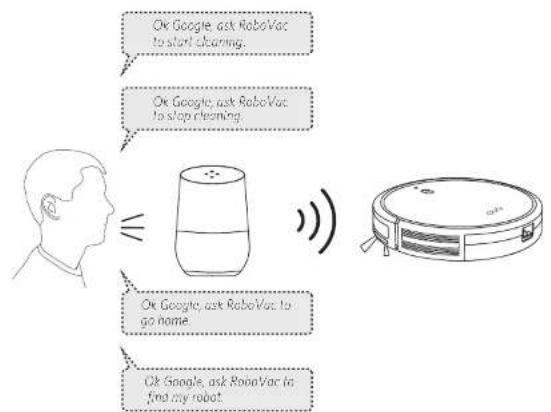
Use Your RoboVac with Amazon Alexa / the Google Assistant
Amazon Alexa or the Google Assistant is a smart voice control device that enables you to control RoboVac with your voice.
Before you start, make sure that:
RoboVac is attached to the Charging Base to ensure there is enough power.
RoboVac is connected with the EufyHome app.
- You have an Alexa-enabled device (i.e. duly Generic, Amazon Echo, Echo Dot and Amazon Tap, Echo Show, Echo Spot) or a device enabled with the Google Assistant (i.e. Google Home, Google Home Mini). These devices are said separately.
The Amazon Alexa app or Google Home app is a ready installed on your smart device, and you have created an account.
To control RoboVac with Amazon Alexa
1 Open the Amazon Alexa app and select "Skills" from the menu.
On the Skills screen, search for "EasyHome - RoboVac".
3 Once you have found the "EufyHorne - RobuVac" skill, tap Enable.
4 Logi with your EufyHorne account so that Alex can control your RoboVet.
Say simple commands to Alcxa.
To control RoboVac with the Google Assistant
RoboVac now works with the Google Assistant on devices like the Google Home.
Open the Google Home app
2 Say "Ok Google, talk to RoboVac" to the Google Assistant-enabled device to initiate the Google action for RoboVac.
3 Follow the instructions in the Google Home app to authorize the Google Assistant with your EuflyHome account.
To control RoboVac with your voice, say simple commands to Google Assistant.
For more information about how RoboVac works with Amazon Alexa/ the Google Assisam, visit https://www.bullyfun.com and go to PRODUCTS>Cleaning>RoboVac TSC for details.
EnglishEng
Cleaning and Maintenance
For optimal performance, follow the instructions below to clean and maintain RoboVac regularly. The cleaning/replacement frequency will depend on your usage habits of RoboVac.
Recommended cleaning/replacement frequency
| RoboVac Part Cleaning Frequency Replacement Frequency | ||
| Dust Colactor After each use - | ||
| Filters Once every week Every 2 months | ||
| Rolling Brush Once every week Every 6-12 months | ||
| Side Brushes Once every month Every 3-6 months (or when visibly worn) | ||
| Brush Guard Once every month Every 3-6 months (or when the silicone rubber strip on the brush guard becomes visibly worn) | ||
| Sensors Once every month - | ||
| Charging Pins Once every month - | ||
| Swivel Wheel Once every month - | ||
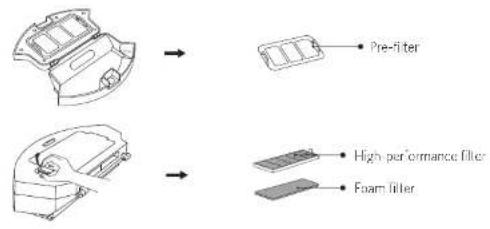
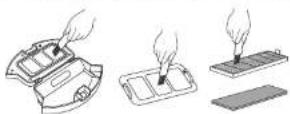
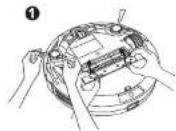
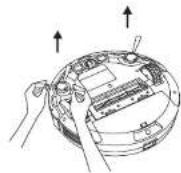
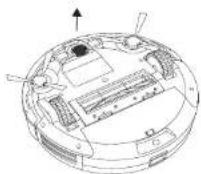
Clean the Dust Collector and Filters
Press the dust collector release button to pull the dust collector out.
Open and empty the cust collector.
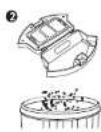
Remove the pre-fitter by pulling the hooks as shown.
20 21
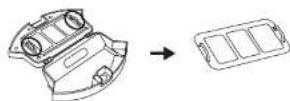
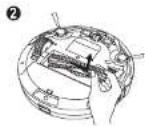
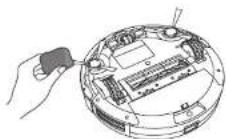
4 Take out the foam filter and high-performance filter.
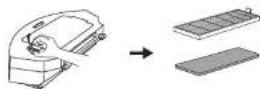
Clean the dust collector and filters with a vacuum cleaner or a cleaning brush.
Put the filters and pre-filter back together in the dust collector.
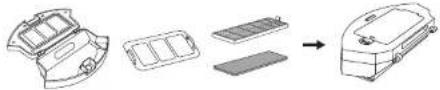
Push the dust collector back in the main unit.
You can wash the dust collector, pre-filter and foam filter with water. Be sure to dry them thoroughly before massassembling. Do not wash the high-performance filter with water, as it may damage the filter and reduce the suction power.
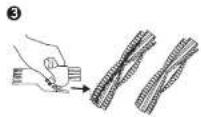
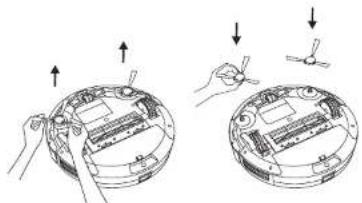
Clean the Rolling Brush
1 Pull on the release tab to unlock the brush guard as shown.
2Lih the rolling brush to remove.
Clean the rolling brush with the provided clearing tool or a vacuum cleaner
- Install the rolling brush by inserting the fixed protruding end first and then clicking into place.
EnglishEng
Press down to snap the brush guard into place.

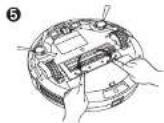
Clean the Side Brushes
Foreign substances, such as hair, can easily get tangled in the side brushes, and dirt may adhere to them. Be sure to clean them regularly.
1 Remove the side brushes.
Carefully unwind and pull off any hair or string that is wrapped between the mini unit and the side brushes.
Use a cloth dampened with warm water to remove dust from the brushes or to gently rushpac them.
22 23
Only use the side brushes when they are completely dry.
Replace the Side Brushes
The side brushes may become bent or damaged after being used for a period of time. Follow the instructions below to replace them:
Pull off the old slice brushes and snap the new ones into place.
Clean the Sensors and Charging Pins
To maintain the best performance, clean the drop sensors and charging pins regularly.
- Dust off the drop sensors and charging contact pins using a cloth or cleaning brush.
EnglishEng
Clean the Swivel Wheel
Hair or dust particles can easily get entangled in the swivel wheel. Because to clean the swivel wheel periodically and its mucosal.
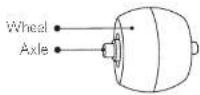
Pull out the swivel wheel
Clean any hair or debris wrapped around the wheel or entangled inside the wheel cavity.
Reinstall the wheel and push in until it clicks into place.
You can can the swivel wheel with water. Use the swivel wheel only when it is completely dry.
Troubleshooting
| Problems Solutions | |
| RoboVac cannot be activated. | Make sure the main power switch is in the ON position. Make sure the battery is fully charged. Replace the batteries (2 AAA) in the remote control. Make sure the remote control is within range (16 ft/5 m) of RoboVac. If you still have trouble, turn off the main power switch and then turn it back on. |
| The remote control does not work. | Replace the bellructions in the remote control. Make sure RoboVac is turned on and fully charged. |
| RoboVac stops working suddenly. | Check if RoboVac is trapped or stuck on an obstacle. Check if the battery level is too low. If you still have trouble, turn off the main power switch, wait for 2 seconds, and then turn it back on. |
| You cannot schedule clearings. | Make sure the main power switch on the holom of RoboVac is turned on. You can set the time of day and scheduled cleaning time via the Eufy-turner app. Make sure the scheduled time has been set correctly. Check if RoboVac's power is too low to start cleaning. Cleaning schedules are erased when RoboVac is powered off. If RoboVac is powered on without Internet access, cleaning schedules will not synchronize and must be reset via the app. |
| Suction power is weak. | Check if any obstructions are blocking the suction inlet. Empty the dust collector. Clean the filters with a vacuum cleaner or a cleaning brush. Check if the filters are wet due to water or other liquid on the floor. Air-dry the filters completely before use. |
| RoboVac cannot be charged. | Check if the indicator on the Charging Base lights up. If not, contact the eufy service center to repair or replace the Charging Base. Dust off the charging contact pins with a dry cloth. Check if you can hear a beep when RoboVac is docked onto the Charging Base. If not, contact the eufy service center to repair or replace the Charging Base. |
| RoboVac cannot return to the Charging Base. | Remove objects within 3 ft/1 m to the left and right side and within 6 ft/2 m of the front of the Charging Base. When RoboVac is in the vicinity of the Charging Base, it will return more quickly. However, if the Charging Base is located far away, RoboVac will need more time to return. Please be patient as it works its way back. Clean the charging contact pins. |
EnglishEng
| Problems Solutions |
| The rolling brush does not rotate. ·Clean the rolling brush ·Check if the rolling brush and brush guard have been installed properly. |
| RoboVac movements or travel path are abnormal ·Clean the sensors carefully with a dry cloth ·Restart RoboVac by turning the power switch off and on |
| RoboVac cannot connect to a Wi-Fi network. ·Make sure your Wi-Fi router supports the 2.4GHz and 802.11x11/23 bands; the 5GHz band is not supported; for details, refer to the "Troubleshooting >Wi-Fi connection" section in this manual. |
| You cannot control RoboVac with Amazon Alexa. ·Check if there are any Internet connection problems. ·Check whether you have installed the Amazon Alexa app onto your smart device and enabled "EufyHome - RoboVac" Skill in the Amazon Alexa app. For details, refer to the "Use Your RoboVac with Amazon Alexa / the Google Assistant" section in this manual. ·Make sure you have an EufyHome account. ·Make sure you are using correct Alexa voice-guidelines. ·The "EufyHome - RoboVac" Skill for Alexa is currently only available in English. |
| You cannot control RoboVac with the Google Assistant. ·Check if there are any Internet connection problems. ·Check if you have installed the Google Home app onto your smart device and initiated the "EufyHome" section in the Google Home app. For details, refer to the "Use Your RoboVac with Amazon Alexa / the Google Assistant" section in this manual. ·Check if you are using the proper commands when talking to the Google Assistant. When making your request, first say the wake words "Ok Google". ·Repeat your question. Speak clearly to the Google Assistant. |
Error Tones
When RoboVac is in trouble, it will emit a series of short or long boops and the red indicator on RoboVac will be solid or flashing.
Flashing red indicator light
| Error Tone Cause Solution | |
| One beep | • RoboVac is stuck and one of the wheels is not making contact with the floor (hanging in mid-air). • RoboVac may be in an extremely large room and the bumper is not registering obstacles. |
| Two beep RoboVac's bumper is stuck | Tap RoboVac's bumper several times to dislodge any debris that may be tripped under earth. |
| Error Tone Cause Solution | |
| Three beeps | • RoboVac's drop sensors are dirty. • RoboVac is stuck on the edge of a staircase and cannot reverse. |
| Four beeps RoboVac's power level is too low. | Manually charge RoboVac for at least 5 hours. |
Solid red indicator light
| Error Tone Cause Solution | ||
| One heep | RoboVac's lift/right wheel is stuck | Turn off RoboVac and remove any hair or debris from the left/right wheel. |
| Two beeps RoboVac's side brush is stuck | Turn off RoboVac and remove any hair or debris from the side brush. | |
| Three beeps RoboVac's suction fan is stuck | Turn off RoboVac, then remove and empty the dust collector. • Make sure the suction inlet is not blocked by any hair or debris. | |
| Four beeps RoboVac's rolling brush is stuck | Turn off RoboVac and remove any hair or debris from the rolling brush. | |
Wi-Fi Connection
Before Wi-Fi setup, make sure RoboVac and your Wi-Fi network meet the following requirements.
Wi-Fi Setup Requirements
RoboVac
- RoboVac is fully charged and the main power switch on the bottom of RoboVac is turned on.
WiFi status light slowly flashes bruc.
Wi-Fi Network
Use the correct password for your network.
- Do not use a VPN (Virtual Private Network) or Proxy Server.
-Your Wi-Fi router supports 802.11b/g/n and IPv4 protocol.
You are using a 2.4GHz router or a dual band router that is configured to support a 2.4CIHz frequency band. RepoVac does not support SGI Hz frequency band.
If RoboVac cannot connect to the Wi-Fi network and you are using a 2.4/5GHz mixed network, switch to a 2.4GHz network for Wi-Fi setup. You can switch back once your setup is complete.
- When connecting to a hidden network, make sure you enter the correct network name,SSID (case sensitive), and connecting to a 2.4GHz wireless network.
EnglishEng
- When using a network extender/repeater, make sure the network name (SSID) and password are the same as your primary network.
The firewall and port settings of your Wi-Fi router allow RoboVac to connect with the utility servers.
Network Security Requirement
- WFA and WFA2 using TKIP, PSK, AES/CCMP encryption.
- WEP EAP (Enterprise Authentication Protocol) is not supported.
Wi-Channels
The FCC requires that all wireless devices in the United States operate on the 1:11 wireless spectrum channels.
Some countries outside North America car use spectrum channels higher than
channel 11 Refer to your local regulatory agency to determine which channels are
accessible
A future software release will support access to channels above II for users outside North America. Until then, use channels I-11.
If you cannot control RoboVac with your smartphone, try the solutions below to solve the problem. If the problem persists, contact the euy service center for help.
| Wi-Fi Status Light | Cause Solutions | |
| Solid free RoboVac can has connected to your router, but cannot access the Internet. | Check if your router is connected to the Internet. Check with your Internet provider to see if there is any Internet connection problem. | |
| Rapidly flashing blue | RoboVac cannot connect to your wireless router. | Check if you have modified your network name and password. Reset Wi-Fi connection if necessary. Refer to the "Use Your RoboVac with the EufyHome App > Reset the Wi-Fi connection" section in this manual. |
| Slowly flashing blue | Wi-Fi connection is reset or has not been set up before. | Set up Wi-Fi connection with RoboVac Refer to the "Use Your RoboVac with the EufyHome App" section in this manual. Reset Wi-Fi connection if necessary. Refer to the "Use Your RoboVac with the EufyHome App > Reset the Wi-Fi connection" section in this manual. |
| Off | • RoboVac is turned off • RoboVac's power level is low. • RoboVac is in Sleep mode | Charge RoboVac by attaching it to the Charging Base. Make sure the main power switch on the bottom of RoboVac is turned on. |
Specifications
| Product Model 12120 | |
| Input | 19 V 500 A |
| Battery Voltage DC 14.4 V | |
| Power Consumption 40 W | |
| Battery Type | DC14.4 V Li-ion 2600 mAh |
| Dust Collector Capacity | 0.6 L |
| Cleaning Time Max. 100 mins | |
| Charging Time 300 - 360 mins | |
| Input | 19 V = 36 A |
| Output | 19 V = 36 A |
Customer Service
FQAqS and more information, please visit www.eufylife.com
Email: support@eufylife.com
Live chat: www.eufylife.com
Customer service hotline:
| (US) + 1 (800) 988 7973 Mon-Fri 9:00pm - 5:00pm (PT) | (中国) + 8645005503036 月-日历天 9:00 - 17:30 |
| (UK) + 44 (0) 1604 936200 Mon-Fri 6:00 - 11:00 (GMT) | (日本) + 810344557823 月-日历天 9:00 - 17:00 |
| (DE) + 49 (0) 69 9579 7960 Mo-Fri 6:00 - 11:00 |

@EulyOfficial

@Eulfoficial@ Official

@EufyOficial
AnkerinnovationsLimited
Roum 1318-19, Hollywood Plaza, 610 Nathan Road, Mongkok, Kowloon, Hong Kong
Inhaltsverzeichnis
Customer service hotline:
| (US) - 1 (800) 988.7973 Mon-Fri 9:00pm - 5:00pm (PT) | (中国) - 86 400 0550 036 即一至周五 9:00 - 17:30 |
| (UK) - 44 (0) '604 936200 Mon-Fri 6:00 - 11:00 (GMT) | (日本) - 8103 4455 7823 月-金 9:00 - 17:00 |
| (DE) - 49 (0) 69 9579 7960 Mon-Fri 6:00 - 11:00 |

@EufyOfficial @EufyOfficial @EufyOfficial
Anker Innovations Limited
Room 1318-19, Hollywood Pava, 610 Naihan Road, Mongtok, Kowloon, Hong Kong
Tabla de Contents
Alexa ask RoboVac to start cleaning.
Alexa, ask RoboVac to stop cleaning.

EspanolEsp
Ruom 1318-19, Hollywood Plaza, 610 Nathan Road, Mengkok, Kowloon, Hong Kong
Table des matieres
Indications LEDIndications LED
104 Utiliser donne RoboVac
Indications LEDIndications LED
VoupsoupeVisuaiserI'elalduRubovacaparridesoyanisLED.
2. Spot cleaning (Nettoyage Localise)
4. Quick cleaning (Nettoyage rapide)
5. Manual cleaning (Nettoyage manuel)
Alexa, ask Bobo Vac to stop cleaning.
FrancaisFra
Specifications techniques
Anker Innovations Limited
Room 1318-19, Hollywood Paza, 610 Nathan Road, Mengkok, Kowloon, Hong Kong
Sommario
You can see the status of RoboVac from the LED indicators.
Anker Innovations Limited
Ruorm 1318-19, Hollywood Pava, 610 Nathan Road, Mengkok, Kowloon, Hong Kong
Inhoudsopgave
| (LU)·1(800)988.7937 Mon-Fri 9:00pm - 5:00pm (PT) | (中国)·864005550336 到一室阁五 9:00-17:30 |
| (LUK)·44(0)1804 9362/300 Mon-Fri 6:00-11:00 (GMT) | (日本)·810344567823 月-金 9:00-17:00 |
| (DE)·49(0)69 9529 7960 Mo-Fri 6:00-11:00 |
EufyOffcial
@EutyOffcial@ @Official
@EutyOficialia
Anker Innovations Limited
Room 1318-19, Hollywood Paza, 610 Nathan Road, Mengkok, Kowloon, Hong Kong

- Table of Contents
- Important Safety Instructions
- About Your RoboVac
- Using Your RoboVac
- Cleaning and Maintenance
- Troubleshooting
- Specifications
- Customer Service
- English
- Important Safety Instructions
- WARNING SYMBOLS USED
- EnglishEng
- Notice
- Declaration of Conformity
- Trademark Notice
- 0405
- About Your RoboVac
- What's in the Box
- RoboVac Anatomy
- Remote Control
- LED Indication
- Using Your RoboVac
- Important Tips Before Use
- Preparation
- 11
- Charge Your RoboVac
- Use Your RoboVac with the EufyHome App
- Before you start, make sure that:
- Wi-Fi Status Light
- Reset the Wi-Fi Connection
- Schedule Cleaning
- Start/Stop Cleaning
- Select a Cleaning Mode
- Auto cleaning
- BoostIQTM Feature
- Spot cleaning
- Edge cleaning
- Quick cleaning
- Manual cleaning
- Use Your RoboVac with Amazon Alexa / the Google Assistant
- To control RoboVac with Amazon Alexa
- To control RoboVac with the Google Assistant
- Cleaning and Maintenance
- Recommended cleaning/replacement frequency
- Clean the Dust Collector and Filters
- Clean the Rolling Brush
- Clean the Side Brushes
- Replace the Side Brushes
- Clean the Sensors and Charging Pins
- Clean the Swivel Wheel
- Troubleshooting
- Error Tones
- Wi-Fi Connection
- Wi-Fi Setup Requirements
- Specifications
- Customer Service
- Inhaltsverzeichnis
- Tabla de Contents
- EspanolEsp
- Table des matieres
- Indications LEDIndications LED
- Spot cleaning (Nettoyage Localise)
- Quick cleaning (Nettoyage rapide)
- Manual cleaning (Nettoyage manuel)
- FrancaisFra
- Specifications techniques
- Sommario
- Inhoudsopgave
Brand : eufy
Model : RoboVac 15C
Category : Robot vacuum