EL500RGB KeyTex - Laser pointer Laserworld - Free user manual and instructions
Find the device manual for free EL500RGB KeyTex Laserworld in PDF.
| Product Type | Professional laser pointer (laser projector) |
| Brand | Laserworld |
| Model | EL500RGB KeyTex |
| Laser Class | 3b |
| Laser Sources | Diodes, DPSS: Red 650 nm, Green 532 nm, Blue 445 nm |
| Typical Optical Power | Red 180 mW, Green 80 mW, Blue 160 mW |
| Scanner | 15 kpps |
| Scan Angle | ±20° and diffraction grating ~90° |
| Operating Modes | DMX, Automatic, Music, Text, Patterns |
| Dimensions | 210 x 165 x 85 mm |
| Weight | 1.64 kg |
| Power Supply | Power supply unit 100-240 V AC, 50/60 Hz; device 12 V DC |
| Power Consumption | 10 W |
| Operating Temperature | +10 °C to +35 °C |
| Beam | ~3 mm, 1.5 mrad |
| Box Content | Projector, USB keyboard, IR remote, power supply unit, USB cable, interlock adapter, manual |
| Main Functions | Text projection, patterns, animations, music reaction, DMX control |
| Safety | Professional use, indoor only, appropriate goggles recommended, interlock mandatory |
| Maintenance and Cleaning | Clean surfaces with a dry cloth, avoid moisture and excessive heat, let cool for 15 min after 1h of use |
| Spare Parts and Repairability | Contact reseller or Laserworld; removal of warranty sticker voids warranty |
Frequently Asked Questions - EL500RGB KeyTex Laserworld
User questions about EL500RGB KeyTex Laserworld
0 question about this device. Answer the ones you know or ask your own.
Ask a new question about this device
Download the instructions for your Laser pointer in PDF format for free! Find your manual EL500RGB KeyTex - Laserworld and take your electronic device back in hand. On this page are published all the documents necessary for the use of your device. EL500RGB KeyTex by Laserworld.
USER MANUAL EL500RGB KeyTex Laserworld
Please spend a few minutes to read this manual fully before operating this laser!
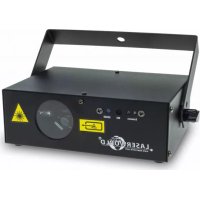
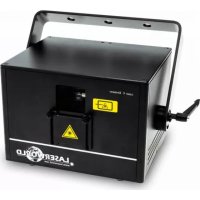
natural_image
Black industrial laser projector with control panel, keyboard, and remote control unit (no visible text or symbols)English
Deutsch
Français
02/2016
Legal notice:
Thank you for purchasing this Laserworld
product. Due to continual product developments and technical improvements, Laserworld (Switzerland) AG reserves the right to make modifications to its products. This manual and its content have been made with due care but Laserworld (Switzerland) AG cannot however, take any responsibility for any errors, omissions or any resulting damages forthwith. The brands and product names mentioned in this manual are trade marks or registered trade marks of their respective owners.
- Product and package contents
- Preliminary warning notices
- Initial operations, safety instructions
- Working on the device
- Service notes
- Warnings, device connections & setting options
- Operation
Final statement
Technical data sheet
Laser specifications
1. Product and package contents
Please check if all listed parts are included and undamaged. Included in delivery:
1 x laser projector 1 x USB keyboard 1 x IR remote
1 x external PSU 1 x USB extension cable 1 x user manual
1 x Interlock connector 1 x key
2. Preliminary warning notices
-
Please use this device only according to these operating instructions.
-
Do not use the device if there are any visible damages on housing, connector panels, power supplies or power cords.
-
Never look directly into the light source of a laser projector. Danger of damage to the eyes or even blindness in extreme circumstances!
-
Do not operate the device at high humidity, in the rain or in dusty environments.
-
Protect device against dripping or splashing water. Do not place any liquid filled containers near to this device.
Any warranty claims are void if the warranty label is removed or tampered with in any way.
3. Initial operations, safety instructions
-
Make sure to use correct voltage; see information on device & in this manual.
-
Make sure that the device is not connected to mains during installation.
-
Installation has to be done by technical experienced and qualified persons according to safety regulations of the respective country.
-
Always ensure that maximum permissible exposure (MPE) is not exceeded in areas accessible to the public.
-
In some countries an additional inspection by technical control institutes could be necessary.
-
Connect an easily accessible inter-lock connector or circuit breaker to the projector.
-
The power supply should be easily accessible.
-
If the device has been exposed to great temperature changes, do not switch it on immediately. Condensation (or any moisture/water formed) may damage device.
-
Never use dimmer, RC or other electronically switched sockets. Whenever possible, do not use the laser projector together with large appliances (especially fog machines) on the same mains!
-
Ensure sufficient ventilation and do not place the device on any warm or heat radiating surface. Especially the ventilation openings must not be covered!
-
Ensure that device does not get overheated. Make sure that the device is not exposed to spotlights (especially moving heads). Heat of spotlights could overheat laser in a little while and leads to a degradation of performance.
-
This unit is intended for indoor use only.
4. Working on the device
-
Be sure that the mains plug is not connected to the power supply while installing.
-
Take off all reflecting things like rings, watches etc. before starting to work with or at the projector.
-
Only use non-reflecting tools to work on device.
-
Wear protective clothing (like goggles, gloves etc.) according to laser power and wavelength of the laser.

text_image
supply5. Service notes
- Moisture and heat can reduce lifetime of the laser system dramatically and expires any warranty claim.
- Quick on/off switching of this device will reduce durability of the laser source dramatically.
- Avoid sharp knocks and shocks to this device and ensure sufficient protection during transportation. Look after your Laserworld product.
• To increase durability of your laser, protect device against overheating:
- Always ensure sufficient ventilation.
- Do not face spotlights (especially moving heads) to the device.
- Check temperature after approx. 30 minutes with each new installation. If necessary install the projector at a place with different temperature.
- Keep the device dry. Protect it from moisture, rain and damp.
- Switch off device when it is not needed. Laser sources are switched on and can wear out even if there is no visible laser output.
- The devices of Ecoline, Evolution, Club and Proline Series are not meant for professional applications. After approx. one hour of operation, the device should cool down for about 15 minutes.
- Please ensure the fans and heatsinks are clear from dust and debris otherwise the risk of overheating may occur. If the unit and airways appear to be blocked then please contact a qualified service engineertomaintainandservicetheproduct.
- Removal of the warranty label as well as damages to the device caused by improper handling, neglect of the safety instructions and service notes will void the warranty.
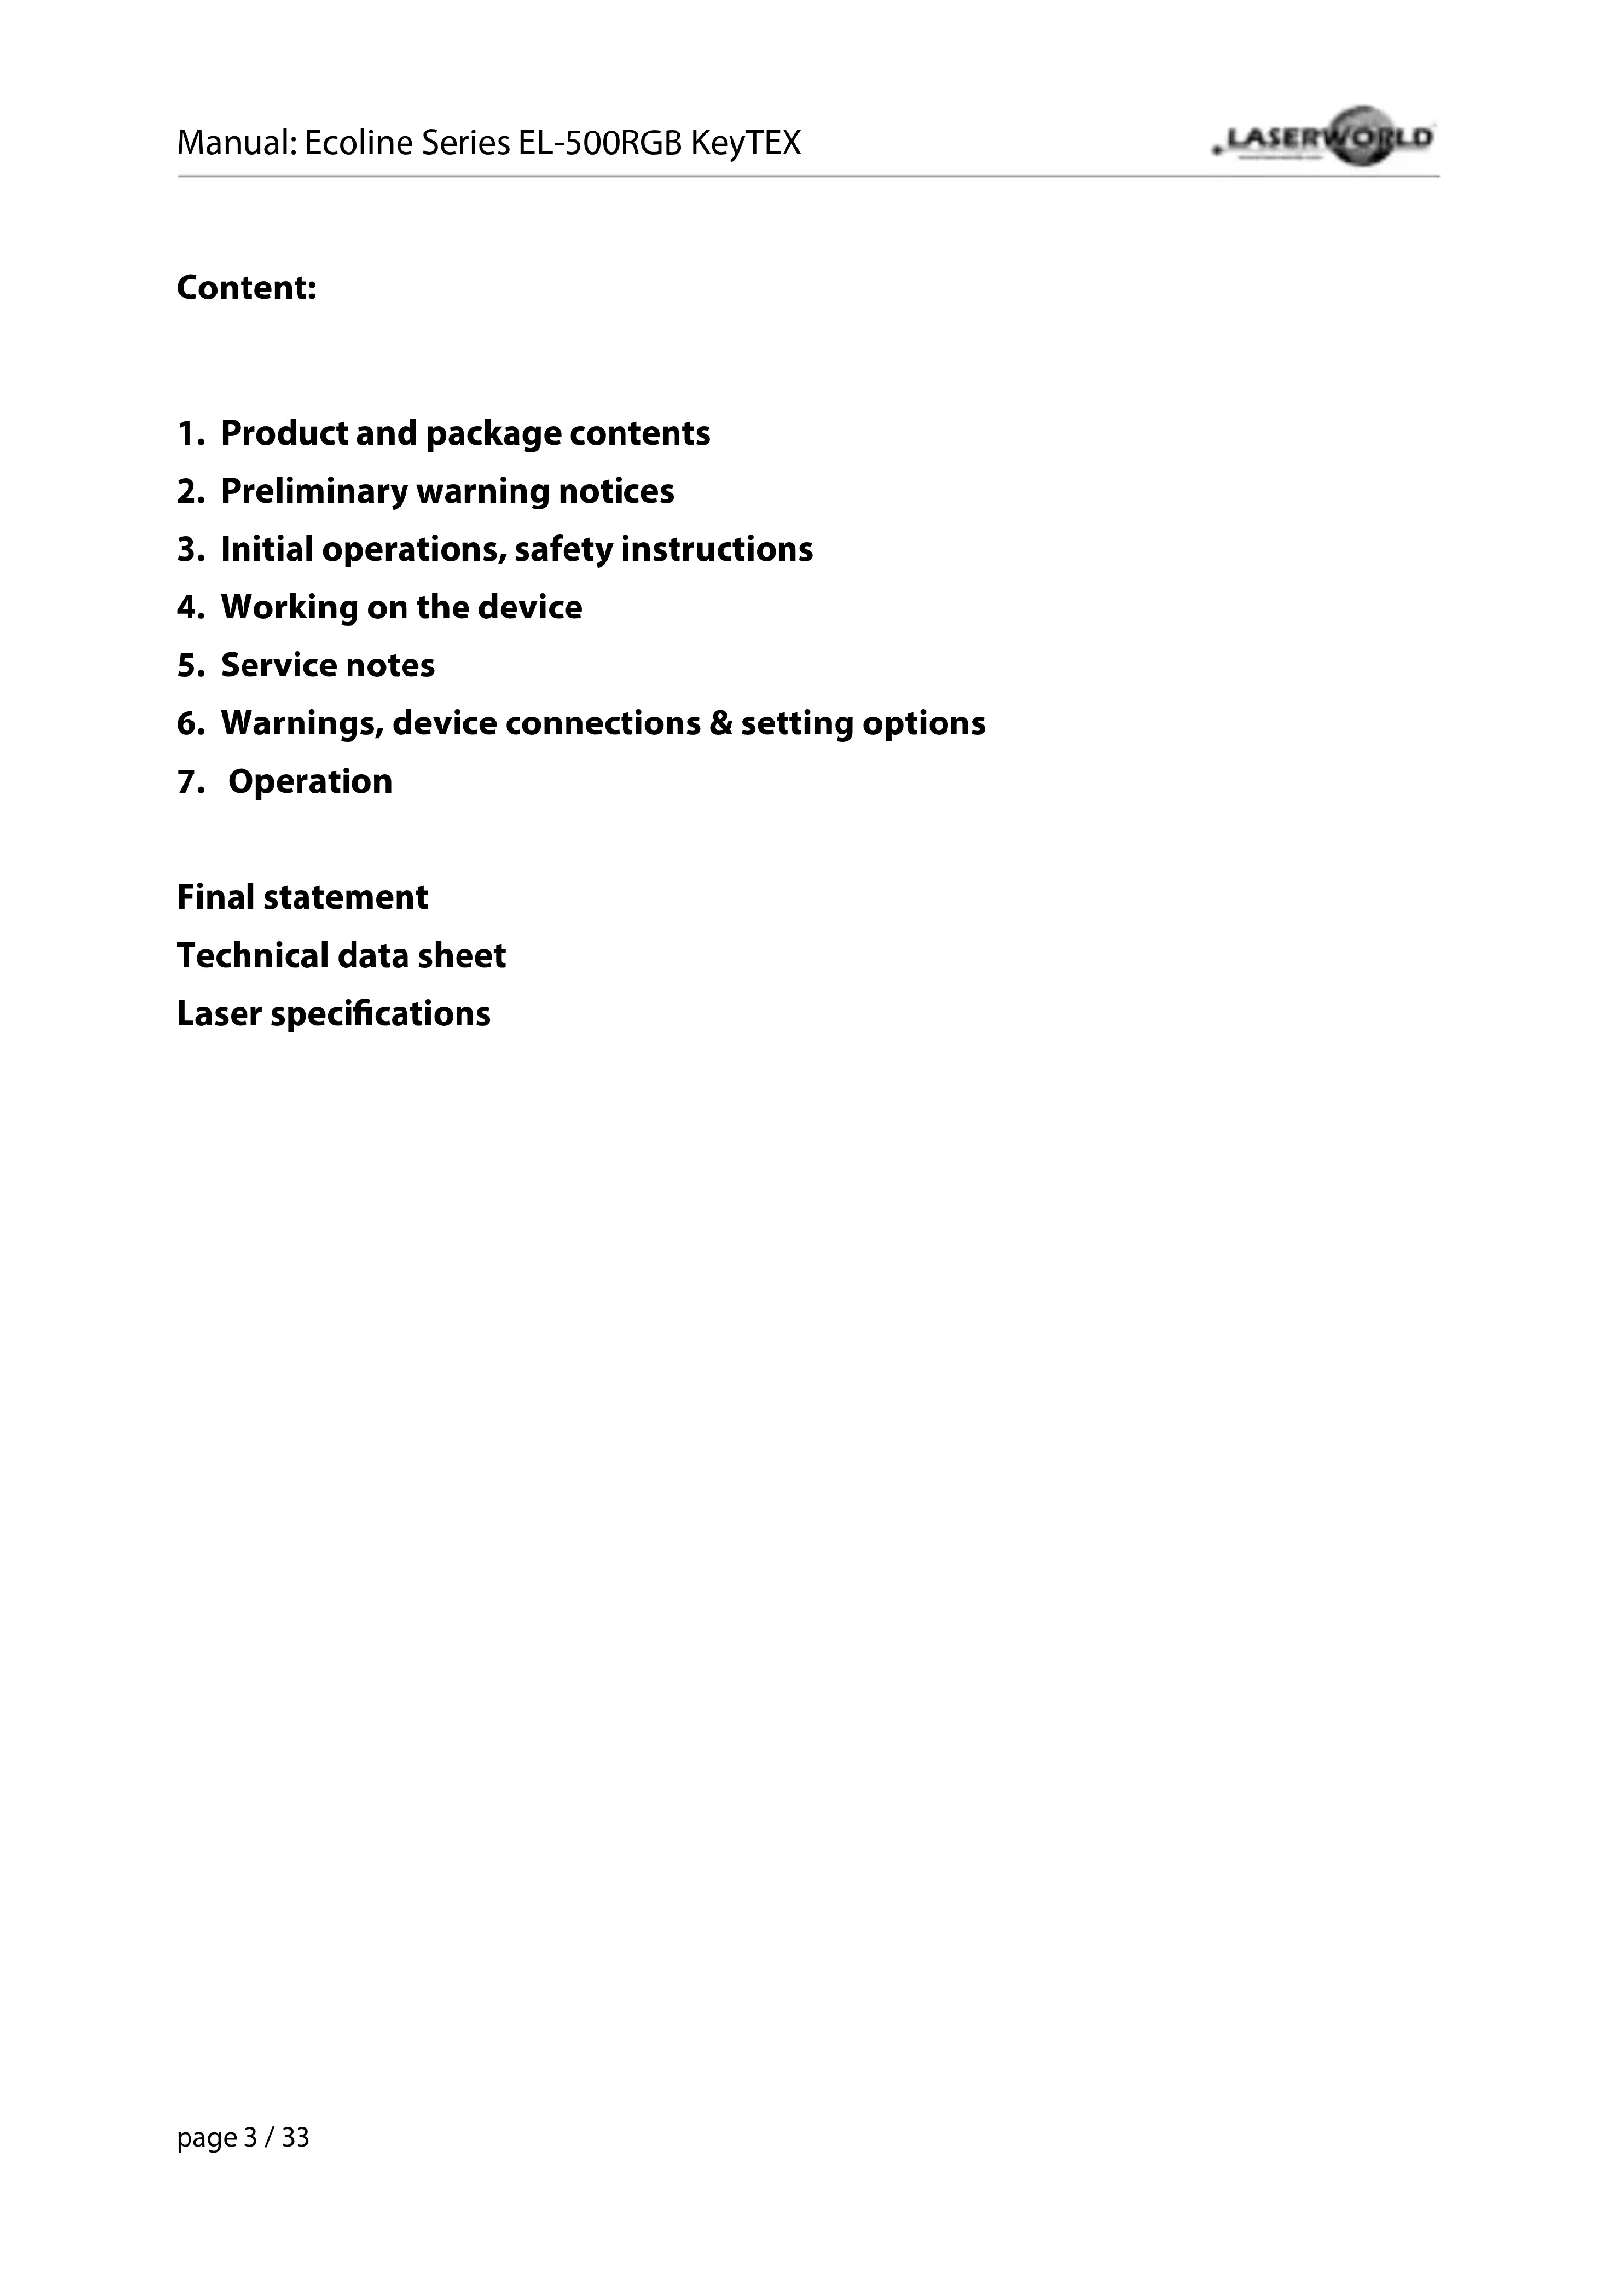
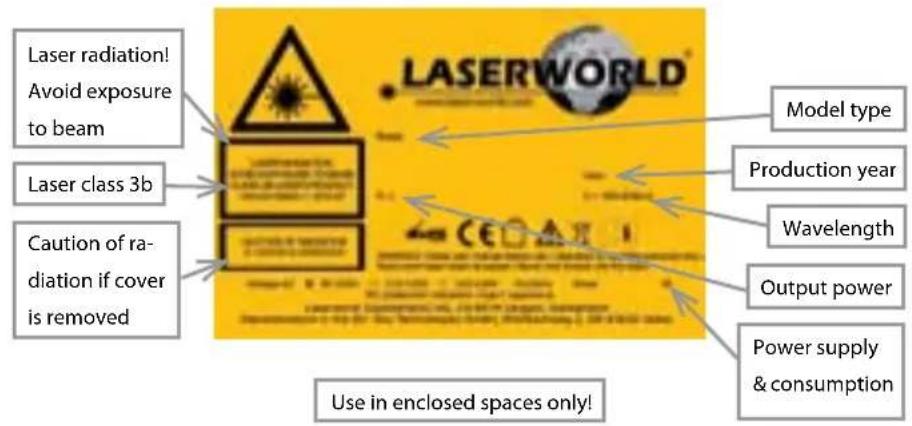
6. Warnings, device connections & setting options
Warnings and other notices on the device
text_image
Laser radiation! Avoid exposure to beam Laser class 3b Caution of ra- diation if cover is removed Use in enclosed spaces only! LASERWORLD Model type Production year Wavelength Output power Power supply & consumption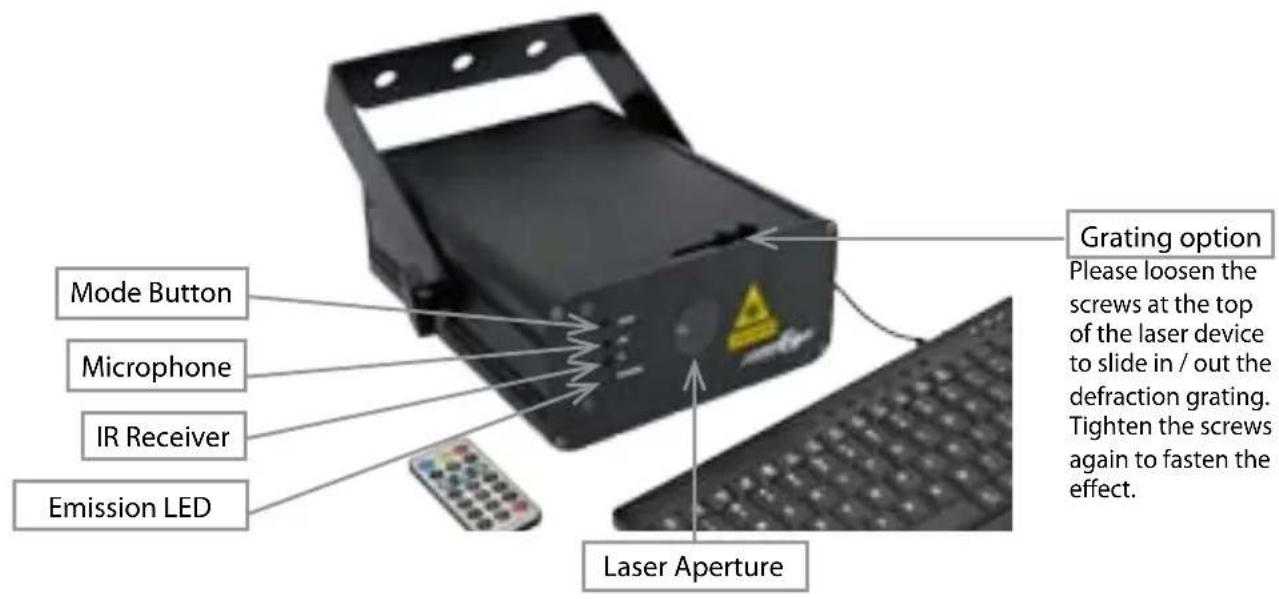
text_image
Mode Button Microphone IR Receiver Emission LED Grating option Please loosen the screws at the top of the laser device to slide in / out the defraction grating. Tighten the screws again to fasten the effect. Laser Aperture
text_image
Adjust Pattern Size Keyboard Interface DMX IN Interface DMX IN Interface Power in Fan Key Switch Interlock7. Operation
7.1 Power supply
Connect your EL-500RGB KeyTEX with the external PSU and connect it to the mains. Please make sure that you are using the correct voltage. False voltages could destroy the device. Please use the voltage specified at the end of this manual. Don't focus the front of the laser on people while installation.
7.2 Switch on / off
Insert the key into the key switch on the back side of the laser and switch to "On" to switch the device on or to "Off" to switch the device off. Please disconnect the device from the power supply if you don't need it for a longer period.
7.3 Modes
Access the four different operating modes available in this product by using the MODE button on the front panel. Pressing and holding the MODE button for 2.5 seconds will turn the product on or off. Press MODE to cycle through the modes. Please see a description of each mode below.
| Mode Description | |
| Auto Built-in auto programs | |
| Scene Pattern selection | |
| Music Music mode | |
| Clock Clock mode | |
| Text Text mode | |
| DMX DMX mode |
7.4 IR remote controller
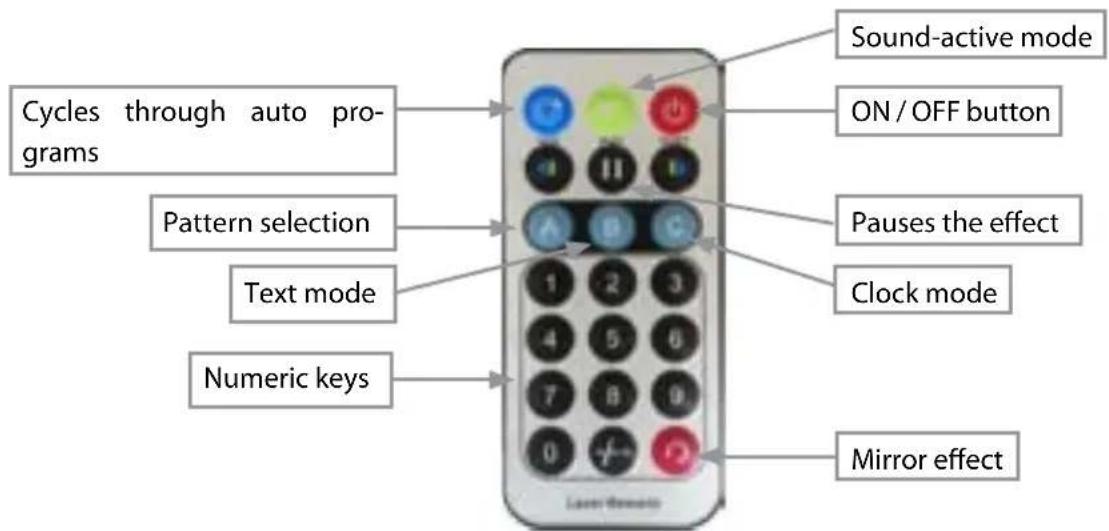
text_image
Cycles through auto pro- grams Pattern selection Text mode Numeric keys Sound-active mode ON / OFF button Pauses the effect Clock mode Mirror effect| Button Function / Button Description | |
 | ON / OFF button Turns laser on/off |
| [TOTG] | Auto mode Laser runs in auto mode. Red LED indicator lights. Press the number buttons to get different design patterns |
| [0HT3] | Sound-active mode Sound-active mode. Blue LED indicator flashes when sound is detected. Sound-active mode displays the same design packs as auto mode, but responds to sounds. Press and hold to enable sound sensitivity adjustment. Use 1 (least sensitive) to 9 (most sensitive) |
| [TTAT] | Pause Pauses the program. Press again to continue the program |
| [4H2D] | Pattern selection Press button to enter the pattern selection and select one of the available patterns by pressing the number buttons |
 | Text mode Press to enter the text mode, then press any numbered button.Enter text using the keyboard. Red and blue LED indicator lights. |
 | Clock mode Press numbers on the number pad to set the time and press ,SPACE' to start the clock function |
| [WXSY] | Numbers Press to select a number |
 | Previous / Next Press to go to a previous / next step |
 | Mirror Press and hold to mirror the laser projection. Press repeatedly for up to 4 mirrored options |
7.5 Using the Keyboard
Use the keyboard to access menu options, select laser patterns, and enter different modes. To use the keyboard with the laser, do the following:
- Connect the USB cable of the keyboard to the USB interface on the back of the laser projector.
- Connect the laser to the mains.
Menu Options
To select the menu options using the keyboard, do the following:
- Press to access the menu options. The laser output displays the current menu option.
- Use to scroll through the menu options: 1. AUTO, 2. SCENE, 3. MUSIC, 4. CLOCK, 5. TEXT and 6. DMX.
- Press ←Enter to confirm the selection.
Text Mode
Press 📄 to select the mode and press ,ENTER' to activate the mode. When text mode is active, use the following keys on the keyboard to enter text and select patterns:
| Function Key Description | ||
| Flow Sets the text flow. | Press again to restart | |
| RGB Color RGB Sets the text in different color variations. | ||
| Draw |  | Selects the drawing functionality. Use up and down arrows to set the speed. |
| Zoom |  | Selects the zoom in, zoom out, and zoom in/out functionality. Use the up and down arrows to set the speed. |
| X Move |  | Text moves to the right or to the left. Use the up and down arrows to set the speed. |
| Y Move |  | Text moves up or down. Use the up and down arrows to set the speed. |
| Y Roll Text curves around the x-axis. Use the up and down arrows to set the speed. | ||
| X Roll |  | Text curves around the x-axis. Use the up and down arrows to set the speed. |
| Z Roll |  | Text spins around the z-axis. Use the up and down arrows to set the speed. |
| Wave |  | Text is projected with a wave effect. Use the up and down arrows to set the speed. |
| Text Qty Displays character quantities of 4, 6, 8, 10, or 12 (incl. free space) | ||
| Play Time Sets the display. | ||
| Mirror |  | Mirrors the display in 4 directions |
 | ||
| Delete |  | Clears the cache. |
| Backspace Deletes a character to the left | ||
| Home Moves the cursor to the beginning of the text. | ||
| End Moves the cursor to the end of the text. | ||
| Arrow Keys |  | Moves the cursor up, down, to the left or to the right. |
| Function Key Description | ||
| Ctrl + Alt + Del Deletes the entire text. | ||
Save + No. Saves the text  and pattern. and pattern. | ||
| Play + No. |  | Plays back the saved text and pattern. |
| Loop Playback |  | Repeats the saved text and pattern. |
| Page up |  | Chooses the last edited text. |
| Page down |  | Chooses the next edited text. |
| Pause |  | Pauses the program |
Auto Mode
Press 📄 to select the mode and press 'ENTER' to activate the mode. When auto mode is active, use the following keys on the keyboard:
| Function Key Description | ||
| Numbers Press 1 - 9 to select one of the auto programs. Press 0 to select all auto programs in a loop. | ||
| Mirror Mirrors the display in 4 directions. | ||
Music Mode
Press 📄 to select the mode and press ,ENTER' to activate the mode. When music mode is active, use the following keys on the keyboard:
| Function Key Description | ||
| Numbers Press ,ENTER' and choose on of the numbers 1 - 9 to select the sensitivity of the microphone. Press ,ENTER' to confirm. | ||
| Mirror Mirrors the display in 4 directions. | ||
Pattern Selection (Scene)
Press 📄 to select the mode and press ,ENTER' to activate the mode. When pattern mode is active, use the following keys on the keyboard:
| Function Key Description | ||
| Numbers Press the number buttons to select one of the available patterns. | ||
DMX Mode
Press 📄 to select the mode and press ,ENTER' to activate the mode. When DMX mode is active, use the following keys on the keyboard:
| Channel Value Function | ||
| 1 - modes 0 - 49 laser off | ||
| 50 - 149 automatic mode | ||
| 150 - 199 sound mode | ||
| 200 - 249 text mode | ||
| 250 - 255 static DMX mode (patterns) | ||
| Attention! The following channel only works if text mode in Channel 1 is active (value 200 - 249)! | ||
| 2 - text mode 0 - 19 zoom | in / out | |
| 20 - 39 static text | ||
| 40 - 59 wave | ||
| 60 - 79 text drawing | ||
| 80 - 99 zoom out | ||
| 100 - 119 x-axis movement | ||
| 120 - 139 y-axis movement | ||
| 140 - 159 y-axis rotation | ||
| 160 - 179 x-axis rotation | ||
| 180 - 255 z-axis rotation | ||
| Attention! The following channels only work if static DMX mode in Channel 1 is active (value 250 - 255)! | ||
| 2 & 3 - pattern selection 0 | - 255 patterns selection | |
| 4 0 - 209 colors selection | ||
| 210 - 255 pattern flashes with speed selection | ||
| 5 0 - 255 pattern drawing with speed selection | ||
| 6 0 - 255 zoom in with speed selection | ||
| 7 0 - 255 y-axis rotation with manual speed selection | ||
| 8 0 - 255 x-axis rotation with manual speed selection | ||
| 9 0 - 255 z-axis rotation with manual speed selection | ||
| 10 0 - 255 x-axis movement with manual speed selection | ||
| 11 0 - 255 y-axis movement with manual speed selection | ||
| 12 0 - 255 stretch effect | ||
Please note that not each pattern can be combined with each effect!
Final statement
Laserworld products are tested and product packaging is inspected before leaving our warehouse.
Users must to follow the local safety regulations and warnings within this manual and adhere to any regulations within its place of use. Damages through inappropriate use will void any liability or warranty of our products.
Due to continual product developments, please check for the latest update of this product manual at www.laserworld.com. If you do have any further questions, then please contact your dealer/place of purchase or use our contact section on our website.
For service issues, please contact your dealer/place of purchase and ensure only genuine Laserworld spare parts are used in any service repairs.
Errors and Omissions excepted and products are subject to change.
Laserworld (Switzerland) AG
Kreuzlingerstrasse 5
8574 Lengwil
SWITZERLAND
Registered office:
8574 Lengwil / Switzerland
Company number: CH-440.3.020.548-6
Commercial Registry Kanton Thurgau
CEO: Martin Werner
VAT no. (Switzerland): 683 180
UID (Switzerland): CHE-113.954.889
VAT no. (Germany): DE258030001
WEEE-Reg.-No. (Germany): DE 90759352
www.laserworld.com
info@laserworld.com
representative according to EMVG:
Managing Director: Karl-Heinz Käs
Mühlbachweg 2
83626 Valley / Germany

text_image
C€Inhaltverzeichnis:
representative according to EMVG:
Managing Director: Karl-Heinz Käs
Mühlbachweg 2
Managing Director: Karl-Heinz Käs
Mühlbachweg 2
*Due to Advanced Optical Correction technology used in our laser systems the optical power of each colour within installed laser module(s) may slightly differ from the specification of respective laser module(s).