
HV 7146 - Vacuum Cleaner SEVERIN - Free user manual and instructions
Find the device manual for free HV 7146 SEVERIN in PDF.
| Product type | Microwave oven with grill function |
| Brand | SEVERIN |
| Model | HV 7146 |
| External dimensions (W x D x H) | 495 mm x 415 mm x 288 mm |
| Internal dimensions (height under turntable) | 195 mm |
| Net weight | 14.4 kg |
| Power supply voltage | 230-240 V ~ 50 Hz |
| Total power consumption | 1400 W |
| Microwave power | From 90 W to 900 W (10 levels) |
| Cooking functions | Microwave, grill, combined microwave/grill (2 modes), automatic programs (9), defrost (by time or weight) |
| Programming | Rotary knob, touch keys, quick start +30s, save 3 favorite dishes |
| Display | Digital screen with clock, function indicators |
| Child safety lock | Locking device (activation by long press) |
| Audible signal | Can be disabled for keys, but remains active for end-of-program alerts |
| Interior light | Automatic when door opens and during operation |
| Included accessories | Metal grid with rubber caps, glass turntable, ceramic floor |
| Cavity materials | Stainless steel and ceramic |
| Cleaning | Damp cloth and mild detergent; do not use water or steam cleaner; grid washable with soapy water (not dishwasher safe) |
| Warranty | 2 years against manufacturing defects (excluding normal wear, glass, bulbs) |
| Reparability | Return to an authorized service center; do not open yourself |
Frequently Asked Questions - HV 7146 SEVERIN
User questions about HV 7146 SEVERIN
0 question about this device. Answer the ones you know or ask your own.
Ask a new question about this device
Download the instructions for your Vacuum Cleaner in PDF format for free! Find your manual HV 7146 - SEVERIN and take your electronic device back in hand. On this page are published all the documents necessary for the use of your device. HV 7146 by SEVERIN.
USER MANUAL HV 7146 SEVERIN
Before using the microwave oven, please read the following instructions carefully and keep this manual for future reference. The appliance must only be used by persons familiar with these instructions.
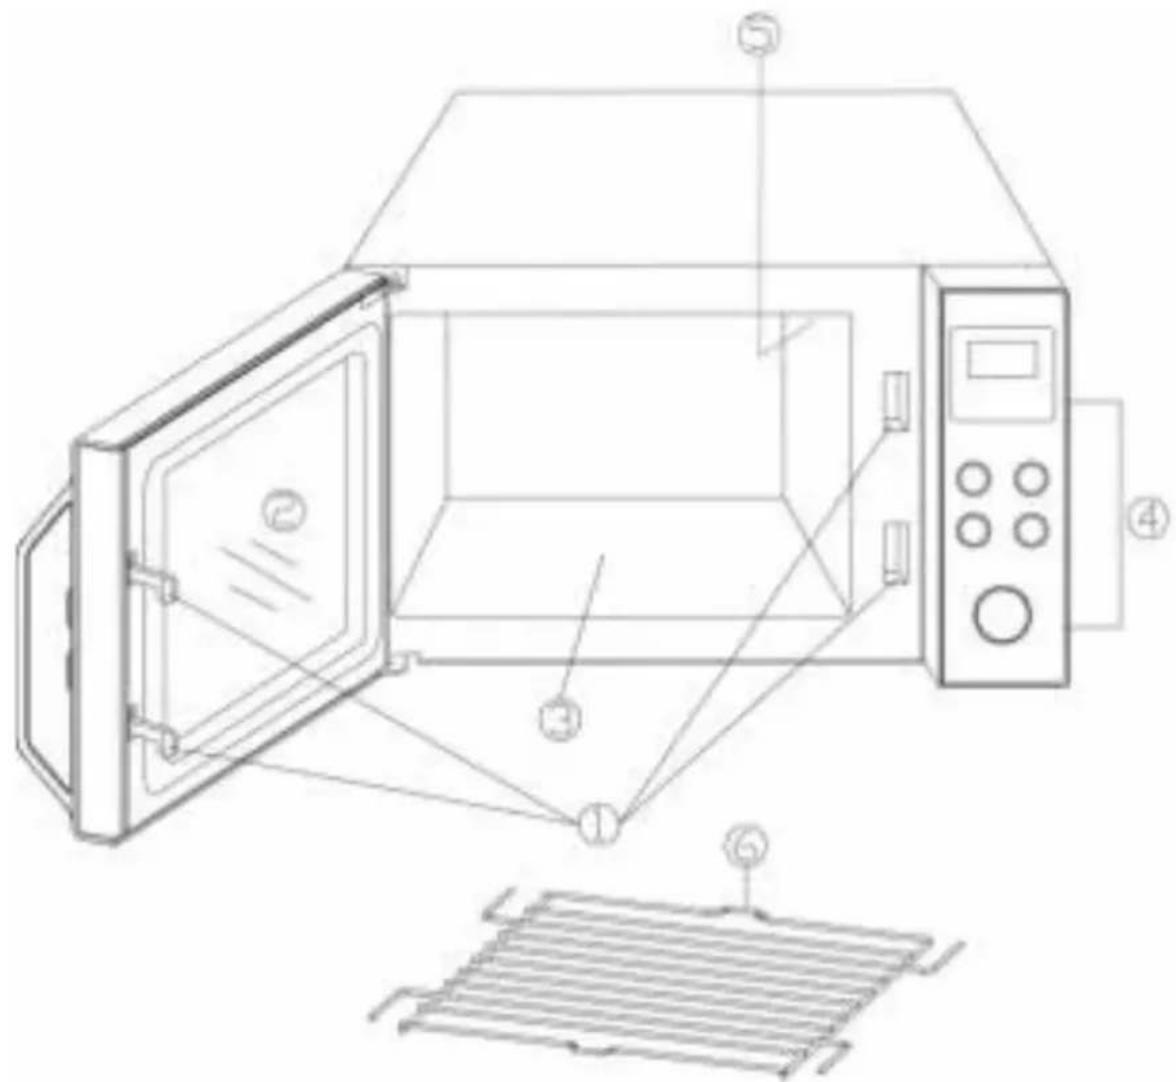
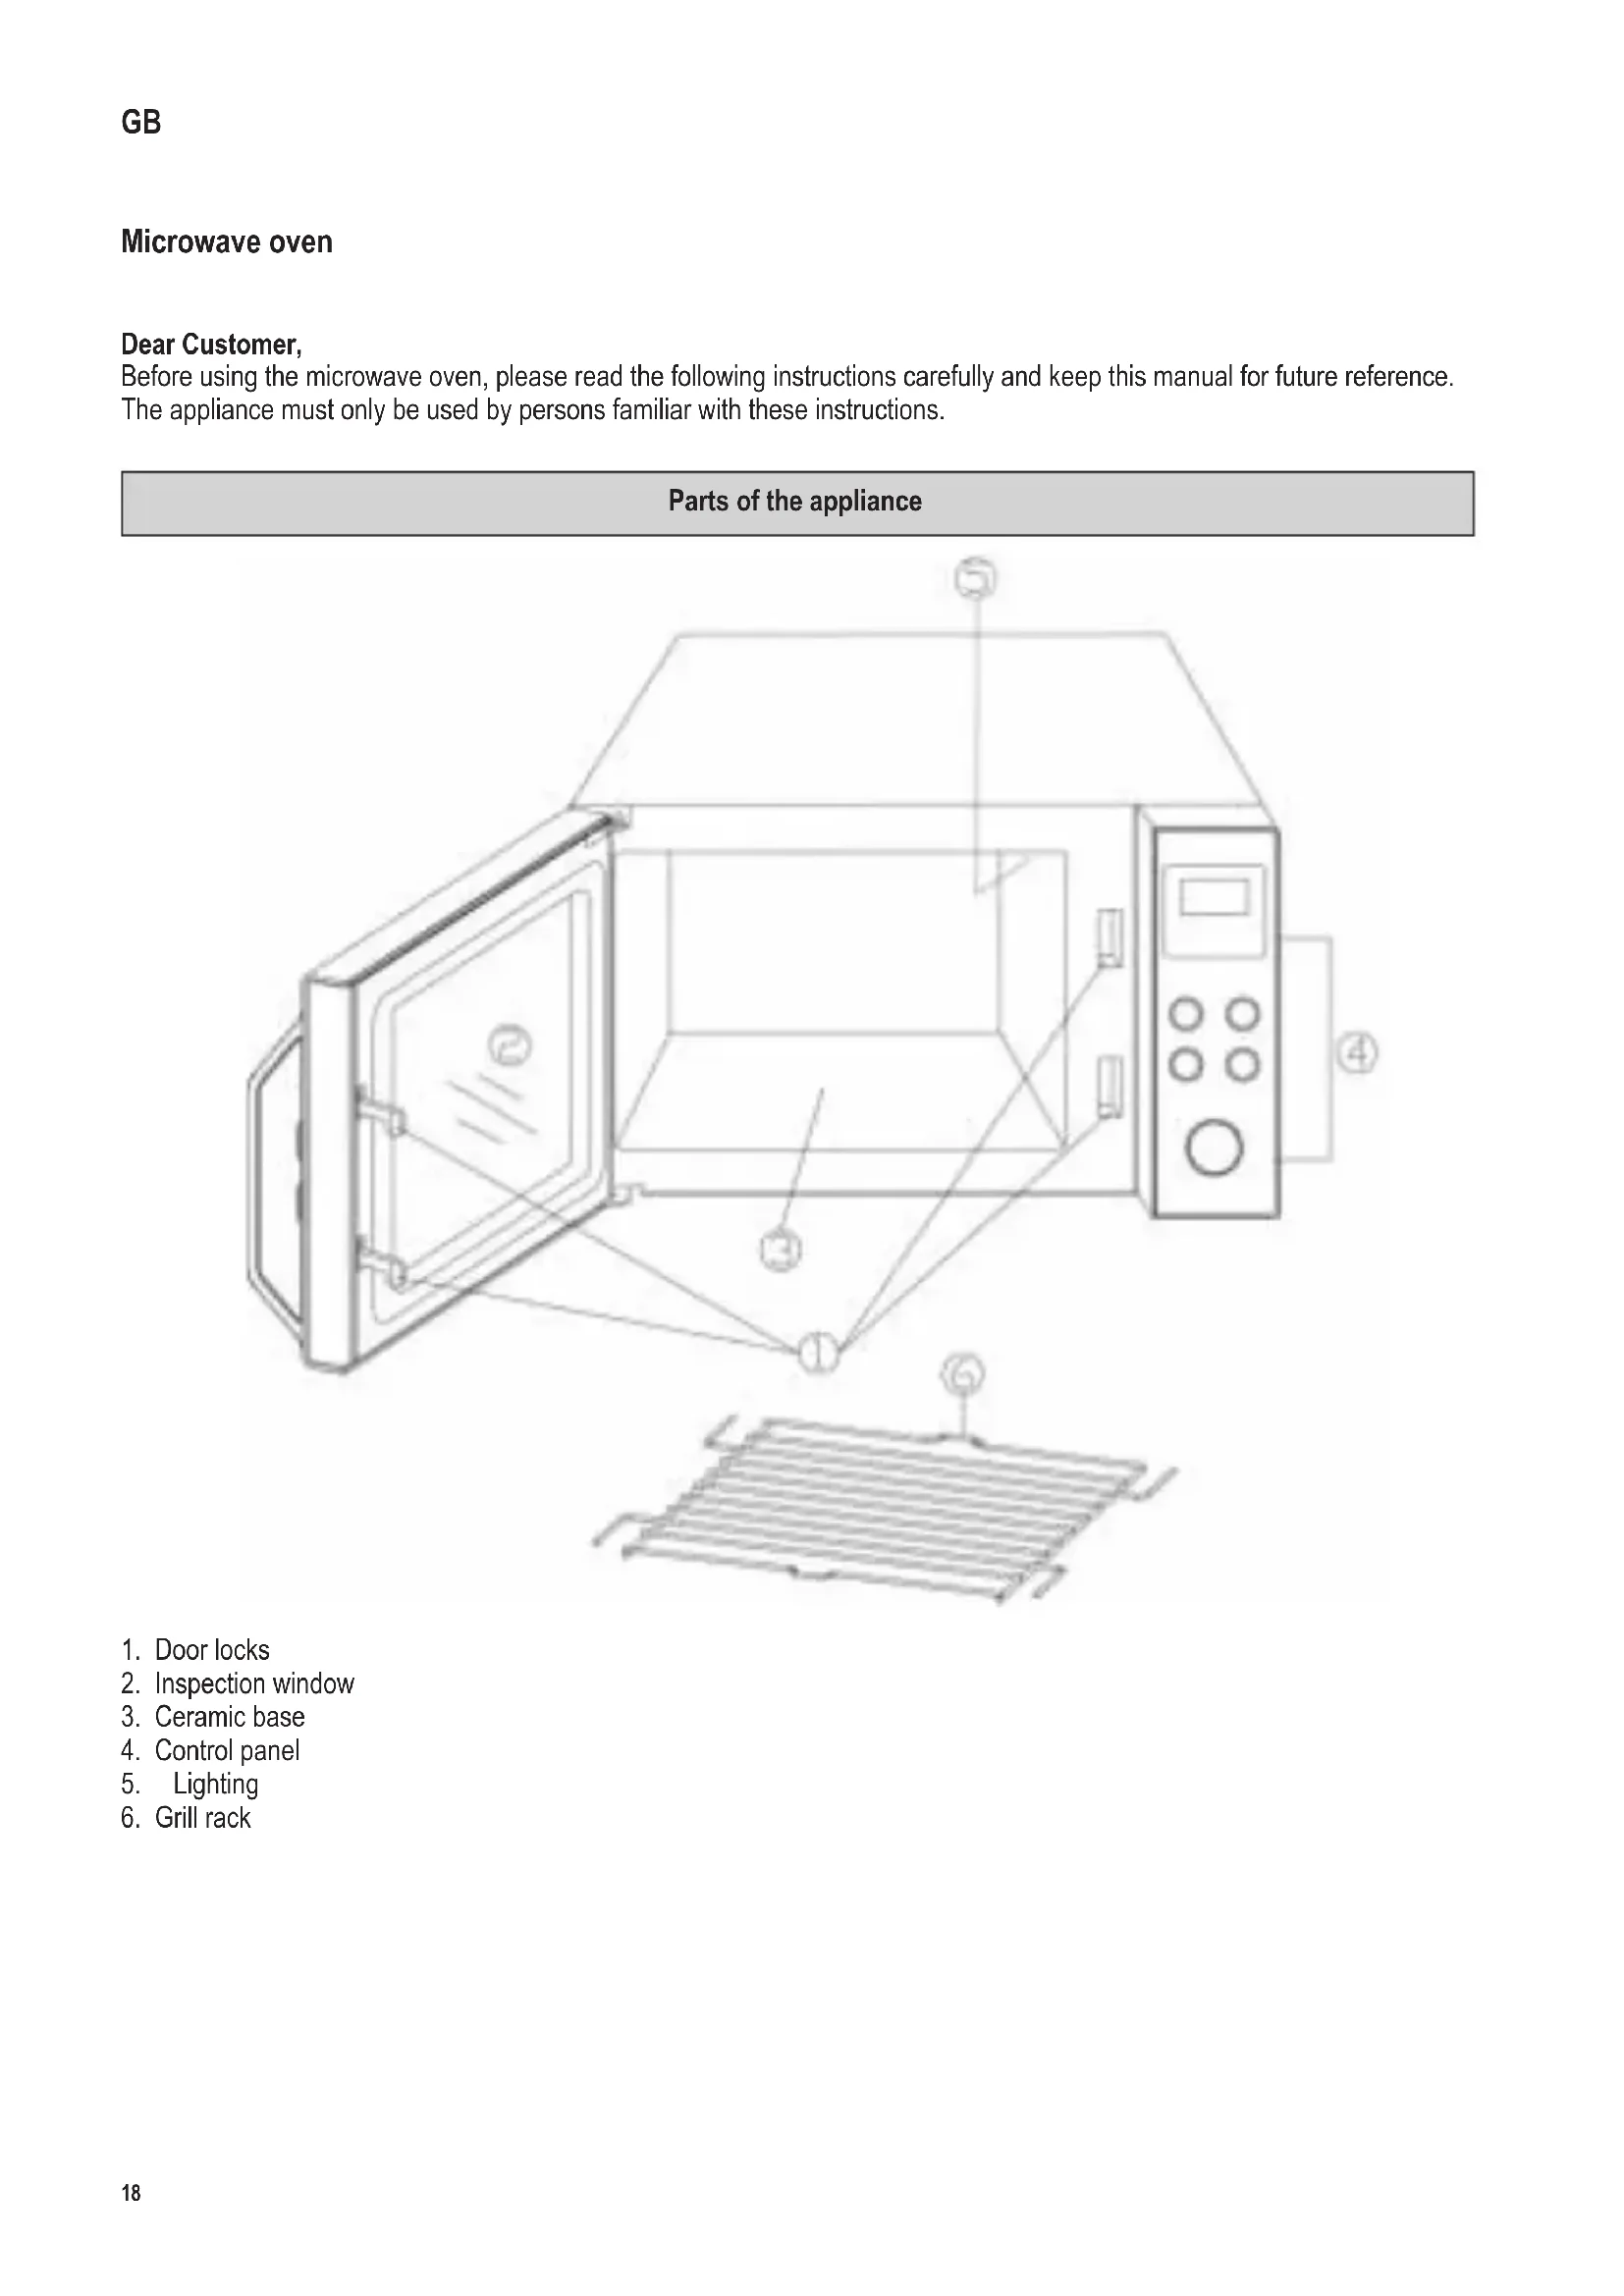
Parts of the appliance
- Door locks
- Inspection window
- Ceramic base
- Control panel
- Lighting
- Grill rack
Control panel detail
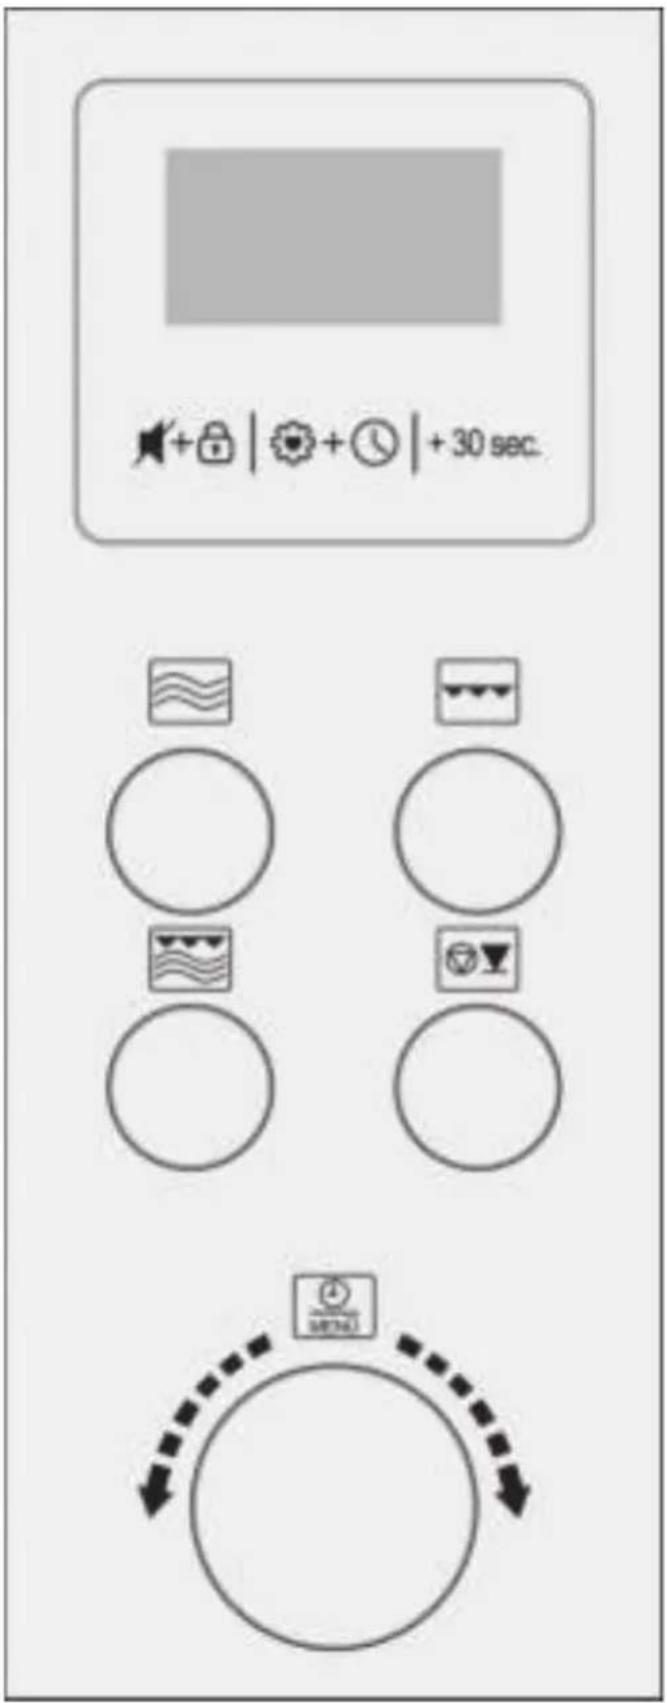
Button Function

Button sounds and Childproof safety device

Favourite dish & Clock

Quick start / Increase cooking time by 30 seconds
Microwave selection
Grill selection

Combination Grill/Microwave selection

Interrupt / Stop
Rotary control Function
Press Start / Quick start
Turn
Time / Automatic cooking programmes
Display

The display shows the current time of the day or, during operation, the running time programmed and functions selected by you.
| AUTO | Automatic programmes |
| 1S | First programme selection |
| 2S | Second programme selection |
| * | Defrosting according to weight |
| Childproof safety device | |
| °C | Temperature |
| Setting the clock | |
| g | Weight |
| nun | Grill function |
| Microwave function | |
| PROG | Automatic programmes |
| *** | Defrosting according to time |
Safety instructions
Important safety instructions
Please read the following instructions carefully and keep this instruction manual for future reference.
Connection to the mains supply
The appliance should only be connected to an earthed socket installed in accordance with the regulations. Make sure that the supply voltage corresponds with the voltage marked on the rating label. This product complies with all binding CE labelling directives.
Positioning the unit
- Always place the microwave oven on a stable, level and heat-resistant surface, ensuring that it is protected from any heat source or excessive humidity.
- Do not operate the appliance outdoors.
- The feet on the base of the unit must not be removed.
- Sufficient ventilation must be ensured at all times. Do not place any objects on the unit, and make sure that the following minimum distances from any wall or other object are maintained:
Sides: 7.5 cm
Rear: 7.5 cm
Top: 30.0cm
- The unit must not be installed inside a cupboard; when positioning the unit, also ensure that it is not placed directly underneath a cupboard or any other similar object.
Important notes
- Caution: Certain types of food may tend to catch fire. Do not, under any circumstances, leave the appliance unattended when using the microwave, grill or combination functions.
- This microwave oven is intended for the defrosting, heating and cooking of food only. Caution: Any attempt to dry food or clothing, to heat up warming pads, house slippers, sponges, wet cleaning cloths etc. may cause injuries, combustion or fire.
- No responsibility will be accepted if damage results from improper use, or if these instructions are not complied with.
-
Only use utensils that are suitable for use in microwave ovens. Do not use any metal containers when heating up food or beverages using the microwave function. For detailed information, please refer to section 'Always use suitable kitchen utensils'.
-
The appliance is not intended to be operated by means of an external timer or separate remote-control system.
- This appliance may be used by children (at least 8 years of age) and by persons with reduced physical, sensory or mental capabilities, or lacking experience and knowledge, provided they have been given supervision or instruction concerning the use of the appliance and fully understand all dangers and safety precautions involved.
Children must not be permitted to play with the appliance. - Children must not be permitted to carry out any cleaning or maintenance work on the appliance unless they are supervised and at least 8 years of age.
- The appliance and its power cord must be kept well away from children under 8 at all times.
- To avoid the risk of electric shock, do not clean the appliance with water and do not immerse it in water.
- Warning: Because of the high temperatures that occur during operation in the grill and/or combination functions, children must not use the appliance unless they are properly supervised by an adult.
- When using the grill and/or combination functions, take extreme care not to touch the interior heating elements.
- Do not use any steam cleaning appliances for cleaning.
-
Always switch the appliance off and remove the plug from the wall socket:
-
before cleaning,
- in case of any malfunction,
-
after each use.
-
When removing the plug from the wall socket, never pull on the power cord; always grip the plug itself.
Caution: The exterior surfaces of the appliance may become hot during operation. There is also a danger of steam being emitted through the on slots, with a consequent risk of scalding.
- Allow the appliance to cool down sufficiently before transporting it.
- Do not allow the appliance or its power cord to touch hot surfaces or come into contact with any heat sources. Do not let the power cord hang free, and keep it away from any hot parts.
-
If the unit is not kept properly clean, deterioration in the quality of its surfaces may be caused, with possible subsequent shortening of its life-cycle, as well as potential risk to the user's safety. Clean the door seals, the cooking area with the ceramic base and the adjacent parts with a damp cloth after each use. Clean the grill with water. Further information about cleaning and user maintenance can be found in the 'Cleaning' section.
-
This appliance is intended for domestic or similar applications, such as the
-
staff kitchens in shops, offices and other similar working environments,
-
agricultural working environments,
- by customers in hotels, motels etc. and similar accommodation,
-
in bed-and breakfast type environments.
-
Caution: Any maintenance or repair work requiring the removal of any microwave radiation protection cover represents a serious hazard to unqualified persons. This includes the replacement of the special power cord or an interior light bulb. The unit must not be opened, except by qualified personnel. If repairs are needed, please send the appliance to one of our customer service departments. The address can be found in the appendix to this manual.
- When heating liquids in your microwave oven, the liquid may heat up beyond boiling-point without visible evidence of bubbling. It is therefore important to exercise extreme caution when handling any containers, e.g. when removing them from the oven.
The risk of such over-boiling may be reduced by placing a heat-resistant glass rod in the container during the heating process.
- Eggs in their shells or whole hard-boiled eggs must not be heated up in a microwave oven, since they may explode even after the microwave heating process has finished.
- Caution: It is also highly dangerous to heat up liquids or any kind of solid food items in closed containers in the unit, since there is a real danger of explosion.
- The contents of baby bottles or glass containers with baby food must be thoroughly stirred or shaken to ensure that the temperature is evenly distributed. Caution: To avoid painful and dangerous scalding, always check the temperature before feeding a child.
- When heating or cooking food contained or wrapped in combustible materials such as plastic or paper, there is a danger of those materials igniting. It is also possible that food will dry out or even ignite if the selected cooking time is excessive. Fat or oil are also inflammable substances. It is therefore important to supervise the appliance during operation. Highly volatile or inflammable liquids such as concentrated alcohol must of course not be heated up.
- Should any smoke be noticed during operation, keep the door closed to inhibit or smother any flames. Switch the unit off immediately and remove the plug from the wall socket.
-
To prevent danger of burns, a suitable oven-cloth must always be used when removing food items from the oven, since the utensils and cooking containers heat up not only during use of the grill function, but also during microwave operation.
-
Special food thermometers (as used in conventional baking ovens) are not suitable for use with microwave ovens.
Before using for the first time
- After unpacking and every time before connecting the unit to the power supply, check the unit and its power cord carefully for any signs of damage.
- Caution: Ensure that the door, including the inspection window, door seals and locks, are not damaged or bent and that it closes firmly against the support. This is important to ensure that no microwave energy is allowed to escape during operation. For the same reason, the entire casing as well as the inside of the oven must be carefully checked.
Should the unit show any signs of damage, it must not be used under any circumstances until it has been repaired by a qualified technician.
- Remove any exterior and interior packaging materials, and any stickers found. All these materials are suitable for recycling.
- Do not remove the rubber stoppers on the grill rack!
- Do not remove the protective film from the inside of the door.
- Keep all packaging material out of the reach of children. There is a risk of suffocation!
Before using the appliance for the first time, and after any prolonged period without use, clean it as described in the 'Cleaning' section. - Before the microwave appliance is used for the first time, let it heat up on the grill setting (without the microwave function activated) for approximately 10 minutes. This will remove the smell typically encountered when first switching on a grill. A little smoke may be emitted; this is quite normal, but ensure there is sufficient ventilation.
Note: Do not switch the unit on unless the food to be heated or cooked has been placed inside the oven.
Operating the appliance empty could result in damage to the unit.
ISM Device
This appliance is a group 2 class B ISM device. Group 2 contains all ISM devices (industrial, scientific, medical) generating radio frequency energy and/or using radio frequency energy in the form of electro-magnetic radiation to process materials; it also comprises spark erosion devices. Class B specifies devices designed for domestic use, or any similar devices integrated in the general power grid supplying domestic units.
The microwave function (Group II in compliance with EN 55011)
Electromagnetic energy is generated inside the unit, causing the molecules in the food (mainly water molecules) to oscillate and subsequently causing the food to become hot. Food with high water content will therefore heat up faster than relatively dry food. The heat is generated gradually inside the food. Any utensils, container or plates used are heated up only indirectly as a result of the food temperature.
Always use suitable kitchen utensils
- Do not place the food to be cooked directly on the ceramic base, but use suitable cookware.
Metal objects are to be avoided since microwaves are reflected from metal surfaces and might not reach the food to be cooked. Any metal in the oven could also cause sparks, resulting in possible damage to the unit. - As a general rule, cutlery or metal containers must not be used in the microwave oven. Some food wrappings contain aluminium foil or wires underneath a layer of paper and are therefore also unsuitable for use with microwave appliances. Should the use of aluminium foil be recommended in a recipe, ensure that the food is tightly wrapped in the aluminium foil (avoiding any air blisters). Ensure a minimum distance of 2.5cm between the aluminium foil and the interior walls of the oven.
- Always make sure that the cooking container or plate used does not contain any metal decoration such as a gold rim or colour containing metal particles. Lead crystal objects are also not suitable. Always make sure that no parts of the cooking
containers used are hollow (e.g. the handles). Porous materials may have absorbed water during cleaning and are again not suitable. Cooking containers or utensils made of 'Melamine' plastic material absorb energy and are also unsuitable.
Using the microwave function
- Containers made from heat-resistant glass or porcelain are particularly suitable for use in microwave appliances.
- Plastic is suitable only if it is heat-resistant.
- Plastic cooking containers especially designed for use with microwave ovens are available at most kitchenware dealers.
- Cooking bags etc. should be punctured to be able to release any high pressure during cooking.
Using the grill function
- When using the grill function, any heat-resistant containers or plates suitable for conventional ovens may be used. Do not use any plastic items when using the grill.
The food to be cooked can be put directly on the grill rack, which is then placed on the glass turntable.
Using the microwave/grill combination function
- When using the microwave/grill combination, the microwave and grill functions are activated alternately. The containers or plates must therefore be suitable for use in a microwave appliance as well as being heat-resistant. Because of the relatively high temperatures, plastic items must not be used. Make sure that the container or plate used does not contain any metal parts.
Operation
Initial setting of the clock
- Once the appliance has been connected to the power supply, the display shows '1:00', the hour indicator flashes and you will hear a signal tone.
- Turn the rotary control to set the correct hour.
- Press the button briefly. The minute indicator flashes.
- Turn the rotary control to set the correct minutes.
Press the + button briefly to finish setting the time. : ' flashes in the display and the current time is shown.
The time setting process can be cancelled or skipped by pressing the key.
After a power failure, the clock must be re-set.
Changing the time
To change the time, press the button for 3 seconds. The display shows Hr 24 or Hr 12.
- Press the button briefly to change between the 24- or 12-hour formats.
The hour indicator flashes, turn the rotary knob to set the correct hour.
- Press the button briefly. The minute indicator flashes.
- Turn the rotary control to set the correct minutes.
- Press the + button briefly to finish setting the time. : ' flashes in the display and the current time is shown.
Acoustic signal & Childproof safety device
Acoustic signal
- When any control button is pressed or the rotary control turned, a correct input is acknowledged by a beep signal.
To cancel the signal, press the + button briefly. - Cancellation the beep signal in this way only affects the use of control buttons or rotary control; the signals indicating programme sequences will still be active.
To re-activate the signal, press the + button again briefly.
Childproof safety device:
This safety device prevents children from operating the appliance without supervision.
To activate the safety device, press + + for 3 seconds. The indicator appears on the display.
To switch off the safety device, press again for 3 seconds. The indicator goes out.
Note: Should you experience a problem when switching the appliance on, first verify that the safety device is not activated.
General operating sequence
Place the food to be heated in a suitable dish and place it on the ceramic base or on the grill in the cooking space.
- When food is placed in the microwave, it should be covered to prevent it from drying out. Glass or plastic covers especially designed for use with microwave appliances are available at most kitchenware dealers.
- When using the combination or grill function, do not cover the food to be cooked.
-
Close the door and set the desired programme.
-
Note: The following steps are used for setting the cooking time:
0-5 minutes : 10-second steps
5-10 minutes : 30-second steps
10-30 minutes : 1-minute steps
30-95 minutes : 5-minute steps
- Press the rotary control to start a programme.
- Once the programme has started, the light comes on during the cooking process.
- If, during operation, the door is opened or the key is pressed (e.g. to stir or to turn the food in order to ensure that the temperature is evenly distributed), the timer and programme functions are automatically suspended. The programme will automatically resume only after the door is closed again and the rotary control is pressed.
Press twice to interrupt the programme. - Beep signals indicates that the pre-programmed cooking time has elapsed; at the same time, the interior lighting switches off and the display shows 'End'.
- Open the door and remove the container with the food.
In order to achieve an even heat distribution through the food, the container should be set aside for several minutes.
If the door is not opened immediately after the pre-programmed operating time has elapsed, a number of beep signals are heard every 2 minutes.
Cooling-off function:
This microwave oven has an automatic cooling feature.
After any operating time exceeding two to three minutes, the cooling fan will automatically run for several minutes after the programme stops.
Grill rack
- The grill rack can be used with the microwave and grill functions.
- Attention! Do not remove the rubber stoppers on the grill rack!
- Insert the grill rack at the desired height.
The food can be placed directly on the grill rack. Do not place the grill rack onto the ceramic plate.

Cooking/heating with microwaves
When cooking/heating with microwaves, the heating directly affects the inside of the food.
Tip! When preparing two portions of food on the grill and the ceramic base, arrange the food to be offset, so that neither of the two portions is directly above the other. Switch the position of the food halfway through.
- Push the button repeatedly until the required power setting is shown (see the table below).
Then use the rotary control to set the desired cooking time. The cooking time can be pre-set to a maximum of 95 minutes. - Press the rotary control to start the cooking process.
To ensure that the heat is evenly distributed, the food being cooked or heated should be occasionally stirred.
If the button is pressed during the cooking process, the power setting value is displayed.
| Power (W) Power (%) Display | Type Use | |||
| Press 1 x | 900 W | 100 | P100 | High |
| 2 x | 810 W | 90 | P-90 | |
| 3 x | 720 W 80 | P-80 | ||
| 4 x | 630 W | 70 | P-70 | Medium high |
| 5 x 540 | W 60 P-60 | ||||
| 6 x 450 | W 50 P-50 Medium Cooking delicate food | ||||
| 7 x 360 | W 40 P-40 | ||||
| 8 x 270 | W 30 P-30 Low Defrosting food | ||||
| 9 x 180 | W 20 P-20 | ||||
| 10 x 90 | W 10 P-10 Very low Defrosting sensitive food | ||||
+30 sec. Quick-programme / Cooking with microwaves:
- Pressing the +30 sec. button activates the cooking process directly. Each press on the button adds 30 seconds to the cooking time.
The microwave power setting is always 100% .
The maximum programmable cooking time is 95 minutes.
If the button is pressed while a microwave programme is running, each press adds 30 seconds to the cooking time.
Quick-Programme/Microwave Cooking rotary knob
The required cooking time is selected by turning the rotary control clockwise.
- Pressing the rotary control will start the cooking process directly.
The microwave power setting is always 100% .
The maximum programmable cooking time is 95 minutes.
Grill function:
The grilling process uses radiation heat to cook the food. The programme is suitable for cooking 'au gratin' or for grilling thin pieces of meat.
Attention! The heating element for the grill function is located at the rear of the cooking space. Therefore, always place the food to be grilled at the rear of the grill and the ceramic base.
- Press the button.
- Then use the rotary control to select the desired cooking time. The maximum programmable cooking time is 95 minutes.
- Start the cooking process by pressing the rotary control.
- As the meat needs to be turned after one side is sufficiently browned, and taken out once it is done on both sides, this process should be closely monitored.
Combination programme grill and microwave:
These programmes are suitable for cooking poultry, fish or cooking 'au gratin'.
Press the button once or twice:
Press once: Co-1 → 30% microwave power, 55% grill power, 15% break
Press twice: Co-2 → 40% microwave power, 45% grill power, 15% break
- Then use the rotary control to select the desired cooking time. The maximum programmable cooking time is 95 minutes.
- Start the cooking process by pressing the rotary control.
- As the food needs to be turned after one side is sufficiently browned, and taken out once it is done on both sides, this process should be closely monitored.
Setting multiple programmes
The microwave can be set for 2 separate programmes to run consecutively without having to restart the unit in-between; eg regular cooking with the microwave function first, followed by cooking 'au gratin' using the grill. This multiple-programme feature can be used with any of the microwave, grill and combination functions. The automatic cooking, defrosting and quick programmes cannot be selected here.
- Press the button for the particular programme repeatedly until the desired power setting/temperature is shown.
- Use the rotary control to select the desired cooking time.
-
Now press the button for the next programme repeatedly until the desired power setting/temperature is shown.
Use the rotary control to select the desired cooking time.
Use the rotary control to start the cooking process. -
The appliance starts the first programme. The display shows S1. As soon as the next programme is started, the display changes to S2.
Hint:
This function is especially helpful when using the microwave to cook food at different power settings. While a higher power setting is selected initially, the power can be reduced at a later stage in order to keep the food hot, and to ensure that the heat is evenly distributed when the food is already done.

Saving your favourite dish
The above described programmes and programme combinations can be saved as 'Favourite dishes' for future quick use. Three different dishes may be pre-stored. If a memory space is not occupied, its corresponding number flashes. The automatic cooking, defrosting and quick programmes cannot be selected here.
Press the button briefly once, twice or three times. The number 1, 2 or 3 start flashing in the display.
Press the button for the particular programme repeatedly until the power setting/temperature is shown.
- Use the rotary control to select the desired cooking time.
Now press the button for the next programme repeatedly until the desired power setting/temperature is shown. - Use the rotary control to select the desired cooking time.
Press the button again briefly to save the favourite dish.
The saved programme can be started by briefly pressing the button first and then the rotary control.
If the appliance has been disconnected from the mains, the programmes must be saved again.
If a memory space is already occupied, the corresponding number will not flash. However, the memory space can be simply over-written as described above.
Automatic cooking and defrosting programmes
These programmes are helpful when cooking or heating up food without having to select any particular settings, e.g. for power or cooking time.
- Turn the rotary control anti-clockwise until the display shows the required programme listed in the table below. Press the rotary control.
-
Use the rotary control to select the appropriate weight (see table).
-
Press the rotary control to start the programme.
The display shows the selected programme running time.
| Menu Weight Display | ||
| A-1 Beverages | 200 ml 1 | |
| 400 ml 2 | ||
| 600 ml 3 | ||
| A-2 Baked potatoes | 230 g 1 | |
| 460 g 2 | ||
| A-3 Heating up | 200 g 200 | |
| 300 g 300 | ||
| 400 g 400 | ||
| 500 g 500 | ||
| 600 g 600 | ||
| 700 g 700 | ||
| 800 g 800 | ||
| A-4 A-4 Fish | 200 g 200 | |
| 300 g 300 | ||
| 400 g 400 | ||
| 500 g 500 | ||
| 600 g 600 | ||
| A-5 Roast chicken | 800 g 800 | |
| 1000 g 1000 | ||
| 1200 g 1200 | ||
| 1400 g 1400 | ||
| A-6 Meat/Chop | 200 g 200 | |
| 300 g 300 | ||
| 400 g 400 | ||
| 500 g 500 | ||
| 600 g 600 | ||
| A-7 Grilled Skewers | 200 g 200 | |
| 300 g 300 | ||
| 400 g 400 | ||
| 500 g 500 | ||
| 600 g 600 | ||
| A-8 Grilled Sausages | 100 100 | |
| 200 200 | ||
| 300 300 | ||
| 400 400 | ||
| A-9 Minute Steaks | 200 200 | |
| 300 300 | ||
| 400 400 | ||
| d-1 Defrosting according to time | Selectable time (in minutes) | 0:00 :- 95:00 |

d-2
Defrosting according to weight
Selectable weight (in grams)
100
1800
General instructions
A-1 Beverages:
To heat up beverages and hot water for tea or instant coffee.
A-2 Baked potatoes:
Put the raw, unpeeled potatoes on a plate suitable for microwave-use, and place it in the centre of the oven.
A-3 Heating up:
For heating up solid food in containers suitable for use with microwaves.
Hint: Arrange the food in a circular pattern to ensure optimal heat distribution.
A-4 Fish:
Put the fish on a plate suitable for microwave-use, and place it in the centre of the oven.
A-5 Roast chicken:
Place the whole chicken on a microwaveable plate in the rear area of the cooking space.
Several beep signals indicate that 2/3 of the pre-programmed cooking time has elapsed, when cooking is interrupted. Turn the chicken over and press the rotary control to restart the cooking process.
A-6 Meat/Chop:
Place chops, cutlets, etc. directly on the grill (or on a suitable plate) in the rear area of the grilling space.
Several beep signals indicate that 2/3 of the pre-programmed cooking time has elapsed, when cooking is interrupted. Turn the food over and press the rotary control to restart the cooking process.
A-7 Grilled Skewers:
Place the skewers directly on the grill (or on a suitable plate) in the rear area of the grilling space.
Several beep signals indicate that 2/3 of the pre-programmed cooking time has elapsed, when cooking is interrupted. Turn the food over and press the rotary control to restart the cooking process.
A-8 Grilled sausages:
Place the sausages directly on the grill (or on a suitable plate) in the rear area of the grilling space.
After 2/3 of the cooking time has elapsed, you will hear a signal tone and the cooking process will stop. Turn the food over.
Press the rotary knob to continue the cooking process.
A-9 Minute Steaks:
Place the minute steaks on the grill or on a microwaveable plate in the rear area of the cooking space.
After 2/3 of the cooking time has elapsed, you will hear a signal tone and the cooking process will stop. Turn the food over.
Press the rotary knob to continue the cooking process.
d-1 Defrosting according to time:
See section 'Defrosting according to time' below.
d-2 Defrosting according to weight:
See section 'Defrosting according to weight' below.
d-1 Defrosting according to time und d-2 Defrosting according to weight
The defrosting programmes allow for time- or weight-based defrosting.
Turn the rotary control anti-clockwise, until the display shows d-1 or d-2.
-
Press the rotary control to confirm the programme selection.
-
Turn the rotary control, until the display shows the desired defrosting time (for d-1) or the relevant weight (for d-2).
-
Press the rotary control to start defrosting.
Helpful notes:
Several beep signals indicate that 2/3 of the programmed defrosting time has elapsed. Turn the food over, taking out any that is already defrosted.
-
Press the rotary control to continue defrosting.
-
Should the food not be completely defrosted after the pre-set defrosting time has elapsed, it is advisable to limit any further defrosting times to 1-minute periods until the food is fully defrosted.
-
Food stored in plastic containers that are not suitable for use in microwave ovens should be left for a while after being taken from the freezer. Wait until the food can be easily detached from the plastic, before it is put into the oven inside a container suitable for use with microwave ovens.
Interior lighting
The interior light comes on when the door is opened; it also remains on during operation. It goes out once a programme has finished.
Cleaning
The microwave should be cleaned regularly, removing any food residue right away after use.
Before cleaning the appliance, ensure it is disconnected from the power supply and has cooled down completely.
- Do not clean the unit with water: ensure that no water is allowed to enter the ventilation slots on the inside or outside of the unit. Do not use any steam cleaning appliances for cleaning.
The entire unit may be wiped with a slightly damp lint-free cloth and a mild household detergent. Wipe thoroughly dry afterwards.
- Do not use abrasives or harsh cleaning solutions. Commercially available cleaning sprays for conventional baking ovens are not to be used.
- Clean the cooking space after every use. The inside of the door, the door frame and the ceramic base must always be kept clean.
- Clean the grill rack in hot soapy water. Do not clean individual parts in the dishwasher.
After cleaning, leave the door open for a while to allow any moisture to escape.
Additional information
Technical specifications
Outside dimensions: 495mm (L) × 415mm (T) × 288mm (H)
Inside dimensions:
clearance above the glass turntable: 195 mm
Unit weight: approx. 14.4kg
Operating voltage: 230 - 240 V~50 Hz
Total power consumption: 1400 W
grill1000W
·microwave1400W
Microwave output: 90 - 900 W

Disposal
Devices marked with this symbol must be disposed of separately from your household waste, as they contain valuable materials which can be recycled. Proper disposal protects the environment and human health. Your local authority or retailer can provide information on the matter.
Guarantee
This product is guaranteed against defects in materials and workmanship for a period of two years from the date of purchase. Under this guarantee the manufacturer undertakes to repair or replace any parts found to be defective, providing the product is returned to one of our authorised service centres. This guarantee is only valid if the appliance has been used in accordance with the instructions, and provided that it has not been modified, repaired or interfered with by any unauthorised person, or damaged through misuse.
This guarantee naturally does not cover wear and tear, nor breakables such as glass and ceramic items, bulbs etc. This guarantee does not affect your statutory rights, nor any legal rights you may have as a consumer under applicable national legislation governing the purchase of goods. If the product fails to operate and needs to be returned, pack it carefully, enclosing your name and address and the reason for return. If within the guarantee period, please also provide the guarantee card and proof of purchase.
Four à micro-ondes
Chere cliente, Cher client,
gril1000W
- micro-ondes1400W
-性和 speed of the operation.
Consumo energetico total: 1400 W
Grelhador: 1000 W
- Micro-ondas: 1400 W
Potência de saída
- Micro-ondas: 90 - 900 W

Eliminação
Pouoi n oaiwv npoypamuatwv
MTopeite va puOmuTe To oouvo mikpokumatw wote va aeitoupynooudiaoxika 2 diaopotik aTpoypamataxwipc va TpeTTe va eTavaekivnoTe Tn ouvaba OTO Eviaeoo, T.x. Tpwa Kavoviko maeyiepa u Tn aeitoupyia mikpokumatwv, akolouthetauevnt ano mayeipema «oykpatev» Te n xpnan Tc oxapac.Autn n duvatotnTa TOnawv TPOypaumatw v MTopei va xnpoiuointhe i e otioahtne aeitoupyia mikpokumatwv, oxapac kai ouvduaou. Edw dev evai duvatn n eTIAnyn tou autouau npoypamatoC maeyepaatoC n atouuEns n tou ynpoyoup TPOypamatoC.
- PntnoTe eTaveIAnmuEva to koupi yia to aataotouevo TPOypaMa pEXPI va EPPAVIOTei n EITUuntnpOuion IOXUC/ 0epuokpaaic.
XpnooioioteTOV TEPIOPTpeoEvO diaKOTN YIA VA EITIAEETe TOV ETIoumTo xpovo mayepaatoC.
Twa, pntote e Tavaeianmueva to koupi yia to eTnóveo Ppypamae xvi aepavioTe i n tIupun npuion oXuc/
Xpnooioote TOV TEPIOPTepeoevo diaokotn yia va EITIAEETe TOV EITIOUmTO xpovo mayepaatoC.
Xpnooiooteovpiotpefoevoiaokntyniava apxote ndaikkaaiaayepaatoc.
H ouakeun apxiz to Tpawto poypauma. Tnv oovn eapavicieta S1. Moic apxioe to troevo poypauma, n oovn aaaaie 0e S2.
∑μβouλn:
Autn n aeitoupyia uynnc ivai idiaitepa xpnoiun otav xponoiotoeiie mikpokumata yia to paayepa paayntw oE diapopetikec puthetaicis 1oXuoc. Evw apxiká eivai etiayevn ia uwnlotepn puthetaion 1oXuoc, n 1oXuc mtoei va 1eiwTei oETTEITA OTABIO TPOKEIevou va diatnpnthei To paaynto zeto, aaaa kai yia eaaqaaioTei ot n 3epmntta diavemai opoiOpopa otav to paaynto exei nonyivei.
1 Angel Kanchev, 5th floor
1000 Sofia, Bulgaria
Tel.: +35929731131, 9735533
Fax:+35929449649
E-Mail: vihra.koleva@pirita.bg
Croatia
Koracell d.o.o.
Donje Svetice 40
26 Oaktree Business Park
Trim Co., Meath
Tel.: 046 94 83100
Fax:0469483663
Web: www.bluestone.ie
Italia
ASSISTENZA POST-VENDITA
NUMERO VERDE 800224155
E-Mail: assistenza@severinitalia.it
Indonesia
PT. Setai Modern Elektronik
Email: info@severin.co.id
Web.:www.severin.co.id
Jakarta
Komp. Glodok Plaza Blok F No. 9, JI. Pinangsia Raya,
Jakarta Barat
02165911888/0216592889
Medan
JI. Apel No. 88 Kom. Cemara Asri
0616620186/0616625836
Surabaya
Pergudangan Mutiara Margo Mulyo Indah,
Blok DC No. 2
Telp:(031)7491012, (031)7491016
Banjarmasin
Dr.Waleed Maraga commercial center, Level 1
Khaldal, Amman Zip code: 11953
Tel: +962 65346429
Fax:+96265341706
Mob Jordan: +962 797426108
Kuwait
Mohammed Abdulrahman Al Bahar
Al Bahar Building P.O. Box 148
Safat 13002 Kuwait
Tel.: +965 4810855
Latvia
SIA GTCL BALTIC
Piedrujas iela 7
LV-Riga 1073
Tel.: +371 29119989
Fax:+37167297769
Lebanon
Khoury Home
7th Floor, Cité Dora 3 Building, Dora
P.O.Box 70611
Antelias, Lebanon
Tel.: +961 1 244200
Fax:+9661253535
E-Mail: info@khouryhome.com
Internet: www.khouryhome.com
Lithuania
UAB Topo Grupe
Savanoriu PR. 206A.
50193 Kaunas, Lithuania
Tel.: +370 660 00200
E-Mail: uzsakymai@topocentras.It
Luxembourg
Ser-Tec
A.A.K & Partners L.L.C.
P.O Box:-1650, Muttrah
Postal Code - 114
Sultanate of Oman
Tel.: +968 24834470
Fax.: +968 24835186
E-Mail: aakplc@gmail.com
Peru
SEVERIN PERU / Comercial Rebecca S.R.L.
208 Circunvalacion del Golf Avenue
Office 301-A Los Inkas Prime Tower II
Santiago de Surco, Lima - Peru
Tel.:0051 1 2729370
E-mail: severinperu@gmail.com
Philippines
COLOMBO MERCHANT PHILIPPINES, INC.
Mezzanine 1, South Center Tower
2206 Venture Street, Madrigal Business Park
Alabang, Muntinlupa City
Tel.: 809 34 41
E-Mail: severinconsumercare@colombophils.com.ph
Polska
Severin Polska Sp.z o.o.
6 Tagore Drive, #03-04
Singapore 787623
Tel.: +65 6455 0005
Fax:+6564554010
Web: www.beste.com.sg
E-Mail: info@beste.com.sg
Slovenia
SEVTIS d.o.o.
Smartinska 130
1000 Ljubljana
Tel.: +386 1542 1927
Fax: +386 1542 1926
Slowak Republic
BVZ Commerce s.r.o.
Parkerova 618
CZ 25067 Klecany
Tel.: +420 233 55 94 74
Fax:+420233558159
South Africa
AL&CD Ashley (PTY) Ltd.
3rd Floor, Grove Exchange
Grove Avenue
Claremont
South Africa
7708
Tel: +27 21 674 0294
Fax:+27216740295
Web: http://www.alcdashley.co.za
Mail: service@alcdashley.co.za
Svenska
EI & Digital Service AB
Folkungagatan 144
11630 Stockholm
Tel.: +46 8 845180
www.eldigital.se
E-Mail: info@eldigital.se
Switzerland
SPC Electronics AG
Mövenstrasse 12
CH-9015 St. Gallen
Tel.: +41 71 227 99 99
E-Mail: service@spcag.ch
www.spc.ch
Thailand
Verasu Ltd. part.
83/7 Wireless Rd., Lumpini,
Patumwan, Bangkok 10330
Tel.: +662 254 81 008
E-Mail: askverasu@verasu.com
Tunisia
GEI
54, rue du Mercure
Zone Industrielle 2013-BEN AROUS
TUNISIE
Ukrayina
Service for Modern Electronics LLC
Sim'i Khokhlovkyh Str.8
4119 Kiev
Tel.: +38 044 247 67 34
E-Mail: info1@photoservice.com.ua
United Kingdom
Homespares Centres Limited
Firwood Industrial Estate
Thicketford Road
Bolton. BL2 3TR
Tel.: 01204 558160
Fax:01204558169
E-Mail: office@homespares.co.uk
Web: wwwhomespares.co.uk
Vietnam
BRAND PARTNER
CTY TNHH DOI TAC NHAN HIEU
2/7 NGUYENTHANHY
DA KAO WARD, DISTRICT 1
HO CHI MINH CITY, VIETNAM
Tel.: +84 862 899 648
Fax:+84862899649
E-Mail: info@brandpartner.vn
Stand:01.2021