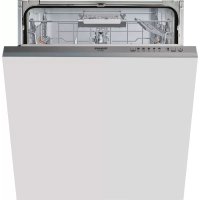
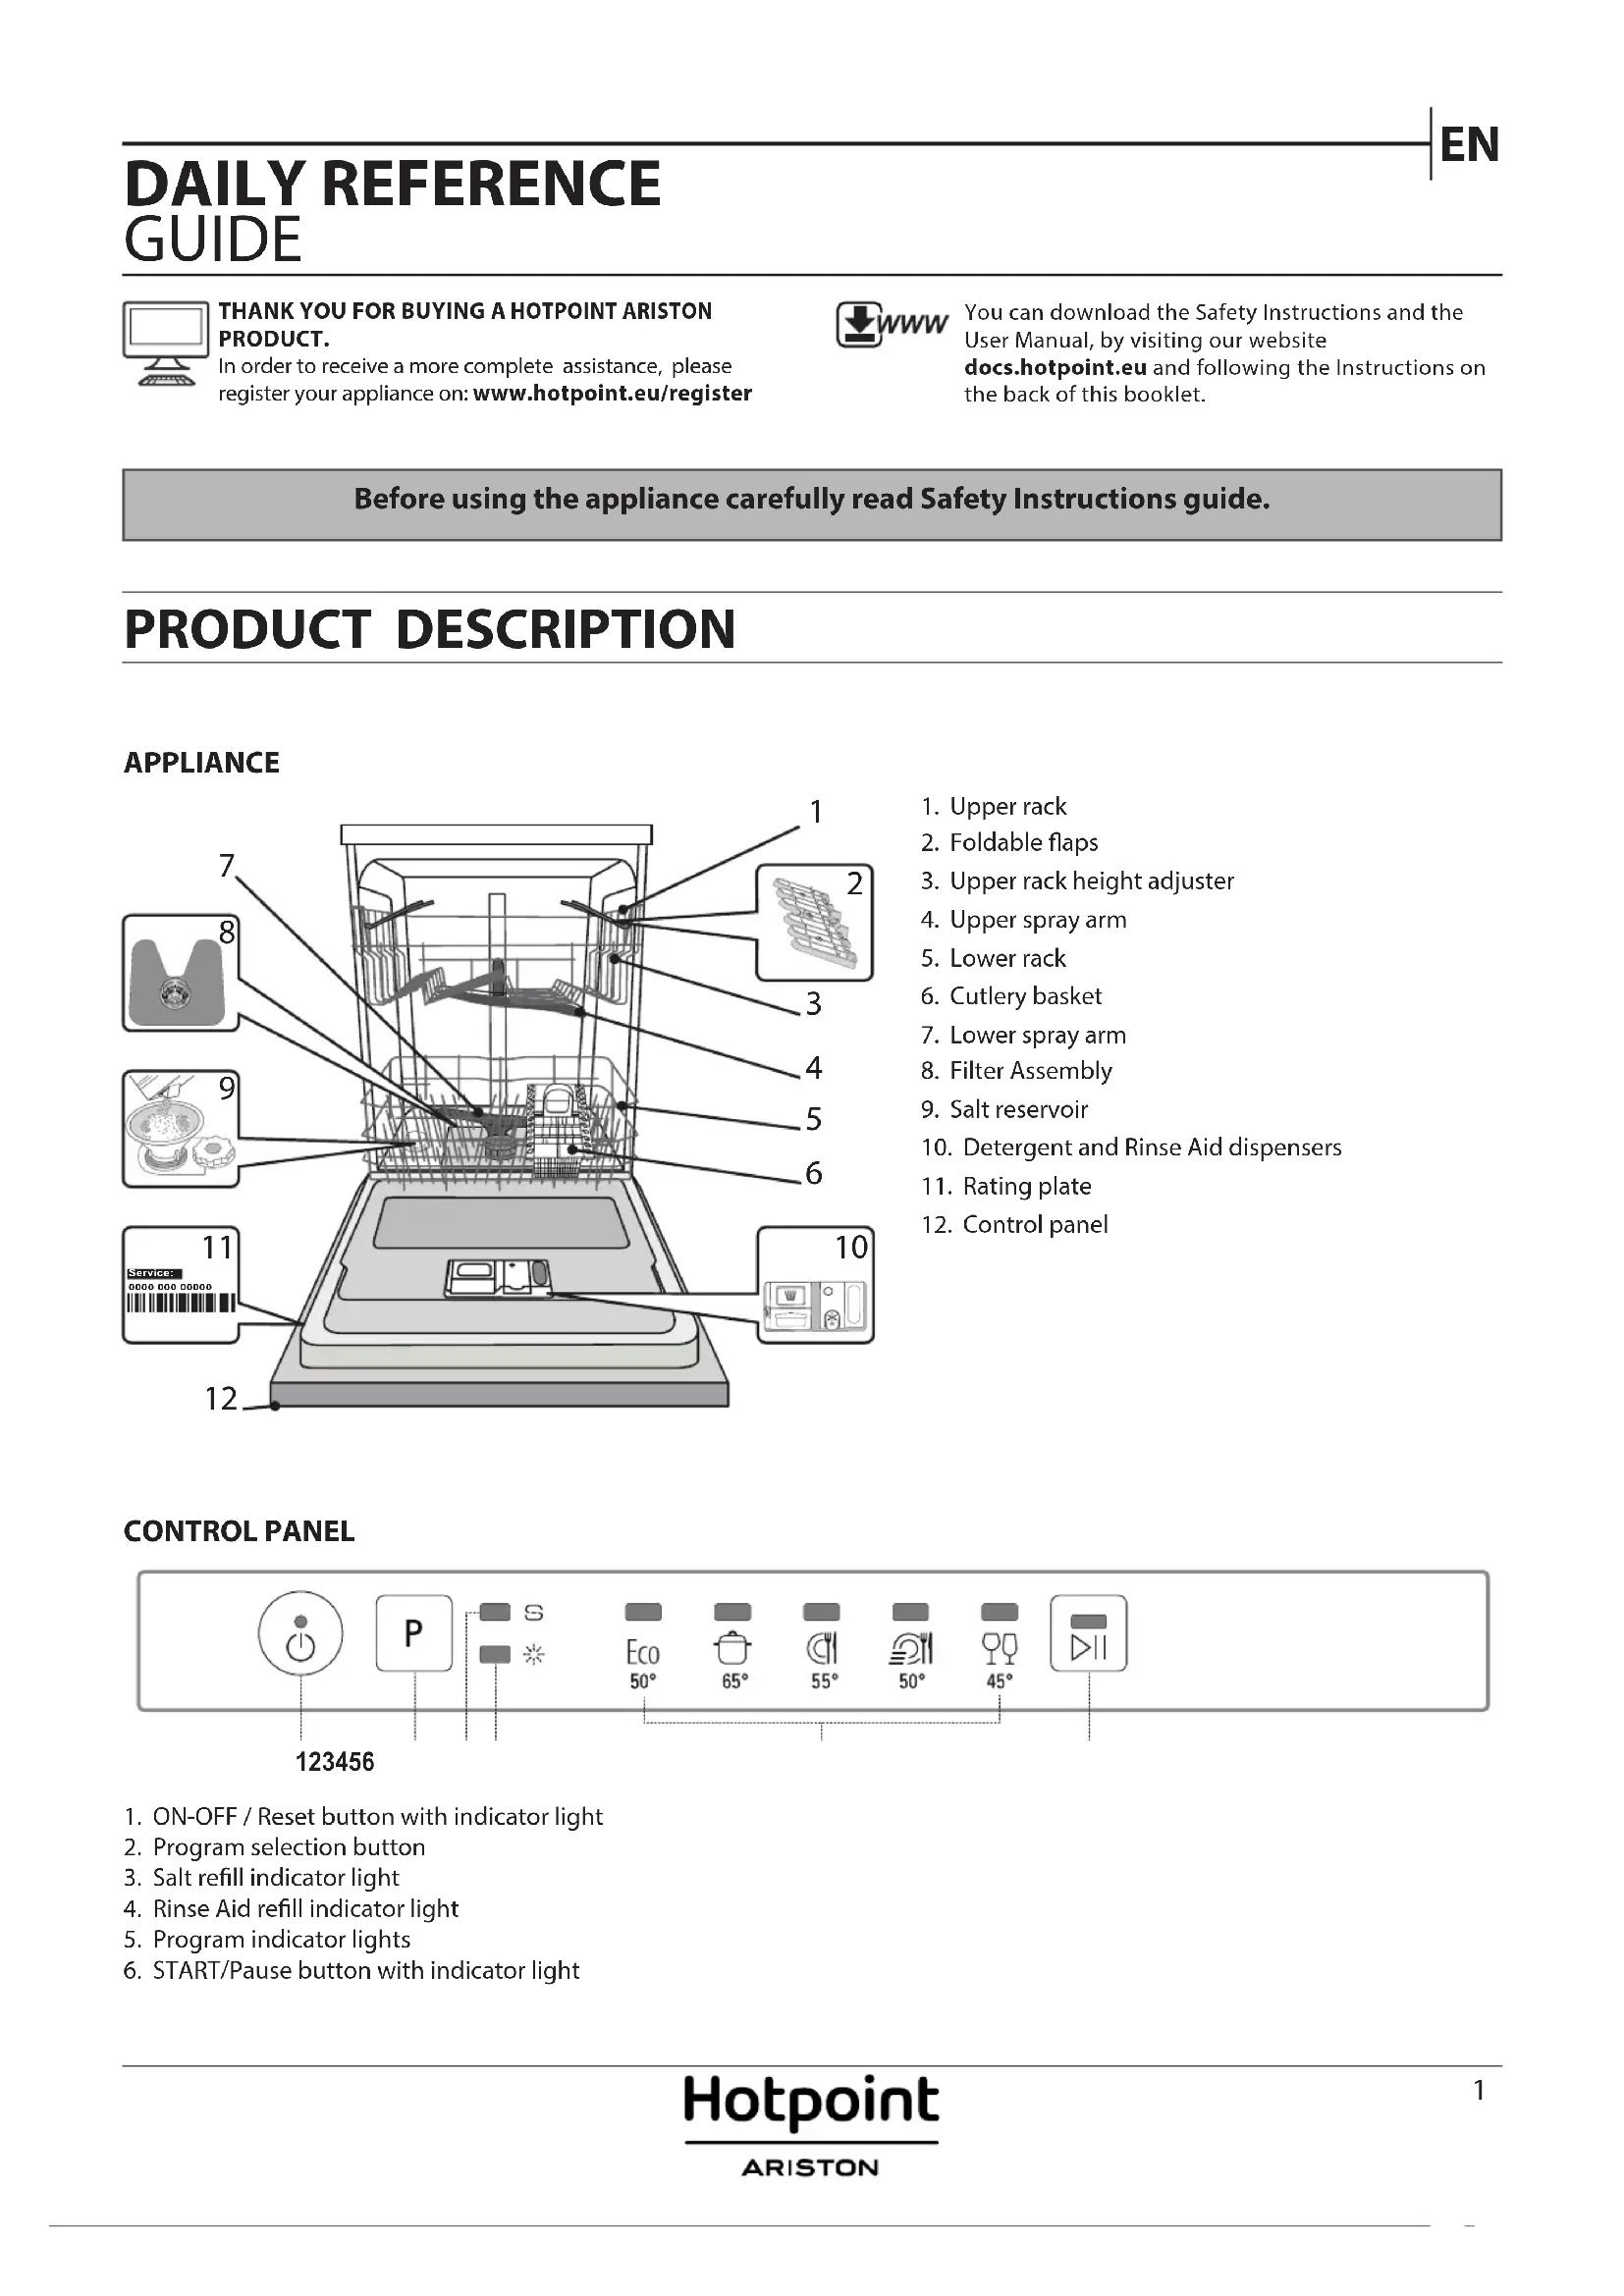
USER MANUAL HIE 2B19 C N HOTPOINT
THANK YOU FOR BUYING A HOTPOINT ARISTON PRODUCT.
In order to receive more complete assistance, please register your appliance on: www.hotpoint.eu/register

WWW
You can download the Safety Instructions and the User Manual by visiting our website docs.hotpoint.eu and following the instructions on the back of this booklet.
Before using the appliance, carefully read the Safety Instructions guide.
PRODUCT DESCRIPTION
APPLIANCE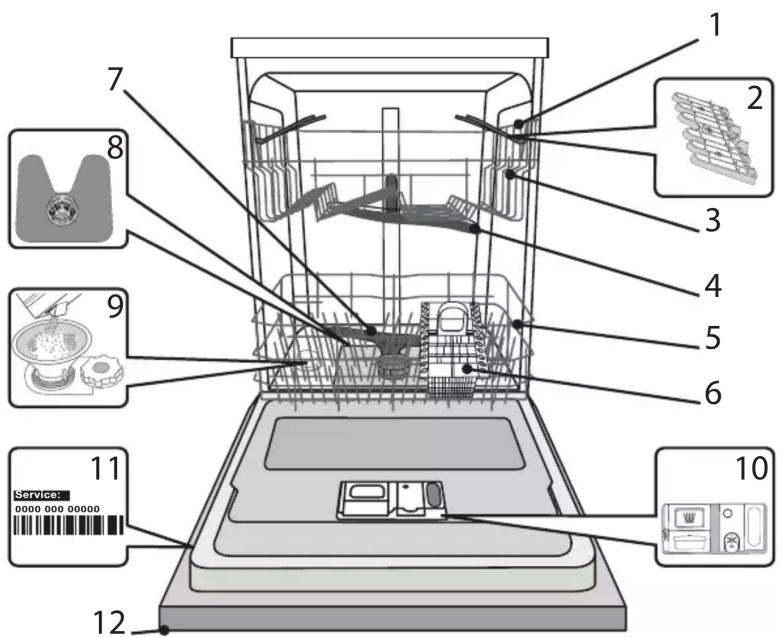
- Upper rack
- Foldable flaps
- Upper rack height adjuster
- Upper spray arm
- Lower rack
- Cutlery basket
- Lower spray arm
- Filter Assembly
- Salt reservoir
- Detergent and Rinse Aid dispensers
- Rating plate
- Control panel
CONTROL PANEL
- ON-OFF / Reset button with indicator light
- Program selection button
- Salt refill indicator light
- Rinse Aid refill indicator light
- Program indicator lights
- START/Pause button with indicator light
FIRST TIME USE
SALT, RINSE AID AND DETERGENT
ADVICE REGARDING THE FIRST TIME USE
After installation, remove the stoppers from the racks and the retaining elastic elements from the upper rack.
FILLING THE SALT RESERVOIR
The use of salt prevents the formation of LIMESCALE on the dishes and on the machine's functional components.
- It is mandatory that THE SALT RESERVOIR NEVER BE EMPTY. It is important to set the water hardness.
The salt reservoir is located in the lower part of the dishwasher (see PRODUCT DESCRIPTION) and must be filled when the SALT REFILL indicator light on the control panel is lit.
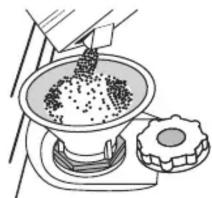
- Remove the lower rack and unscrew the reservoir cap (anticlockwise).
- Only the first time you do this: fill the salt reservoir with water.
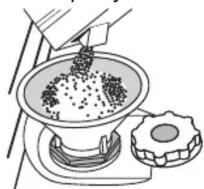
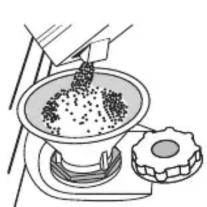
- Position the funnel (see figure) and fill the salt reservoir right up to its edge (approximately 1 kg); it is not unusual for a little water to leak out.
- Remove the funnel and wipe any salt residue away from the opening.
Make sure the cap is screwed on tightly, so that no detergent can get into the container during the wash program (this could damage the water softener beyond repair).
Whenever you need to add salt, it is mandatory to complete the procedure before the beginning of the washing cycle to avoid corrosion.
SETTING THE WATER HARDNESS
To allow the water softener to work in a perfect way, it is essential that the water hardness setting is based on the actual water hardness in your house. This information can be obtained from your local water supplier.
The factory sets the default value for the water hardness.
- Switch on the appliance by pressing the ON/OFF button.
- Switch off the appliance by pressing the ON/OFF button.
- Hold down button P for 5 seconds, until you hear a beep.
- Switch on the appliance by pressing the ON/OFF button.
- The program indicator light of the current set level flashes.
- Press button P to select the desired hardness level (see WATER HARDNESS TABLE).
| Water Hardness Table |
| Level | °dH German degrees | °fH French degrees | °C Clark English degrees |
| 1 | Soft | 0 - 6 | 0 - 10 | 0 - 7 |
| 2 | Medium | 7 - 11 | 11 - 20 | 8 - 14 |
| 3 | Average | 12 - 16 | 21 - 29 | 15 - 20 |
| 4 | Hard | 17 - 34 | 30 - 60 | 21 - 42 |
| 5 | Very hard | 35 - 50 | 61 - 90 | 43 - 62 |
- Switch off the appliance by pressing the ON/OFF button. Setting is complete!
As soon as this procedure is complete, run a program without loading. Only use salt that has been specifically designed for dishwashers. After the salt has been poured into the machine, the SALT REFILL indicator light switches off.
If the salt container is not filled, the water softener and the heating element may be damaged as a result of limescale accumulation. Using of Salt is recommended with any type of dishwasher detergent.
FILLING THE RINSE AID DISPENSER
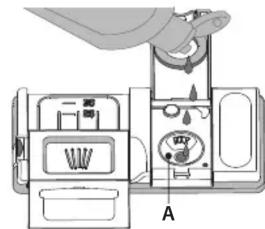
Rinse aid makes dish DRYING easier. The rinse aid dispenser A should be filled when the RINSE AID REFILL indicator light in the control panel is lit.
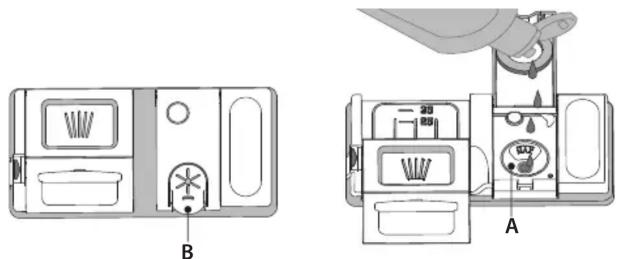
- Open the dispenser B by pressing and pulling up the tab on the lid.
- Pour in the rinse aid (max.110 ml), making sure it does not overflow from the dispenser. If this happens, clean the spill immediately with a dry cloth.
- Press the lid down until you hear a click to close it.
NEVER pour the rinse aid directly into the appliance tub.
ADJUSTING THE DOSAGE OF RINSE AID
If you are not completely satisfied with the drying results, you can adjust the quantity of rinse aid used.
- Switch the dishwasher on using the ON/OFF button.
- Switch it off using the ON/OFF button.
- Press button P three times - a beep will be heard.
- Switch it on using the ON/OFF button.
- The program indicator light of the current set level flashes.
- Press button P to select the level of rinse aid quantity to be supplied.
- Switch it off using the ON/OFF button.
Setting is complete!
If the rinse aid level is set to 1 (ECO), no rinse aid will be supplied. The LOW RINSE AID indicator light will not be lit if you run out of rinse aid. A maximum of 5 levels can be set according to the dishwasher model. The factory setting is specific to the model, please follow instruction above to check this for your machine. - If you see bluish streaks on the dishes, set a low number (2-3). - If there are drops of water or limescale marks on the dishes, set a mid-range number (4-5).
FILLING THE DETERGENT DISPENSER
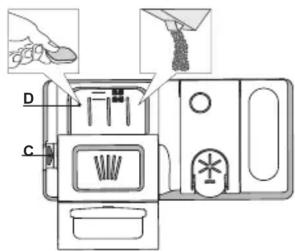
To open the detergent dispenser use the opening device C. Introduce the detergent into the dry dispenser D only. Place the amount of detergent for pre-washing directly inside the tub.
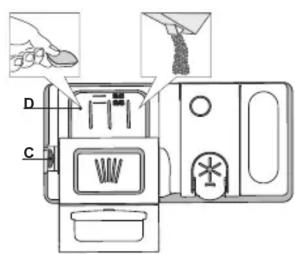
- When measuring out the detergent refer to the mentioned earlier information to add the proper quantity. Inside the dispenser D there are indications to help the detergent dosing.
- Remove detergent residues from the edges of the dispenser and close the cover until it clicks.
- Close the lid of the detergent dispenser by pulling it up until the closing device is secured in place.
The detergent dispenser automatically opens up at the right time according to the program.
Usage of detergent not designed for dishwashers may cause malfunction or damage to the appliance.
PROGRAM TABLE
| Program | Drying phase | Duration of wash program (h:min)1 | Water consumption (litres/cycle) | Energy consumption (kWh/cycle) |
| 1. Eco 50° Eco | ✓ | 3:20 12.0 1.04 | | |
| 2. Intensive 65° 2:30 16,0 1.50 | ✓ | | | |
| 3. Mixed 55° 2:25 16.0 1.35 | ✓ | | | |
| 4. Fast Wash 50° | - | 1:00 11.5 1.10 | | |
| 5. Delicate 45° | ✓ | 1:30 11,5 1.10 | | |
ECO program data is measured under laboratory conditions according to European Standard EN 60436:2020.
Note for Test Laboratories:
For information on comparative EN testing conditions, please send an email to the following address: dw_test_support@whirlpool.com
Pre-treatment of the dishes is not needed before any of the programs.
*) Values given for programmes other than the eco programme are indicative only. The actual time may vary depending on many factors such as temperature and pressure of the incoming water, room temperature, amount of detergent, quantity and type of load, load balancing, additional selected options and sensor calibration. The sensor calibration can increase program duration up to 20 min.
PROGRAMS DESCRIPTION
Instructions on wash cycle selection.
1 ECO
Eco program is suitable to clean normally soiled tableware, that for this use, it is the most efficient program in terms of its combined energy and water consumption, and that it is used to assess compliance with the EU Ecodesign legislation.
2 INTENSIVE
Program recommended for heavily soiled crockery, especially suitable for pans and saucepans (not to be used for delicate items).
3 MIXED
Mixed soil. For normally soiled dishes with dried food residues.
4 FASTWASH
Program for limited quantity of normally soiled crockery. Ensures optimal cleaning performance in shorter time.
5 DELICATE
Program for delicate items, which are more sensitive to high temperatures, for example glasses and cups.
LOADING THE RACKS
UPPER RACK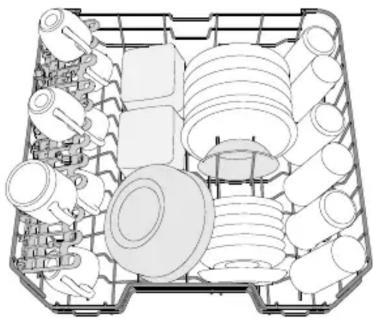
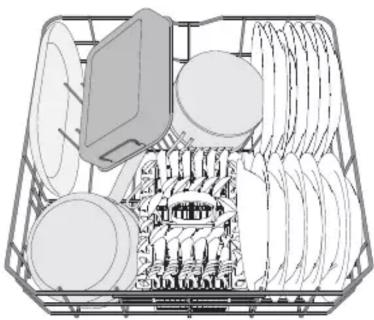
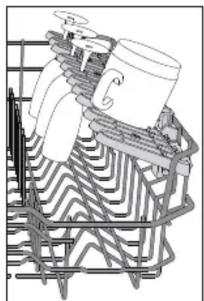
Load delicate and light dishes: glasses, cups, saucers, low salad bowls.
(loading example for the upper rack)
ADJUSTING THE HEIGHT OF THE UPPER RACK
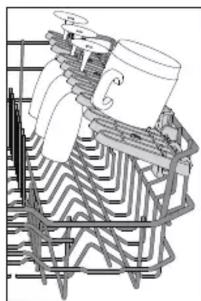
The height of the upper basket can be adjusted: high position to place bulky crockery in the lower basket and low position to make the most of the tip-up compartments by creating more space upwards.
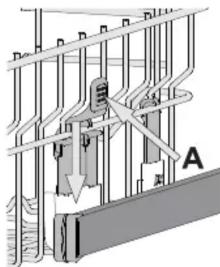
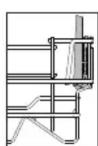
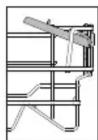
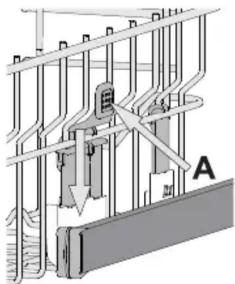
The upper rack is equipped with a Upper Rack height adjuster (see figure), without pressing the levers, lift it up by simply holding the rack sides, as soon as the rack is stable in its upper position. To restore to the lower position, press the levers (A) at the sides of the rack and move the basket downwards.
We strongly recommend that you do not adjust the height of the rack when it is loaded.
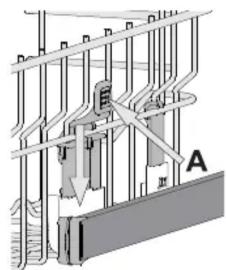
NEVER raise or lower the basket on one side only.
FOLDABLE FLAPS WITH ADJUSTABLE POSITION
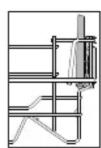
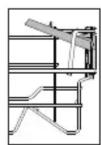
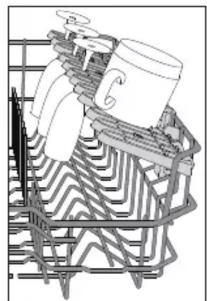
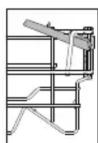
The side foldable flaps can be fold or unfold to optimize the arrangement of crockery inside the rack.
Wine glasses can be placed safely in the foldable flaps by inserting the stem of each glass into the corresponding slots.
Depending on the model:
- To unfold the flaps, slide them up and rotate, or release them from the snaps and pull them down.
- To fold the flaps,
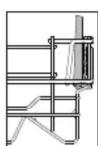
rotate them and slide the flaps down, or pull them up and attach the flaps to the snaps.
SLIDING TRAY
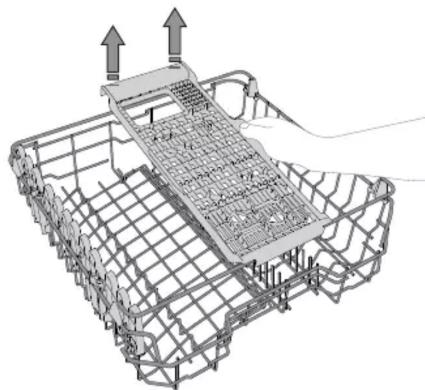
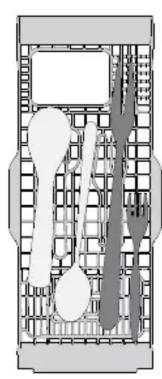
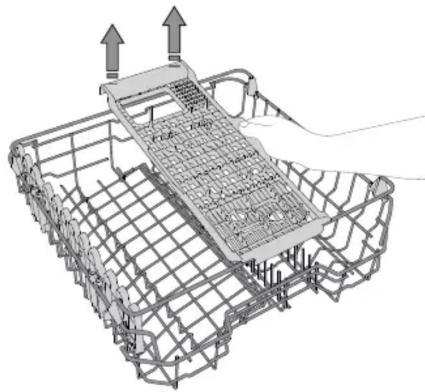
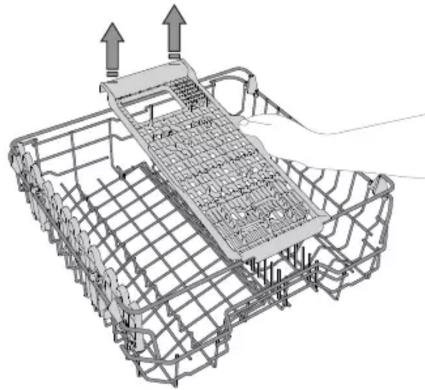
The upper rack is fitted with a sliding tray which can be used to hold small crockery and cutlery. For optimum washing performance, avoid positioning bulky crockery directly below the tray. The tray is removable.
LOWER RACK (loading example for the lower rack)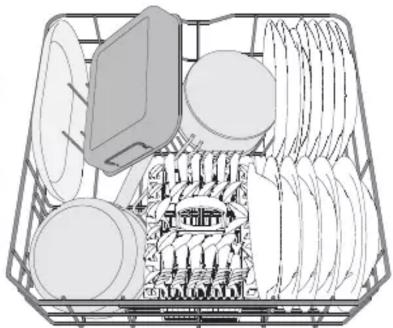
For pots, lids, plates, salad bowls, cutlery, etc. Large plates and lids should ideally be placed at the sides to avoid interference with the spray arm.
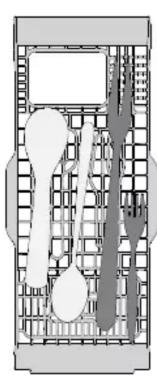
CUTLERY BASKET
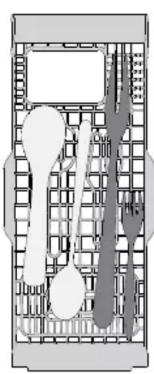
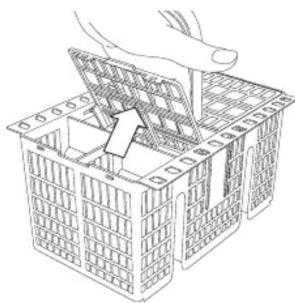
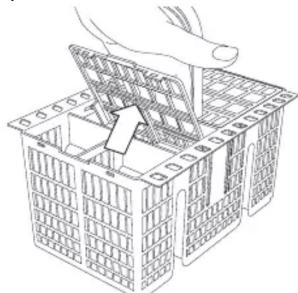
The basket is equipped with top grilles for improved cutlery arrangement. The cutlery basket should be positioned only at the front of the lower rack. Knives and other utensils with sharp edges must be placed in the cutlery basket with the points facing downwards or they must be positioned horizontally in the tip-up compartments on the upper rack.


Before using the appliance, read these instructions carefully. The manufacturer is not liable if incorrect installation and use causes injury or damage. Always keep these instructions with the appliance for future reference. Visit docs.hotpoint.eu.
Read the user manual carefully before installing the appliance.
SAFETY INSTRUCTIONS
INSTALLATION
- SAFETY WARNINGS
- ELECTRICAL CONNECTIONS
- SAFETY WARNINGS FOR INSTALLATION
- SAFETY WARNINGS FOR USE
- HOT SURFACE
- WHITE GOODS DISPOSAL
- HOT SURFACE WARNING
- WATER SUPPLY
- CONTROL PANEL
- CLEANING AND MAINTENANCE
1. Indicator lamp for adding/removing salt 2. Salt level indicator 3. Salt container cap 4. Salt level indicator 5. Salt level indicator lamps 6. Indicator lamp for start/pause
Use only coarse salt, without impurities
Recommendations for using coarse salt
After installation, remove any packaging and protective elements from the upper part.
Filling with salt
When using salt, follow the instructions for the water softener.
- The salt container must be filled before starting the dishwasher.
The water softener must be filled.
Fill the salt container before starting the dishwasher (see the rating plate) and when the salt level indicator lamp is on.
- Remove the lower basket and unscrew the cap (counterclockwise).
- This should only be done before the first use: pour water into the salt container.
- Fill the container (see figure) with salt up to the edge (about 1 kg); the water will overflow.
- The device is designed for use with the specified type of water.
Before starting the device and testing, it is necessary to connect it to a container with a water supply during the test (this may cause the water to be shut off if the device is not working properly).
When it is necessary to drain the water, to prevent corrosion, this procedure should be performed with the device turned off.
WATER HARDNESS SETTING
To ensure the correct operation of the water softener, the water hardness parameter must be set based on the water hardness. These settings can be adjusted by the user.
The settings for the water hardness are adjusted using the buttons on the control panel.
Do not press the ADD/SET button while the device is operating. Press the ADD/SET button briefly. If the signal is not heard within 5 seconds, press the button again. - The indicator will flash and the current setting will be displayed. Press the ADD/SET button to select the required setting (see WATER HARDNESS SETTINGS).
| Су кермektīri kecteci |
| Дeнгей | °dH
Германя
deнгейлөрì | °FH
Фразцузке
градүьì | °CClark
Альшынша
градүстар |
| 1 | Жúмсak | 0 - 6 | 0 - 10 | 0 - 7 |
| 2 | Ортаа | 7 - 11 | 11 - 20 | 8 - 14 |
| 3 | Шamамен | 12 - 16 | 21 - 29 | 15 - 20 |
| 4 | Каattы | 17 - 34 | 30 - 60 | 21 - 42 |
| 5 | ΘTeΚaattы | 35 - 50 | 61 - 90 | 43 - 62 |
Press the ADD/SET button briefly.
Parameter set!
After this procedure, the device will operate with the new setting.
Only use the settings intended for your specific machine model.
After setting the machine, if the salt refill indicator does not light up, it may be necessary to add salt and check the regeneration element in the regeneration process.
The settings are intended for machines with a specific type of water softener.
SALT REFILL INDICATOR
The salt refill indicator will light up. When the salt refill indicator is lit, it is necessary to refill the salt.
B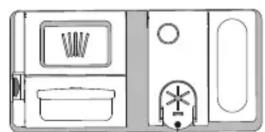
- Insert the injector into the fuel tank filler neck.
- Raise the crane hook to the maximum height (110 m) and set it in place. Then, lower the hook, moving it away from the circular platform.
- Remove the hook and install the safety latch. Do not use the crane without the safety latch.
ADJUSTING THE CRANE LIMIT SWITCHES
If you are not qualified to adjust the crane limit switches, contact the manufacturer or the crane supplier for adjustment. - Turn off the power supply. - Open the cover. - Press the reset button, then follow the steps. Turn off the power supply. The indicator lights on the control panel and the crane limit switch should be off. To adjust the limit switches, press the reset button 10 times. - Then turn off the power supply.
Parameter settings!
If the crane is equipped with a load cell (load cell), the crane will operate. If the crane is not equipped with a load cell, the crane limit switches will be used. The load cell must be calibrated at least 5 times. The parameters must be set correctly, and the load cell must be checked for proper operation.
- If the load cell readings are stable, set the low limit (2-3).
- If the load cell readings fluctuate or are unstable, set the high limit (4-5).
LOWERING THE CRANE HOOK
To lower the crane hook, press the lower button. Lower the hook only with the D button. Do not lower the hook with the remote control.
- When lowering the crane, check the limit switches and the brake. The indicator lights on the control panel will show the crane status.
- Remove the safety latch and slide the crane hooks along the guide rails.
- If the device is not used for a long time, remove the batteries to prevent leakage.
The device is designed for use with the original power adapter supplied.
If the device is used with an adapter not intended for it, there is a risk of damage or malfunction.
ACCESSORIES LIST
Spare parts. Spare parts for devices with replaceable parts.
4 QUICK
Designed for quick measurement of the device's parameters. Slightly reduces measurement time.
5 PRECISE
Designed for precise measurements with a glass and other accessories.
REPLACING THE BATTERIES
Battery
(Battery replacement procedure)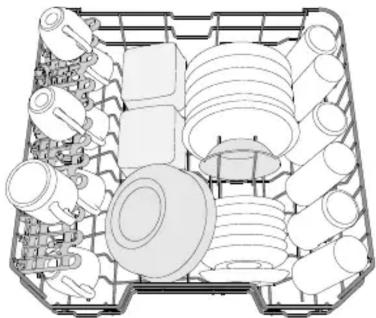
Precise and sensitive instruments: glasses, scales, small thermometers, small devices.
Battery replacement instructions
To adjust the temperature, press the button: set the desired temperature using the buttons. The temperature will be displayed on the screen. Press the button to confirm the temperature setting.
The device will turn off automatically.
If the temperature is not adjusted, the temperature will be set to the default setting (shown in the picture). If the temperature is set incorrectly, press the button to reset it.
To set the desired temperature, press the button on the control panel, then use the up and down buttons.
After setting, the temperature will be adjusted automatically. To turn off the device, press the power button once or hold it down.
ADJUSTABLE TEMPERATURE SETTINGS
The temperature can be adjusted using the control buttons.
The temperature can be adjusted using the control buttons on the device.
For children:
- To adjust the temperature, press the button
or use the up and down buttons
- To set the temperature, press the button and adjust the temperature using the up and down buttons, or press the button to set the temperature.
TEMPERATURE SETTINGS
The temperature can be adjusted using the control buttons. For optimal performance, set the temperature to the recommended level. The temperature can be adjusted.
TEMPERATURE CONTROL
Koctpən, kaknaK, TəpeIke, caIat Iapalapbl, ac KypalapbHa apHaNfAH. YIKeH TəpeIkeIep MeH KaKaNkTapdbI bypikKiUke KeIepri Jkacamaybl ysiH 6yipjKaTapbHa opHaNaCTbIPfAH dypbIC.
(acombIHbI mop cepee bIDbcMbI cany MbIcaJIbI)
ПышAKTAPFA APHAJIFAH HAYA
Cebetac KypanapbIH XaKcbipak opHaIacTbipyFa apHaIFaH yctiHi TOpnapMeH Xa6dbkTaNFaH. PbIwaKTapfa apHaIFaH HayaHbI TeMeHI cpeHH aIbIHbI XaFbHa fHa KOHOKepeK.
ΘTkip yUtapbI 6ap nbIwaKTap MeH 6acka ac γι KypaIapbIH 6eTIN TEmen KapaTbIN nbIwaKTapra apHaIraH hayara caJIbIH3 Hemece OIapDbI XORapFbI cpeHIn XINHaIMaJIbI 6eNIkTepiHe KeIJeHEnHe canyra 6oJaBI.
INSTRUKCJA
CODZIENNEJ EKSPLOATACJI
DZIEKUJEMY ZA ZAKUP PRODUKTU HOTPOINT ARISTON.
www.hotpoint.eu/register

WWW
Puteti descarca Instructiunile privind siguranta si Manualul deutilizare,vizitand site-ul nostr docs hotspot.eu si urmmand instructiunile depe spatele acestei brosuri.
IPEEDIPEBbIM IcIOJIb3OBAHnEM
Iocne yctahOBKn ydaJIte 0nkCaTOpbl c Kop3nH n ydepXnbauOuIe 3JlactNhbIe 3JeMeHTbI c BepXHeK Kop3HbI.
RIFORNIMENTO DEL SERBATOIO DEL SALE
IcnoB3ObaHne coN npEoTbpaaet o6pa3ObaHne I3BECTKOBTO HAJETA Ha nocyde n fynKcuHOHaJIbHbIX KOMnOHeHTax nocydomoeHoi MaunHbl.
- The salt container must never be left empty.
- Be sure to set the water hardness level.
The salt container is located in the lower part of the dishwasher (see DESCRIPTION OF THE APPLIANCE). It must be filled when the indicator for missing salt appears on the control panel.
- Remove the lower basket and unscrew the lid of the container (counterclockwise).
- This is done only at first use: pour water into the container until it overflows.
- Insert the funnel (see figure) and fill the container with salt (about 1 kg). During this, a small amount of water may leak out of the container.
- Remove the funnel and wipe the area around the opening to remove any salt residue.
Screw the lid back on tightly, so that during the wash cycle the container does not leak detergent (the water softener may be damaged).
If you need to add salt, you must complete the procedure before starting a wash cycle to avoid corrosion.
SETTING THE WATER HARDNESS
To ensure proper operation of the softener, the water hardness parameter must correspond to the actual water hardness in your home. The relevant information can be obtained from your local water supply company.
The factory setting for the water hardness level is the default value.
Turn on the appliance by pressing the ON/OFF button. - Turn off the appliance by pressing the ON/OFF button. - Press and hold the P button for 5 seconds until a beep sounds. Turn on the appliance by pressing the ON/OFF button. - The program indicator corresponding to the selected level flashes. - Press the P button to select the desired hardness level (see WATER HARDNESS TABLE).
Never pour rinse aid directly into the washing chamber.
ADJUSTING THE RINSE AID DOSAGE
If the quality of the dishes is not satisfactory, you can adjust the rinse aid dosage.
Turn on the dishwasher by pressing the ON/OFF button. - Turn off the appliance by pressing the ON/OFF button. - Press the P button three times: an audible signal sounds. Turn on the appliance by pressing the ON/OFF button. - The program indicator corresponding to the selected level lights up. - Press the P button to select the rinse aid level. - Turn off the appliance by pressing the ON/OFF button.
Setup complete!
The rinse aid level can be set to 1 (off). In this case, the rinse aid is not used, and the indicator for the absence of rinse aid will not light up, even if the dispenser is empty.
Depending on the model of the dishwasher, 5 setting levels are available. The factory settings are indicated for each model; to find out the settings for your machine, follow the instructions below. - If white streaks remain on the dishes, set a lower value (2-3). - If water drops remain on the dishes or limescale deposits, set a higher value (4-5).
LOADING DETERGENT
To open the detergent dispenser, use the catch. Load the detergent only into the dry dispenser. For pre-wash detergent, place it directly in the washing chamber.
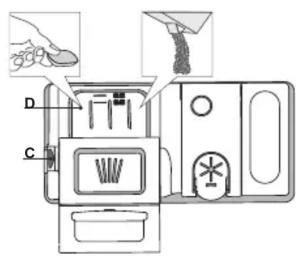
1. To determine the required amount of detergent, see the instructions above. On the inside of the dispenser door, there are measuring marks that allow you to dose the detergent correctly. 2. Remove any detergent residue from the edges of the dispenser and close the lid with a click. 3. Close the detergent dispenser lid, pushing it up until it clicks into place.
The detergent dispenser opens automatically at the right moment during the cycle according to the selected program.
Using detergents not intended for dishwashers may cause malfunctions or damage to the appliance.
PROGRAM TABLE
Dishes: glasses, cups, plates, small salad bowls.
ADJUSTING THE HEIGHT OF THE UPPER RACK
The height of the upper rack can be adjusted: the upper position — to allow placing large dishes in the lower rack, the lower position — to use the fold-down cup racks to the full extent (to increase the free space above without creating obstacles for dishes loaded in the lower rack).
The upper rack is equipped
HEIGHTS (see figure). To raise the upper basket, simply pull it up by the edge, without pressing the levers, until it locks into a stable position at the top. To return the basket to the lower position, press the levers A located on its side panels and slide the basket down.
Do not adjust the height of the upper basket when it is loaded with dishes. Never raise or lower the basket by holding it from only one side.
FOLDING SHELF HOLDERS WITH ADJUSTABLE POSITION
Side folding shelf holders
They can be folded or unfolded to optimize the arrangement of dishes on the rack. Tall glasses can be securely attached in the folding shelf holders by inserting their stems into the special slots.
Depending on the model:
- To unfold the holders, slide them up, rotate them outward, engage them in the slots, and pull them down.
- To fold the holders, rotate them inward, slide them down, pull them up, and attach the holders to the slots.
CUTLERY BASKET
The upper basket is equipped with a cutlery basket that can be used to place cutlery and tableware. To improve washing quality, do not place large dishes directly under the basket. The basket is removable.
LOWER BASKET This basket is intended for pots, lids, plates, salad bowls, tableware, etc. (example of loading the lower basket)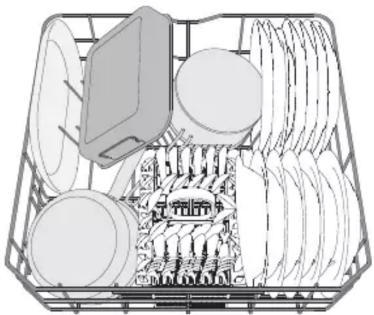
CUTLERY BASKET FOR TABLEWARE
The basket is equipped with a top rack for more convenient placement of tableware. The removable basket should be placed only in the front part of the lower basket.
Knives and other sharp objects should be placed in the cutlery basket with the sharp edge down or placed horizontally on the folding sections of the upper basket.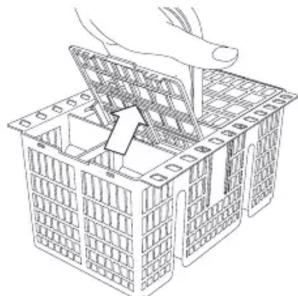
TROUBLESHOOTING INSTRUCTIONS

THANK YOU FOR PURCHASING A HOTPOINT ARISTON PRODUCT. To receive complete support, please register your appliance at: www.hotpoint.eu/register

Once you have done this, start a program without any dishes.
www.hotpoint.eu/register

WWW
Safety Instructions and User Manual can be downloaded from our website docs.hotpoint.eu
and also follow the instructions on the back of this brochure.
- END OF WASH CYCLE
DRAIN HOSE CONNECTION
Connect the drain hose to the siphon or to the sink drain pipe, at a height between 30 and 100 cm from the floor.
If the drain hose is connected to a sink or a siphon that is blocked or if the drain hose is kinked, the water may not drain properly. Check and clean the hose and the siphon.
The drain hose must be free of obstructions. Make sure that the hose is not bent or kinked, and that the water can flow freely.
If the drain hose is not properly connected or if the water is not draining, the appliance may not work correctly.
If the water does not drain, check the drain hose and the siphon. Make sure that the hose is not kinked or blocked. If necessary, clean the filter and the drain pump.
- 1. Disconnect the drain hose from the siphon and place it in a container (see figure 1). 2. Remove any obstructions from the drain hose and clean it (see figure 2).
- To connect the water supply hose to the tap, use the supplied gasket (Figure 3).
- Check all connections (hose, inlet hose, faucet, etc.) for leaks and tighten them if necessary.
- If the hoses are damaged, replace them. The sharp edges of the tap (black plastic) can damage the hose (Figure 4).
After connecting the hoses, turn on the water supply and check for leaks; this will prevent possible water damage.
CONNECTING THE WATER SUPPLY HOSE
If the water supply hose is not long enough, replace it with a longer one. Do not use extension hoses. If these safety measures are not followed, water leakage may occur and cause damage to other appliances.
CLEANING THE FILTER
The filter mesh may become clogged with debris. Clean the filter by removing it and rinsing it under running water. Use a soft brush to clean the mesh if necessary.
To remove the filter, press the release button and pull it out. Clean the filter with a soft brush and rinse it under running water.
Do not use sharp objects to clean the filter.
WATER SOFTENER SALT
The water softener automatically adjusts the water hardness level, reducing the need for manual adjustment and improving washing performance.
This salt is 100% regenerable, so it must be kept dry and free from impurities.
The regeneration process is based on the water hardness level. Regeneration occurs every 5 hours of operation, or when the water hardness level changes.
The regeneration process should be carried out at least once a week, or more often if the water hardness is high.
- Bip peTTik perehepaunr TytbHaNbI: 3.5 n cy;
- Bip Lünkfra KocbIMsa 5 MmHyT Xymcanaabi; 0.005 kBt/caf-tah a3 3Heprn TytbHaBbl.
AKAYIbIKTAPdbI WEEWY
Erep ci3diH bIDbc JyrbI MaunHaBbI TnicTi deHreJe Jxmbic icTeMei Typca, on MceeneHi TeMeHderi TiImHen eTin Weuyre 60nMa, aJIne 6oNmaI Ma, TekcepH3. 3re de akaynap MeH maceleep TybHdaFAnJa, CatbIn anFaHHan KeiHri Kbl3Met KepcetyopTaIbIFbHa JxryHlH3, OHbIMe H bainbCy aknapaTbI KeiINdK TaIOhBHa Da KepceTInReH. Kocankbl 6eJWeKTeP apNaBI HopMaTnBtIK TaIanTapra cKeKec 7 HeMece 10 XbInra DeH KOJ XetIMDi 60nAbI.
| AKAYIbIKTAP | БИKTIMAN CESENTPEI WIIUIMDEP | |
| Суз Иndикаторы
Жанын Тур | Туз сayытсыбoc. (Туз салганнан кеин,
Туз Иndикаторы Береше чуу члki
боны жанын Туруь МУМКИ). | |
| Шаыts
Индикаторы
Жанын Тур | Шаыts диссесерб. (Туз салганнан
кeин, Шаыts Иndикаторы Берше чуу
члкпббьбьбьбь.
Б�лын Сын
Бын
Бын
Бын
Бын
Бын
Бын
Бын
Бын
Бын
Бын
Бын
Бын
Бын
Бын
Бын
Бын
Бын
Бын
Бын
Бын
Бын
Бын
Бын
Бын
Бын
Bapмени
Бермени
Бермени
Бермени
Бермени
Бермени
Бермени
Бермени
Бермени
Бермени
Бермени
Бермени
Бермени
Бермени
Бермени
Бермени
Бермени
Бермени
Бермени
Бермени
Бермени
Бermени
Бермени
Берmени
Берmени
Берmени
Берmени
Берmени
Берmени
Берmени
Берmени
Берmени
Берmени
Берmени
Берmени
Берmени
Берmени
Берmени
Берmени
Берmени
Берmени
Берmени
Берmени
Бермени
Берmени
Берmени
Берmени
Берmени
Берmени
Берmени
Берmени
Берmени
Берmени
Берmени
Берmени
Берmени
Берmени
Берmени
Берmени
Берmени
Берmени
Берmени
Бermени
Берmени
Берmени
Берmени
Берmени
Берmени
Берmени
Берmени
Берmени
Берmени
Берmени
Берmени
Берmени
Берmени
Берmени
Берmени
Берmени
Берmени
Берmени
Берmени
Бermени
Бермени
Берmени
Берmени
Берmени
Берmени
Берmени
Берmени
Берmени
Берmени
Берmени
Берmени
Берmени
Берmени
Берmени
Берmени
Берmени
Берmени
Берmени
Бермени
Берmени
Бермени
Берmени
Берmени
Берmени
Берmени
Берmени
Берmени
Берmени
Берmени
Берmени
Берmени
Берmени
Берmени
Берmени
Берmени
Берmени
Берmени
Берmени
Бермени
Бermени
Берmени
Берmени
Берmени
Берmени
Берmени
Берmени
Берmени
Берmени
Берmени
Берmени
Берmени
Берmени
Берmени
Берmени
Берmени
Берmени
Берmени
Берmени
Бермени
Бermени
Бермени
Берmени
Берmени
Берmени
Берmени
Берmени
Берmени
Берmени
Берmени
Берmени
Берmени
Берmени
Берmени
Берmени
Берmени
Берmени
Берmени
Бермени
Берmени
Берmени
Бермени
Берmени
Берmени
Берmени
Берmени
Берmени
Берmени
Берmени
Берmени
Берmени
Берmени
Берmени
Берmени
Берmени
Берmени
Берmени
Берmени
Бермени
Берmени
Бermени
Берmени
Берmени
Берmени
Берmени
Берmени
Берmени
Берmени
Берmени
Берmени
Берmени
Берmени
Берmени
Берmени
Берmени
Берmени
Берmени
Берmени
Бермени
Берmени
Бermени
Бермени
Берmени
Берmени
Берmени
Берmени
Берmени
Берmени
Берmени
Берmени
Берmени
Берmени
Берmени
Берmени
Берmени
Берmени
Берmени
Берmени
Бермени
Бермени
Берmени
Берmени
Берmени
Берmени
Берmени
Берmени
Берmени
Берmени
Берmени
Берmени
Берmени
Берmени
Берmени
Берmени
Берmени
Берmени
Берmени
Берmени
Бермени
Бермени
Берmени
Бермени
Берmени
Берmени
Берmени
Берmени
Берmени
Берmени
Берmени
Берmени
Берmени
Берmени
Берmени
Берmени
Берmени
Берmени
Берmени
Берmени
Бермени
Бермени
Бermени
Берmени
Берmени
Берmени
Берmени
Берmени
Берmени
Берmени
Берmени
Берmени
Берmени
Берmени
Берmени
Берmени
Берmени
Берmени
Берmени
Берmени
Бермени
Бермени
Бermени
Бермени
Берmени
Берmени
Берmени
Берmени
Берmени
Берmени
Берmени
Берmени
Берmени
Берmени
Берmени
Берmени
Берmени
Берmени
Берmени
Бермени
Берmени
Берmени
Берmени
Бермени
Берmени
Берmени
Берmени
Берmени
Берmени
Берmени
Берmени
Берmени
Берmени
Берmени
Берmени
Берmени
Берmени
Берmени
Берmени
Бермени
Берmени
Берmени
Бermени
Берmени
Берmени
Берmени
Берmени
Берmени
Берmени
Берmени
Берmени
Берmени
Берmени
Берmени
Берmени
Берmени
Берmени
Берmени
Берmени
Бермени
Берmени
Берmени
Бermени
Бермени
Берmени
Берmени
Берmени
Берmени
Берmени
Берmени
Берmени
Берmени
Берmени
Берmени
Берmени
Берmени
Берmени
Берmени
Берmени
Бермени
Берmени
Бермени
Берmени
Бермени
Берmени
Берmени
Берmени
Берmени
Берmени
Берmени
Берmени
Берmени
Берmени
Берmени
Берmени
Берmени
Берmени
Берmени
Берmени
Бермени
Берmени
Бермени
Бermени
Берmени
Берmени
Берmени
Берmени
Берmени
Берmени
Берmени
Берmени
Берmени
Берmени
Берmени
Берmени
Берmени
Берmени
Берmени
Берmени
Бермени
Берmени
Бермени
Бermени
Бермени
Берmени
Берmени
Берmени
Берmени
Берmени
Берmени
Берmени
Берmени
Берmени
Берmени
Берmени
Берmени
Берmени
Берmени
Берmени
Бермени
Бермени
Берmени
Берmени
Бермени
Берmени
Берmени
Берmени
Берmени
Берmени
Берmени
Берmени
Берmени
Берmени
Берmени
Берmени
Берmени
Берmени
Берmени
Берmени
Бермени
Бермени
Берmени
Бermени
Берmени
Берmени
Берmени
Берmени
Берmени
Берmени
Берmени
Берmени
Берmени
Берmени
Берmени
Берmени
Берmени
Берmени
Берmени
Берmени
Бермени
Бермени
Берmени
Бermени
Бермени
Берmени
Берmени
Берmени
Берmени
Берmени
Берmени
Берmени
Берmени
Берmени
Берmени
Берmени
Берmени
Берmени
Берmени
Берmени
Бермени
Бермени
Бермени
Берmени
Берmени
Берmени
Берmени
Берmени
Берmени
Берmени
Берmени
Берmени
Берmени
Берmени
Берmени
Берmени
Берmени
Берmени
Берmени
Берmени
Бермени
Бермени
Бермени
Берmени
Бермени
Берmени
Берmени
Берmени
Берmени
Берmени
Берmени
Берmени
Берmени
Берmени
Берmени
Берmени
Берmени
Берmени
Берmени
Берmени
Бермени
Бермени
Бермени
Бermени
Берmени
Берmени
Берmени
Берmени
Берmени
Берmени
Берmени
Берmени
Берmени
Берmени
Берmени
Берmени
Берmени
Берmени
Берmени
Берmени
Бермени
Бермени
Бермени
Бermени
Бермени
Берmени
Берmени
Берmени
Берmени
Берmени
Берmени
Берmени
Берmени
Берmени
Берmени
Берmени
Берmени
Берmени
Берmени
Бермени
Берmени
Берmени
Берmени
Берmени
Бермени
Берmени
Берmени
Берmени
Берmени
Берmени
Берmени
Берmени
Берmени
Берmени
Берmени
Берmени
Берmени
Берmени
Берmени
Бермени
Берmени
Берmени
Берmени
БERMENH
Сын
Сын
Сын
Сын
Сын
Сын
Сын
Сын
Сын
Сын
Сын
Сын
Сын
Сын
Сын
Сын
Сын
Сын
Сын
Сын
Сын
Сын
Сын
Сын
Сын
Сы网
Сы网
Сы网
Сы网
Сы网
Сы网
Сы网
Сы网
Сы网
Сы网
Сы网
Сы网
Сы网
Сы网
Сы网
Сы网
Сы网
Сы网
Сы网
Сы网
Сы网
Сы网
Сы网
Сы网
Сы网
Сы树
Сы树
Сы树
Сы树
Сы树
Сы树
Сы树
Сы树
Сы树
Сы树
Сы树
Сы树
Сы树
Сы树
Сы树
Сы树
Сы树
Сы树
Сы树
Сы树
Сы树
Сы树
Сы树
Сы树
Сы树
Сы网
Сы网
Сы网
Сы网
Сы网
Сы网
Сы网
Сы网
Сы网
Сы网
Сы网
Сы网
Сы网
Сы网
Сы网
Сы网
Сы网
Сы网
Сы网
Сы网
Сы网
Сы网
Сы网
Сы网
Сыneti
Сы网
Сы网
Сы网
Сы网
Сы网
Сы网
Сы网
Сы网
Сы网
Сы网
Сы网
Сы网
Сы网
Сы网
Сы网
Сы网
Сы网
Сы网
Сы网
Сы网
Сы网
Сы网
Сы网
Сы网
Сы neti
Сы网
Сы网
Сы网
Сы网
Сы网
Сы网
Сы网
Сы网
Сы网
Сы网
Сы网
Сы网
Сы网
Сы网
Сы网
Сы网
Сы网
Сы网
Сы网
Сы网
Сы网
Сы网
Сы网
Сы网
С�ы网
Сы网
Сы网
Сы网
Сы网
Сы网
Сы网
Сы网
Сы网
Сы网
Сы网
Сы网
Сы网
Сы网
Сы网
Сы网
Сы网
Сы网
Сы网
Сы网
Сы网
Сы网
Сы网
Сы网
Сы网
Cryonny | Кадун
Кадун
Кадун
Кадун
Кадун
Кадун
Кадун
Кадун
Кадун
Кадун
Кадун
Кадун
Кадун
Кадун
Кадун
Кадун
Кадун
Кадун
Кадун
Кадун
Кадун |

CaraCat neh cTahdapt TpaIbI TOIbIK KxKaTTama, KocajkbI 6eJIweKTepre Tancbipbc XeHe eHIM TpaIbI TOIbIK aKnapaATbI MbHa XepDeH Ta6a ana
- Bi3iH caɪtka kipɪn ʌbɪfblɪhɪdDocs.hotpoint.eu XəHe parts-selfservice.indsit.com KypblfblhIH QR KOlbIH KOJaHaHbIb3
- Hemece, 6i3in CaTyan KeiHri KbI3MeT KepCteTy optaIbIbHa xa6apIacbIb3 (Tepeoh Hemipih KeiJIeMe IapTTapbIH KapaHbI3).KeiJIik BoMbIHsa KbI3MeT KepCteTy optaIbIbHa xa6apIaCKaHda, eHIMHi TExNkAblK keCTecIHde KepCteIInreH KoIaTbpI xa6apIaNbI3.
Ynlire katbictb aknapaattb 3HepeTnKaJIbIK 3a76enriige KepcetinreH QR-KoDtbIH kemerimekapayra 6oanaDbI. Cohdai-ak 6yI 3a76enriige yIri caikecteHdiprii biap, onbl https://eprel.ec.europa.eu MekehkaBHaTbTipkey npotanbHaH KeHec any ysiH KoIdahyra 6oanaDbI.
USO QUOTIDIANO
1. VERIFICA DEL COLLEGAMENTO ALLA RETE IDRICA
INTERRUPTIONS IMPRÉVUES
1. CHECK WATER CONNECTION
Check that the dishwasher is connected to the water supply and that the tap is open.
2. SWITCH ON THE DISHWASHER
Open the door and press the ON/OFF button.
3. LOAD THE RACKS (see LOADING THE RACKS)
4. FILLING THE DETERGENT DISPENSER
5. CHOOSE THE PROGRAM AND CUSTOMISE THE CYCLE
Select the most appropriate program in accordance with the type of crockery and its soiling level (see PROGRAMS DESCRIPTION) by pressing the P button.
6. START
Start the wash cycle by pressing START/Pause button (led is lit) and closing the door within 4 sec. When the program starts you hear a single beep. If the door was not closed within 4sec., the alarm sound will be played. In this case, open the door, press START/Pause button and close the door again within 4 sec.
7. END OF WASH CYCLE
The end of the wash cycle is indicated by beeps and by the flashing of the indicator light of the selected program. Open the door and switch off the appliance by pressing the ON/OFF button.
Wait for a few minutes before removing the crockery - to avoid burns. Unload the racks, beginning with the lower one.
The machine will switch off automatically during certain extended periods of inactivity, in order to minimise electricity consumption. If the crockery is only lightly soiled or if it has been rinsed with water before being placed in the dishwasher, reduce the amount of detergent used accordingly.
MODIFYING A RUNNING PROGRAM
If a wrong program was selected, it is possible to change it, provided that it has only just begun: open the door, press and hold the ON/OFF button, the machine will switch off.
Switch the machine back on using the ON/OFF button and select the new wash cycle and any desired options; Start the wash cycle by pressing START/Pause button and closing the door within 4 sec.
Without switching off the machine, open the door (START/Pause led starts blinking) (be ware of HOT steam!) and place the crockery inside the dishwasher. Press the START/Pause button and close the door within 4 sec., the cycle will resume from the point at which it was interrupted.
ACCIDENTAL INTERRUPTIONS
If the door is opened during the wash cycle, or if there is a power cut, the cycle stops. Press the START/Pause button and close the door within 4 sec., the cycle will resume from the point at which it was interrupted.
ADVICE AND TIPS
TIPS
Before loading the baskets, remove all food residues from the crockery and empty the glasses. You do not need to rinse beforehand under running water.
Arrange the crockery so that it is held in place firmly and does not tip over; and arrange the containers with the openings facing downwards and the concave/convex parts placed obliquely, thus allowing the water to reach every surface and flow freely.
Warning: lids, handles, trays and frying pans do not prevent the sprayer arms from rotating.
Place any small items in the cutlery basket.
Very soiled dishes and pans should be placed in the lower basket because in this sector the water sprays are stronger and allow a higher washing performance.
After loading the appliance, make sure that the sprayer arms can rotate freely.
UNSUITABLE CROCKERY
- Wooden crockery and cutlery.
- Delicate decorated glasses, artistic handicraft and antique crockery. Their decorations are not resistant.
- Parts in synthetic material which do not withstand high temperatures. Copper and tin crockery. Crockery soiled with ash, wax, lubricating grease or ink.
The colours of glass decorations and aluminium/silver pieces can change and fade during the washing process. Some types of glass (e.g. crystal objects) can become opaque after a number of wash cycles too.
DAMAGE TO GLASS AND CROCKERY
- Only use glasses and porcelain guaranteed by the manufacturer as dishwasher safe.
- Use a delicate detergent suitable for crockery.
- Collect glasses and cutlery from the dishwasher as soon as the wash cycle is over.
TIPS ON ENERGY SAVING
- When the household dishwasher is used according to the manufacturer's instructions, washing tableware in a dishwasher usually consumes less energy and water than hand dishwashing.
- In order to maximize dishwasher efficiency it is recommended to initiate the wash cycle once dishwasher is fully loaded. Loading the household dishwasher up to the capacity indicated by the manufacturer will contribute to energy and water savings. Information on correct loading of tableware can be found in Loading chapter. In case of partial loading it is recommended to use dedicated wash options if available (Half load/ Zone Wash, Multizone), filling up only selected racks. Incorrect loading or overloading the dishwasher may increase resources usage (such as water, energy and time, as well as increase noise level), reducing cleaning and drying performance.
- Manual pre-rinsing of tableware items leads to increased water and energy consumption and is not recommended.
HYGIENE
To avoid odour and sediment which can be accumulated in the dishwasher please run a high temperature program at least one a month. Use a tea spoon of detergent and run it without the loading to clean your appliance.
CARE AND MAINTENANCE
CLEANING THE FILTER ASSEMBLY
Regularly clean the filter assembly so that the filters do not clog and that the waste water flows away correctly.
Using dishwasher with clogged filters or foreign objects inside filtration system or sprayarms may cause unit malfunction resulting in lose of performance, noisy work or higher resources usage.
The filter assembly consists of three filters which remove food residues from the washing water and then recirculate the water.
The dishwasher must not be used without filters or if the filter is loose.
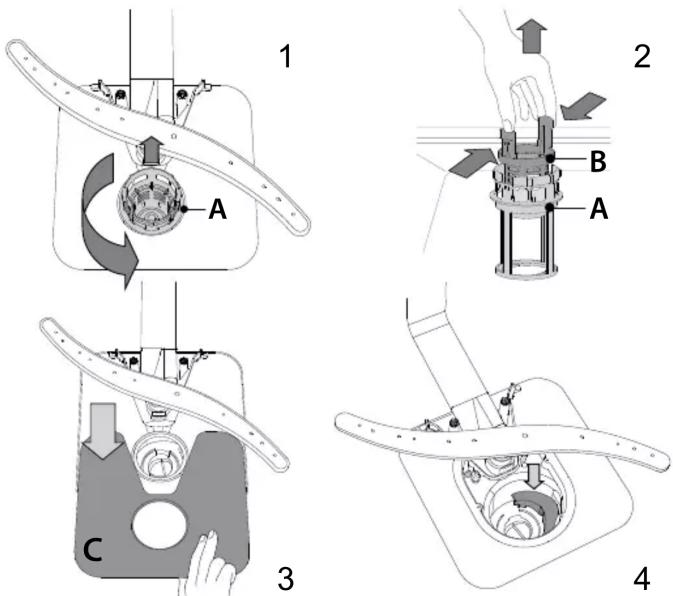
At least once per month or after each 30 cycles, check the filter assembly and if necessary clean it thoroughly under running water, using a non-metallic brush and following the instructions below:
- Turn the cylindrical filter A in an anti-clockwise direction and pull it out (Fig 1).
- Remove the cup filter B by exerting a slight pressure on the side flaps (Fig 2).
- Slide out the stainless-steel plate filter C (Fig 3).
- In case you find foreign objects (such as broken glass, porcelain, bones, fruit seeds etc.) please remove them carefully.
- Inspect the trap and remove any food residues. NEVER REMOVE the wash-cycle pump protection (black detail) (Fig 4).
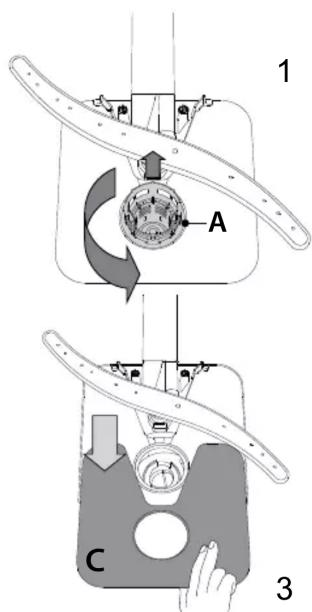
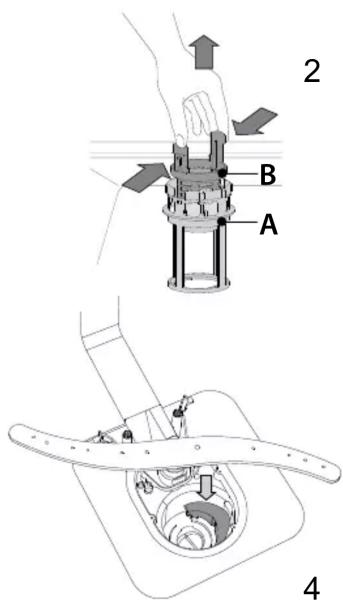
After cleaning the filters, re-place the filter assembly and fix it in position correctly; this is essential for maintaining the efficient operation of the dishwasher.
CLEANING THE WATER INLET HOSE
If the water hoses are new or have not been used for an extended period of time, let the water run to make sure it is clear and free of impurities before performing the necessary connections. If this precaution is not taken, the water inlet could become blocked and damage the dishwasher.
CLEANING THE SPRAY ARMS
On occasions, food residue may become encrusted onto the spray arms and block the holes used to spray the water. It is therefore recommended that you check the arms from time to time and clean them with a small non-metallic brush.
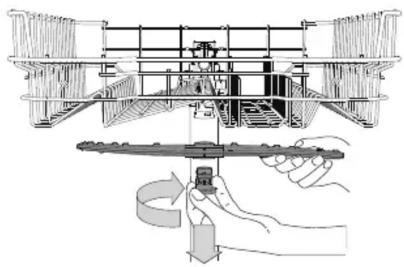
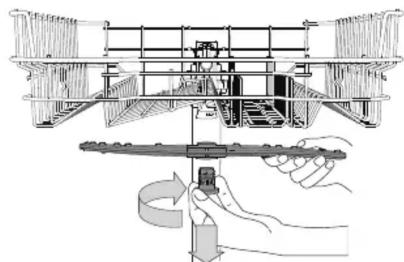
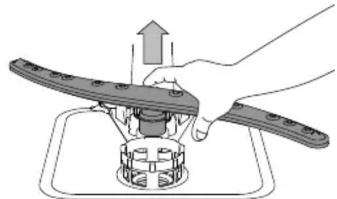
To remove the upper spray arm, turn the plastic locking ring in a clockwise direction. The upper spray arm should be replaced so that the side with the greater number of holes is facing upwards.
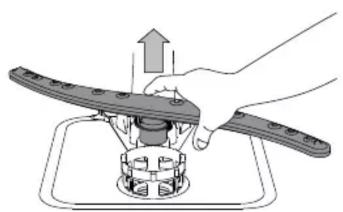
The lower spray arm may be removed by pulling it upwards.
WATER SOFTENING SYSTEM
Water softener automatically reduces water hardness, consequently preventing scale buildup on heater, contributing also to better cleaning efficiency.
This system regenerates itself with salt, therefore it is required to refill salt container when empty.
Frequency of regeneration depends on water hardness level setting - regeneration takes place once per 5 Eco cycles with water hardness level set to 3.
Regeneration process starts in final rinse and finishes in drying phase, before cycle ends.
- Single regeneration consumes: ~3.5 L of water;
- Takes up to 5 additional minutes for the cycle; Consumes below 0.005 kWh of energy.
TROUBLESHOOTING
In case your dishwasher doesn't work properly, check if the problem can be solved by going through the following list. For other errors or issues please contact authorized After-sales Service which contact details can be found in the warranty booklet. Spare parts will be available for a period of either up to 7 or up to 10 years, according to the specific Regulation requirements.
| PROBLEMS | POSSIBLE CAUSES SOLUTIONS | |
| Salt indicator is lit | Salt reservoir is empty. (After refill the salt indicator may remain lit for several wash cycles). | Refill reservoir with salt (for more information - see page 2). Adjust water hardness - see table, page 2. |
| Rinse aid indicator is lit | Rinse aid dispenser is empty (after refill the rinse aid indicator may remain lit for several wash cycles). | Refill dispenser with rinse aid (for more information - see page 2). |
| The dishwasher won't start or does not respond to commands. | The appliance has not been plugged in properly. | Insert the plug into the socket. |
| Power outage. | For safety reasons, dishwasher will not re-start automatically when power returns. Open dishwasher door, press START/Pause button and close the door within 4 seconds.. |
| The dishwasher door is not closed. Vigorous | push the door until you hear the "click". |
| Cycle is interrupted by door opening for more than 4 seconds. | Press START/Pause and close the door within 4 seconds. |
| It does not respond to commands. | Switch off the appliance by pressing the ON/OFF button, switch it back on after approximately one minute and restart the program. If problem persists, unplug the appliance for 1 minute, then plug it back in. |
| The dishwasher won't drain. | The wash cycle has not finished yet. Wait until | til the wash cycle finishes. |
| The drain hose is bent. Check that the drain h | ose is not bent (see INSTALLATION INSTRUCTION). |
| The sink drain pipe is blocked. Clean the sink | drain pipe. |
| The filter is clogged up with food residues. C | ean the filter (see CLEANING THE FILTER ASSEMBLY). |
| The dishwasher makes excessive noise. | The dishes are rattling against each other. | Position the crockery correctly (see LOADING THE RACKS). |
| An excessive amount of foam has been produced. | The detergent has not been measured out correctly or it is not suitable for use in dishwashers (see FILLING THE DETERGENT DISPENSER). Restart the current cycle by switching OFF the dishwasher, then switch it on again, select a new program, press START/Pause and close the door within 4 seconds. Please do not add any detergent. |
| The dishes are not clean. | The crockery has not been arranged properly. | Arrange the crockery correctly (see LOADING THE RACKS). |
| The spray arms cannot rotate freely, being hindered by the dishes. | Arrange the crockery correctly (see LOADING THE RACKS). |
| The wash cycle is too gentle. Select an appro | priate wash cycle (see PROGRAMS TABLE). |
| An excessive amount of foam has been produced. | The detergent has not been measured out correctly or it is not suitable for use in dishwashers (see FILLING THE DETERGENT DISPENSER). |
| The cap on the rinse aid compartment has not been shut correctly. | Make sure the cap of the rinse aid dispenser is closed. |
| The filter is soiled or clogged. Clean the filter | assembly (see CARE AND MAINTENANCE). |
| There is no salt. Fill the salt reservoir (see FILLING THE SALT RESERVOIR). | |
| The dishwasher does not fill the water. All LEDs are blinking rapidly | No water in the water supply or the tap is closed. | Make sure there is water in the water supply or the tap running. |
| The inlet hose is bent. | Make sure the inlet hose is not bent (see INSTALLATION) reprogram the dishwasher and reboot. |
| The sieve in the water inlet hose is clogged; it is necessary to clean it | After having carried out the verification and cleaning, turn off and turn on the dishwasher and restart a new program. |
| Dishwasher finishes the cycle prematurely. | Drain hose positioned too low or siphoning into home sewage system. | Check if end of drain hose is placed at correct height (see INSTALLATION). Check for siphoning into home sewage system, install air admittance valve if necessary. |
| Air in water supply. Check water supply for leaks | aks or other issues letting air inside. |
- Visiting our website docs.hotpoint.eu and parts-selfservice.whirlpool.com
- Using QR Code
- Alternatively, contact our After-sales Service (See phone number in the warranty booklet). When contacting our After-sales Service, please state the codes provided on your product's identification plate.
The model information can be retrieved using the QR-Code reported in the energy label. The label also includes the model identifier that can be used to consult the portal of the registry at https://eprel.ec.europa.eu.