CDX-C580RW - Car stereo SONY - Free user manual and instructions
Find the device manual for free CDX-C580RW SONY in PDF.

User questions about CDX-C580RW SONY
0 question about this device. Answer the ones you know or ask your own.
Ask a new question about this device
Download the instructions for your Car stereo in PDF format for free! Find your manual CDX-C580RW - SONY and take your electronic device back in hand. On this page are published all the documents necessary for the use of your device. CDX-C580RW by SONY.
USER MANUAL CDX-C580RW SONY
FM/MW/LW Compact Disc Player
Operating Instructions EN
For installation and connections, see the supplied installation/connections manual.
Thank you for purchasing the Sony Compact Disc Player. This unit lets you enjoy a variety of features by using either an optional rotary commander (RM-X4S) or a wireless remote (RM-X47).
In addition to the CD playback and radio operations, you can expand your system by connecting an optional CD/MD unit ^*1 .
If you operate this unit or connect an optional CD unit with the CD TEXT function, the CD TEXT information will appear in the display when you play back a CD TEXT disc*2.
1 You can connect to a CD changer, an MD changer, a CD player, an MD player.
2 A CD TEXT disc is an audio CD that includes information such as the disc name, artist name and track names.
This information is recorded on the disc.
Table of Contents
This Unit Only
Location of controls 4
Getting Started
Resetting the unit 6
Detaching the front panel 6
Setting the clock 7
CD Player
Listening to a CD 7
Playing a CD in various modes 9
Radio
Memorising stations automatically
— Best Tuning Memory (BTM) 10
Memorising only the desired stations. 10
Receiving the memorised stations 11
RDS
Overview of the RDS function 12
Displaying the station name. 12
Re-tuning the same programme automatically -Alternative Frequencies (AF) 12
Listening to traffic announcements 13
Preseting the RDS stations with the AF and TA data 14
Locating a station by programme type 15
Setting the clock automatically 16
Other Functions
Using the rotary commander 16
Adjusting the sound characteristics 18
Attenuating the sound 18
Changing the sound and display settings..... 18
With Optional Equipment
CD/MD Unit
Playing a CD or MD 19
Scanning the tracks - Intro Scan 21
Playing tracks repeatedly
— Repeat Play 21
Playing tracks in random order Shuffle Play 21
Labeling a CD — Disc Memo 22
Locating a disc by name -List-up 23
Selecting specific tracks for playback Bank 24
Additional Information
Precautions 25
Maintenance 26
Dismounting the unit 26
Attaching the label to the rotary commander 27
Specifications 28
Troubleshooting guide 29
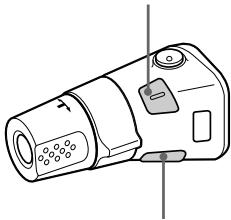
Location of controls

Refer to the pages for details.
SEEK/AMS (seek/Automatic Music Sensor/manual search) control 8, 10, 11, 13, 15, 20, 24
2 MODE (band/unit select) button 10, 11, 19, 23
3 SOURCE (source select) button 7, 10, 11, 19, 23
4 Dial (volume/bass/treble/left-right/ front-rear) 7,18,22,23
5 SOUND button 18
DSPL (display mode change) button 8,11,12,19,20,22,23
7 Display window
Receptor for the optional wireless remote
9 PTY/List button
Disc Memo 22, 23
List-up 23
RDS Programme 15
10 (eject) button 7
11 AF/TA button 12, 13, 14
12 RELEASE(front panel release) button 6,26
Reset button (located on the front side of the unit behind by the front panel) 6
14 OFF button 6,7
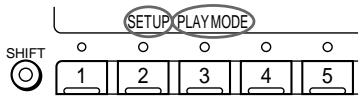
15 SHIFT button
PLAY MODE 9,10,11,13,14,21,24
REP 9,21
SETUP7,8,16,18,20
SHUF 9,21
16 POWER SELECT switch (located on the bottom of the unit)
See "POWER SELECT Switch" in the
Installation/Connections manual.
17 During radio reception:
Number buttons 10, 11, 13, 14
During CD/MD playback:
Direct disc selection buttons 20
18 D-BASS dial 19
Optional wireless remote (RM-X47)
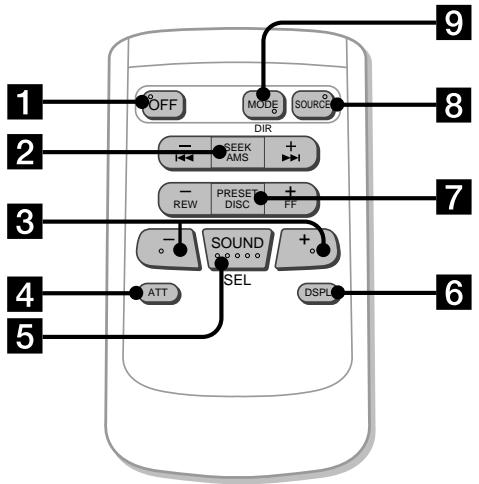
The buttons of the wireless remote work the same functions as those on this unit.
1 OFF button
2 SEEK/AMS button
3 buttons
4 ATT button
5 SOUND button
6 DSPL button
7 PRESET/DISC button
You cannot do manual search and manual tuning with the remote.
8 SOURCE button
9 MODE/DIR button
Functions as MODE on this unit.
When the POWER SELECT switch is set to the 3 position, the unit cannot be operated with the wireless remote unless SOURCE on the unit is pressed or a CD is inserted to activate the unit first.
Resetting the unit
Before operating the unit for the first time or after replacing the car battery, you must reset the unit.
Press the reset button with a pointed object, such as a ballpoint pen.
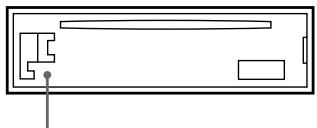
Reset button
Notes
- Pressing the reset button will erase the clock and some memorized functions.
- When you connect the power supply cord to the unit or reset the unit, wait for about 10 seconds before you insert a disc. If you insert a disc within these 10 seconds, the unit will not be reset, and you will have to press the reset button again.
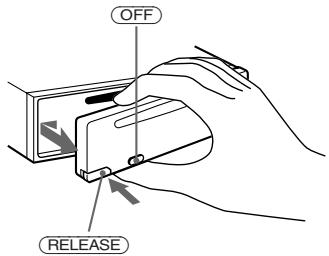
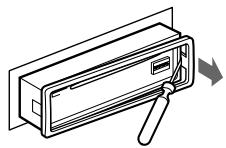
Detaching the front panel
You can detach the front panel of this unit to prevent the unit from being stolen.
1 Press OFF.
2 Press (RELEASE) to open up the front panel. Then slide the front panel a little to the left, and pull it off towards you.
Notes
- Be sure not to drop the panel when detaching it from the unit.
- If you press (RELEASE) to detach the panel while the unit is still on, the unit will turn off automatically to prevent the speakers from being damaged.
- When you carry the front panel with you, put it in the supplied front panel case.
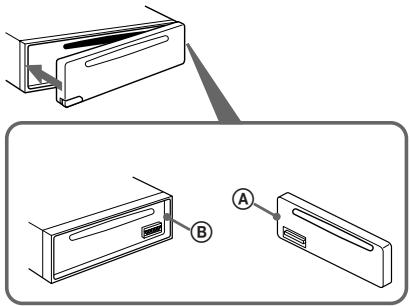
Attaching the front panel
Align part A of the front panel to part B of the unit as illustrated, and push until it clicks.
Notes
- Be sure not to attach the front panel upside down.
- Do not press the front panel hard against the unit when attaching it. Press it lightly against the unit.
- Do not press hard or put excessive pressure on the display windows of the front panel.
- Do not expose the front panel to direct sunlight, heat sources such as hot air ducts, and do not leave it in a humid place. Never leave it on the dashboard of a car parked in direct sunlight where there may be a considerable rise in temperature.
Caution alarm
If you turn the ignition key switch to the OFF position without removing the front panel, the caution alarm will beep for a few seconds (only when the POWER SELECT switch is set to the A position).
If you connect an optional power amplifier and do not use the built-in amplifier, the beep tone will be disabled.
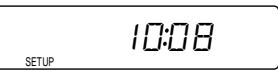
Setting the clock
The clock uses a 24-hour digital indication.
Example: Set the clock to 10:08
1 Press SHIFT, then press ② (SET UP).

1 Press (4)()

The hour digit flashes.
2 Set the hour.

to go backward to go forward

Press (4)()

The minute digits flash.
4 Set the minute.

to go backward
to go forward

2 Press SHIFT.

The clock starts.
3 Press SHIFT.
After the mode setting is complete, the display goes back to normal playback mode.
Note
If the POWER SELECT switch on the bottom of the unit is set to the ⑥ position, turn the power on first, then set the clock.
CD Player
Listening to a CD
Simply insert the CD.
Playback starts automatically. Labelled side up
If a CD is already inserted, press SOURCE repeatedly until "CD" appears.
Note
To play back an 8 cm CD, use the optional Sony compact disc single adapter (CSA-8).
| To | Press |
| Stop playback | ▲ or (OFF) |
| Eject the CD | ▲ |
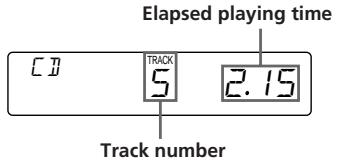
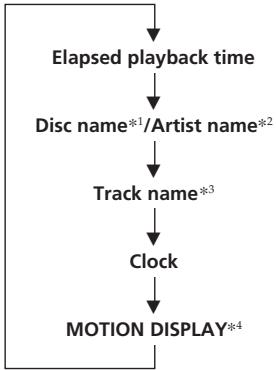
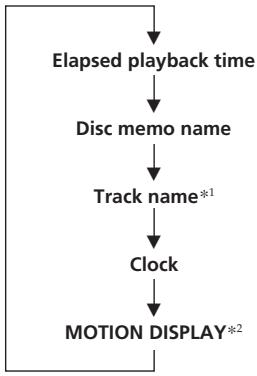
Changing the displayed item
Each time you press DSPL, the item changes as follows:

1 If you inserted a non-CD TEXT disc, "NO NAME" appears in the display.
2 If you play a CD TEXT disc, the artist name appears in the display after the disc name. (Only for CD TEXT discs with the artist name.)
*3 All the items above are scrolled in the display one by one in order.
You can label CD and CD TEXT discs with a personalized name using the disc memo function, refer to "Labeling a CD" (page 22). However, if you use personalized labels, they will always take priority over the original CD TEXT information when such information is displayed.
Tip
If the name of the CD TEXT disc is too long, you can scroll it across the display by pressing (SHIFT), then ① (←).
Automatically scrolling a disc name
— Auto Scroll
If the disc name/artist name or track name on a CD TEXT disc exceeds 10 characters and the Auto Scroll function is on, the following automatically scrolls on the display:
- The disc name appears when the disc has changed (if the disc name is selected).
- The track name appears when the track has changed (if the track name is selected).
If you press DSPL to change the display item, the disc or track name of the CD TEXT disc is scrolled automatically whether you set the function on or off.
1 During playback, press SHIFT.
2 Press (2) (SET UP) repeatedly until "A.SCRL" appears.
3 Press ④ () to select "A.SCRL-ON."
4 Press SHIFT
To cancel Auto Scroll, select "A.SCRL-OFF" in step 2 above.
Note
For some CD TEXT discs with an unusually large number of characters:
Some of the characters are not displayed.
Auto Scroll does not work.
Locating a specific track
Automatic Music Sensor (AMS)
During playback, push the SEEK/AMS control up or down momentarily.
To locate succeeding tracks
To locate preceding tracks
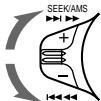
Locating a specific point in a track
- Manual Search
During playback, push the SEEK/AMS control up or down and hold. Release the button when you have found the desired point.
To search forward
To search backward
Note
If "L L L L" or "J J J" appears in the display, that means you have reached the beginning or the end of the disc and you cannot go any further.
Playing a CD in various modes
You can play CDs in various modes:
- INTRO (Intro Scan) lets you play the first 10 seconds of all the tracks.
- REP (Repeat Play) repeats the current track.
- SHUF (Shuffle Play) plays all the tracks in random order.
Searching for the desired track - Intro scan
1 Press SHIFT.
Every time you press (SHIFT), only the items you can select light up.
2 Press (3) (PLAY MODE) repeatedly until "INTRO" appears.

3 Press ④ () to select "INTRO-ON."
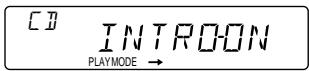
Intro Scan starts.
4 Press SHIFT.
To go back to normal playback mode, select "INTRO-OFF" in step 3 above.
Playing tracks repeatedly
Repeat Play
1 During playback, press SHIFT.
2 Press (6) (REP) repeatedly until "REP-1" appears.
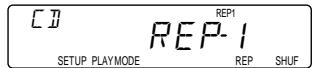
Repeat Play starts.
3 Press SHIFT.
To go back to normal playback mode, select "REP-OFF" in step 2 above.
Playing tracks in random order — Shuffle Play
1 During playback, press SHIFT.
2 Press (7) (SHUF) repeatedly until "SHUF-1" appears.
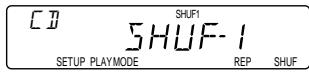
Shuffle Play starts.
3 Press SHIFT.
To go back to normal playback mode, select "SHUF-OFF" in step 2 above.
Memorising stations automatically
Best Tuning Memory (BTM)
The unit selects the stations with the strongest signals and memorises them in the order of their frequencies. You can store up to 10 stations on each band (FM1, FM2, MW and LW).
Caution
When tuning in stations while driving, use Best Tuning Memory to prevent accidents.
1 Press SOURCE repeatedly to select the tuner.
Each time you press (SOURCE), the source changes as follows:
$$ C D \longleftrightarrow T U N E R $$
2 Press MODE repeatedly to select the band.
Each time you press MODE, the band changes as follows:

3 Press SHIFT, then press 3 (PLAY MODE) repeatedly until "B.T.M" appears.
4 Press (四) () .
The unit stores stations in the order of their frequencies on the number buttons.
A beep sound and the setting is stored.
5 Press SHIFT.
Notes
- The unit does not store stations with weak signals. If only a few stations are received, some number buttons will retain their former setting.
- When a number is indicated in the display, the unit starts storing stations from the one currently displayed.
Memorising only the desired stations
You can store up to 10 stations on each band (20 for FM1 and FM2, 10 for each MW and LW) in the order of your choice.
1 Press SOURCE repeatedly to select the tuner.
2 Press MODE repeatedly to select the band (FM1, FM2, MW or LW).
3 Push the SEEK/AMS control up or down to tune in the station you want to store on the number button.
4 Keep the desired number button (1 to 10) pressed for two seconds until "MEM" appears.
The number button indication appears in the display.
Note
If you try to store another station on the same number button, the previously stored station will be erased.
Receiving the memorised stations
1 Press (SOURCE) repeatedly to select the tuner.
2 Press MODE repeatedly to select the band (FM1, FM2, MW or LW).
3 Press the number button (1 to 10) momentarily where the desired station is stored.
If you cannot tune in a preset station
Push the SEEK/AMS control up or down momentarily to search for the station (automatic tuning).
Scanning stops when the unit receives a station. Push the SEEK/AMS control up or down repeatedly until the desired station is received.
Note
If the automatic tuning stops too frequently, press (SHIFT), then press 3 (PLAY MODE) repeatedly until "LOCAL" (local seek mode) is displayed. Then press 4 () to select "LOCAL-ON." Press (SHIFT). Only the stations with relatively strong signals will be tuned in.
Tip
If you know the frequency of the station you want to listen to, push the SEEK/AMS control up or down and hold until the desired frequency appears (manual tuning).
If FM stereo reception is poor
— Monaural Mode
1 Press SHIFT, then press 3 (PLAY MODE) repeatedly until "MONO" appears.
2 Press (4)() repeatedly until "MONON" appears.
The sound improves, but becomes monaural ("ST" disappears).
3 Press SHIFT.
To go back to normal mode, select "MONOFF" in step 2 above.
Changing the displayed items
Each time you press DSPL, the item changes as follows:

- All the items above are scrolled in the display one by one in order.
Overview of the RDS function
Radio Data System (RDS) is a broadcasting service that allows FM stations to send additional digital information along with the regular radio programme signal. Your car stereo offers you a variety of services. Here are just a few: retuning the same programme automatically, listening to traffic announcements and locating a station by programme type.
Notes
- Depending on the country or region, not all of the RDS functions are available.
- RDS may not work properly if the signal strength is weak or if the station you are tuned to is not transmitting RDS data.
Displaying the station name
The name of the current station lights up in the display.
Select an FM station (page 10). When you tune in an FM station that transmits RDS data, the station name appears in the display.
F11
BEC
R1
Note
The **indication means that an RDS station is being received.
Changing the displayed item
Each time you press DSPL, the item changes as follows:
Frequency (Station Name)
Clock
MOTION DISPLAY*
- All the items above are scrolled in the display one by one in order.
Note
"NO NAME" appears if the received station does not transmit RDS data.
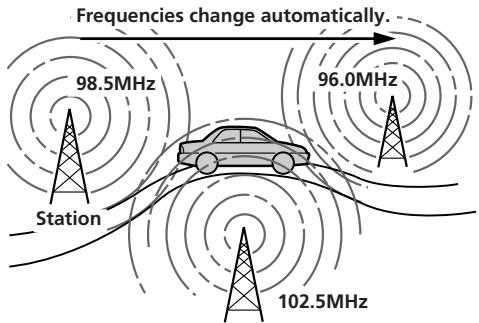
Re-tuning the same programme automatically
Alternative Frequencies (AF)
The Alternative Frequencies (AF) function automatically selects and re-tunes the station with the strongest signal in a network. By using this function, you can continuously listen to the same programme during a long-distance drive without having to re-tune the station manually.
1 Select an FM station (page 10).
2 Press AF/TA repeatedly until "AF-ON" appears.
The unit starts searching for an alternative station with a stronger signal in the same network.
Note
When there is no alternative station in the area and you do not need to search for an alternative station, turn the AF function off by pressing (AF/TA) repeatedly until "AF.TA-OFF" appears.
Changing the displayed item
Each time you press / TA , the item changes as follows:

- Select this to turn on both the AF and TA functions.
Notes
- "NO AF" and the station name flash alternately, if the unit cannot find an alternative station in the network.
- If the station name starts flashing after selecting a station with the AF function on, this indicates that no alternative frequency is available. Push the SEEK/AMS control up or down while the station name is flashing (within eight seconds). The unit starts searching for another frequency with the same PI (Programme Identification) data ("PI SEEK" appears and no sound is heard). If the unit cannot find another frequency, "NO PI" appears, and the unit returns to the originally selected frequency.
Listening to a regional programme
The "REG-ON" (regional on) function lets you stay tuned to a regional programme without being switched to another regional station. (Note that you must turn the AF function on.) The unit is factory preset to "REG-ON," but if you want to turn off the function, do the following.
1 Press SHIFT, then press ③ (PLAY MODE) repeatedly until "REG" appears.
2 Press (4) () repeatedly until "REG-OFF" appears.
3 Press SHIFT.
Note that selecting "REG-OFF" might cause the unit to switch to another regional station within the same network.
To go back to regional on, select "REG-ON" in step 2 above.
Note
This function does not work in the United Kingdom and in some other areas.
Local link function (United Kingdom only)
The Local Link function lets you select other local stations in the area, even though they are not stored on your number buttons.
1 Press a number button that has a local station stored on it.
2 Within five seconds, press the number button of the local station again.
3 Repeat this procedure until the desired local station is received.
Listening to traffic announcements
The Traffic Announcement (TA) and Traffic Programme (TP) data let you automatically tune in an FM station is broadcasting traffic announcements even though you are listening to other programme sources.
Press / TA repeatedly until "TA-ON" or "AF.TA-ON" appears.
The unit starts searching for traffic information stations. "TP" appears in the display when the unit finds a station broadcasting traffic announcements. When the traffic announcement starts, "TA" flashes. The flashing stops when the traffic announcement is over.
Tip
If the traffic announcement starts while you are listening to another programme source, the unit automatically switches to the announcement and goes back to the original source when the announcement is over.
Notes
- "NO TP" flashes for five seconds if the received station does not broadcast traffic announcements. Then, the unit starts searching for a station that broadcasts traffic announcements.
- When "EON" appears with "TP" in the display, the current station makes use of broadcast traffic announcement of other stations in the same network.
To cancel the current traffic announcement
Press AF/TA momentarily.
To cancel all traffic announcements, turn off the function by pressing AF/TA until "AF.TA-OFF" appears.
Presetting the volume of traffic announcements
You can preset the volume level of the traffic announcements beforehand so you won't miss the announcement. When a traffic announcement starts, the volume will be automatically adjusted to the preset level.
1 Select the desired volume level.
2 Press / TA for two seconds. "TA" appears and the setting is stored.
Receiving emergency announcements
If an emergency announcement comes in while you are listening to the radio, the programme will be automatically switched to the announcement. If you are listening to a source other than the radio, the emergency announcements will be heard if you set AF or TA to on. The unit will then automatically switch to these announcements no matter what you are listening to at the time.
Presetting the RDS stations with the AF and TA data
When you preset RDS stations, the unit stores each station's data as well as its frequency, so you don't have to turn on the AF or TA function every time you tune in the preset station. You can select a different setting (AF, TA, or both) for individual preset stations, or the same setting for all preset stations.
Presetting the same setting for all preset stations
1 Select an FM band (page 10).
2 Press ( / TA) repeatedly to select either "AF-ON", "TA-ON" or "AF.TA-ON" (for both AF and TA functions). Note that selecting "AF.TA-OFF" stores no only RDS stations, but also non-RDS stations.
3 Press SHIFT, then press 3 (PLAY MODE) repeatedly until "BTM" appears.
4 Press (四)() .
5 Press SHIFT.
Preseting different settings for each preset station
1 Select an FM band, and tune in the desired station (page 11).
2 Press / TA repeatedly to select either "AF-ON", "TA-ON" or "AF.TA-ON" (for both AF and TA functions).
3 Press the desired number button until "MEM" appears. Repeat from step 1 to preset other stations.
Tip If you want to change the AF and/or TA setting after you tuned in the preset station, you can do so by turning the AF or TA function on or off.
Locating a station by programme type
You can locate the station you want by selecting one of the programme types shown below.
Note
If you are in a country or region where EON data is not transmitted, you can use this function only for the stations you have tuned in once.
| Programme types | Display |
| News | NEWS |
| Current Affairs | AFFAIRS |
| Information | INFO |
| Sports | SPORT |
| Education | EDUCATE |
| Drama | DRAMA |
| Culture | CULTURE |
| Science | SCIENCE |
| Varied | VARIED |
| Popular Music | POP M |
| Rock Music | ROCK M |
| Middle of the Road Music | M.O.R. M |
| Light Classical | LIGHT M |
| Classical | CLASSICS |
| Other Music Type | OTHER M |
| Weather | WEATHER |
| Finance | FINANCE |
| Children's programmes | CHILDREN |
| Social Affairs | SOCIAL A |
| Religion | RELIGION |
| Phone In | PHONE IN |
| Travel | TRAVEL |
| Leisure | LEISURE |
| Jazz Music | JAZZ |
| Country Music | COUNTRY |
| National Music | NATION M |
| Oldies Music | OLDIES |
| Folk Music | FOLK M |
| Documentary | DOCUMENT |
| Not specified | NONE |
Note
You cannot use this function in some countries where no PTY (Programme Type selection) data is available.
Press (PTY/LIST) during FM reception until "PTY" appears.
PTy INFO
The current programme type name appears if the station is transmitting the PTY data. "---" appears if the received station is not an RDS station, or if the RDS data has not been received.
2 Press PTY/LIST repeatedly until the desired programme type appears.
The programme types appear in the order shown in the above table. Note that you cannot select "NONE" (Not specified) for searching.
PTY SPORT
3 Push the SEEK/AMS control up or down.
The unit starts searching for a station broadcasting the selected programme type. When the unit finds the programme, the programme type appears again for five seconds.
"NO" and the programme type appear alternately for five seconds if the unit cannot find the programme type. It then returns to the previous station.
Setting the clock automatically
The CT (Clock Time) data from the RDS transmission sets the clock automatically.
1 Press SHIFT, then press 2 (SET UP) repeatedly until "CT" appears.

2 Press (4) () repeatedly until "CT-ON" appears.
The clock is set.

3 Press SHIFT to return to the normal display.
To cancel the CT function
Select "CT-OFF" in step 2 above.
Notes
- The CT function may not work even though an RDS station is being received.
- There might be a difference between the time set by the CT function and the actual time.
Other Functions
You can connect an optional rotary commander (RM-X4S) with this unit.
Using the rotary commander
The rotary commander works by pressing buttons and/or rotating controls. You can control an optional CD or MD unit with the rotary commander.
By pressing buttons (the SOURCE and MODE buttons)
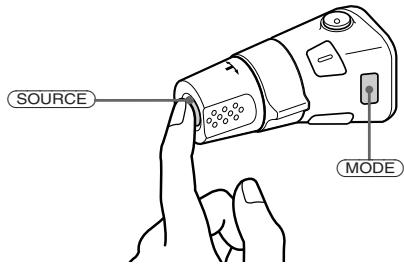
Each time you press SOURCE, the source changes as follows:
TUNER CD MD
Pressing MODE changes the operation in the following ways;
- Tuner: FM1 FM2 MW LW
- CD unit: CD1 CD2 ...
- MD unit: MD1 → MD2 → ...
Tip
When the POWER SELECT switch is set to position 3, you can turn on this unit by pressing (SOURCE) on the rotary commander.
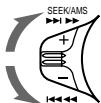
By rotating the control (the SEEK/ AMS control)
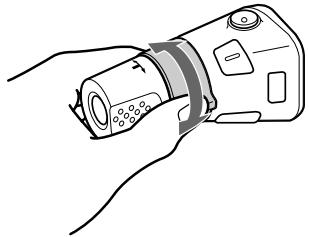
Rotate the control momentarily and release it to:
- Locate a specific track on a disc. Rotate and hold the control until you locate the specific point in a track, then release it to start playback.
- Tune in stations automatically. Rotate and hold the control to tune in a specific station.
By pushing in and rotating the control (the PRESET/DISC control)
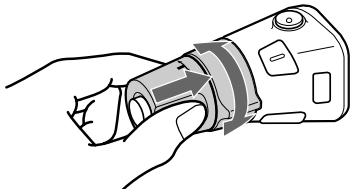
Push in and rotate the control to:
- Receive the stations memorised on the number buttons.
- Change the disc.
Other operations
Rotate the VOL control to adjust the volume.
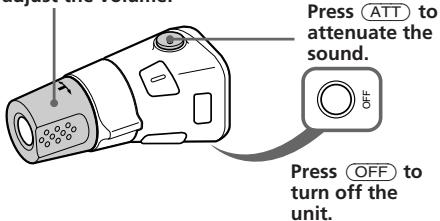
Press SOUND to adjust the volume and sound menu.
Press LIST to:
- Display the memorised names.
- Display the programme type.
Changing the operative direction
The operative direction of controls is factory-set as in the illustration below.
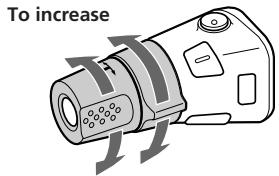
To decrease
If you need to mount the rotary commander on the right side of the steering column, you can reverse the operative direction.

Press (SOUND) for two seconds while pushing the VOL control.
Tip
You can control the operative direction of controls with the unit (page 18).
Adjusting the sound characteristics
You can adjust the bass, treble, balance and fader.
Each source can store the bass and treble levels respectively.
1 Select the item you want to adjust by pressing SOUND repeatedly.
VOL (volume) BAS (bass) TRE (treble) BAL (left-right) FAD (front-rear)
2 Adjust the selected item by rotating the dial.
Adjust within three seconds after selecting the item. (After three seconds, the dial functions as the volume control.)
Attenuating the sound
Press ATT on the rotary commander or wireless remote.
"ATT-ON" flashes momentarily.
To restore the previous volume level, press ATT again.
Tip
The unit decreases the volume automatically when a telephone call comes in (Telephone-ATT function).
Changing the sound and display settings
You can set:
- CLOCK (page 7).
- CT (Clock Time) (page 16).
D. INFO (Dual Information) to display the clock and the play mode at the same time (ON) or to display the information alternately (OFF). - AMBER/GREEN to change the illumination colour to amber or green.
- DIM (Dimmer) to change the brightness of the display.
— Select "ON" to dim the display. - BEEP to turn on or off the beeps.
-
RM (Rotary Commander) to change the operative direction of the controls of the rotary commander.
-
Select "NORM" to use the rotary remote as the factory-set position.
-
Select "REV" when you mount the rotary remote on the right side of the steering column.
A.SCRL (Auto Scroll) (page 8, 20).
1 Press SHIFT.
2 Press (SET UP) repeatedly until the desired item appears.
Each time you press (2) (SET UP), the item changes as follows:
CLOCK CT D.INFO* AMBER/GREEN DIM BEEP RM A.SCRL*
- When you have not tune the station or there is no CD/MD being played, these items will not appear.
Note
The displayed item will differ depending on the source.
3 Press (4) () to select the desired setting (for example: ON or OFF).
4 Press SHIFT.
After the mode setting is complete, the display goes back to normal playback mode.
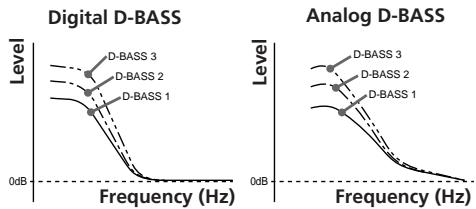
Boosting the bass sound — D.bass
You can enjoy clear and powerful bass sound. The D-bass function boosts the low frequency signal with a sharper curve than conventional bass boost.
You can hear the bass line more clearly even if the vocal sound is the same volume. You can emphasize and adjust the bass sound easily with the D-bass control. This effect is similar to the one you get when you use an optional subwoofer system.
Moreover, the Digital D-bass* function creates even sharper and more powerful bass sound than Analog D-bass.
- Digital D-bass is available during CD playback.
Adjusting the bass curve
Turn the D-BASS dial to adjust the bass level (1, 2 or 3).
"D-BASS" appears in the display.
During CD playback, "DIGITAL D-BASS" appears in the display.
To cancel, turn the dial to the OFF position.
Note
If the bass sound becomes distorted, adjust the D-bass dial or volume control.
With Optional Equipment
CD/MD Unit
You can control up to 7 CD and MD unitswith this unit.
If you connect an optional CD unit with the CD TEXT function, the CD TEXT information will appear in the display when you play back a CD TEXT disc.
Playing a CD or MD
1 Press SOURCE repeatedly to select the CD or MD.
2 Press MODE until the desired unit appears.
CD/MD playback starts.
When a CD/MD unit is connected, all the tracks play from the beginning.
Changing the displayed item
Each time you press DSPL during CD, CD TEXT or MD playback, the item changes as follows:
1 If you have not labeled the disc or there is no disc name prerecorded on the MD, "NO NAME" appears in the display.
2 If you play a CD TEXT disc, the artist name appears in the display after the disc name. (Only for CD TEXT discs with the artist name.)
3 If the track name of a CD TEXT disc or MD is not prerecorded, "NO NAME" appears in the display.
4 All the items above are scrolled in the display one by one in order.
You can label CD and CD TEXT discs with a personalized name using the disc memo function, refer to "Labeling a CD" (page 22). However, if you use personalized labels, they will always take priority over the original CD TEXT information when such information is displayed.
Tip If the name of the MD or CD TEXT disc is too long, you can scroll it across the display by pressing (SHIFT), then 1 ()
Automatically scrolling a disc name
— Auto Scroll
If the disc name/artist name or track name on a CD TEXT disc or MD exceeds 10 characters and the Auto Scroll function is on, the following automatically scrolls on the display:
- The disc name appears when the disc has changed (if the disc name is selected).
- The track name appears when the track has changed (if the track name is selected).
If you press DSPL to change the display item, the disc or track name of the MD or CD TEXT disc is scrolled automatically whether you set the function on or off.
1 During playback, press SHIFT.
2 Press (2) (SET UP) repeatedly until "A.SCRL" appears.
3 Press ④ () to select "A.SCRL-ON."
4 Press SHIFT
To cancel Auto Scroll, select "A.SCRL-OFF" in step 2 above.
Note
For some CD TEXT discs with an unusually large number of characters:
Some of the characters are not displayed.
—Auto Scroll does not work.
Displaying the recording date of the current MD
Press DSPL for two seconds during MD playback.
The recording date of the track is displayed for about three seconds.
Locating a specific track
Automatic Music Sensor (AMS)
During playback, push the SEEK/AMS control up or down momentarily for each track you want to skip.
To locate succeeding tracks
To locate preceding tracks

Locating a specific point in a track - Manual Search
During playback, push the SEEK/AMS control up or down and hold. Release the button when you have found the desired point.
To search forward
To search backward

Locating a disc by disc number Direct Disc Selection
Press the number button that corresponds with the desired disc number.
The desired disc in the current changer begins playback.
Scanning the tracks
— Intro Scan
You can play the first 10 seconds of all the tracks on the current disc.
1 During playback, press (SHIFT), then press (3) (PLAY MODE) repeatedly until "INTRO" appears.
2 Press (4) () to select "INTRO-ON." Intro Scan starts.
3 Press SHIFT.
To go back to normal playback mode, select "INTRO-OFF" in step 2 above.
Playing tracks repeatedly
Repeat Play
You can select:
- REP-1 to repeat a track.
- REP-2 to repeat a disc.
1 During playback, press (SHIFT).
2 Press (REP) repeatedly until the desired setting appears.

Repeat Play starts.
3 Press SHIFT.
To go back to normal playback mode, select "REP-OFF" in step 2 above.
Playing tracks in random order — Shuffle Play
You can select:
- SHUF-1 to play the tracks on the current disc in random order.
- SHUF-ALL to play all the tracks in random order.
1 During playback, press SHIFT.
2 Press (7) (SHUF) repeatedly until the desired setting appears.

Shuffle Play starts.
3 Press SHIFT.
To go back to normal playback mode, select "SHUF-OFF" in step 2 above.
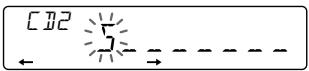
Labeling a CD — Disc Memo
(CD unit with the custom file function)
You can label each disc with a personalized name. You can enter up to eight characters for a disc. If you label a CD, you can locate the disc by name (page 23) and select the specific tracks for playback (page 24).
1 Play the CD and press (PTY/LIST) for two seconds.
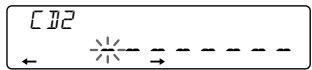
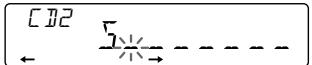
2 Enter the characters.
1 Rotate the dial clockwise to select the desired characters.
$$ \begin{array}{l} (\mathsf {A} \to \mathsf {B} \to \mathsf {C} \to \dots \mathsf {Z} \to 0 \to 1 \to 2 \to \ \dots 9 \to + \to - \to^ {*} \to / \to \backslash \to > \to < \ \to . \to_ {-}) \end{array} $$
If you rotate the dial counterclockwise, the characters appear in the reverse order.
If you want to put a blank space between characters, select "_ " (underbar).
Press (4) () after locating the desired character.
The flashing cursor moves to the next space.
If you press (1) ( ), the flashing cursor moves to the left.
Repeat steps 1 and 2 to enter the entire name.
3 To return to normal CD playback mode, press PTY/LIST for two seconds.
Tip
To erase/correct a name enter " _ " (under-bar) for each character.
Displaying the disc memo name
Press DSPL during CD or CD TEXT disc playback.

Each time you press DSPL during CD or CD TEXT disc playback, the item changes as follows:
1 If you connect an optional CD unit with the CD TEXT function, the CD TEXT information will appear in the display when you playback a CD TEXT disc.
2 All the items above are scrolled in the display one by one in order.
Erasing the disc memo
6 Press (⑤) (ENTER) for two seconds.
1 Press SOURCE repeatedly to select CD.
2 Press MODE repeatedly to select the CD unit.
3 Press PTY/LIST for two seconds.
4 Press DSPL for two seconds.
5 Rotate the dial to select the name you want to erase.
The name is erased.
Repeat steps 5 and 6 if you want to erase other names.
7 Press (PTY/LIST) for two seconds.
The unit returns to normal CD playback mode.
Note
When the personalized label is erased, the original CD TEXT information will appear in the display.
Locating a disc by name
List-up (CD unit with the custom file function or MD unit)
You can use this function for discs that have been assigned a custom name. For more information on disc names, refer to "Labeling a CD" (page 22).
1 Press PTY/LIST momentarily.
The name assigned to the current disc appears in the display.

If you add disc memo labels to a CD TEXT disc, the display setting you make will determine which information is displayed. If the disc has only one set of information (either CD TEXT or disc memo labels), that information will be displayed regardless of the display setting you make.
2 Press (PTY/LIST) repeatedly until you find the desired disc.
3 Press (ENTER) to play back the disc.
Notes
After a disc name has been displayed for five seconds, the display goes back to normal playback mode. To turn off the display, press DSPL.
- The track names are not displayed during MD playback.
- If there are no discs in the magazine, "NO DISC" appears in the display.
- If a disc has not been assigned a custom file, "****" appears in the display.
- If the disc information has not been read by the unit, "NOT READ" appears in the display. To load the disc, first press the number button, then choose the disc that has not been loaded.
- The information appears only in upper case. There are also some letters which cannot be displayed (during MD playback).
Selecting specific tracks for playback
Bank
(CD unit with the custom file function)
If you label the disc, you can set the unit to skip tracks and play only the tracks you want.
1 Start playing the disc and press (SHIFT). Then press ③ (PLAY MODE) for two seconds.
Bank edit mode.
Note
If you have not labeled the disc, the bank edit mode does not appear. To go back to normal playback mode, press (SHIFT).
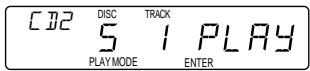
2 Push the SEEK/AMS control up or down to select the track number you want to skip and press (ENTER).

The indication changes from "PLAY" to "SKIP." If you want to return to "PLAY," press ⑤ (ENTER) again.
3 Repeat step 2 to set the "PLAY" or "SKIP" mode on all the tracks.
4 Press ③ (PLAY MODE) for two seconds.
The unit returns to normal CD playback mode.
5 Press SHIFT.
Notes
- You can set the "PLAY" and "SKIP" mode on up to 24 tracks.
- You cannot set the "SKIP" mode on all the tracks.
Playing the specific tracks only
You can select:
- BANK-ON to play the tracks with the "PLAY" setting.
- BANK-INV (Inverse) to play the tracks with the "SKIP" setting.
1 During playback, press (SHIFT), then press (3) (PLAY MODE) repeatedly until "BANK" appears.
2 Press (4) () to repeatedly until the desired setting appears.


Playback starts from the track following the current one.
3 Press SHIFT.
To go back to normal playing mode, select "BANK-OFF" in step 2 above.
Additional Information
Precautions
- If your car was parked in direct sunlight resulting in a considerable rise in temperature inside the car, allow the unit to cool off before operating it.
- If no power is being supplied to the unit, check the connections first. If everything is in order, check the fuse.
- If no sound comes from the speakers of two-speaker systems, set the fader control to the centre position.
- If your car is equipped with a power aerial, it will extend automatically while the unit is operating.
If you have any questions or problems concerning your unit that are not covered in this manual, please consult your nearest Sony dealer.
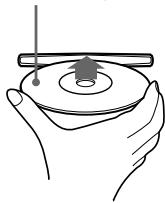
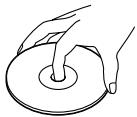
Notes on handling CDs
A dirty or defective disc may cause sound dropouts while playing. To enjoy optimum sound, handle the disc as follows. Handle the disc by its edge. To keep the disc clean, do not touch the surface.
Do not stick paper or tape on the labelled surface.

Do not expose the discs to direct sunlight or heat sources such as hot air-ducts, or leave them in a car parked in direct sunlight where there can be a considerable rise in the temperature inside the car.

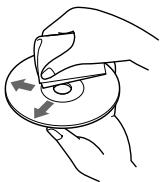
Before playing, clean the discs with an optional cleaning cloth. Wipe each disc from the centre out.
Do not use solvents such as benzine, thinner, commercially available cleaners or antistatic spray intended for analog discs.
Notes on moisture condensation
On a rainy day or in a very damp area, moisture may condense on the lenses inside the CD player. Should this occur, the unit will not operate properly. In this case, remove the disc and wait for about an hour until the moisture evaporates.
When you play 8 cm CDs
Use the optional Sony compact disc single adapter (CSA-8) to protect the CD player from being damaged.
Maintenance
Fuse replacement
When replacing the fuse, be sure to use one that matches the amperage described on the fuse. If the fuse blows, check the power connection and replace the fuse. If the fuse blows again after replacement, there may be an internal malfunction. In such a case, consult your nearest Sony dealer.
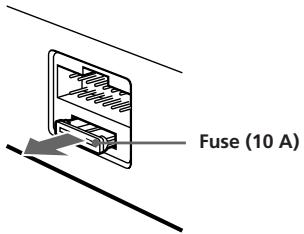
Warning
Never use a fuse with an amperage rating exceeding the one supplied with the unit as this could damage the unit.
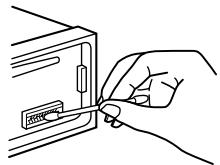
Cleaning the connectors
The unit may not function properly if the connectors between the unit and the front panel are not clean. To prevent this, open the front panel by pressing (RELEASE), then detach it and clean the connectors with a cotton swab dipped in alcohol. Do not apply too much force. Otherwise, the connectors may be damaged.
Main unit
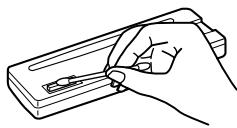
Back of the front panel
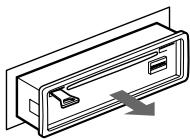
Dismounting the unit
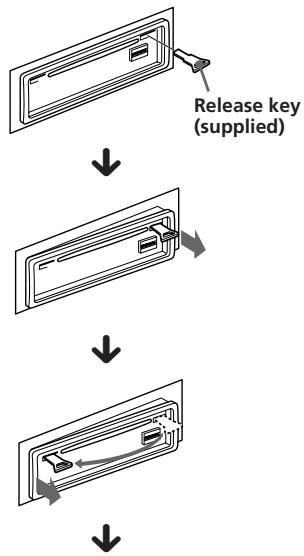
Pull the unit out while the release key is inserted.
↓
Press the clip inside the front cover with a thin screwdriver, and lever the front cover free.
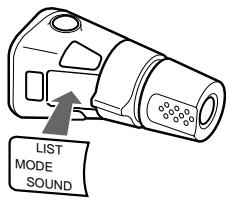
Attaching the label to the rotary commander
You can control this unit with the optional rotary commander (RM-X4S).
Several labels are supplied with the rotary commander. Attach the label that matches the functions of this unit and the mounting position of the rotary commander.
After you mount the rotary commander, attach the label in the illustration below.

Specifications
CD player section
| System | Compact disc digital audio system |
| Signal-to-noise ratio | 90 dB |
| Frequency response | 10 – 20,000 Hz |
| Wow and flutter | Below measurable limit |
Tuner section
FM
| Tuning range | 87.5 – 108.0 MHz |
| Aerial terminal | External aerial connector |
| Intermediate frequency | 10.7 MHz |
| Usable sensitivity | 8 dBf |
| Selectivity | 75 dB at 400 kHz |
| Signal-to-noise ratio | 65 dB (stereo), 68 dB (mono) |
| Harmonic distortion at 1 kHz | |
| 0.5 % (stereo), 0.3 % (mono) | |
| Separation | 35 dB at 1 kHz |
| Frequency response | 30 – 15,000 Hz |
| Capture ratio | 2 dB |
MW/LW
| Tuning range | MW: 531 – 1,602 kHz LW: 153 – 281 kHz |
| Aerial terminal | External aerial connector |
| Intermediate frequency | 10.71 MHz/450 kHz |
| Sensitivity | MW: 30 μV LW: 50 μV |
Power amplifier section
| Outputs | Speaker outputs (sure seal connectors) |
| Speaker impedance | 4 - 8 ohms |
| Maximum power output | 40 W × 4 (at 4 ohms) |
General
| Outputs | CDX-C580R, -C580RW: Line outputs (2) CDX-C570R: Line output (1) Power aerial relay control lead Power amplifier control lead Telephone ATT control lead |
| Tone controls | Bass ±10 dB at 100 Hz Treble ±10 dB at 10 kHz |
| Power requirements | 12 V DC car battery (negative ground) |
| Dimensions | Approx. 178 × 50 × 185 mm (w/h/d) |
| Mounting dimensions | Approx. 182 × 53 × 162 mm (w/h/d) |
| Mass | Approx. 1.2 kg |
| Supplied accessories | Parts for installation and connections (1 set) Front panel case (1) |
| Optional accessories | Rotary Commander RM-X4S Wireless remote RM-X47 BUS cable (supplied with an RCA pin cord) RC-61 (1 m), RC-62 (2 m) RCA pin cord RC-63 (1 m) Cleaning cloth XP-CD1 Compact disc single adapter CSA-8 |
| Optional equipment | CD changer CDX-805 (10 discs), CDX-705 (10 discs), CDX-T65 (6 discs), CDX-T62 (6 discs) MD changer MDX-60, MDX-61 Source selector XA-C30 |
Design and specifications are subject to change without notice.
Troubleshooting guide
The following checklist will help you remedy the problems you may encounter with your unit. Before going through the checklist below, check the connection and operating procedures.
General
| Problem | Cause/Solution |
| No sound. | ·Cancel the ATT function. ·Set the fader control to the centre position for two-speaker systems. ·Rotate the dial in a clockwise direction to adjust the volume. |
| The contents of the memory have been erased. | ·The power cord or battery has been disconnected. ·The reset button has been pressed. →Store again into the memory. |
| Indications do not appear in the display. | Remove the front panel and clean the connectors. See “Cleaning the connectors” (page 26) for details. |
| No beep tone. | ·An optional power amplifier is connected and you are not using the built-in amplifier. ·The beep tone is attenuated (page 18). |
CD/MD playback
| Problem | Cause/Solution |
| A disc cannot be loaded. | • Another CD is already loaded. • The CD is forcibly inserted upside down or in the wrong way (MD). |
| Playback does not begin. | Defective MD or dusty CD. |
| A disc is automatically ejected. | The ambient temperature exceeds 50°C. |
| The operation buttons do not function. | Press the reset button. |
| The sound skips due to vibration. | • The unit is installed at an angle of more than 60°. • The unit is not installed in a sturdy part of the car. |
Radio reception
| Problem | Cause/Solution |
| Preset tuning is not possible. | • Memorise the correct frequency. • The broadcast signal is too weak. |
| Automatic tuning is not possible. | The broadcast signal is too weak. → Use manual tuning. |
| The "ST" indication flashes. | • Tune in the frequency accurately. • The broadcast signal is too weak. → Set to the MONO mode (page 11). |
RDS
| Problem | Cause/Solution |
| A SEEK starts after a few seconds of listening. | The station is non-TP or the signal is weak. →Press (AF/TA) until “AF.TA-OFF” appears. |
| No traffic announcements. | • Activate “TA.” • The station does not broadcast any traffic announcements despite being TP. →Tune to another station. |
| PTY displays “NONE.” | The station does not specify the programme type. |
Error displays (when an optional CD/MD unit is connected)
The following indications will flash for about five seconds, and an alarm sound will be heard.
| Display | Cause | Solution |
| NO MAG | The disc magazine is not inserted in the CD/MD unit. | Insert the disc magazine in the CD/ MD unit. |
| NO DISC | No disc is inserted in the CD/MD unit. | Insert discs in the CD/MD unit. |
| NG DISCS | A CD/MD cannot play because of some problem. | Insert another CD/MD. |
| ERROR*1 | A CD is dirty or inserted upside down.*2 | Clean or insert the CD correctly. |
| An MD does not play because of some problem.*2 | Insert another MD. | |
| BLANK*1 | No tracks have been recorded on an MD.*2 | Play an MD with tracks recorded on it. |
| RESET | The CD/MD unit cannot be operated because of some problem. | Press the reset button of the unit. |
| NO READY | The lid of the MD unit is open or MDs are not inserted properly. | Close the lid or insert the MDs properly. |
| HI TEMP | The ambient temperature is more than 50°C. | Wait until the temperature goes down below 50°C. |
1 When an error occurs during playback of an MD or CD, the disc number of the MD or CD dose not appear in the display.
2 The disc number of the disc causing the error appears in the display.
If the above-mentioned solutions do not help improve the situation, consult your nearest Sony dealer.
Bienvenido!
Colocar o paine frontal
— Pesquisa subsequencial
Satta fast frontpanelen
2 Tryck paa (SHIFT).
Klockan aktiveras.
3 Tryck pa _a SHIFT).
4 Tryck paa (SHIFT).
3 Tryck paa (SHIFT).
3 Tryck paa (SHIFT).
3 Tryck paa (SHIFT).
3 Tryck paa (SHIFT).
5 Tryck paa (SHIFT).
Observera
3 Tryck paa (SHIFT).