IAN 24576 - Fitness Equipment CRIVIT - Free user manual and instructions
Find the device manual for free IAN 24576 CRIVIT in PDF.
User questions about IAN 24576 CRIVIT
0 question about this device. Answer the ones you know or ask your own.
Ask a new question about this device
Download the instructions for your Fitness Equipment in PDF format for free! Find your manual IAN 24576 - CRIVIT and take your electronic device back in hand. On this page are published all the documents necessary for the use of your device. IAN 24576 by CRIVIT.
USER MANUAL IAN 24576 CRIVIT
GILTA-SPOIT HANDELSKONTOR GAMIT
20-gomrA
1234567890
(一)本次会议是否有否决议案:无
Wwss 68-201c
2019年3月28日:5771637
12x - 1 > 0
D A C H
WING-STEPPER
Notice of attribution
Notes:
WING-TEPPER
Gebruksangwijzing

DE/AT/CH Bedienungs und Sicherheitswirse 06
FR/CH Instructions d'utilisation et de sécurité Page 14
IT/CH Istuzionid'usecd iucmzoo Fogna 22
NL Gebruksaorwizgen er verilghedinstuctes Pogina 30
C5 Instructions and Safety Notice

IAN24576IAN24576
()ACH
HCL 08


DE AT CH
Lieferumfang 6
Technische Daten 6
Scope of delivery 38
Technical Data 38
Intended use 38
Safety guidelines 38-39
Attach handles to the exercise bands 39
Assembling the stepper 39
Operating the computer 39-40
Training instructions 40-42
Stretching exercises 42
Exercises without bands 42
Exercises with bands 43
Care and maintenance 43
Information on disposal 43
Disposing of batteries 44
3 Years Warranty 44
FR CH
m = 311
Exercices d'étirement
m = 311
i Congratulations! With your purchase you have decided on a high-quality product. Get to know the product before you start to use it. Carefully read the following operating instructions. Use the product only as described and only for the given areas of application. Keep these instructions safe. When passing the product on to a third party, always make sure that the documentation is included.
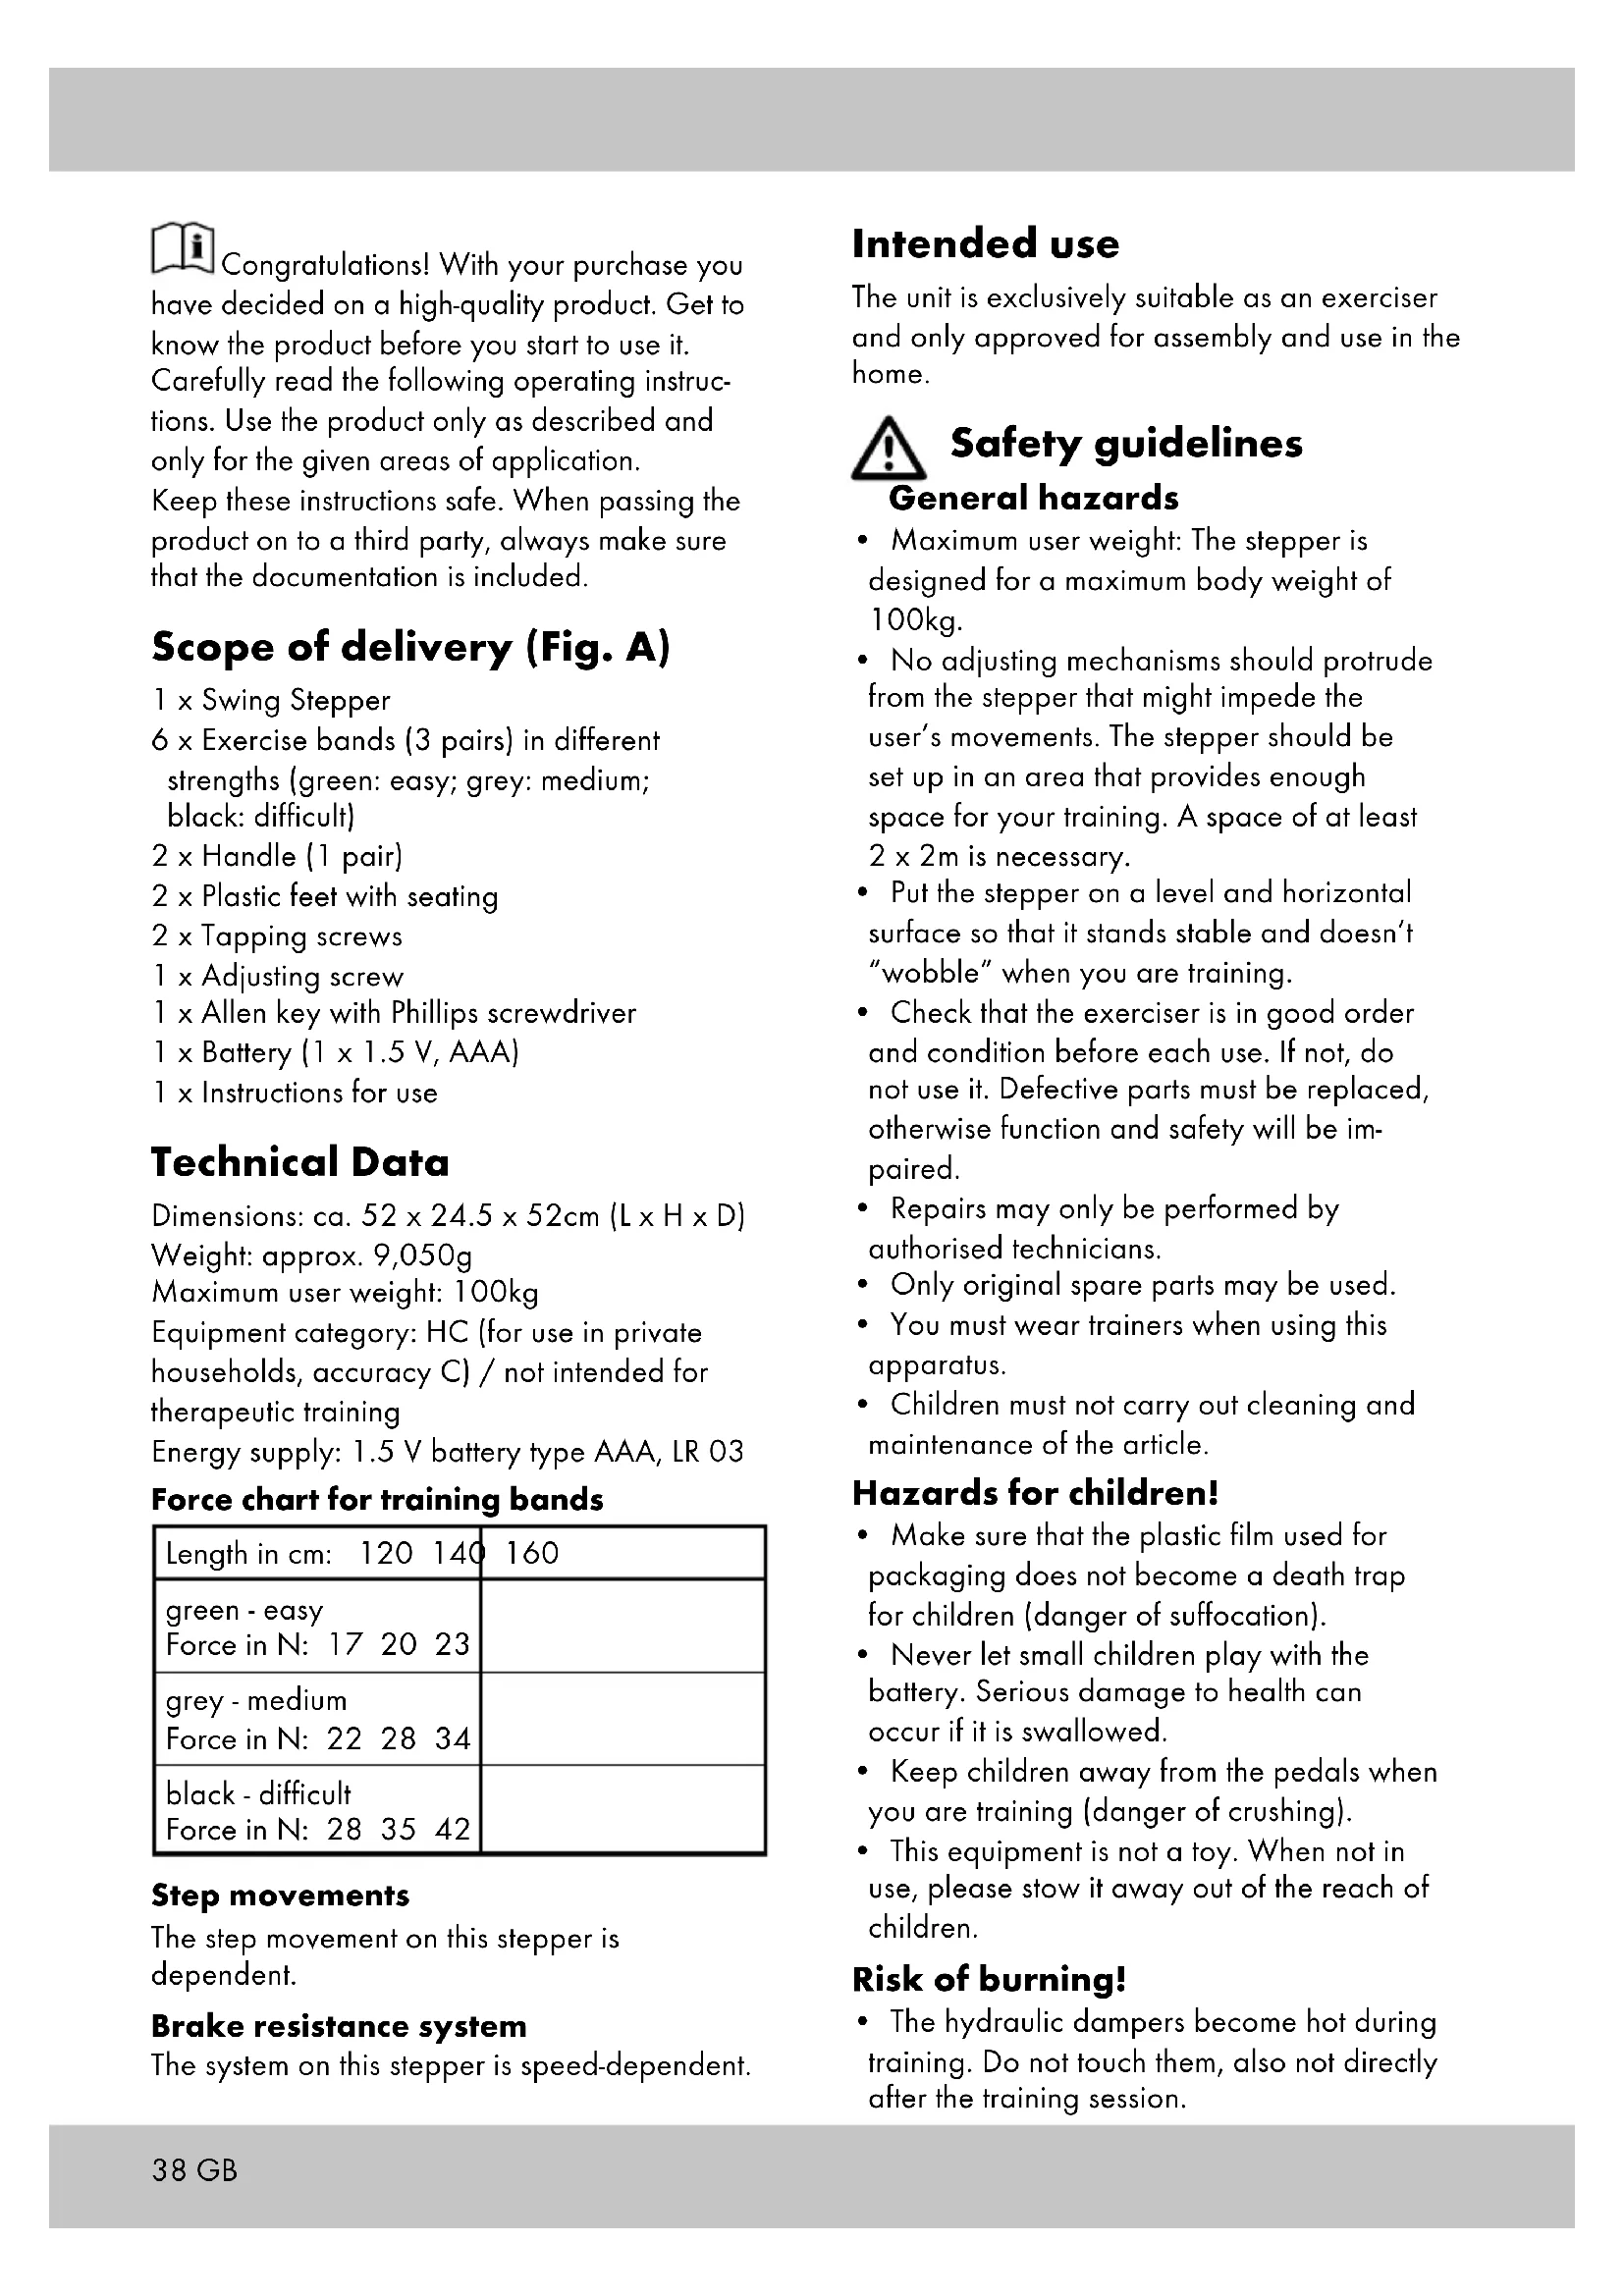
Scope of delivery (Fig. A)
1 x Swing Stepper
6 x Exercise bands (3 pairs) in different strengths (green: easy; grey: medium; black: difficult)
2 × Handle (1 pair)
2 × Plastic feet with seating
2 x Tapping screws
1 x Adjusting screw
1 x Allen key with Phillips screwdriver
1 x Battery (1 x 1.5 V, AAA)
1 x Instructions for use
Technical Data
Dimensions: ca. 52 × 24.5 × 52cm (L × H × D)
Weight: approx. 9,050g
Maximum user weight: 100kg
Equipment category: HC (for use in private households, accuracy C) / not intended for therapeutic training
Energy supply: 1.5 V battery type AAA, LR 03
Force chart for training bands
| Length in cm: 120 140 | 160 |
| green - easy Force in N: 17 20 23 | |
| grey - medium Force in N: 22 28 34 | |
| black - difficult Force in N: 28 35 42 |
Step movements
The step movement on this stepper is dependent.
Brake resistance system
The system on this stepper is speed-dependent.
Intended use
The unit is exclusively suitable as an exerciser and only approved for assembly and use in the home.
Safety guidelines General hazards
Maximum user weight: The stepper is designed for a maximum body weight of 100kg.
- No adjusting mechanisms should protrude from the stepper that might impede the user's movements. The stepper should be set up in an area that provides enough space for your training. A space of at least 2 × 2m is necessary.
- Put the stepper on a level and horizontal surface so that it stands stable and doesn't "wobble" when you are training.
- Check that the exerciser is in good order and condition before each use. If not, do not use it. Defective parts must be replaced, otherwise function and safety will be impaired.
- Repairs may only be performed by authorised technicians.
- Only original spare parts may be used.
- You must wear trainers when using this apparatus.
Children must not carry out cleaning and maintenance of the article.
Hazards for children!
- Make sure that the plastic film used for packaging does not become a death trap for children (danger of suffocation).
- Never let small children play with the battery. Serious damage to health can occur if it is swallowed.
- Keep children away from the pedals when you are training (danger of crushing).
- This equipment is not a toy. When not in use, please stow it away out of the reach of children.
Risk of burning!
- The hydraulic dampers become hot during training. Do not touch them, also not directly after the training session.
Dangers due to incorrect/ exaggerated training!
- Please observe all instructions given in the chapter "Training instructions".
Material damage!
- Oil might leak from the hydraulic dampers. To avoid soiling the floor or carpet, stand the exerciser on a level, anti-slip underlay.
- Prevent liquids from penetrating the computer. The delicate electronics could be damaged. Protect the computer from direct sunlight.
- Regularly check the tightness of all screws and nuts. Self-locking nuts cannot become loose through the vibrations. This feature can only be guaranteed when they have been tightened once. All self-locking nuts must be replaced should the stepper be taken apart [and reassembled].
- Remove the battery from the computer, should you not use the exerciser for a longer period. Otherwise it might leak and cause damage.
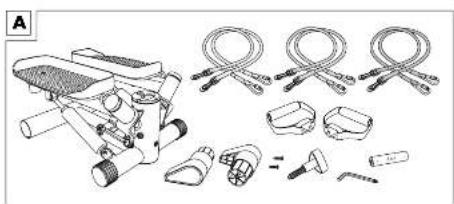
Attach handles to the exercise bands
The exercise band has two ends with different fittings. First take the end with the plastic hook and connect it to the loop on the handle (Fig. B).
Assembling the stepper
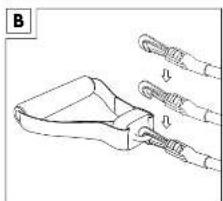
Step 1:
Plug both plastic feet in the tube on the rear side of the frame.
The seating faces the rear (Fig. C). To attach them insert a tapping screw into the pre-drilled hole on the underside of the frame.
Step 2:
The adjusting screw is turned into the thread on the front side of the stepper. You can adjust the height of the foot pads using this screw.
To increase the step height, turn the screw clockwise. To decrease the step height, turn the screw anti-clockwise.
Step 3:
Remove the computer from the stepper, by pulling it upwards. Place the supplied battery in the compartment in the underside of the computer. Observe correct polarity.
Connect the computer to the plug of the housing and place the computer back into the stepper. Make sure that the cables do not get caught.
Step 4:
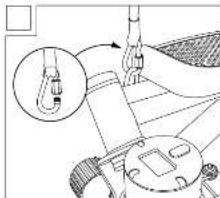
Decide which pull strength you wish to use and attach the handles to the appropriate exercise bands. Attach the metal hooks to the loop on the stepper frame and screw the fastening on the hook tight (Fig. D).
Before each training session, check that the bands are securely attached and the hook is screwed shut.
Attention! The loops are exclusively designed for upward pulls and must not be stressed transversely. This could cause damage to the stepper or injury to the user.
Should you wish to train without the bands, remove the hooks from the loops in order to avoid a trip hazard. Check that all screws and nuts are securely tightened.
Operating the computer
The stepper complies with the accuracy class C, i.e. no warranty is given for the accuracy of the values displayed by the computer.
Switching on and off
The computer switches on automatically when you use the pedals and start training.
The computer switches off automatically if the stepper is not used for approx. 4 minutes.
Display
Appears in the upper line:
- "STOP", when training is interrupted
- The number of steps per minute (computer estimate)
Select mode
The 4 modes are displayed in the lower line. Press the "MODE" button briefly in order to change from one mode to another.
- "TMR": Training time elapsed from 0:00 to 99:59
- "REPS": Number of steps of the present training session from 0 to 9999
- "CAL": calories* used from 0 to 9999
-
"TTR": Number of training steps since inserting the battery from 0 to 9999
-
The calculation is based on the pre-programmed standard values that can only serve as an approximate value. The calorie consumption by using the bands is not included in this consideration.
All training data can be displayed one after the other. Press the "MODE" button until the field "TMR" flashes. The display will automatically change from mode to mode every 5 seconds.
Enter training targets
You can enter one or more targets:
- Training duration (TMR)
- Number of steps (REPS)
-
Calorie consumption (CAL)
-
Keep the "MODE" button pressed until "0:00 (TMR)" appears in the lower line and the first 0 flashes (approx. 7 seconds).
- In order to enter the duration of a training session; press the MODE button until the display shows the desired duration in minutes.
- After a couple of seconds, the display will show the next mode (REPS). Press the "MODE" button to set the number of steps (in steps of 10).
- The desired calorie consumption can be set in the next mode (CAL) (in steps of 10).
- Now you can start training. The computer counts the pre-set values down to zero.
- The computer will not continue counting for about 10 seconds when the pre-set target is reached. After that the computer begins at zero again.
Reset display
The display only shows zero when it is started for the first time. The computer continues counting from the point at which the last training session ended for all following sessions.
To reset the display, press and hold the "MODE" button until all symbols appear at the same time.
Remove the battery in order to reset the total number of training steps to zero (TTR).
Training instructions
General
See your doctor before starting training!
Setting targets
Different targets can be reached with the appropriate training:
- Improved general fitness
- Increased stamina
Enhanced well-being
Training success depends mainly on the following points that we would like to call to your particular attention:
- Regular and sufficiently long training sessions
- Appropriate nutrition
Monitoring the training success
Who can train?
If you have not done any sport for a long time, have heart, circulation or orthopaedic problems, take medication, or are pregnant, then you should consult your doctor before beginning training. Tell your doctor what kind of training apparatus you are planning to use. Let your doctor examine you to ascertain which training programmes are suitable for you. In the interest of safety, please take these operating instructions with you, so that your doctor can create an individual training programme for you.
Basically every physically healthy person, whether young or old, can begin training as long as he or she consulted a doctor beforehand.
Attention!
During the training sessions: incorrect or exaggerated training can harm your health.
Stress
Intensive training subjects the whole body to stress, not just the leg muscles.
The body, in particular the heart and circulation require time to adapt to the resulting differences caused by training. That is why it is important to increase the muscle stress slowly and make sure that you take breaks during and after each training session.
In other words, train in a performance range that doesn't over-exert and exhaust you. Listen to your body; stop training immediately when you feel unwell, become short of breath or feel dizzy. You are training correctly when you can carry on a conversation normally during training.
Cool down/relax
Just as important as a proper warm-up program is the cool down or relaxing phase. Stop your training session gradually; reduce the speed and exertion and do some easy stretching exercises. That calms your pulse and the body can regenerate better for further exercises.
The length of regeneration phases between the training sessions should match your fitness level. Avoid a too high training intensity, in order to prevent overexertion. Overexertion can cause health problems and even death. Stop training immediately when you are fatigued or feel faint.
In order to determine your personal training intensity you can calculate your approximate maximum heart rate (HRmax): MHF = 220 - your age
Depending on the training target, there are 5 training zones, in which you can train based on your maximum heart rate.
Zones
Regeneration zone = 50 - 60% of MHF
Fatburning zone = 60 - 70% of MHF
Carbohydrate (carb)-burning zone = 70 - 80% of MHF
Anderobe zone = 80 - 90% of MHF
Warning zone = 90 - 100% of MHF
- Regeneration zone/health zone
This training is adjusted to the basic fitness level. It consists of longer, slowly performed exercises. Especially suitable for beginners and/or people that have a low fitness level.
- Fatburning zone
Optimised for fat burning and strengthens the cardiovascular system (heart and circulation). Here the body burns proportionately the most kilojoules from fat. During training you should feel relaxed and be able to carry on a conversation.
- Carb-burning zone
Here more carbohydrates than fat are burned. The training is more strenuous but also much more effective.
Getting onto the stepper
Press one pedal down all the way with your foot so that the pedal arm rests on the stopper on the frame base.
Then step onto the foot pad of the lowered pedal arm. Place the other foot on the other foot pad that is diagonally raised.
Getting off the stepper
Standing on the stepper, press one pedal down all the way with your foot so that the pedal arm rests on the stopper on the frame base. Then take your foot off the diagonally raised foot pad and place it on the floor. Then place the foot that is on the lower foot pad onto the floor.
Moving the stepper during training sessions
Your stepper simulates the movements of climbing stairs. The swing effect means that the foot pads do not merely move up and down but also to the outer sides to the left and the right.
Working muscle groups
The exercises without the bands train mainly the leg and buttock muscles.
Exercises where you step and use the exercise bands strengthen the buttocks, legs, arms and the shoulder muscles.
Exercises where you don't use the stepper function but only use the bands, strengthen the arms and the shoulder muscles.
Posture
Take care that you are standing straight when you are exercising. In particular, make sure that the small of your back isn't 'hollow'.
The pedal arm stopper should not touch the base frame when your step movement is regular. So always make sure that you switch the weight from one leg to the other shortly before the pedal arm touches the stopper. It can help to swing your slightly bent arms in front of your upper body in your step rhythm.
Stretching exercises
Stretching the lower back extensor (Fig. E)
You are in the all-fours kneeling position. Arch your back and then straighten it again, your buttocks must be raised. You should feel this in the back region. You are working the entire back extensor with this exercise.
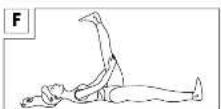
Stretching the back thigh muscles (Fig. F)
Lie on the floor on your back and pull one thigh upwards with your foot flexed i.e. the foot is parallel to the floor and not extended and pointing to the ceiling. The other leg remains stretched and on the floor. You should feel this in the back of the thigh of the raised and pulled leg. Change sides after 20-30 seconds. You are working the back thigh muscles and the buttocks with this exercise.
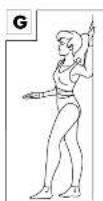
Stretching the chest muscles (Fig. G)
Place your left elbow and lower arm on a wall; upper arm and lower arm form a right angle. Now turn your body slightly away from the arm. Change sides after 20-30 seconds. You are working the chest muscles and the delta muscle with this exercise.
Stretching the neck muscles (Fig. H)
While standing, lean your head to the shoulder on one side. At the same time pull the other shoulder down towards the floor. You should feel this exercise in the side of your neck.
Change sides after 20-30 seconds.
You are working the trapezius muscle (descending part) with this exercise.
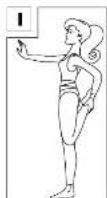
Stretching the front thigh muscles (Fig. 1)
Stand straight and tighten your tummy muscles and buttocks, so that your back stays straight (avoid hollow back). Keep the tension while you bend your leg at the knee to the back and grasp the ankle. Pull the foot towards your buttocks. Keep your knees parallel.
You should feel this exercise in the front of the bent leg.
Change sides after 20-30 seconds.
You are working the front thigh muscles with this exercise.
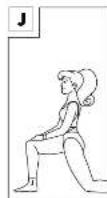
Stretching the hip flexor (Fig. J)
Kneel on the flooras depicted in figure J and move your pelvis/hips forwards towards the floor. Make sure that your back is straight and you are sitting upright. Hold the back knee and hip in one line and do not twist your pelvis. You should feel this exercise in the hip of the leg at the back.
Change sides after 20-30 seconds.
You are working the hip flexor muscles and the front thigh muscles with this exercise.
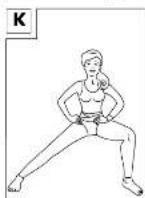
Stretching the inner thigh (Fig. K)
Stand with your legs quite far apart as depicted in figure K und bend one leg. Place your weight on the bent leg. The other leg is stretched - the foot stays on the floor. You should feel this exercise in the inside thigh muscle of the stretched leg.
Change sides after 20-30 seconds.
You are working the thigh flexor muscles with this exercise.
Exercises without bands
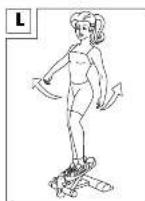
For thighs, calves and buttocks (Fig. L)
- Move your arms naturally back and forth while your step - similar to when you run or climb stairs.
- Gradually lift your arms higher.
Exercises with bands
Note on training with exercise bands! The exercise band may only be stretched to 165cm as a maximum. Otherwise it could rip and injure the user.
The more you stretch the exercise band, the more strength you require.
The correct grip
Make sure that you always hold the handles horizontally when stretching the exercise bands. Do not bend your wrists otherwise they will become overstressed.
Exercises
The following applies to all exercises listed below:
Take the handles into your hands.
- Perform the movements in a controlled manner.
- Keep your arms muscles working, the band under tension at all times.
- Check that the fixtures of the rope hooks are fixed tight before each training session.
- The duration of each set of exercises should be adjusted to your personal fitness level. Split the exercises into several sets and rest between each set.
We recommend performing 3 sets of each exercise with the duration of each repetition dependent on your fitness level.
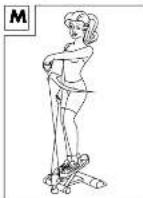
For arms, shoulders, legs and buttocks (Fig. M)
- Bend your left arm slightly and lift it away from your body up to approximately shoulder height and press down the right pedal.
- Lower your left arm and lift your right arm while pressing down on the left pedal.
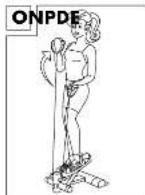
For arms and particularly shoulders (Fig. N)
- Do not step.
- Hold hands at hip height.
- Pull the right handle towards your chin. Keep the back of your hand facing upwards
- Lower the left handle at the same time.
- Then lift the left handle to your chin and lower the right handle.
For arms, legs, buttocks and particularly upper arms (Fig. O)
- Hold your palms facing upwards.
- Press your elbows firmly against your body.
- Lower the right pedal and pull the rope upwards with your right arm.
- Then lower the left pedal, pull your left arm upwards and lower your right arm.
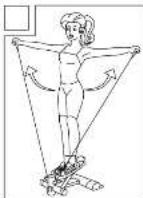
For the back, shoulders, chest, legs and buttocks (Fig. P)
- Begin stepping.
- While stepping lift your arms up sideways to shoulder height.
- Allow your arms to fall again.
Variation: perform the exercise with your palms facing upwards.
Care and maintenance
Please remember that regular maintenance and cleaning contribute to the safety of your stepper and mean that you will enjoy using your stepper for a long time. Always store the product in a dry and clean room at normal temperature. IMPORTANT! Only clean with water and never use harsh detergents. Wipe dry after cleaning.
Information on disposal
Please dispose of packaging and product in an environmentally friendly way and according to the material type!
Dispos of the product through an authorised waste disposal company or your municipal authorities.
Please observe the currently applicable regulations.
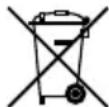
Disposing of batteries
Batteries and rechargeable batteries must not be disposed of with domestic waste! Each consumer is legally obliged to dispose of batteries and rechargeable batteries at a collection point of the municipality, town district or retailer.
This ensures that all batteries and rechargeable batteries are disposed of in an environmentally friendly way.

Pb
m = 311
Batteries and rechargeable batteries that contain harmful substances bear this mark and the chemical symbols (Cd for cadmium, Hg for mercury, Pb for lead).
3 Years Warranty
The product was produced with great care and under constant supervision. You receive a three-year warranty for this product from the date of purchase. Please retain your receipt.
The warranty applies only to material and workmanship and does not apply to misuse or improper handling. Your statutory rights, especially the warranty rights, are not affected by this warranty.
With regard to complaints, please contact the following service hotline or contact us by e-mail.
Our service employees will advise as to the subsequent procedure as quickly as possible.
We will be personally available to discuss the situation with you.
Any repairs under the warranty, statutory guarantees or through goodwill do not extend the warranty period. This also applies to replaced and repaired parts. Repairs after the warranty are subject to a charge.
IAN:24576

Service Great Britain
Tel.: 08715000720
(£0.10/Min.)
E-Mail: deltasport@lidl.co.uk
You can also find spare parts for your product at:
www.delta-sport.com, category Service - Lidl Spare Parts
Service