Platinum PRO Upright Bike - Exercise bike TUNTURI - Free user manual and instructions
Find the device manual for free Platinum PRO Upright Bike TUNTURI in PDF.

User questions about Platinum PRO Upright Bike TUNTURI
0 question about this device. Answer the ones you know or ask your own.
Ask a new question about this device
Download the instructions for your Exercise bike in PDF format for free! Find your manual Platinum PRO Upright Bike - TUNTURI and take your electronic device back in hand. On this page are published all the documents necessary for the use of your device. Platinum PRO Upright Bike by TUNTURI.
USER MANUAL Platinum PRO Upright Bike TUNTURI
natural_image
Black Platinum PRO stationary bike with visible branding and side arm (no text-heavy elements)It's easy to feel good!
Contents
Welcome....3
Safety Instructions .... 3
Electrical safety 4
Assembly.... 5
Step 1: ....5
Step 2: 6
Step 3: ....
Step 4: 8
User interface.... 9
Jog wheel and Buttons 9
Start up screen 10
Programs......10
Quick start 10
End your workout....11
Target heart rate 11
Manual....12
Watt Constant....13
T-Ride 14
Preset Programs.... 14
Own Trainings.... 16
Fitness test 17
T-Road....19
User settings....19
User Log....20
User Setting......20
Edit User....20
Delete User.... 21
Change User 21
Create User 21
Heart Rate Training.... 22
How to wear your wireless chest strap transmitter: 22
Exercising 23
Maintenance....23
Troubleshooting....24
Moving and storage....24
Specifications 97
User Interface 97
Equipment 97
Spare parts list.... 98
Exploded view 100
Welcome
Welcome to the world of Tunturi exercising!
Your choice shows that you really want to invest in your well being and condition; it also shows you really value high quality, safe and motivating product as your training partner. Whatever your goal in training, we are certain this is the training equipment to get you there. You'll find information about using your exercise equipment and what makes for efficient training at Tunturi's website at www.tunturi.com
Safety Instructions
Read this guide through carefully before assembling, using or servicing your fitness equipment. Please keep the guide somewhere safe; it will provide you now and in the future with the information you need to use and maintain your equipment. Always follow these instructions with care.
Note about your health
- Before you start any training, consult a physician to check your state of health.
- If you experience nausea, dizziness or other abnormal symptoms while exercising, stop your workout at once and consult a physician.
- To avoid muscular pain and strain, begin each workout by warming up and end it by cooling down (slow pedaling at low resistance). Don't forget to stretch at the end of the workout.
Note about the exercise environment
- The equipment is not to be used outdoors.
- Place the equipment on a firm, level surface. Place the equipment on a protective base to avoid any damages to the floor beneath the equipment.
• Make sure that the exercising environment has adequate
ventilation. To avoid catching cold, do not exercise in a draughty place.
- In training, the equipment tolerates an environment measuring +10°C to +35°C. The equipment can be stored in temperatures ranging between -15°C and +40°C. Air humidity in the training or storage environment must never exceed 90%.
Note about the equipment
- If children are allowed to use the equipment, they should be supervised and taught to use the equipment properly, keeping in mind the child's physical and mental development and their personality.
- Before you start using the equipment, make sure that it functions correctly in every way. Do not use faulty equipment.
- Press the keys with the tip of the finger; your nails may damage the key membrane.
- Never lean on the interface.
- Never remove the side covers. Do not step on the frame casing.
- Only one person may use the equipment at a time.
- Hold the handlebar for support when getting on or off the equipment.
- Wear appropriate clothing and shoes when exercising.
- Protect the meter from sunlight and always dry the surface of the meter if there are any drops of sweat on it.
• Further information on warranty terms can be found in the warranty booklet included with the product.
- Please note that the warranty does not cover damage due to shipping or negligence of adjustment or maintenance instructions described in this manual.
- The equipment must not be used by persons weighing over 150 kg.
- Do not attempt any servicing or adjustments other than those described in this guide. Everything else must be left to someone familiar with the maintenance of electromechanical equipment and authorized under the laws of the country in question to carry out maintenance and repair work.
- Never drop or insert any object into any openings.
- Do not use outdoors.
- Do not use excessive pressure on console control keys. They are precision set to properly function with little finger pressure. Pushing harder is not going to make the unit go faster or slower. If you feel the buttons are not functioning properly with normal pressure, contact your dealer.
Electrical safety
(only for equipment with electric power)
- Before use, always check that the mains voltage is the same as the voltage on the rating plate of the equipment.
- Do not use an extension cable.
- Keep the mains cable away from heat, oil and sharp edges.
- Do not alter or modify the mains cable or the mains plug.
- Do not use the equipment if the mains cable or the mains plug is damaged or defective. If the mains cable or the mains plug is damaged or defective, contact your dealer.
• Always fully unwind the mains cable.
- Do not run the mains cable underneath the equipment. Do not run the mains cable underneath a carpet. Do not place any objects on the mains cable.
- Make sure that the mains cable does not hang over the edge of a table. Make sure that the mains cable cannot be caught accidentally or tripped over.
- Do not leave the equipment unattended when the mains plug is inserted into the wall socket.
- Do not pull the mains cable to remove the mains plug from the wall socket.
- Remove the mains plug from the wall socket when the equipment is not in use, before assembly or disassembly and before cleaning and maintenance.
SAVE THIS INSTRUCTION MANUAL
Assembly
Step 1:
Rear support tube assembly
- Install the rear support tube (5) onto the main frame (1) with four 3/8" x 2" Hex head bolts (50) and four 3/8" x 25mm Flat Washers (71).
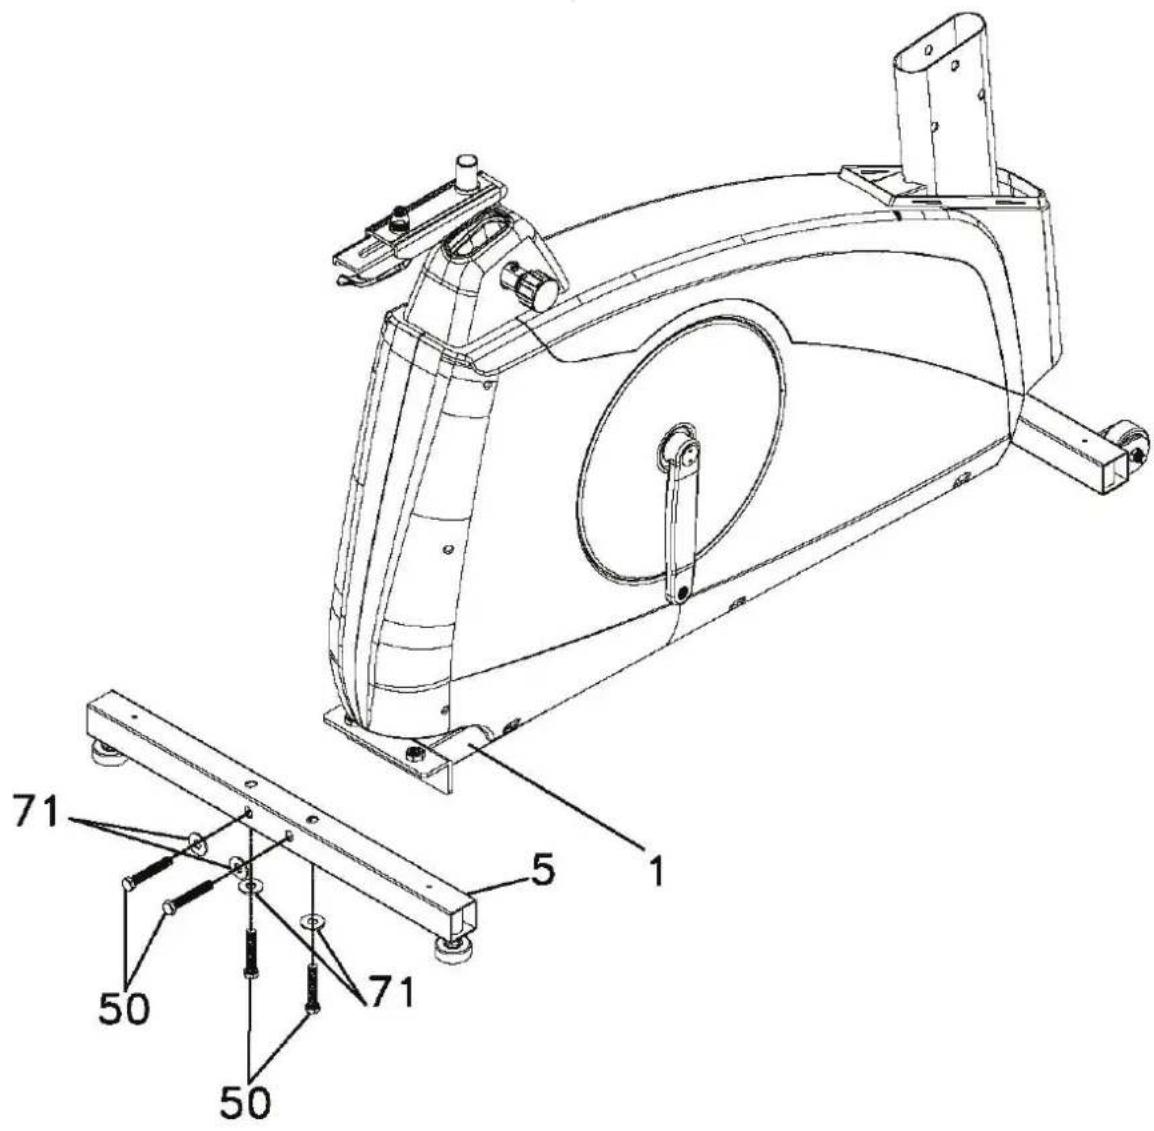
text_image
Technical diagram of a stationary exercise machine with labeled components and assembly details
50. 3/8"X2" Hex Head bolt - 4PCS

71. 3/8"X25mmx2T Flat Washer - 4PCS
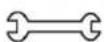
100. 12/14m/m_Wrench
Step 2:
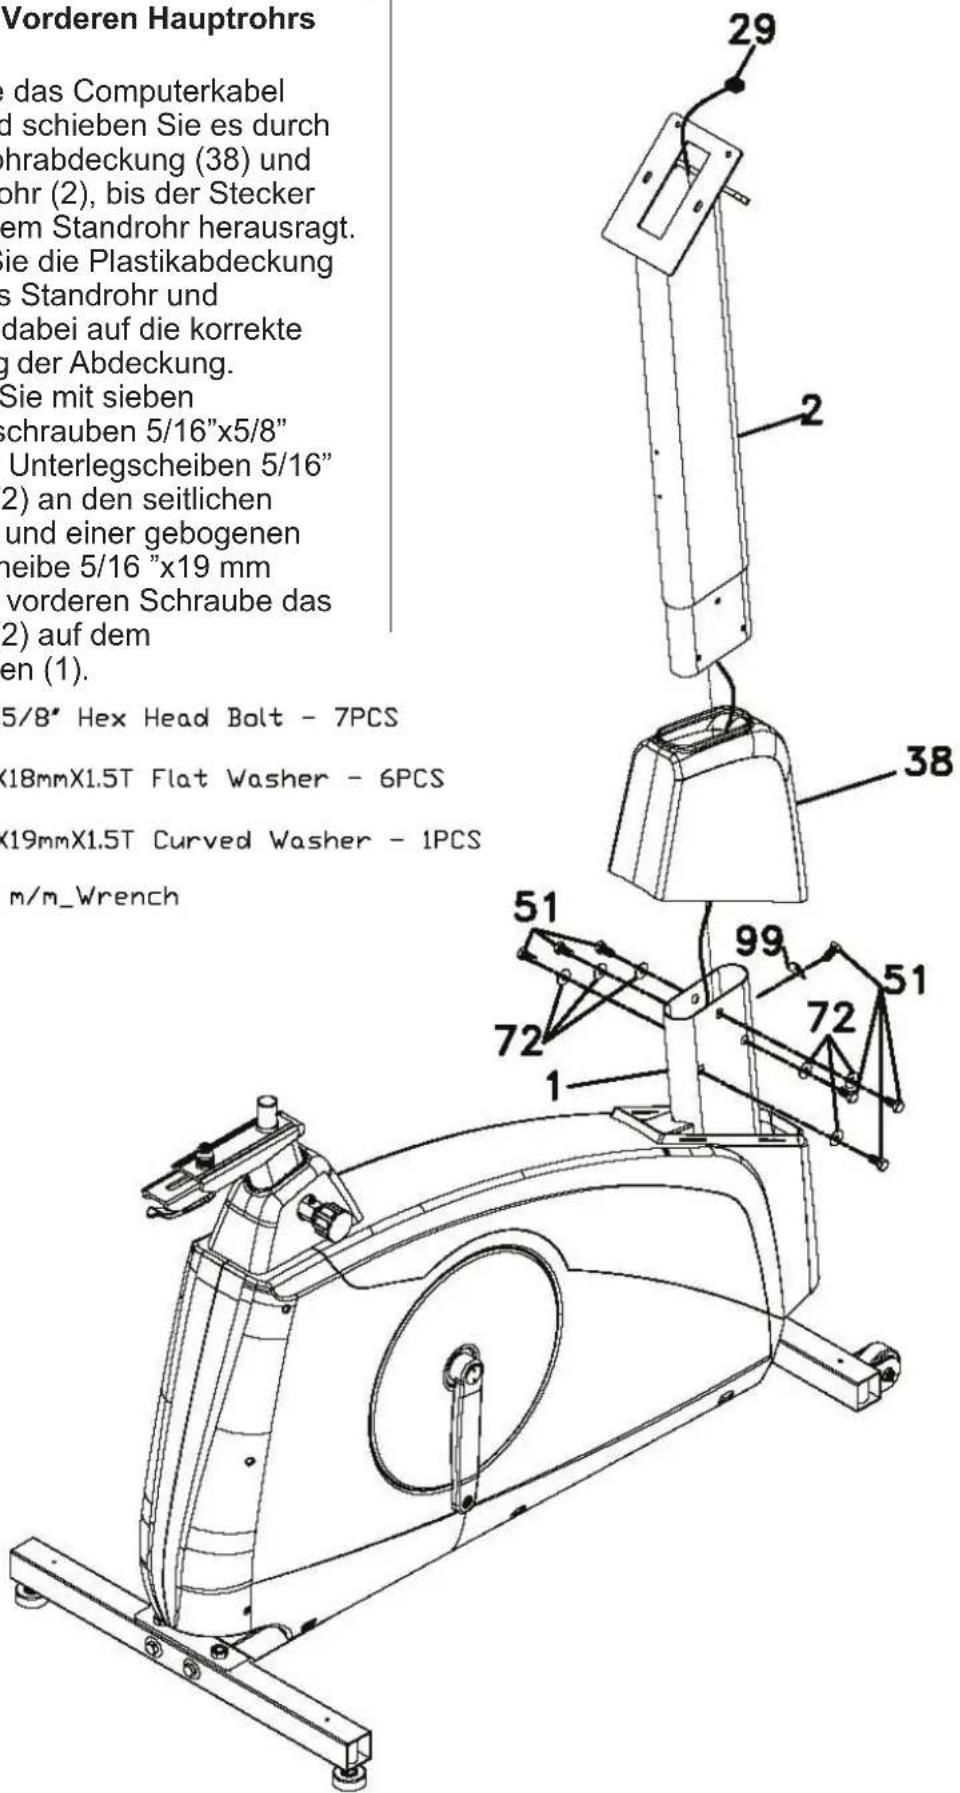
Front upright tube assembly
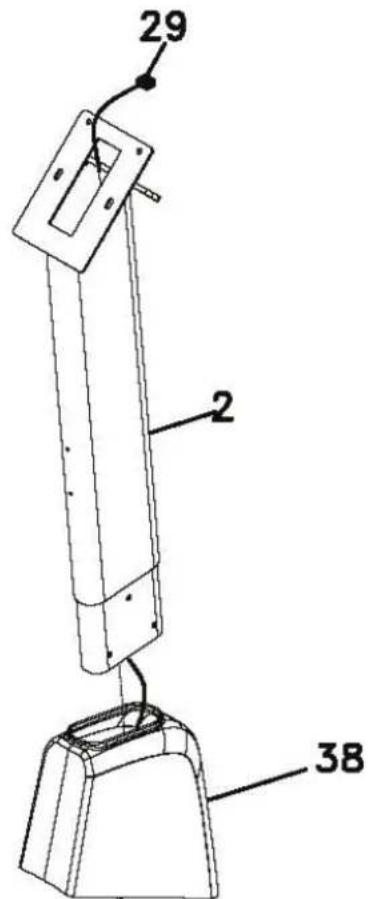
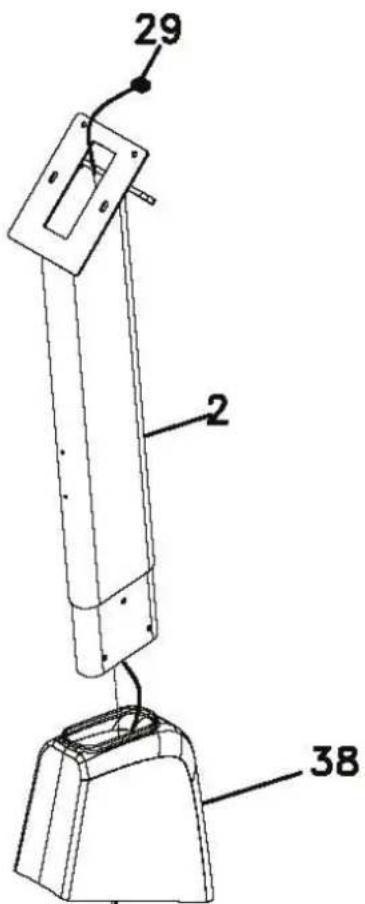
- Unravel the Computer Cable (29) and snake it through the Upright tube Cover (38) and the Upright tube (2) until the cable connector comes out the top opening of the upright tube. Slide the plastic cover (38) onto the upright tube, ensuring the correct orientation of the cover.
- Install the Upright tube (2) onto the Main Frame (1) with seven 5/16" x 5/8" Hex Head bolts (51), six 5/16" x 18mm Flat Washers (72) on the side screws and one 5/16" x 19mm Curved Washer (99) on the front screw.

51. 5/16"X5/8" Hex Head Bolt - 7PCS

72. 5/16"X18mmX1.5T Flat Washer - 6PCS

99. 5/16"X19mmX1.5T Curved Washer - 1PCS

100. 12/14 m/m_Wrench

text_image
29 2 38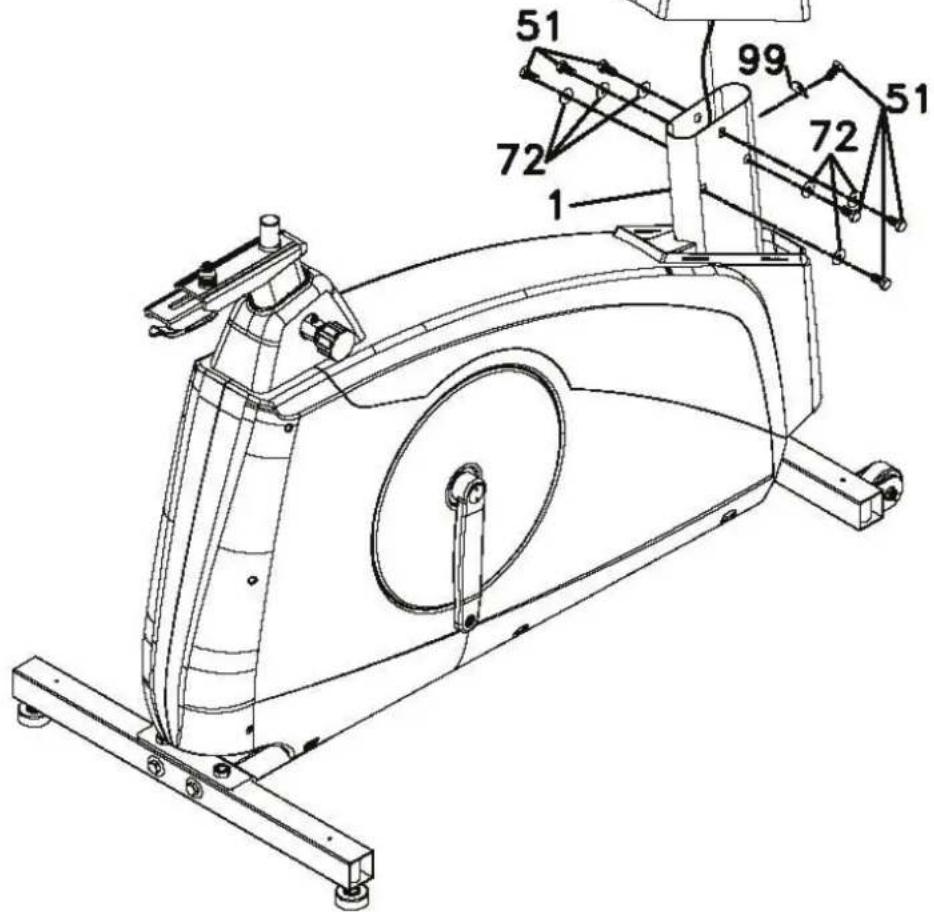
text_image
Technical diagram of a stationary exercise machine with numbered components and labeled partsStep 3:
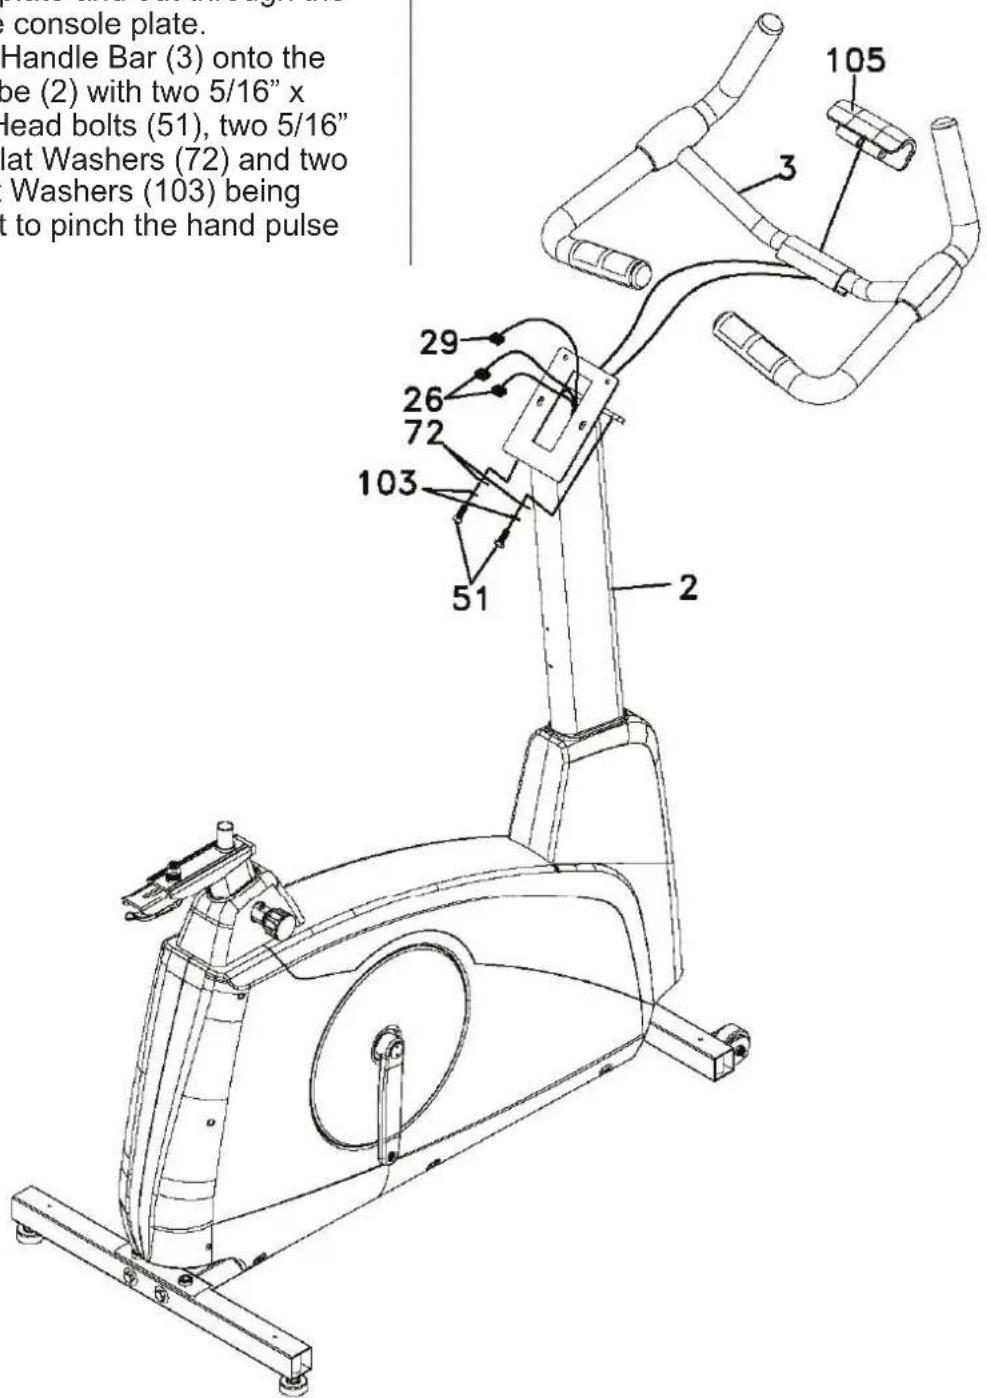
Handlebar
- Run the two hand pulse wires (26) into the hole in the handle bar mounting plate and out through the hole in the console plate.
- Install the Handle Bar (3) onto the Upright tube (2) with two 5/16" x 5/8" Hex Head bolts (51), two 5/16" x 18mm Flat Washers (72) and two 5/16" Split Washers (103) being careful not to pinch the hand pulse wires.
text_image
console plate. Handle Bar (3) onto the boe (2) with two 5/16" x Head bolts (51), two 5/16" lat Washers (72) and two Washers (103) being t to pinch the hand pulse 105 3 29 26 72 103 51 251. 5/16"X5/8" Hex Head Bolt - 2PCS
72. 5/16"X18mmX1.5T Flat Washer - 2PCS
100. 12/14m/m_Wrench
103. 5/16"X1.5T Split Washer - 2PCS
Step 4:
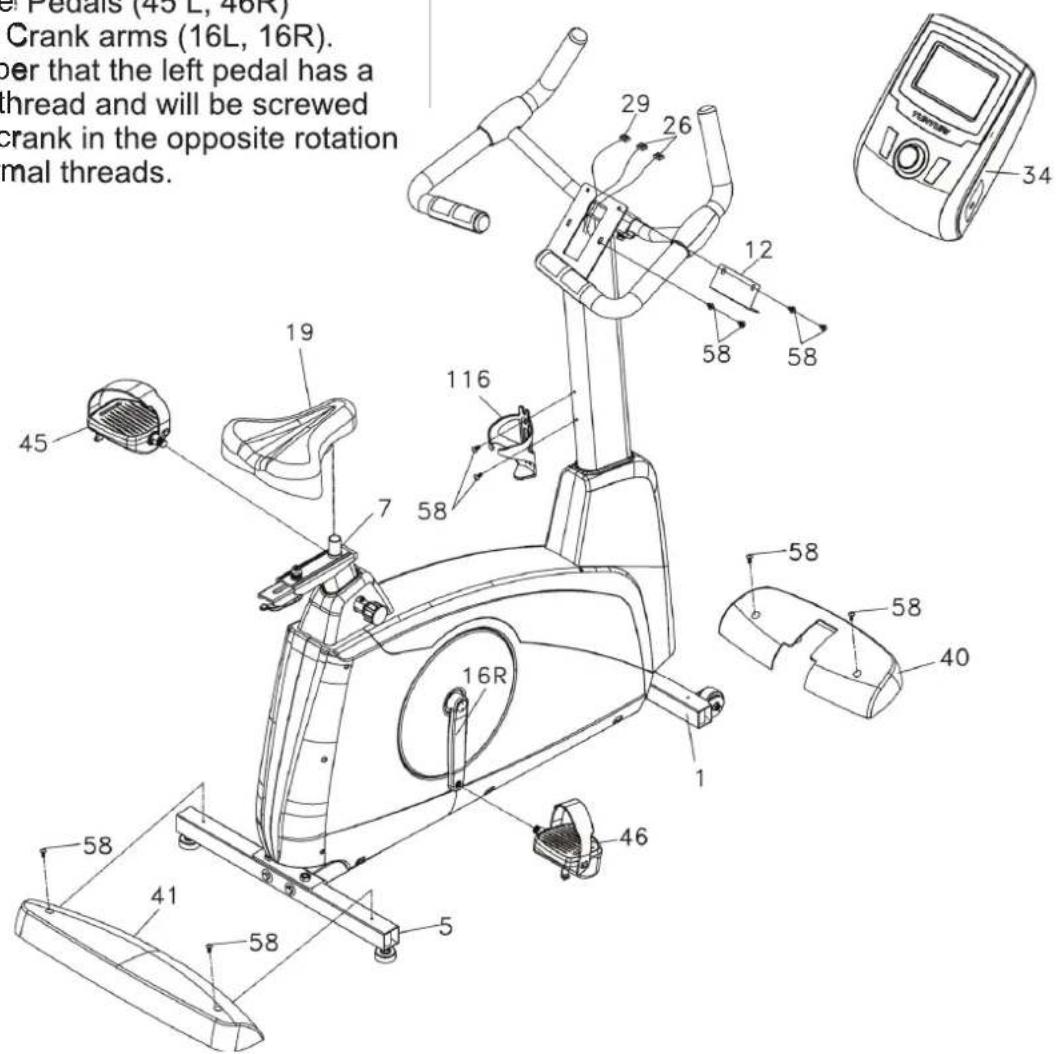
Console, Seat, Pedals And Main Housing Covers Assembly
- Insert the Computer Cable (29) and two Hand pulse cables (26) into the connectors in the back of the Console (34). Install the Console (34) onto the Upright tube at the bottom with two M5x12mm Phillips Head Screws (58). Then fasten the Console (34) with the Fixing Plate (12) onto the Upright tube on the top with two M5x12mm Phillips Head Screws (58).
- Install the Front Foot Cover (40) and the Rear Foot Cover (41) onto the Main Frame (1) with four M5x12mm Phillips Head Screws (58).
- Install the Pedals (45 L, 46R) onto the Crank arms (16L, 16R). Remember that the left pedal has a reverse thread and will be screwed into the crank in the opposite rotation from normal threads.
There is an "L" stamped into the end of the threaded post of the left pedal and an "R" in the right. Make sure to tighten the pedals as much as you possibly can. It may be necessary to re-tighten the pedals if you feel a thumping during pedaling the bike. A noise or feeling such as a thumping or clicking is usually caused by the pedals being too loose.
- Install the Seat slide tube (7) onto the track on top of the seat tube with the seat post facing forward. Install the seat (19) onto the seat post.
- Install the Bottle Holder (116) onto the Upright tube with two M5x12mm Phillips Head Screws (58)..
text_image
Crank arms (16L, 16R). per that the left pedal has a thread and will be screwed crank in the opposite rotation mal threads.
58. M5X12mm Phillips Head Screw - 10pcs
93. Phillips Head Screw Driver

117. 13/15m/m_Wrench
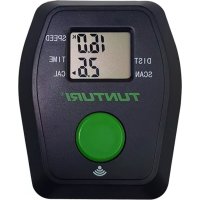
Userinterface
text_image
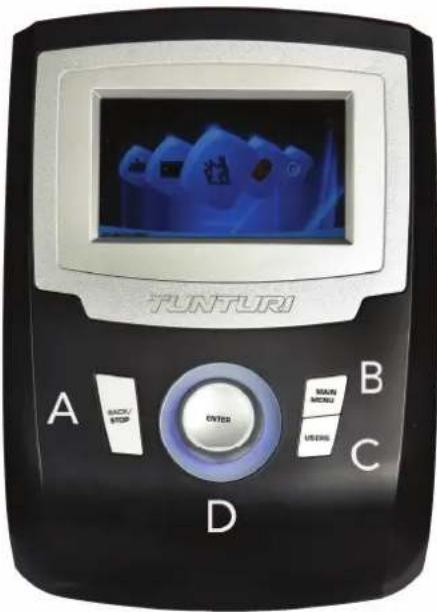
TUNTURI A BACK/STOP ENTER MAIN MENU USERS B C DJog wheel and Buttons
A Back, Stop button:
- Move back to previous window
- Stop the active training
B Main menu:
- It will go back to main menu or quick start if press main menu button.
- During training: pause if press this button
C User/Settings:
- Press this button to enter User/Setting mode screen
• This button is of no use during workout
D Jog wheel:
Turn functions:
- Choose workout mode in main menu
- User/setting mode option selection
- Choose working item on the setting screen
- Increase or decrease the setting value
- Adjusting target value (high/low) during workout
- Shift up or down during T-Ride™ or T-Road workout
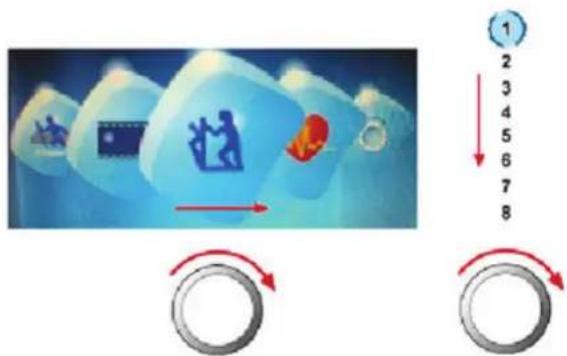
Horizontal
Turning clockwise to choose option rightward; counterclockwise for leftward
Vertical
Turning clockwise to shift up; counterclockwise to shift down
flowchart
graph TD
    A["Player at top"] --> B["Player in blue box"]
    B --> C["Player moving on ice with red flame"]
    C --> D["Roller to track 1"]
    D --> E["Roller to track 2"]
    E --> F["Roller to track 3"]
    F --> G["Roller to track 4"]
    G --> H["Roller to track 5"]
    H --> I["Roller to track 6"]
    I --> J["Roller to track 7"]
    J --> K["Roller to track 8"]
Press functions:
- Sport mode confirmation
- Option confirmation under User/Setting mode
- Confirmation of working item on setting screen
- Setting value confirmation
- Screen switching between bpm ↔ Nm or bpm ↔ W during workout
- Screen switching between bpm ↔ m or bpm ↔ ft during T-Ride™
- Screen switching between Video ↔ Profile during T-Road
- Switching to next tutoring mode during T-Trainer™
- Option confirmation under Music mode screen
USB Port
Usb port can be used for:
• Service purposes such as software update.
Note! Format should not be NTFS
Start up screen
When user interface startup it will show loading screen as shown below.
TUNTURI®
After a few seconds this scree will change into Data reading in progress screen. Shown below.

natural_image
Person jogging on a paved path with trees and hills in the background (no text or symbols visible)After loading the application the user interface will be show main menu screen.

text_image
Fitness Plus T-Tur Quick Start TargetPR Method TUNTURI®Trainer is now ready to start your workout programming of just select quick start and begin.
Programs

Quick start
- Turn the jog wheel and select "Quick start"
- Press the jog wheel to confirm and enter the workout screen quickly
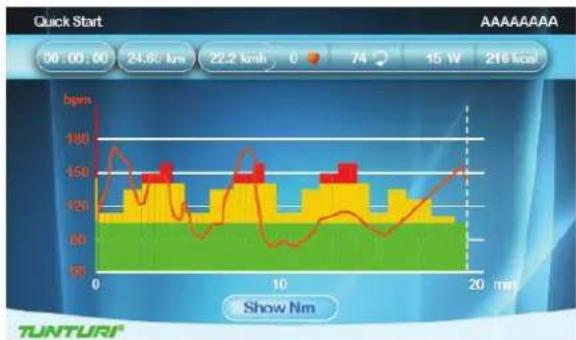
Workout screen
line
| Time (min) | Power (bpm) | | ---------- | ----------- | | 0 | 180 | | 5 | 150 | | 10 | 160 | | 15 | 140 | | 20 | 150 |The X axis denote time in minutes between 0\~30. It is updated once every 15 minutes during workout
- During workout, press the jog wheel button to switch the Y-axis between Nm↔bpm.
- The bar chart denotes torque value Nm. Rotate the jog wheel to adjust the Nm value.
- The white dot line shows current position, which moves rightward as workout time increases. The workout screen could show 5-hour data at most.
- The orange curve shows the user's actual heart rate, which varies as the heart rate frequency goes up and down.
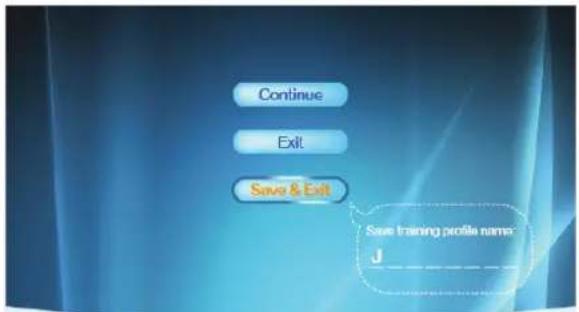
End your workout
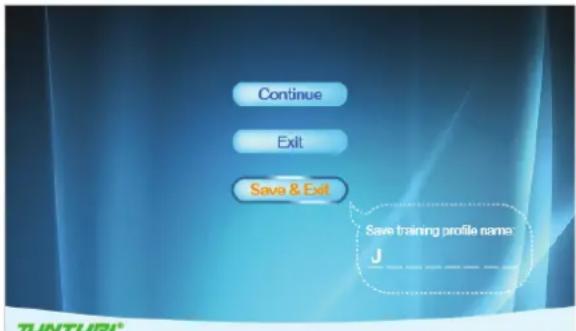
The workout end screen pops up when Back/stop or Main menu is pressed or when the white dot line reaches the target value.
Workout end screen
text_image
Continue Exit Save & Exit Save training profile name: JTUNTURI
Continue:
Choose "Continue" to return to workout screen
Exit:
Choose "Exit" to exit to last session screen.
Save&Exit:
Choose "Save&Exit" and enter a file name at the bottom of the screen: use the jog wheel to select A\~Z or 0\~9, save all workout data and name the file for a new workout mode.
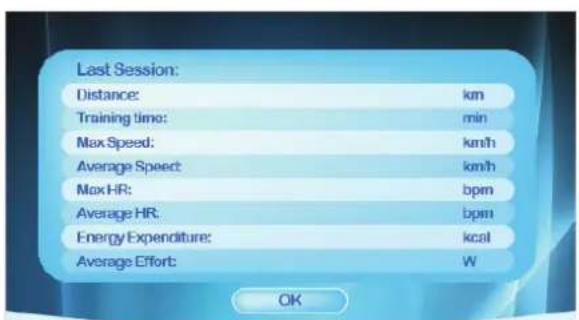
Display the workout data in Last session screen.
Workout data screen
text_image
Last Session: Distance: km Training time: min Max Speed: km/h Average Speed: km/h Max HR: bpm Average HR: bpm Energy Expenditure: kcal Average Effort: W OKTUNTURI
Press the jog wheel button to return to main menu.

Target heart rate
- Turn the jog wheel and select "Target HR"
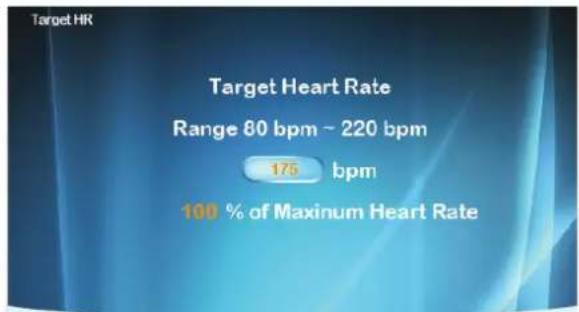
- Press the jog wheel to confirm and enter the Setting screen (1)
Setting screen (1)
text_image
Target HR Target Heart Rate Range 80 bpm ~ 220 bpm 175 bpm 100 % of Maximum Heart RateTUNTURI®
- Turn the jog wheel to adjust target heart rate value. (The percentage varies with bpm value)
- Press the jog wheel to confirm and enter the Setting screen (2)
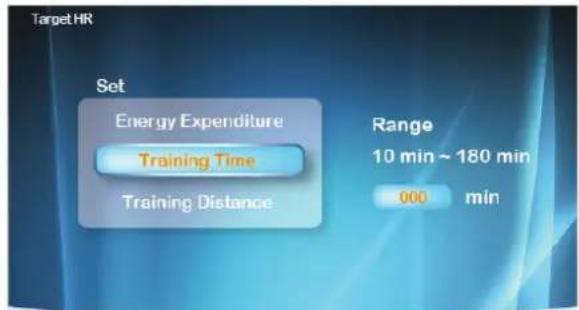
Setting screen (2)
text_image
Target HR Set Energy Expenditure Training Time Training Distance Range 10 min ~ 180 min 000 minTUNTURI®
- Turn jog wheel to select item
- Press the jog wheel button for confirmation and continue the range setting at the right.
- Turn jog wheel to change setting ranges
- Press the jog wheel button to confirm and enter the Workout screen.
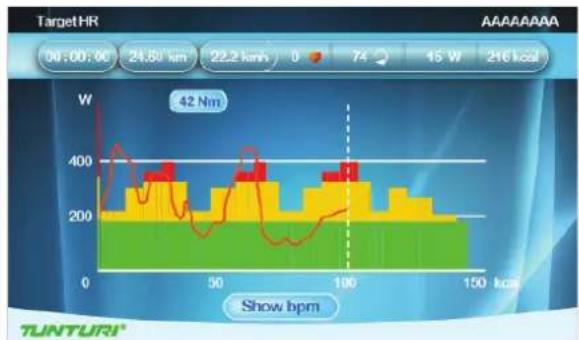
Workout screen
bar_line
| Time (kcal) | Power (W) | |---|---| | 0 | 42 | | 10 | 380 | | 20 | 320 | | 30 | 360 | | 40 | 340 | | 50 | 380 | | 60 | 360 | | 70 | 340 | | 80 | 320 | | 90 | 360 | | 100 | 380 | | 110 | 340 | | 120 | 320 | | 130 | 300 | | 140 | 280 | | 150 | 260 |The X-axis unit is shown according to the selection of Energy/Time/Distance in Set screen:
Energy Unit: kcal
Time Unit: min
Distance Unit: km in metric
mile in
- During workout, press the jog wheel button to switch the Y-axis between W↔ bpm
- The bar chart denotes target heart rate value bpm. Rotate the jog wheel to adjust the target heart rate value.
- The white dot line shows current position, which moves rightward as calorie /time/distance increases.
- The orange curve shows the user's actual heart rate, which varies as the heart rate frequency goes up and down.
- The blue curve shows the actual Watt value.
- Console programming: Assist the user to achieve the target according to its target heart rate input during workout. When actual heart rate is higher than target value, the system would decrease Watt value; while increases Watt value when actual heart rate is below target value.
- A message of "No Heart Rate" is shown if the user's heart rate is not detected during workout.
To stop your workout see:
"End your workout"

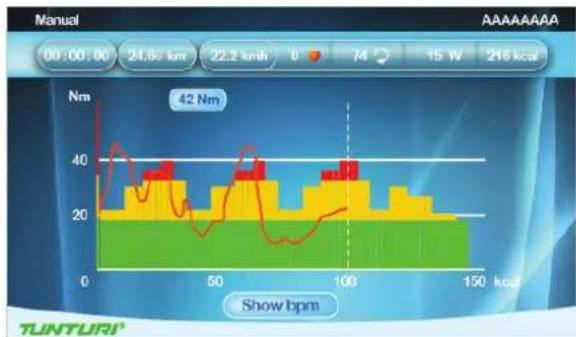
Manual
- Turn the jog wheel and select "Manual"
- Press the jog wheel to confirm and enter the Setting screen (1).
Setting screen (1)

text_image
Manual Set Training Time Training Distance Energy Expenditure Range 3 km ~ 100 km 000 kmTUNTURI
- Turn jog wheel to select item
- Press the jog wheel button for confirmation and continue the range setting at the right.
- Turn jog wheel to change setting ranges
- Press the jog wheel button to confirm and enter the Workout screen.
Workout screen
bar_line
| Time (kcal) | Speed (Nm) | |-------------|------------| | 0 | 42 | | 50 | 38 | | 100 | 36 | | 150 | 28 |The X-axis unit is shown according to the selection of Energy/Time/Distance in Set screen.
Energy Unit: kcal
Time Unit: min
Distance Unit: km in metric
mile in Imperial
- During workout, press the jog wheel button to switch the Y-axis between
-
Nm↔bpm
-
The bar chart denotes torque Nm value. Rotate the jog wheel to adjust the Nm value.
- The white dot line shows current position, which moves rightward as calorie /time/distance increases.
- The orange curve shows the user's actual heart rate, which varies as the heart rate frequency goes up and down
To stop your workout see:
"End your workout"

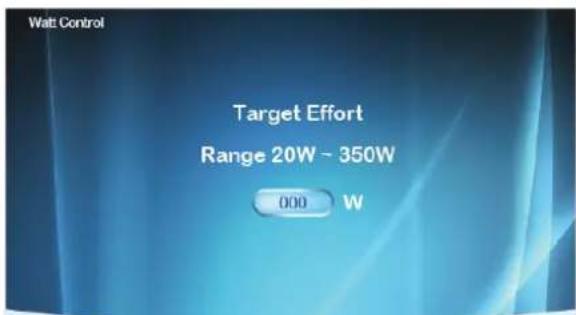
Watt Constant
- Turn the jog wheel and select "Watt Constant"
- Press the jog wheel to confirm and enter the Setting screen (1).
Setting screen (1)
text_image
Watt Control Target Effort Range 20W ~ 350W 000 WTUNTURI
- Turn the jog wheel to adjust target Watt value.
- Press the jog wheel to confirm and enter the Setting screen (2)
Setting screen (2)
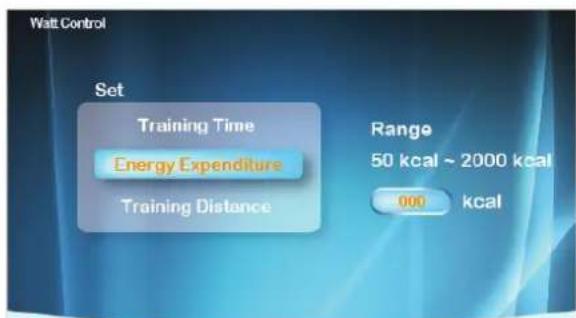
text_image
Watt Control Set Training Time Energy Expenditure Training Distance Range 50 kcal ~ 2000 kcal 000 kcalTUNTURI
- Turn jog wheel to select item
- Press the jog wheel button for confirmation and continue the range setting at the right.
- Turn jog wheel to change setting ranges
- Press the jog wheel button to confirm and enter the Workout screen
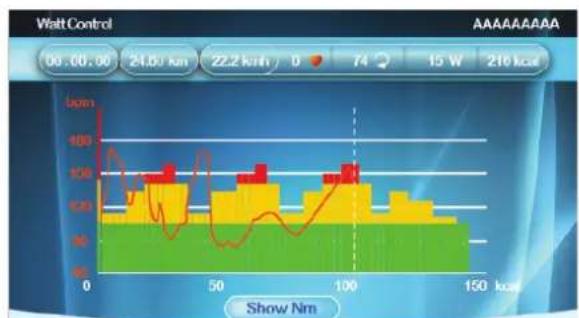
Workout screen
bar_line
| Load (Nm) | Bar Value (Lpm) | Line Value (Lpm) | |---|---|---| | 0 | 100 | 100 | | 25 | 80 | 60 | | 50 | 90 | 40 | | 75 | 100 | 60 | | 100 | 100 | 80 | | 125 | 90 | 100 | | 150 | 80 | 120 | | 175 | 70 | 140 | | 200 | 60 | 160 | | 225 | 50 | 180 | | 250 | 40 | 200 | | 275 | 30 | 220 | | 300 | 20 | 240 | | 325 | 10 | 260 | | 350 | 5 | 280 | | 375 | 3 | 300 | | 400 | 2 | 320 | | 425 | 1 | 340 | | 450 | 0.5 | 360 | | 475 | 0.3 | 380 | | 500 | 0.2 | 400 | | 525 | 0.1 | 420 | | 550 | 0.05 | 440 | | 575 | 0.03 | 460 | | 600 | 0.02 | 480 | | 625 | 0.01 | 500 | | 650 | 0.005 | 520 | | 675 | 0.003 | 540 | | 700 | 0.002 | 560 | | 725 | 0.001 | 580 | | 750 | 0.0005 | 600 | | 775 | 0.0003 | 620 | | 800 | 0.0002 | 640 | | 825 | 0.0001 | 660 | | 850 | 0.00005 | 680 | | 875 | 0.00003 | 700 | | 900 | 0.00002 | 720 | | 925 | 0.00001 | 740 | | 950 | 0.000005 | 760 | | 975 | 0.000003 | 780 | | 1000 | 0.000002 | 800 | | Note: The actual values for 'Walt Control' and 'Show Nm' are not provided in the image. The data is extracted from the table above by using the code to create a table format.TUNTURI
The X-axis unit is shown according to the selection of Energy/Time/Distance in Set screen.
Energy Unit: kcal
Time Unit: min
Distance Unit: km in metric
mile in Imperial
- During workout, press the jog wheel button to switch the Y-axis between Nm↔bpm
- The bar chart denotes the Watt value. Rotate the jog wheel to adjust the Watt value
- The white dot line shows current position, which moves rightward as calorie /time/distance increases
- The orange curve shows the user's actual heart rate, which varies as the heart rate frequency goes up and down
- Console programming: Assist the user to achieve the target according to its target Watt value input during workout. When actual Watt value > target value, the system would decrease Watt value; while increases Watt value when actual Watt rate < target value.
To stop your workout see:
"End your workout"

T-Ride
- Turn the jog wheel and select "T-ride"
- Press the jog wheel to confirm and enter the Setting screen (1).
Setting screen (1)
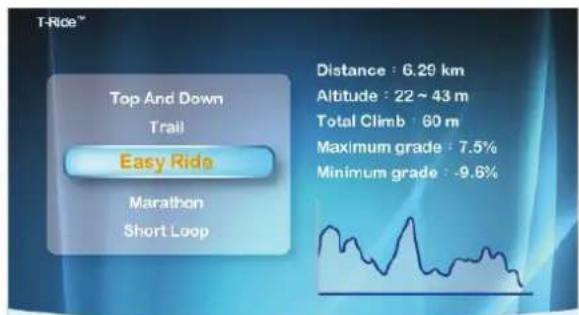
text_image
T-Rice™ Top And Down Trail Easy Rida Marathon Short Loop Distance : 6.29 km Altitude : 22 ~ 43 m Total Climb : 60 m Maximum grade : 7.5% Minimum grade : -9.6%TUNTURI
- Turn the jog wheel to select between: Top and Down - Trail - Easy Ride - Marathon - Short Loop
- Press the jog wheel to confirm and enter the Setting screen (2)
Setting screen (2)
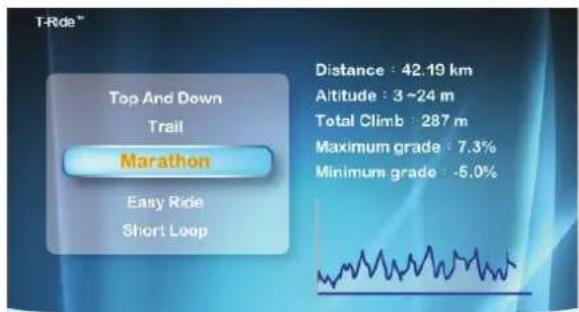
text_image
T-Ride™ Top And Down Trail Marathon Easy Ride Short Loop Distance : 42.19 km Altitude : 3 ~24 m Total Climb : 287 m Maximum grade : 7.3% Minimum grade : -5.0%TUNTURI
- Set up the Startup point of Workout: rotate the jog wheel button to adjust the left white dot line, press the jog wheel button for confirmation.
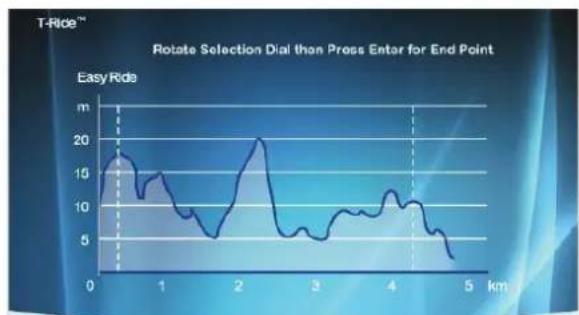
line
| Time (km) | Easy Ride (m) | | --------- | ------------- | | 0 | 15 | | 1 | 10 | | 2 | 20 | | 3 | 5 | | 4 | 10 | | 5 | 5 |TUNTURI®
- Set up the Ending point of Workout: rotate the jog wheel button to adjust the right white dot line, press the jog wheel button for confirmation then enter the Workout screen.
Workout screen
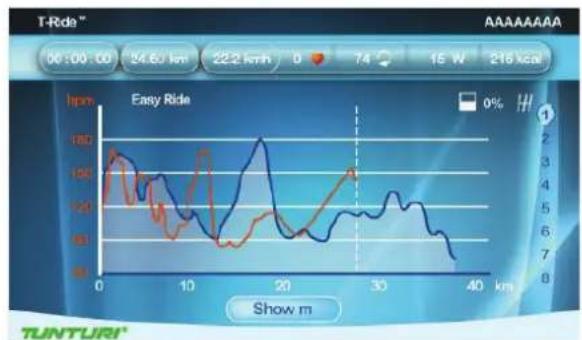
line
| Time (min) | Speed (km/h) | |------------|--------------| | 0 | 180 | | 10 | 120 | | 20 | 160 | | 30 | 140 | | 40 | 80 |The X-axis is shown as distance unit, km in metric and mile in Imperial
- During workout, press the jog wheel button to switch the Y-axis between m↔bpm in metric, ft↔bpm in imperial
- The white dot line shows current position, which moves rightward as distance increases
- The orange curve shows the user's actual heart rate, which varies as the heart rate frequency goes up and down
- In the right of the screen is the gear shift from 1\~8, Turn the jog wheel button to switch
- The white icon + 0° in the left bottom of the screen shows the incline level and it varies with the Profile incline level change.
- The Last Session screen shows workout data. Press the jog wheel button to return to Main menu
To stop your workout see:
"End your workout"

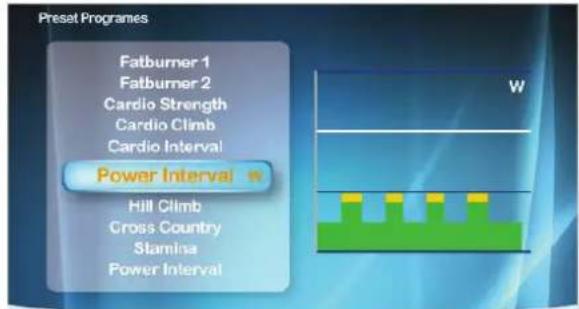
Preset Programs
- Turn the jog wheel and select "Preset Programs"
- Press the jog wheel to confirm and enter the Setting screen (1).
Setting screen (1)
text_image
Preset Programes Fatburner 1 Fatburner 2 Cardio Strength Cardio Climb Cardio Interval Power Interval Hill Climb Cross Country Stamina Power IntervalTUNTURI
- Turn the jog wheel to select between:
• Watt control: Rolling Hills - Hill Climb
- Cross Country - Stamina - Power Interval items and,
Heart Rate Control: Fat burner 1 - Fat burner 2 - Cardio Strength - Cardio Climb - Cardio Interval
- Press the jog wheel to confirm and enter the Setting screen (2)
Setting screen (2)

text_image
Preset Programmes Set Training Time Training Distance Range 10 min ~ 180 min 000 minTUNTURI
- Turn jog wheel to select item
- Press the jog wheel button for confirmation and continue the range setting at the right.
- Turn jog wheel to change setting ranges
- Press the jog wheel button to confirm and enter the Workout screen
Workout screen ( Watt Control )

area
| Time (min) | Value | |---|---| | 0 | 100 | | 2 | 120 | | 4 | 130 | | 6 | 140 | | 8 | 150 | | 10 | 140 | | 12 | 130 | | 14 | 120 | | 16 | 110 | | 18 | 100 | | 20 | 90 |TUNTURI
The X-axis unit is shown according to the selection of Time/Distance in Set screen:
Time Unit: min
Distance Unit: km in metric
mile in Imperial
- During workout, press the jog wheel button to switch the Y-axis between W↔ bpm
- The bar chart denotes the default target Watt value of the Profile. Rotate the jog wheel to adjust the percentage of Profile Watt value in the right of the white dot line
- The white dot line shows current position, which moves rightward as time/distance increases
- The orange curve shows the user's actual heart rate, which varies as the heart rate frequency goes up and down
- Console Programming is the same as Watt Constant mode
Workout (Heart Rate Control)

line
| Time (min) | Temperature (lpm) | | ---------- | ----------------- | | 0 | 180 | | 10 | 150 | | 20 | 120 |The X-axis unit is shown according to the selection of Time/Distance in Set screen:
Time Unit: min
Distance Unit: km in metric
mile in Imperial
- During workout, press the jog wheel button to switch the Y-axis between W↔ bpm
- The bar chart denotes the default target Watt value of the Profile. Rotate the jog wheel to adjust the percentage of Profile Watt value in the right of the white dot line
-
The white dot line shows current position, which moves rightward as time/distance increases
-
The orange curve shows the user's actual heart rate, which varies as the heart rate frequency goes up and down
- The blue curve shows the actual Watt value
- Console Programming is the same as Target HR mode
To stop your workout see:
"End your workout"

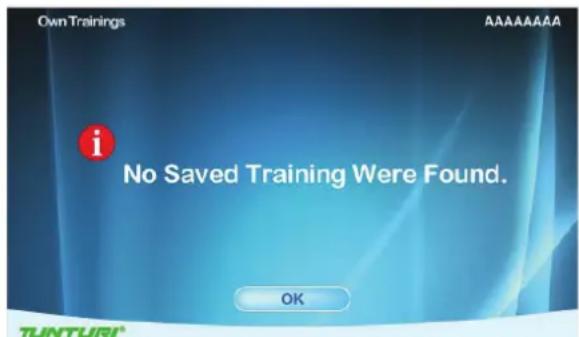
Own Trainings
- Turn the jog wheel and select "Preset Programs"
- Press the jog wheel to confirm and enter the Setting screen (1).
NOTE
When no saved trainings are found below window will appear.
text_image
Own Trainings No Saved Training Were Found. OK AAAAAAAAA TUNTURI- Press jog wheel to go back to main menu
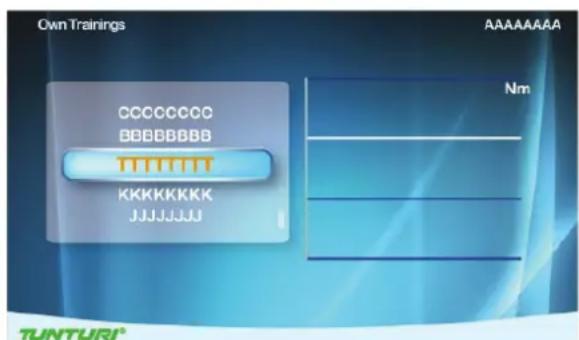
Setting screen (1)
text_image
Own Trainings CCCCCC BBBBBBBB KKKKKKKK JJJJJJJJ Nm TUNTURI®Setting Screen (1) is for user's saved items and training records.
They are shown in the right and left screen.
- Turn jog wheel to select item
- Press the jog wheel button to confirm and to open selection window.
Selection window
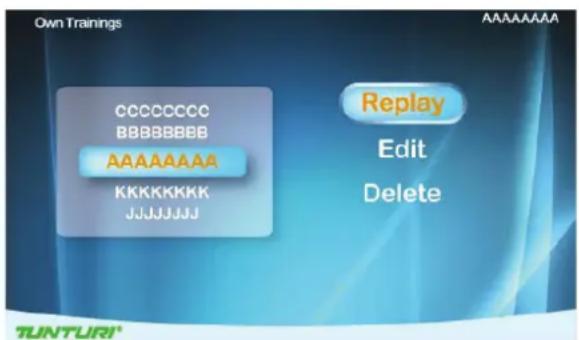
text_image
Own Trainings CCCCCC BBBBBBBB AAAAAAAA KKKKKKKK JJJJJJJJ Replay Edit Delete TUNTURI®- Turn the jog wheel and select item Choose "Replay"
- Press jog wheel button to confirm. Enter workout screen and continue the previous training
Choose "Edit"
- Press jog wheel to confirm
- Enter and edit the range setting
- Press jog wheel button to confirm and to enter workout screen
Choose "Delete"
- Turn jog wheel to select item
- Press the jog wheel button to confirm and to open selection window.
- Choose Yes to delete selected file, choose no not delete selected file.
- Press jog wheel button to confirm.
Workout screen:
Workout screen is depending on the trainings mode you are in.
Nm manual mode
It's the same as Manual mode
Watt Constant Mode
Its' the same as Preset programs Watt Mode
Target HR Mode
It's the same as Preset programs Heart Rate Mode

Fitness test
- Turn the jog wheel and select "Fitness test"
- Press the jog wheel to confirm and enter the Setting screen (1).
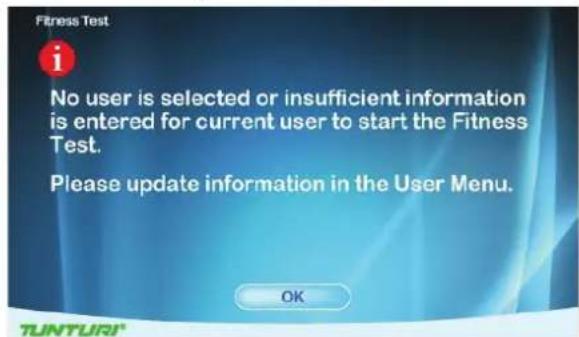
NOTE
User interface needs the user's data to process Fitness test, if no any user data available Fitness test cannot start up. Below message will pop up.
text_image
Fitness Test i No user is selected or insufficient information is entered for current user to start the Fitness Test. Please update information in the User Menu. OK TUNTURI!- Press jog wheel to go back to main menu
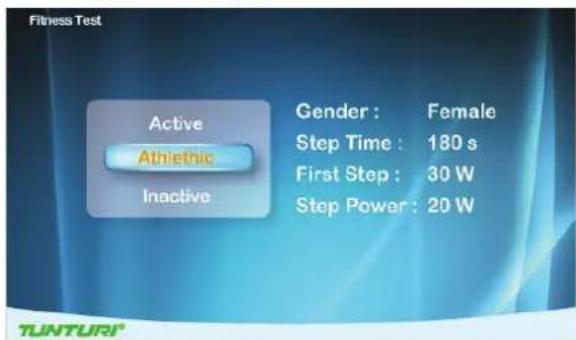
Setting screen (1)
text_image
Fitness Test Active Athletic Inactive Gender : Female Step Time : 180 s First Step : 30 W Step Power : 20 W- Turn jog wheel to select item
• (Inactive / Active / Athletic mode) - Press the jog wheel button to confirm and to open setting screen (2)
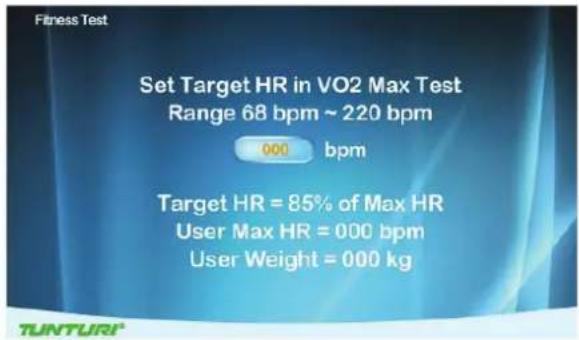
Setting screen (2)
text_image
Set Target HR in VO2 Max Test Range 68 bpm ~ 220 bpm 000 bpm Target HR = 85% of Max HR User Max HR = 000 bpm User Weight = 000 kg- Turn jog wheel set up user's target heart rate within Vo2 Max value. (The range is between 68\~220bpm.) default: 85% of Max HR and shows user's Max HR (bpm) and weight (kg)
- Press the jog wheel button to confirm and to open information window
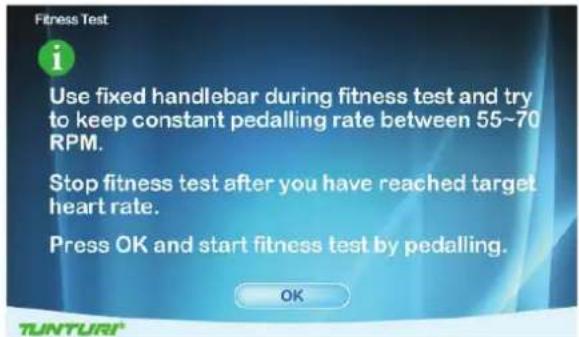
Information window
text_image
Use fixed handlebar during fitness test and try to keep constant pedalling rate between 55~70 RPM. Stop fitness test after you have reached target heart rate. Press OK and start fitness test by pedalling. OK- Press the jog wheel button to confirm and to open Workout screen.
Workout screen
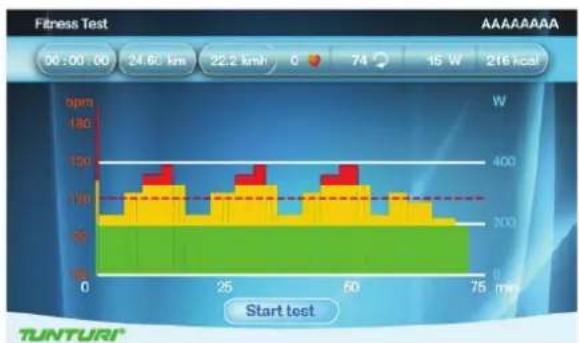
bar
| Time (min) | Energy (W) | |---|---| | 0 | 120 | | 10 | 130 | | 20 | 140 | | 30 | 150 | | 40 | 160 | | 50 | 170 | | 60 | 180 | | 70 | 190 | | 80 | 200 | | 90 | 210 | | 100 | 220 | | 110 | 230 | | 120 | 240 | | 130 | 250 | | 140 | 260 | | 150 | 270 | | 160 | 280 | | 170 | 290 | | 180 | 300 | | 190 | 310 | | 200 | 320 | | 210 | 330 | | 220 | 340 | | 230 | 350 | | 240 | 360 | | 250 | 370 | | 260 | 380 | | 270 | 390 | | 280 | 400 | | 290 | 410 | | 300 | 420 | | 310 | 430 | | 320 | 440 | | 330 | 450 | | 340 | 460 | | 350 | 470 | | 360 | 480 | | 370 | 490 | | 380 | 500 | | 390 | 510 | | 400 | 520 | | 410 | 530 | | 420 | 540 | | 430 | 550 | | 440 | 560 | | 450 | 570 | | 460 | 580 | | 470 | 590 | | 480 | 600 | | 490 | 610 | | 500 | 620 | | 510 | 630 | | 520 | 640 | | 530 | 650 | | 540 | 660 | | 550 | 670 | | 560 | 680 | | 570 | 690 | | 580 | 700 | | 590 | 710 | | 600 | 720 | | 610 | 730 | | 620 | 740 | | 630 | 750 | | 640 | 760 | | 650 | 770 | | 660 | 780 | | 670 | 790 | | 680 | 800 | | 690 | 810 | | 700 | 820 | | 710 | 830 | | 720 | 840 | | 730 | 850 | | 740 | 860 | | 750 | 870 | | Start test | TUNTURI®• The X-axis unit is min
• The Y-axis unit is bpm
- The bar chart denotes the Watt value of the Profile.
- The white dot line shows current position, which moves rightward as time increases, the workout time is 5-hour at most then the workout screen
leaves
- The orange curve shows the user's actual heart rate, which varies as the heart rate frequency goes up and down
- The horizontal red dot line shows the user's target hear rate value
The screen shows
"Test Failed! if:
• The workout time is too short
• RPM value is too low
• HR target is not reached
• HR is less than 110 bpm
"No Heart Rate detected" if:
- It doesn't detect the user's heart rate
Press Back/stop or Main menu button to leave the workout screen
"Target HR reached! Stop test or Continue"
- User has achieves the target.
- Press the jog wheel button to end the test and show workout data screen
Workout data screen
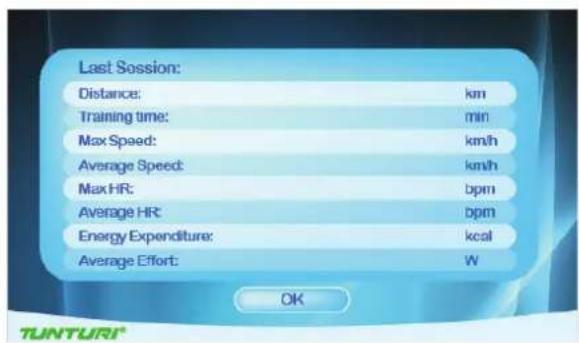
text_image
Last Session: Distance: km Training time: min Max Speed: km/h Average Speed: km/h Max HR: bpm Average HR: bpm Energy Expenditure: kcal Average Effort: W OK TUNTURI®- Press jog wheel to go to VO2 Max test result screen
VO2 Max test result screen
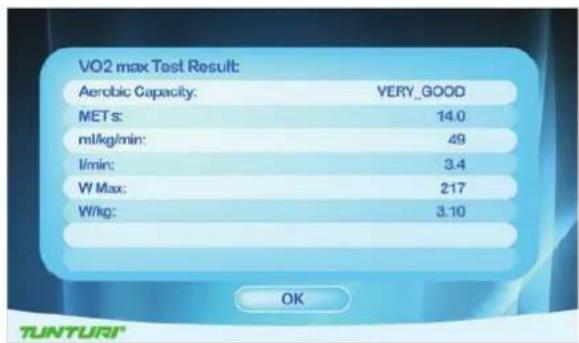
text_image
VO2 max Test Result: Aerobic Capacity: VERY_GOOD MET s: 14.0 ml/kg/min: 49 l/min: 3.4 W Max: 217 W/kg: 3.10 OK TUNTURI®- Press jog wheel to go back to main menu
To stop your workout see:
"End your workout"
VO2 Max test result table.
| MEN / MAXIMAL OXYGEN UPTAKE (VO2MAX)1 = VERY POOR - 7 = EXCELLENT | |||||||
| AGE | 1 | 2 | 3 | 4 | 5 | 6 | 7 |
| 18-19 | <33 | 33-38 | 39-44 | 45-51 | 52-57 | 58-63 | >63 |
| 20-24 | <32 | 32-37 | 38-43 | 44-50 | 51-56 | 57-62 | >62 |
| 25-29 | <31 | 31-35 | 36-42 | 43-48 | 49-53 | 54-59 | >59 |
| 30-34 | <29 | 29-34 | 35-40 | 41-45 | 46-51 | 52-56 | >56 |
| 35-39 | <28 | 28-32 | 33-38 | 39-43 | 44-48 | 49-54 | >54 |
| 40-44 | <26 | 26-31 | 32-35 | 36-41 | 42-46 | 47-51 | >51 |
| 45-49 | <25 | 25-29 | 30-34 | 35-39 | 40-43 | 44-48 | >48 |
| 50-54 | <24 | 24-27 | 28-32 | 33-36 | 37-41 | 42-46 | >46 |
| 55-59 | <22 | 22-26 | 27-30 | 31-34 | 35-39 | 40-43 | >43 |
| 60-65 | <21 | 21-24 | 25-28 | 29-32 | 33-36 | 37-40 | >40 |
| WOMEN / MAXIMAL OXYGEN UPTAKE (VO2MAX)1 = VERY POOR - 7 = EXCELLENT | |||||||
| AGE | 1 | 2 | 3 | 4 | 5 | 6 | 7 |
| 18-19 | <28 | 28-32 | 33-37 | 38-42 | 43-47 | 48-52 | >52 |
| 20-24 | <27 | 27-31 | 32-36 | 37-41 | 42-46 | 47-51 | >51 |
| 25-29 | <26 | 26-30 | 31-35 | 36-40 | 41-44 | 45-49 | >49 |
| 30-34 | <25 | 25-29 | 30-33 | 34-37 | 38-42 | 43-46 | >46 |
| 35-39 | <24 | 24-27 | 28-31 | 32-35 | 36-40 | 41-44 | >44 |
| 40-44 | <22 | 22-25 | 26-29 | 30-33 | 34-37 | 38-41 | >41 |
| 45-49 | <21 | 21-23 | 24-27 | 28-31 | 32-35 | 36-38 | >38 |
| 50-54 | <19 | 19-22 | 23-25 | 26-29 | 30-32 | 33-36 | >36 |
| 55-59 | <18 | 18-20 | 21-23 | 24-27 | 28-30 | 31-33 | >33 |
| 60-65 | <16 | 16-18 | 19-21 | 22-24 | 25-27 | 28-30 | >30 |

T-Road
- Turn the jog wheel and select "T-Trainer"
- Press the jog wheel to confirm and enter the Setting screen (1).
Setting screen (1)
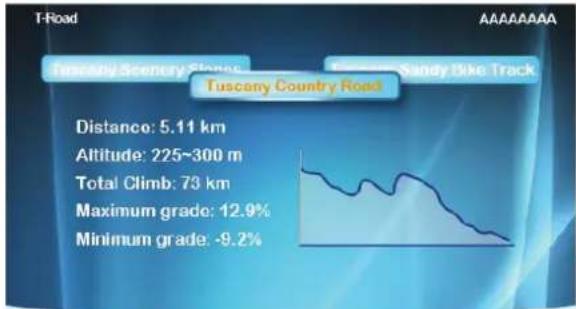
text_image
Tuscany Scenery Stones Tuscany Country Road Distance: 5.11 km Altitude: 225~300 m Total Climb: 73 km Maximum grade: 12.9% Minimum grade: -9.2%TUNTURI
There are 3 selectable tracks available. Knowing: Tuscany Sandy Road/ Tuscany Scenrey Road/ Tuscany Country Road.
- Turn the jog wheel and select your training track
- Press the jog wheel to confirm and enter the workout video screen.
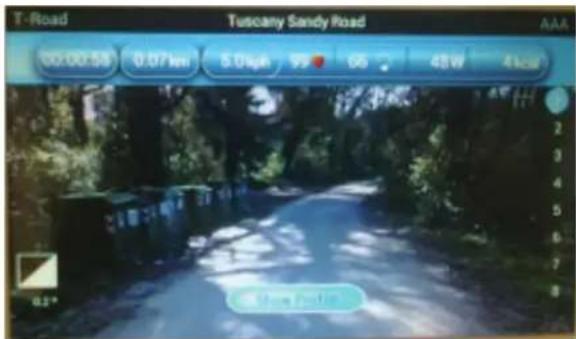
text_image
T-Road Tuscany Sandy Road 00.00.53 0.07 km 5.04ph 95 65 48W 4 kcal 2 3 4 5 6 7 8 12° 2nd Road RoadPress the jog wheel during workout to switch between Video and Profile screen
text_image
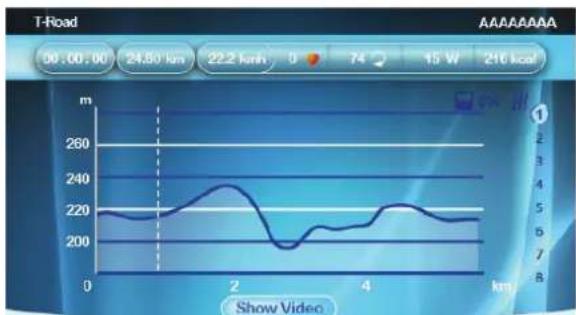
T-Road 50.00.00 24.50 km 22.2 km 0 74 15 W 216 km Show Video m 260 240 220 200 180 160 140 120 100 80 2 3 4 5 6 7 8 9 10 11 12 13 14 15 16 17 18 19 20 21 22 23 24 25 26 27 28 29 30 31 32 33 34 35 36 37 38 39 40 41 42 43 44 45 46 47 48 49 50 51 52 53 54 55 56 57 58 59 60 61 62 63 64 65 66 67 68 69 70 71 72 73 74 75 76 77 78 79 80TUNTURI
- The X-axis is shown as distance unit, km in metric and mile in Imperial
- The Y-axis unit is m in metric and ft in Imperial
- Press the Jog wheel during workout to switch between Video Profile screen
In profile screen:
- The white dot line shows current position, which moves rightward as workout time increases.
- The orange curve shows the user's actual heart rate, which varies as the heart rate frequency goes up and down
In video screen:
- In the right of the screen is the gear shift from 1\~8, use the jog wheel button to switch
- The white icon + 0° in the left bottom of the screen shows the incline level and it varies with the Profile incline level change.
- Press Back/stop, Main menu or the white dot line reaches the target value can leave the workout screen
To stop your workout see:
"End your workout"
User settings
Press "User/Settings" button to enter the User/Settings main menu.
- Use the jog wheel to select one of the six available items.
- Press the jog wheel button for confirmation to enter the selected item setting screen

User Log
By selecting the "User Log" you can: view the training data of the selected user.
You can view either the last training session data or a summary of all the user's sessions.
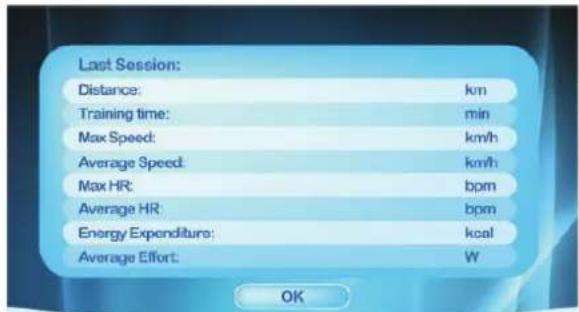
text_image
Last Session: Distance: km Training time: min Max Speed: km/h Average Speed: km/h Max HR: bpm Average HR: bpm Energy Expenditure: kcal Average Effort: W OKTUNTURI
Exit the training data by pressing BACK/STOP.

User Setting
By selecting the "User Setting" you can:
- Adjust the brightness (Default=50%)
- Check the total mileages of the machine.
- Check the total used time for the machine.
- Check the default firmware and software version of Console
- Change language
- Select button beep sound on(yes) or off (NO)
User setting window.

text_image
User Setting Contrast : 99 % Machine Total : Distance 000000 km Time 000000 min Current Version : TUC-E60-DB-1884 SW Upgrade : Yes Language : Volume Control : onTUNTURI
How to modify settings
- Turn jog wheel to select changeable item.
- Press jog wheel to open selected item in right side of the screen for edit..
- Turn jog wheel to change value of selected.
- Press jog wheel to confirm change.
- Turn jog wheel to select next item, or use Back/ Stop button to go back to setting menu.

Edit User
By selecting the Edit User you can: Edit:
User name:
- Turn jog wheel and select "Name"
- Press jog wheel to open "Name"edit.
- Turn jog wheel to select letter
- Press jog wheel to confirm
- Turn jog wheel to select next letter
- When name is edit correctly than select "√" to confirm name and go back to Edit user Menu
Units, Display
- Turn jog wheel and select "Units"
- Press jog wheel to open "Units" edit
- Turn jog wheel to select Metric: show units in km/kph/Kcal Imperial: show units in mile/mph/kcal
- Press jog wheel to confirm and go back to Edit user Menu
Display
- Turn jog wheel and select "Display"
- Press jog wheel to open "Display" edit
- Turn jog wheel to select Count up: preset time/ distance will be counting up Count Down: preset time/ distance will be counting down.
- Press jog wheel to confirm and go back to Edit user Menu
Gender
- Turn jog wheel and select "Gender"
- Press jog wheel to open "Gender" edit
- Turn jog wheel to select Male/Female
- Press jog wheel to confirm and go back to Edit user Menu
Age
- Turn jog wheel and select "Age"
- Press jog wheel to open "Age" edit
- Turn jog wheel to change age
- Press jog wheel to confirm and go back to Edit user Menu
Height
- Turn jog wheel and select "Height"
- Press jog wheel to open "Height" edit
- Turn jog wheel to change Height In cm when units in Metric In ft/inch when units in Imperial.
- Press jog wheel to confirm and go back to Edit user Menu
Weight
- Turn jog wheel and select "Weight"
- Press jog wheel to open "Weight" edit
- Turn jog wheel to change Weight In kg when units in Metric In lbs when units in Imperial.
- Press jog wheel to confirm and go back to Edit user Menu
Max HR
- Turn jog wheel and select "Max HR"
- Press jog wheel to open "Max HR" edit
- Turn jog wheel to change default max HR preset as: when selected Male : 220-age when selected female : 226-age
- Press jog wheel to confirm and go back to Edit user Menu
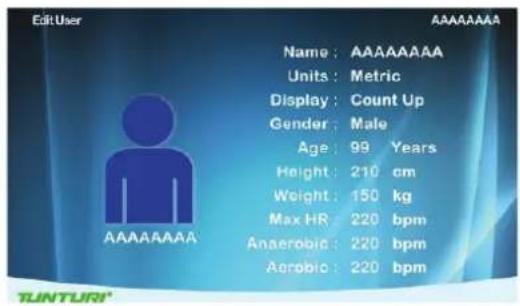
text_image
EditUser Name: AAAAAAAA Units: Metric Display: Count Up Gender: Male Age: 99 Years Height: 210 cm Weight: 150 kg Max HR: 220 bpm Anaerobic: 220 bpm Aerobic: 220 bpm AAAAAAAA
Delete User
By selecting the "Delete User" you can: Delete a user and all its data.
- Turn jog wheel and select the user you want to delete
- Press jog wheel to delete the selected user and go back to setting menu.
User will be deleted without further prompting

Change User
By selecting the "Change User" you can: Select an other preset user profile.
- Turn jog wheel and select the user you want to activate
- Press jog wheel to confirm the selected user and go back to setting menu.

Create User
By selecting the "Create User" you can set up a new user profile. Maximum of 8 users can be installed. See Edit user on how to create user.
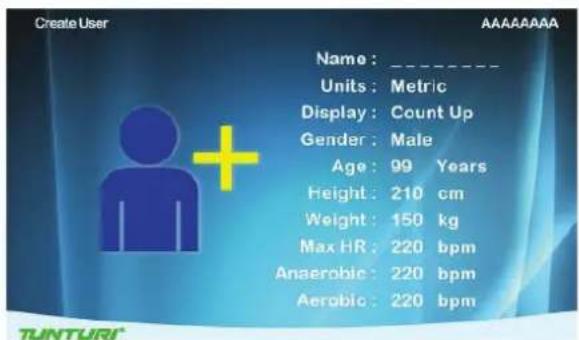
text_image
Create User Name : _ Units : Metric Display : Count Up Gender : Male Age : 99 Years Height : 210 cm Weight : 150 kg Max HR : 220 bpm Anaerobic : 220 bpm Aerobic : 220 bpm TUNTURIHeart Rate Training
A word about Heart Rate:
The old motto, “no pain, no gain”, is a myth that has been overpowered by the benefits of exercising comfortably. A great deal of this success has been promoted by the use of heart rate monitors. With the proper use of a heart rate monitor, many people find that their usual choice of exercise intensity was either too high or too low and exercise is much more enjoyable by maintaining their heart rate in the desired benefit range.
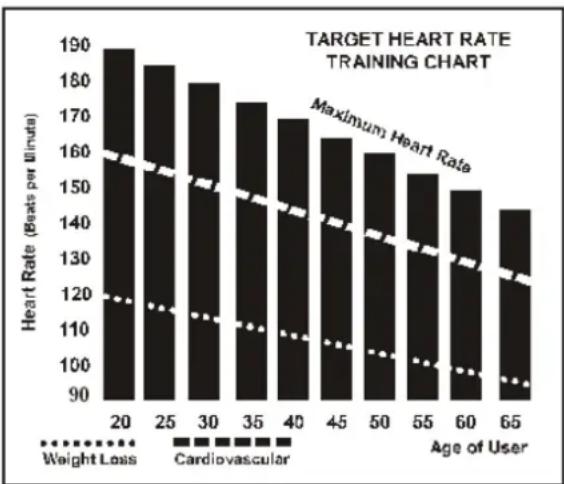
To determine the benefit range in which you wish to train, you must first determine your Maximum Heart Rate. This can be accomplished by using the following formula: 220 minus your age. This will give you the Maximum heart rate (MHR) for someone of your age. To determine the effective heart rate range for specific goals you simply calculate a percentage your MHR. Your Heart rate training zone is 50% to 90% of your maximum heart rate. 60% of your MHR is the zone that burns fat while 70% is for strengthening the cardio vascular system. This 60% to 70% is the zone to stay in for maximum benefit.
bar
| Age of User | Weight Loss | Cardiovascular | | ----------- | ----------- | -------------- | | 20 | 120 | 190 | | 25 | 118 | 185 | | 30 | 116 | 180 | | 35 | 114 | 175 | | 40 | 112 | 170 | | 45 | 110 | 165 | | 50 | 108 | 160 | | 55 | 106 | 155 | | 60 | 104 | 150 | | 65 | 102 | 145 |For someone who is 40 years old their target heart rate zone is calculated:
220 - 40 = 180 (maximum heart rate) 180 x .6 = 108 beats per minute (60% of maximum) 180 X .7 = 126 beats per minute (70% of maximum)
So for a 40 year old the training zone would be 108 to 126 beats per minute.
How to wear your wireless chest
strap transmitter:
- Attach the transmitter to the elastic strap using the locking parts.
- Adjust the strap as tightly as possible as long as the strap is not too tight to remain comfortable.
- Position the transmitter with the logo centred in the middle of your body facing away from your chest (some people must position the transmitter slightly left of centre). Attach the final end of the elastic strap by inserting the round end and, using the locking parts, secure the transmitter and strap around your chest.
- Position the transmitter immediately below the pectoral muscles.
- Sweat is the best conductor to measure very minute heart beat electrical signals. However, plain water can also be used to pre-wet the electrodes (2 black square areas on the reverse side of the belt and either side of transmitter). It's also recommended that you wear the transmitter strap a few minutes before your work out. Some users, because of body chemistry, have a more difficult time in achieving a strong, steady signal at the beginning. After “warming up”, this problem lessens. As noted, wearing clothing over the transmitter/strap doesn't affect performance.
- Your workout must be within range - distance between transmitter/receiver - to achieve a strong steady signal. The length of range may vary some what but generally stay close enough
to the console to maintain good, strong, reliable readings. Wearing the transmitter immediately against bare skin assures you of proper operation. If you wish, you may wear the transmitter over a shirt. To do so, moisten the areas of the shirt that the electrodes will rest upon.
NOTE!
The transmitter is automatically activated when it detects activity from the user's heart. Additionally, it automatically deactivates when it does not receive any activity. Although the transmitter is water resistant, moisture can have the effect of creating false signals, so you should take precautions to completely dry the transmitter after use to prolong battery life (estimated transmitter battery life is 2500 hours). If your chest strap has a replaceable battery the replacement battery is Panasonic CR2032.
Caution!
Do not use this trainer for Target Heart Rate unless a steady, solid Actual Heart Rate value is being displayed. High, wild, random numbers being displayed indicate a problem.
- Areas to look at for interference, which may cause erratic heart rate:
- Microwave ovens, TVs, small appliances, etc. Fluorescent lights.
- Some household security systems.
- Perimeter fence for a pet.
- Some people have problems with the transmitter picking up a signal from their skin. If you have problems try wearing the transmitter upside down. Normally the transmitter will be oriented so the logo is right side up.
- The antenna that picks up your heart rate is very sensitive. If there is an outside noise source, turning the whole machine 90 degrees may de-tune the interference.
- If you continue to experience problems contact your dealer.
Exercising
Working out with this device is excellent aerobic exercise, the principle being that the exercise should be suitably light, but of long duration. Aerobic exercise is based on improving the body's maximum oxygen uptake, which in turn improves endurance and fitness. The ability of the body to burn fat as a fuel is directly dependent on its oxygen-uptake capacity. Aerobic exercise should be above all pleasant. You should work up a light sweat but you should not get out of breath during the workout.
You should exercise at least three times a week, 30 minutes at a time, to reach a basic fitness level Maintaining this level requires a few exercise sessions each week. Once the basic condition has been reached, it is easily improved, simply by increasing the number of exercise sessions. You should start slowly at a low pedalling speed and low resistance, because for an overweight person strenuous exercise may subject the heart and circulatory system to excessive strain. As fitness improves, resistance and pedalling speed can be increased gradually.
Maintenance
The equipment requires very little maintenance. Check, however, from time-to-time that all screws and nuts are tight.
• After exercising, clean the equipment with a soft, absorbent cloth. Do not use solvents.
- Never remove the equipment's protective casing.
The electromagnetic brake forms a magnetic field that may damage the mechanism of a watch, or the magnetic identification strip on a credit or cash card, should they come into immediate contact with the magnets.
Never attempt to detach or remove the electromagnetic brake! The electromagnetic brake is based on electromagnetic resistance; resistance level is electronically measured and shown as watt reading on the display. Due to the measurement system, your Tunturi ergometer need not be recalibrated when assembled, serviced and used according to this Owner's Manual.
Troubleshooting
Despite continuous quality control, defects and malfunctions caused by individual components may occur in the equipment. In most cases it's unnecessary to take the whole device in for repair, as it's usually sufficient to replace the defective part. If the equipment does not function properly during use, contact your Tunturi dealer immediately. Always give the model and serial number of your equipment. Please state also the nature of the problem, conditions of use and purchase date.
If you require spare parts, always give the model, serial number of your equipment and the spare part number for the part you need. The spare part list is at the back of this manual. Use only spare parts mentioned in the spare part list.
Moving and storage
Please follow these instructions when carrying and moving the equipment about, because lifting it incorrectly may strain your back or risk other accidents:
For transportation or moving of the device, two grown-ups are needed. Remain standing in front of the device on each side and take a sturdy grip at the handles. Lift the rear of the device so as to lift the front of the device on the wheels. Move the device and carefully
put it down to its new place. To prevent the equipment malfunctioning, store in a dry place with as little temperature variation as possible and protected from dust.
NOTE!
Transport the equipment with caution over uneven surfaces, for example over a step. The equipment should never be transported upstairs using the wheels over the steps, instead it must be carried. We recommend that you use a protective base when transporting the equipment.
NOTE!
The instructions must be followed carefully in the assembly, use and maintenance of your equipment. The warranty does not cover damage due to negligence of the assembly, adjustment and maintenance instructions described herein. Changes or modifications not expressly approved by Tunturi New Fitness BV. will void the user's authority to operate the equipment!
WE WISH YOU MANY ENJOYABLE TRAININGS WITH YOUR NEW TUNTURI TRAINING PARTNER!
Contents
Welcome......25
Moving and storage 48
Deutsch
text_image
Technical diagram of a stationary exercise machine with labeled components and numbered parts
50. 3/8"X2" Hex Head bolt - 4PCS

71. 3/8"X25mmx2T Flat Washer - 4PCS

100. 12/14m/m_Wrench
Schritt 2:
51. 5/16"X5/8" Hex Head Bolt - 7PCS

72. 5/16"X18mmX1.5T Flat Washer - 6PCS

99. 5/16"X19mmX1.5T Curved Washer - 1PCS

100. 12/14 m/m_Wrench
51. 5/16"X5/8" Hex Head Bolt - 2PCS
72. 5/16"X18mmX1.5T Flat Washer - 2PCS
100, 12/14m/m_Wrench
103. 5/16"X1.5T Split Washer - 2PCS
Schritt 4:
flowchart
graph TD
    A["Player at top"] --> B["Player at bottom"]
    B --> C["Player at top"]
    C --> D["Player at bottom"]
    D --> E["Player at top"]
    style A fill:#f9f,stroke:#333
    style B fill:#ccf,stroke:#333
    style C fill:#cff,stroke:#333
    style D fill:#ffc,stroke:#333
    style E fill:#cfc,stroke:#333
natural_image
Person jogging on a paved path with trees and hills in the background (no text or symbols visible)text_image
Last Session: Distance: km Training time: min Max Speed: km/h Average Speed: km/h Max HR: bpm Average HR: bpm Energy Expenditure: kcal Average Effort: W OKtext_image
Target HR Target Heart Rate Range 80 bpm ~ 220 bpm 175 bpm 100 % of Maximum Heart RateTUNTURI®
text_image
Target HR Set Energy Expenditure Training Time Training Distance Range 10 min ~ 180 min 000 minTUNTURI®
text_image
Set Training Time Training Distance Energy Expenditure Range 3 km ~ 100 km 000 km TUNTURI®text_image
Watt Control Target Effort Range 20W ~ 350W 000 WTUNTURI®
text_image
Wait Control Set Training Time Energy Expenditure Training Distance Range 50 kcal ~ 2000 kcal 000 kcalTUNTURI®
text_image
Presal Programs Fatburner 1 Fatburner 2 Cardio Strength Cardio Climb Cardio Interval Power Interval Hill Climb Cross Country Stamina Power IntervalTUNTURI
text_image
Own Trainings A A A A A A A A A A A A A A A i No Saved Training Were Found. OKTUNTURI ^1
text_image
Own Trainings CCCCCC BBBBBBBB KKKKKKKK JJJJJJJJ Nm AAAAAAATUNTURI
text_image
Own Trainings CCCCCC BBBBBBBB AAAAAAAAA KKKKKKKK JNJJJJJJ Replay Edit DeleteTUNTURI®
text_image
Fitness Test No user is selected or insufficient information is entered for current user to start the Fitness Test. Please update information in the User Menu. OK TUNTURItext_image
Set Target HR in VO2 Max Test Range 68 bpm ~ 220 bpm 000 bpm Target HR = 85% of Max HR User Max HR = 000 bpm User Weight = 000 kgtext_image
Use fixed handlebar during fitness test and try to keep constant pedalling rate between 55~70 RPM. Stop fitness test after you have reached target heart rate. Press OK and start fitness test by pedalling.TUNTURI
text_image
Last Session: Distance: km Training time: min Max Speed: km/h Average Speed: km/h Max HR: bpm Average Hit: rpm Energy Expenditure: kcal Average Effort: W OKTUNTURI
MEN / MAXIMAL OXYGEN UPTAKE (VO2MAX) 1 = VERY POOR - 7 = EXCELLENT
| AGE | 1 | 2 | 3 | 4 | 5 | 6 | 7 |
| 18-19 | <33 | 33-38 | 39-44 | 45-51 | 52-57 | 58-63 | >63 |
| 20-24 | <32 | 32-37 | 38-43 | 44-50 | 51-56 | 57-62 | >62 |
| 25-29 | <31 | 31-35 | 36-42 | 43-48 | 49-53 | 54-59 | >59 |
| 30-34 | <29 | 29-34 | 35-40 | 41-45 | 46-51 | 52-56 | >56 |
| 35-39 | <28 | 28-32 | 33-38 | 39-43 | 44-48 | 49-54 | >54 |
| 40-44 | <26 | 26-31 | 32-35 | 36-41 | 42-46 | 47-51 | >51 |
| 45-49 | <25 | 25-29 | 30-34 | 35-39 | 40-43 | 44-48 | >48 |
| 50-54 | <24 | 24-27 | 28-32 | 33-36 | 37-41 | 42-46 | >46 |
| 55-59 | <22 | 22-26 | 27-30 | 31-34 | 35-39 | 40-43 | >43 |
| 60-65 | <21 | 21-24 | 25-28 | 29-32 | 33-36 | 37-40 | >40 |
WOMEN / MAXIMAL OXYGEN UPTAKE (VO2MAX) 1 = VERY POOR - 7 = EXCELLENT
| AGE | 1 | 2 | 3 | 4 | 5 | 6 | 7 |
| 18-19 | <28 | 28-32 | 33-37 | 38-42 | 43-47 | 48-52 | >52 |
| 20-24 | <27 | 27-31 | 32-36 | 37-41 | 42-46 | 47-51 | >51 |
| 25-29 | <26 | 26-30 | 31-35 | 36-40 | 41-44 | 45-49 | >49 |
| 30-34 | <25 | 25-29 | 30-33 | 34-37 | 38-42 | 43-46 | >46 |
| 35-39 | <24 | 24-27 | 28-31 | 32-35 | 36-40 | 41-44 | >44 |
| 40-44 | <22 | 22-25 | 26-29 | 30-33 | 34-37 | 38-41 | >41 |
| 45-49 | <21 | 21-23 | 24-27 | 28-31 | 32-35 | 36-38 | >38 |
| 50-54 | <19 | 19-22 | 23-25 | 26-29 | 30-32 | 33-36 | >36 |
| 55-59 | <18 | 18-20 | 21-23 | 24-27 | 28-30 | 31-33 | >33 |
| 60-65 | <16 | 16-18 | 19-21 | 22-24 | 25-27 | 28-30 | >30 |

T-Road
text_image
Tuscany Scenery Slones Tuscany Country Road Distance: 5.11 km Altitude: 225~300 m Total Climb: 73 km Maximum grade: 12.9% Minimum grade: -9.2%TUNTURI
text_image
Last Session: Distance: km Training time: min Max Speed: km/h Average Speed: km/h Max HR: bpm Average HR: bpm Energy Expenditure: kcal Average Effort: W OKTUNTURI
text_image
Edit User Name: AAAAAAAAA Units: Metric Display: Count Up Gender: Male Age: 99 Years Height: 210 cm Weight: 150 kg Max HR: 220 bpm Anaerobic: 220 bpm Aerobic: 220 bpmTUNTURI

Benutzer Löschen
Select an other preset user profile.
Test De Fitness....64
T-Road....66
CONSERVEZ CES INSTRUCTIONS!
Instructions de
montage
Etape 1:
50. 3/8"X2" Hex Head bolt - 4PCS

71. 3/8"X25mmx2T Flat Washer - 4PCS

100. 12/14m/m_Wrench
Etape 2:
51. 5/16"X5/8" Hex Head Bolt - 7PCS

72. 5/16*X18mmX1.5T Flat Washer - 6PCS

99. 5/16*X19mmX1.5T Curved Washer - 1PCS

100, 12/14 m/m_Wrench
text_image
29 2 38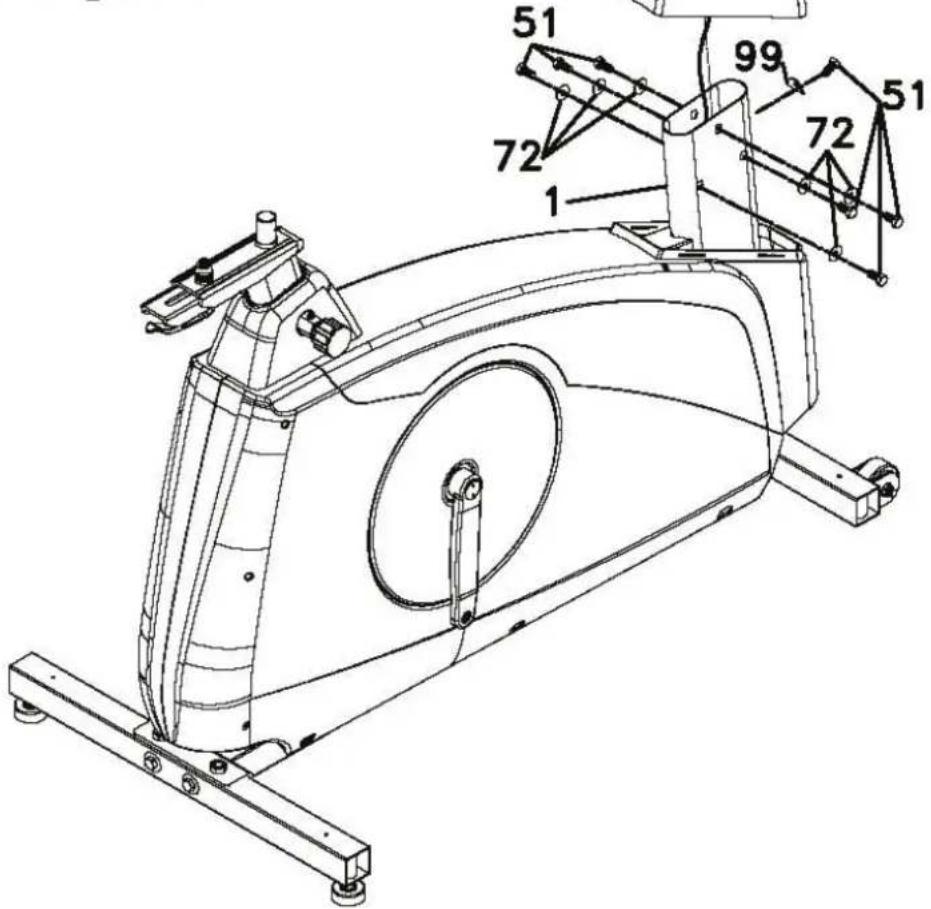
text_image
Technical line drawing of a stationary exercise machine with numbered components and labeled partsEtape 3:
Montage du guidon
51. 5/16"X5/8" Hex Head Bolt - 2PCS
72. 5/16"X18mmX1.5T Flat Washer - 2PCS
100. 12/14m/m_Wrench
103. 5/16"X1.5T Split Washer - 2PCS
Etape 4:
93. Phillips Head Screw Driver

117. 13/15m/m_Wrench
flowchart
graph TD
    A["Player at top"] --> B["Player in blue box"]
    B --> C["Player moving on ice with red flame"]
    C --> D["Roller to ice with red arrow"]
    D --> E["Step 1: 2, 3, 4, 5, 6, 7, 8"]
    E --> F["Step 2: Red arrow, Rolling Ring"]
    F --> G["Step 3: Red arrow, Rolling Ring"]
    G --> H["Step 4: Red arrow, Rolling Ring"]
natural_image
Person jogging on a paved path with trees and hills in the background (no text or symbols visible)flowchart
graph TD
    A["Continue"] --> B["Exit"]
    B --> C["Save & Exit"]
    C --> D["Saw training profile name J"]
TUNTURI
Continuer: (continue)
text_image
Last Session: Distance: km Training time: min Max Speed: km/h Average Speed: km/h Max HR: bpm Average HR: bpm Energy Expenditure: kcal Average Effort: W OKTUNTURI
text_image
Target HR Target Heart Rate Range 80 bpm ~ 220 bpm 175 bpm 100 % of Maximum Heart RateTUNTURI®
text_image
Target HR Set Energy Expenditure Training Time Training Distance Range 10 min ~ 180 min 000 minTUNTURI
text_image
Manual Set Training Time Training Distance Energy Expenditure Range 3 km ~ 100 km 000 kmTUNTURI
text_image
Walt Control Set Training Time Energy Expenditure Training Distance Range 50 kcal ~ 2000 kcal 000 kcal TUNTURI®text_image
Own Trainings No Saved Training Were Found. OK AAAAAAAAA TUNTURI®text_image
Own Trainings CCCCCC BBBBBBBB AAAAAAAAA KKKKKKKK JJJJJJJJ Replay Edit Delete TUNTURI"Supprimer" (Delete)
text_image
Fitness Test i No user is selected or insufficient information is entered for current user to start the Fitness Test. Please update information in the User Menu. OK TUNTURI®text_image
Set Target HR in VO2 Max Test Range 68 bpm ~ 220 bpm 000 bpm Target HR = 85% of Max HR User Max HR = 000 bpm User Weight = 000 kgtext_image
Fitness Test i Use fixed handlebar during fitness test and try to keep constant pedalling rate between 55~70 RPM. Stop fitness test after you have reached target heart rate. Press OK and start fitness test by pedalling. OKTUNTURI
text_image
Last Session: Distance: km Training time: min Max Speed: km/h Average Speed: km/h Max HR: bpm Average HR: bpm Energy Expenditure: kcal Average Effort: W OKTUNTURI
text_image
T-Road Tuscany Scantery Shops Tuscany Country Road Distance: 5.11 km Altitude: 225~300 m Total Climb: 73 km Maximum grade: 12.9% Minimum grade: -9.2%TUNTURI
text_image
Last Session: Distance: km Training time: min Max Speed: km/h Average Speed: km/h Max HR: bpm Average HR: bpm Energy Expenditure: kcal Average Effort: W OKTUNTURI
text_image
Edit User Name: AAAAAAAA Units: Metric Display: Count Up Gender: Male Age: 99 Years Height: 210 cm Weight: 150 kg Max HR: 220 bpm Anaerobic: 220 bpm Aerobic: 220 bpmTUNTURI

Effacer utilisateur
Fitness Training....95
Onderhoud 95
text_image
Technical diagram of a stationary exercise machine with labeled components and numbered parts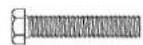
50. 3/8"X2" Hex Head bolt - 4PCS

71. 3/8"X25mmx2T Flat Washer - 4PCS
100. 12/14m/m_Wrench
Stap 2:
Montage Van De Verticale Buis Voor
51. 5/16"X5/8" Hex Head Bolt - 7PCS
72. 5/16"X18mmX1.5T Flat Washer - 6PCS
99. 5/16"X19mmX1.5T Curved Washer - 1PCS
100. 12/14 m/m_Wrench
text_image
29 2 38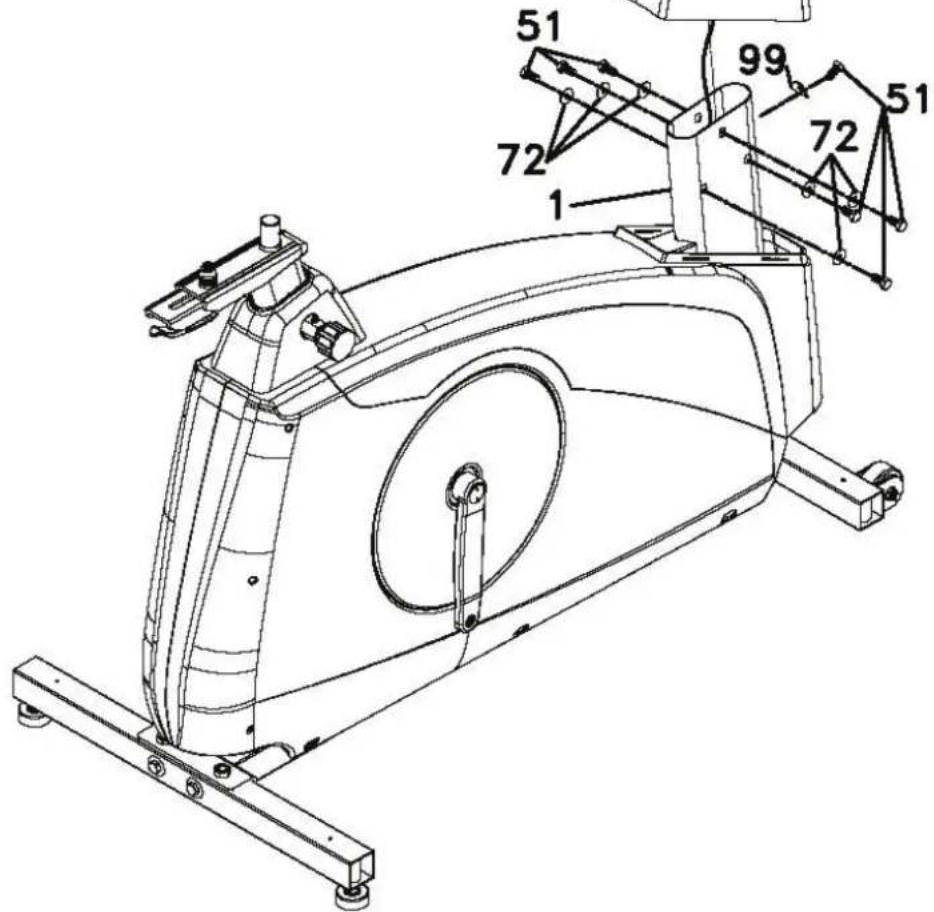
text_image
Technical diagram of an exercise machine with numbered components and labeled partsStap 3:
51. 5/16"X5/8" Hex Head Bolt - 2PCS
72. 5/16"X18mmX1.5T Flat Washer - 2PCS
100, 12/14m/m_Wrench
103. 5/16"X1.5T Split Washer - 2PCS
Stap 4:
text_image
#58. M5X12mm Phillips Head Screw-10pcs #93. Phillips Head Screw Driver #117. 13/15m/m_Wrench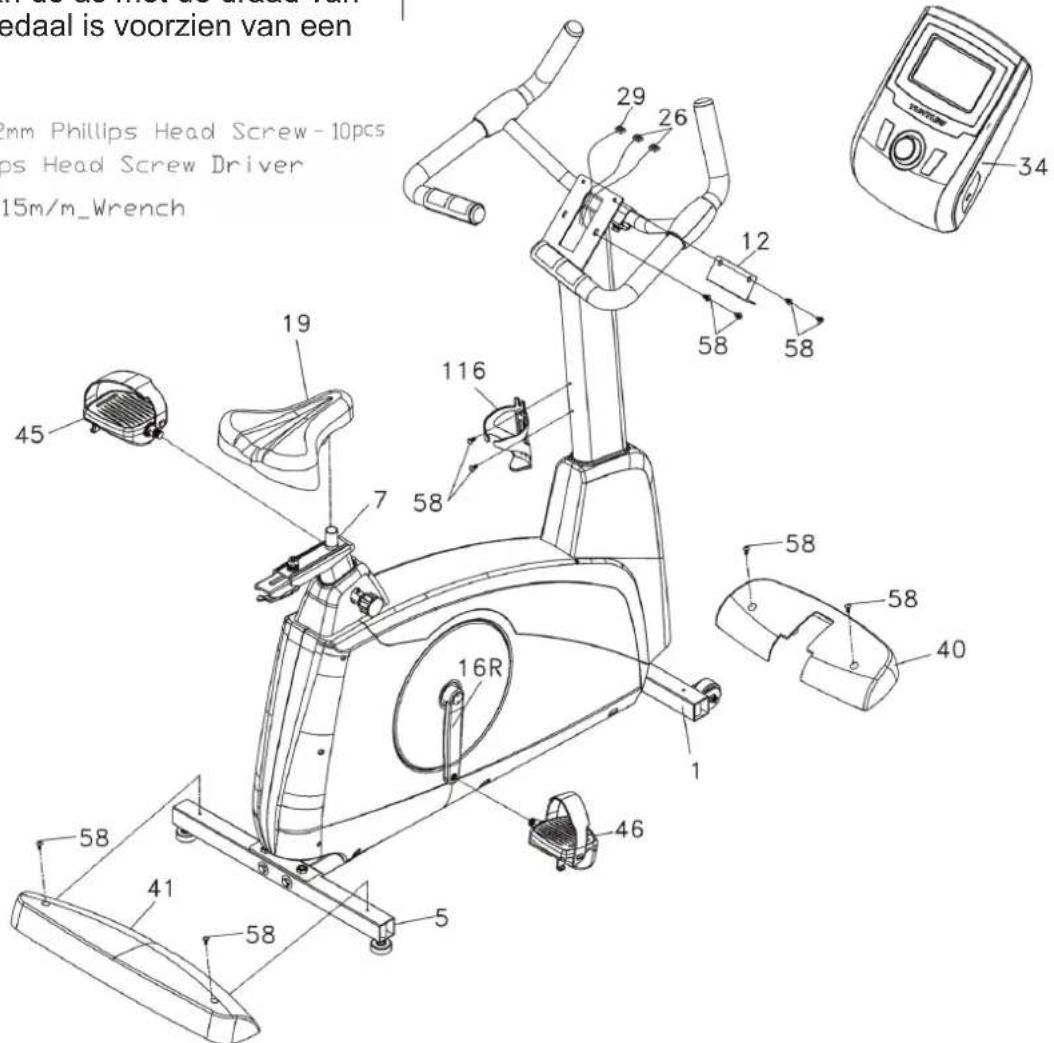
flowchart
graph TD
    A["Player at top"] --> B["Player at bottom"]
    B --> C["Player at top"]
    C --> D["Player at bottom"]
    D --> E["Player at top"]
    style A fill:#f9f,stroke:#333
    style B fill:#ccf,stroke:#333
    style C fill:#cff,stroke:#333
    style D fill:#ffc,stroke:#333
    style E fill:#cfc,stroke:#333
Druk funties:
natural_image
Person jogging on a paved path with trees and hills in the background (no text or symbols visible)Trainer is nu klaar om uw training te beginnen of selecteer quicksnel
Programma's

Snel start
Training beeindigen scherm
text_image
Continue Exit Save & Exit Save training profile name: J TUNTURIDoorgaan: (Continue)
text_image
Last Session: Distance: km Training time: min Max Speed: km/h Average Speed: km/h Max HR: bpm Average HR: bpm Energy Expenditure: kcal Average Effort: W OKtext_image
Target HR Target Heart Rate Range 80 bpm ~ 220 bpm 175 bpm 100 % of Maxinum Heart RateTUNTURI®
text_image
Target HR Set Energy Expenditure Training Time Training Distance Range 10 min ~ 180 min 000 minTUNTURI®
text_image
Manual Set Training Time Training Distance Energy Expenditure Range 3 km ~ 100 km 000 km TUNTURI®text_image
Watt Control Target Effort Range 20W ~ 350W 000 WTUNTURI®
text_image
Watt Control Set Training Time Energy Expenditure Training Distance Range 50 kcal ~ 2000 kcal 000 kcalTUNTURI®
text_image
Own Trainings i No Saved Training Were Found. OKtext_image
Own Trainings CCCCCC BBBBBBB KKKKKKK JJJJJJJ Nm AAAAAAAAATUNTURI
text_image
Own Trainings CCCCCC BBBBBBBB AAAAAAAAA KKKKKKKK JNJJJJJ Replay Edit DeleteTUNTURI
Kies "Herhaal" (Replay)
Kies "Bewerk" (Edit)
Kies "Verwijder" (Delete)
text_image
Fitness Test No user is selected or insufficient information is entered for current user to start the Fitness Test. Please update information in the User Menu. OKtext_image
Set Target HR in VO2 Max Test Range 68 bpm ~ 220 bpm 000 bpm Target HR = 85% of Max HR User Max HR = 000 bpm User Weight = 000 kgtext_image
Fitness Test Use fixed handlebar during fitness test and try to keep constant pedalling rate between 55~70 RPM. Stop fitness test after you have reached target heart rate. Press OK and start fitness test by pedalling. OKtext_image
Last Session: Distance: km Training time: min Max Speed: km/h Average Speed: km/h Max HR: bpm Average HR: bpm Energy Expenditure: kcal Average Effort: W OKMEN / MAXIMAL OXYGEN UPTAKE (VO2MAX) 1 = VERY POOR - 7 = EXCELLENT
| AGE | 1 | 2 | 3 | 4 | 5 | 6 | 7 |
| 18-19 | <33 | 33-38 | 39-44 | 45-51 | 52-57 | 58-63 | >63 |
| 20-24 | <32 | 32-37 | 38-43 | 44-50 | 51-56 | 57-62 | >62 |
| 25-29 | <31 | 31-35 | 36-42 | 43-48 | 49-53 | 54-59 | >59 |
| 30-34 | <29 | 29-34 | 35-40 | 41-45 | 46-51 | 52-56 | >56 |
| 35-39 | <28 | 28-32 | 33-38 | 39-43 | 44-48 | 49-54 | >54 |
| 40-44 | <26 | 26-31 | 32-35 | 36-41 | 42-46 | 47-51 | >51 |
| 45-49 | <25 | 25-29 | 30-34 | 35-39 | 40-43 | 44-48 | >48 |
| 50-54 | <24 | 24-27 | 28-32 | 33-36 | 37-41 | 42-46 | >46 |
| 55-59 | <22 | 22-26 | 27-30 | 31-34 | 35-39 | 40-43 | >43 |
| 60-65 | <21 | 21-24 | 25-28 | 29-32 | 33-36 | 37-40 | >40 |
WOMEN / MAXIMAL OXYGEN UPTAKE (VO2MAX) 1 = VERY POOR - 7 = EXCELLENT
| AGE | 1 | 2 | 3 | 4 | 5 | 6 | 7 |
| 18-19 | <28 | 28-32 | 33-37 | 38-42 | 43-47 | 48-52 | >52 |
| 20-24 | <27 | 27-31 | 32-36 | 37-41 | 42-46 | 47-51 | >51 |
| 25-29 | <26 | 26-30 | 31-35 | 36-40 | 41-44 | 45-49 | >49 |
| 30-34 | <25 | 25-29 | 30-33 | 34-37 | 38-42 | 43-46 | >46 |
| 35-39 | <24 | 24-27 | 28-31 | 32-35 | 36-40 | 41-44 | >44 |
| 40-44 | <22 | 22-25 | 26-29 | 30-33 | 34-37 | 38-41 | >41 |
| 45-49 | <21 | 21-23 | 24-27 | 28-31 | 32-35 | 36-38 | >38 |
| 50-54 | <19 | 19-22 | 23-25 | 26-29 | 30-32 | 33-36 | >36 |
| 55-59 | <18 | 18-20 | 21-23 | 24-27 | 28-30 | 31-33 | >33 |
| 60-65 | <16 | 16-18 | 19-21 | 22-24 | 25-27 | 28-30 | >30 |

T-Road
text_image
Tuscony Scenery Slope Tuscony Country Road Distance: 5.11 km Altitude: 225~300 m Total Climb: 73 km Maximum grade: 12.9% Minimum grade: -9.2%TUNTURI
text_image
Last Session: Distance: km Training time: min Max Speed: km/h Average Speed: km/h Max HR: bpm Average HR: bpm Energy Expenditures: kcal Average Effort: W OKTUNTURI
text_image
EditUser Name: AAAAAAAA Units: Metric Display: Count Up Gender: Male Age: 99 Years Height: 210 cm Weight: 150 kg Max HR: 220 bpm Anaerobic: 220 bpm Aerobic: 220 bpmTUNTURI

Verwijderen
Graphic window in training mode:
Y-axis: Watt, bpm, Nm
X-axis: km, min, kcal
Factory defaults:
Some values should be in default setting when shown (not zero) for first time in session.
Time: 30:00 min
Distance: 10.0 km
Energy: 200 kcal
HR: 75 % of Max HR of user
Effort: 100 W
Units: Metric
Target display: ...... Count Up
Speed: kph
Gender...... Male
Age: 40 years
Height: 175 cm
Weight: 75 kg
Max HR.... 180 bpm
Range:
Energy range .....50\~2000 kcal (±50)
Time range ...... 10\~180 minutes (±10)
Distance range ...... 3\~100 kms (± 1)
Target HR Range .....80\~220 bpm (± 1)
Target effort Range ...20W \~ 350W (± 1)
Age 10\~99 years (± 1)
Height
Metric Units ......110\~210 cm (±1)
Imperial units ..... 3'7"\~6'10" ft/inch(± 1)
Weight
Metric Units ....30\~220 kg (± 1)
Imperial units ......66\~330 lb(± 1)
Max HR....- 80\~220 bpm (± 1)
Equipment
Length....108cm
Width 55 cm
Height 136 cm
Weight 52 kg
This product meets the requirements of the EU's EMC Directives on electromagnetic compatibility (89/336/EEC) and electrical equipment designed for use within certain voltage limits (73/23/EEC). This product therefore carries the CE label.
This product meets EN precision and safety standards (Class SA, EN-957, parts 1 and 9).
Due to our continuous policy of product development, Tunturi reserves the right to change specifications without notice.
Spare parts list
| Buble Description Qty | ||
| 1 Main frame 1 | ||
| 2 Console mast 1 | ||
| 3 Handle bar 1 | ||
| 5 Rear stabilizer 1 | ||
| 6 Seat slider 1 | ||
| 7 Sliding seat mount 1 | ||
| 9 Idler wheel Assy. 1 | ||
| 11 Crank axle 1 | ||
| 12 | Fixing cover plate | 1 |
| 13 | Chain cover bracket | 1 |
| 14 | Drive belt | 1 |
| 15 | Drive pulley (∅330) | 1 |
| 16L | Crank arm (LH) | 1 |
| 16R | Crank arm (RH) | 1 |
| 17 | Bearing (6004) 2 | |
| 18 | Bearing (6203) 2 | |
| 19 | Seat | 1 |
| 20 | Induction brake | 1 |
| 21 | Power control board | 1 |
| 22 | Magnet (speed pick-up) | 8 |
| 23 | Sensor w/cable (350mm) | 1 |
| 24 | Handgrip foam | 2 |
| 25 | Handgrip foam | 2 |
| 26 | Handpulse W/Cable Assy. | 2 |
| 29 | Computer cable (1900mm) | 1 |
| 30 | Wire brake coil harness | 1 |
| 31 | DC wire (250mm) | 1 |
| 34 | Console Assy. | 1 |
| 34~6 | Console top cover | 1 |
| 34~7 | Console bottom cover | 1 |
| 35 | ∅35 × 10m/m_Rubber foot | 4 |
| 36 | Chain cover (LH) | 1 |
| 37 | Chain cover (RH) | 1 |
| 38 | Console mast cover | 1 |
| 39 | Seat post cover | 1 |
| 40 | Front stabilizer cover | 1 |
| 41 | Rear stabilizer cover | 1 |
| 42 | Handgrip side cap (upper) | 2 |
| 43 | Handgrip side cap (lower) | 2 |
| 45 | Pedal (LH) | 1 |
| 46 | Pedal (RH) | 1 |
| 47 | Transportation wheel (Ø54) | 2 |
| 49 | Button head plug | 4 |
| 50 | Hex head bolt (3/8”×2”) | 4 |
| 51 | Hex head bolt (5/16”×58”) | 9 |
| 52 | Tapping screw (5×19) | 2 |
| 53 | Button head socket bolt | 2 |
| 54 | Hex head bolt (14”×3/4”) | 8 |
| 55 | J bolt (M8×170) | 1 |
| 56 | Phillips head screw (M6×15) | 3 |
| 58 | Phillips head screw (M5×12) | 10 |
| 59 | Flat head socket bolt (3/8”×2”) | 4 |
| 62 | Tapping screw (Ø3×20) | 4 |
| 65 | Tapping screw (Ø3×10) | 4 |
| 66 | C Ring (Ø17) | 1 |
| 67 | C Ring (Ø20) | 2 |
| 69 | Flat washer (1/4”×13×1T) | 7 |
| 70 | Flat washer (3/8”×19×1.5T) | 4 |
| 71 | Flat washer (3/8”×25×2T) | 4 |
| 72 | Flat washer (5/16”×18×1.5T) | 9 |
| 73 | Flat washer (Ø17×23.5×1T) | 1 |
| 75 | Hex blind nut (M5) | 6 |
| 76 | Split washer (Ø14”) | 7 |
| 77 | Nyloc nut (M8×7T) | 1 |
| 79 | Nyloc nut (14”×8T) | 4 |
| 80 | Nyloc nut (516”×6T) | 4 |
| 82 | Nut (38”×7T) | 8 |
| 83 | M10 × 1.25m/m_nut | 2 |
| 85 | Round disk 2 | |
| 86 | Quick release lever | 1 |
| 93 | Phillips head screw driver | 1 |
| 96 | Crank arm end cap | 2 |
| 97 | Phillips head screw (M5×12) | 13 |
| 99 | Curved washer | 1 |
| 100 | Wrench (12/14) | 1 |
| 102 | Flat washer (5/16×16×1.0T) 2 | |
| 103 | Split washer (5/16”×1.5T) | 2 |
| 104 | Power adaptor | 1 |
| 105 | Handle bar cover | 1 |
| 106 | Seat height Adjustment knob | 1 |
| 106~1 | Knob nut (22×M16×M22×37) | 1 |
| 106~2 | Phillips head screw (M4×5L) | 2 |
| 107 Slider sleeve 1 | |
| 114 Slide spacer 1 | |
| 116 Drink bottle holder 1 | |
| 117 Wrench (13/15) 1 | |
| 118 Hex head bolt (5/16”×2-14”) 2 | |
| 120 Connecting cap 1 | |
| 121 Flat washer (5/16”×20×3.0T) 3 | |
| 122 Sleeve 1 | |
| 123 Power cord 1 | |
| 132 Phillips head screw (M3×10) | 4 |
| 133 Attaching plate 1 | |
| 135 Isolation column | 4 |
Note:
All nut, bold, washer and screw sizes are in inches.
Exploded view
Owner's manual • PLATINUM PRO
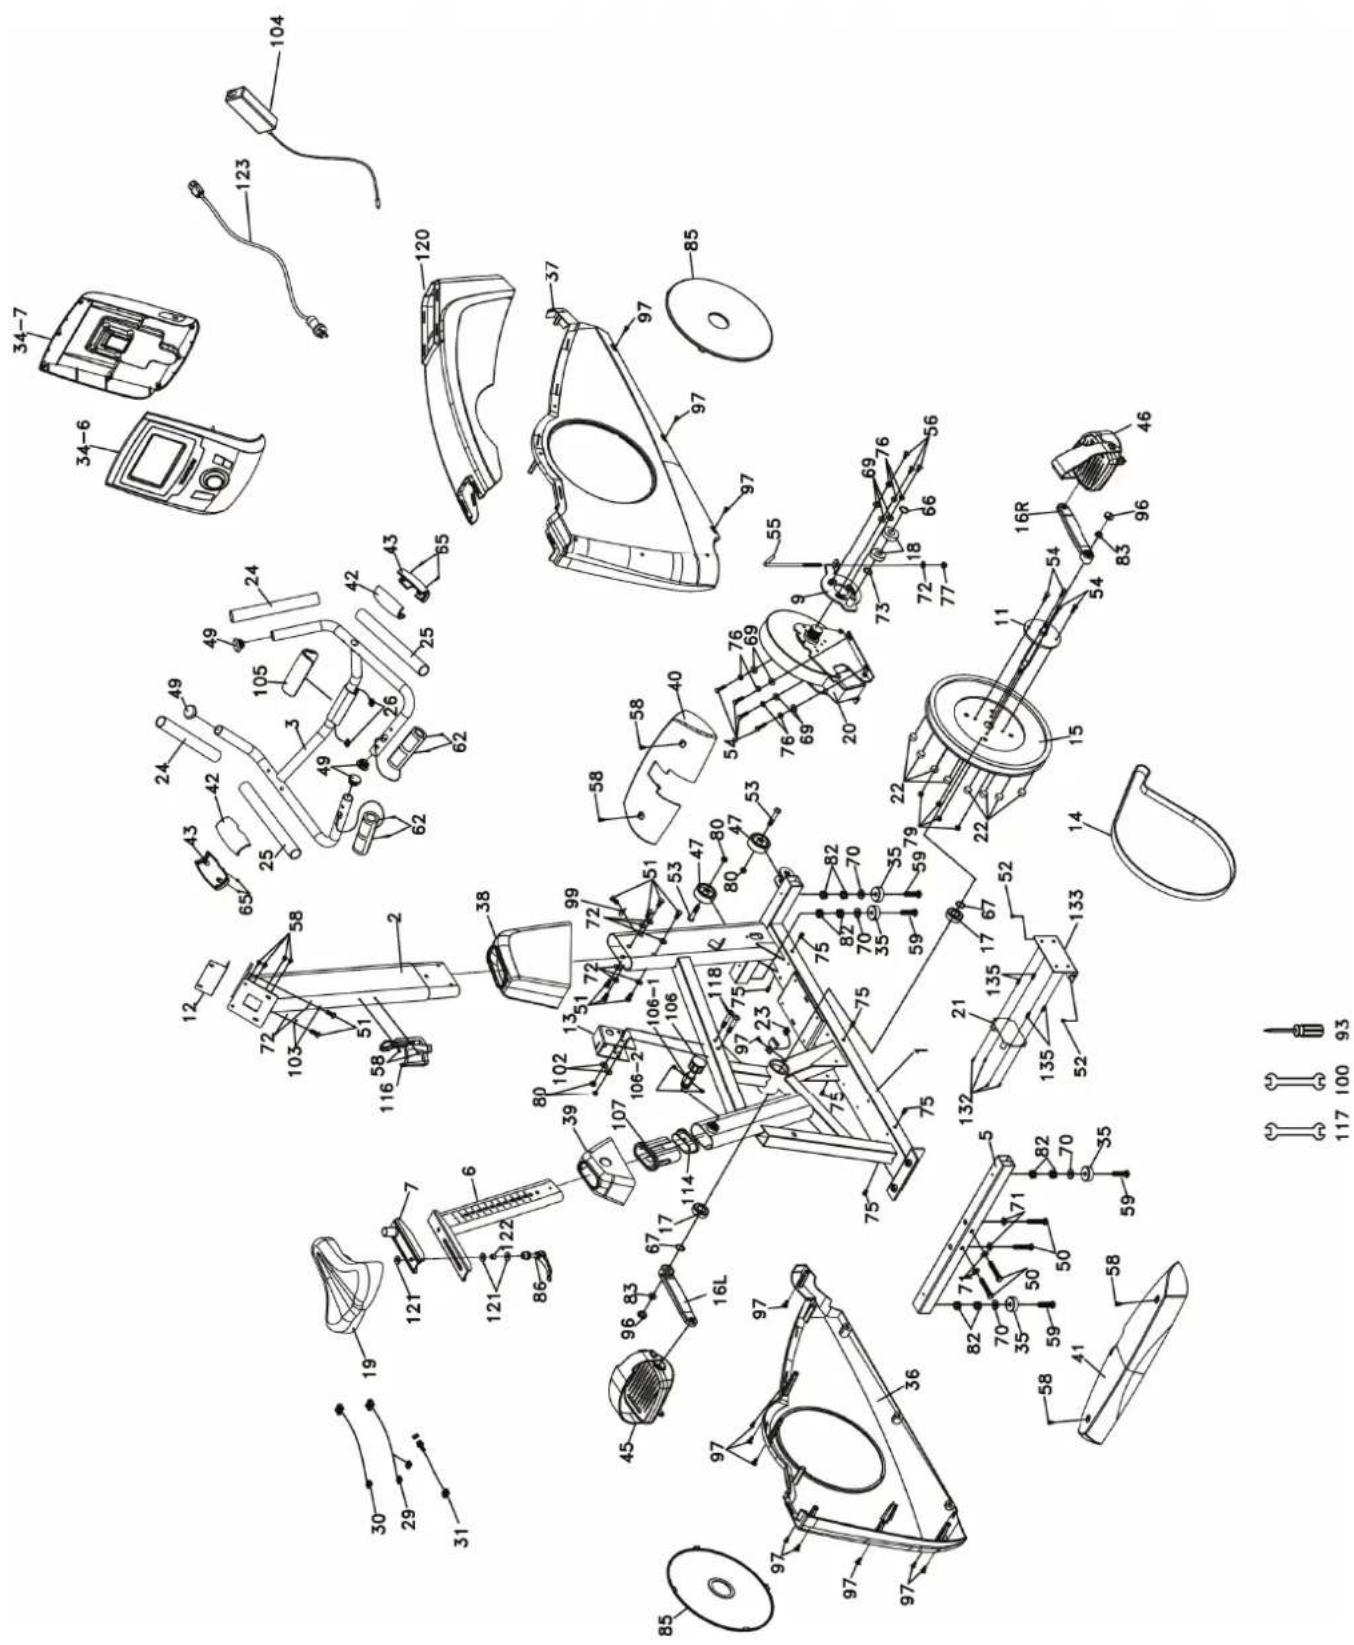
text_image
Exploded view diagram of a mechanical device with numbered components and exploded view, including labeled parts like camera, motor, and accessories.TUNTURI®
TUNTURI NEW FITNESS B.V.
P.O. BOX 60001
1320 AA
THE NETHERLANDS
www.tunturi.com
Version 20141113