AT 3605 - Kitchen appliance CLATRONIC - Free user manual and instructions
Find the device manual for free AT 3605 CLATRONIC in PDF.
| Product type | Breathalyzer (alcohol tester) |
| Brand | Clatronic |
| Model | AT 3605 |
| Power supply | 2 x 1.5 V AAA batteries (UM-4, R03), not included |
| Sensor | Alcohol oxide tester |
| Measurement range | 0.0 ‰ to 1.9 ‰ (per mille) |
| Accuracy | ± 0.1 % |
| Warm-up time | 10 seconds |
| Result time | Less than 5 seconds after blowing |
| Auto power off | Approximately 40 seconds after result display |
| Net weight | Approximately 0.36 kg |
| Main functions | Alcohol test, clock (12/24 h), alarm, countdown, temperature display (°C/°F) |
| Display units | g/L, ‰ (per mille), BAC |
| Alert level display | CAUTION (0.2-0.5 ‰), DANGER (>0.5 ‰) with audible alarm |
| Maintenance | Wipe with a slightly damp cloth; do not immerse or use solvents |
| Safety | Do not recharge batteries, do not expose to heat, observe polarity, remove batteries if not used for a long time |
| Repairability and spare parts | Not specified; do not modify the device, contact customer service |
| General information | Private use only; does not replace legal obligations; wait 20 minutes after alcohol consumption before testing |
Frequently Asked Questions - AT 3605 CLATRONIC
User questions about AT 3605 CLATRONIC
0 question about this device. Answer the ones you know or ask your own.
Ask a new question about this device
Download the instructions for your Kitchen appliance in PDF format for free! Find your manual AT 3605 - CLATRONIC and take your electronic device back in hand. On this page are published all the documents necessary for the use of your device. AT 3605 by CLATRONIC.
USER MANUAL AT 3605 CLATRONIC
natural_image
Diagram of a battery pack with two external batteries and internal components, no text or symbols presentnatural_image
Simple line drawing of a human head profile with a ruler beside it (no text or symbols)natural_image
Diagram of a battery pack with two batteries and directional arrows indicating flow or movement (no text or symbols)Sensor: ....Alcohol oxide tester
Meetbereik: 0,0% – 1,9% Promille
Nauwkeurigheid: +/- 0,1%
Voeding: 2x 1,5 V AAA • UM-4 • R03 Alkaline
natural_image
Diagram of a battery cell with two external batteries and internal components, showing no text or symbols.natural_image
Simple line drawing of a human face profile with a pencil, no text or symbols presentnatural_image
Diagram of a battery cell with two external batteries and internal components, showing no text or symbols.natural_image
Diagram of a battery pack with two batteries and arrows indicating direction (no text or symbols)BAC Tasso alcoolemico (Blood Alcohol Concentration)
Thank you very much for purchasing our product. We hope you will enjoy this product.
Safety Instructions
- Carefully read these operating instructions before using the device and keep the instructions including warranty, purchase receipt and, if possible, the box with inside packaging for future use. When handing over this product to third parties, please include these operating instructions.
- The device is only intended for private use and not for any commercial use.
- This product has been designed to support you in responsible driving of motor vehicles and machinery.
- Beware: Every body reacts differently on alcohol. One person might be endangered by alcohol influence from an early point. Responsibility for driving a vehicle/machine remains with you.
- This product has not been intended to guide consumption behaviour. Neither does it provide any conclusion concerning your blood alcohol level nor your driving capability.
- Legal regulations in your country referring to blood alcohol value and driving ability cannot be sufficiently captured by this device.
• Hence, Clatronic International Ltd. rejects any liability in controversial cases. - In case of doubt abstain from driving your vehicle!
Handling batteries

Do not charge!

Danger of explosion! Do not expose batteries to intense heat, such as sunlight, fire or similar.

Do not disassemble! Do not


Insert correctly!
- Batteries can leak and lose battery acid. When not using the device for a long period of time, remove the battery.
- Batteries must not be disposed of through household waste. Return spent batteries to designated collection facilities or retailers.
Overview of the Components
1 Breathalyzer sensor
2 LCD-Clock
3 LCD-Alcohol Tester
4 MODE button (selecting different functions)
5 SET button (confirming an input)
6 POWER button (starting the breathalyzer)
7 ADJ button (setting button)
8 Battery Compartment
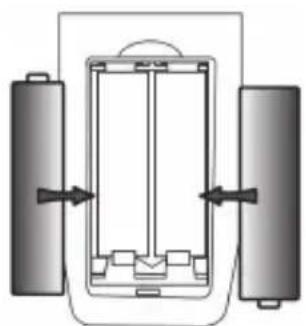
Inserting of batteries
(Batteries are not included)
natural_image
Diagram of a battery pack with two external batteries and internal components, no text or symbols present- Remove the battery cover on the backside of the device.
- For the alcohol tester, Insert 2 AAA • UM-4 • R03 batteries.
- Mind polarity! Instructions you can see on the device.

NOTE:
Once the indicators in the LCDs start flashing or fading, replace the batteries by two new batteries of the same type. Always replace both batteries at the same time.
Handling
What you should keep in mind before a test
• Alcohol remains in the mouth for some while and must be degraded first.
• After your last alcoholic drink you have to wait for 20 minutes before measuring.
- Do not smoke and eat 20 minutes before measuring.
- Also do not take any cough candy or peppermint drops which could distort results.
- You can repeat the test to prove the result. But wait three minutes before taking the next measurement!
- Do not use volatile substances like paints, solvents, pesticides etc.
Warm-up

- Press and hold the POWER button until a signal sounds.
- The symbol "WARM UP" appears and a countdown from 10 to 0 starts. The alcohol tester is in warm up state.
i NOTE:
Before first use or after an extended period of time of non-use: the tester needs several times to clean and warm up the sensor. Press the POWER key repeatedly and wait for the warm-up procedures.
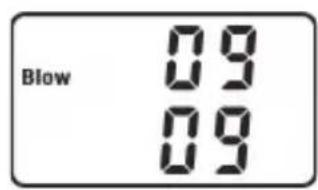
Test
- After a successful warm-up phase, the display shows "BLOW". The device is in testing mode. A countdown starts with 10.


natural_image
Simple line drawing of a human head profile with a pencil, no text or symbols present- During countdown, exhale into the breathalyzer sensor for 3 to 5 seconds.
- A signal sounds. You can read the result now on the display.
g/l Gram / liters
% Per mil
BAC Blood alcohol concentration (Blood Alcohol Concentration)
- The symbol CAUTION will be displayed if the alcohol content is within the range of 0.2 to 0.5 per mille (PPM).
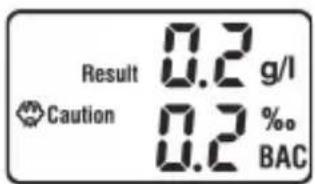
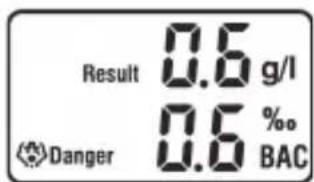
- The symbol DANGER will show up if the alcohol content exceeds 0.5 per mille. At the same time, a loud alarm will go off.

NOTE:
If no air is exhaled into the sensor during a test run, the display will show "0.0".
Automatic Switch-Off
- The result will be displayed for 10 seconds, afterwards, the display switches to "OFF".
- The tester will switch off after 2 to 3 seconds. The background light of the LCD turns off.
Other functions

NOTE:
The device will activate the clock time mode after inserting the batteries.
Repeatedly press the MODE button to select one of the following functions:

Clock time

Temperature

Alarm time

Countdown timer (counting backwards)
GB
Setting up the clock time, alarm time or countdown timer
- Press and hold the SET key for 2 seconds. The hour digits will flash.
- Press the ADJ key to set the hours.
- Press the SET key. The minute digits will flash.
- Press the ADJ key to set the minutes.
- Then press the SET key to confirm the settings.
Clock time in 12- or 24-hour format
Repeatedly press the ADJ key to toggle between 12 and 24 hour display modes. The letter "P" will appear when selecting the 12-hour format.
Alarm Time
Press the ADJ button to activate or deactivate the alarm time. If activated, “(•)” will appear. Once the set alarm time has been reached, a signal will sound. Use the ADJ button to stop the signal.
Temperature
Press the ADJ key to select the Fahrenheit or Celsius display.
Countdown timer (counting backwards)
Press the ADJ key to start the countdown or to stop it. If the countdown has been activated, the letters "H" and "M" (hours and minutes) will flash. When the countdown finishes an alarm will go off. Use the ADJ button to stop the signal.
Maintenance and Cleaning

CAUTION:
- Do not immerse the device in water. This could damage the electronic circuit.
- Do not use chemicals like benzene, solvents or petroleum ether to clean the tester.
- Wipe the device only with a slightly moist cloth.
- Make sure no liquid enters the breathalyzer sensor.
- Do not store the device in rooms with contaminated air.
- Do not modify the tester as this could result in malfunction.
Technical Data
Sensor:....Alcohol oxide tester
Measuring range: 0.0% – 1.9% per mille
Accuracy:....+/- 0.1%
Power supply: 2x 1.5 V AAA • UM-4 • R03 battery
Operation time warm-up: 10 seconds, result after: <5 seconds
Automatic switch-off:.... approx. 40 seconds
Net weight: .... approx. 0.36 kg
The right to make technical and design modifications in the course of continuous product development remains reserved.
This device has been tested according to all relevant current CE guidelines, such as electro-magnetic compatibility and low voltage directives, and has been constructed in accordance with the latest safety regulations.
Disposal

- Remove the batteries from the battery compartment.
- Return spent batteries to designated collection facilities or retailers. Do not dispose of through household waste!
- At the end of its life time, do not dispose of the device with common household waste. Hand it over to an official collecting point for recycling. Thus you help save the environment.
Instrukcja obsługi
natural_image
Diagram of a battery pack with two batteries and directional arrows indicating flow or movement (no text or symbols)natural_image
Simple line drawing of a human head profile with a pencil, no text or symbols presentCTC Clatronic Sp. z o.o
natural_image
Diagram of a battery cell with two external batteries and internal components, showing no text or symbols.natural_image
Simple line drawing of a human head profile with a pencil, no text or symbols presentH
natural_image
Diagram of a battery pack with two external batteries and internal components, no text or symbols presentnatural_image
Simple line drawing of a human head profile with a pencil, no text or symbols presentRUS
natural_image
Simple line drawing of a human head profile with a pencil, no text or symbols presentnatural_image
Diagram of a battery pack with two batteries and directional arrows indicating flow or movement (no text or symbols)ملاحظة: