DeepMind 6 - Synthesizer BEHRINGER - Free user manual and instructions
Find the device manual for free DeepMind 6 BEHRINGER in PDF.
User questions about DeepMind 6 BEHRINGER
0 question about this device. Answer the ones you know or ask your own.
Ask a new question about this device
Download the instructions for your Synthesizer in PDF format for free! Find your manual DeepMind 6 - BEHRINGER and take your electronic device back in hand. On this page are published all the documents necessary for the use of your device. DeepMind 6 by BEHRINGER.
USER MANUAL DeepMind 6 BEHRINGER
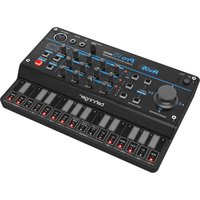
True Analog 6-Voice Polyphonic Synthesizer with 4 FX Engines,2 OSCs and LFOs per Voice, 3 ADSR Generators, 8-Channel Modulation Matrix, 32-Step Control Sequencer and Tablet Remote Control
2 DeepWind&QuickStartGuide3
EN
Important Safety Instructions

Terminal'smared with this symbol carry electrical current of sufficient magnitude to constitute risk of electronic shock. the only high quality professional speaker cables with ^ 念 8 ^ 念 T5T in tool, lacking plug-per installed. All other installation or modification should be performed only by qualified personnel.
This symbol, otherwise it appears, always you to the presence of unrelabeled dangerous voltage inside the enclosure-voltage that may be sufficient to constitute a risk of shock.
This symbol, wherever it appears, stries you to important opening and maintenance instructions in the accompanying literature. Please read the manual.
Caution To reduce the risk of electric shock, do not remove the top cover (or the seat section). No user swivelable parts include. Refer servicing to qualified personnel.
Caution To reduce the risk of fire or electric char, do not expose this appliance to salt and moisture. The apparatus shall not be exposed to dropping or splashing inks and no objects filled with liquids such as eggs, shall be placed on the apparatus.
Caution These service instructions are for use by qualified service personnel only. To reduce the risk of electronic check does not perform any sewing other than that contained in the operation instructions. Repairs have to be performed by qualified service personnel.
-
Read these instructions.
-
Keep these instructions.
-
Hedall warnings
-
Follow-al functions
-
Do not use this apparatus near water.
-
Cleanly with dry cloth
-
Do not blacany ventilation openings install in
a accordance with the manufacturer's Instruction
-
Do not treat any new sources such as the same species of a species (such as 'inclamming amplifiers' that produce heat).
-
Do not defeat the safety purpose of the polarized or grounding-type plug. A polarized plug has two blades with one water than the other. A grounding-type plug has two blades and a third grounding plug. The wide blade or the thin plug are provided for your safety. If the provided plug does not connect to your outlet, consult an electronic repair or replacement of the oblique outlet.
-
Project the power coil from being waked on an unpaired partially at plug, convert resonance frequencies, and the point where they exit from the apparatus.
-
Use any attachments/accessories specified by the manufacturer.

- On-the-job with the cart stand, tripod, bracket, or table specified by the manufacturer, or sold with the apparatus. When a cart is used, use caution when moving the cart/apparatus combination to avoid
Injury from tip-over
- Imputing the apparatus during lightning storms or when caused for long periods of time.
-
Refer all seeking to qualified service personnel. Servicing is required when the apparatus has been damaged in any way, such as power supply coil or plug is damaged. Liquid has been spilled or objects have fallen into the apparatus, the apparatus has been exposed to rain or moisture, does not operate normally, or has been dropped.
-
The apparatus shall be converted to a AWKS socket outlet with a protective retaining connection.
-
Where the MAINS play or an appliance could be used as the disconnect device, the disconnected device shall remain mostly open.

- Correctly diagnose of this product: this symbol indicates that this product must not be diagnosed with household water, according to the WHO Directive 2019-BH and your national law. This product
should be taken to a collection center leased for the recycling of waste electrical and electronic equipment (EEI). The monitoring of this type of waste could have a possible negative impact on the environment and human health due to potentially hazardous substances that are generally associated with EII, at the same time, your cooperation in the correct disposal of this product will contribute to the efficient use of natural resources. For more information about where you can take your waste equipment for recycling, please contact your local city office, or your household waste collection service. 18. Do not install in a confined space, such as a book case or similar unit. 19. Do not place elevated flame sources, such as lighted candles, on the apparatus.
-
Please keep the environmental aspects of battery disposal in line. Batteries must be disposed of at a battery collection point.
-
This apparatus may be used in tropical and moderate climates up to 45^ .
LEGAL DISCLAIMER
Music: Tribe accepts no liability for any loss which may be suffered by any person who dies either wholly or in part upon any description, photograph, statement contained herein. Technical specifications, appearances and other information are subject to change without notice. All trademarks are the property of their respective owners. Mids, Kink Teenk, Labu Gopinam, Laiti Tanoy, Turbozound, TC Electronic, TC Hekkon, Behringen, Begaue, Aarauste and Cusanda are trademarks or registered trademarks of Music. Tribe Global Brands Ltd., O Music: Tribe Global Brands Ltd. 2010. All rights reserved.
LIMITED WARRANTY
For the applicable warranty term and conditions, and additional information regarding Music Taber's Limited Warranty, please see complete details online at mustaber.com/warranty.

Instrucciones de
seguridad

BESCHRANKTE GARANTIE
species is combinedcarbopolymethicone pre-fabricated resin ofstefamintone
Musie Internet: Is it possible to assume a responsible part even if the channel does not have access to data? The answer is no. The internet is a tool for the exchange of information, but it is also a tool for the exchange of information. This is because the internet is a tool for the exchange of information.
GARANZIA LIMITATA
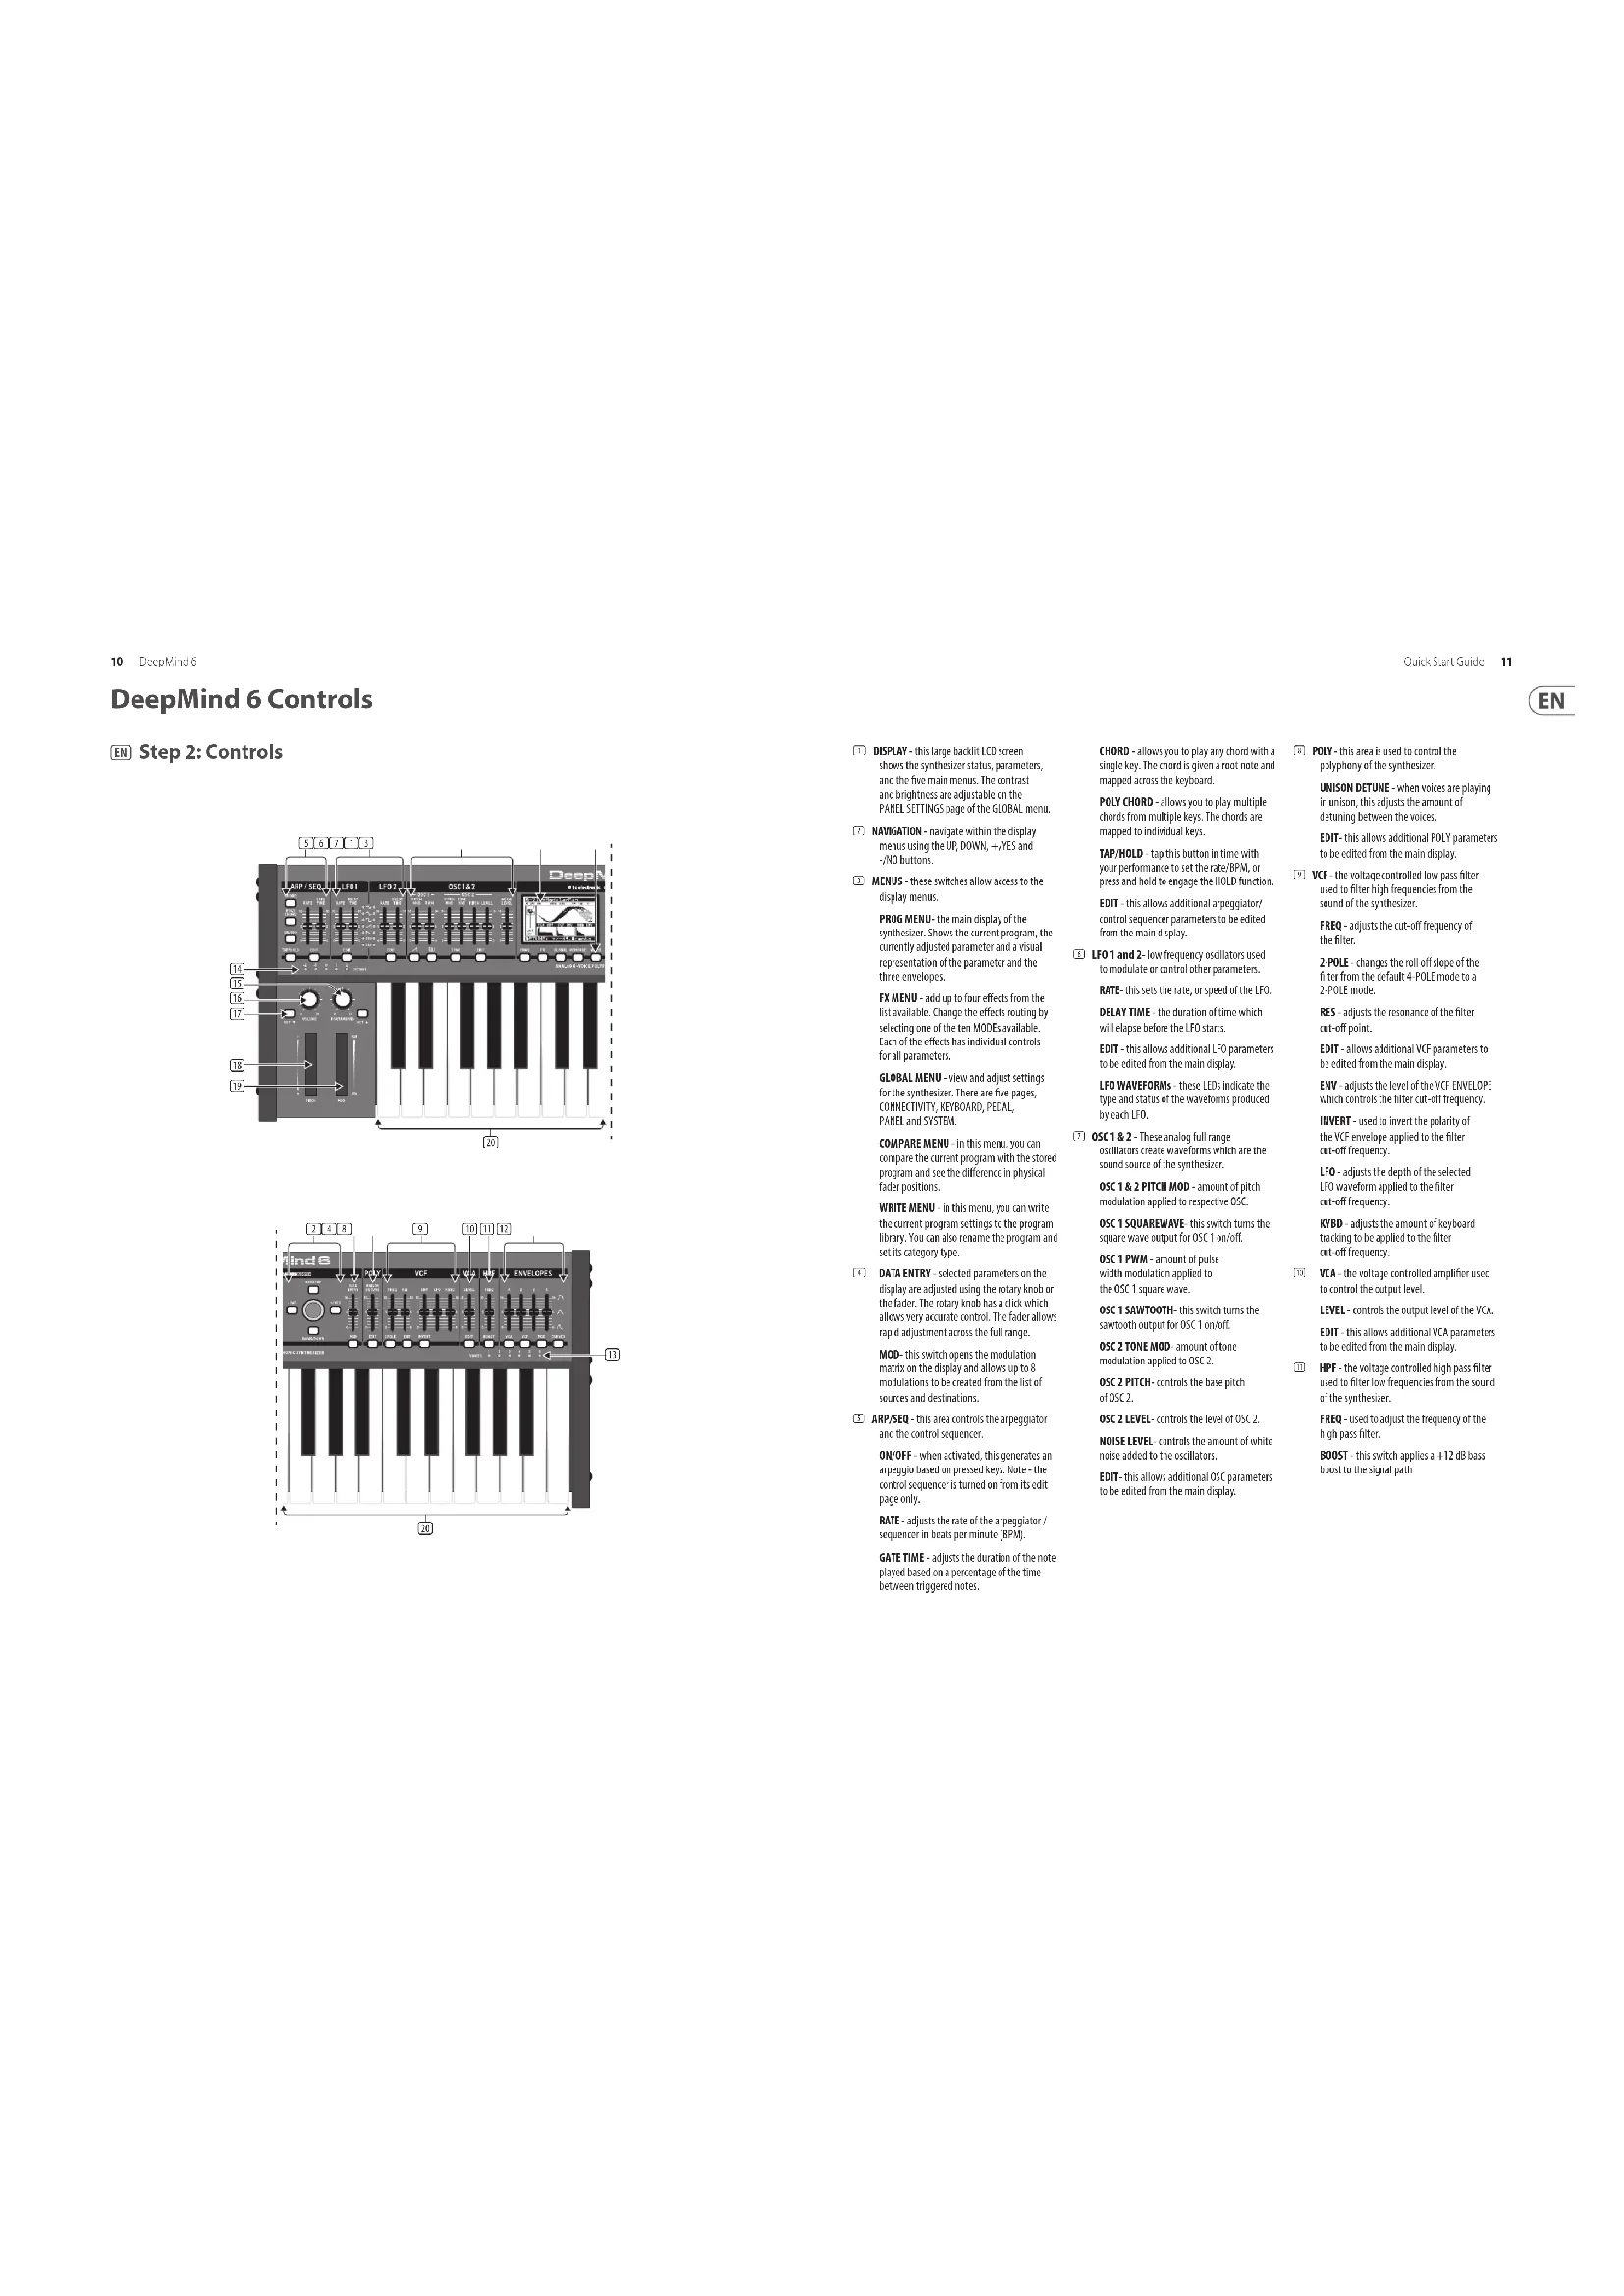
DISPLAY this large basket LCD screen shows the spinner status, parameters, and the four main menus. The contrast and brightness are adjustable on the PAXLE SCITTING65 page of the GLOBAL menu.
NAVIGATION - noalign within the display menus using the UP DOWN +/NES and -NO buttons.
(7)MENUS: these twitches allow access to the display menus.
PROG MENU: the main display of the synthesizer. Shows the current program, the currently adjusted parameter and a visual representation of the parameter and the three envelopes.
FXMLM - add up to four effects from the list available. Change the effects mutiny by selecting one of the ten 500s available. Each of the effects has individual controls for all parameters.
GLOBAL MENU - View and adjust settings for the synthesizer. There are five pages, CONNECTIVITY, KEYBOARD, PEDAL, PAEL and SYSTEM.
COMPARE MENU - In this menu, you can compare the current program with the stored program and see the difference in physical fader positions.
WRITE MENU - in this menu, you can write the current program settings to the program library. You can also rename the program and set its category type.
DATA ENTRY selected parameters on the display are adjusted using the rotary knob of the fader. The rotary knob has a click which allows very accurate control. The fader allows rapid adjustment across the full range.
M00- this switch opens the modulation matrix on the display and allows up to 8 modulations to be created from the list of sources and destinations.
(3) ARP/SEG - this area controls the arpeggulator and the control sequence.
OK/OFF when activated, this generates an aropogic based on processed keys. Note: the control sequence is turned off from its edit page only.
RATE regulates the rate of the asparteglyase / isoenzyme in beats per minute (BPM).
GATE TIME - adjusts the duration of the note played based on a percentage of the time between triggered notes.
CHORD allows you to play any chord with a single key. The chord is given a num note and mapped across the keyboard.
POLY CHORD - allows you to play multiple chords from multiple keys. The chords are mapped to individual keys.
TAP/HOLD - tap this button in time with your performance to set the male/PSI, or press and hold to engage the HIL 0 function EDIT - this allows additional apeggrator/ control sequencer parameters to be edited from the main display.
LFO1 and 2: low frequency oscillators used to modulate or control other parameters.
RATE: this sets the rate, or speed of the ILO. DELAY TIME -the duration of time which will lapse before the ILO starts.
EDIT this allows additional LTO parameters to be edited from the main display.
LFO WAVEFORMS- these LEDs indicate the type and status of the waveforms produced by such LFO.
OSC1&2-These analog full range oscillators create waveforms which are the sound sources of the synthesizer.
OSC 1.2, PITCH MOD - amount of pitch modulation applied to respective OSC.
OSC 1SQUAREWARE: this switch turns the square wave output for OSC I count.
OSC 1 PWM - amount of pulse width modulation applied to the OSC 1 square wave.
OSC 1 SAWTOOTH- this switch turns the synchrotron output for OSC 1 on/off.
OSC 2 TORE MOD: amount of time; mutation applied to OSCC.
OSC2 PITCH-corrects the base pitch of OSC2.
OSC2 LEVEL controls the level of DSC 2.
LEVEL LEVELS:
NOSLE LEVEL - controls the amount of urine more easily added to the colloid.
EDIT: This allows additional 25C parameters to be edited from the main display.
POLY this area is used to control the polyhym of the synthesizer.
UNISON DETUNE-when voices are playing in unison, this adjusts the amount of detuning between the voices.
EDIT- this allows additional PCL's parameters to be edited from the main display;
VCF-the voltage controlled low pass filter used to filter high frequencies from the sound of the synthesizer.
FREQ - adjusts the cut-off frequency of the filter.
2-POLE - changes the roll off slope of the filter from the default 4-POLE mode to a 2-PIE mode.
RES - adjusts the resonance of the filter cut-off point.
EDIT-allocate additional HCT parameters to be edited from the main display.
ENV- adjusts the level of the VSC ENVELOPE, which controls the filter cut off frequency.
INVERT - used to invert the polarity of the VCI envelope applied to the filter cut-off frequency.
LFD adjusts the depth of the selected LFD waveform applied to the filter out-off frequency.
KYBD - adjusts the amount of keyboard tracing to be applied to the line cut-off frequency.
VCA - the voltage controlled amplifier used to control the output level.
LEVEL - controls the output level of the VCA.
EDIT - this allows additional VCA parameters to be edited from the main display.
(F) MPF - the voltage controlled high-pass filter used to filter low frequencies from the sound of the synthesizer.
FREQ. used to adjust the frequency of the high pass filter.
BOST this switch applies 3± 12 dB bass boost to the signal path
12 Deep Wind e Quick Start Guide 13
DeepMind 6 Controls
EN Step 2:Controls
ENVELOPE these are the threes envelopes
used in the above parameter.
A [ATTACK] - controls the attack time of the adversary.
D [DECAY] controls the decay time of
the envelope
S [SUSTAIN] - controls the sustain level of
R [RELEASE] - controls the release time of
VCA selects the envelope used to control the voltage controlling amplifier.
VCF - selects the envelope used to control
the voltage controlled filter
MOD selects the envelope used for user
specific modulation.
CURVES changes the ADSR controls to
affect the associated curves for each stage of
VOCIES: these LEDs show which voices are
active as keys are played
(OCTAVE-theseLEDshoostheoctave shift
applied to the keyboard.
VOLUME - controls the output level of
the synthesiser.
OCTAVEUP/DPOW-RAISEORKOWthe
keyhord's pithrare in ste
PITCH BEND WHEEL - this spring loaded
whecl allows you to lower raise the
pitchexpressively
(1) MOD WHEEL - used for expressive
modulation of pa
C9 KEYS-37 semw-weighted full-size keys
featuring expressiive velocity and after-touch.
Rear Panel
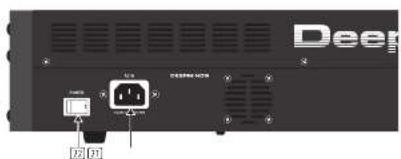
30 POWER INPUT- connect using the supplied power cable only.
POWERSWITCH-use this to tum the
synthesizer on and off. Only turn on after
all connections have been made.
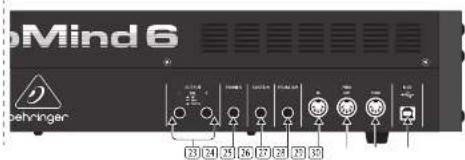
OUTPUTR/R- this is the main output of the synthesizer. It should be connected in your audio interface or sound system. Remember to turn your monitors/ I/O speakers on last when turning on your system and turn your monitors/ I/O speakers off first when turning your system off.
PHONES- the headphones output of the synthesizer follows the main input. Connect your headphones here. Ensure the volume control is at its minimum when putting an headphones or when turning the synthesizer on or off.
SUSTAIN - this ' s! I job allows you to connect a portable pedal, such as a normally open switch. The operation of this pedal can be customised using the GORDAN / PEDAL SETTINGS菜单。
59 PEDAL/CV this IV TRS jack allows you to create the expression pedal. The operation of this pedal can be customized using the GLOBAL /PEDAL SETTINGS menu.
MIDI IN this 5 pin DVI jack receives MIDE data from an extenl source. This will commonly be an external hard drive sequencer, a computer equipped with a MID interface, etc.
MIDI OUT - this 5-pin DIA Jack sensor
MIDI data to an external source. This will commonly be an external hardware sequencer, a computer equipped with a MIDE interface, etc.
MIDI THRU this 5 pin DIN jack is used to
pass through. NMDA received at the MHD INPUT. This will commonly be sent to another synthesizer or drum machine assigned to a different EVFID ID, or NMDI channel.
SRPORT: this USR type Black allows
connection to a computer. The DeepMind will show up as a class-compliant USB MII device, capable of supporting MIO in and out. The DeepMind does not require any additional drivers to work with Windows, Android, MacOS and OS devices.
USB MIDIN-accepts incoming MIDI data
from an application
USB MIDOUT-sends MIDl data
to an application.
DeepMind 6 Controles
[5] Paso 2: Controles
USB MIDOUT-ew89a data Muta a uniafication.
DeepMind 6 Reglages
FR Etape 2: Reglages
DeepMind 6 Getting started
Step 3:Getting started
OVERVIEW
This 'Getting Started' guide will help you set up the DeepMind 6 analog polyphonic synthesizer and briefly introduce its capabilities.
CONNECTION
To connect the DeepMind 6 to your system, please consult the connection guide earlier in this document.
BROWSING PROGRAMS
To change programs, use the -NO and ^+ YES switches. To access the program browser press and hold the PROG switch, then press the GLOBAL switch, or move the rotary knob. For more information on program management please consult the product manual.
PROGRAMMING
The DeepMind 6 programming techniques are described in detail in the product manual.
RECORD,EDIT and PLAYBACK AUTOMATION
When using the analog engine of the synthesizer with a Digital Audio Workstation (DAW) you can record and playback any automatic parameter. This allows you to record expressive automation and playback or edit that automation in your DAW.
USING AS A CONTROLLER
When using the synthesizer features as a controller you can control your virtual instruments and Digital Audio Workstation (DAW) with the accurate launch and feel of a high quality keyboard, 1 rotary potentiometer, 26 side faders, and 33 backlets switches. For mapping please consult the product manual.
SOFTWARE SET-UP
The DeepMind 6 is a USB Class Compliant MII device, and so no driver installation is required. The DeepMind 6 does not require any additional drivers to work with Windows, Android, MacOS and iOS devices.
HARDWARE SETUP
Make all the connections in your system. Apply power to the BespritMied using the supplied power cable only. Ensure your sound system is turned down. Turn on the power switch.
DAW SETTINGS
In your BMW, create a new channel and select the DeepMind 6 as the MIDI input device. On the same channel ensure that recorded MIDi is also sent back by missing the DeepMind 6 the same channel's MIDi output device.
If you can't see the DeepMind 6 in your DAW channel options please consult your DAW documentation to ensure you have enabled the DeepMind 6 as a MIDI device.
GLOBAL SETTINGS
The GLOBAL menu allows you to customize the DresWind 6 analog polyphoric synthesize to your specific workflow requirements. For more information on the GLOBAL settings, please consult the product manual.
FIRMAWARE UPDATE
Check that the latest firmware in your unit is up to date (see the GLOBAL SYSTEM SETTINGS menu of the display, if not, then updating the firmware will give you the latest enhancements. Visit our website behringer.com, and download the latest firmware from the DeepMind 6 analog polyphonic synthesizer product page.

IMPORTANT NOTE: Updating the firmware may affect your programs, please ensure you make a fall back.
consult the product manual.
BUSQUEDA DE PROGRAMAS
Para便可 be programa, use the interruptors
-902 y -Y1VS. Para asiccerado a buccador de
programas, manegna puspao o interruptor PROG
y pulsos despised est interruptor GLOBAL o gire
am girdo-gratia. Para mas informacion sobre
la quidion de los programas, consulte el manual de
instruccion complete del producto.
PROGRAMACION
26 Dec Wind o Kick Start Curve 27
| Display Display LCD |
| Main Menu PRINT, XG, GLOBAL, COMPARE, WRITE |
| Edit Menu APP/SEQ, LEO, 8SG, POLY, NVE, NCA, VCA ENP, VCE ENV, MOO ENV, MOD MMTAX |
| Press B Ianto each with 12 programs |
| Fader Modes A/D/CC, RMPX, OFF |
| Controls |
| Keyboard 37 semi weighted full side keys |
| Keyboard sensing Aftertouch and note on/off velocity |
| Forceder 1 rotary inch |
| Faden 26 slide fans (35 mm) |
| Switches 23 beacill switch |
| Modulation Free moving wheel |
| Pitch Bend Spring backed othert |
| MIND Inching/Thing | 5-pin DFN / 16 channels |
| Pedal/XY of TRS | |
| Sustain X Y S | |
| USB | USB 2.0, type 8 |
| Dutput LR | NTRS,bilateral,max=16 dBi |
| Headphones | NTRS,unilateral,max=-21 dBi |
| Synthesizer Architecture | |
| Number of voices | 6 analog |
| DESC | 2 per voice |
| LFD | 2 per voice |
| VCF | 2 pole/4 pole |
| IFR (Common to all voices) | 5dB per voice |
| Envelopes | VGA,VCH,MCU |
| Most Mice 23 sources / 13 specifications | |
| Digital Effects | |
| FX Slots | 4 per Program |
| FX Types | 35 Agoutreme |
| Internal effect engines | 1 Immaterisnes SHARE DSP |
| Effects signal processing | 32-bit shift floating point S-48 bits |
| A-Dv-dv performance | 24-bit 48 bits, 14-bit dynamic range |
| Bypasses | True hard-sparq |
| USB | |
| Type | Class compliant USB 2.0, type B |
| Supported operating systems | Windows 7 or higher* Mac OS X 10.6 or higher iOS 8 or higher (iPad) Android 6.0 or higher |
| Power Requirements | |
| Kits connector | Standard IEC receptacle |
| Power consumption | 550 max. |
| Internal Switch mode PSU | Autocycle 100-200V, 650/60Hz |
| Environmental | |
| Operating temperature range | 55~40°C (41°F - 104°F) |
| Physical (Packaged) | |
| Dimensions (R x W x D) | 103 x 649 x 257 mm |
| Weight 6.9 kg | |
| Shipping Weight | 9.0 kg |
28 DeepMind
EN
Other important information
ES
EN Important information
- Register online. Please register your new Mark 300 equipment right after you purchase it by visiting mark300.com, registering your purchase using our simple online form helps us to process your repair claims more quickly and efficiently. Also, send the terms and conditions of customer warranty, if applicable.
- Malfunction. Should your Music Title Authorised Reseller not be installed in your system, you may contact the Music Title Authorised Fixer for your country listed under "Support" at www.musictitle.com. Should your country not be listed, please check if your problem can be dealt with by our "Online Support" within may also be found under "Support" at www.musictitle.com. Alternatively, please submit an online warranty claim at musictitle.com BEFORE returning the product.
- Power Connections. Before plotting the unit into a power outlet, please make sure you are using the correct male voltage for your particular model.
Family lines must be replaced with lines of the same type and rating without exception.
IT
Responsible Party Name: Music Tribe Commercial NV Inc.
Address: 901 Grier Drive
Las Vegas, NV 89118
USA
Phnkr Nmber+17422375033
DeepMind 6
This equipment has been tested and found to comply with the limits for a Class B digital device, pursuant to part 15 of the FCC Rules. These limits are designed to provide passive protection against harmful interference in a residential installation. This equipment generates, uses and can radiate radio frequency energy and, if not installed and used in accordance with the instructions, may cause harmful interference to radio communications. However, there is no guarantee that interference will occur in a particular installation. If this equipment does cause harmful interference to radio or television reception, which can be determined by turning the equipment off and on, the user is encouraged to try to correct the interference by one or more of the following measures:
- Rerient or relocate the receiving antenna.
Increase the separation between the equipment and receiver. - Connect the equipment into an outlet on a circuit different from that to which the receiver is connected.
- Consult the dealer on an experienced radinTV technician for help.
This device complies with Part 10 of the FCC rules. Operation is subject to the following two conditions:
(1) this device may not cause harmful interference, and
(2) this device must accept any interference received, including interference that may be caused by the device.
Important information:
Changes or modifications to the equipment not expressly approved by Music Tribe can and do not create a user's authority to use the equipment.
Quick Start Guide
29
EN
We Hear You